Last time I considered Charles Dealtry Locock’s tournament and match play in the 1880s and 1890s, at which point he gave up competitive chess.
But it was far from the end of his chess career. Alongside his chess playing he had a parallel career as a chess problemist.
In The Chess Bouquet (1897) he was given the opportunity to say something about how he started to take an interest in the problem art.
Here’s that first problem.
Problem 1 (#3 Illustrated Sporting and Dramatic News 18-02-1882). The solutions to all problems are at the end of this article.
Here’s another early problem.
Problem 2 (#2 Southern Weekly News 29-12-1883).
But these represented just an early dalliance in the problem world. Concentrating on his studies and over the board play, he took a break from composition, only returning in 1890.
This miniature had probably first been published in Tinsley’s Magazine a few months earlier.
Problem 3. (#2 Morning Post 06-01-1890)
He published a few more problems in 1891, gradually increasing his production over the next few years as he stopped playing tournament chess.
Most of the problems were mates in 2 or 3 moves (quite a few of them, sadly, cooked, which suggests, as does his play, a certain carelessness), but also a few selfmates. By now he had a column in Knowledge, which ran from 1891 to 1904, which provided an outlet for some of his compositions.
While some of them were complex, he also published a lot of simpler problems suitable for casual readers, often employing perennially popular themes such as queen moves to corners, star flights and switchbacks.
Problem 4. (#2 The Field 1891)
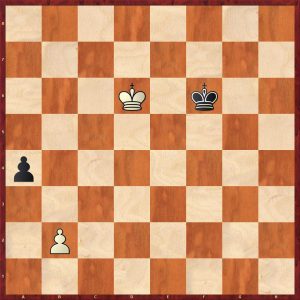
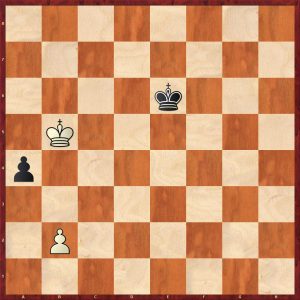
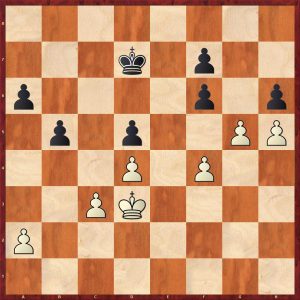
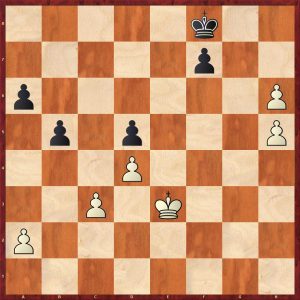
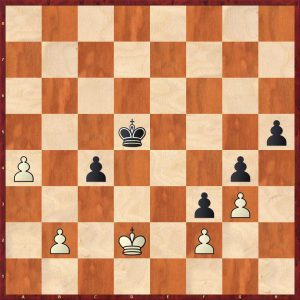
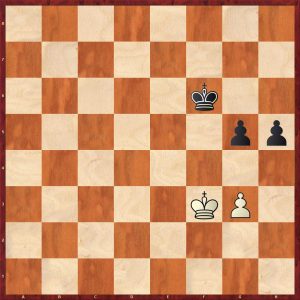
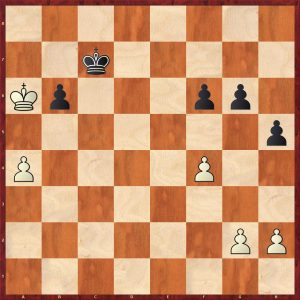
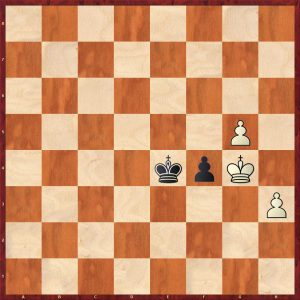
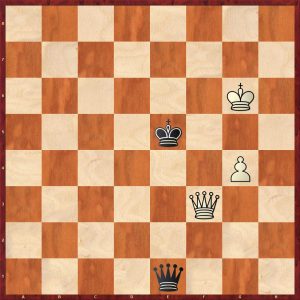
In 1892 Locock made a brief excursion into the world of endgame studies, with this early example of Co-ordinate Squares.
You’ll see Locock was living in Kingston at the time, but by the September he’d moved down the road to Putney Heath.
I haven’t been able to find anything further, either in the 1892 or 1893 BCM, perhaps unsurprisingly, since the position is drawn, regardless of whose move it is. If it’s Black’s move, though, the only drawing move is 1… Kg7.
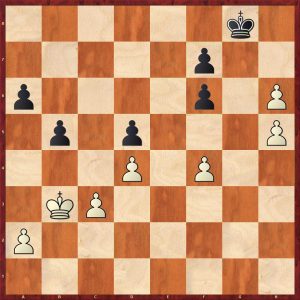
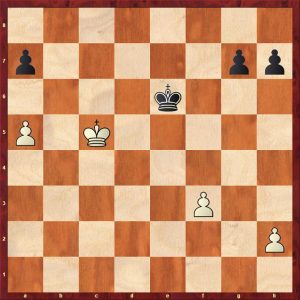
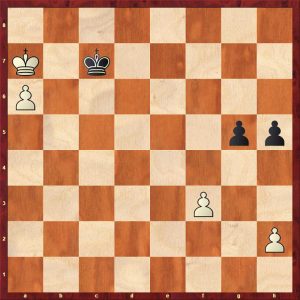
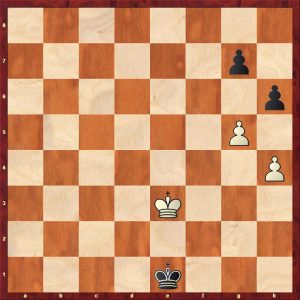
If, however, you start with the white king on a1 instead, then you have an excellent study. It was published with this correction in the Deutsche Schachzeitung in October 1914.
White wants to meet Kf6 with Kd4, and therefore also wants to meet Kg5 with Ke3. There’s only one route to get there.
Study. (W to play and win British Chess Magazine July 1892 (corrected))
In the 1893 Christmas Special issue of the British Chess Magazine, Locock offered a puzzle involving retroanalysis.
Here’s the published solution. I’ll leave to experts in this field to comment.
His problems didn’t win a lot of prizes, but this Mate in 3 from 1896 was a first prize winner.
Problem 5. (#3 Manchester Weekly Times 1896)
In The Chess Bouquet Locock discussed his ‘decidedly heterodox’ views on chess problems.
He concluded like this.
This is one of the problems he composed for The Chess Bouquet.
Problem 6. (#2 The Chess Bouquet 1897)
Although he retired from competitive chess in 1899, Locock certainly didn’t retire from composition, although he was increasingly drawn to 3-movers rather than 2-movers. Some of them are pretty complex, but this one is rather sweet and certainly accessible to the casual solver.
Problem 7. (#3 British Chess Magazine February 1909)
This more complex mate in 3 was a 1st prize winner in 1933.
Problem 8. (#3 1st Prize British Chess Magazine 1933)
Now let me take you back to 1909. On April 1 (note the date), Locock wrote to the editor of the BCM:
A sui-mate is what we’d now call a selfmate. Black compels a reluctant White to deliver checkmate.
For those of you who aren’t bilingual, here’s the game.
Locock would maintain an interest in these tasks, known as Synthetic Games, throughout the rest of his long life. In 1944 he published a whole host of them in the BCM. Note that, unlike in Proof Games, there are often multiple solutions.
You might like to try a couple here.
Synthetic Game 1: White opens 1. Nc3 and delivers a pure mate (there’s only one reason why the king cannot move to any adjacent square) with the queen’s rook on the 5th move. (British Chess Magazine May 1944)
Synthetic Game 2: Black mates on move 5 by promotion to a knight (this is also a pure mate). (Manchester Weekly Times 28 Dec 1912)
If you’re interested in synthetic games you’ll want to read this comprehensive and authoritative paper written by George Jelliss.
There, then, you have the problem career of Charles Dealtry Locock, who, as well as being a very strong player during the 1880s and 1890s, held an important and, you might say, unique place in the chess problem world for more than 60 years. If you’d like to see more of his problems, check out the links to YACPDB and MESON at the foot of this article.
But there was much more to Locock’s chess life than playing and composing, as you’ll find out next time. Be sure not to miss it.
Solutions to Problems and Study (click on any move for a pop-up board).
Problem 1.
Problem 2.
Problem 3.
Study.
Problem 5.
Problem 6.
Problem 7.
Problem 8.
Synthetic Game 1.
Synthetic Game 2.
Sources and Acknowledgements
ancestry.co.uk
findmypast.co.uk/British Newspaper Library
Wikipedia The Chess Bouquet (FR Gittins: here) British Chess Magazine (various issues)
Internet Archive (here)
Chess Archaeology (here) The Problemist
Yet Another Chess Problem Database (here)
MESON Chess Problem Database (here) Synthetic Games (George Jelliss: here)
Secrets of Queen Endgames: Ferenc Berkes and Tibor Karolyi
From the publisher:
“A revolutionary new work on a notoriously challenging type of chess endgame
Queen endgames can seem unfathomably complicated. Computers have provided complete information for some of the basic queen and pawn endings, but human understanding has proved elusive.
In this ground-breaking work, two Hungarian authors have gone to extraordinary lengths to explain strategies and methods in queen endgames. Rather than a random series of checks, we can now understand king and queen triangulations that gradually bring the pieces to the squares they need to be to engineer the killer tactic that completes the process. Berkes and Karolyi have devised guidelines that help us judge what we need to aim for, and provided a broad set of tools to help us achieve these goals.
Going beyond previous texts, the authors have used not just seven-man tablebases and modern engines, but the specialized program FinalGen to delve with the same certainty into endgames with many more pawns. But most of all, they have spent thousands of hours seeking to present the whole truth about queen endings in human terms. Their wide-ranging discussion of shelters is especially instructive.”
A definitive guide to a fundamental class of endgames
Explains all types of endings with queens and pawns
A wealth of guidelines for handling positions with many pawns
Spectacular and previously unpublished endgame studies
Thoroughly up to date, with more than 1000 chess diagrams
Ferenc Berkes is a grandmaster from Hungary. A former World Under-18 Champion, he was won the championship of his country on eight occasions. He plays team chess in several European leagues. IM Tibor Karolyi is also from Hungary. His many pupils have included super-GMs Peter Leko and Judit Polgar, and he is a highly experienced chess writer.
To get some idea of the book Gambit (via Amazon) provide a “Look Inside” at their Kindle edition. As you would expect with Gambit, the notation is English short form algebraic using figurines for pieces. A previous criticism (ibid) has been addressed in that each diagram has a W or B “whose move it is” indicator.
The book is divided into 9 chapters as follows :
Extreme Tactics in Queen Endings
Tools in Queen Endings Technical Queen Endgames
Queen and Pawn vs Queen
All the Pawns on the Same Side
Extra Outside Passed Pawn Practical and Strategic Queen Endgames
The Pawn
The Queen
The King
Complex Queen Endgames
Here on YouTube John Nunn gives the reader an introduction to the book :
This book is a superb tour de force covering a complex subject that has not been covered so extensively before. My short review cannot really do justice to this magnus opus.
The book is aimed at expert players, probably 2200 and above. The vast majority of GMs would learn a lot from this book. Despite these comments, it is the reviewer’s opinion that any aspiring, improving player would benefit from reading the more general chapters 1, 2, 5, 6, 7, 8. The pure technical chapters 3 and 4 are certainly more abstruse but very instructive: the authors don’t just give long variations but intersperse these with pithy, useful comments.
The short first chapter really introduces the power of the queen with a mixture of studies and over the board positions.
Chapter 1: Extreme Tactics in Queen Endings
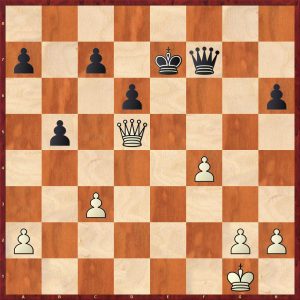
Here is an amazing and stunning study by Rusz:
Rusz 2022 White to play and win
Black is threatening to mate with Qa1+, so white plays 1.Qf6!!
Rusz 2022 Position after 1.Qf6 mutual zugzwang Black to move
Amazingly, this is a position of mutual zugzwang as White to play only draws, whereas Black to play loses. It is hard to believe that in an open position with three queens each, having the move is a disadvantage!
Black can try 1…Qad8_ 2.Qaxd8 Qxd8+ 3.Qxd8 Qf1+ 4.Kc2 Qf2+
Rusz 2022 Position after 4…Qf2+ White to move
5.Qd2 (The careless 5.Kb3? allows a standard trick 5…Qg3+ 6.Qxg3 stalemate, always watch out for this type of idea in queen endings) 5…Qc5+ 6.Kd1 Qc2+
Rusz 2022 Position after 6…Qc2+ White to move
7.Ke2! Black has run out of useful checks, so white wins
Here is a practical example showing many important principles in queen and pawn endings:
Percivaldi – Thybo Danish League 2021-2 Position after 42.Qd5+ Black to move
White has three pawns for a bishop, but the most important feature of the position is black’s far advanced passed a-pawn. In queen endgames, it’s the degree of advancement of passed pawns that is all important, not the number of pawns. Black correctly shed the bishop with his next move:
42…Kc7! 43.Qf7+ Kb6 44. Qxf8 Kb5!
Percivaldi-Thybo Danish League 2021-2 Position after 44…Kb5 White to move
White is three pawns up but is totally lost. White’s only potentially useful pawn is the d-pawn as it’s closest to queening, but white is just too far behind in the race. Black’s king will shelter behind the white’s pawns, there is no chance of a perpetual check.
45.Qe8+ Kb4 46.Qb8+ Ka4 47.Qg8 Trying to bar the king’s progress, but to no avail. 47…Qc2! (47…Qb3 also wins) 48.Qe8+ Kb4 49.Qb8+ Kc3 50.Kg2 a2 51.d5 Using a little tactic to prevent queening and putting black under a little pressure
Percivaldi-Thybo Danish League 2021-2 Position after 51.d5 Black to move
51…Qb2? A poor move deactivating the queen allowing white an amazing draw which he misses, the obvious 51…Qe4+ 52.Kh3 Qxd5 eliminating white’s counterplay, followed by putting the king behind white’s pawns wins easily, 51…Qd1! also wins watching White’s d-pawn and preparing to promote, after 52.Qe5+ Kc2 53.Qe4+ Kb3 54.d6 a1=Q wins as does 54…Qxd6
White missed a clever draw and black won after a slugfest in a four queen ending. Buy the book to see this entertainment.
Chapter 2: Tools in Queen Endings
This is an excellent toolbox chapter that covers the follows topics:
The Queen Triangulates
Cutting Off the King
Batteries and Discovered Checks
Pinning Down a Piece
Exploiting the Opponent’s Harmful Pawn
Zugzwangs
These ideas are absolutely key themes in queen endings. This section is definitely worthy of examination.
The reviewer will show examples from many of the themes in turn:
The Queen Triangulates
The author explains the concept concisely:
“In queen endings, there are more zugzwangs than most players would assume. We shall see many examples where the attacker’s king manoeuvres to give up the right to move – a familiar theme from pawn endings, but more surprising with queens on the board. But the queen itself can also lose a tempo by a form of triangulation. It usually happens when the defender’s king is in danger.”
Here is another Rusz study showing this idea:
Rusz 2022 Queen Triangulation White to play and win
This positions look ok for black as he has White’s passed pawn under control. 1.Qg5+ Ke8 2.Qc5! 2…a3! 3.Qe3+! Kd8 4.Qg5+ Ke8 5.Qc5! completing the first triangulation
Rusz 2022 Queen Triangulation Position after 5.Qc5 Black to play
Rusz 2022 Queen Triangulation Position after 14.Qc5 Black to play
14…Qc8+ (14…Kd8 15.Qf8# ends the suffering) 15.Ka7 Qc7+ 16.Ka6 wins black’s pawns and the game
Cutting Off the King
This principle can be used by the stronger side or the weaker side to prevent the opposing king getting to a desirable area. For example, the stronger side can use this technique in Q+P v Q to cut off the defender’s king from a drawing zone. The example below shows the defending side successfully using this theme in an over the board game:
Lupulescu – Sarakauskas After move 46.Qxg5 Black to play
White has just taken the pawn on g5, black can now draw with an accurate sequence of checks: 46…Qb1+ 47.Kh2 Qb8+ 48.Kg1 Qb1+ 49.Kh2 Qb8+ 50.Kg1 Qb1+ 51.Kf2 Qc2+ 52.Kf3
Lupulescu – Sarakauskas After move 52.Kf3 Black to play
Black must choose the right check here to draw: 52…Qd1+! (the sloppy 52…Qd3+ 53.Kg4! allows white to approach the h-pawn and win the game) 53.Ke4 Qa4+! not allowing the king to cross the fifth rank 54.Ke3 Qb3+ 55.Kd2 Qb2+ 56.Ke1 Qb1+ 57.Ke2 Qe4+ 58.Qe3 Qxg2+ Black has regained his pawn and drew comfortably
In this famous ending, Black is winning with an extra pawn and centralised queen. He played 62..f5? mobilising the pawn majority
Pillsbury – Burn Vienna 1898 Position after 62.Qe2 Black to move
Better was 62…Kd6! activating the king trying to cross over to white’s queenside pawns: white cannot defend against the twin threats of the king invasion and the advance of the kingside pawn majority. After 62…f5? white took the opportunity to make Black’s life very difficult 63.Qb5! cutting the king off from white’s queenside. White missed a probable difficult draw and black eventually won.
Batteries and Discovered Checks
From the author: “Powerful ideas in queen endings include forcing an exchange of queens and launching an attack on the enemy king. Usually the queen harasses the enemy ling by giving checks, but sometimes setting up a battery is stronger than the immediate check. Players often miss such an opportunity, or the potential to play for it. The attacker typically uses a battery to attack the opponent’s king or to win a tempo and stop the opponent’s queen from continuously checking by stepping out the check with a cross check.”
This practical example is instructive:
Ni Hua – Berkes Taiyuan 2006 Position after 56…Kh6 White to move
White played 57.Qxd5 winning a pawn, 57… Qe3+ (black can also draw with the flashy 57…Qf6+ or 57…Qg4+ or 57…Qa4+) 58.Kf6 Qf2+ (58…Qf3!+ draws easily, 59.Qxf3 is stalemate, and 59.Kf6 Qc3+ draws) 59. Qf5 Qh4+ 60.Ke6 Qc4+ 61. Qd5 This position is getting difficult for black, but there are still six drawing moves, Black choose a terrible check 61…Qa6??+ 62.Qd6! setting up a deadly battery 62…Qe2+ 63.Kd5+1-0 as white exchanges queens
Ni Hua – Berkes Taiyuan 2006 Position after 61.Qd5 Black to move
Pinning Down a Piece
Portisch – Morovic Dubai Olympiad 1986 Position after 103…Qe6 White to move
White played 104.Kc2? and lost . Portisch missed a brilliant move here 104.Qd4!! which amazingly draws, after 104…b3 105.Qd3! attacks the pawn and paralyses the Black queen.
Exploiting the Opponent’s Harmful Pawn
There are many example in the ending Q+P v Q+P where the defending side (player with the pawn that’s least advanced) loses because the extra pawn is harmful blocking defender’s queen checks and/or providing shelter to the stronger side’s king. An example is given below:
Boleslavsky – Taimanov Zurich Candidates 1953 Position after 42…c1Q White to move
White played 43.Qb8+ which wins but Boleslavsky messed up later on. In some ways 43.h4 is simpler. A possible line is 43.h4 Qc2+ 44. Qg6 Qxa4 45.h5 Qxa2 reaching this position:
Boleslavsky – Taimanov Zurich Candidates 1953 Variation position after 45…Qxa2 White to move
Without Black’s b-pawn this is a tablebase draw but not easy in practice. With the b-pawn, Black is losing after 46.Kg7!! The pawn blocks the g1-a7 diagonal.
The next huge section of the book is all about Technical Endgames.
Chapter 3: Queen and Pawn vs Queen
This is in some ways the core of the book with 65 pages devoted to this basic ending. But it is anything but basic!
Each pawn is covered in turn starting with the rook’s pawn working towards the centre pawn. Within each pawn’s section, positions are covered from the second rank to the seventh rank. It is certainly a systematic approach.
It is clear that the least favourable pawn is the rook’s pawn, followed by the knight’s pawn. It may surprise some readers to know that the bishop’s pawn is the most favourable.
Rook’s Pawn
These are the authors’ conclusions:
“The closer the pawn get to promotion, the harder it becomes to hold.
In the case of a white a7-pawn:
Black’s safest option is to get really close to the pawn, at least to the d-file.
The h1-corner is a draw for black’s king, but in practice the defence will require a lot of concentration.
The a1-corner is the second least difficult location for the defender’s king.
In case the black king gets trapped in the h8-corner, there is only one mutual zugzwang position that might save the defender.”
The reviewer will show a few positions:
Honfi – Toth Budapest Ch 1966 Position after 89…Qd1+ White to play
This position is a tablebase draw particularly as black’s king is fairly close to the h1 corner.
White played 90.Kb4 The author adds a didactic comment: “Ever since the famous Minev -Botvinnik game in 1954, we know the player with the extra pawn should look to put his king on the same or neighbouring file or rank as the opponent’s king. This creates chances for a cross check or to set up a battery.”
The game continued for another 61 moves until this position was reached:
Honfi – Toth Budapest Ch 1966 Position after 151.Kc7 Black to play
Black’s king is not ideally placed, but he can draw with the correct check. Black played 151…Qe7+? (151…Qf7+ draws as 152.Kc8 is met by 152…Qf5+ drawing, Gelfand has made an observation, if in doubt check on the opposite colour square to your king, obviously this not a hard and fast rule) 152.Kc8! Black has run out of checks because of the king on h4. White now plays superbly to bring home the full point fully exploiting the badly placed black king 152…Qe4 153.Qc5!
Honfi – Toth Budapest Ch 1966 Position after 153.Qc5
153…Qe6+ 154.Kc7 Qf7+ 155.Kb6 Qb3+ 156.Ka5!
Honfi – Toth Budapest Ch 1966 Position after 156.Ka5
A standard winning technique in Q+P v Q The author comments thus: “White approaches the rank of Black’s king. Now 156…Qa2+ would be the last check, as it is met by 157.Kb5. from this point, the win is easy, as White can promote after some checks.”
156…Qf3 157.Qc4+ Kh5 158.Kb6 Qf6+ 159.Qc6 Qd8+ 160.Kb7 Qe7+ 161.Ka6 Qa3+ 162.Kb6 exploiting black’s king position again, there are no more checks, so 1-0
Honfi – Toth Budapest Ch 1966 Position after 162.Kb6
The reviewer adds an observation: when the black king is in or near the h1-corner, it is much harder for White to manoeuvre his king to an adjoining rank/file and keep his pieces coordinated as well as the pawn safe.
Gligoric – Timman Bugojno 1980 Position after 60…g1Q White to play
This is a tablebase draw as white’s king is close to the best corner (a8) but an experienced top GM still lost this position thirty moves later. This shows how hard it is in practice. The book has some excellent coverage of this endgame viz:
Gligoric – Timman Bugojno 1980 Position after 84…Kc3 White to move
This position is still a draw.
“White should also wait with 85.Ke5, or he could move closer to the corner with 85.Kf7 or 85.Kf6”
White played the obvious centralising check 85.Qe5+? which loses, black replied with the 85…Kc2? (85…Kd2! wins: the analysis is worth looking at just to see the process as Black uses triangulation and White’s poorly placed king to escape the checks, get the book to find out)
Gligoric – Timman Bugojno 1980 Position after 85…Kc2 White to play
In this position White can draw. Over to the authors: “86.Qf4!! is the right move. But why? If it Black’s turn to move in the diagram, Qf3 would cut off the white king and win. The queen on f4 stops that. If 86…Kd1 87.Kf7!= (87.Kf6 also draws) 87…Qe2 88.Qd4+ only move 88…Kc2 89.Qa4+ holds or 89.Qc5+ or 89.Qf4! h2 90.Qa4+ draws”
This subtle, underlying battle of the cut off is amazing. The game continued with 86.Qh2+? Kd1! Once again the king approaches the neighbouring file of the enemy king 87.Qh1+ Kd2 88.Kf6 (the authors note that if white’s king could move to the c-file he would draw, the win after 88.Ke7 is very instructive as black triangulates again, get the book to find out how)
Gligoric – Timman Bugojno 1980 Position after 88.Kf6 Black to move
Timman misses a fairly simple idea to win quickly here 88…Qg3! He played 88…Qe3? This throws away all the hard work. White can draw with 89.Qh2+ and then run with the king towards the h8 corner. White blundered with 89.Kf5? A fatigue blunder allowing 89…Qf2+ 90.Ke5 Qe1+ exchanging queens 0-1
Knight’s Pawn
This is the authors’ observations:
“This situation occurs more often in practice than Q+P v Q with other pawns. This type of pawn has some unique features. for example, the attacker’s king has more scope for hiding near the pawn then it does behind a rook’s pawn, but less room compared to a bishop’s pawn. There is a drawing zone that often exists for the defender’s king in the far corner from the promotion square.”
The reviewer adds the proviso: but even this depends on the exact position of the queens of course.
Lenart position after 19…Qxh3
This is position from an unknown composer/player. Surprisingly White wins here even with the black king so close. White plays 20.Qc6! which is a standard cut off move. The winning process here takes 75 moves with perfect defence. There are some mind boggling triangulations with white’s king to wrong foot the black queen. Buy the book to find out how.
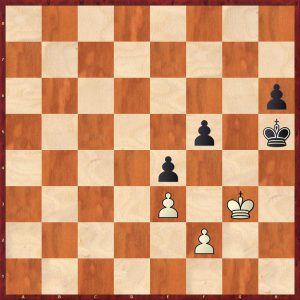
Here is a position with a knight’s pawn on the fifth rank.
Zurakhov – Boleslavsky Riga 1955 Position after 73…e1Q White to play
White wins here with the brilliant 74.Qf8+ Kg4 75.Qa3!! cutting black’s king off from the drawing zone. Zurakhov played 74.Qc8? throwing away the win but he won anyway on move 119.
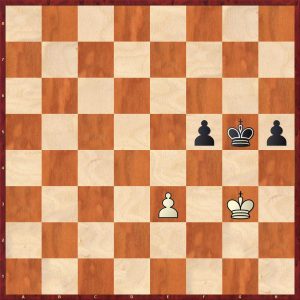
Once the knight’s pawn reaches the seventh rank, the defender’s king has to stay in the opposite corner. This is the type of position the attacking side should aim for:
Cheron 1968 Black to play loses
Apparently with a g-pawn on g7, the d4 is vitally important for the stronger side’s queen.
Bishop’s Pawn
There is no drawing zone for the defender’s king (unless of course the king can get in front of the pawn).
Velimirovic – Uhlmann Arandjelovac Zonal play-off 1976 Position after 55.Kxa6
This is a technical win for Black: 55…Qg4! is an excellent cut-off preparing to activate the king. Uhlmann played this ending well not letting the win slip at any point. This ending is worth close study.
Centre Pawn
Jevtic – Vujacic (analysis) Belgrade 2008
1.Qxf7+ Ke3! the only winning move.
If white’s king was on h1, he would draw as his king would be in the small drawing zone on the short side of the pawn. 2.Qg8 Qd5+ (a series of queen checks to force white’s king to the unfavourable long side of the pawn) 3. Kc1 Qh1+ 4.Kb2 Qe4!
Jevtic – Vujacic (analysis) Belgrade 2008 Position after 4…Qe4 White to move
5. Qg1+ Ke2 6.Qh2+ Kc3 7.Qg3+ Qe3! 8.Qg6+ Kd2 9.Qc2 Ke1 10.Qb1+ Kf2 stopping the checks, notice how white’s own king impedes his own queen 11.Qh7 e5
Jevtic – Vujacic (analysis) Belgrade 2008 Position after 11…e5 White to move
Nunn comments: “The general theory of queen and pawn against queen tells us that this position is probably winning, because with the centre pawn there is no drawing zone for the white king in a remote corner, and if the defender’s king cannot move in front of the pawn then his chances are grim.”
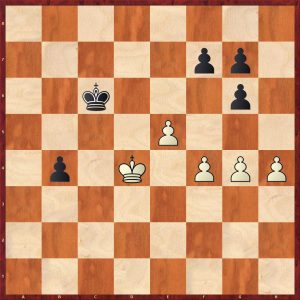
Chapter 4: All the Pawns on the Same Side
This is a systematic analysis of all the different pawn configurations and is a really technical. For mortals like me, this will take many months to take in, but is nonetheless really interesting.
One surprising conclusion is that a two pawn advantage Q and rook’s pawn + knight’s pawn [gh-0] v Q is drawn in many positions if the defender’s queen and king are actively placed.
Here is a practical example:
Atanasov – Spiridonov Ruse 1978 Position after 68…Kg8 White to move
How should White capture the Black pawn? On general principles, it looks better to capture with the queen retaining two connected passed pawns. Here both captures win, but generally Q+f+h pawns v Q is a win unless there is an immediate perpetual. Q+g+h pawns v Q is drawn in many cases. After 69.Qxf4?! Qc5+ 70.Kg4? White has thrown the win away:
Atanasov – Spiridonov Ruse 1978 Position after 70.Kg4
Black played 70…Qc8+ which draws as does 70…Qa7, 70…Qc3, 70…Qc6
The game was drawn after both sides made mistakes. Instead of 70.Kg4?, 70.Kg6! wins.
This ending is truly complex and worthy of study. Buy the book to find out more.
Chapter 5: Extra Outside Passed Pawn This is divided into four natural subsections:
Passed Rook’s Pawn
Passed Knight’s Pawn
Passed Bishop’s Pawn
Passed Centre Pawn
The author concentrates on the passed rook’s pawn:
“Firstly, they occur more often than other passed pawns, as is also the case in rook endings. Secondly, the defender has much better drawing chances compared to positions with a c-pawn for example, because the stronger side’s king can’t find shelter around the rook’s pawn. If the attacker’s queen is busy defending the king from checks, there is little capacity left to help the rook’s pawn advance. On the opposite wing from the passed rook’s pawn, exchange of pawns tend to favour the defending side for several reasons:
1) They increase the chance of perpetual check.
2) Less frequently, it may even be possible to simplify to a queen and pawn versus queen endgame by exchanging off all the kingside pawns.”
Here is an excellent demonstration by the strongest player in the world:
Carlsen – Vachier-Lagrave Karlsruhe/Baden-Baden 2019 Position after 32…Kg7 White to play
Carlsen played the neat 33.Bd5! (33.Qb2+ Kg8 34.a3 Qd3 black is very active and white cannot make progress) 33…Bxd5 34. Qe5+ f6? A serious mistake from a top player as it weakens the king’s shelter. Chapter 8 gives lots of advice and examples about shelters. Much better was 34…Kg8 35.Qxd5 Qa3 36.Qb3 Qc1+ 37.Kg2 h5 38.gxh5 Qg5+ 39.Kh2 Qxh5 and black can hold. 35.Qxd5 h5 (Trying to weaken White’s kingside) 36.gxh5 gxh5 37.Qd7+ Kg6 38.a4
Carlsen – Vachier-Lagrave Karlsruhe/Baden-Baden 2019 Position after 38.a4 Black to play
Although both Kings’ shelters have been partially wrecked, Black’s exposed king is more significant as the game continuation shows. 38…Qe2 39.Qd5! Centralisation 39…f5 Black is trying to block in the White king, but this move exposes his own king even more 40.a5 f4 41.Kg2! Kh6 42.Qf5
Carlsen – Vachier-Lagrave Karlsruhe/Baden-Baden 2019 Position after 42.Qf5 Black to play
42…Qc4 43.Kf3 winning another pawn, so 1-0
Notice how Black’s pawn advances brought down his downfall.
The last four chapters are in a section of the book on Practical and Strategic Queen Endgames
Chapter 6: The Pawn
The following ideas are discussed:
Breakthrough
Promoting With Check
Reducing the Number of Pawns in Order to Hold the Draw
Pushing a Pawn to Force an Exchange of Queens
Connected Passed Pawns
Gaining Space
Races
Races when Both Sides Have Only One Pawn
Quality vs Quantity
Doubled Pawns
An example from the Quality vs Quantity subsection is given below.
The author states “It’s a well-known and common saying that in queen endgames, ‘it’s not the number of pawns that counts, but their quantity!’ In other types of endgames, the principle of strength in numbers map apply more often, but less so in queen endings.”
This ending has been quoted often:
Stahlberg – Euwe Stockholm Olympiad 1937 Position after 41.Kh2 Black to play
Euwe played the natural centralising move 41…Qd4? which is multi functional, but surprisingly throws away the win. The h4-pawn is not important here. There is a win with a very subtle move 41…Qd6!!+ which looks like a superfluous check, but forces white to weaken his position.
Stahlberg – Euwe Stockholm Olympiad 1937 Position after 41…Qd6+ White to play
White now has an invidious choice on how to spoil his position, g3 weakens the king’s shelter and both king moves have their disadvantages. Let’s look at each alternative.
a) 42. g3? Qd4! Now this move gains in strength as white would like to take the f2 pawn exposing White’s king fatally 43.Qb5 Qxf2+ 44.Kh3
Stahlberg – Euwe Stockholm Olympiad 1937 Variation A Position after 44.Kh3 Black to play
Black has two different wins here 44…Qf3! (44…Qf5+ also wins) 45.Kh2 (45.Qxb4? Qh1+ 46.Kg4 Qf1! forcing mate or win of queen) 45…b3 46.a5 Qf2+ 47.Kh3 Qg1! winning
Stahlberg – Euwe Stockholm Olympiad 1937 Variation A Position after 47…Qg1 White to play
48.Qxb3 Qh1+ 49.Kg4 f5+ 50.Kf4 Qe4#
b) 42.Kh3 b3 43.Qb5 (43.Qc3 Qd7+ exploits White’s wins exposed king, winning the a-pawn) Qa3!! This is unconventional move, putting the queen on the side, but it exploits the exposed White king: the threat of a discovered check is fatal for white.
Stahlberg – Euwe Stockholm Olympiad 1937 Variation B Position after 43…Qa3 White to play
If 44.Qb7 a2+ 45.Kh2 Qa2 wins
If 44.a5 b2+ 45. g3 Qa2 wins as well as 45…Qf3
If 44.h5 b2+ 45.f3 g5 46.Qf5+ Kg7 47.Qe5+ Kg8 48.Qb8+ Kh7 49.Qb7 Qa2 wins
c) 42.Kg1 b3 43.Qb5 Qa3 44.Qc4! b2!!
Stahlberg – Euwe Stockholm Olympiad 1937 Variation C Position after 44…b2 White to play
Black gives up three pawns to get his king out of the checks. This is a brilliant example of quality over quantity. 45. Qxf7+ Kh8 46.Qf6+ Kg8 47.Qxg6+ Kf8 48.Qxh6+ Ke7 49.Qg7+ Ke6 50.Qg8+ Kd5 51.Qg7+ Kd5 52.Qf7+ Kg4 53.Qg7+ Kc4 54.Qf7+ Kc3 55.Qf3+! Kb4 56.Qb7+ Kxa4 57.Qa6+ Kb3 58.Qe6+ Kc2
Stahlberg – Euwe Stockholm Olympiad 1937 Variation C Position after 58…Kc2 White to play
Now after the obvious 59.Qe2+ black plays 59…Kb1!!
The author explains why this wins: “Although Black is two pawns down and apparently has no shelter, he can win. The white king has to give up the back rank due to threats of crosschecks, after which the black king can find shelter on f1! For this reason, sacrificing the f2-pawn is inevitable. Then, in marvellous variations, White, can be forced into zugzwang where he either loses his h-pawn or is force to play Kh3, which means that the black king can find a shelter on g1, which decides the battle.”
Back to the game continuation, after 41…Qd4? 42.Kg3? White defends a pawn with little value and exposes his king fatally. 42.Qb5! draws easily viz: 42…Qxh4+ 43.Kg1 Qe4 44.a5 Qb1+ 45.Kh2 b3 46.Qb7 Kg7 47.a6 Qa2 48.a7 b2= The best Black can achieve here is Q+3 v Q+2 all on one side which is a draw.
Stahlberg – Euwe Stockholm Olympiad 1937 Missed draw in game Position after 48…b2 White to play
After 42.Kg3? this is the position:
Stahlberg – Euwe Stockholm Olympiad 1937 After fatal mistake 42.Kg3 Black to play
Black exploited the exposed white king as follows: 42…b3 43.Qb5 b2 44.Qb3 Kg7! winning 45.f4 (Other moves lose as well, for example 45.a5 Qe5+ 46.Kf3 Qf5+) 45… Qd2 0-1
A really instructive game.
Chapter 7: The Queen
The following ideas are discussed:
Exchanging Queens
Zwischenzugs
Passive and Active Queens
Neutralizing Queens
The Queen has Multiple Tasks
Restraining an Enemy Passed Pawn from Behind
Superfluous Checks
The reviewer will show an example on the topic of superfluous checks. The author explains: “In many positions there is no clear plan to implement, and in this case having the move in an over-the-board game creates tension. Rather than finding something constructive to do, or at least find a move that doesn’t compromise their position, players often insert an exchange or a pointless check. Either can harm their position.”
Miron – Lupulescu Romanian Team Ch Sovata 2018 Position after 36…Qf6 White to play
This position is objectively equal, although Black’s position looks slightly superior as his pawn majority has been mobilised. White’s pieces are well placed. 37.b4 is equal, but simpler is probably 37.exf5 Qxf5+ 38.Ke2 Qc2+ 39.Qd2 Qe4+ 40.Qe3 is equal, Black has no realistic winning chances.
White played 37.Ke2?! So Black responded with the obvious 37..f4 gaining space and creating a passed pawn 38.Qa7+? The superfluous check that loses. The author quotes John Nunn here: “Nunn pinpoints the basic truth that many people think they must keep giving checks in queen endings. this is one of the most common conceptual mistakes.” 38.Qd3! holds 38…Kg6 39.b4! getting the queen side pawns going draws 38…Kh6
Miron – Lupulescu Romanian Team Ch Sovata 2018 Position after 38…Kh6 White to play
After two poor strategic moves, White is totally lost. After 39.Qd7? (39.Qf2 is more resilient but still loses after 39…Kg5) 39…fxg3! won easily as Black’s king can shelter near his passed pawn.
Chapter 8: The King
These topics are covered:
Attacking The King
Stalemate
Avoiding Stalemate
Perpetual Check
Shelters
The section on Shelters is really important and is broken down into 9 further sub-sections:
The Importance of a Good Shelter
Weakening Our Own Shelter
Failing To Reach a Shelter
Invading and Destroying Shelters
Unusual Shelters
Leaving The Shelter to Support Pawns on the Other Wing
Leaving the Shelter to Exchange Queens
Leaving The Shelter to Win a Pawn
Breaking Open The Shelter with Pawn Sacrifices
Here is an example from the Weakening Our Own Shelter section.
Tal – Tseshkovsky Riga 1981 Position after 39…Qg4 White to play
The great Tal made a serious mistake here in a winning queen endgame 40.f3? Voluntarily weakening his king’s shelter: a poor move from a great player. 40.Qd5 centralising the queen wins easily 40…Qc8 41.Qd2 b5 42.Qb4 wins or 40…b5 41.a4 wins 40…Qd7 41.Qd5 Qc7 42.Qd2 b5 43.a3 (43.a4 bxa4 44.bxa4 Qc4 45.a5 Kg6 holding) Qc5 44.Qa2 Qc1 draw agreed
Chapter 9 Complex Queen Endgames rounds off the book with the study of some intricate endings.
This is a great book and is thoroughly recommended. Be prepared to put in some hard work.
FM Richard Webb, Chineham, Hampshire, 17th June 2024
The Art of the Endgame
My Journeys in the Magical World of Endgame Studies
Revised Edition – with 14 New Studies
by Jan Timman
From the publisher, New in Chess:
“All through his career Jan Timman has been captivated by the mystery and splendour of endgame studies. Even during his most successful and busy years as a world-class player, Timman continued to compose studies and admire those of others. For him, there has never been any doubt that his journeys in this magical world helped him to grow as a player.
In this fascinating book, first published in 2011, Timman has collected studies by other composers and explains in his lucid style how they inspired him to create dozens of brand-new studies.
Timman has revised the book for this new edition. With the help of engines, Timman discovered that a few studies needed to be corrected or had alternative solutions. He removed six studies and replaced another six with better versions. And fourteen new studies have been added, two of which are published here for the first time.”
About the Author, Jan Timman:
“Jan Timman is a former world championship candidate who rose to number two on the FIDE world rankings. He is the author of several highly acclaimed bestsellers, such as Timman’s Titans and Max Euwe’s Best Games. He was awarded the title of FIDE Master of Composition in 2022.”
GM Jan Timman
This book is a gem and I do remember perusing the first edition at a bookstall a while back, now I have a copy of the second edition.
There is no doubt that familiarity with ideas from endgame studies improves a player’s overall chess ability and imagination.
The reviewer was introduced to endgame studies at a tournament in London when he was junior: I was having lunch in the analysis room, when an older gentlemen showed some Harold Lommer studies involving knight promotions which got me hooked. The acquisition of Test Tube Chess by John Roycroft soon followed.
Jan Timman’s book has a variety of positions some of which are really “game like” whilst others are artistic beauties involving for example multiple promotions.
The book is divided into fourteen themed chapters viz:
Chapter 1: Miniature studies
Chapter 2: Rook versus bishop
Chapter 3: Preventing pawn promotion
Chapter 4: Various promotion combinations
Chapter 5: Knight promotions
Chapter 6: Bishop promotions
Chapter 7: Mating patterns
Chapter 8: Stalemate patterns
Chapter 9: Mutual zugzwang
Chapter 10: Building a fortress
Chapter 11: Systematic manoeuvres
Chapter 12: The disappearing trick
Chapter 13: Three themes
Chapter 14: Various endgame studies
The reviewer will show a variety of positions from various subsections.
Chapter 1: Miniature studies
These are positions with no more than seven pieces. This one is particularly beautiful with a mutual zugzwang.
Position 1
Liburkin, ’64’ 1933 White to play and win
White is a pawn up with black’s king close to the passed pawn, so white needs something special here. 1.Kd1 pins the knight forcing 1…Kf5 2.Ke2 threatening to win the knight. Black bishop’s impedes his king, so he goes after the h-pawn with 2…Bf6 3.Kf3 Bxh4
Liburkin 1934 After 3…Bxh4
If white takes the bishop 4.Nxh4+ Kg5 attacking the knight saves black. So 4.Bxe4+ Kg5 5.Bd5!Kh5 6.Bf7+ Kg5 7.Be8
Liburkin 1934 After 7.Be8
Black is zugzwang and loses the bishop and the game. Note this is a position of mutual zugzwang as white has no good waiting move and cannot win with the move! Very pretty.
Chapter 2: Rook versus bishop
This is the most practical chapter with studies in the complex endgame of R+P v B+P.
Position 18
Reshevsky-Fischer, Los Angeles match (11) Position after 52…Ra2+
This is a celebrated position where Reshevsky played 53.Kf3? with Fischer missing a clear win by exchanging rooks and occupying g4 with his king. Instead Fischer kept the rooks on. White draws with 53.Kh3!
This study was created to show this:
Position 19
Study based on Reshevsky-Fischer game White to play and draw
1.Kg2! Kf5 2.Kh3 Rc4 3.Be7! the only move 3…Rc1 4.Bf8! (The bishop hides itself to prevent a rook check followed by attacking the bishop to allow black to get in Kg4) 4…Rb1 5. Bg7 or 5.Bh6 draws
Chapter 3: Preventing pawn promotion
This is a famous promotion combination from a game which resembles the elegance of a study:
Position 44
Ortueta-Sanz Madrid 1933 Position after 30.h3
Black played 30…Rd2 31.Na4 (31.a4 was better) 31…Rxb2! 32.Nxb2 c3 33.Rxb6 c4!! 34.Rb4 a5!! winning
Ortueta-Sanz Madrid 1933 Position after 34…a5
White cannot prevent the coronation of a new queen.
The great composer, Pogosyants composed a study with a very similar theme:
Position 46
Pogosyants, ‘Themes-64’ 1977 White to play and win
The solution is 1.Bg3 dxc4 2.Rxg7! Nxg7 3.f6 Rxg3 4.f5!! Rg5 5.f4! Nxf5 6.f7 wins
Chapter 4: Various promotion combinations
Position 69
Wotawa Schach Magazin 1951 White to play and win
A game like position. 1.d6 Be5 2.Bb8 threatening d7 winning the bishop, so 2…Bf6 3.d7 Bd8 apparently saving the bishop, but 4.Bg3! a4 5.Bh4! Bxh4 6.g4+ and wins
Chapter 5: Knight promotions
Here is a superb Harold Lommer study with multiple promotions:
Position 96
Lommer, ‘Feuille d’Avis de Lausanne’ 1933 White to play and win
White is threatened with a brutal discovered mate by the black monarch. So 1.d8N Bd5 2.g8B!! (2.g8Q allows black a brilliant defence 2…Ke3+ 3.Qxd5 stalemate!) 2… Be4 3.e8R!! (3.e8Q allows another fantastic defence 3…Kg3+ 4.Qxe4 stalemate!) and wins
A brilliant study has with stunning counterplay.
Position 97 shows a famous Lommer involving 5 knight promotions, but unfortunately after the fourth promotion, there is alternative prosaic win promoting to a queen.
Chapter 6: Bishop promotions
Position 112
Rusinek ‘New Statesman’ 1971 White to play and draw
White has an army of far advanced pawns against 3 minor pieces and a well placed black king.
If black plays 4…Ndxf6 5.Kb8 gets the king out of the mating trap, so 4…Nexf6 5.a8B!! (5.a8=Q? Nd5 followed by Ne7#)
Rusinek 1971 after 5.a8B
White is attempting a self stalemate, so black must release this and rearrange his pieces. 5…Ne5 (5…Bf1 6.b8N! draws) 6.Kb8 Nc6+ 7.Kc8 Bf1 threatening Bh3# 8.b8R!! (8.b8Q? Ba6+ 9.Qb7 Ne4 10.Qxa6 Nd6#, or 8.b8N? Ne7+ 9.Kb7 Bg2+ 10.Ka7 Nc8+ wins the bishop on a8 and the game)
Rusinek 1971 after 8.b8R
8…Ba6+ 9.Rb7! with a draw
Scintillating promotion play.
Position 124
This is a creation of genius and very amusing.
Troitzky, Korolkov 1938-1939 White to play and win
The great Troitzky is involved here. Black threatens a brutal Ng3 mate. 1.Qc3!! (Threatening the key g7 pawn, 1.Qa3? is met by f1N reinforcing the threat on g3 winning for black) 1…Nxc3 2.d8B!! (Not 2.d8Q? Nde4 3.Qxc7 f1N 4.Bf4 Ne2 followed by sacrificing all the knights ending with Qxg3 stalemate) 2…Ne2 3.Bxc7 f1N 4.b8B!! (4.b8Q allows black to sacrifice all the knights on g3 ending with Qg3 stalemate) 4…Ne4 5.B1f4 winning as the three white bishops control the three knights.
Troitzky, Korolkov 1938-1939 Position after 5.B1f4
Who says there is no humour in chess?
Chapter 7: Mating patterns
Here is an elegant study by the author, Jan Timman:
Position 163
Timman 2010 White to play and win
1.h5 preventing Bxa2 as Rd7+ would win easily 1…Kh6 2.Rd8! Bxa2 3.Rh8! Bg8! great counterplay
Timman 2010 Position after 3…Bg8
4.Kc3 a2 5.Kb2 a3+ 6.Ka1 Kg7 7.h6+
Timman 2010 Position after 7.h6+
7…Kxh8 8.g7 mate
Chapter 8: Stalemate patterns
Position 167
Rusinek 1973 White to play and draw
Stalemate looks unlikely here. 1.b6 must be played as white is two pieces down 1…Rf5 2.b7! Rf7+ 3.Kd6 Nc4+ 4.Ke6 Bxb7 5.Rh3+ Kg7 6.Rf3+ Kf8
Rusinek 1973 position after 6…Kf8
7.Rg8+! Kxg8 stalemate!
Chapter 9: Mutual Zugzwang
Position 189
Here is an entertaining position:
Kliatskin 1924 White to play and win
1.Rc8+ Kxc8 2.b7+ Kb8 3.d5 Kc7
Kliatskin 1924 Position after 3…Kc7
Now only 4.bxa8B! Kb8 5.Bb7 wins with a position of mutual zugzwang
Chapter 10: Building a fortress
Position 203
Smyslov 2005 White to play and draw
The elderly former World Champion, Smyslov, composed this amusing study in his eighties. 1.Nb8 Rd6 2.Nd7+! Rxd7 3.Rxg7! Kxg7 4.h4
Smyslov 2005 Position after 4.h4
After 4…Rd6 5.Kg2 Rg6+ 6.Kh3! black has to move the rook off the g-file to avoid stalemate, so white draws!
Chapter 11: Systematic manoeuvres
Kotov, Mitrofanov 1976 White to play and draw
The reviewer assumes this is the Mitrofanov of Qg5!! fame.
The disappearing trick is a kind of systematic manoeuvre whereby white plays to achieve a particular position without a certain white piece. This is demonstrated below with a neat study.
Position 260
Sochniev, Gurgenidze JT 2004 White to play and win
King’s Indian Killer: The Harry Attack by Richard Palliser & Simon Williams
From the publisher, Everyman Chess:
“Do you want a simple and practical method to counter Black’s kingside fianchetto defences after 1 d4? A line that takes the initiative from a very early stage and creates difficult practical problems? If so, then The Harry Attack (1 d4 Nf6 2 c4 g6 3 h4!) is for you.
At first this looks like some sort of joke or, at the very least, a weird outlandish line. Aren’t we all taught to focus on development and control of the centre in the early stages? What’s 3 h4 got to do with that? Perhaps surprisingly, this is a very difficult line for Black to counter effectively. This applies not just in practical play but also theoretically, where it is far from straightforward for Black even to find a route to equality. And when Black gets it wrong they are often on the receiving end of a very unpleasant miniature.
You may be thinking that surely the best chess engines can show how to counter this line? No! One of the unexpected features of leading engine play is their enthusiasm for shoving the h-pawn up the board and they fully concur that 3 h4! is a very decent move for White.
Many leading players have taken the hint and 3 h4 is frequently seen at elite level. Richard Palliser and Simon Williams (the GingerGM) provide a thorough guide to this fascinating line. They show how to adapt when Black chooses a King’s Indian set-up, a Grunfeld set-up, a Benoni set-up or even plays in Benko style.
The Harry Attack is easy to learn and is perfect for unsettling players steeped in the theory of their favourite Indian defences.”
Simon Williams is a Grandmaster, a well-known presenter and a widely-followed streamer, as well as a popular writer whose previous books have received great praise. He is much admired for his dynamic and spontaneous attacking style.
GM Simon Williams
Richard Palliser is an International Master and the editor of CHESS Magazine. In 2006 he became Joint British Rapidplay Champion and in 2019 finished third in the British Championship. He has established a reputation as a skilled chess writer and written many works for Everyman, including the bestselling The Complete Chess Workout.
IM Richard Palliser
Harry is a nickname for the h-pawn. The Harry Attack is 1.d4 Nf6 2.c4 g6 3.h4!?
Although this book is titled as an anti-King’s Indian system, it is also aimed at the Gruenfeld Defence as the book explains.
The reviewer likes the book and despite his initial scepticism about the Harry Attack (based on his ignorance), has come to realise that this is a serious system that cannot be refuted: in fact it has been adopted at the highest levels. It is not just a one trick pony with the crude idea of hacking down the h-file, it is a sophisticated scheme with many facets including space gain. After just one or two careless moves, black can easily find himself/herself being suffocated, devoid of counterplay.
Of course, it is an “anti-book/theory” system aimed at getting the opponent out of their familiar territory. As ever, these fresh systems soon acquire a fair body of theory!
This book is suitable for club players and above. Chapter 2 gives a pertinent precis of the whole system which would be perfectly adequate for a less experienced player to play the variation with confidence.
The book is divided into seven main chapters:
Chapter 1: Model Games
Chapter 2: The Basic Repertoire
Chapter 3: Gruenfeldesque Lines
Chapter 4: Black Obstructs Harry
Chapter 5: Other Third Move Alternatives to 3…Bg7
Chapter 6: King’s Indian Style 3…Bg7
Chapter 7: The Main Line: 3…Bg7 and 6…c5
Chapter 1: Model Games
This is a really good section that shows many of the key ideas of the Harry Attack. There are six model games that are definitely worth studying. A summary of these games is:
Games 1, 2 & 3 show typical continuations if black replies with the Gruenfeld move d5 on moves 3 or 4
Chapter 3 covers this in more depth
Game 4 showcases black blocking Harry with 3…h5
Chapter 4 gives further coverage when black blocks Harry
Game 5 introduces the second player responding in a Modern Benoni fashion
Chapter 7 gives good guidance on this main line
Game 6 demonstrates Peter Svidler responding in Benko Gambit style
Chapter 7 also presents this important system in more detail
The first two games show black’s difficulties if he insists on playing a Gruenfeld setup. viz: 1.d4 Nf6 2.c4 g6 3.h4!? Bg7 4.Nc3 d5?!
Basman – Grinberg Ramat Hasharon 1980 White to move
Game 1 is a superb model game from the late and great Mike Basman.
After 5.h5! Nxh5 6.cxd5 c6 (6…e6 is a more modern try but white has powerful riposte with an excellent pawn sacrifice covered in Chapter 3. Buy the book to find out.) 7.e4! cxd5 8.e5! A well judged pawn sac’ from the creative Basman viz:
Basman – Grinberg 1980 Excellent pawn sac 8.e5 Black to move
White has a simple threat of 9.g4 winning the stranded knight, after 8…Bf8 9.Nf3 Nc6 (9…Bg4 10.Qb3! is awkward) 10.Qb3! white has a clear advantage:
Basman – Grinberg After 10.Qb3 Black to move
The next few moves showed what a pickle black is in 10…e6 11.g4! Ng7 12.Bh6! reaching this horror show for black:
Basman – Grinberg After 12.Bh6 Black to move
The knight on g7 is particularly awkward. Basman went on to win a fine game.
The second illustrative game shows one of the authors, Simon Williams, in scintillating form beating Katarzyna Toma following the Mike Basman game until move 9, where black varied with 9…Ng7, white responded with the natural 10.Qb3!
Williams – Toma 10.Qb3 Black to move
Stockfish gives this as a clear plus to white. Simon went on to win a fine game.
Chapter 2: The Basic Repertoire
This section gives the reader a quick overview of the repertoire against black’s main tries. It is a useful introduction to all the subsequent chapters. As I stated above, this chapter is adequate coverage for a less experienced player to play this system.
Chapter 3: Gruenfeldesque Lines
As already mentioned, this covers black’s attempt at an early d5.
Stockfish does not like 4…d5 and gives 5.h5! with an edge for white already!
4…d5 5.h5 Black to move
Black’s best move, according to the engine, appears to be the nonchalant 5…0-0 completely ignoring white’s attack! 6.hxg6 hxg6 7.cxd5 Nxd5 8.Bh6!
Basman – Grinberg 1980 4…d5 early h-file attack Black to move
This is looks scary for black, but he can defend with 8…Bxh6! 9.Rxh6 Kg7! Nevertheless, white is still for choice here owing to his extra space, central control and the initiative. This is covered in some detail in Chapter 3.
Beware Gruenfeld players!
Chapter 4: Black Obstructs Harry
Black can block the h-pawn with 3…h6 or 3…h5 which is committal.
The obstructive 3…h5 can lead to either KID or Gruenfeld lines with the extra h4 and h5 moves thrown in. Who does this favour? White can profitably occupy g5 with a bishop or knight that cannot be kicked with h6. Buy the book to find out.
Chapter 5: Other Third Move Alternatives to 3…Bg7
This chapter important alternatives such as the super solid 3…c6 and the more aggressive 3…c5 which can lead to Benoni or Benko Gambit type positions.
The solid 3…c6 cannot be a bad move. White responds by going into a Schlechter Slav viz: 4.Nc3 d5 5.cxd5 cxd5 6.Bf4 Nc6 7.e3 Bg7 8.Be2 h5 9.Nf3 0-0 10.Qb3
Exchange Slav type position 10.Qb3 Black to play
White has a pull here and his position is easier to play. The line given in the book involves black playing a5 a few moves later which is a little compliant creating weaknesses.
After the Benko Gambit type response viz: 1.d4 Nf6 2.c4 g6 3.h4 c5 4.d5 b5!? 5.cxb5 a6 6.e3!
Benko Response 6.e3 Black to play
White plays solidly and intends to use b5 as an outpost to slow black’s counterplay. Clearly black has some compensation here but not a full pawn’s worth. A critical line here may be 6…Bg7 7.Nc3 0-0 8.a4! e6!? This is covered in the book.
Chapter 6: King’s Indian Style 3…Bg7
This and the final chapter are probably the key chapters for more experienced players who want to get to the meaty main lines.
Chapter 7: The Main Line: 3…Bg7 and 6…c5
After these natural moves 1.d4 Nf6 2.c4 g6 3.h4 Bg7 4.Nc3 d6 5.e4 0-0 6.Be2 c5 7.d5 e6 8.h5 exd5 9.exd5! Re8 10.h6! Bh8 11.Bg5, this tabiya is reached:
Main tabiya after 11.Bg5 Black to move
This is a hot position played quite a bit at the top level. The open e-file may look scary for white, but the king can slide to f1. White’s space advantage is significant and black can have difficulties finding counterplay. Stockfish gives white about a small advantage. More important than that is understanding the ideas in this interesting position. Get the book to further your knowledge.
For those competitors fed up with meeting reams of KID or Gruenfeld theory, I recommend giving The Harry Attack a go!
FM Richard Webb, Chineham, Hampshire, 9th June 2024
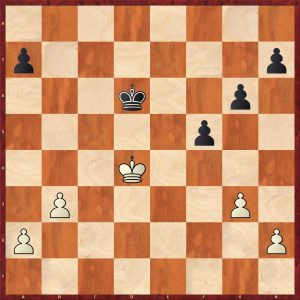
From the publisher, Gambit Publications “Understanding the endgame is fundamental to playing good chess, and at its heart lie positions where just kings and pawns remain on the board.
Even when a pawn ending is not actually reached, the players must often assess ones that could arise from an exchange of pieces. And an error calculating a pawn ending is normally fatal. Questions of pawn-structure, and thus decisions made early in the game, can be fully understood only when we appreciate how they impact the possible pawn endings.
This book takes a practical angle, so is the perfect complement to Secrets of Pawn Endings, which examines their theory in detail. Experienced trainer Bogdanov examines a wealth of pawn endings where strong players made significant errors, and draws lessons and rules of thumb from them.
While we are enjoying the entertaining material in this book, we are painlessly absorbing endgame principles and improving our intuitive decision-making skills. We learn how to calculate and identify key positional elements, and appreciate the beautiful tactics and paradoxical ideas that are unique to the world of pawns.
The Nunn Convention is used throughout the book, and all the material has been checked in detail with modern NNUE-based engines with access to seven-man tablebases.”
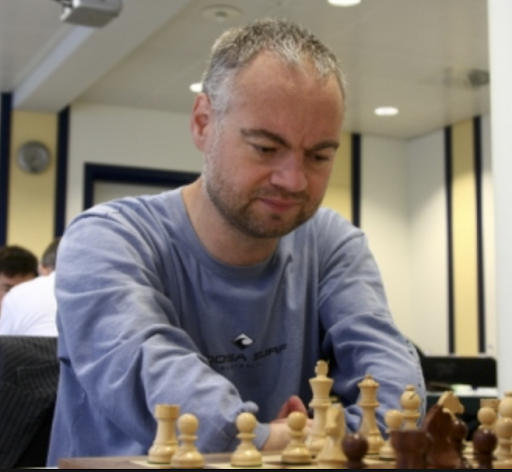
International Master Valentin Bogdanov has vast experience as a chess trainer, and is from Ukraine. His pupils include grandmasters Moskalenko, Savchenko and Drozdovsky, and he has acted as a second for the well-known grandmaster and theoretician Viacheslav Eingorn since the late 1970s.
For 50 years he has been a teacher at the chess school in Odesa (Ukraine), and in 2016 won the European Over-65 Championship. In the same year he also qualified as an International Arbiter and has since then officiated over a great many chess events in his country.
This is his fourth book for Gambit.
IM Valentin Bogdanov (UKR)
Before we start our review it is worth watching this video preview from John Nunn and Gambit Publications:
This is a excellent book that has an emphasis on practical king and pawn endgames. All the examples are taken from 1981 onwards which means that the reader will see novel positions rather than a rehash of old favourites. The other fresh approach is the structure of the ten chapters based on themes rather than the number of pawns. This book is not for beginners or very inexperienced club players as it assumes a basic knowledge of elementary pawn endgames. It is aimed at 1750+ chess enthusiasts but ambitious lower rated readers will benefit from some of the easier examples. The more difficult positions will tax GMs. This book would be ideal material for a coach for training purposes to give the students a toolkit of ideas.
The chapter structure is as follows:
Chapter 1: Obvious Errors Chapter 2: Breakthrough Chapter 3: Zugzwang Chapter 4: Opposition and Corresponding Squares Chapter 5:Spare Tempi Chapter 6: The Fight To Promote Chapter 7: Changing the Pawn-Structure Chapter 8: Calculation Chapter 9: Evaluating the Resulting Queen Endings Chapter 10: Positional Play
The reviewer will show examples distributed from all the chapters to give the reader a flavour of this instructional idyll.
Chapter 1: Obvious Errors
Position 21
Movsesian-Sadvakasov Calvia Olympiad 2004 White to play
White, Movsesian, a 2600+ GM played the dreadful blunder 59.Kc6? (throwing away a totally winning pawn endgame. 59.Kc5! wins as the threat is to play Kb4 which will preserve white’s remaining pawn as a b-pawn with the king in front and a reserve tempo move of b3, if 59…a3 60.bxa3! Ke7 61. Kc6 Kd8 62.Kb7! and the a-pawn promotes) 59…Ke6 60.Kb5 reaching this position:
Movsesian-Sadvakasov Calvia Olympiad 2004 Move 60 Black to play
Now, black drew with a common, but nevertheless neat idea: 60…a3! (transforming white’s pawn into a now useless a-pawn, as black’s king is just close enough to draw) 61.bxa3! Kd7! 62.Kb6 Kc8! reaching c8 with an elementary draw
Position 22
Forcen Esteban – Lagarde Internet rapid 2019 Move 83 Black to play
This position is simpler than the last one. Both players are rated well over 2500! Black is to play here and after the obvious 83..b3, it is crystal clear to a novice player that both sides are going to promote with a draw, even though white promotes first. If 83…Kb7 trying to impede the advance of the d-pawn, white can play 84.Kf6 making sure that the d-pawn does promote with a stone cold draw. Black played 83…Kb8? (Placing the king on the back rank presumably in the mistaken belief that he could stop the white pawn from promoting. 84.Kf6! b3 85.d7! followed by promoting with check, winning the game, thanks to black’s foolish Kb8 move!
Chapter 2: Breakthrough
This is a key topic in pawn endings and there are many beautiful examples. Sometimes, the threat of a breakthrough can limit the opponent’s king manoeuvres, thus winning the game indirectly. Once a player has seen some pretty examples of this theme, they are never forgotten.
Position 33
Nikolic-Lautier Reykjavik rapid 2004 White to play
White missed a chance for a standard breakthrough against black’s mangled pawns viz: 35.h5 Kd7 36.g5 reaching this key position:
Nikolic-Lautier Reykjavik rapid 2005 Move 36 Black to move
Now there are two main variations:
A) 36…Ke8 37.gxh6! Kf8 38.Kc2 Kg8 39.Kb3
Nikolic-Lautier Reykjavik rapid 2005 variation A
and white wins the race to get a new queen for example: 39… Kh7 (39…a5 40.a4 breaks through) 40.Kb4 Kxh6 41.Kc5 Kxh5 42.Kxd5 Kg4 43.Kc6 Kxf4 44.d5 wins easily
B) 36…fxg5 37.fxg5! Ke8 38.gxh6! Kf8 39.Ke3
Nikolic-Lautier Reykjavik rapid 2005 variation B
39…Kg8 40.Kf4 Kh7 41.Kg5 winning
Back to the original position: white played 35.Kc2? f5! 36.g5 h5! 37. Kb3 draw agreed
Position 36
Gashimov-Anastasian Dubai 2003 Move 53 White to play
White has an outside passed a-pawn and was probably dreaming of swapping his a-pawn for black’s c-pawn, leaving black to deal with an outside passed b-pawn, while white’s king mops up the king side pawns winning the game, hence his next move 53.Kc3?
A more alert white player would have spotted the danger of black’s advanced kingside pawns. It might look as though black can only create a passed e-pawn as his extra kingside pawn is on the e-file, but this an illusion: black can now breakthrough creating a pawn configuration that ties down the white king permanently, thus allowing black to win on the queenside. Once seen never forgotten! 53…e4! would have won threatening e3 or f3 winning, if 54.Kd2 f3! 55.gxf3 exf3 reaching a position similar to the game
53…Kd5? 54.a4? Pursing his faulty plan, 54.Kd2! would have drawn 54…e4! 55.Kd2 (55.gxf4 allows an immediate breakthrough 55…e3! 56.fxe3 h4! and the h-pawn queens) 55…f3! 56.gxf3 exf3! reaching this position:
Gashimov-Anastasian Dubai 2003 Move 56 White to play
White’s king is tied down and cannot cross to the c-file as this allows a decisive breakthrough of h4! Therefore black’s king can invade on the queenside with decisive gains viz: 57.Ke3 Kc5 58.Ke4 Kb4 59.Kd4 Kxa4 60.Kxc4 h4 61.b3+ Ka3 62.gxh4 g3! 63.Kd40-1
Position 38
Mamedyarov-Sokolov Hoogeveen 2006 White to play
White missed the elegant 59.f5! b3 60.Kc3! Kd5 61.e6 fxe6 62.f6 62…gxf6 63.h5! and the h-pawn queens.
White played 59.Kc4? and still won after black missed a draw.
Chapter 3: Zugzwang
Here is a subtle example, but nevertheless didactic:
Position 56
Grabarczyk – Rustemov Koszalin 1997 Black to play
This ending looks like an easy win for black with a extra passed pawn. But be careful! Black played the natural 52…Kg5? which throws away the win. This won’t become clear for a few moves. 52…Kg6! wins 53.f4+ exf3 54.Kxf3! h5 55.Kg3! reaching a position of mutual zugzwang:
Grabarczyk-Rustemov Mutual Zugzwang
If black had played 52…Kg6, white would be on move here and would be lost as 56.Kh3 or 56.Kf3 would be met by 56…h4 and any other king move would allow 56…Kg4 winning easily.
The game continued 55…h4+ 56.Kf3! Kh5 57.Kf4! Kh6 58.e4! h3 59.Kg3 drawn
Chapter 4: Opposition and Corresponding Squares
The introduction to this chapter is excellent explaining the concept of the opposition, the distant opposition, corresponding squares and triangulation.
Here is a simple example from a game between players rated in the 2400s:
Position 70
Heim – Helmers Reykjavik 1981 White to play
White played the “active” 55.Ke4? (55.Kf2! maintaining the distant opposition draws a textbook ending) 55…Ke6! winning the opposition 56. Kf3 Kd5 bypassing 57.Ke3 Ke5! 58.Kf3 Kd4 (another bypass) 59.Kf2 Kd3 60.Kf3 g4+ and white threw in the towel
Chapter 5: Spare Tempi
Position 105
Siugirov – Lupulescu Jerusalem 2015 Black to Play
The author’s explanation of black’s defensive plan here is pithy and pedagogical:
“Black’s defensive plan is to let White take the a7-pawn and then block the king in permanently in front of his own a-pawn. For this idea to work, Black needs a spare tempo on the kingside, as otherwise he will be forced to release the white king from its a-file prison. Immediately fixing the kingside pawns by 43…g5!? secures two such tempi and is the simplest path to a draw viz: 44.Kc6 Ke5 45.Kb7 Kd6! 46.Kxa7 Kc7! 47.h3 h6 48.a6 h5!”
Siugirov – Lupulescu Jerusalem 2016 Trapped king
White does not enough tempi to release his imprisoned king.
In practice Black played 43…Kd7 which retains the draw but mis-defended on the next move and lost.
Interestingly, I had a similar position in a game many decades ago with reversed flanks. I won the game and proudly showed the endgame to a friend, who promptly demonstrated a drawing plan for my opponent identical to this game.
Chapter 6: The Fight To Promote
Mchedlishvili – Jankovic Dubai 2009 White to move
White totally mis-assessed the resulting king and pawn endgame after the exchange of queens here. He probably thought that his connected passed pawns on the kingside were at least a match for black’s queenside majority.
What white missed was that black can create a passed a-pawn and a passed d-pawn (separated by two files) and these pawns can reach the fifth rank safely which means they are unstoppable.
White played the desperate 39.c4 dxc4+ (39…bxc4+ also wins) 40.Kc3 a3 41.h4 Kg6 42.g5 h5 43.Kd2 b4 44.Kc2 c3 white resigned
7: Changing the Pawn-Structure
This is one of the most complex chapters and the hardest to evaluate in practice.
The reviewer will show an excellent example to show a typical idea:
Position 153
Kasparov – Azmaiparashvili Geropotamos rapid 2003 Black to play
Black played the automatic 46…Kc6? White won with a well known technique exploiting the fact that his king is one move ahead in the race to the kingside 47.h4! f5 48.g3! Kc5 (48…Kc7 49.Ka7 Kc6 50.Kb8 wins) 49.Kb7! and black resigned because of this variation: 49…b5 50.axb5 Kxb5 51.Kc7 Kc4 52.Kd6 Kd3 53.Ke6 Ke3 54.Kf6 Kf3 55.Kxg6! Kxg3
Kasparov – Azmaiparashvili Geropotamos rapid 2004 possible continuation White to play
56.Kg5! winning
Going back to the original position:
Kasparov – Azmaiparashvili Geropotamos rapid 2003 Black to play
Instead of the passive 46…Kc6? black can actively rearrange the kingside pawn structure to draw as follows:
46…h4! 47.Ka7 f5 48.h3
Kasparov – Azmaiparashvili Geropotamos rapid 2004 variation in missed draw Black to play
Kasparov – Azmaiparashvili Geropotamos rapid 2004 variation in missed draw move 57 Black to play
Black draws here with 57…Ke4! 58.Kg5 Ke5! 59.Kxh4 Kf4! 60.g4 (60.g3 Ke3 draws) 60…Ke5! 61.g5 f4! 62.Kg4 Ke4! leads to a drawn Q + h-pawn v Q endgame
Kasparov – Azmaiparashvili Geropotamos rapid 2004 variation in missed draw move 62 White to play
Position 158
The reviewer loves this endgame.
Gelfand-Jobava (Move 50)
This king and pawn ending is clearly drawn but white is pressing with a more advanced king. White played 50.h4 setting a subtle trap. 50…h5? losing, incredible to believe but it is true. 50…Kd7 draws, for example 51.g4 f6+ 52.Kd5 e6+ 53.Kc5 h6 54. e5 fxe5 55.fxe5 Kc7 seizing the opposition and drawing 51.f5! f6+ 52.Ke6! gxf5
Gelfand-Jobava (Move 53)
Now white played 53. e5! which had been completed missed by black (automatic recapture syndrome) 53… fxe5 54.Kxe5! Kd7 55.Kxf5! Kd6 56.Kg5 Ke5 57.Kxh5! Kf4
Gelfand-Jobava (Move 57)
Now white can enter a winning queen endgame with 58.Kg6! e5 59.h5! e4 60.h6! e3 61.h7! e2! 62.h8Q e1Q
Gelfand – Jobava Dortmund 2006 Queen Ending White to play
This looks drawn as the white g-pawn is only on the second rank and the black king is close to it. However, white has a series of checks to exploit the poor position of the black pieces viz:
63. Qb8+ Kg4 64. Qc8+ Kf4 (64…Kg3 65.Qh3! is the same as the game) 65. Qf5+ Kg3 66.Qh3+ Ke5 67.g4!
Surprisingly this is a tablebase win even though the g-pawn is only on the fourth rank. Looking more closely at the position, black’s pieces are badly placed with the king interfering with the queen. If the black king was in the south west corner, he would draw.
Gelfand did win this game about 50 moves later after mistakes by both sides.
Chapter 8: Calculation
Clearly this is absolutely critical in king and pawn endings. Here is a relatively simple example:
Position 172
Ikonnikov – Liogky Paris 1998 Black to play
Black played the obvious exchange 47…hxg5? which loses trivially 48.hxg5! Kf1 49.Kf3! Kg1 50.Kg3 (50.g6 Kh2 51.Kg4! also wins) 50…Kg1 51.g6! Black resigned as white’s king travels to f7 and black’s cannot get to h6 in time.
Ikonnikov – Liogky Paris 1999 Final Position Black to play
Going back to the start:
Ikonnikov – Liogky Paris 1998
Black can draw with 47…h5! After 48.g6 viz:
Ikonnikov – Liogky Paris 1999 Drawing Line
As soon as white plays Kxh5, black will answer Kf4 stalemate! If white goes after the g-pawn, black draws by going after the h-pawn, for example 48…Kf1 49.Kf4 Kg2 50.Ke5 Kh3 51.Ke6 Kxh4 52.Kf7 Kg3 53.Kg7 h4 54.Kf6 h3 55.g7 h2 56.g8Q+ Kf2 drawing
Chapter 9: Evaluating the Resulting Queen Endings
The introduction to this chapter by the author is a superb summary of the intricacies of these transitions. The reviewer has already given an example from Chapter 7 (position 158), so I will leave the reader to buy the book to sample this chapter.
Chapter 10: Positional Play
Position 259
Radjabov – Ding Liren Internet rapid 2021 Black to play
This looks very difficult for black as not only does white have a potential outside passed pawn but also a better king. He played 52…Kc6? and lost. Buy the book to find out how black can draw or work it for yourself!
In summary, this is a really good book and close study will reap rewards. The book is very well laid out and is easy to read with lots of diagrams. Thoroughly recommended.
FM Richard Webb, Chineham, Hampshire, 30th May 2021
Grandmaster Thomas Luther, born in 1969, is the first player with a disability to have entered the FIDE Top 100 rating list. In 2001 he was ranked 80th in the world. He has won the German Championship three times and is well known as an experienced and successful coach. In 2014 his achievements were recognised by being granted the title of FIDE Senior Trainer. In his career to-date he has published several books and DVDs. This is his fourth book for Thinkers’ Publishing, after a co-production with Jugend Schach Verlag entitled ‘Chess Coaching for Kids – the U10 Project‘ and the current series
GM Thomas Luther
This is the third volume in Thinkers’ Chess Academy (TCA), an ever-growing series written by Grandmaster and FIDE Senior Trainer Thomas Luther intended for beginners through to club standard players.
John Upham has previously reviewed the first volume, First Steps in Tactics, although I note a negative review on Amazon which considered the examples were too hard for the target market. Volume 2, From Tactics to Strategy – Winning Knowledge, which, I believe, hasn’t been submitted for review by BCN, covers more advanced tactics along with an introduction to strategy.
Volume 3 is designed as a workbook for readers of the two previous volumes, while also providing more challenging exercises for ambitious students.
From the author’s introduction (it’s also on the publisher’s website):
Not every reader is ambitious enough or has enough time to work very hard on his chess. That’s quite understandable and nothing to be ashamed of. You can enjoy chess very well without being a strong tournament player. You could just entertain yourself by playing through interesting combinations. In this case don’t try too hard to solve the Advanced Lessons or Master Class exercises. Have a look to make yourself familiar with the position, than look at the solution and enjoy the surprising combinations. You won’t learn as much as you would by racking your brain to crack the hard nuts. But some knowledge and experience will certainly rub off and increase your understanding of chess. I hope this book will help you to work towards your goals and let have you fun with chess.
The book has an unusual structure. We have 20 chapters alternately easier and harder, with the answers at the end of each chapter. Less experienced players are advised to work through the odd numbered chapters first before tackling the odd numbered chapters, while stronger players could work through the book in order, using the odd numbered chapters as ward-up exercises.
An interesting concept, but does it work? Let’s take a look inside. All the odd numbered chapters are billed simply as ‘Quick Test’, although their specific themes are discussed in the chapter introductions. The first Quick Test, which corresponds to Chapter 7 of TCA1, features mates in up to 2 moves. Other tests involve winning material in various ways. There is a gradual increase in length and complexity, until, by Chapter 19 you’ll be able to find wins (material or mate) in up to 5 moves.
I enjoyed Chapter 9 (Quick Test 5): From The Good Old Times!
Can you find this mate in 3 (Napier – Amateur 1904)?
Ng5+ is only a mate in 4: it’s quicker and more spectacular to play 1. Qg6+ Bxg6 2. Ng5+ hxg5 3. hxg6#
This, for example is Q12 in Chapter 19.
If you can solve this within a few seconds you’re a pretty good tactician: quite a jump forward from the simple positions in Chapter 1.
In case you haven’t spotted it yet: 1. Bxf6 Bxf6 2. Qxe6+ Kg7 3. Qxf6+ Kxf6 4. Nxd5+ followed by 5. Nxb6.
The even numbered chapters, apart from Chapter 2, have more specific titles, Chapters 4-12 being Advanced Lessons and Chapters 14-20 being Master Classes. We have (from 4 in steps of 2): Easy Tactics in the Endgame, Chess History, Checkmate in Up to 5 Moves, Advantage or Mate in Up to 5 Moves, All Kinds of Draws, Advantage in 5 or More Moves, The Classics, Studies and finally The Long Way to Checkmate. Yes, of course some two move combinations can be much harder to spot than some five move combinations, but the author has been very careful in his choice of material.
This is from Chapter 10: Mohammad Fahad – Vatsal Mumbai 2018.
White won by continuing 17. fxe6 fxe6 18. Nxe5 dxe5 19. Nxe6 Bxe6 20. Bb5+ Kf7 21. Qf2+ Bf6 22. Rxd8. A nice example of a clearance; very difficult to see, according to Luther.
Like many leading chess teachers these days, Thomas Luther is very keen on endgame studies. “Don’t be frightened or repulsed by the studies”, he says in the introduction to Chapter 4. “They are not like problem chess but very practical and instructive. You can learn a lot by trying to solve them.”
Here, from Chapter 18, is an 1851 study by Horwitz and Kling.
Instructive, I think, because you need to know basic KP v K theory as well as being able to spot knight forks.
The book is beautifully produced and the author has clearly put a lot of thought into both the selection of the puzzles and the structure of the chapters.
If you’re following the Thinkers’ Chess Academy series you’ll definitely want this book. If you’re looking for a book, with puzzles you probably haven’t seen before, this book would also be an excellent choice. I would place this volume high up in my list of recommended puzzle books for club standard players.
Of course many players these days prefer to solve puzzles online, but there’s also much to be said for the old-fashioned method of using a book. Although I’d guess the main target market would be roughly 1250-1750 rated players, anyone between, say, 1000 and 2000 strength would find this book both instructive and enjoyable. Lower rated players should work through the odd numbered chapters first, while higher rated players will prefer to start at the beginning and work through sequentially.
If you want to make sure the book’s for you, you can read the first three chapters here.
Thinkers Chess Academy Volume 3 – Test your chess knowledge – Crucial exercises to sharpen your understanding, Thomas Luther, Thinker’s Publishing, Thinkers Publishing; 1st edition (20 Dec. 2022)
You’ve already read about Charles Dealtry Locock’s career as a chess player and problemist. In the final part of this trilogy you’ll learn more about his life, and about what might be seen as his most lasting and significant contribution to chess.
You’ll recall that he married his first cousin, Ida Gertrude Locock, and that they had two daughters. Both were named after characters in Wagner operas who met unfortunate ends: was Wagner his favourite composer?
Elsa, born in 1891, received her name from a character in Lohengrin, who, to cut a long story short, died of grief after her brother was turned into a swan. She worked for a time as a shorthand typist, did voluntary social work for the Red Cross during the Second World War, and died unmarried in 1985.
Her sister, born in 1894, was named Brynhild, a version of Brünnhilde from the Ring Cycle, a Valkyrie who, to cut a very long story short, rode her horse into a funeral pyre after the death of her lover Siegfried. (If you’d like to find out more, Anna Russell is considerably shorter and much more amusing than Wagner.) In fact her name was registered twice, the second time as Hilda Vivien, which she seemed to prefer. She worked as a children’s nurse, and died, again unmarried, in 1950.
Although Locock gave up competitive over the board chess in 1899, he played on Board 2 for the South of England in a correspondence match against the North the following year. He was matched against the mathematician George Adolphus Schott, winning a brilliant game. As always, click on any move for a pop-up window.
In the 1901 census the family were living in Camberley, on the Surrey-Hampshire border, along with four servants: governess, parlourmaid, cook and housemaid.
Charles’s occupation was described as ‘living on own means & literature”. His particular literary interests were the poems of Percy Bysshe Shelley and Swedish poetry and drama. It appears that he was also still writing a regular chess column in the science magazine Knowledge at this point (some of them are available online).
The same year he had his first book published: neither literary nor chess related, but about the game of billiards. Entitled Side and Screw, you can read it here.
Chess and billiards weren’t Locock’s only games. He was also very much involved in the game of croquet, editing the Croquet Association Gazette between 1904 and 1915, and being employed as the Croquet Association handicapper from 1907 to 1929.
More books followed: Modern Croquet Tactics in 1907, Olympian Echoes, a book of poems and essays, in 1908 (here), and, in 1911, an edition of Shelley’s poetry (Volume 2 here).
In October 1910 he made a rare appearance at the chessboard, taking part in one of a series of consultation games between the veterans Blackburne and Gunsberg. His team was unsuccessful, but the game was exciting.
By the 1911 census the family were in the Hertfordshire market town of Berkhamsted, now employing only two servants, a Swiss cook and a parlourmaid. Charles’s occupation was given as Editor and Handicapper.
In 1912 he celebrated his 50th birthday by writing his first chess book, which, unfortunately, doesn’t appear to be available online.
Hampshire Post and Southsea Observer 13 September 1912
By 1915, Charles Dealtry Locock, returned to playing chess, having joined the Imperial Chess Club, here giving a simultaneous display.
West Sussex County Times 01 May 1915
Here’s his loss against solicitor George Bodman, formerly of Bexhill, whom he may well have known from his time in Sussex chess.
It’s possible his marriage had broken up by this time, and he was living in London. Either way, the social atmosphere of the Imperial (about which there’s much to be researched and written) would have been ideal for Locock, who loved chess while not enjoying the pressures of competition.
Linlithgowshire Gazette 16 July 1915
Locock continued at the Imperial for the rest of the decade, and, in 1920, returned to correspondence chess, playing on top board for Kent against an Italian magazine, and scoring the full point when his opponent went wrong in a bishop ending.
In the 1921 census, Charles Dealtry Locock, claiming to be still married, was visiting a widow named Rose Edith Heath in 4 Ferry Road, Barnes. (I got off the bus about 100 metres from there the other day: perhaps I should have walked in the other direction to say hello.) I don’t know whether he was just visiting a friend, or whether there was anything else to their relationship. Ida and Elsa, working for the Red Cross as a shorthand typist, were living in Redcliffe Square, just south of Earl’s Court. Brynhild was in Scarborough, a trained nurse but working as a servant for a young doctor, perhaps helping to care for his infant son. I’d like to think she bought her groceries from Edward Wallis, whose shop was only a short walk away.
By this time, Locock was very much engaged in translating Swedish poetry and plays, particularly those of Strindberg, into English (for which he was awarded a silver medal in 1928), and resigned from his post at the Imperial Chess Club in 1923. He was still actively involved in the world of chess composition, though, publishing another collection of problems and puzzles in 1926.
You might think that, approaching his seventies, it was time to wind down his chess career, but in fact he had a few more moves to make.
In 1930 he published a booklet entitled 100 Chess Maxims (for Beginners and Moderate Players). Perhaps I’ll review this further another time. For the moment I’ll just say that, while it contains much excellent advice, some of the maxims are decidedly odd.
No. 4, for instance (translated into algebraic by Carsten Hansen) advises you not to play your c1-bishop to f4. Devotees of the London System won’t be happy.
Then there’s:
37. The object of the game is to mate, and as quickly as possible. Captures are only made to deprive the king of his defenses.
Perhaps I’m wrong, but I always thought the object of the game was to mate as certainly as possible. If you look back to some of his games in the first article of my Locock trilogy, you’ll see some examples of him playing in exactly this way 40 years or so earlier.
This book might, in part, have been occasioned by Locock’s new career – as a chess teacher in schools, specifically girls’ schools, and specifically the Oratory Central Girls School in Chelsea. He even wrote an article about Chess for Girls for the first issue of the Social Chess Quarterly.
Hastings and St Leonards Observer 18 April 1931
This seems to have been a rival tournament to the British Girls Championship, with which Locock was also involved, which had taken place a few months previously, with the same winner. See BritBase (here) for further information on this event.
Here’s Honor having just won the earlier tournament.
The Sphere 10 January 1931
The school prizegiving that year even included a chess play.
Chelsea News and General Advertiser 20 November 1931
By 1935 one of his very young private pupils was doing rather well.
Falkirk Herald 22 May 1935
She was Elaine, not Eileen, and her family were living on the prestigious St Margaret’s Estate, on the borders of Twickenham and Isleworth.
That July she was successful again in a rather unusual event organised by her chess teacher.
Linlithgowshire Gazette 02 August 1935
Almost half a century later, Elaine wrote (British Chess Pergamon Press 1983):
My father, assisted by a 2d. (= almost 1p) book of rules from Smiths, taught me the moves at somewhere round the age of five. We were rescued by the problemist CD Locock who noticed me playing in a girls’ tournament two years later. It was he who brought me up on a diet of the Scotch, the Evans and any gambit that was going. We analysed them in some depth – for those days – and my severe task-master made me copy out long columns of dubious lines. He also made me his guinea-pig for his Imagination in Chess and it is small wonder that I still find it hard to resist a sacrifice, and much of my undoing comes from premature sorties such as f4 and Qh5.
In retrospect he must have been a brilliant teacher. Starting in 1936 a succession of girls’ titles came my way including the FIDE under-21, and in 1939 the British Ladies at the age of 13. It is hard to assess how strong or weak one was at the time because there has been such a marked improvement in the standard of play among women over recent years. At all events, those pre-war years were happy ones, especially away from chess which took second place to horses and more physical pastimes.
Yes, we have another book, Imagination in Chess, published in 1937.
From the author’s introduction:
Based on my own chess teaching experience I have partial sympathy with Locock’s views. I noticed at Richmond Junior Club that children learnt the Two Rooks Checkmate early on, and, if they were winning, would head for that mate, spurning quicker mates in the process. On the other hand, most checkmates don’t require sacrifices, apart from a few stock patterns which need to be remembered, just accurate calculation. While we all like to play brilliant combinations, my view is that, at club level, more games are lost by unsound sacrifices than won by sound sacrifices. Over-emphasising sacrifices to young and inexperienced players can be dangerous.
We have 60 positions, in each of which (with one exception) you can play a problem-like sacrifice to force mate. A halfway house, if you will, between problems and game positions.
A couple of examples:
This is a mate in 3: you’ll want to sacrifice your knight, and then your queen.
Here, you have to mate in 4 moves, being careful to play your sacrifices in the right order: knight, then queen, then the other knight.
If you’d like to see more you’ll be delighted to know that this book has very recently been updated, edited and published by Carsten Hansen, with 100 Chess Maxims added as a bonus. You can buy it here.
Locock also played training games with Elaine, one of which survives.
By the time of the 1939 Register, and with war imminent, the Saunders family had taken the precaution of moving out of London, and were staying in the George & Dragon Hotel in Princes Risborough – and Charles Dealtry Locock (Author, retired) was staying with them. It’s not clear how long they stayed there, and whether or not Locock was only visiting.
When he was writing about synthetic games in 1944, one of his correspondents and collaborators was a young RAF pilot named David Brine Pritchard. I’d like to think they met and perhaps played each other, if only because it would give me a Locock number of 2 (I played David, but not Elaine). I’d also like to think he introduced David to Elaine, as they married in 1952. Their daughter, Wanda, was also a strong chess player.
Charles Dealtry Locock died in Putney on 13 May 1946. Here’s his probate record.
I haven’t been able to identify Nina Agnes Wood for certain: the only likely candidate is a journalist named Agnes Nina Wood (1871-1950). I wouldn’t want to speculate.
His wife lived on until the age of 94, dying in 1962 at the same address and leaving £63975 11s: were they reconciled at the end of their lives?
There, in three parts, you have the long and eventful chess career of Charles Dealtry Locock. In the first part we looked at his competitive chess career in the 1880s and 1890s, winning the British Amateur Championship and representing his country. The second part considered his career of more than sixty years as a creative and innovative problemist. But perhaps it’s for his final act, as a pioneer in promoting chess in schools, and, particularly chess for girls, that he should be most remembered. Elaine (Saunders) Pritchard’s memoir confirms that he was a brilliant teacher. More than that, he also pioneered the idea of solving composed positions to teach creativity and imagination. Many chess teachers today encourage their students to solve studies and problems for this reason, but Locock got there first. He should always be an inspiration to all of us involved in junior chess.
Come back soon for the story of another chess prodigy.
Sources and Acknowledgements:
Many thanks to Carsten Hansen for sending me a copy of his new edition of Locock’s Imagination in Chess + 100 Chess Maxims.
Many thanks also to Brian Denman for sending me his file of Locock’s games.
Other sources:
ancestry.co.uk
findmypast.co.uk/British Newspaper Library
Wikipedia
Internet Archive
ChessBase 17/Stockfish 16.1
We focus on the British Chess Scene Past & Present !
This website uses cookies to improve your experience. We'll assume you're ok with this, but you can opt-out if you wish. Cookie settingsACCEPT
Privacy & Cookies Policy
Privacy Overview
This website uses cookies to improve your experience while you navigate through the website. Out of these cookies, the cookies that are categorized as necessary are stored on your browser as they are as essential for the working of basic functionalities of the website. We also use third-party cookies that help us analyze and understand how you use this website. These cookies will be stored in your browser only with your consent. You also have the option to opt-out of these cookies. But opting out of some of these cookies may have an effect on your browsing experience.
Necessary cookies are absolutely essential for the website to function properly. This category only includes cookies that ensures basic functionalities and security features of the website. These cookies do not store any personal information.
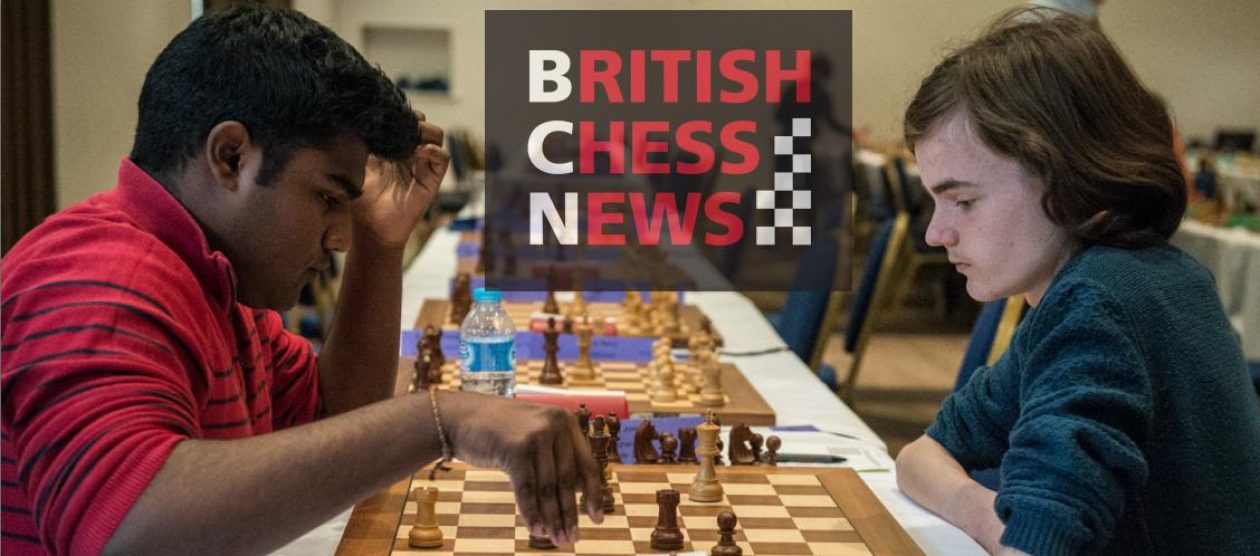
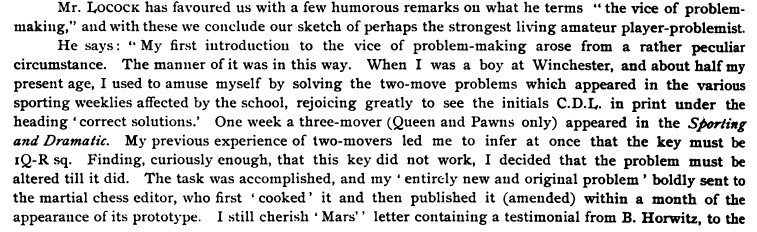
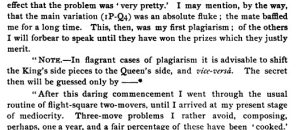
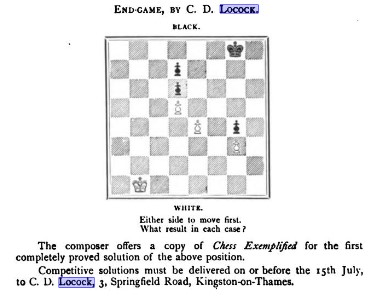
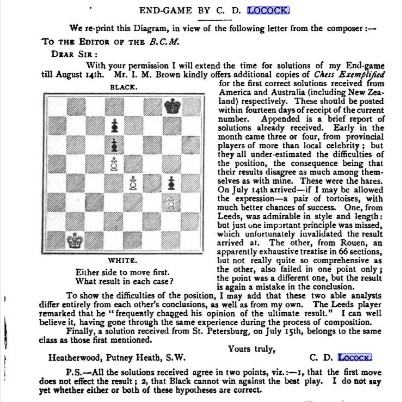
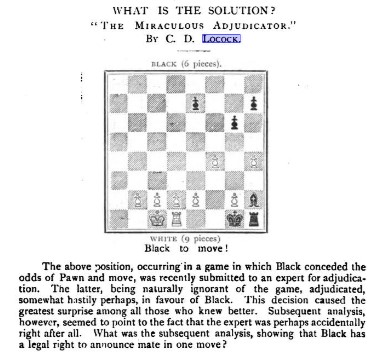

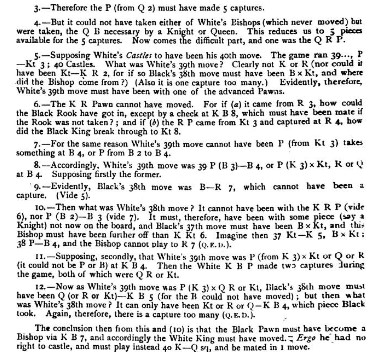
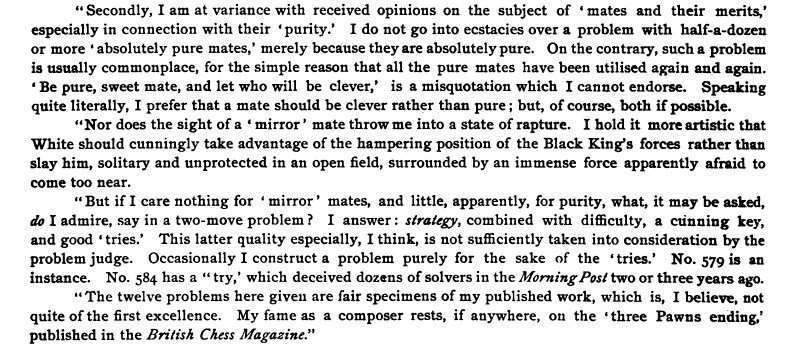
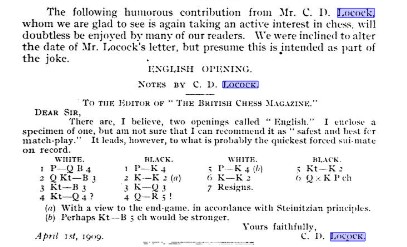
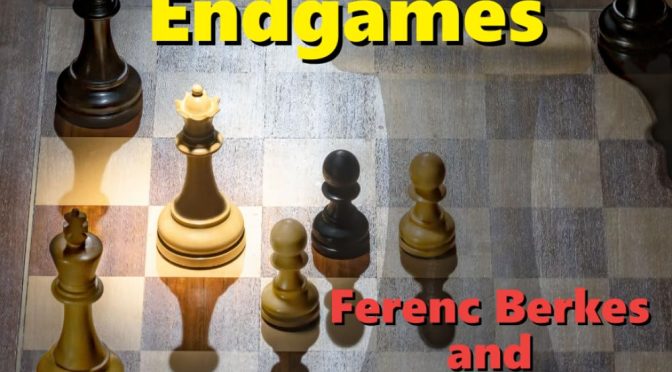
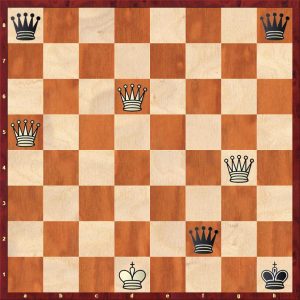
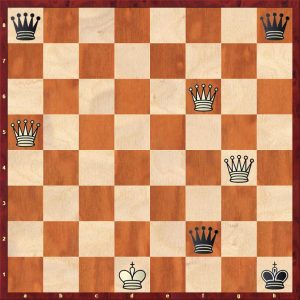
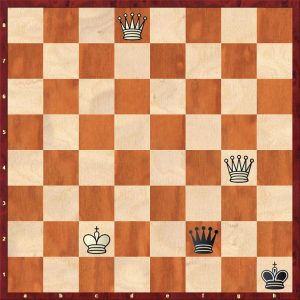
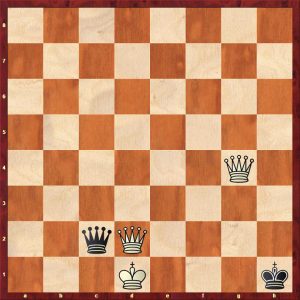
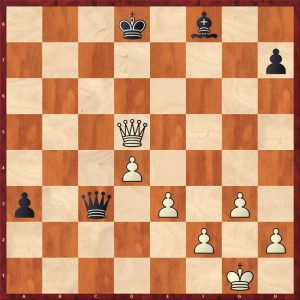
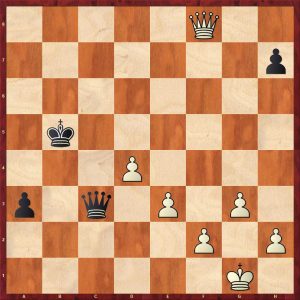
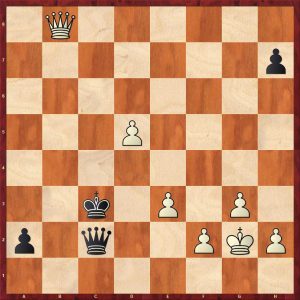
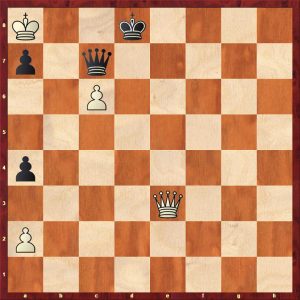
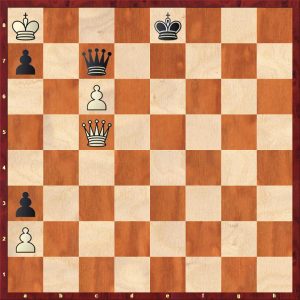
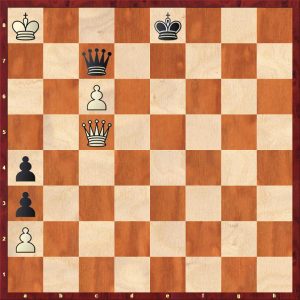
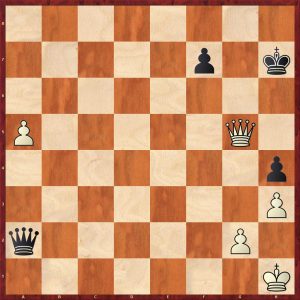
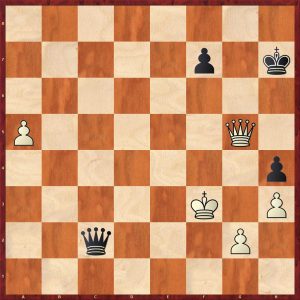
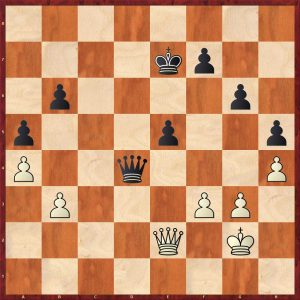
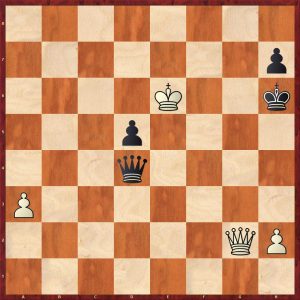
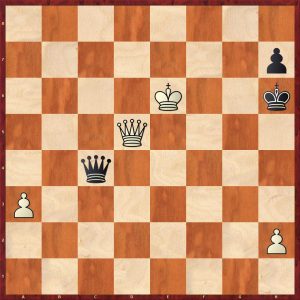
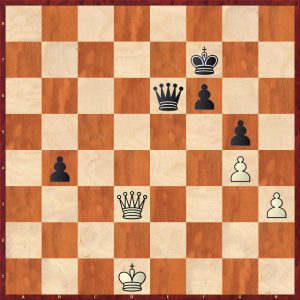
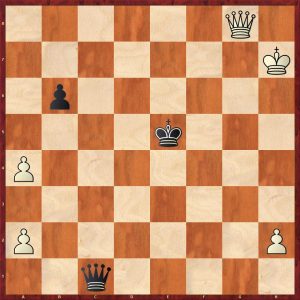
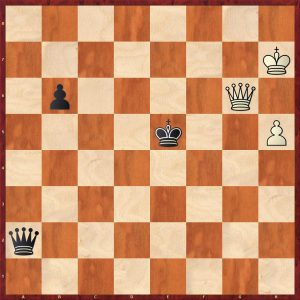
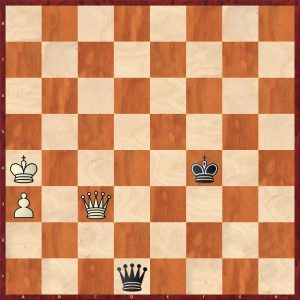
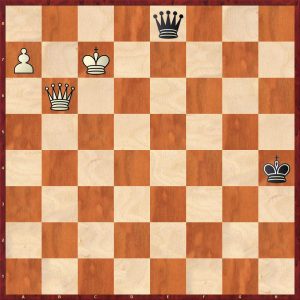
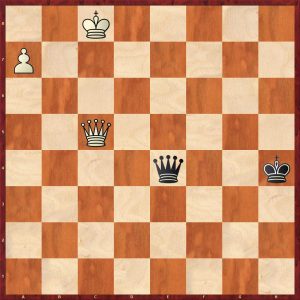
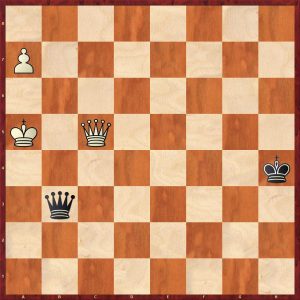
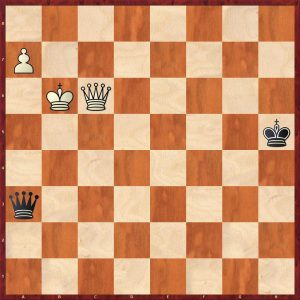
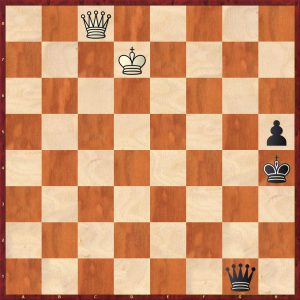
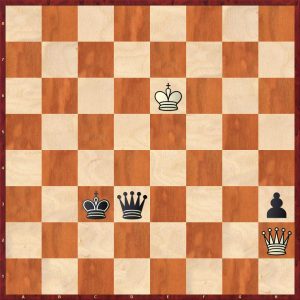
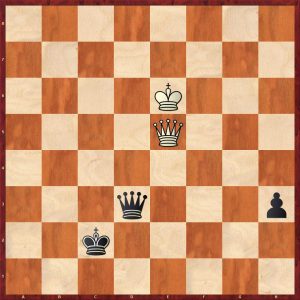
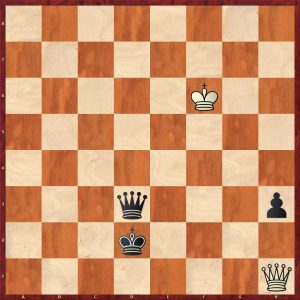

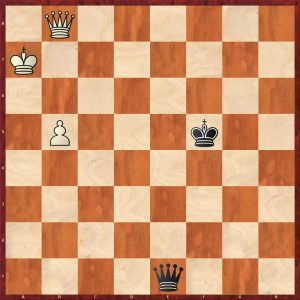
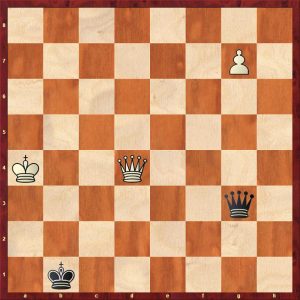
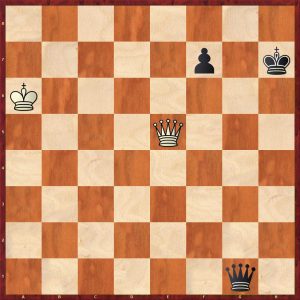
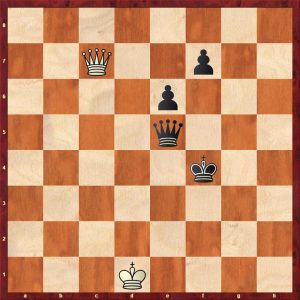
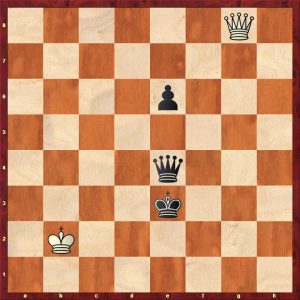
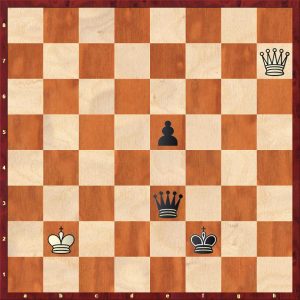
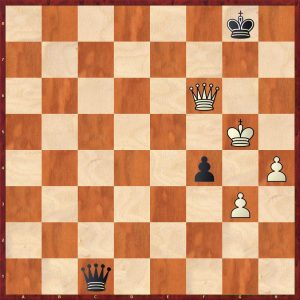
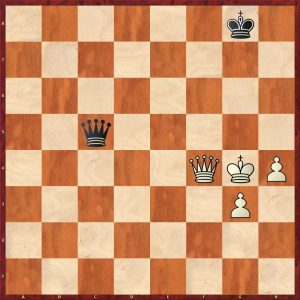

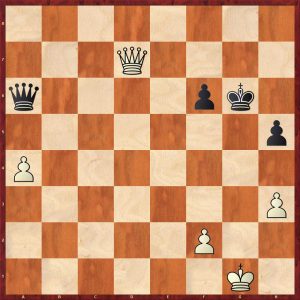
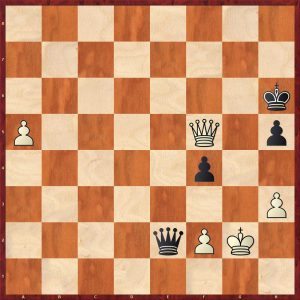
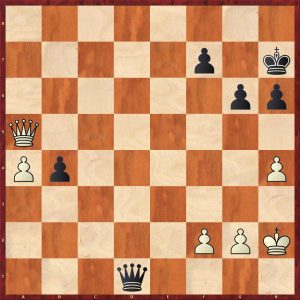
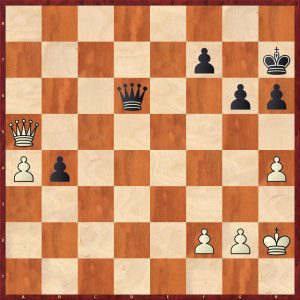
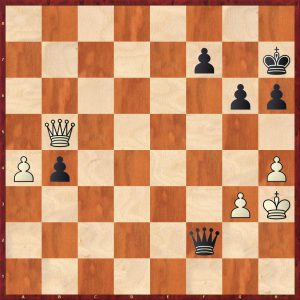
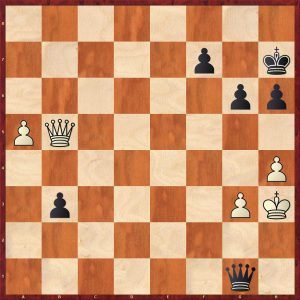
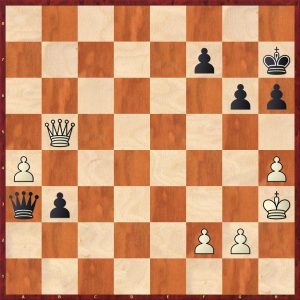
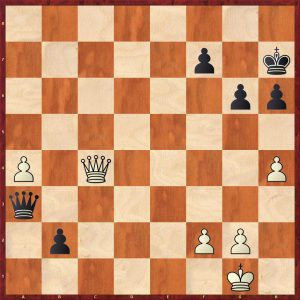
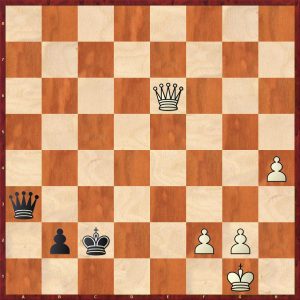
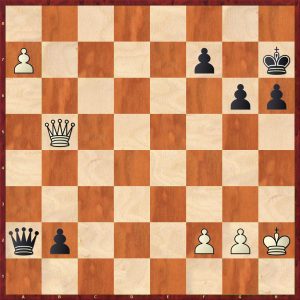
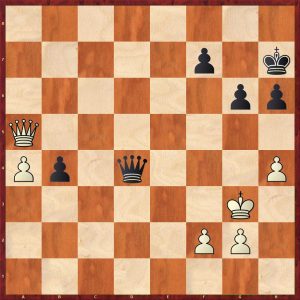
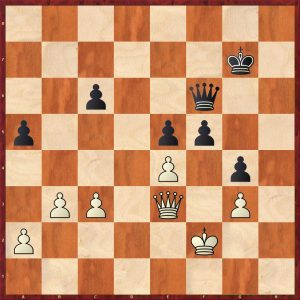
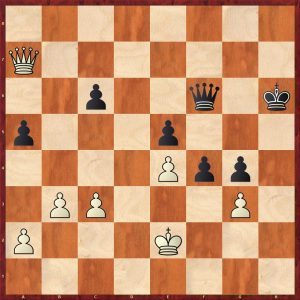
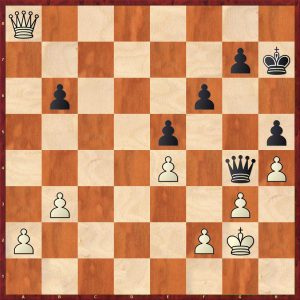
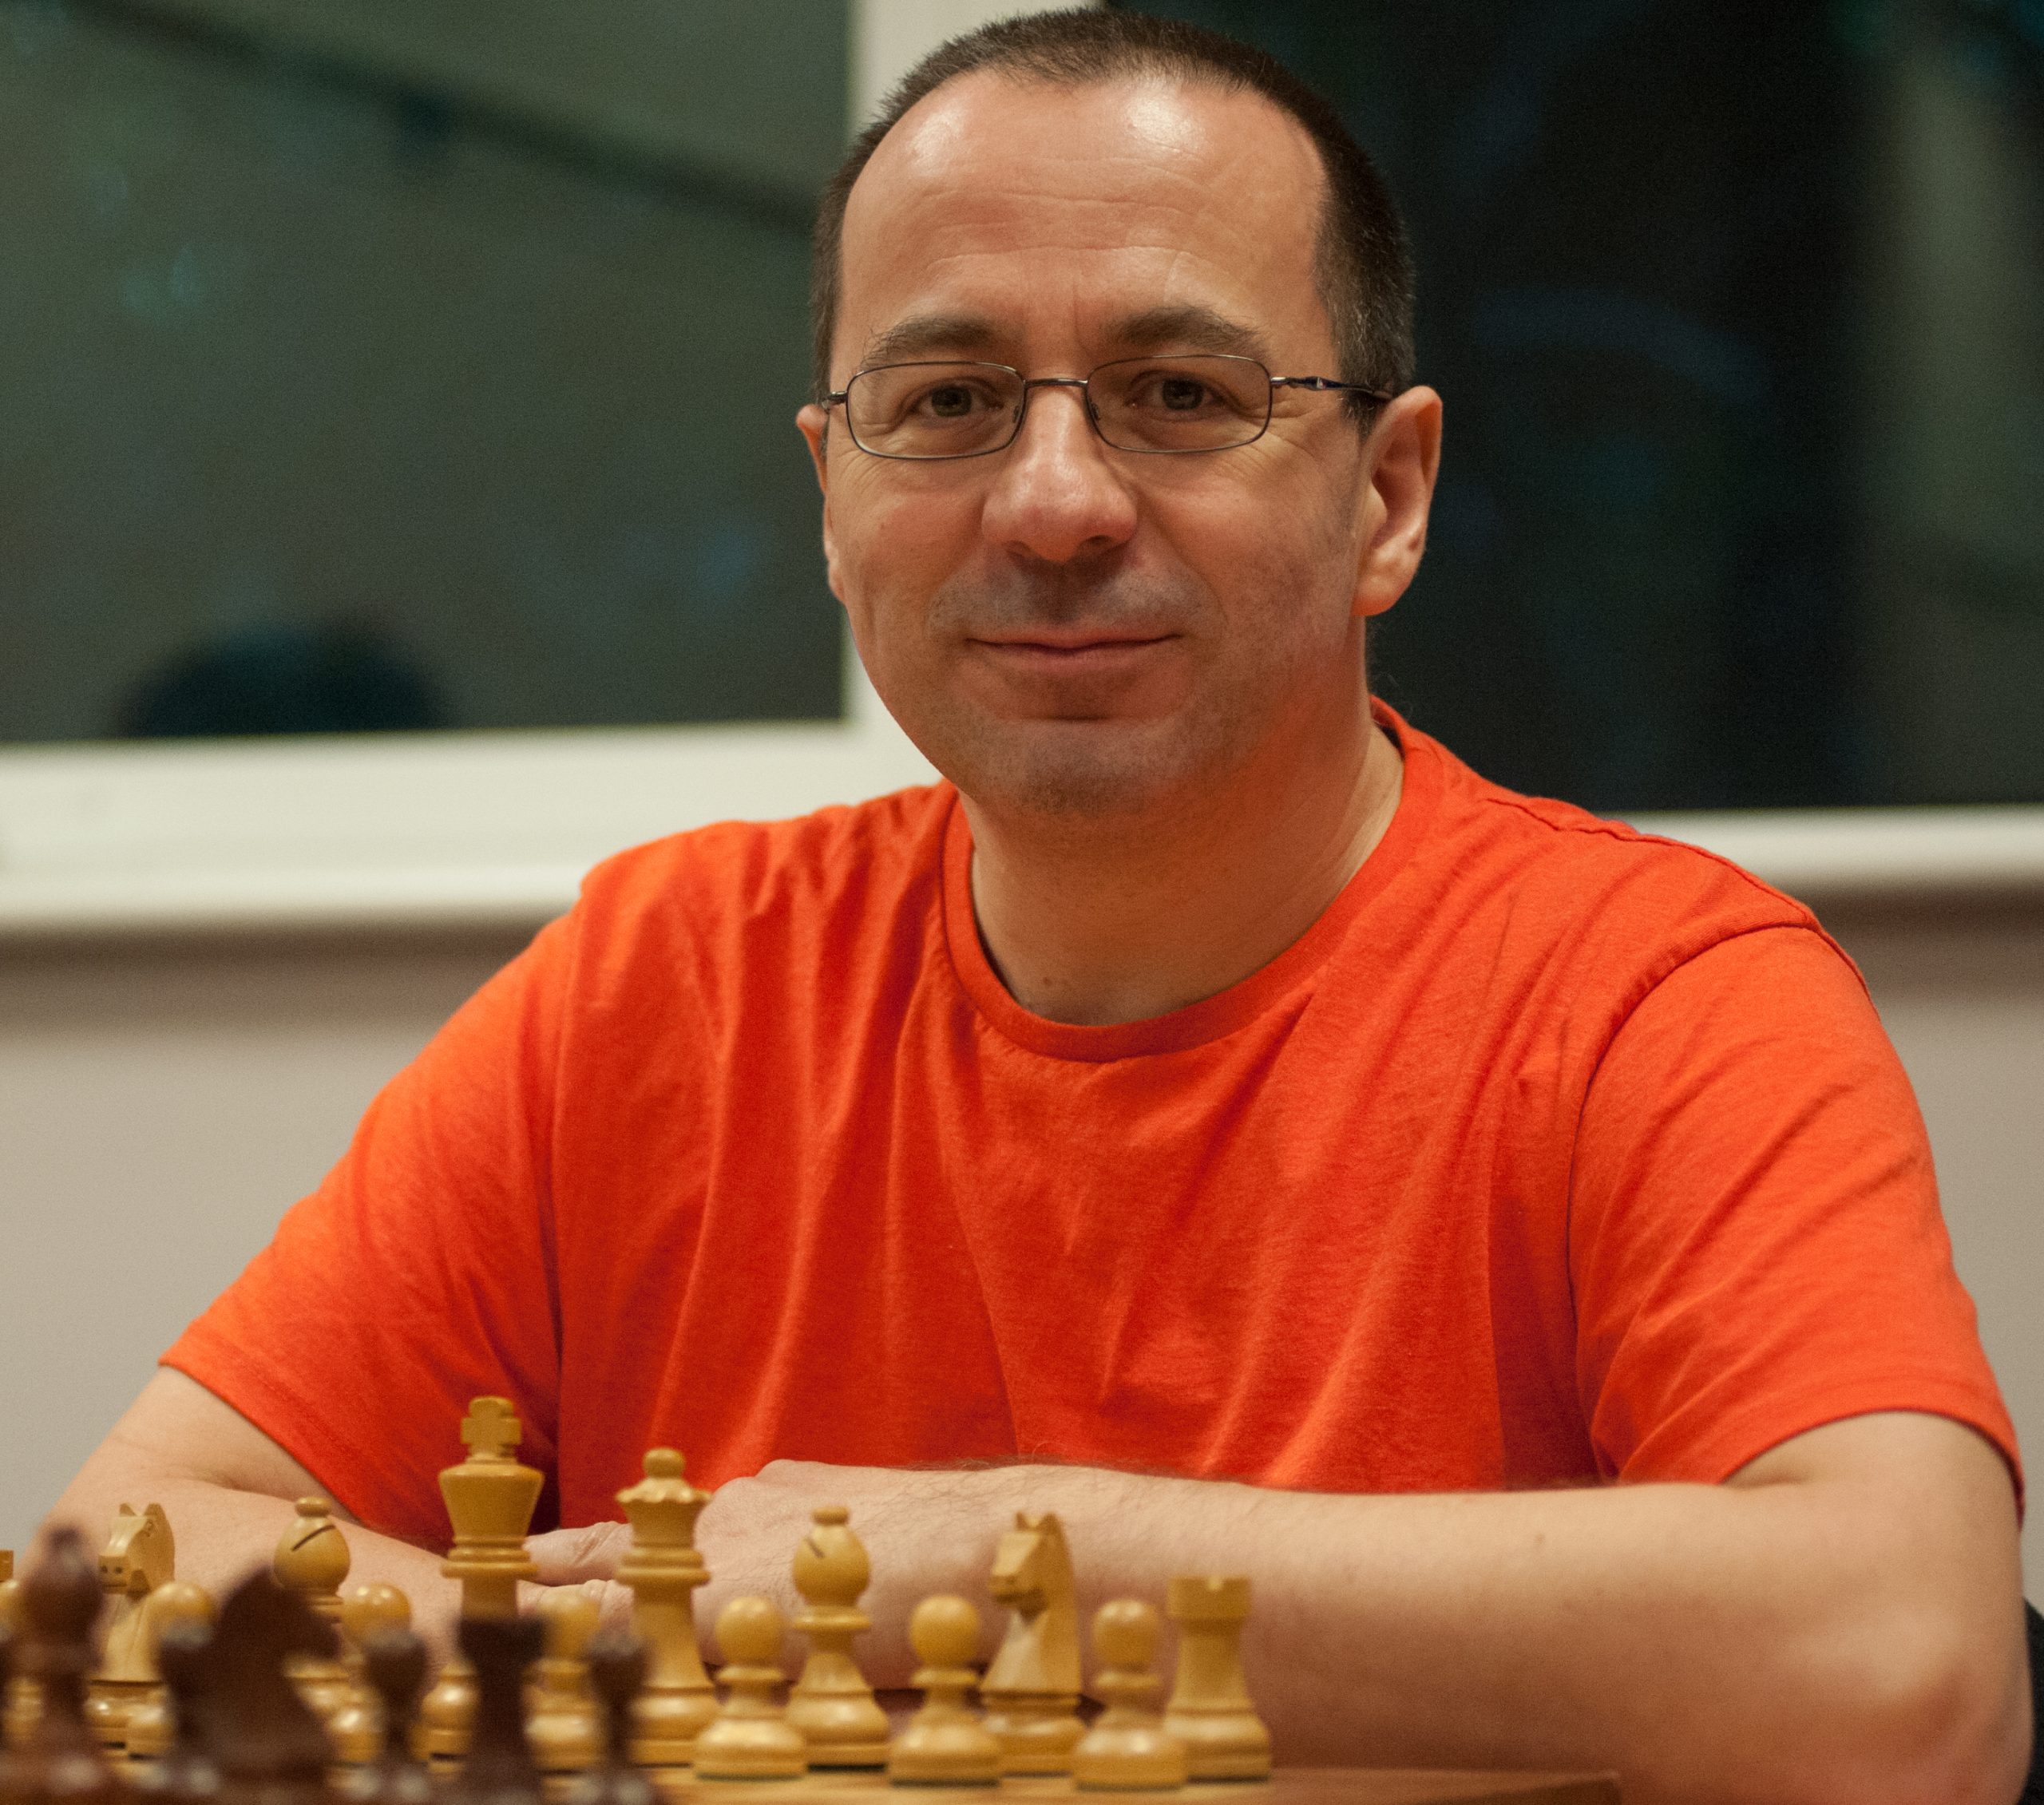
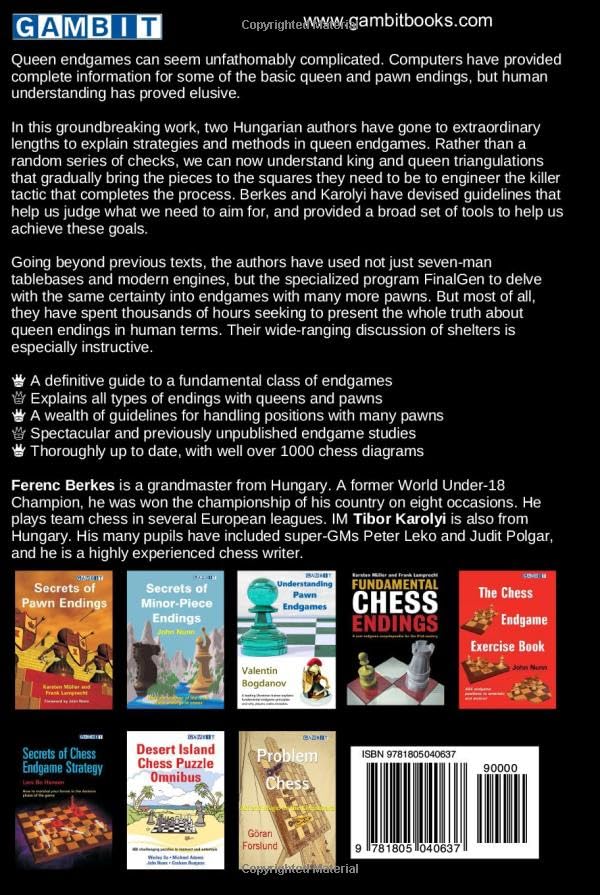
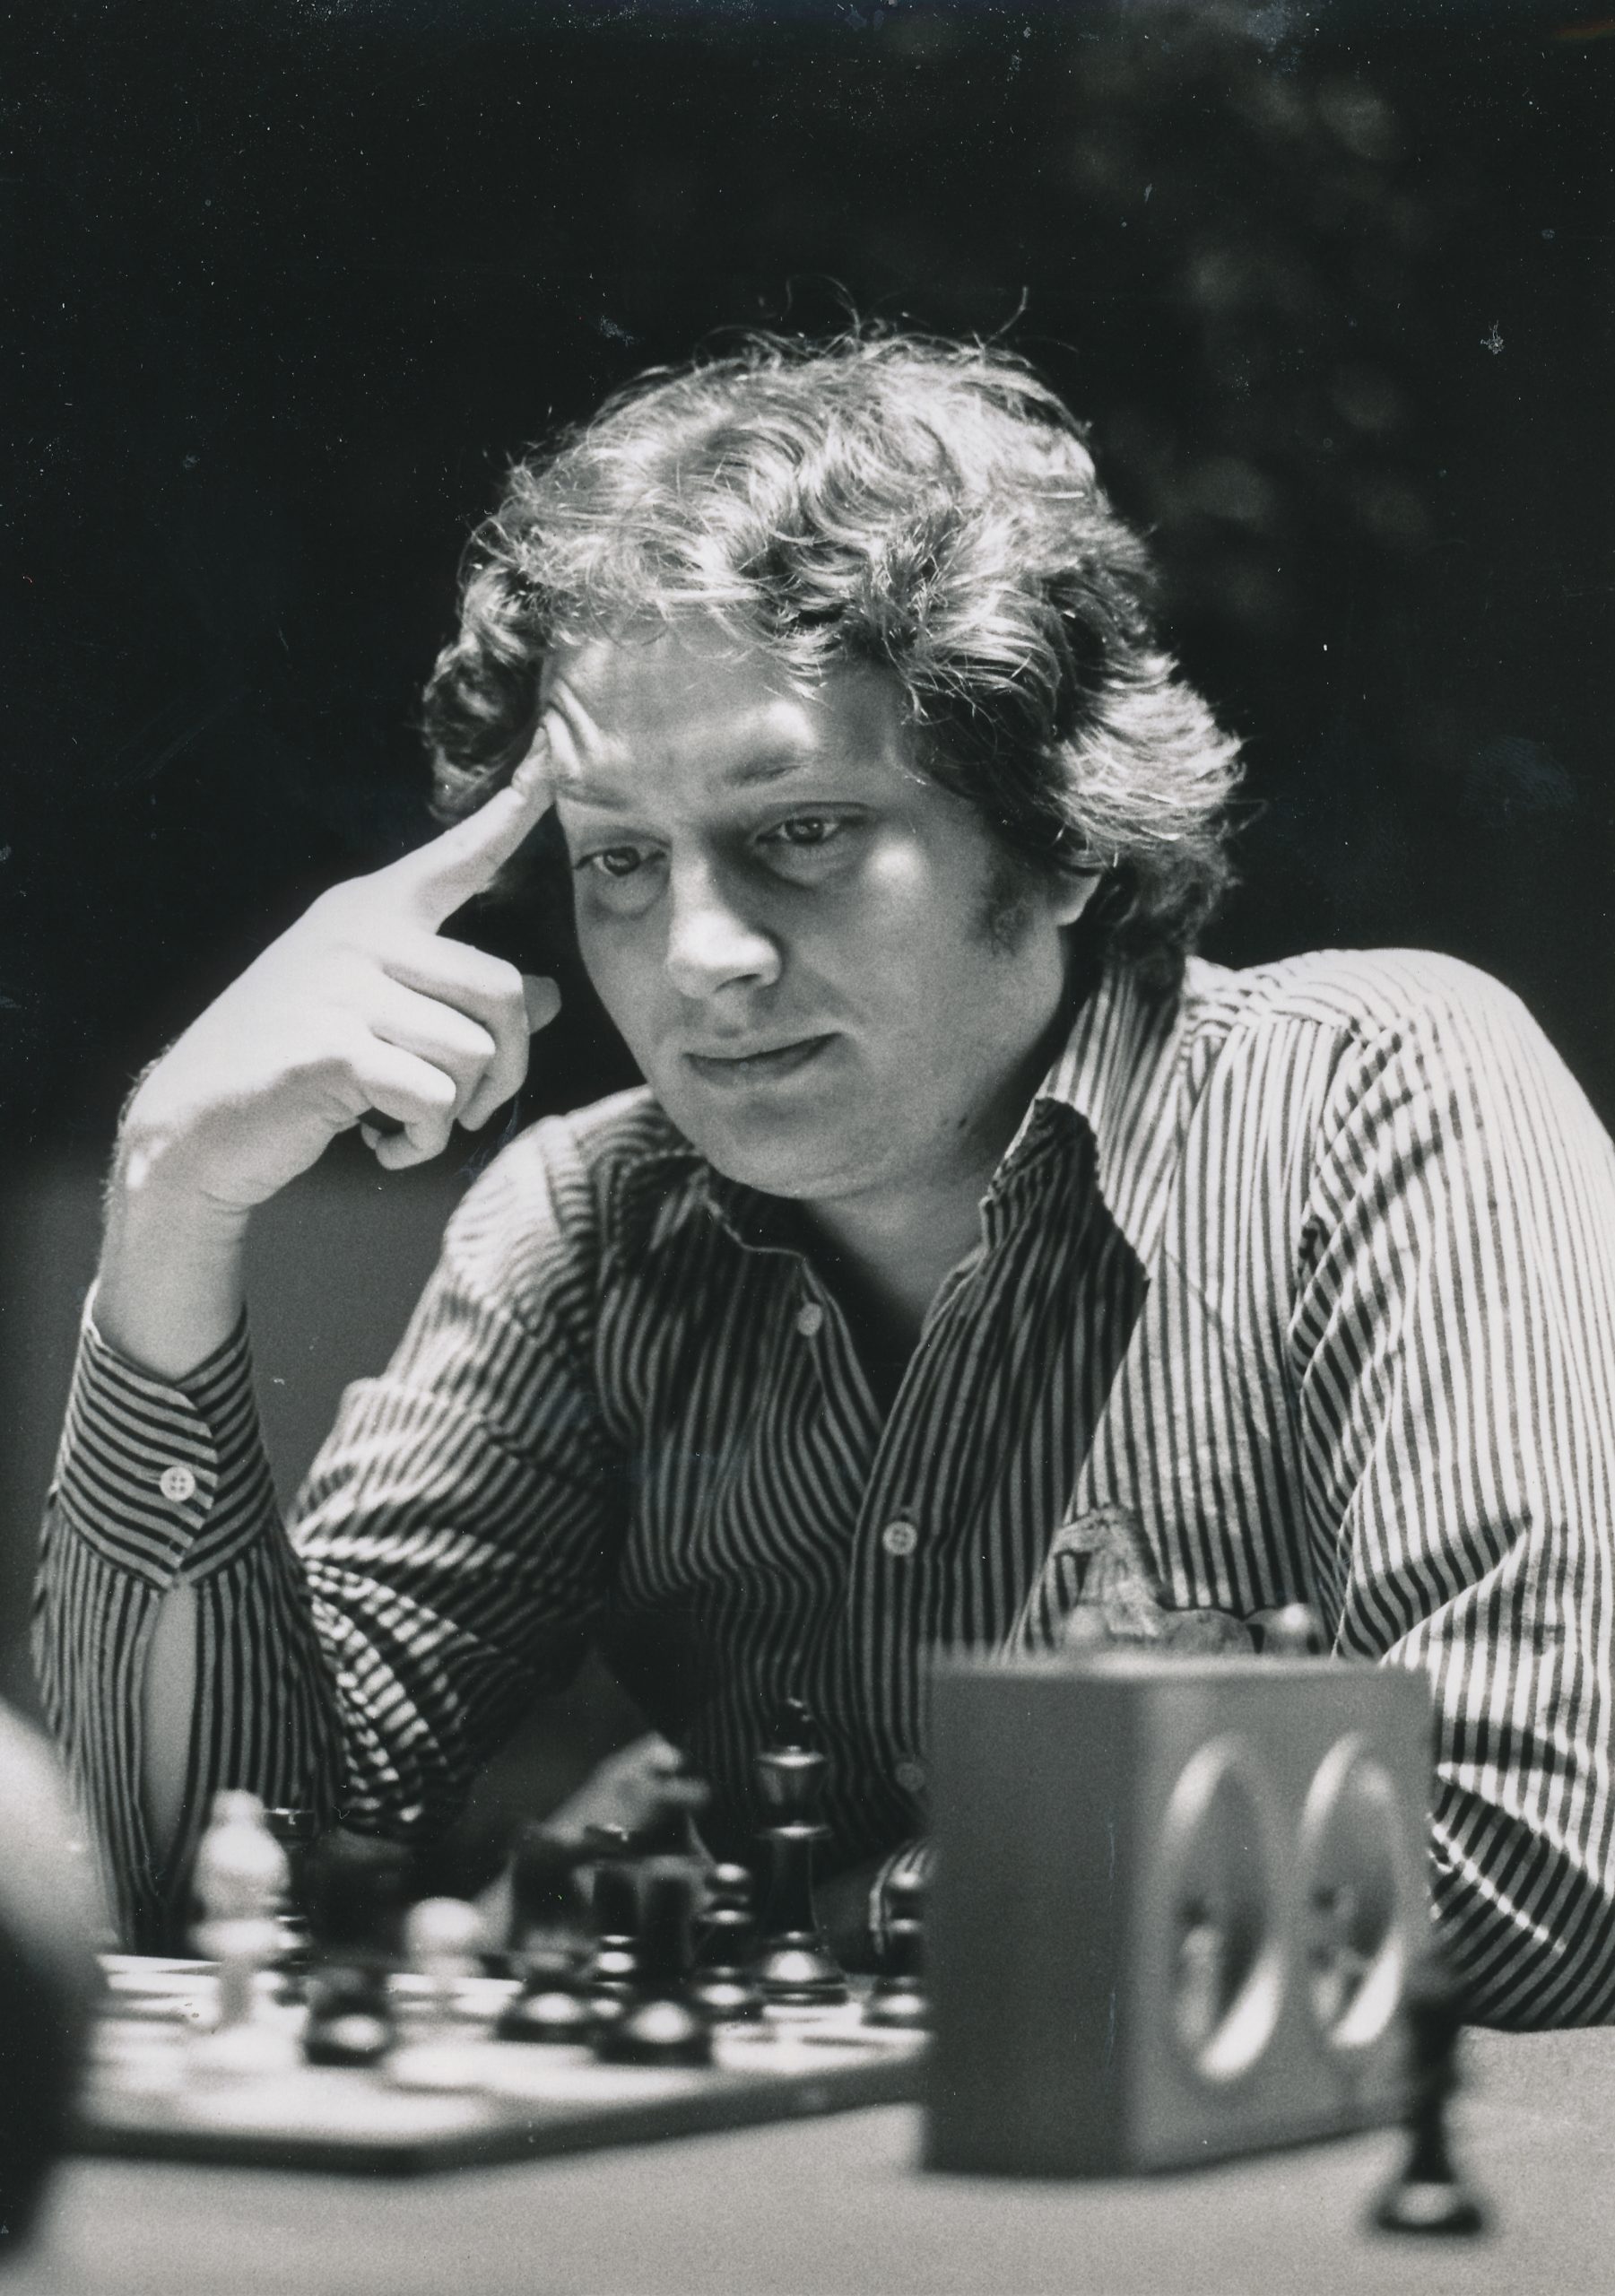

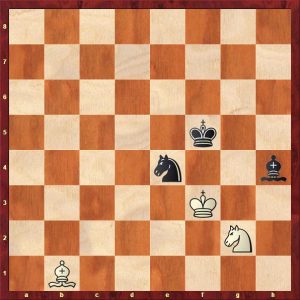
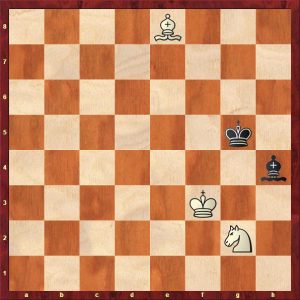
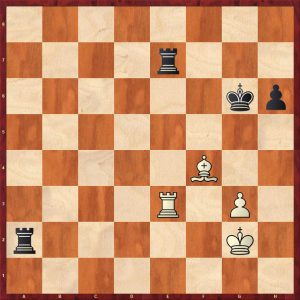
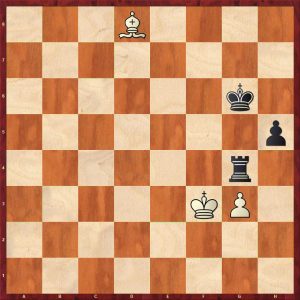
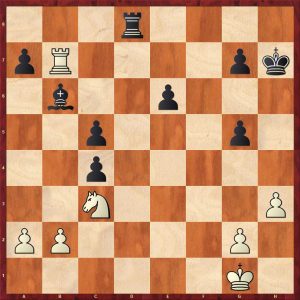
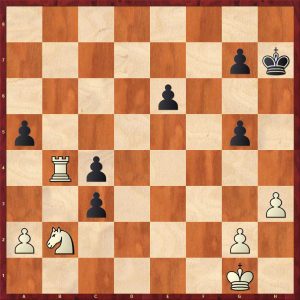
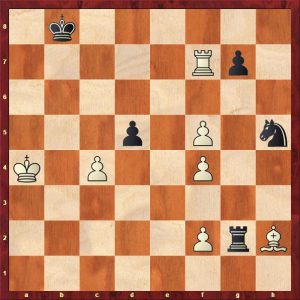
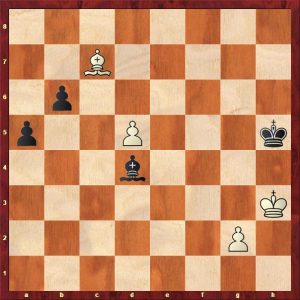
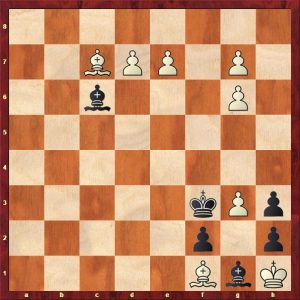
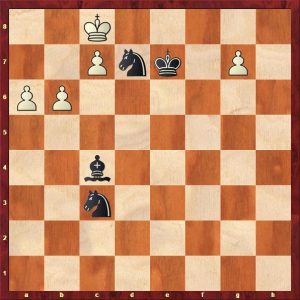
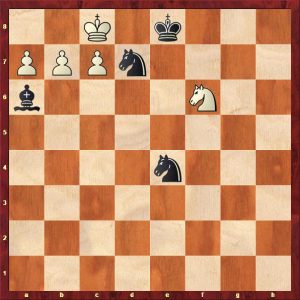
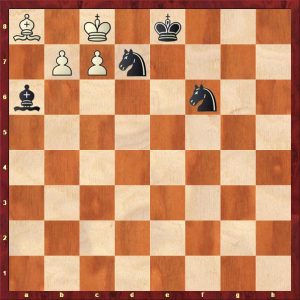
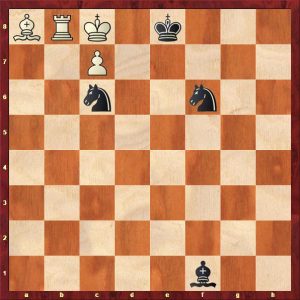
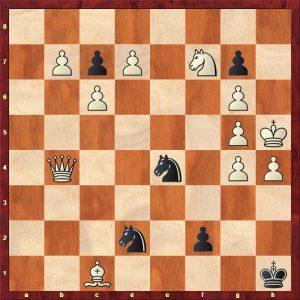
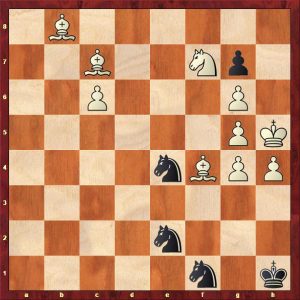
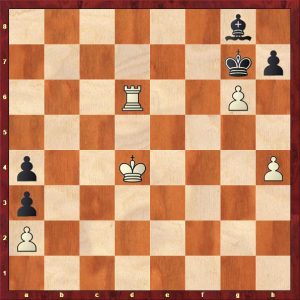
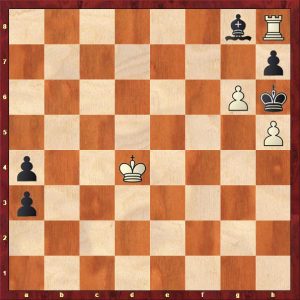
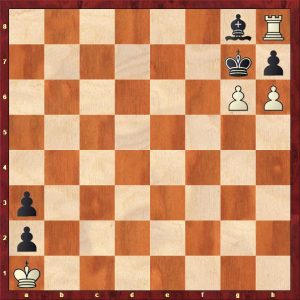

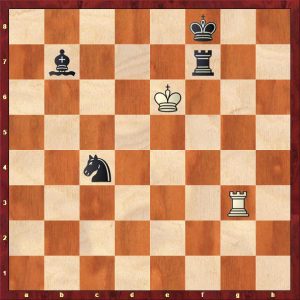
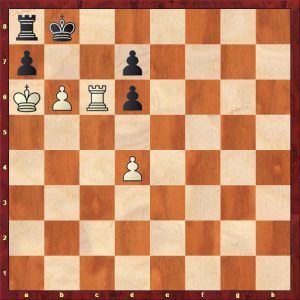
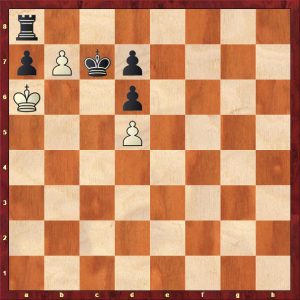
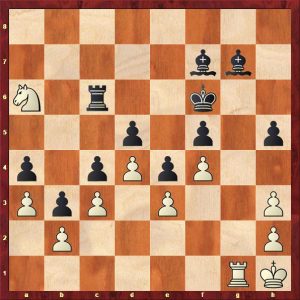
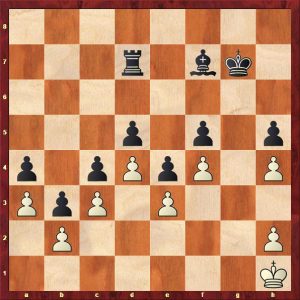
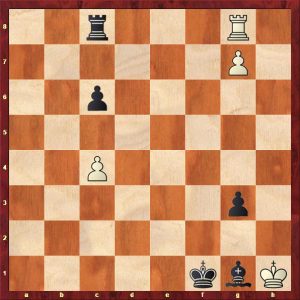
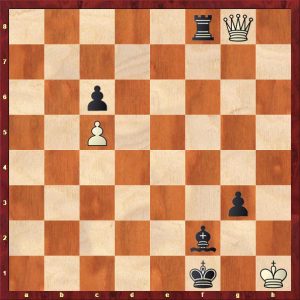
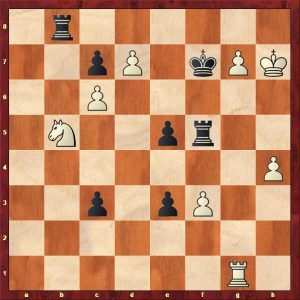
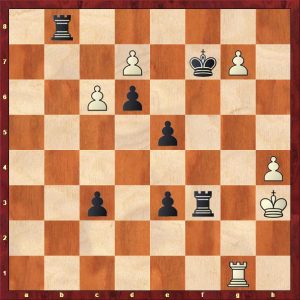
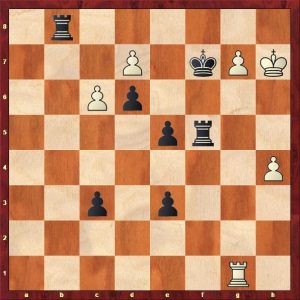
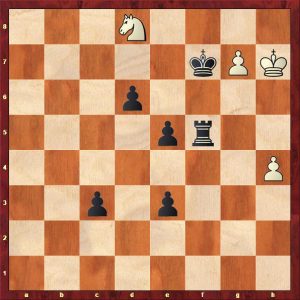
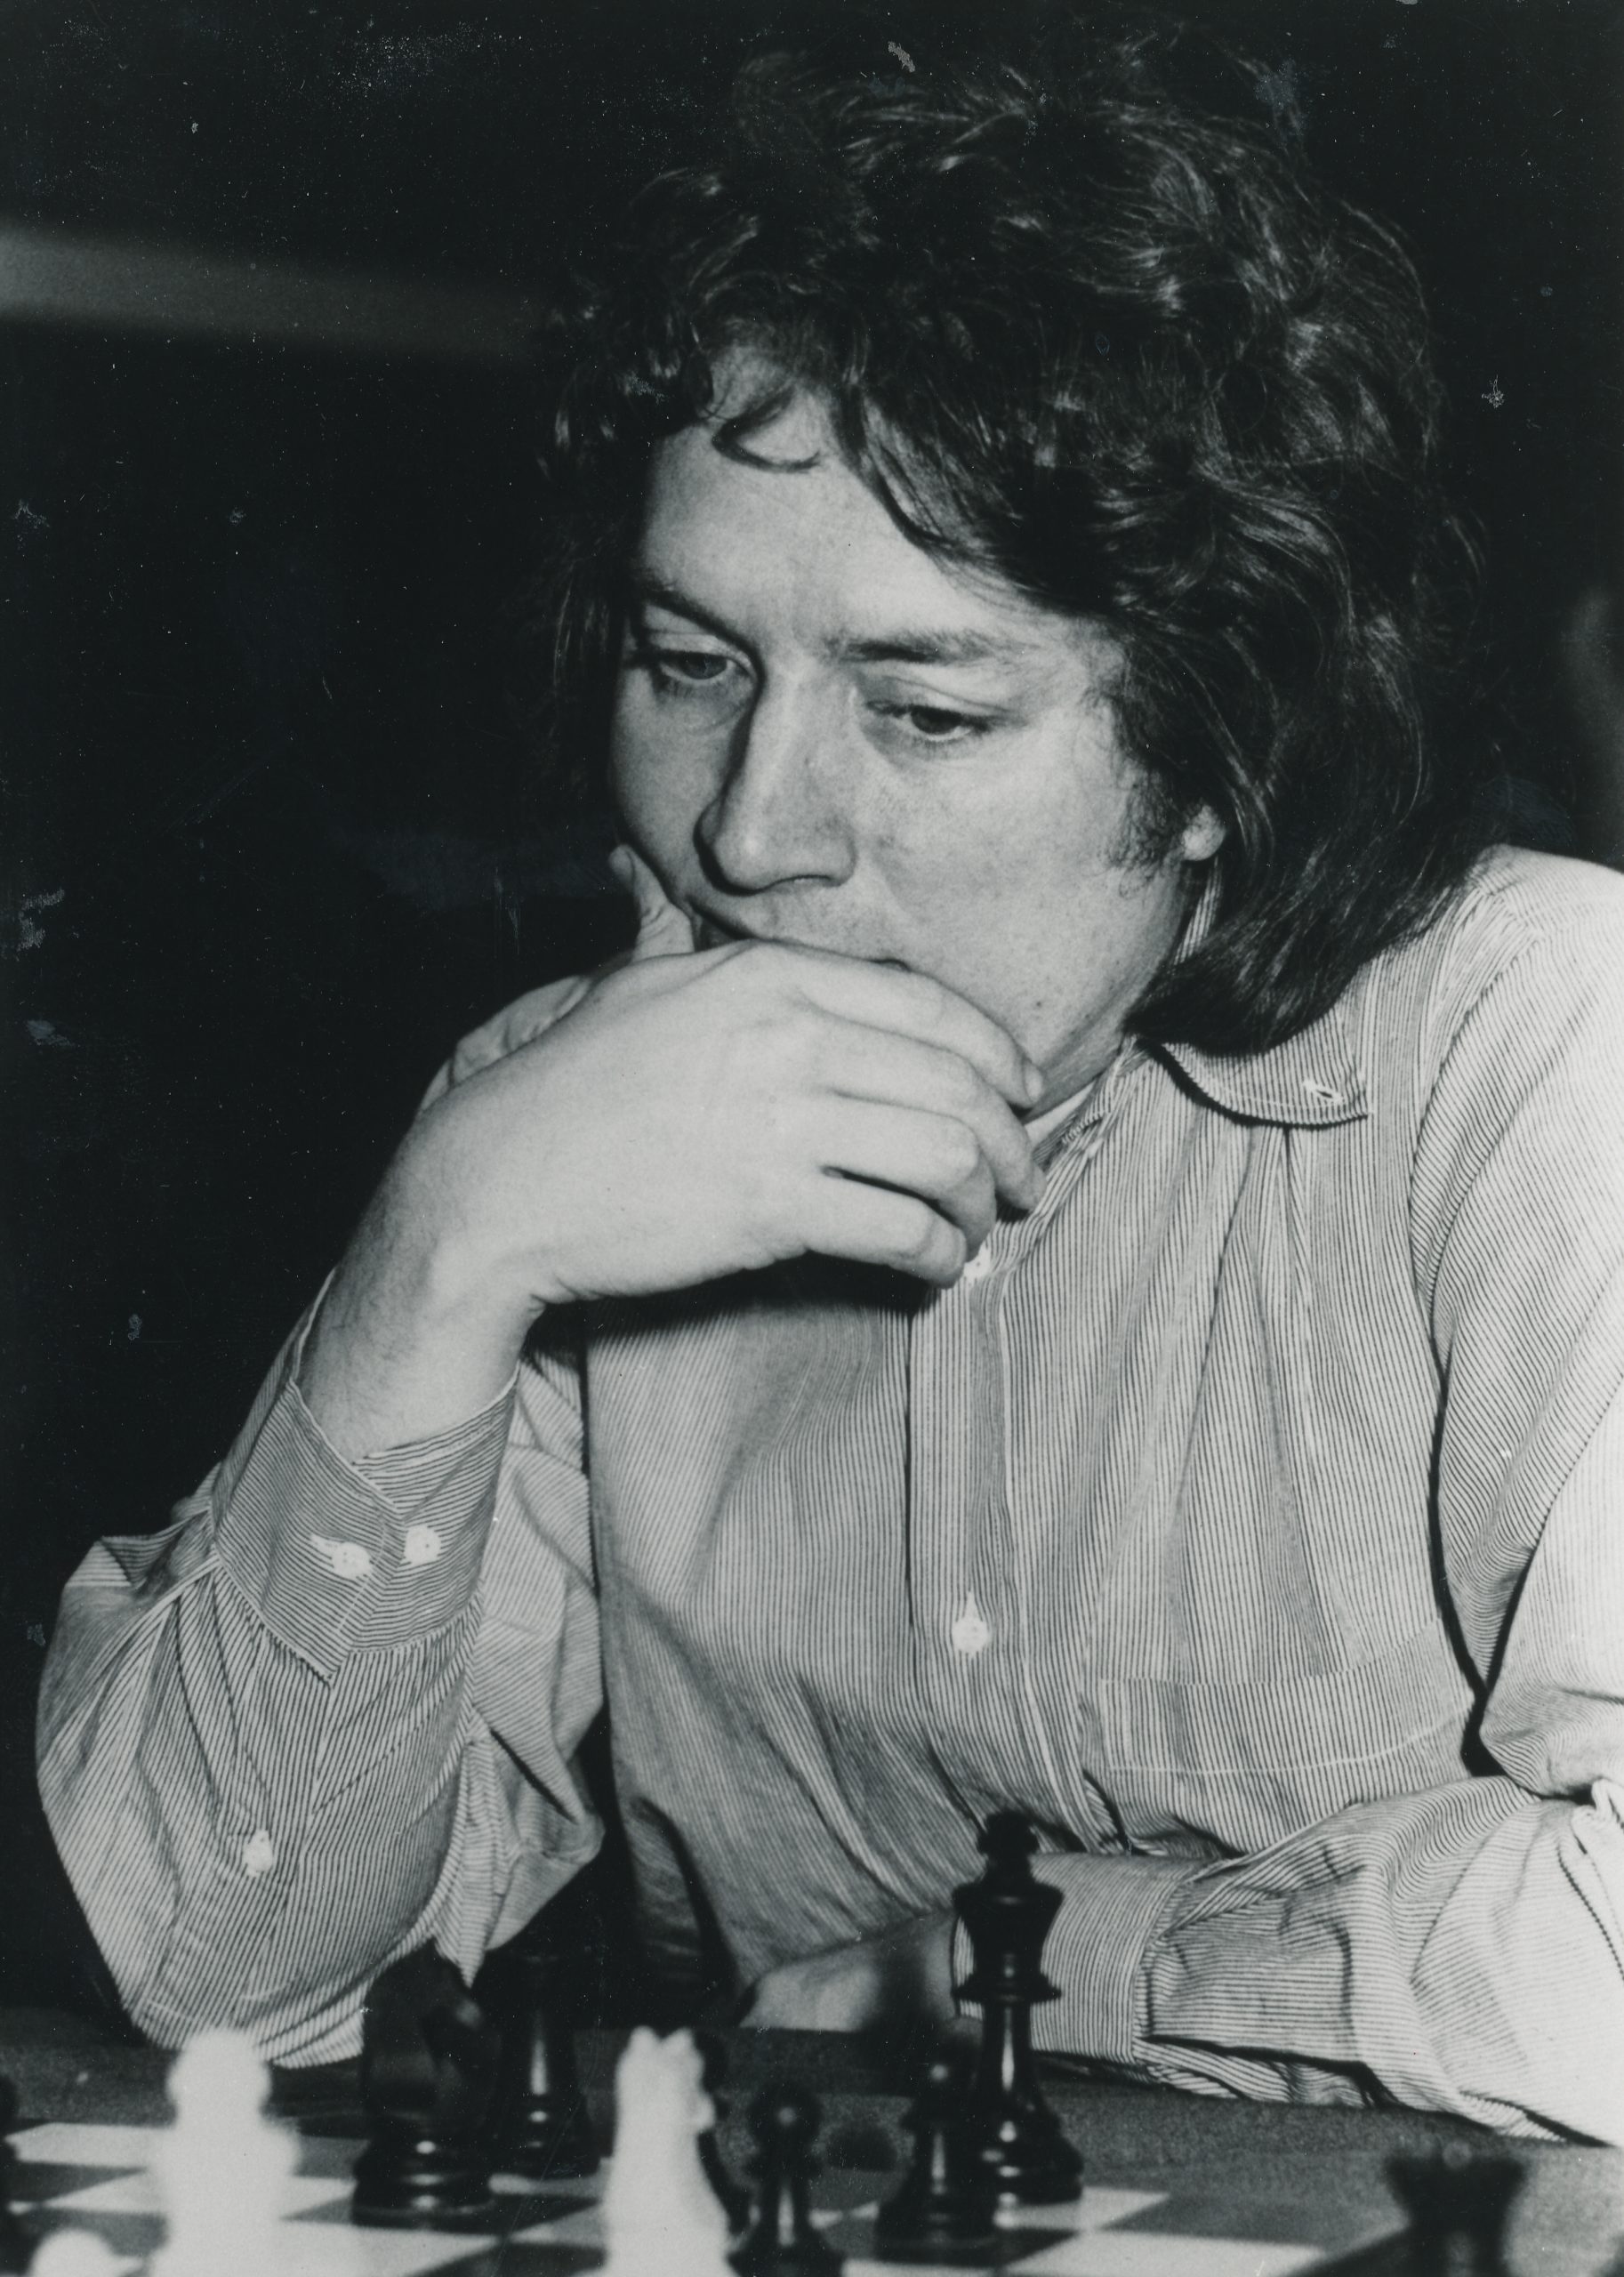
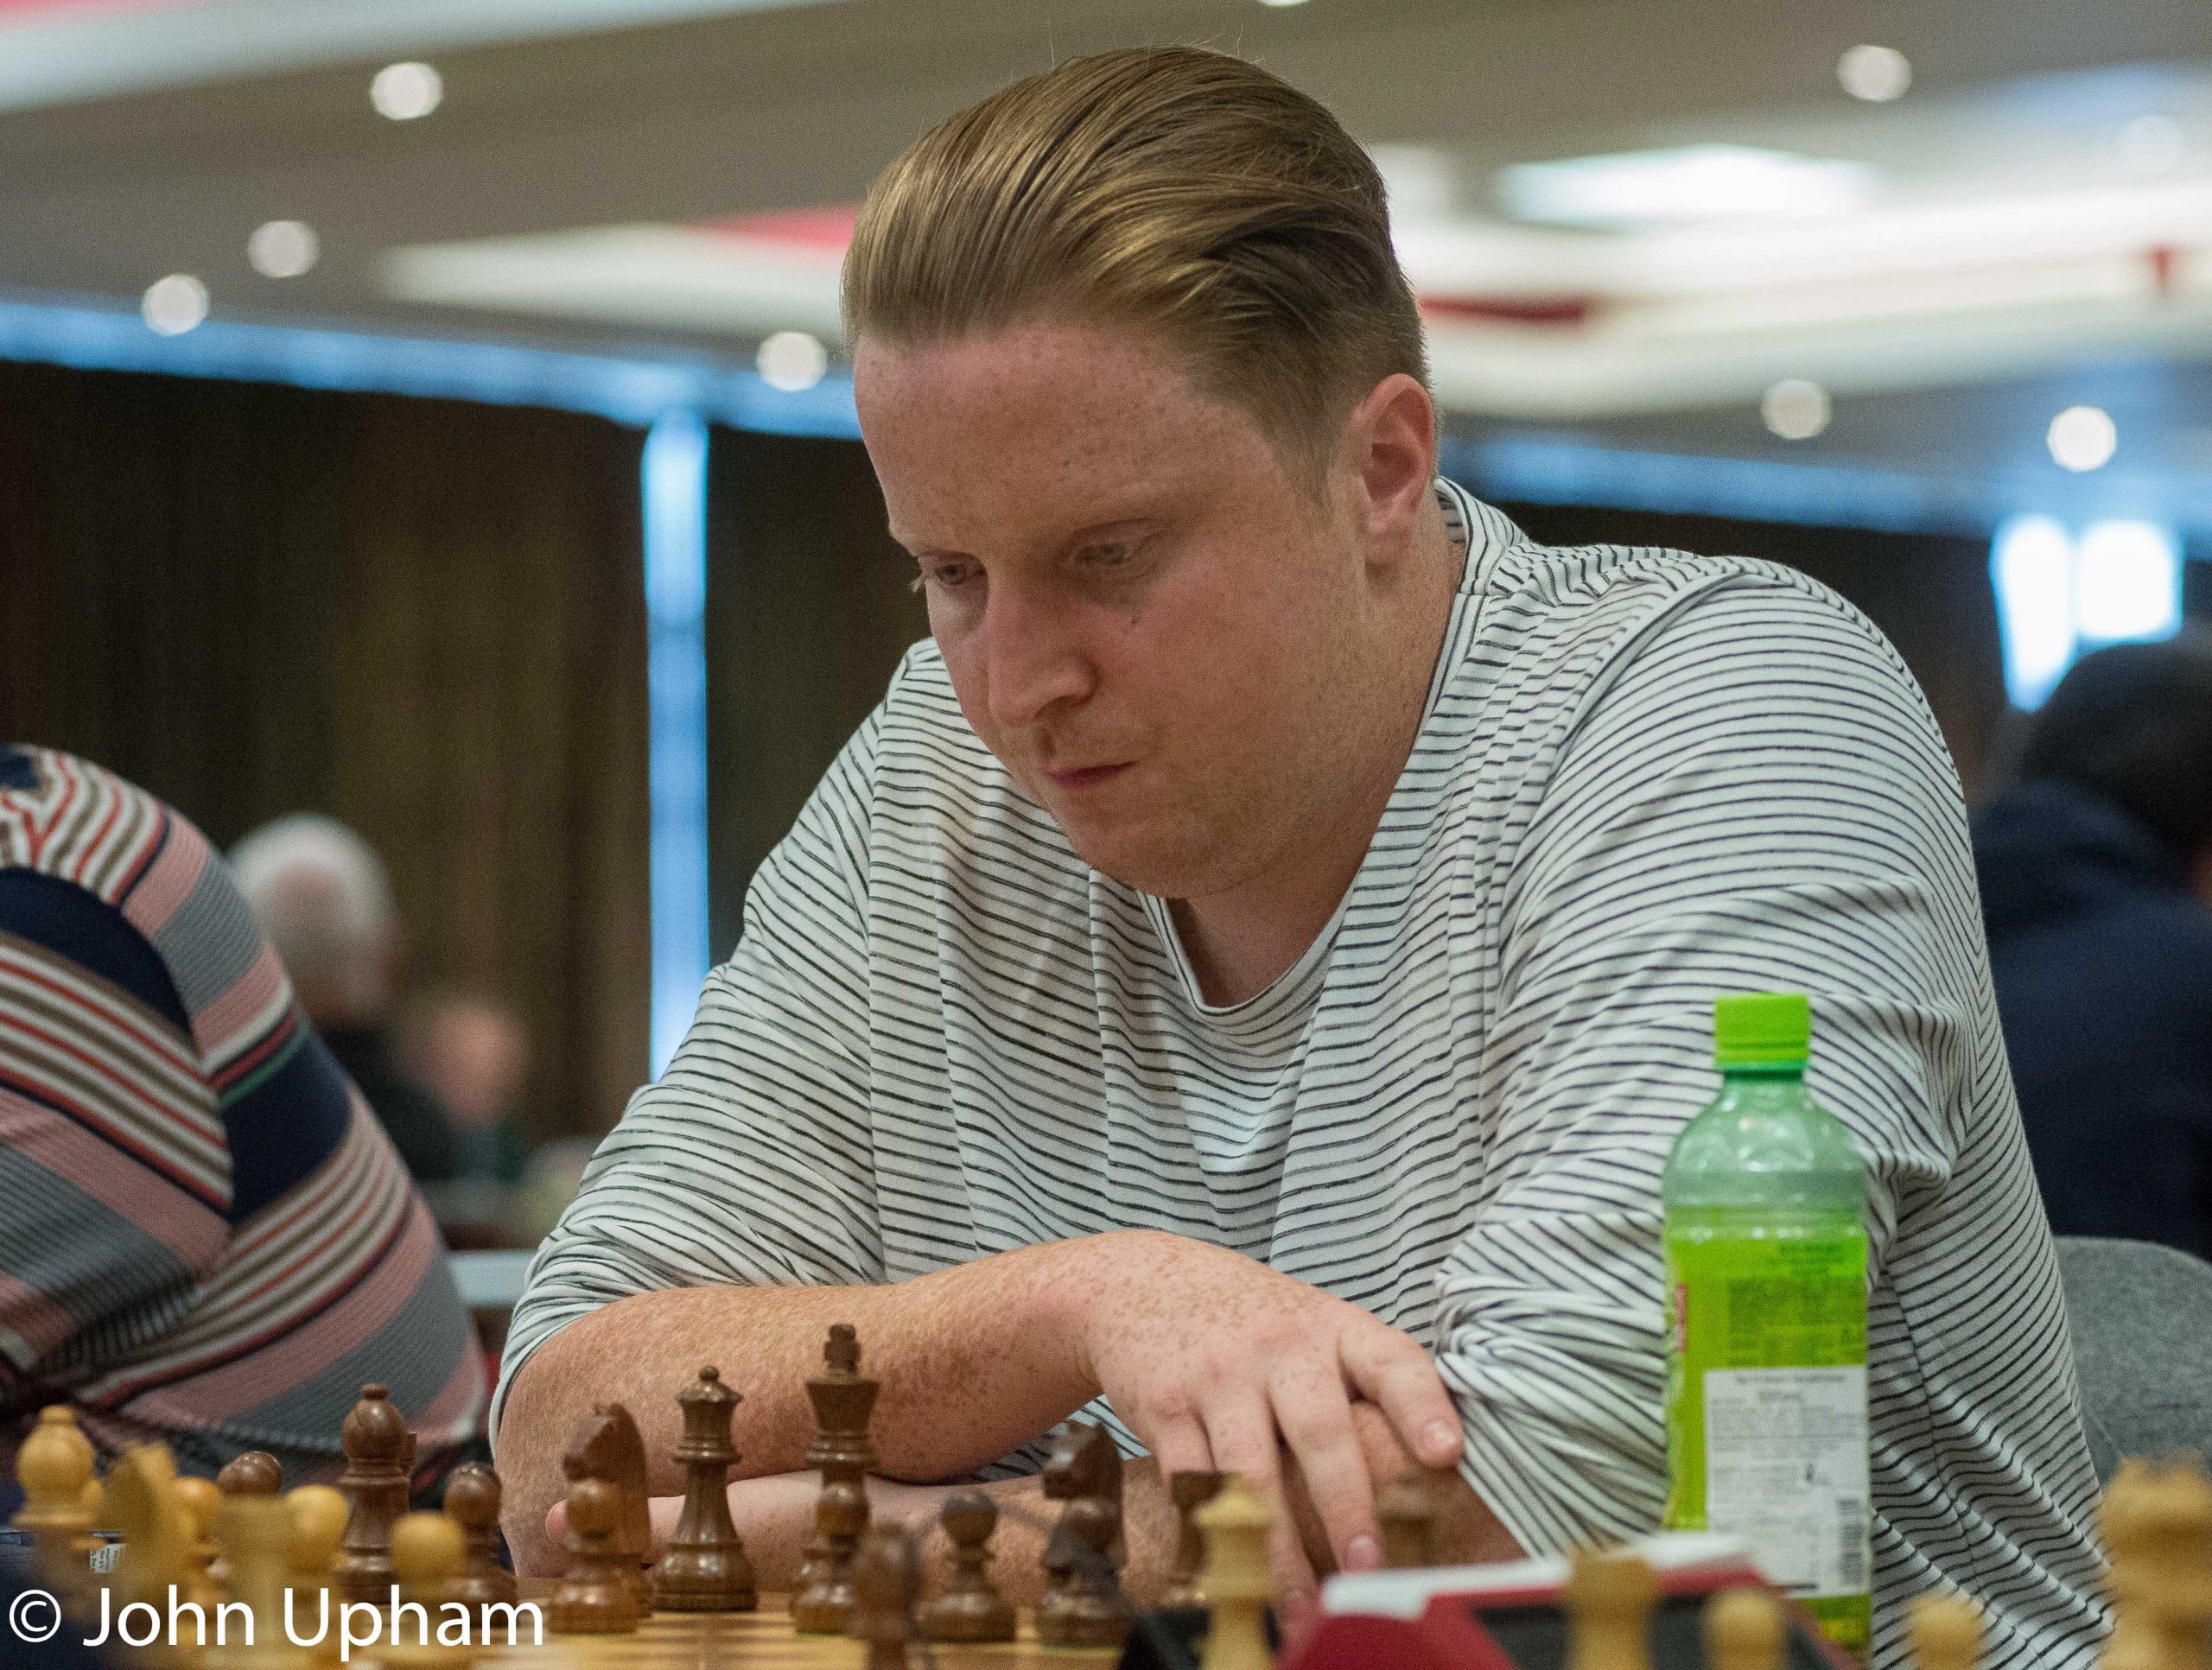
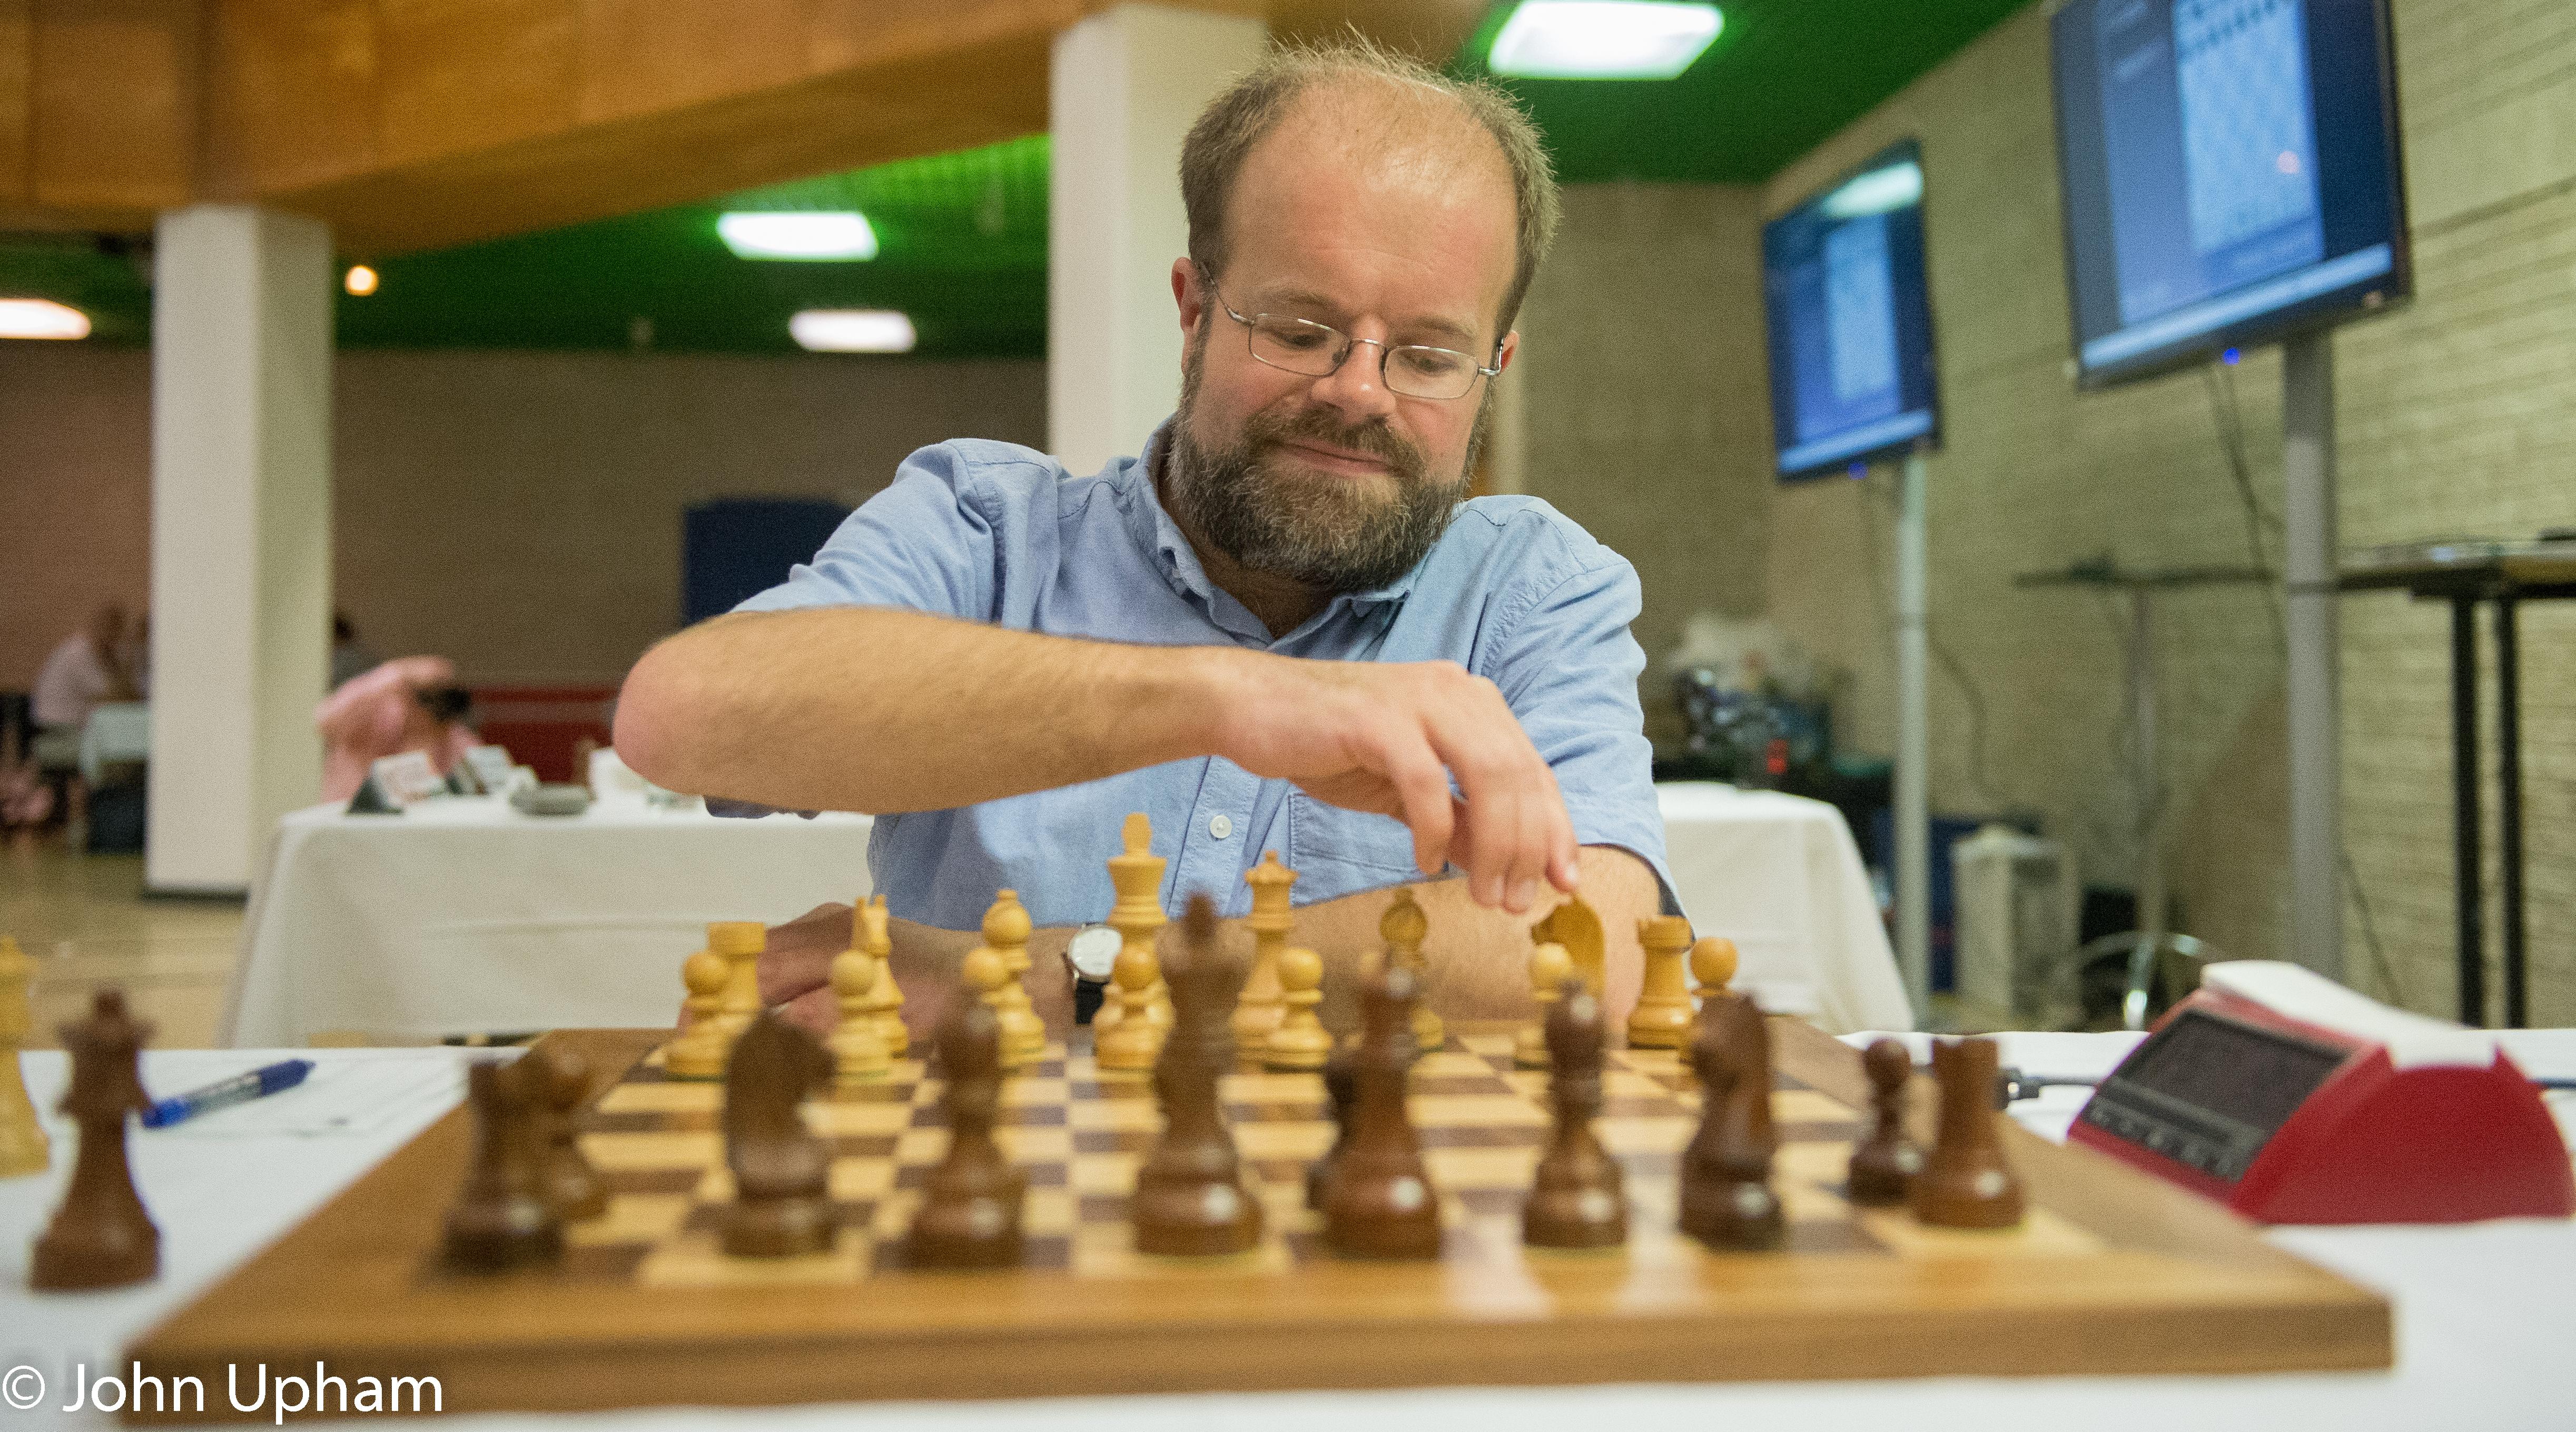
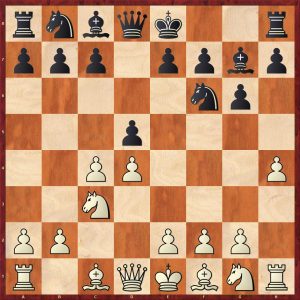
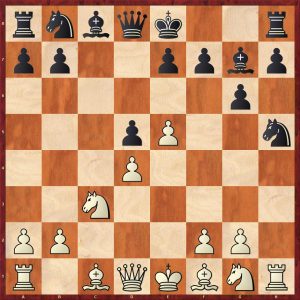
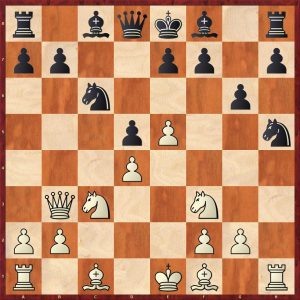
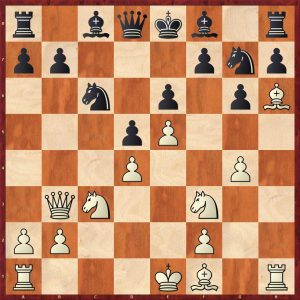
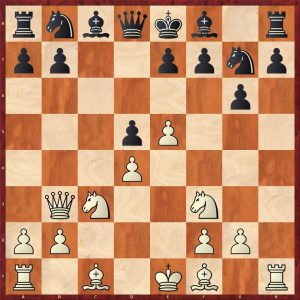
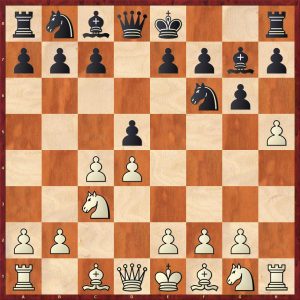
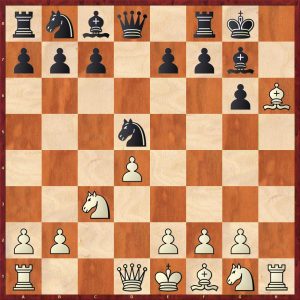
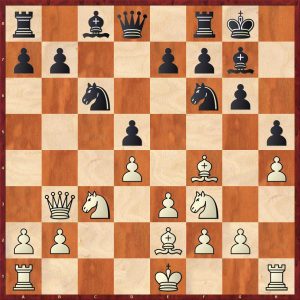
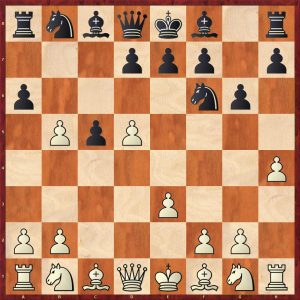
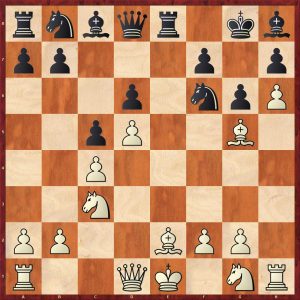
 Understanding Pawn Endgames: Valentin Bogdanov