Rook Endgames from Morphy to Carlsen: Valentin Bogdanov
From the publisher:
“So, you want to improve your rook endings? Good choice, as they occur more often in your games than your favourite opening lines!
Allow vastly experienced trainer Valentin Bogdanov to assist. However, we are not headed for the classroom, but to the tournament hall! We shall witness tense moments as the greatest champions in chess history battle their way through all manner of rook endings: tactical, strategic and technical. Your coach will be whispering in your ear, explaining what is happening and giving the theoretical background. You will also be getting the benefit of modern computer analysis, which X-rays these classic games for errors and missed resources in a way that was not possible even a few years ago. A feast of astonishing analysis awaits!
We shall see that even the best players make a surprising number of errors in rook endings. This should give us heart to fight even in the most desperate of situations, and motivate us to study these endgames so we can pick up the many half-points and even full points that our opponents will surely offer up to us.
By emphasizing the most common themes and areas where players go astray, Bogdanov helps us determine which parts of those technical endgame manuals that are sitting on our shelves are most worth thumbing through. This book can also simply be enjoyed as a stroll through chess history – you will be amazed how many key turning-points occurred in rook endgames!
The players featured in this book include all 17 official world champions, the 3 ‘uncrowned kings’ who preceded them, and a selection of 8 other outstanding players. There are 384 examples in total. The book is completed with a selection of 68 exercise positions, and detailed indexes of themes and players.”
About the author, Valentin Bogdanov
“International Master Valentin Bogdanov has vast experience as a chess trainer, and is from Ukraine. His pupils include Moskalenko, Savchenko and Drozdovsky, and he has acted as a second for the well-known grandmaster and theoretician Viacheslav Eingorn since the late 1970s. For more than 50 years he has been a teacher at the chess school in Odesa (Ukraine), and in 2016 won the European Over-65 Championship. In the same year he also qualified as an International Arbiter and has since then officiated over a great many chess events in his country. This is his fifth book for Gambit.”
Here, on YouTube John Nunn gives the reader an introduction to the book:
This book is an excellent publication on rook endgames. It is packed full of an instructive examples from practical games which makes the material more accessible than a book of purely theoretical positions. There are a lot of fresh examples that are new to the reviewer which makes the book particularly novel. The book is probably aimed at 2000+ players although any aspiring player would glean lots of useful guidelines on playing rook endings from this tome. There is an excellent “Index Of Themes” at the back.
The reviewer will show six examples from the book.
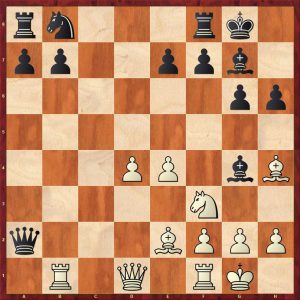
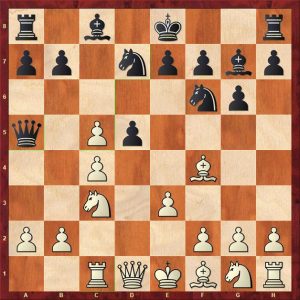
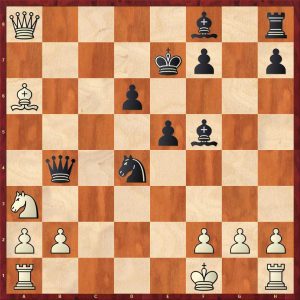
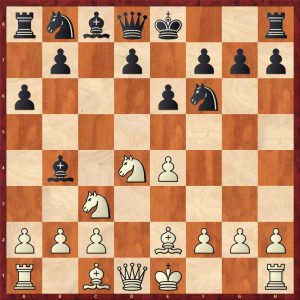
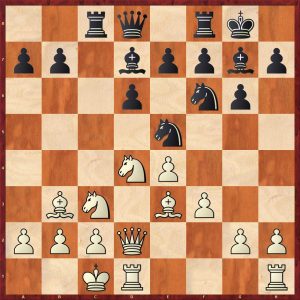
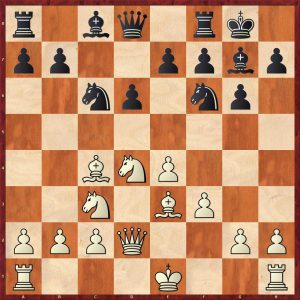
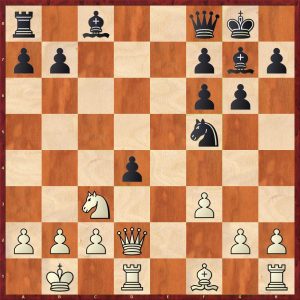
Position 10
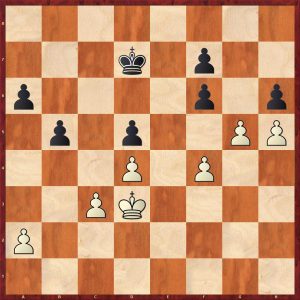
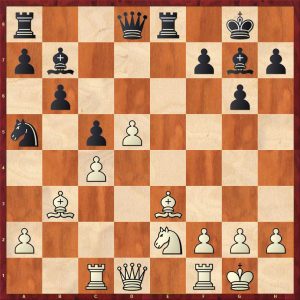
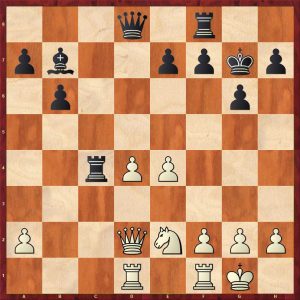
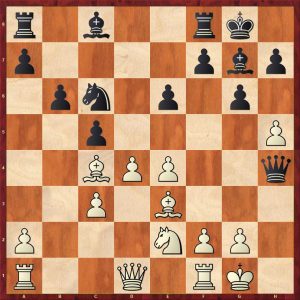
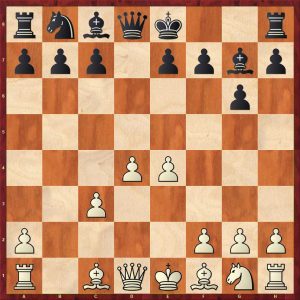
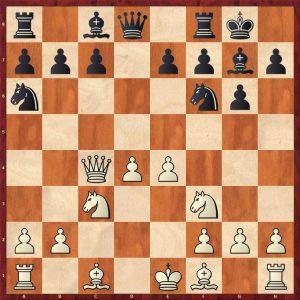
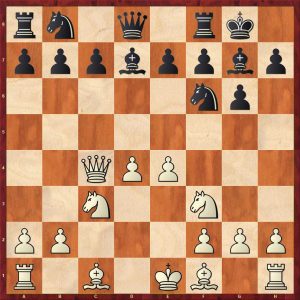
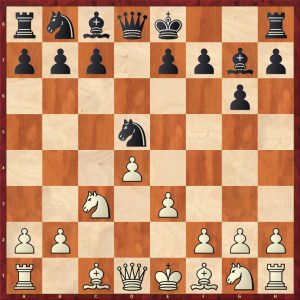
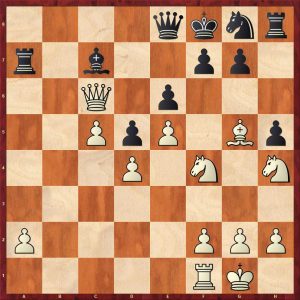
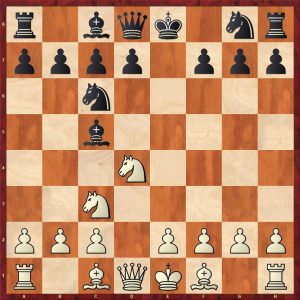
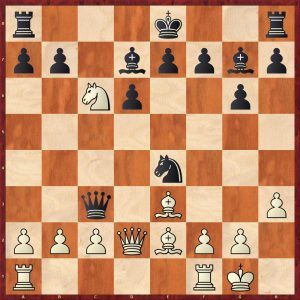
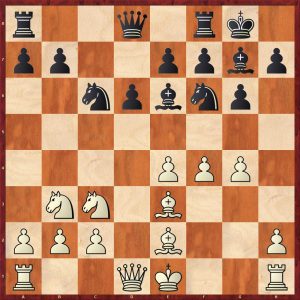
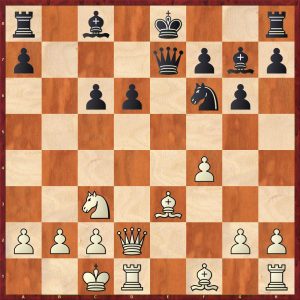
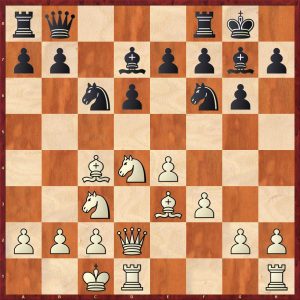
Steinitz-Blackburne Vienna 1898 Position after 80…Rc2
There are many positions with R+2P v R with a and c pawns that are drawn. This position is winning with care. Steinitz inexplicably played 81.a7+? believing that seizing c7 for the king would win. 81…Kxa7! 82.Kc7 Rh1! 83.c6 Rh7+ drawing with flank checks.
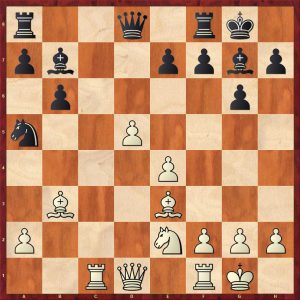
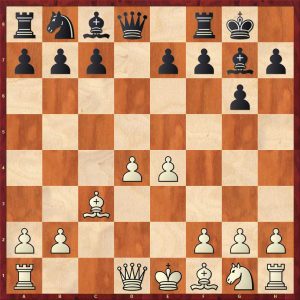
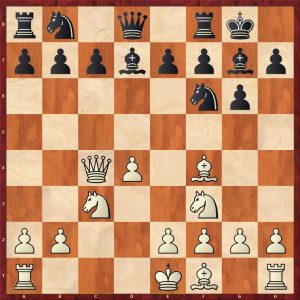
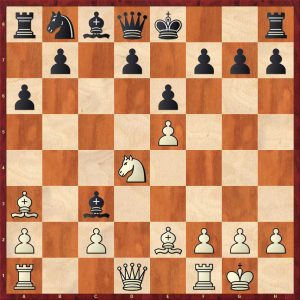
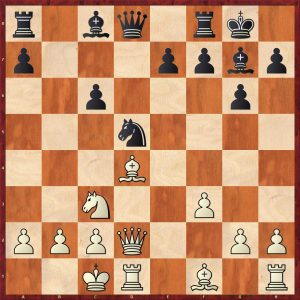
The natural 81.Kd7! wins easily, for example 81…Rh1 82.c6 Rh7+ 83.Kd6 Rh6+ 84.Kc5 Rh1 85.Kb6 Rb1+ 86.Rb5
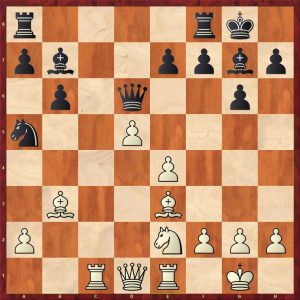
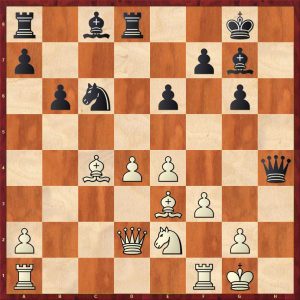
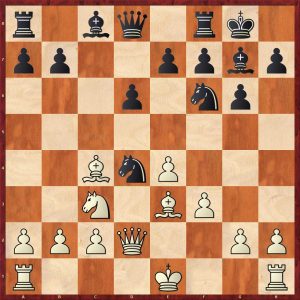
Steinitz-Blackburne Vienna 1898 Variation after 86.Rb5
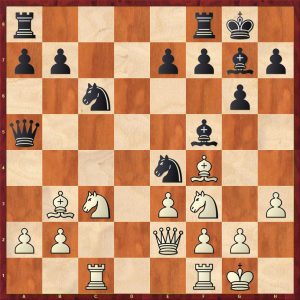
Larsen-Tal Candidates (9) Bled 1965 Position after 52.Kxe5
Black hurries to force a drawn R+P v R endgame, but is mistaken. 52…b3? 52…Rh2 or Re2 is much better 53.axb3! Rxb3 54.Kd6 Rd3+
Larsen-Tal Candidates (9) Bled 1965 Position after 54…Rd3+
White played 55.Ke6? throwing away the win, 55.Ke7! wins controlling d8, after 55…Rh3 intending flank checks 56.Ra4 Rh7+ 57.Kf6 Rh6+ (57..Kd8 58.Ra8+) 58.Kg5
Larsen-Tal Candidates (9) Bled 1965 Variation after 58.Kg5
58…Rd6 otherwise, white will cut black’s king off with Rd4 59.e5 Rd1 60.Kf6! winning because black’s rook can only work on the short side as his king is on the long side
Larsen-Tal Candidates (9) Bled 1965 Variation after 60.Kf6
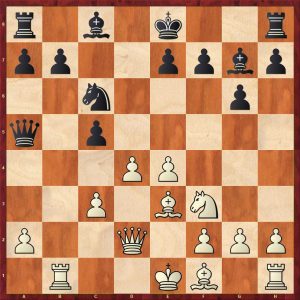
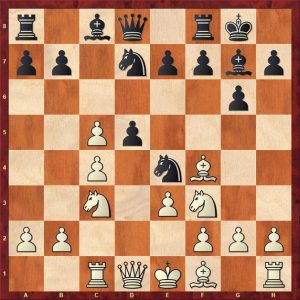
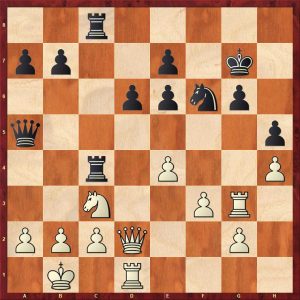
Position 116
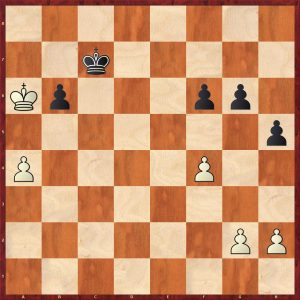
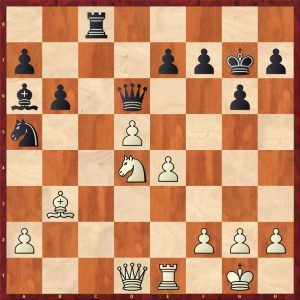
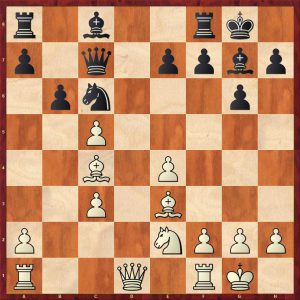
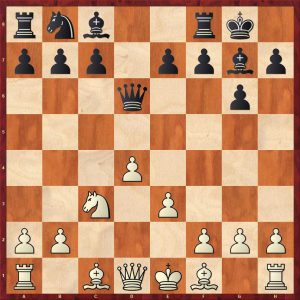
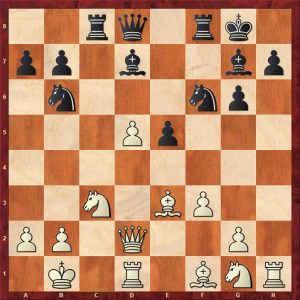
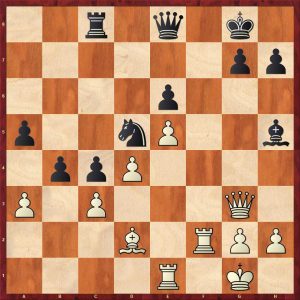
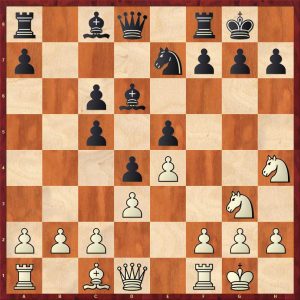
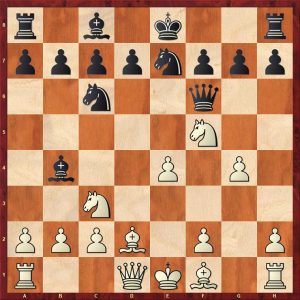
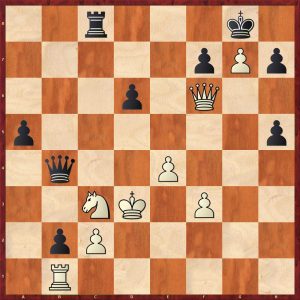
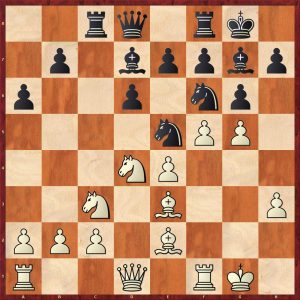
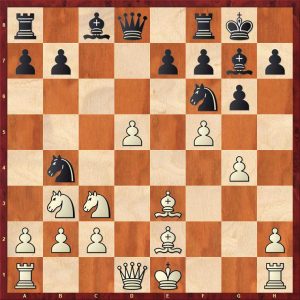
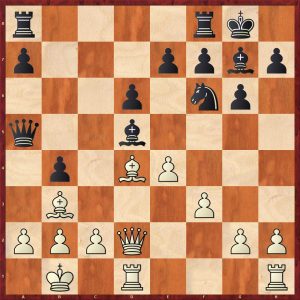
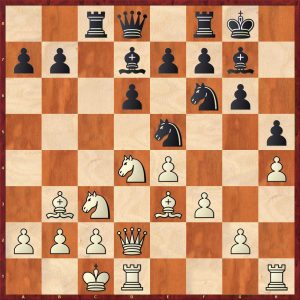
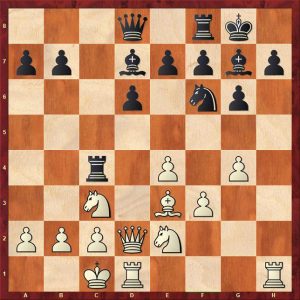
Unzicker-Petrosian Varna Olympiad 1962 Position after 47.Kg2
This position is deceptive 47…Rb6 (47…Rb5 allows 48.Rd6 and the rook gets behind the pawn and white probably draws) 48.Ra4 Ra6? for once placing the rook behind the pawn does not win as the a-pawn is only on the fourth rank! 48…Rb5! 49.Rc4 Kf6! and black’s active king wins the game as it can support the a-pawn quickly
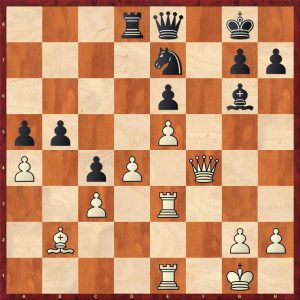
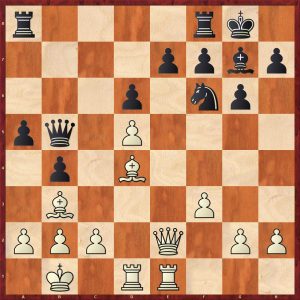
Unzicker-Petrosian Varna Olympiad 1962 Position after 48…Ra6
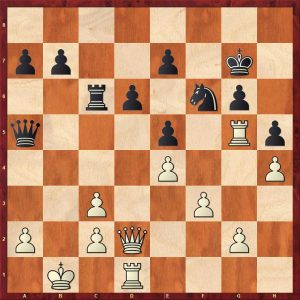
49.Kf3? natural but 49.f3! and 50.g4! seeking counterplay draws 49…Kf6 50.Ke4 Ke6 natural, but 50…Re6+ and Re5 activating the rook wins 51.f3! white advances the kingside pawns to get counterplay which draws with accurate play.
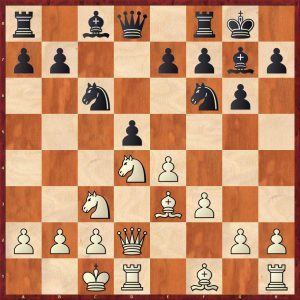
Unzicker-Petrosian Varna Olympiad 1962 Position after 51.f3
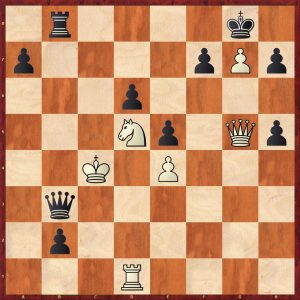
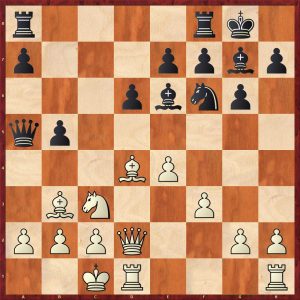
Unzicker-Petrosian Varna Olympiad 1962 Position after 62…Kc4
White has defended well but now makes a fatal mistake 63.Rc1+ draws as the black king has to retreat, 63.Kf4? Kc3! The a-pawn is too strong 64.Kg5 Kb2 65.Re1 f4+! 66.Kxf4 a4! 67.Ke4 a3 68.f4 a2 winning
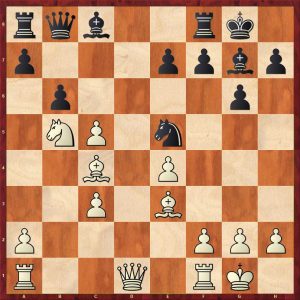
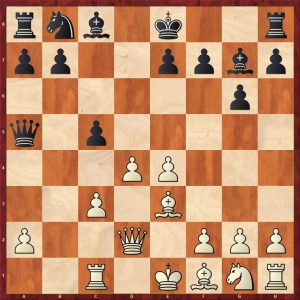
Position 131
Fischer-Bisguier UA Ch New York 1958-9 Position after 70.b4
Bisguier had an appalling record against Fischer, gaining a single win and a single draw against the young Bobby. He lost the other thirteen games including this one.
White has an edge as black’s king is a long way from the b-pawn, but he can draw with careful defence. 70…d4? (Sloppy, black can draw easily with 70…Rb3! 71.Kc5 Rb1 72.Rd2 Ke6!) 71.Kd5! a clever switchback probably missed by Black 71…Rd1 72.Rf2+! The point forcing the black king further away 72…Kg4
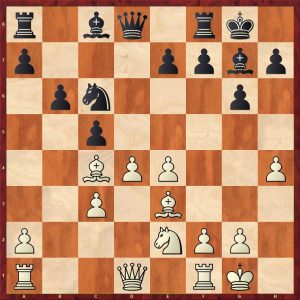
Fischer-Bisguier UA Ch New York 1958-9 Position after 72…Kg4
Now Fischer goes astray, 73.Kc4? White can win with 73.b5! Kg3 (73…Rb1 74.Kc4 d3 75.Rd2! Rc1+ 76.Kc5! Rc1+ 77.Kb6 Rc3 78.Ka5 and Black loses the d-pawn and the game) 74.Rb2! winning
Fischer-Bisguier UA Ch New York 1958-9 Variation 1 Position after 74.Rb2
After 73.Kc4? played in the game:
Fischer-Bisguier UA Ch New York 1958-9 Position after 73.Kc4
Bisguier came up with a faulty plan 73…d3?74.Kc3! winning the pawn after Rd2 and as the Black king is cut off by two files, the ensuing R+P v P is easily won
73…Kg3! draws 74.Rf5 (74.Rb2 Kf4 75.b5 Ke3 draws), 74…d3! 75.Kc3 d2! 76.b5 Kg4! 77. Rd5 Kf4! draws as capturing the d2-pawn allows a drawn K+P v K ending.
So much play with only 6 pieces!
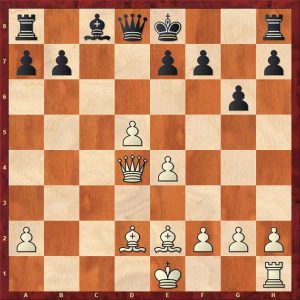
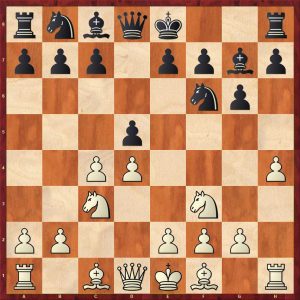
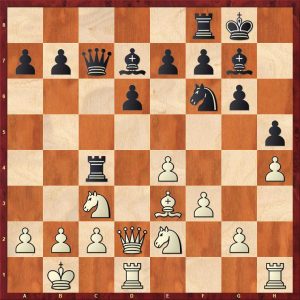
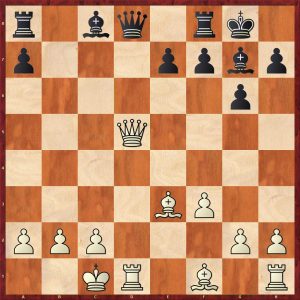
Position 200
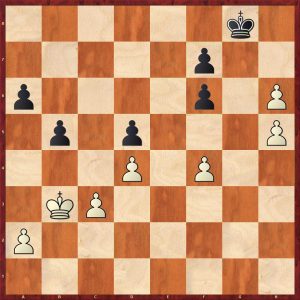
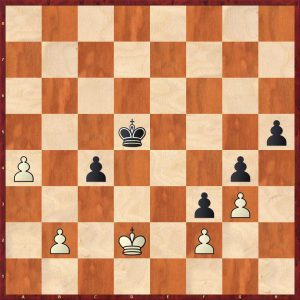
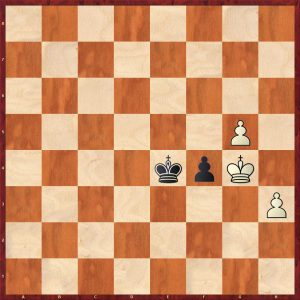
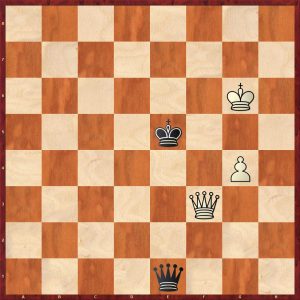
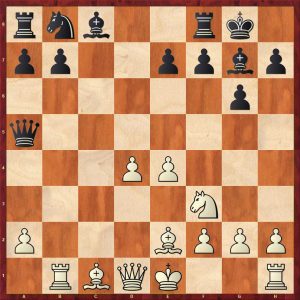
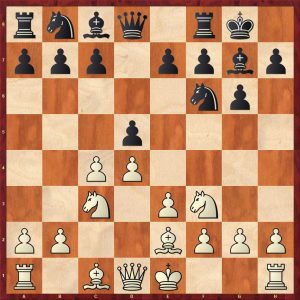
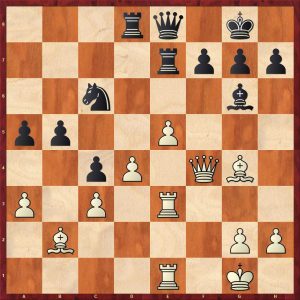
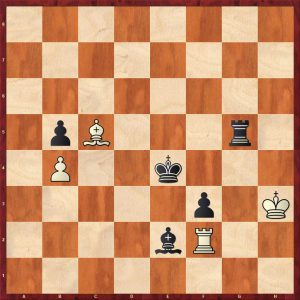
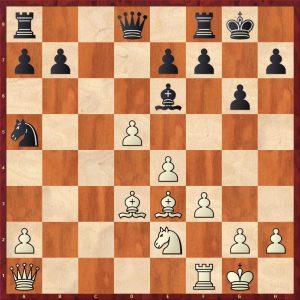
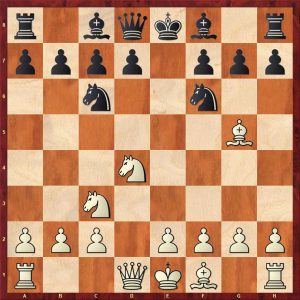
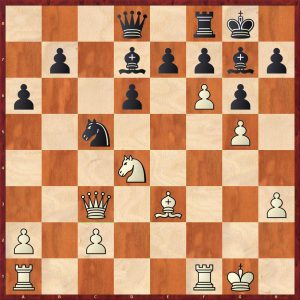
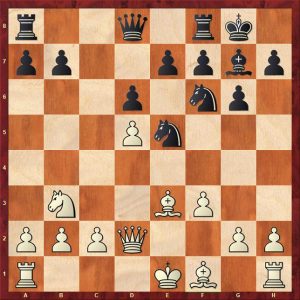
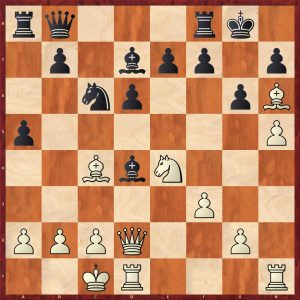
Aronian-Carlsen Moscow 2006 Position after 72…Ra8
Aronian played the cunning waiting move 73.Rd6 testing the young Magnus. This trap is also covered in Rook Endings by Levenfish & Smyslov. Black played the natural check 73…Ra7+? which loses. After 74.Ke8! Carlsen resigned. Only 73…Kg6! draws.
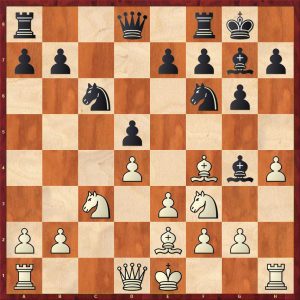
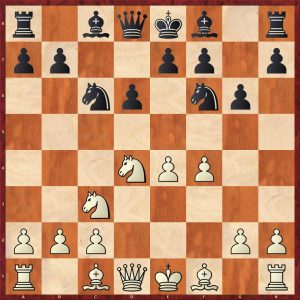
Position 293
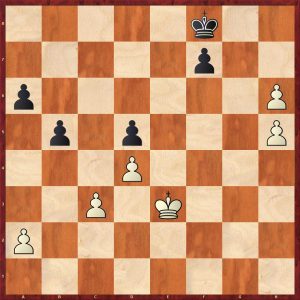
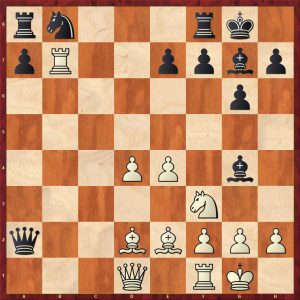
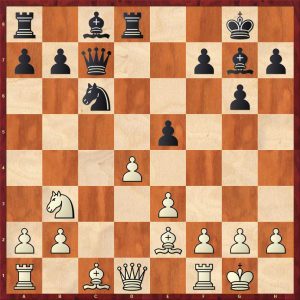
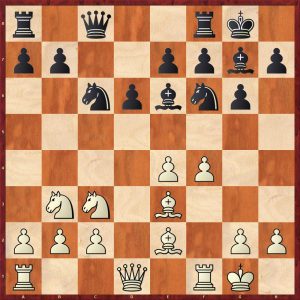
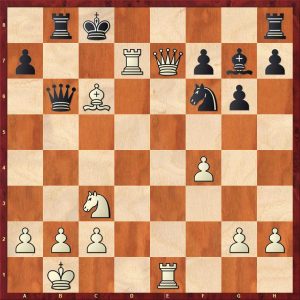
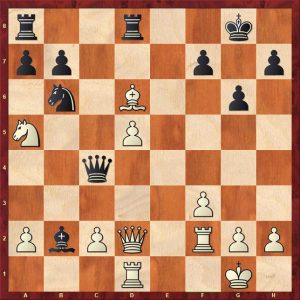
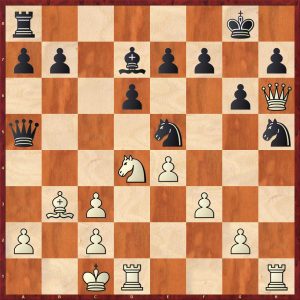
Jansa-Geller Budapest (team event) 1970 Position after 66…Rxb4
White won here using a famous systematic manoeuvre called Lasker’s steps. 67.Rxc2? throws away the win as Black’s flank checks with the rook draw, so 67.f7! Rg4+ 68.Kh8 Rf4 69.Rc6+ Kh5 70.Kg7 Rg4+ 71.Kh7 Rf4 72.Rc5+ Kh4 73.Kg7 Rg4+ 74.Kf6 Rf4+ 75.Ke6 Re4+ 76.Kf5 Re2 77.Kg6 Rg2+ 78.Kh6 Rf2 79.Rc4+ Kh3 80.Kg6 Rg2+ 81.Kh5 Rf2 82.Rc3+ Kh2 83.Rxc2! queening the pawn. Now White just has to win Q v R.
This short review cannot really do justice to this book. I do highly recommend it. The graded exercises at the end are tricky , even the so called easy ones!
FM Richard Webb, Chineham, Hampshire, 6th July 2024
Rook Endgames from Morphy to Carlsen, Valentin Bogdanov, Gambit Publications (1 April 2024), ISBN-13: 978-1805040712Rook Endgames from Morphy to Carlsen, Valentin Bogdanov, Gambit Publications (1 April 2024), ISBN-13: 978-1805040712
Secrets of Queen Endgames: Ferenc Berkes and Tibor Karolyi
From the publisher:
“A revolutionary new work on a notoriously challenging type of chess endgame
Queen endgames can seem unfathomably complicated. Computers have provided complete information for some of the basic queen and pawn endings, but human understanding has proved elusive.
In this ground-breaking work, two Hungarian authors have gone to extraordinary lengths to explain strategies and methods in queen endgames. Rather than a random series of checks, we can now understand king and queen triangulations that gradually bring the pieces to the squares they need to be to engineer the killer tactic that completes the process. Berkes and Karolyi have devised guidelines that help us judge what we need to aim for, and provided a broad set of tools to help us achieve these goals.
Going beyond previous texts, the authors have used not just seven-man tablebases and modern engines, but the specialized program FinalGen to delve with the same certainty into endgames with many more pawns. But most of all, they have spent thousands of hours seeking to present the whole truth about queen endings in human terms. Their wide-ranging discussion of shelters is especially instructive.”
A definitive guide to a fundamental class of endgames
Explains all types of endings with queens and pawns
A wealth of guidelines for handling positions with many pawns
Spectacular and previously unpublished endgame studies
Thoroughly up to date, with more than 1000 chess diagrams
Ferenc Berkes is a grandmaster from Hungary. A former World Under-18 Champion, he was won the championship of his country on eight occasions. He plays team chess in several European leagues. IM Tibor Karolyi is also from Hungary. His many pupils have included super-GMs Peter Leko and Judit Polgar, and he is a highly experienced chess writer.
To get some idea of the book Gambit (via Amazon) provide a “Look Inside” at their Kindle edition. As you would expect with Gambit, the notation is English short form algebraic using figurines for pieces. A previous criticism (ibid) has been addressed in that each diagram has a W or B “whose move it is” indicator.
The book is divided into 9 chapters as follows :
Extreme Tactics in Queen Endings
Tools in Queen Endings Technical Queen Endgames
Queen and Pawn vs Queen
All the Pawns on the Same Side
Extra Outside Passed Pawn Practical and Strategic Queen Endgames
The Pawn
The Queen
The King
Complex Queen Endgames
Here on YouTube John Nunn gives the reader an introduction to the book :
This book is a superb tour de force covering a complex subject that has not been covered so extensively before. My short review cannot really do justice to this magnus opus.
The book is aimed at expert players, probably 2200 and above. The vast majority of GMs would learn a lot from this book. Despite these comments, it is the reviewer’s opinion that any aspiring, improving player would benefit from reading the more general chapters 1, 2, 5, 6, 7, 8. The pure technical chapters 3 and 4 are certainly more abstruse but very instructive: the authors don’t just give long variations but intersperse these with pithy, useful comments.
The short first chapter really introduces the power of the queen with a mixture of studies and over the board positions.
Chapter 1: Extreme Tactics in Queen Endings
Here is an amazing and stunning study by Rusz:
Rusz 2022 White to play and win
Black is threatening to mate with Qa1+, so white plays 1.Qf6!!
Rusz 2022 Position after 1.Qf6 mutual zugzwang Black to move
Amazingly, this is a position of mutual zugzwang as White to play only draws, whereas Black to play loses. It is hard to believe that in an open position with three queens each, having the move is a disadvantage!
Black can try 1…Qad8_ 2.Qaxd8 Qxd8+ 3.Qxd8 Qf1+ 4.Kc2 Qf2+
Rusz 2022 Position after 4…Qf2+ White to move
5.Qd2 (The careless 5.Kb3? allows a standard trick 5…Qg3+ 6.Qxg3 stalemate, always watch out for this type of idea in queen endings) 5…Qc5+ 6.Kd1 Qc2+
Rusz 2022 Position after 6…Qc2+ White to move
7.Ke2! Black has run out of useful checks, so white wins
Here is a practical example showing many important principles in queen and pawn endings:
Percivaldi – Thybo Danish League 2021-2 Position after 42.Qd5+ Black to move
White has three pawns for a bishop, but the most important feature of the position is black’s far advanced passed a-pawn. In queen endgames, it’s the degree of advancement of passed pawns that is all important, not the number of pawns. Black correctly shed the bishop with his next move:
42…Kc7! 43.Qf7+ Kb6 44. Qxf8 Kb5!
Percivaldi-Thybo Danish League 2021-2 Position after 44…Kb5 White to move
White is three pawns up but is totally lost. White’s only potentially useful pawn is the d-pawn as it’s closest to queening, but white is just too far behind in the race. Black’s king will shelter behind the white’s pawns, there is no chance of a perpetual check.
45.Qe8+ Kb4 46.Qb8+ Ka4 47.Qg8 Trying to bar the king’s progress, but to no avail. 47…Qc2! (47…Qb3 also wins) 48.Qe8+ Kb4 49.Qb8+ Kc3 50.Kg2 a2 51.d5 Using a little tactic to prevent queening and putting black under a little pressure
Percivaldi-Thybo Danish League 2021-2 Position after 51.d5 Black to move
51…Qb2? A poor move deactivating the queen allowing white an amazing draw which he misses, the obvious 51…Qe4+ 52.Kh3 Qxd5 eliminating white’s counterplay, followed by putting the king behind white’s pawns wins easily, 51…Qd1! also wins watching White’s d-pawn and preparing to promote, after 52.Qe5+ Kc2 53.Qe4+ Kb3 54.d6 a1=Q wins as does 54…Qxd6
White missed a clever draw and black won after a slugfest in a four queen ending. Buy the book to see this entertainment.
Chapter 2: Tools in Queen Endings
This is an excellent toolbox chapter that covers the follows topics:
The Queen Triangulates
Cutting Off the King
Batteries and Discovered Checks
Pinning Down a Piece
Exploiting the Opponent’s Harmful Pawn
Zugzwangs
These ideas are absolutely key themes in queen endings. This section is definitely worthy of examination.
The reviewer will show examples from many of the themes in turn:
The Queen Triangulates
The author explains the concept concisely:
“In queen endings, there are more zugzwangs than most players would assume. We shall see many examples where the attacker’s king manoeuvres to give up the right to move – a familiar theme from pawn endings, but more surprising with queens on the board. But the queen itself can also lose a tempo by a form of triangulation. It usually happens when the defender’s king is in danger.”
Here is another Rusz study showing this idea:
Rusz 2022 Queen Triangulation White to play and win
This positions look ok for black as he has White’s passed pawn under control. 1.Qg5+ Ke8 2.Qc5! 2…a3! 3.Qe3+! Kd8 4.Qg5+ Ke8 5.Qc5! completing the first triangulation
Rusz 2022 Queen Triangulation Position after 5.Qc5 Black to play
Rusz 2022 Queen Triangulation Position after 14.Qc5 Black to play
14…Qc8+ (14…Kd8 15.Qf8# ends the suffering) 15.Ka7 Qc7+ 16.Ka6 wins black’s pawns and the game
Cutting Off the King
This principle can be used by the stronger side or the weaker side to prevent the opposing king getting to a desirable area. For example, the stronger side can use this technique in Q+P v Q to cut off the defender’s king from a drawing zone. The example below shows the defending side successfully using this theme in an over the board game:
Lupulescu – Sarakauskas After move 46.Qxg5 Black to play
White has just taken the pawn on g5, black can now draw with an accurate sequence of checks: 46…Qb1+ 47.Kh2 Qb8+ 48.Kg1 Qb1+ 49.Kh2 Qb8+ 50.Kg1 Qb1+ 51.Kf2 Qc2+ 52.Kf3
Lupulescu – Sarakauskas After move 52.Kf3 Black to play
Black must choose the right check here to draw: 52…Qd1+! (the sloppy 52…Qd3+ 53.Kg4! allows white to approach the h-pawn and win the game) 53.Ke4 Qa4+! not allowing the king to cross the fifth rank 54.Ke3 Qb3+ 55.Kd2 Qb2+ 56.Ke1 Qb1+ 57.Ke2 Qe4+ 58.Qe3 Qxg2+ Black has regained his pawn and drew comfortably
In this famous ending, Black is winning with an extra pawn and centralised queen. He played 62..f5? mobilising the pawn majority
Pillsbury – Burn Vienna 1898 Position after 62.Qe2 Black to move
Better was 62…Kd6! activating the king trying to cross over to white’s queenside pawns: white cannot defend against the twin threats of the king invasion and the advance of the kingside pawn majority. After 62…f5? white took the opportunity to make Black’s life very difficult 63.Qb5! cutting the king off from white’s queenside. White missed a probable difficult draw and black eventually won.
Batteries and Discovered Checks
From the author: “Powerful ideas in queen endings include forcing an exchange of queens and launching an attack on the enemy king. Usually the queen harasses the enemy ling by giving checks, but sometimes setting up a battery is stronger than the immediate check. Players often miss such an opportunity, or the potential to play for it. The attacker typically uses a battery to attack the opponent’s king or to win a tempo and stop the opponent’s queen from continuously checking by stepping out the check with a cross check.”
This practical example is instructive:
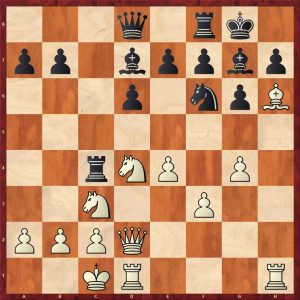
Ni Hua – Berkes Taiyuan 2006 Position after 56…Kh6 White to move
White played 57.Qxd5 winning a pawn, 57… Qe3+ (black can also draw with the flashy 57…Qf6+ or 57…Qg4+ or 57…Qa4+) 58.Kf6 Qf2+ (58…Qf3!+ draws easily, 59.Qxf3 is stalemate, and 59.Kf6 Qc3+ draws) 59. Qf5 Qh4+ 60.Ke6 Qc4+ 61. Qd5 This position is getting difficult for black, but there are still six drawing moves, Black choose a terrible check 61…Qa6??+ 62.Qd6! setting up a deadly battery 62…Qe2+ 63.Kd5+1-0 as white exchanges queens
Ni Hua – Berkes Taiyuan 2006 Position after 61.Qd5 Black to move
Pinning Down a Piece
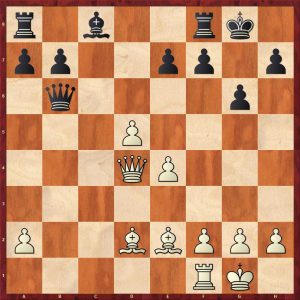
Portisch – Morovic Dubai Olympiad 1986 Position after 103…Qe6 White to move
White played 104.Kc2? and lost . Portisch missed a brilliant move here 104.Qd4!! which amazingly draws, after 104…b3 105.Qd3! attacks the pawn and paralyses the Black queen.
Exploiting the Opponent’s Harmful Pawn
There are many example in the ending Q+P v Q+P where the defending side (player with the pawn that’s least advanced) loses because the extra pawn is harmful blocking defender’s queen checks and/or providing shelter to the stronger side’s king. An example is given below:
Boleslavsky – Taimanov Zurich Candidates 1953 Position after 42…c1Q White to move
White played 43.Qb8+ which wins but Boleslavsky messed up later on. In some ways 43.h4 is simpler. A possible line is 43.h4 Qc2+ 44. Qg6 Qxa4 45.h5 Qxa2 reaching this position:
Boleslavsky – Taimanov Zurich Candidates 1953 Variation position after 45…Qxa2 White to move
Without Black’s b-pawn this is a tablebase draw but not easy in practice. With the b-pawn, Black is losing after 46.Kg7!! The pawn blocks the g1-a7 diagonal.
The next huge section of the book is all about Technical Endgames.
Chapter 3: Queen and Pawn vs Queen
This is in some ways the core of the book with 65 pages devoted to this basic ending. But it is anything but basic!
Each pawn is covered in turn starting with the rook’s pawn working towards the centre pawn. Within each pawn’s section, positions are covered from the second rank to the seventh rank. It is certainly a systematic approach.
It is clear that the least favourable pawn is the rook’s pawn, followed by the knight’s pawn. It may surprise some readers to know that the bishop’s pawn is the most favourable.
Rook’s Pawn
These are the authors’ conclusions:
“The closer the pawn get to promotion, the harder it becomes to hold.
In the case of a white a7-pawn:
Black’s safest option is to get really close to the pawn, at least to the d-file.
The h1-corner is a draw for black’s king, but in practice the defence will require a lot of concentration.
The a1-corner is the second least difficult location for the defender’s king.
In case the black king gets trapped in the h8-corner, there is only one mutual zugzwang position that might save the defender.”
The reviewer will show a few positions:
Honfi – Toth Budapest Ch 1966 Position after 89…Qd1+ White to play
This position is a tablebase draw particularly as black’s king is fairly close to the h1 corner.
White played 90.Kb4 The author adds a didactic comment: “Ever since the famous Minev -Botvinnik game in 1954, we know the player with the extra pawn should look to put his king on the same or neighbouring file or rank as the opponent’s king. This creates chances for a cross check or to set up a battery.”
The game continued for another 61 moves until this position was reached:
Honfi – Toth Budapest Ch 1966 Position after 151.Kc7 Black to play
Black’s king is not ideally placed, but he can draw with the correct check. Black played 151…Qe7+? (151…Qf7+ draws as 152.Kc8 is met by 152…Qf5+ drawing, Gelfand has made an observation, if in doubt check on the opposite colour square to your king, obviously this not a hard and fast rule) 152.Kc8! Black has run out of checks because of the king on h4. White now plays superbly to bring home the full point fully exploiting the badly placed black king 152…Qe4 153.Qc5!
Honfi – Toth Budapest Ch 1966 Position after 153.Qc5
153…Qe6+ 154.Kc7 Qf7+ 155.Kb6 Qb3+ 156.Ka5!
Honfi – Toth Budapest Ch 1966 Position after 156.Ka5
A standard winning technique in Q+P v Q The author comments thus: “White approaches the rank of Black’s king. Now 156…Qa2+ would be the last check, as it is met by 157.Kb5. from this point, the win is easy, as White can promote after some checks.”
156…Qf3 157.Qc4+ Kh5 158.Kb6 Qf6+ 159.Qc6 Qd8+ 160.Kb7 Qe7+ 161.Ka6 Qa3+ 162.Kb6 exploiting black’s king position again, there are no more checks, so 1-0
Honfi – Toth Budapest Ch 1966 Position after 162.Kb6
The reviewer adds an observation: when the black king is in or near the h1-corner, it is much harder for White to manoeuvre his king to an adjoining rank/file and keep his pieces coordinated as well as the pawn safe.
Gligoric – Timman Bugojno 1980 Position after 60…g1Q White to play
This is a tablebase draw as white’s king is close to the best corner (a8) but an experienced top GM still lost this position thirty moves later. This shows how hard it is in practice. The book has some excellent coverage of this endgame viz:
Gligoric – Timman Bugojno 1980 Position after 84…Kc3 White to move
This position is still a draw.
“White should also wait with 85.Ke5, or he could move closer to the corner with 85.Kf7 or 85.Kf6”
White played the obvious centralising check 85.Qe5+? which loses, black replied with the 85…Kc2? (85…Kd2! wins: the analysis is worth looking at just to see the process as Black uses triangulation and White’s poorly placed king to escape the checks, get the book to find out)
Gligoric – Timman Bugojno 1980 Position after 85…Kc2 White to play
In this position White can draw. Over to the authors: “86.Qf4!! is the right move. But why? If it Black’s turn to move in the diagram, Qf3 would cut off the white king and win. The queen on f4 stops that. If 86…Kd1 87.Kf7!= (87.Kf6 also draws) 87…Qe2 88.Qd4+ only move 88…Kc2 89.Qa4+ holds or 89.Qc5+ or 89.Qf4! h2 90.Qa4+ draws”
This subtle, underlying battle of the cut off is amazing. The game continued with 86.Qh2+? Kd1! Once again the king approaches the neighbouring file of the enemy king 87.Qh1+ Kd2 88.Kf6 (the authors note that if white’s king could move to the c-file he would draw, the win after 88.Ke7 is very instructive as black triangulates again, get the book to find out how)
Gligoric – Timman Bugojno 1980 Position after 88.Kf6 Black to move
Timman misses a fairly simple idea to win quickly here 88…Qg3! He played 88…Qe3? This throws away all the hard work. White can draw with 89.Qh2+ and then run with the king towards the h8 corner. White blundered with 89.Kf5? A fatigue blunder allowing 89…Qf2+ 90.Ke5 Qe1+ exchanging queens 0-1
Knight’s Pawn
This is the authors’ observations:
“This situation occurs more often in practice than Q+P v Q with other pawns. This type of pawn has some unique features. for example, the attacker’s king has more scope for hiding near the pawn then it does behind a rook’s pawn, but less room compared to a bishop’s pawn. There is a drawing zone that often exists for the defender’s king in the far corner from the promotion square.”
The reviewer adds the proviso: but even this depends on the exact position of the queens of course.
Lenart position after 19…Qxh3
This is position from an unknown composer/player. Surprisingly White wins here even with the black king so close. White plays 20.Qc6! which is a standard cut off move. The winning process here takes 75 moves with perfect defence. There are some mind boggling triangulations with white’s king to wrong foot the black queen. Buy the book to find out how.
Here is a position with a knight’s pawn on the fifth rank.
Zurakhov – Boleslavsky Riga 1955 Position after 73…e1Q White to play
White wins here with the brilliant 74.Qf8+ Kg4 75.Qa3!! cutting black’s king off from the drawing zone. Zurakhov played 74.Qc8? throwing away the win but he won anyway on move 119.
Once the knight’s pawn reaches the seventh rank, the defender’s king has to stay in the opposite corner. This is the type of position the attacking side should aim for:
Cheron 1968 Black to play loses
Apparently with a g-pawn on g7, the d4 is vitally important for the stronger side’s queen.
Bishop’s Pawn
There is no drawing zone for the defender’s king (unless of course the king can get in front of the pawn).
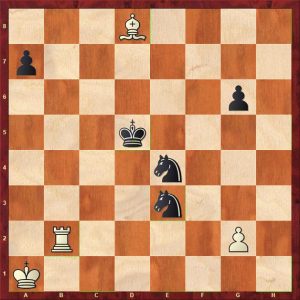
Velimirovic – Uhlmann Arandjelovac Zonal play-off 1976 Position after 55.Kxa6
This is a technical win for Black: 55…Qg4! is an excellent cut-off preparing to activate the king. Uhlmann played this ending well not letting the win slip at any point. This ending is worth close study.
Centre Pawn
Jevtic – Vujacic (analysis) Belgrade 2008
1.Qxf7+ Ke3! the only winning move.
If white’s king was on h1, he would draw as his king would be in the small drawing zone on the short side of the pawn. 2.Qg8 Qd5+ (a series of queen checks to force white’s king to the unfavourable long side of the pawn) 3. Kc1 Qh1+ 4.Kb2 Qe4!
Jevtic – Vujacic (analysis) Belgrade 2008 Position after 4…Qe4 White to move
5. Qg1+ Ke2 6.Qh2+ Kc3 7.Qg3+ Qe3! 8.Qg6+ Kd2 9.Qc2 Ke1 10.Qb1+ Kf2 stopping the checks, notice how white’s own king impedes his own queen 11.Qh7 e5
Jevtic – Vujacic (analysis) Belgrade 2008 Position after 11…e5 White to move
Nunn comments: “The general theory of queen and pawn against queen tells us that this position is probably winning, because with the centre pawn there is no drawing zone for the white king in a remote corner, and if the defender’s king cannot move in front of the pawn then his chances are grim.”
Chapter 4: All the Pawns on the Same Side
This is a systematic analysis of all the different pawn configurations and is a really technical. For mortals like me, this will take many months to take in, but is nonetheless really interesting.
One surprising conclusion is that a two pawn advantage Q and rook’s pawn + knight’s pawn [gh-0] v Q is drawn in many positions if the defender’s queen and king are actively placed.
Here is a practical example:
Atanasov – Spiridonov Ruse 1978 Position after 68…Kg8 White to move
How should White capture the Black pawn? On general principles, it looks better to capture with the queen retaining two connected passed pawns. Here both captures win, but generally Q+f+h pawns v Q is a win unless there is an immediate perpetual. Q+g+h pawns v Q is drawn in many cases. After 69.Qxf4?! Qc5+ 70.Kg4? White has thrown the win away:
Atanasov – Spiridonov Ruse 1978 Position after 70.Kg4
Black played 70…Qc8+ which draws as does 70…Qa7, 70…Qc3, 70…Qc6
The game was drawn after both sides made mistakes. Instead of 70.Kg4?, 70.Kg6! wins.
This ending is truly complex and worthy of study. Buy the book to find out more.
Chapter 5: Extra Outside Passed Pawn This is divided into four natural subsections:
Passed Rook’s Pawn
Passed Knight’s Pawn
Passed Bishop’s Pawn
Passed Centre Pawn
The author concentrates on the passed rook’s pawn:
“Firstly, they occur more often than other passed pawns, as is also the case in rook endings. Secondly, the defender has much better drawing chances compared to positions with a c-pawn for example, because the stronger side’s king can’t find shelter around the rook’s pawn. If the attacker’s queen is busy defending the king from checks, there is little capacity left to help the rook’s pawn advance. On the opposite wing from the passed rook’s pawn, exchange of pawns tend to favour the defending side for several reasons:
1) They increase the chance of perpetual check.
2) Less frequently, it may even be possible to simplify to a queen and pawn versus queen endgame by exchanging off all the kingside pawns.”
Here is an excellent demonstration by the strongest player in the world:
Carlsen – Vachier-Lagrave Karlsruhe/Baden-Baden 2019 Position after 32…Kg7 White to play
Carlsen played the neat 33.Bd5! (33.Qb2+ Kg8 34.a3 Qd3 black is very active and white cannot make progress) 33…Bxd5 34. Qe5+ f6? A serious mistake from a top player as it weakens the king’s shelter. Chapter 8 gives lots of advice and examples about shelters. Much better was 34…Kg8 35.Qxd5 Qa3 36.Qb3 Qc1+ 37.Kg2 h5 38.gxh5 Qg5+ 39.Kh2 Qxh5 and black can hold. 35.Qxd5 h5 (Trying to weaken White’s kingside) 36.gxh5 gxh5 37.Qd7+ Kg6 38.a4
Carlsen – Vachier-Lagrave Karlsruhe/Baden-Baden 2019 Position after 38.a4 Black to play
Although both Kings’ shelters have been partially wrecked, Black’s exposed king is more significant as the game continuation shows. 38…Qe2 39.Qd5! Centralisation 39…f5 Black is trying to block in the White king, but this move exposes his own king even more 40.a5 f4 41.Kg2! Kh6 42.Qf5
Carlsen – Vachier-Lagrave Karlsruhe/Baden-Baden 2019 Position after 42.Qf5 Black to play
42…Qc4 43.Kf3 winning another pawn, so 1-0
Notice how Black’s pawn advances brought down his downfall.
The last four chapters are in a section of the book on Practical and Strategic Queen Endgames
Chapter 6: The Pawn
The following ideas are discussed:
Breakthrough
Promoting With Check
Reducing the Number of Pawns in Order to Hold the Draw
Pushing a Pawn to Force an Exchange of Queens
Connected Passed Pawns
Gaining Space
Races
Races when Both Sides Have Only One Pawn
Quality vs Quantity
Doubled Pawns
An example from the Quality vs Quantity subsection is given below.
The author states “It’s a well-known and common saying that in queen endgames, ‘it’s not the number of pawns that counts, but their quantity!’ In other types of endgames, the principle of strength in numbers map apply more often, but less so in queen endings.”
This ending has been quoted often:
Stahlberg – Euwe Stockholm Olympiad 1937 Position after 41.Kh2 Black to play
Euwe played the natural centralising move 41…Qd4? which is multi functional, but surprisingly throws away the win. The h4-pawn is not important here. There is a win with a very subtle move 41…Qd6!!+ which looks like a superfluous check, but forces white to weaken his position.
Stahlberg – Euwe Stockholm Olympiad 1937 Position after 41…Qd6+ White to play
White now has an invidious choice on how to spoil his position, g3 weakens the king’s shelter and both king moves have their disadvantages. Let’s look at each alternative.
a) 42. g3? Qd4! Now this move gains in strength as white would like to take the f2 pawn exposing White’s king fatally 43.Qb5 Qxf2+ 44.Kh3
Stahlberg – Euwe Stockholm Olympiad 1937 Variation A Position after 44.Kh3 Black to play
Black has two different wins here 44…Qf3! (44…Qf5+ also wins) 45.Kh2 (45.Qxb4? Qh1+ 46.Kg4 Qf1! forcing mate or win of queen) 45…b3 46.a5 Qf2+ 47.Kh3 Qg1! winning
Stahlberg – Euwe Stockholm Olympiad 1937 Variation A Position after 47…Qg1 White to play
48.Qxb3 Qh1+ 49.Kg4 f5+ 50.Kf4 Qe4#
b) 42.Kh3 b3 43.Qb5 (43.Qc3 Qd7+ exploits White’s wins exposed king, winning the a-pawn) Qa3!! This is unconventional move, putting the queen on the side, but it exploits the exposed White king: the threat of a discovered check is fatal for white.
Stahlberg – Euwe Stockholm Olympiad 1937 Variation B Position after 43…Qa3 White to play
If 44.Qb7 a2+ 45.Kh2 Qa2 wins
If 44.a5 b2+ 45. g3 Qa2 wins as well as 45…Qf3
If 44.h5 b2+ 45.f3 g5 46.Qf5+ Kg7 47.Qe5+ Kg8 48.Qb8+ Kh7 49.Qb7 Qa2 wins
c) 42.Kg1 b3 43.Qb5 Qa3 44.Qc4! b2!!
Stahlberg – Euwe Stockholm Olympiad 1937 Variation C Position after 44…b2 White to play
Black gives up three pawns to get his king out of the checks. This is a brilliant example of quality over quantity. 45. Qxf7+ Kh8 46.Qf6+ Kg8 47.Qxg6+ Kf8 48.Qxh6+ Ke7 49.Qg7+ Ke6 50.Qg8+ Kd5 51.Qg7+ Kd5 52.Qf7+ Kg4 53.Qg7+ Kc4 54.Qf7+ Kc3 55.Qf3+! Kb4 56.Qb7+ Kxa4 57.Qa6+ Kb3 58.Qe6+ Kc2
Stahlberg – Euwe Stockholm Olympiad 1937 Variation C Position after 58…Kc2 White to play
Now after the obvious 59.Qe2+ black plays 59…Kb1!!
The author explains why this wins: “Although Black is two pawns down and apparently has no shelter, he can win. The white king has to give up the back rank due to threats of crosschecks, after which the black king can find shelter on f1! For this reason, sacrificing the f2-pawn is inevitable. Then, in marvellous variations, White, can be forced into zugzwang where he either loses his h-pawn or is force to play Kh3, which means that the black king can find a shelter on g1, which decides the battle.”
Back to the game continuation, after 41…Qd4? 42.Kg3? White defends a pawn with little value and exposes his king fatally. 42.Qb5! draws easily viz: 42…Qxh4+ 43.Kg1 Qe4 44.a5 Qb1+ 45.Kh2 b3 46.Qb7 Kg7 47.a6 Qa2 48.a7 b2= The best Black can achieve here is Q+3 v Q+2 all on one side which is a draw.
Stahlberg – Euwe Stockholm Olympiad 1937 Missed draw in game Position after 48…b2 White to play
After 42.Kg3? this is the position:
Stahlberg – Euwe Stockholm Olympiad 1937 After fatal mistake 42.Kg3 Black to play
Black exploited the exposed white king as follows: 42…b3 43.Qb5 b2 44.Qb3 Kg7! winning 45.f4 (Other moves lose as well, for example 45.a5 Qe5+ 46.Kf3 Qf5+) 45… Qd2 0-1
A really instructive game.
Chapter 7: The Queen
The following ideas are discussed:
Exchanging Queens
Zwischenzugs
Passive and Active Queens
Neutralizing Queens
The Queen has Multiple Tasks
Restraining an Enemy Passed Pawn from Behind
Superfluous Checks
The reviewer will show an example on the topic of superfluous checks. The author explains: “In many positions there is no clear plan to implement, and in this case having the move in an over-the-board game creates tension. Rather than finding something constructive to do, or at least find a move that doesn’t compromise their position, players often insert an exchange or a pointless check. Either can harm their position.”
Miron – Lupulescu Romanian Team Ch Sovata 2018 Position after 36…Qf6 White to play
This position is objectively equal, although Black’s position looks slightly superior as his pawn majority has been mobilised. White’s pieces are well placed. 37.b4 is equal, but simpler is probably 37.exf5 Qxf5+ 38.Ke2 Qc2+ 39.Qd2 Qe4+ 40.Qe3 is equal, Black has no realistic winning chances.
White played 37.Ke2?! So Black responded with the obvious 37..f4 gaining space and creating a passed pawn 38.Qa7+? The superfluous check that loses. The author quotes John Nunn here: “Nunn pinpoints the basic truth that many people think they must keep giving checks in queen endings. this is one of the most common conceptual mistakes.” 38.Qd3! holds 38…Kg6 39.b4! getting the queen side pawns going draws 38…Kh6
Miron – Lupulescu Romanian Team Ch Sovata 2018 Position after 38…Kh6 White to play
After two poor strategic moves, White is totally lost. After 39.Qd7? (39.Qf2 is more resilient but still loses after 39…Kg5) 39…fxg3! won easily as Black’s king can shelter near his passed pawn.
Chapter 8: The King
These topics are covered:
Attacking The King
Stalemate
Avoiding Stalemate
Perpetual Check
Shelters
The section on Shelters is really important and is broken down into 9 further sub-sections:
The Importance of a Good Shelter
Weakening Our Own Shelter
Failing To Reach a Shelter
Invading and Destroying Shelters
Unusual Shelters
Leaving The Shelter to Support Pawns on the Other Wing
Leaving the Shelter to Exchange Queens
Leaving The Shelter to Win a Pawn
Breaking Open The Shelter with Pawn Sacrifices
Here is an example from the Weakening Our Own Shelter section.
Tal – Tseshkovsky Riga 1981 Position after 39…Qg4 White to play
The great Tal made a serious mistake here in a winning queen endgame 40.f3? Voluntarily weakening his king’s shelter: a poor move from a great player. 40.Qd5 centralising the queen wins easily 40…Qc8 41.Qd2 b5 42.Qb4 wins or 40…b5 41.a4 wins 40…Qd7 41.Qd5 Qc7 42.Qd2 b5 43.a3 (43.a4 bxa4 44.bxa4 Qc4 45.a5 Kg6 holding) Qc5 44.Qa2 Qc1 draw agreed
Chapter 9 Complex Queen Endgames rounds off the book with the study of some intricate endings.
This is a great book and is thoroughly recommended. Be prepared to put in some hard work.
FM Richard Webb, Chineham, Hampshire, 17th June 2024
The Art of the Endgame
My Journeys in the Magical World of Endgame Studies
Revised Edition – with 14 New Studies
by Jan Timman
From the publisher, New in Chess:
“All through his career Jan Timman has been captivated by the mystery and splendour of endgame studies. Even during his most successful and busy years as a world-class player, Timman continued to compose studies and admire those of others. For him, there has never been any doubt that his journeys in this magical world helped him to grow as a player.
In this fascinating book, first published in 2011, Timman has collected studies by other composers and explains in his lucid style how they inspired him to create dozens of brand-new studies.
Timman has revised the book for this new edition. With the help of engines, Timman discovered that a few studies needed to be corrected or had alternative solutions. He removed six studies and replaced another six with better versions. And fourteen new studies have been added, two of which are published here for the first time.”
About the Author, Jan Timman:
“Jan Timman is a former world championship candidate who rose to number two on the FIDE world rankings. He is the author of several highly acclaimed bestsellers, such as Timman’s Titans and Max Euwe’s Best Games. He was awarded the title of FIDE Master of Composition in 2022.”
GM Jan Timman
This book is a gem and I do remember perusing the first edition at a bookstall a while back, now I have a copy of the second edition.
There is no doubt that familiarity with ideas from endgame studies improves a player’s overall chess ability and imagination.
The reviewer was introduced to endgame studies at a tournament in London when he was junior: I was having lunch in the analysis room, when an older gentlemen showed some Harold Lommer studies involving knight promotions which got me hooked. The acquisition of Test Tube Chess by John Roycroft soon followed.
Jan Timman’s book has a variety of positions some of which are really “game like” whilst others are artistic beauties involving for example multiple promotions.
The book is divided into fourteen themed chapters viz:
Chapter 1: Miniature studies
Chapter 2: Rook versus bishop
Chapter 3: Preventing pawn promotion
Chapter 4: Various promotion combinations
Chapter 5: Knight promotions
Chapter 6: Bishop promotions
Chapter 7: Mating patterns
Chapter 8: Stalemate patterns
Chapter 9: Mutual zugzwang
Chapter 10: Building a fortress
Chapter 11: Systematic manoeuvres
Chapter 12: The disappearing trick
Chapter 13: Three themes
Chapter 14: Various endgame studies
The reviewer will show a variety of positions from various subsections.
Chapter 1: Miniature studies
These are positions with no more than seven pieces. This one is particularly beautiful with a mutual zugzwang.
Position 1
Liburkin, ’64’ 1933 White to play and win
White is a pawn up with black’s king close to the passed pawn, so white needs something special here. 1.Kd1 pins the knight forcing 1…Kf5 2.Ke2 threatening to win the knight. Black bishop’s impedes his king, so he goes after the h-pawn with 2…Bf6 3.Kf3 Bxh4
Liburkin 1934 After 3…Bxh4
If white takes the bishop 4.Nxh4+ Kg5 attacking the knight saves black. So 4.Bxe4+ Kg5 5.Bd5!Kh5 6.Bf7+ Kg5 7.Be8
Liburkin 1934 After 7.Be8
Black is zugzwang and loses the bishop and the game. Note this is a position of mutual zugzwang as white has no good waiting move and cannot win with the move! Very pretty.
Chapter 2: Rook versus bishop
This is the most practical chapter with studies in the complex endgame of R+P v B+P.
Position 18
Reshevsky-Fischer, Los Angeles match (11) Position after 52…Ra2+
This is a celebrated position where Reshevsky played 53.Kf3? with Fischer missing a clear win by exchanging rooks and occupying g4 with his king. Instead Fischer kept the rooks on. White draws with 53.Kh3!
This study was created to show this:
Position 19
Study based on Reshevsky-Fischer game White to play and draw
1.Kg2! Kf5 2.Kh3 Rc4 3.Be7! the only move 3…Rc1 4.Bf8! (The bishop hides itself to prevent a rook check followed by attacking the bishop to allow black to get in Kg4) 4…Rb1 5. Bg7 or 5.Bh6 draws
Chapter 3: Preventing pawn promotion
This is a famous promotion combination from a game which resembles the elegance of a study:
Position 44
Ortueta-Sanz Madrid 1933 Position after 30.h3
Black played 30…Rd2 31.Na4 (31.a4 was better) 31…Rxb2! 32.Nxb2 c3 33.Rxb6 c4!! 34.Rb4 a5!! winning
Ortueta-Sanz Madrid 1933 Position after 34…a5
White cannot prevent the coronation of a new queen.
The great composer, Pogosyants composed a study with a very similar theme:
Position 46
Pogosyants, ‘Themes-64’ 1977 White to play and win
The solution is 1.Bg3 dxc4 2.Rxg7! Nxg7 3.f6 Rxg3 4.f5!! Rg5 5.f4! Nxf5 6.f7 wins
Chapter 4: Various promotion combinations
Position 69
Wotawa Schach Magazin 1951 White to play and win
A game like position. 1.d6 Be5 2.Bb8 threatening d7 winning the bishop, so 2…Bf6 3.d7 Bd8 apparently saving the bishop, but 4.Bg3! a4 5.Bh4! Bxh4 6.g4+ and wins
Chapter 5: Knight promotions
Here is a superb Harold Lommer study with multiple promotions:
Position 96
Lommer, ‘Feuille d’Avis de Lausanne’ 1933 White to play and win
White is threatened with a brutal discovered mate by the black monarch. So 1.d8N Bd5 2.g8B!! (2.g8Q allows black a brilliant defence 2…Ke3+ 3.Qxd5 stalemate!) 2… Be4 3.e8R!! (3.e8Q allows another fantastic defence 3…Kg3+ 4.Qxe4 stalemate!) and wins
A brilliant study has with stunning counterplay.
Position 97 shows a famous Lommer involving 5 knight promotions, but unfortunately after the fourth promotion, there is alternative prosaic win promoting to a queen.
Chapter 6: Bishop promotions
Position 112
Rusinek ‘New Statesman’ 1971 White to play and draw
White has an army of far advanced pawns against 3 minor pieces and a well placed black king.
If black plays 4…Ndxf6 5.Kb8 gets the king out of the mating trap, so 4…Nexf6 5.a8B!! (5.a8=Q? Nd5 followed by Ne7#)
Rusinek 1971 after 5.a8B
White is attempting a self stalemate, so black must release this and rearrange his pieces. 5…Ne5 (5…Bf1 6.b8N! draws) 6.Kb8 Nc6+ 7.Kc8 Bf1 threatening Bh3# 8.b8R!! (8.b8Q? Ba6+ 9.Qb7 Ne4 10.Qxa6 Nd6#, or 8.b8N? Ne7+ 9.Kb7 Bg2+ 10.Ka7 Nc8+ wins the bishop on a8 and the game)
Rusinek 1971 after 8.b8R
8…Ba6+ 9.Rb7! with a draw
Scintillating promotion play.
Position 124
This is a creation of genius and very amusing.
Troitzky, Korolkov 1938-1939 White to play and win
The great Troitzky is involved here. Black threatens a brutal Ng3 mate. 1.Qc3!! (Threatening the key g7 pawn, 1.Qa3? is met by f1N reinforcing the threat on g3 winning for black) 1…Nxc3 2.d8B!! (Not 2.d8Q? Nde4 3.Qxc7 f1N 4.Bf4 Ne2 followed by sacrificing all the knights ending with Qxg3 stalemate) 2…Ne2 3.Bxc7 f1N 4.b8B!! (4.b8Q allows black to sacrifice all the knights on g3 ending with Qg3 stalemate) 4…Ne4 5.B1f4 winning as the three white bishops control the three knights.
Troitzky, Korolkov 1938-1939 Position after 5.B1f4
Who says there is no humour in chess?
Chapter 7: Mating patterns
Here is an elegant study by the author, Jan Timman:
Position 163
Timman 2010 White to play and win
1.h5 preventing Bxa2 as Rd7+ would win easily 1…Kh6 2.Rd8! Bxa2 3.Rh8! Bg8! great counterplay
Timman 2010 Position after 3…Bg8
4.Kc3 a2 5.Kb2 a3+ 6.Ka1 Kg7 7.h6+
Timman 2010 Position after 7.h6+
7…Kxh8 8.g7 mate
Chapter 8: Stalemate patterns
Position 167
Rusinek 1973 White to play and draw
Stalemate looks unlikely here. 1.b6 must be played as white is two pieces down 1…Rf5 2.b7! Rf7+ 3.Kd6 Nc4+ 4.Ke6 Bxb7 5.Rh3+ Kg7 6.Rf3+ Kf8
Rusinek 1973 position after 6…Kf8
7.Rg8+! Kxg8 stalemate!
Chapter 9: Mutual Zugzwang
Position 189
Here is an entertaining position:
Kliatskin 1924 White to play and win
1.Rc8+ Kxc8 2.b7+ Kb8 3.d5 Kc7
Kliatskin 1924 Position after 3…Kc7
Now only 4.bxa8B! Kb8 5.Bb7 wins with a position of mutual zugzwang
Chapter 10: Building a fortress
Position 203
Smyslov 2005 White to play and draw
The elderly former World Champion, Smyslov, composed this amusing study in his eighties. 1.Nb8 Rd6 2.Nd7+! Rxd7 3.Rxg7! Kxg7 4.h4
Smyslov 2005 Position after 4.h4
After 4…Rd6 5.Kg2 Rg6+ 6.Kh3! black has to move the rook off the g-file to avoid stalemate, so white draws!
Chapter 11: Systematic manoeuvres
Kotov, Mitrofanov 1976 White to play and draw
The reviewer assumes this is the Mitrofanov of Qg5!! fame.
The disappearing trick is a kind of systematic manoeuvre whereby white plays to achieve a particular position without a certain white piece. This is demonstrated below with a neat study.
Position 260
Sochniev, Gurgenidze JT 2004 White to play and win
King’s Indian Killer: The Harry Attack by Richard Palliser & Simon Williams
From the publisher, Everyman Chess:
“Do you want a simple and practical method to counter Black’s kingside fianchetto defences after 1 d4? A line that takes the initiative from a very early stage and creates difficult practical problems? If so, then The Harry Attack (1 d4 Nf6 2 c4 g6 3 h4!) is for you.
At first this looks like some sort of joke or, at the very least, a weird outlandish line. Aren’t we all taught to focus on development and control of the centre in the early stages? What’s 3 h4 got to do with that? Perhaps surprisingly, this is a very difficult line for Black to counter effectively. This applies not just in practical play but also theoretically, where it is far from straightforward for Black even to find a route to equality. And when Black gets it wrong they are often on the receiving end of a very unpleasant miniature.
You may be thinking that surely the best chess engines can show how to counter this line? No! One of the unexpected features of leading engine play is their enthusiasm for shoving the h-pawn up the board and they fully concur that 3 h4! is a very decent move for White.
Many leading players have taken the hint and 3 h4 is frequently seen at elite level. Richard Palliser and Simon Williams (the GingerGM) provide a thorough guide to this fascinating line. They show how to adapt when Black chooses a King’s Indian set-up, a Grunfeld set-up, a Benoni set-up or even plays in Benko style.
The Harry Attack is easy to learn and is perfect for unsettling players steeped in the theory of their favourite Indian defences.”
Simon Williams is a Grandmaster, a well-known presenter and a widely-followed streamer, as well as a popular writer whose previous books have received great praise. He is much admired for his dynamic and spontaneous attacking style.
GM Simon Williams
Richard Palliser is an International Master and the editor of CHESS Magazine. In 2006 he became Joint British Rapidplay Champion and in 2019 finished third in the British Championship. He has established a reputation as a skilled chess writer and written many works for Everyman, including the bestselling The Complete Chess Workout.
IM Richard Palliser
Harry is a nickname for the h-pawn. The Harry Attack is 1.d4 Nf6 2.c4 g6 3.h4!?
Although this book is titled as an anti-King’s Indian system, it is also aimed at the Gruenfeld Defence as the book explains.
The reviewer likes the book and despite his initial scepticism about the Harry Attack (based on his ignorance), has come to realise that this is a serious system that cannot be refuted: in fact it has been adopted at the highest levels. It is not just a one trick pony with the crude idea of hacking down the h-file, it is a sophisticated scheme with many facets including space gain. After just one or two careless moves, black can easily find himself/herself being suffocated, devoid of counterplay.
Of course, it is an “anti-book/theory” system aimed at getting the opponent out of their familiar territory. As ever, these fresh systems soon acquire a fair body of theory!
This book is suitable for club players and above. Chapter 2 gives a pertinent precis of the whole system which would be perfectly adequate for a less experienced player to play the variation with confidence.
The book is divided into seven main chapters:
Chapter 1: Model Games
Chapter 2: The Basic Repertoire
Chapter 3: Gruenfeldesque Lines
Chapter 4: Black Obstructs Harry
Chapter 5: Other Third Move Alternatives to 3…Bg7
Chapter 6: King’s Indian Style 3…Bg7
Chapter 7: The Main Line: 3…Bg7 and 6…c5
Chapter 1: Model Games
This is a really good section that shows many of the key ideas of the Harry Attack. There are six model games that are definitely worth studying. A summary of these games is:
Games 1, 2 & 3 show typical continuations if black replies with the Gruenfeld move d5 on moves 3 or 4
Chapter 3 covers this in more depth
Game 4 showcases black blocking Harry with 3…h5
Chapter 4 gives further coverage when black blocks Harry
Game 5 introduces the second player responding in a Modern Benoni fashion
Chapter 7 gives good guidance on this main line
Game 6 demonstrates Peter Svidler responding in Benko Gambit style
Chapter 7 also presents this important system in more detail
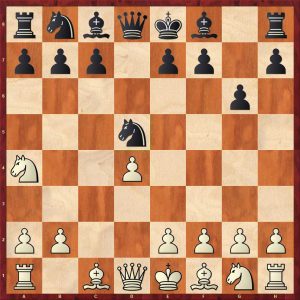
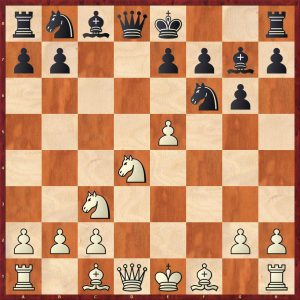
The first two games show black’s difficulties if he insists on playing a Gruenfeld setup. viz: 1.d4 Nf6 2.c4 g6 3.h4!? Bg7 4.Nc3 d5?!
Basman – Grinberg Ramat Hasharon 1980 White to move
Game 1 is a superb model game from the late and great Mike Basman.
After 5.h5! Nxh5 6.cxd5 c6 (6…e6 is a more modern try but white has powerful riposte with an excellent pawn sacrifice covered in Chapter 3. Buy the book to find out.) 7.e4! cxd5 8.e5! A well judged pawn sac’ from the creative Basman viz:
Basman – Grinberg 1980 Excellent pawn sac 8.e5 Black to move
White has a simple threat of 9.g4 winning the stranded knight, after 8…Bf8 9.Nf3 Nc6 (9…Bg4 10.Qb3! is awkward) 10.Qb3! white has a clear advantage:
Basman – Grinberg After 10.Qb3 Black to move
The next few moves showed what a pickle black is in 10…e6 11.g4! Ng7 12.Bh6! reaching this horror show for black:
Basman – Grinberg After 12.Bh6 Black to move
The knight on g7 is particularly awkward. Basman went on to win a fine game.
The second illustrative game shows one of the authors, Simon Williams, in scintillating form beating Katarzyna Toma following the Mike Basman game until move 9, where black varied with 9…Ng7, white responded with the natural 10.Qb3!
Williams – Toma 10.Qb3 Black to move
Stockfish gives this as a clear plus to white. Simon went on to win a fine game.
Chapter 2: The Basic Repertoire
This section gives the reader a quick overview of the repertoire against black’s main tries. It is a useful introduction to all the subsequent chapters. As I stated above, this chapter is adequate coverage for a less experienced player to play this system.
Chapter 3: Gruenfeldesque Lines
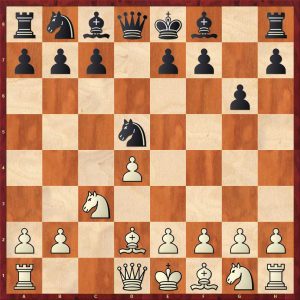
As already mentioned, this covers black’s attempt at an early d5.
Stockfish does not like 4…d5 and gives 5.h5! with an edge for white already!
4…d5 5.h5 Black to move
Black’s best move, according to the engine, appears to be the nonchalant 5…0-0 completely ignoring white’s attack! 6.hxg6 hxg6 7.cxd5 Nxd5 8.Bh6!
Basman – Grinberg 1980 4…d5 early h-file attack Black to move
This is looks scary for black, but he can defend with 8…Bxh6! 9.Rxh6 Kg7! Nevertheless, white is still for choice here owing to his extra space, central control and the initiative. This is covered in some detail in Chapter 3.
Beware Gruenfeld players!
Chapter 4: Black Obstructs Harry
Black can block the h-pawn with 3…h6 or 3…h5 which is committal.
The obstructive 3…h5 can lead to either KID or Gruenfeld lines with the extra h4 and h5 moves thrown in. Who does this favour? White can profitably occupy g5 with a bishop or knight that cannot be kicked with h6. Buy the book to find out.
Chapter 5: Other Third Move Alternatives to 3…Bg7
This chapter important alternatives such as the super solid 3…c6 and the more aggressive 3…c5 which can lead to Benoni or Benko Gambit type positions.
The solid 3…c6 cannot be a bad move. White responds by going into a Schlechter Slav viz: 4.Nc3 d5 5.cxd5 cxd5 6.Bf4 Nc6 7.e3 Bg7 8.Be2 h5 9.Nf3 0-0 10.Qb3
Exchange Slav type position 10.Qb3 Black to play
White has a pull here and his position is easier to play. The line given in the book involves black playing a5 a few moves later which is a little compliant creating weaknesses.
After the Benko Gambit type response viz: 1.d4 Nf6 2.c4 g6 3.h4 c5 4.d5 b5!? 5.cxb5 a6 6.e3!
Benko Response 6.e3 Black to play
White plays solidly and intends to use b5 as an outpost to slow black’s counterplay. Clearly black has some compensation here but not a full pawn’s worth. A critical line here may be 6…Bg7 7.Nc3 0-0 8.a4! e6!? This is covered in the book.
Chapter 6: King’s Indian Style 3…Bg7
This and the final chapter are probably the key chapters for more experienced players who want to get to the meaty main lines.
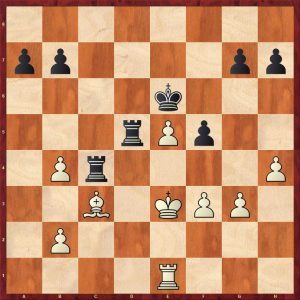
Chapter 7: The Main Line: 3…Bg7 and 6…c5
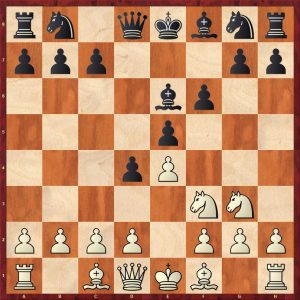
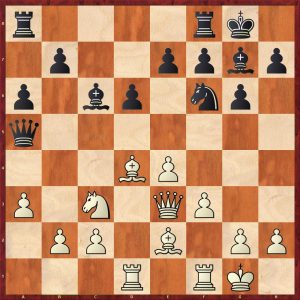
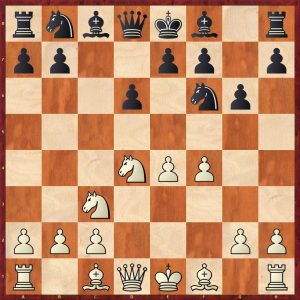
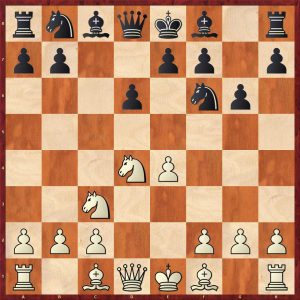
After these natural moves 1.d4 Nf6 2.c4 g6 3.h4 Bg7 4.Nc3 d6 5.e4 0-0 6.Be2 c5 7.d5 e6 8.h5 exd5 9.exd5! Re8 10.h6! Bh8 11.Bg5, this tabiya is reached:
Main tabiya after 11.Bg5 Black to move
This is a hot position played quite a bit at the top level. The open e-file may look scary for white, but the king can slide to f1. White’s space advantage is significant and black can have difficulties finding counterplay. Stockfish gives white about a small advantage. More important than that is understanding the ideas in this interesting position. Get the book to further your knowledge.
For those competitors fed up with meeting reams of KID or Gruenfeld theory, I recommend giving The Harry Attack a go!
FM Richard Webb, Chineham, Hampshire, 9th June 2024
From the publisher, Gambit Publications “Understanding the endgame is fundamental to playing good chess, and at its heart lie positions where just kings and pawns remain on the board.
Even when a pawn ending is not actually reached, the players must often assess ones that could arise from an exchange of pieces. And an error calculating a pawn ending is normally fatal. Questions of pawn-structure, and thus decisions made early in the game, can be fully understood only when we appreciate how they impact the possible pawn endings.
This book takes a practical angle, so is the perfect complement to Secrets of Pawn Endings, which examines their theory in detail. Experienced trainer Bogdanov examines a wealth of pawn endings where strong players made significant errors, and draws lessons and rules of thumb from them.
While we are enjoying the entertaining material in this book, we are painlessly absorbing endgame principles and improving our intuitive decision-making skills. We learn how to calculate and identify key positional elements, and appreciate the beautiful tactics and paradoxical ideas that are unique to the world of pawns.
The Nunn Convention is used throughout the book, and all the material has been checked in detail with modern NNUE-based engines with access to seven-man tablebases.”
International Master Valentin Bogdanov has vast experience as a chess trainer, and is from Ukraine. His pupils include grandmasters Moskalenko, Savchenko and Drozdovsky, and he has acted as a second for the well-known grandmaster and theoretician Viacheslav Eingorn since the late 1970s.
For 50 years he has been a teacher at the chess school in Odesa (Ukraine), and in 2016 won the European Over-65 Championship. In the same year he also qualified as an International Arbiter and has since then officiated over a great many chess events in his country.
This is his fourth book for Gambit.
IM Valentin Bogdanov (UKR)
Before we start our review it is worth watching this video preview from John Nunn and Gambit Publications:
This is a excellent book that has an emphasis on practical king and pawn endgames. All the examples are taken from 1981 onwards which means that the reader will see novel positions rather than a rehash of old favourites. The other fresh approach is the structure of the ten chapters based on themes rather than the number of pawns. This book is not for beginners or very inexperienced club players as it assumes a basic knowledge of elementary pawn endgames. It is aimed at 1750+ chess enthusiasts but ambitious lower rated readers will benefit from some of the easier examples. The more difficult positions will tax GMs. This book would be ideal material for a coach for training purposes to give the students a toolkit of ideas.
The chapter structure is as follows:
Chapter 1: Obvious Errors Chapter 2: Breakthrough Chapter 3: Zugzwang Chapter 4: Opposition and Corresponding Squares Chapter 5:Spare Tempi Chapter 6: The Fight To Promote Chapter 7: Changing the Pawn-Structure Chapter 8: Calculation Chapter 9: Evaluating the Resulting Queen Endings Chapter 10: Positional Play
The reviewer will show examples distributed from all the chapters to give the reader a flavour of this instructional idyll.
Chapter 1: Obvious Errors
Position 21
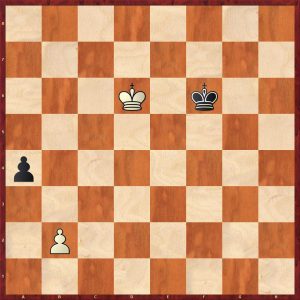
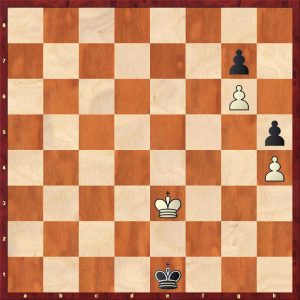
Movsesian-Sadvakasov Calvia Olympiad 2004 White to play
White, Movsesian, a 2600+ GM played the dreadful blunder 59.Kc6? (throwing away a totally winning pawn endgame. 59.Kc5! wins as the threat is to play Kb4 which will preserve white’s remaining pawn as a b-pawn with the king in front and a reserve tempo move of b3, if 59…a3 60.bxa3! Ke7 61. Kc6 Kd8 62.Kb7! and the a-pawn promotes) 59…Ke6 60.Kb5 reaching this position:
Movsesian-Sadvakasov Calvia Olympiad 2004 Move 60 Black to play
Now, black drew with a common, but nevertheless neat idea: 60…a3! (transforming white’s pawn into a now useless a-pawn, as black’s king is just close enough to draw) 61.bxa3! Kd7! 62.Kb6 Kc8! reaching c8 with an elementary draw
Position 22
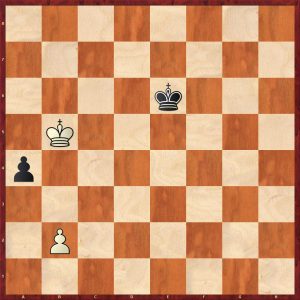
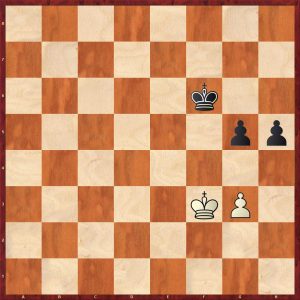
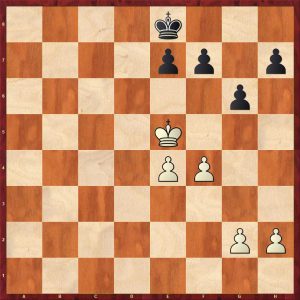
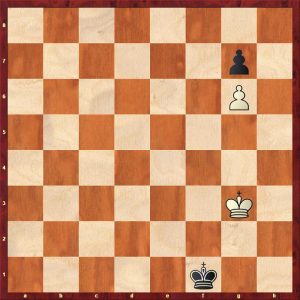
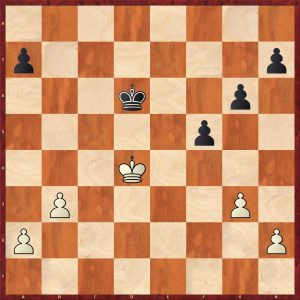
Forcen Esteban – Lagarde Internet rapid 2019 Move 83 Black to play
This position is simpler than the last one. Both players are rated well over 2500! Black is to play here and after the obvious 83..b3, it is crystal clear to a novice player that both sides are going to promote with a draw, even though white promotes first. If 83…Kb7 trying to impede the advance of the d-pawn, white can play 84.Kf6 making sure that the d-pawn does promote with a stone cold draw. Black played 83…Kb8? (Placing the king on the back rank presumably in the mistaken belief that he could stop the white pawn from promoting. 84.Kf6! b3 85.d7! followed by promoting with check, winning the game, thanks to black’s foolish Kb8 move!
Chapter 2: Breakthrough
This is a key topic in pawn endings and there are many beautiful examples. Sometimes, the threat of a breakthrough can limit the opponent’s king manoeuvres, thus winning the game indirectly. Once a player has seen some pretty examples of this theme, they are never forgotten.
Position 33
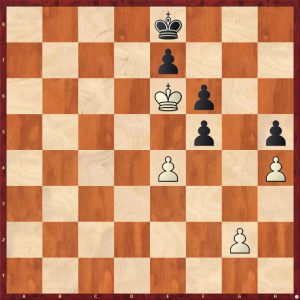
Nikolic-Lautier Reykjavik rapid 2004 White to play
White missed a chance for a standard breakthrough against black’s mangled pawns viz: 35.h5 Kd7 36.g5 reaching this key position:
Nikolic-Lautier Reykjavik rapid 2005 Move 36 Black to move
Now there are two main variations:
A) 36…Ke8 37.gxh6! Kf8 38.Kc2 Kg8 39.Kb3
Nikolic-Lautier Reykjavik rapid 2005 variation A
and white wins the race to get a new queen for example: 39… Kh7 (39…a5 40.a4 breaks through) 40.Kb4 Kxh6 41.Kc5 Kxh5 42.Kxd5 Kg4 43.Kc6 Kxf4 44.d5 wins easily
B) 36…fxg5 37.fxg5! Ke8 38.gxh6! Kf8 39.Ke3
Nikolic-Lautier Reykjavik rapid 2005 variation B
39…Kg8 40.Kf4 Kh7 41.Kg5 winning
Back to the original position: white played 35.Kc2? f5! 36.g5 h5! 37. Kb3 draw agreed
Position 36
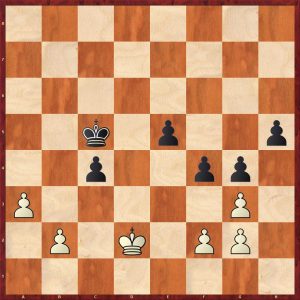
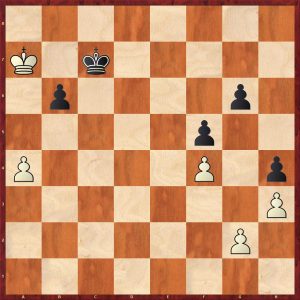
Gashimov-Anastasian Dubai 2003 Move 53 White to play
White has an outside passed a-pawn and was probably dreaming of swapping his a-pawn for black’s c-pawn, leaving black to deal with an outside passed b-pawn, while white’s king mops up the king side pawns winning the game, hence his next move 53.Kc3?
A more alert white player would have spotted the danger of black’s advanced kingside pawns. It might look as though black can only create a passed e-pawn as his extra kingside pawn is on the e-file, but this an illusion: black can now breakthrough creating a pawn configuration that ties down the white king permanently, thus allowing black to win on the queenside. Once seen never forgotten! 53…e4! would have won threatening e3 or f3 winning, if 54.Kd2 f3! 55.gxf3 exf3 reaching a position similar to the game
53…Kd5? 54.a4? Pursing his faulty plan, 54.Kd2! would have drawn 54…e4! 55.Kd2 (55.gxf4 allows an immediate breakthrough 55…e3! 56.fxe3 h4! and the h-pawn queens) 55…f3! 56.gxf3 exf3! reaching this position:
Gashimov-Anastasian Dubai 2003 Move 56 White to play
White’s king is tied down and cannot cross to the c-file as this allows a decisive breakthrough of h4! Therefore black’s king can invade on the queenside with decisive gains viz: 57.Ke3 Kc5 58.Ke4 Kb4 59.Kd4 Kxa4 60.Kxc4 h4 61.b3+ Ka3 62.gxh4 g3! 63.Kd40-1
Position 38
Mamedyarov-Sokolov Hoogeveen 2006 White to play
White missed the elegant 59.f5! b3 60.Kc3! Kd5 61.e6 fxe6 62.f6 62…gxf6 63.h5! and the h-pawn queens.
White played 59.Kc4? and still won after black missed a draw.
Chapter 3: Zugzwang
Here is a subtle example, but nevertheless didactic:
Position 56
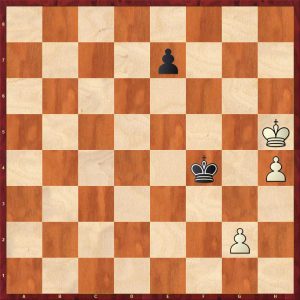
Grabarczyk – Rustemov Koszalin 1997 Black to play
This ending looks like an easy win for black with a extra passed pawn. But be careful! Black played the natural 52…Kg5? which throws away the win. This won’t become clear for a few moves. 52…Kg6! wins 53.f4+ exf3 54.Kxf3! h5 55.Kg3! reaching a position of mutual zugzwang:
Grabarczyk-Rustemov Mutual Zugzwang
If black had played 52…Kg6, white would be on move here and would be lost as 56.Kh3 or 56.Kf3 would be met by 56…h4 and any other king move would allow 56…Kg4 winning easily.
The game continued 55…h4+ 56.Kf3! Kh5 57.Kf4! Kh6 58.e4! h3 59.Kg3 drawn
Chapter 4: Opposition and Corresponding Squares
The introduction to this chapter is excellent explaining the concept of the opposition, the distant opposition, corresponding squares and triangulation.
Here is a simple example from a game between players rated in the 2400s:
Position 70
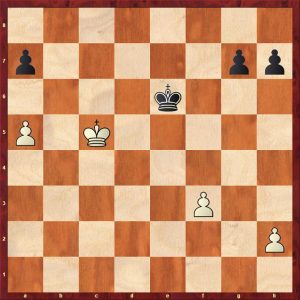
Heim – Helmers Reykjavik 1981 White to play
White played the “active” 55.Ke4? (55.Kf2! maintaining the distant opposition draws a textbook ending) 55…Ke6! winning the opposition 56. Kf3 Kd5 bypassing 57.Ke3 Ke5! 58.Kf3 Kd4 (another bypass) 59.Kf2 Kd3 60.Kf3 g4+ and white threw in the towel
Chapter 5: Spare Tempi
Position 105
Siugirov – Lupulescu Jerusalem 2015 Black to Play
The author’s explanation of black’s defensive plan here is pithy and pedagogical:
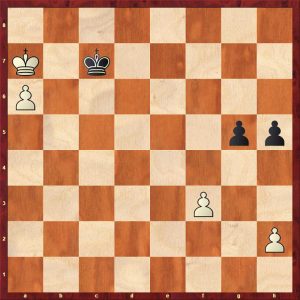
“Black’s defensive plan is to let White take the a7-pawn and then block the king in permanently in front of his own a-pawn. For this idea to work, Black needs a spare tempo on the kingside, as otherwise he will be forced to release the white king from its a-file prison. Immediately fixing the kingside pawns by 43…g5!? secures two such tempi and is the simplest path to a draw viz: 44.Kc6 Ke5 45.Kb7 Kd6! 46.Kxa7 Kc7! 47.h3 h6 48.a6 h5!”
Siugirov – Lupulescu Jerusalem 2016 Trapped king
White does not enough tempi to release his imprisoned king.
In practice Black played 43…Kd7 which retains the draw but mis-defended on the next move and lost.
Interestingly, I had a similar position in a game many decades ago with reversed flanks. I won the game and proudly showed the endgame to a friend, who promptly demonstrated a drawing plan for my opponent identical to this game.
Chapter 6: The Fight To Promote
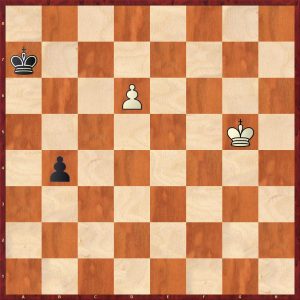
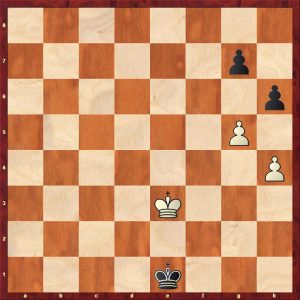
Mchedlishvili – Jankovic Dubai 2009 White to move
White totally mis-assessed the resulting king and pawn endgame after the exchange of queens here. He probably thought that his connected passed pawns on the kingside were at least a match for black’s queenside majority.
What white missed was that black can create a passed a-pawn and a passed d-pawn (separated by two files) and these pawns can reach the fifth rank safely which means they are unstoppable.
White played the desperate 39.c4 dxc4+ (39…bxc4+ also wins) 40.Kc3 a3 41.h4 Kg6 42.g5 h5 43.Kd2 b4 44.Kc2 c3 white resigned
7: Changing the Pawn-Structure
This is one of the most complex chapters and the hardest to evaluate in practice.
The reviewer will show an excellent example to show a typical idea:
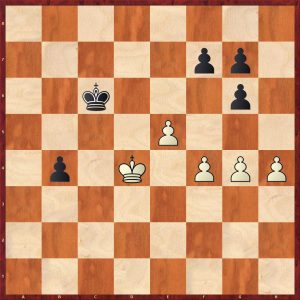
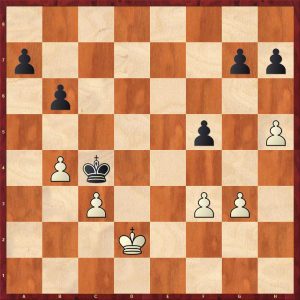
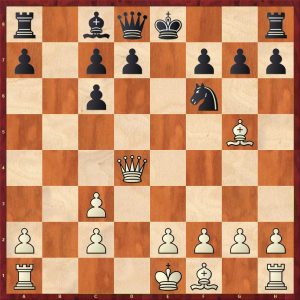
Position 153
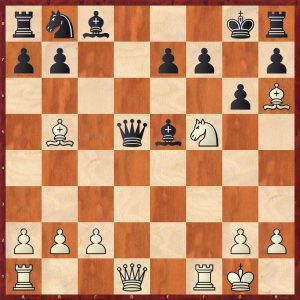
Kasparov – Azmaiparashvili Geropotamos rapid 2003 Black to play
Black played the automatic 46…Kc6? White won with a well known technique exploiting the fact that his king is one move ahead in the race to the kingside 47.h4! f5 48.g3! Kc5 (48…Kc7 49.Ka7 Kc6 50.Kb8 wins) 49.Kb7! and black resigned because of this variation: 49…b5 50.axb5 Kxb5 51.Kc7 Kc4 52.Kd6 Kd3 53.Ke6 Ke3 54.Kf6 Kf3 55.Kxg6! Kxg3
Kasparov – Azmaiparashvili Geropotamos rapid 2004 possible continuation White to play
56.Kg5! winning
Going back to the original position:
Kasparov – Azmaiparashvili Geropotamos rapid 2003 Black to play
Instead of the passive 46…Kc6? black can actively rearrange the kingside pawn structure to draw as follows:
46…h4! 47.Ka7 f5 48.h3
Kasparov – Azmaiparashvili Geropotamos rapid 2004 variation in missed draw Black to play
Kasparov – Azmaiparashvili Geropotamos rapid 2004 variation in missed draw move 57 Black to play
Black draws here with 57…Ke4! 58.Kg5 Ke5! 59.Kxh4 Kf4! 60.g4 (60.g3 Ke3 draws) 60…Ke5! 61.g5 f4! 62.Kg4 Ke4! leads to a drawn Q + h-pawn v Q endgame
Kasparov – Azmaiparashvili Geropotamos rapid 2004 variation in missed draw move 62 White to play
Position 158
The reviewer loves this endgame.
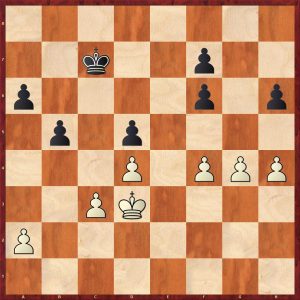
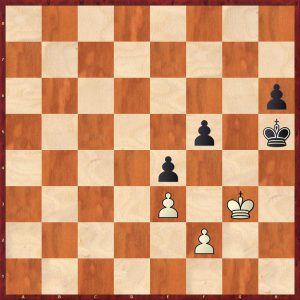
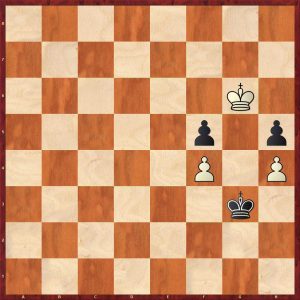
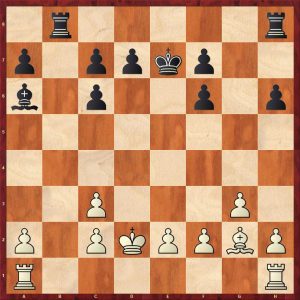
Gelfand-Jobava (Move 50)
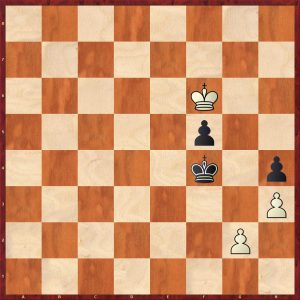
This king and pawn ending is clearly drawn but white is pressing with a more advanced king. White played 50.h4 setting a subtle trap. 50…h5? losing, incredible to believe but it is true. 50…Kd7 draws, for example 51.g4 f6+ 52.Kd5 e6+ 53.Kc5 h6 54. e5 fxe5 55.fxe5 Kc7 seizing the opposition and drawing 51.f5! f6+ 52.Ke6! gxf5
Gelfand-Jobava (Move 53)
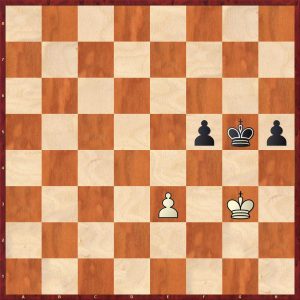
Now white played 53. e5! which had been completed missed by black (automatic recapture syndrome) 53… fxe5 54.Kxe5! Kd7 55.Kxf5! Kd6 56.Kg5 Ke5 57.Kxh5! Kf4
Gelfand-Jobava (Move 57)
Now white can enter a winning queen endgame with 58.Kg6! e5 59.h5! e4 60.h6! e3 61.h7! e2! 62.h8Q e1Q
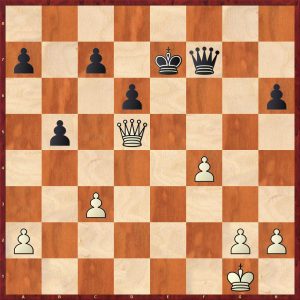
Gelfand – Jobava Dortmund 2006 Queen Ending White to play
This looks drawn as the white g-pawn is only on the second rank and the black king is close to it. However, white has a series of checks to exploit the poor position of the black pieces viz:
63. Qb8+ Kg4 64. Qc8+ Kf4 (64…Kg3 65.Qh3! is the same as the game) 65. Qf5+ Kg3 66.Qh3+ Ke5 67.g4!
Surprisingly this is a tablebase win even though the g-pawn is only on the fourth rank. Looking more closely at the position, black’s pieces are badly placed with the king interfering with the queen. If the black king was in the south west corner, he would draw.
Gelfand did win this game about 50 moves later after mistakes by both sides.
Chapter 8: Calculation
Clearly this is absolutely critical in king and pawn endings. Here is a relatively simple example:
Position 172
Ikonnikov – Liogky Paris 1998 Black to play
Black played the obvious exchange 47…hxg5? which loses trivially 48.hxg5! Kf1 49.Kf3! Kg1 50.Kg3 (50.g6 Kh2 51.Kg4! also wins) 50…Kg1 51.g6! Black resigned as white’s king travels to f7 and black’s cannot get to h6 in time.
Ikonnikov – Liogky Paris 1999 Final Position Black to play
Going back to the start:
Ikonnikov – Liogky Paris 1998
Black can draw with 47…h5! After 48.g6 viz:
Ikonnikov – Liogky Paris 1999 Drawing Line
As soon as white plays Kxh5, black will answer Kf4 stalemate! If white goes after the g-pawn, black draws by going after the h-pawn, for example 48…Kf1 49.Kf4 Kg2 50.Ke5 Kh3 51.Ke6 Kxh4 52.Kf7 Kg3 53.Kg7 h4 54.Kf6 h3 55.g7 h2 56.g8Q+ Kf2 drawing
Chapter 9: Evaluating the Resulting Queen Endings
The introduction to this chapter by the author is a superb summary of the intricacies of these transitions. The reviewer has already given an example from Chapter 7 (position 158), so I will leave the reader to buy the book to sample this chapter.
Chapter 10: Positional Play
Position 259
Radjabov – Ding Liren Internet rapid 2021 Black to play
This looks very difficult for black as not only does white have a potential outside passed pawn but also a better king. He played 52…Kc6? and lost. Buy the book to find out how black can draw or work it for yourself!
In summary, this is a really good book and close study will reap rewards. The book is very well laid out and is easy to read with lots of diagrams. Thoroughly recommended.
FM Richard Webb, Chineham, Hampshire, 30th May 2021
“The Grunfeld Defence is one of the most dynamic openings for Black.
The opening was developed by two famous World Champions, namely Bobby Fischer and Garry Kasparov.
While theory is far from being exhausted and still developing, our author Grandmaster Milos Pavlovic made a strange case and found new alternatives to battle White’s setups. On top this book cuts through the dense theory that surrounds this opening and establishes a total new repertoire based around consistent strategies, concepts and novelties.
This is a fully revised and seriously extended edition of the original book published in 2017.”
About the Author:
“Grandmaster Milos Pavlovic was born in Belgrade in 1964. He has won many chess tournaments worldwide including becoming Yugoslav Champion in 1992. A well-known theoretician, he has published many well-received chess books and numerous articles in a variety of chess magazines. This is his 14th book for Thinkers Publishing.”
This theoretical tome is certainly a comprehensive guide to the contemporary opening theory of the Gruenfeld Defence from black’s point of view . It is certainly a repertoire book for black. There are pithy paragraphs that explain the ideas behind the moves but these are few and far between the dense variations. In my opinion, it is aimed at active 2000+ tournament players. This is in no way a criticism, but an inexperienced player wanting to learn the opening with just this book may be lost in a sea of variations without a mentor and/or a Gruenfeld primer book to explain the ideas.
In terms of layout, the book is easy to read, has sufficient accompanying text and plenty of diagrams to be able to get a good grasp of the lines. The chapter structure is logical with a strong bias toward the contemporary lines played at the top. This slant is perfectly reasonable as trendy lines trickle down to all levels.
This review will briefly summarise the suggested repertoire and highlight a few interesting variation choices from the author.
Chapter 1 covers the “old” Exchange after these moves:
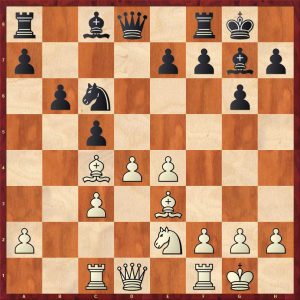
Diagram 1: Old Exchange Variation after10…b6 11.Rc1
The author has recommended the modern 10…b6 which is the key line now. This supersedes the old 10…Qc7 of Fischer-Spassky days.
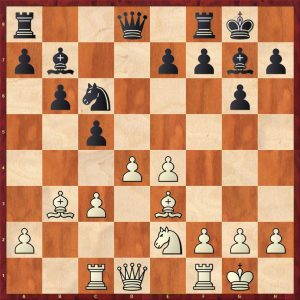
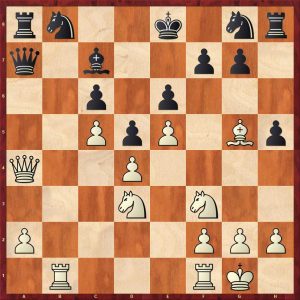
The last line covered in this chapter is 11…Bb7 12.Bb3!?
Diagram 2: Old Exchange after 10…b6 11.Rc1 Bb7 12.Bb3
The main move here is 12…cxd4 but the author suggests 12…Na5!? as an improvement. 13.d5 e6 14.c4 exd5 15.exd5 Re8
Diagram 3: After 15…Re8
The author gives 16.h3 (Stockfish suggests the irritating 16.Ba4 when 16…Re5 17.Qd3 17…a6 looks to equalise) 16…Bc8 a neat manoeuvre to rearrange black’s minor pieces to better posts 17.Ng3 Nb7 18.Qd2 Nd6 =
Back to the main line after 12…cxd4 13.cxd4 Na5 14.d5 reaching this position:
Diagram 4: After 14.d5
I like the author’s didactic comment on this position, explaining white’s positional idea with 14.d5:
“That’s the idea. White doesn’t care about his bishop on b3; he wants to trade the dark-squared bishops on d4 and play a middlegame with a strong knight against a poor bishop on b7”
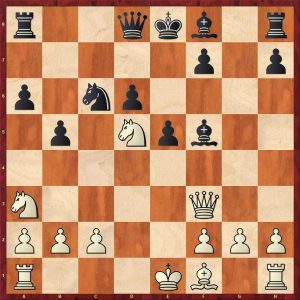
14…Qd6 15.Re1!?N (15.Bd4 Ba6! ridding black of his poor bishop by exploiting the pin on white’s e2 knight which equalises as played by Gruenfeld expert Grischuk)
Diagram 5: After 15.Re1
15…Rac8 16.Rxc8 (16.Qd2 Nxb3 17.axb3 f5! striking in the centre to equalise) 16…Rxc8 17.Bd4 Ba6 activating the prelate 18.Bxg7 Kxg7 19.Nd4!
Diagram 6: After 19.Nd4
White has achieved his goal of centralising his horse although black has activated his bishop and rook. White’s plan is now to advance the h-pawn: black must not faff about. Hence 19…Qb4 20.h4 Qc3! 21.h5 Bd3 with equality.
Chapter 2 covers the “sidelines” other than 11.Rc1 from Diagram 1 above. Sidelines is a slight misnomer as these lines are all important.
The three moves covered are the solid 11.Qd2, the greedy 11.bxc5 and the aggressive 11.h4.
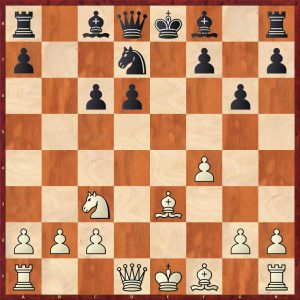
After 11.Qd2 a main line continuation with typical Gruenfeld moves is: 11…Bb7 12.Rad1 cxd4 13.cxd4 Rc8 14.Bh6 Na5! 15. Bxg7 Kxg7 16.Bd3 Nc4 17.Bxc4 Rxc4 reaching a balanced tabiya position where both sides have their trumps:
Navara – Ding Prague 2019 after 17…Rxc4
The greedy 11.bxc5 is obviously critical as it wins a pawn but black has good positional compensation.
Old Exchange after 10…b6 11.bxc5
After 11…Qc7! the obvious 12.cxb6 axb6 winning a pawn is dismissed briefly with a couple of variations. I do not disagree with the author that this line gives white no advantage, but black players should study this line in more detail, as it is common response from white players.
After 11…Qc7 12.Nd4 Ne5 13.Nb5 Qb8! reaches a key position:
11.bxc5 main line
There are two critical lines, the greedy 14.Bd5 and the more popular, solid 14.Be2
Both lines are covered in detail showing adequate play for black to equalise.
11.h4 is extremely interesting and in the author’s opinion, the critical test of 10…b6.
Old Exchange Variation 10…b6 11.h4
Black should respond 11..e6 12.h5 Qh4
After 12…Qh4
White has two main moves here, the reviewer will show a pretty line after the natural 13.hxg6 hxg6 14.f3 cxd4 15.cxd4 Rd8 16.Qd2
After 16.Qd2
Black looks to be in trouble with 17.Bg5 threatened, however black calmly develops with 16…Bb7 offering a poisoned exchange, after 17.Bg5 17…Qh5 18.Bxd8 loses, after 18…Rxd8, the two bishops and white’s gapping black squares lead to defeat, for example 19.d5 Ne5 20.Rac1 Nxc4 21.Rxc4 Ba6 22.Ra4 Bh6 wins
13.Qc1 is much more dangerous, buy the book to find out how black neutralises this enterprising continuation.
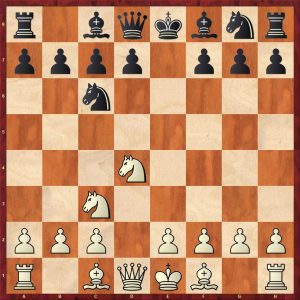
Chapter 3 is all about the Modern Exchange variation with 8.Rb1.
As the author points out, this is a well-known weapon, and for a while, a few decades ago, created massive problems for the Gruenfeld opening. Its fangs have now been drawn; at the moment there are at least two decent variations that equalise for black. Several recent Gruenfeld books such as those by Delchev and Kovalchuk recommend 8…0-0 9.Be2 Nc6 (with 13…Bc7!) which has been known for a while to be perfectly viable for equality. The reviewer thinks that line is perhaps simpler for black, but both that line and the author’s suggestion require a significant amount of theoretical knowledge.
Pavlovic recommends the “old fashioned” Qa5+ taking the a2 pawn.
Modern Exchange after 10…Qa5+
11.Qd2 is rather anaemic, leading to an equal ending.
After 11.Bd2!? Qxa2 12.0-0 Bg4! Quick development to put pressure on the d4 pawn, not worrying about the b7 pawn.
13.Rxb7 leads to equality although black has to be careful.
Modern Exchange after 13.Rxb7
Now 13…Bxf3 14.Bxf3 Bxd4 15.e5 Na6! 16.Rxe7 Rad8 is ok for black, the pressure on the d-file makes it hard for white to generate a serious initiative.
The last two sub-variations in this chapter are in a very sharp line:
Modern Exchange after 14.Bh4
The author gives two lines for black to achieve equality: 14..g5! and 14…a5! The fact there are two good lines indicates that the line is clearly satisfactory for black.
This is a large chapter and one of the major white systems. There are many subtleties in the placing of white’s rook on c1 or b1. The author has 15 principal lines.
This is the position in the 10.Rb1 line viz:
Modern Exchange after 10.Rb1
Pavlovic recommends two different variations for black here:
10…cxd4 going into the queenless middlegame
10…a6 waiting and preventing Rb5
After 10…a6 white’s main move is 11.Rc1: white argues that 10…a6 has weakened black’s queenside.
Black again has two alternatives:
11…cxd4 going into the queenless middlegame
11…Bg4 keeping the queens on
If instead of 10.Rb1 white plays 10.Rc1, Pavlovic unequivocally recommends 10…cxd4 11.cxd4 Qxd2+ as this ending is definitely ok for black.
White can play Be3 and Qd2 before Nf3:
Modern Exchange after 9.Rc1
In this, the recommended line is to exchange queens with 10…cxd4 11.cxd4 Qxd2+ which lead to an interesting ending where black is holding his own.
Chapter 5 covers 7.Nf3 c5 sidelines
These variations include:
8.h3
8.Be2
8.Bb5+
I have never faced 8.h3 and have rarely met 8.Bb5+.
On the other hand, I have faced 8.Be2.
There is an exciting exchange sacrifice in this line viz:
1.d4 Nf6 2.c4 g6 3.Nc3 d5 4.cxd5 Nxd5 5.e4 Nxc3 6.bxc3 Bg7 7.Nf3 c5 8.Be2 Nc6 9.d5 (9.Be3 is inept 9…Bg4! and black is at least equal) 9…Bxc3+ 10.Bd2 Bxa1 11.Qxa1 Nd4 12.Nxd4 cxd4 13.Qxd4
Exchange Variation 8.Be2: main line after 13.Qxd4
Black has two moves, the obvious 13…f6 preserving the material advantage and the probably safer 13…0-0
After 13…f6, the author is of the opinion that 14.Bc4! is exciting and dangerous
After 13…0-0 white can regain the exchange with the obvious 14.Bh6 but loses time and forfeits castling rights after 14…Qa5+ 15.Kf1 f6 16.Bxf8 Rxf8 – this is equal
14.0-0 is more ambitious when 14…Qb6! 15.Qa1!? Bd7 16.Bh6 f6 17.Bxf8 Rxf8 18.Rb1 (18.Qb1 leads to a drawn bishop endgame) 18…Qc7 leads to approximate equality
Chapter 6 covers alternatives on move 7 in the Exchange Variation:
Exchange after 6…Bg7
The book shows the following four alternatives:
7.Ba3
7. Bg5
7.Bb5+
7.Qa4+
These moves are rare: in full length games, the reviewer only recalls facing 7.Ba3 once, 7.Bg5 once and has never faced the other two.
Pavlovic handles these lines well. It is interesting that his recommendation against Bb5+ is to play 7…c6 and then play for e5. Many books have suggested rapid queenside expansion for black.
The super trendy 5.Bd2 which is played at all levels
After 5.Na4
After 5.Na4
Pavlovic recommends the dynamic 5…e5 striking in the centre which is the top engine suggestion. This draws the teeth of this extravagant knight move. (5…Nf6 6.Nc3 Nd5 7.Na4 has been played as a silly repetition draw).
5.Bd2 is a different kettle of fish, the idea is to recapture the knight on c3 with the bishop:
After 5.Bd2
The author recommends a straightforward approach from black viz:
5…Bg7 6.e4 Bxc3 7.Bxc3 0-0 maintaining flexibility & waiting to see which setup white adopts.
After 7…0-0
The two main lines here are 8.Bc4 and 8.Qd2 which the author covers in great detail. Shirov’s idea of 8.h4!? is covered very briefly with a variation given that is far from best play for white.
In the reviewer’s opinion this is a very important chapter, as this variation is so popular to avoid main line theory. Ironically, this setup now has a large body of practice.
Chapter 8 covers the Russian System. Pavlovic recommends the Prins Variation which is 7..Na6.
Prins Variation
As the author points out, black can play this variation against many of white’s tricky move orders involving Qb3. The Prins Variation was often used by Garry Kasparov, so has an excellent pedigree. The reviewer loves this part of the repertoire as black avoids the Hungarian 7…a6 and 7…Nc6 which are both decent systems but very topical. Avoiding the most popular lines does have its advantages.
Chapter 9 covers Qa4+ ideas which is a short chapter. Qa4+ ideas are usually used as a move order trick to get black out of main line theory.
There are two really important positions in this chapter.
and after 1.d4 Nf6 2.c4 g6 3.Nc3 d5 4.Nf3 Bg7 5.Qa4+ Bd7 6.Qb3 dxc4 7.Qxc4 0-0 8.e4
Early Qa4 with e4
White has played a move order to disrupt black’s development by giving him an extra move of Bd7. However, black can exploit the bishop on d7, to play 8…b5! in both positions gaining good play with this energic pawn sacrifice.
Chapter 10 covers the 4.Bf4 line which is very popular at club level and was played by Karpov against Kasparov.
The author gives three major sub-variations in the main line:
4.Bf4 main line
14.g4
14.Nxe4
14.Nd5
All these lines are well known and black has equality with care.
Pavlovic suggests a really interesting idea early in one of the main lines which I had not seen before:
Chapter 11 is all about Bg5 ideas which occur on move 4 or 5.
Against 1.d4 Nf6 2.c4 g6 3.Nc3 d5 4.Nf3 Bg7 5.Bg5, Pavlovic suggests the traditional 5…Ne4 and against 4.Bg5 he also approves of the knight move to e4.
The solid repertoire here is pretty well known and respectable.
Chapter 12 is a brief chapter on 1.d4 Nf6 2.c4 g6 3.Nc3 d5 4.Nf3 Bg7 5.h4!?
After 5.h4
The author recommends 5…c6 which is solid and sensible. The author states this is an important new line: it has been around for decades.
After these sensible developing moves 6.cxd5 cxd5 7.Bf4 0-0 8.e3 Nc6 9.Be2 Bg4 resembles a Slav Defence.
Morozevich-Nepomniachtchi 2014
White has absolutely nothing here. A draw was soon agreed.
Chapter 13 is about 4.e3 which is a solid continuation, not generally played by the top players. It covers a topical line:
1.d4 Nf6 2.c4 g6 3.Nc3 d5 4.e3 Bg7 5.cxd5 Nxd5
Quiet 4.e3
Now white draws the black queen into the centre with 6.Nxd5 Qxd5 only to manoeuvre his other knight to gain time 7.Ne2 0-0 8.Nc3 8…Qd6
After 8…Qd6
But it’s all too slow really. After 9.Be2 black can play 9…c5! sacrificing a pawn for loads of play 10.Nxe4 (10.d5 is the main line but leads to nothing for white) 10…Qc7 11.Nxc5 e5 12.0-0 Rd8 13,Nb3 Nc6 reaching this position:
After 13…Nc6
White can retain his extra pawn with 14.d5, but 14…e4! gains space and after 15.Qc2 Rxd5 16.Qe4 Be6 black has excellent play for a pawn.
The author fails to cover 6.Be2:
After 6.Be2
This is a solid line that can lead to a reversed Queen’s Gambit, Tarrasch after 6…c5 7.0-0 cxd4. I have faced this as black, against an an IM, so perhaps it should have been covered. Of course, the author has to make a decision on what to include: as this is not a fashionable line, I can understand why the line was omitted.
The final chapter covers 3.f3, a popular anti-Gruenfeld system.
The author recommends the “old” main line with 3…d5 which some authors have eschewed in favour of other systems such as 3…c5 transposing into a kind of Benoni or simply going into a King’s Indian Defence.
The key tabiya is this:
Ding-Gelfand Wenzhou 2015
The analysis given by the author is an excellent coverage of all the critical lines from this position and happens to very largely agree with my own investigations.
Here is one fascinating endgame that results after 16.d6 e4! 17.fxe4 Ng4 18.Bg5 Qe8 19.Nf3 Rf7! 20.Qe1 Bxc3! 21.bxc3 Na4 22.Rc1 Nc5 23.Bc4 Be6 24.Bxe6 Qxe6 25.Be7 Nd3 26.Qd2 Nxc1 27.Ng5 Qxa2+ 28. Qxa2 Nxa2 29.Nxf7 Nxc3+ 30.Ka1 Kxf7 31.d7 Ra8 32.d8Q Rxd8 33.Bxd8 Nxe4 34.Rxb7 Ne3 35.Rb2 Kd5
3.f3 crazy forced line to 35…Kd5
This is a draw as white’s rook and king are passive. This occurred in a correspondence game and the reviewer has had it in an on-line blitz game: white allowed a perpetual with the two knights in a few moves.
The only major variation that has been missed from the book is the Fianchetto Variation which is pretty popular as a solid, positional line. In the reviewer’s last game with the Gruenfeld, he did indeed face a Fianchetto Variation. This is a significant omission but does not spoil an excellent publication on the Gruenfeld Defence.
The reviewer notes a fair few typos in the book.
FM Richard Webb, Basingstoke, Hampshire, 12th May 2024
FM Richard Webb
Book Details :
Hardcover : 404 pages
Publisher:Thinkers Publishing; 2nd edition (2 May 2024)
“The book you have just started reading is about a very interesting and difficult concept: the exchange sacrifice. This is the moment in chess when basic mathematics breaks down, the moment when 3 counts equal to or even more than 5. So let us leave the mathematics aside and try to figure out why this simple calculation is so difficult to understand.
The answer is largely hidden in psychology, as the ninth World Champion, Tigran Petrosian, has often told us, as the man who brought this strategic-tactical chess concept to its first peak. Chess beginners were taught the value of pieces by their teachers (parents, grandparents, perhaps at school or even later in the beginners’ sections of chess clubs).
We explain the difference between piece values to children in the simplest way possible, with the help of a unit of measurement, and in chess those units are the pawns. They tell us that a rook is worth five pawns (units) and a knight and a bishop are worth about three each. They also tell us to always be careful, especially during exchanges, to ensure we take at least as much from our opponent as he or she took from us. So, one rook at a time, perhaps for a bishop and a knight next to two pawns. This “chess thinking” is done quickly and very strongly subconsciously in most, one could even say all. Therefore, when choosing moves, we will automatically reject unfavourable exchanges. But who trades a queen for a knight, a bishop for a pawn, and the like? We know from our own life experience that it is better to have ten coins in our pocket than three, and I prefer three to one!
This psychological barrier is the most difficult step in making the decision to sacrifice. And so it is with the sacrifice of an exchange. Five for three, that is! Even five for four, if we get a pawn for the rook along with the knight or the bishop. “I am not stupid,” you think. The Exchange Sacrifice Unleashed brings different games or coaches try to explain this and that to us, we see that a material advantage is not always something to celebrate about.”
About the Author:
“Georg Mohr was born in Maribor, Slovenia in 1965 becoming a Grandmaster in 1997. He joined as a member of the FIDE Trainers Commission from 2002, becoming a FIDE Senior Trainer in 2004 and a FIDE International Organizer in 2011. Georg has been a professional chess trainer for many years. He was coach and captain of Slovenian national team from 2003 – 2010 and since 2011 he has been Turkish national youth trainer. He is a chess writer and was editor of Slovenian chess magazine Šahovska Misel from 1999 and editor of Fide Trainers Commission trainers’ surveys. He is also an organiser of chess events acting as tournament director of the European Club Cup (Rogaška Slatina 2011), the World Youth Championship (Maribor 2012) and the World Senior Championship (Bled 2018). This is his third book for ‘Thinkers Publishing’.”
Chapter 1 – The Exchange Sacrifice for the Attack
Chapter 2 – Defence!
Chapter 3 – Ending
Chapter 4 – Exchange Sacrifice in the Opening
Chapter 5 – Critical Squares
Chapter 6 – The Positional Exchange Sacrifice
Chapter 7 – World Champions and the Exchange Sacrifice
Chapter 1 is divided into seven themed subsections, each with plenty of entertaining and didactic examples of exchange sacrifices for the attack.
Here is a splendid finish from the “King in the centre” segment:
Geller-Karpov Moscow 1976
Karpov, who was crowned World Champion, in 1975, had played a rather inept French Defence, Winawer variation. The great theoretician, Efim Geller finished him off neatly with a exchange sacrifice removing a key defender:
21.Rxb8+! Qxb8 (21…Bxb8?? 22.Qxc6+ wins quickly) 22.Qxc6+ Kf8 23.Nf4 Ra7 24.Nh4 (The knights close in to stomp on Black) 24… Qe8?! (Allowing a lovely combination)
Here is a very famous defensive exchange sacrifice from Chapter 2.
Reshevsky – Petrosian Zurich 1953
Black, Petrosian is some trouble as White dominates the centre, has more space and good attacking chances on the kingside with h4, h5 etc.
Black played 25…Re6! If White takes the exchange straightaway with 26.Bxe6 fxe6, he cannot prevent Black’s knight moving to d5, a possible continuation is 27.Rf3 Ne7 28.Bc1 Nd5 29.Qg3 Rc8 30.Bd2 b4! reaching this position:
Reshevsky-Petrosian Zurich 1953 Variation
Black has plenty of play with very active pieces and White’s rooks defensively placed. This is a Petrosian blockade at its best. Modern analysis suggests 26.h4! as best.
The game continued 26.a4 Ne7! 27.Bxe6 fxe6 reaching this celebrated position:
Reshevsky-Petrosian Zurich 1953 after move 27
Black is almost equal, Reshevsky bailed out with a draw on move 41.
Chapter 3 is an excellent chapter about exchange sacrifices in the ending.
Here is an instructive position with a pawn up in a rook and opposite colour bishop ending:
Isgandarova – Zimina Riga 2017
White has just played 79.Kh3 and at first glance appears to be holding. Black played 79…Rxc5! 80.bxc5 Kd5 winning another pawn: the passive rook dooms White and Black won by pushing the b-pawn supported by the king.
A famous Fischer finish is very instructive:
Lombardy-Fischer New York 1960
White has just played 30.Re1? which Fischer ruthlessly exploited with a neat simplification:
30…Rxc3+! 31.bxc3 Rxe5+ 32.Kd2 Rxe1 33.Kxe1 Kd5 34.Kd2 Kc4 35.h5 b6! creating an outside passed pawn which won easily:
Lombardy-Fischer New York 1961 after move 35
Chapter 4 covers some exchange sacrifices in the opening. I shall give two examples, one of which I fell into as a junior player:
Dieks – Van der Sterren After 13.Qf3?
White has just played 13.Qf3? winning material which was met with the excellent 13…Nd4! 14.Nc7+ Qxc7 15.Qxa8+ Ke7 with a nasty threat of b4! 16.c3 b4! 17cxb4 Qb6 18.Bxa6 Qb4 19.Kf1
Dieks – Van der Sterren After 19.Kf1
Now, the engine gives 19…Bh6! which wins prettily. The game continued with the tempting 19…Qd2 20.h3 (20.h4! limits White disadvantage, 20.Re1?? is a gross blunder as played by the reviewer, losing to 20…Bd3+ followed by a smothered mate) 20…Bd3+ 21.Bxd3 Qxd3+ 22. Kg1 Bh6! 23. Qb7 (23.Qxh8 Ne2+ 24.Kf1 Ng3+ 25.Kg1 Bf4! winning)23…Kf6 and Black won
There is a special section on some Gruenfeld exchange sacrifices:
Gruenfeld Bronstein’s Exchange Sacrifice
Gruenfeld Modern Exchange Sacrifice
Buy the book to see a couple of exciting Gruenfeld games.
There are of course, plenty of Sicilian Rxc3 examples which is the most famous and important exchange sacrifice. Here is an example from the Dragon Variation in an old variation which is rare nowadays:
Kasparov-Piket Tilburg 1989 After 16.Bh6!?
White’s attack looks powerful, but the well-known sequence starting with 16…Nxe4! leads to equality which modern engines confirm. 17.Qe3! Rxc3! removing the key attacker 18.bxc3 Nf6! Although Kasparov won, Black’s opening was a success.
A pretty example from a Sicilian Paulsen is given showing an offering for black square domination:
Giri-Vitiugov Reggio Emilia 2012
Black has just played the risky 6…Bb4 against one of the best theoreticians
Gipslis-Simagin Sverdlovsk 1957
which is ruthlessly punished: 7.e5! Nd5 8.0-0! Nxc3 9.bxc3 Bxc3 10.Ba3!
Giri-Vitiugov Reggio Emilia 2012 10.Ba3
Throwing in an exchange as well, Black is now in real trouble as his king is trapped in the with a weak colour complex on the black squares.
Chapter 5 Critical Squares has plenty of traditional Sicilian exchange sacrifices on c3.
Here is an example from the Sicilian Defence, Sozin Variation:
Gipslis – Simagin Sverdlovsk 1957 After 16.Rad1
Black played the natural 16…Rxc3! and won a nice game. The reviewer has played Rxc3 is a very similar position and also won a good game.
Chapter 6 – The Positional Exchange Sacrifice is really the heart of the book with 22 themes.
Here is a good example from the Exchange sacrifice to dominate the black squares section:
Adams – Khalifman Las Palmas 1993
Adams has played a rather insipid Classical Variation against the Dragon. Black played 17…Rxd4! 18.Rxd4 Rb8! (activating the black rook, also preventing white from playing Rb4) 19.f4?! (19.Rb1 with equality according to the engines, but black is having all the fun) 19…exf3 20.Bxf3 Bxe5 and Black won a lovely game.
The final chapter shows many didactic examples from the World Champions.
I would suggest that the book is aimed at 1750+ players. The book is well produced in an easy to read style with plenty of diagrams and themes to learn from.
However, there are more than a few typographical errors/grammatical errors and the reviewer has spotted an incorrect diagram at the top of page 31. Although this does not detract from the many merits of the book, perhaps future publications should address this.
FM Richard Webb, Basingstoke, Hampshire, 10th May 2024
The idea of the move 1. Nc3 is to confuse the second player, as White plays a supposedly unambitious move to mislead Black. This is why we found the name “Trojan Horse” very appropriate for the move 1. Nc3, just as the gift from Ulysses to the Trojans appeared to be a tricky and poisoned gift. The appropriate term for chess will, therefore, be the Trojan Knight to refer to the Trojan Horse.
1. Nc3 became popular among professional players, and many grandmasters have added it to their repertoire or played it occasionally in official games: Nakamura, Morozevich, Rapport, Bauer, Vallejo Pons… However, it is especially in rapid games that it has reached the world elite, and the very best players in the world have tried it: Carlsen, Mamedyarov, Andreikin and Firouzja for example. I truly hope that seeing the very best players in the world playing it will convince even the most sceptical critics.
About the Author:
The author Bruno Dieu is a FIDE Master and became French Correspondence Chess Champion in 2000. He has a rich experience in chess, having participated in various chess tournaments, both over the board and in correspondence. It’s fascinating that he has competed with notable experts and writers on the 1 Nc3, such as Dick Van Geet, Anker Aasum, and Harald Keilhack. The mention of a book being a token of his experience suggests that he has documented his insights and knowledge about this opening.
FM Bruno Dieu
This absorbing and well-thought tome is a delight and covers a wealth of material after White’s opening salvo with 1.Nc3.
First encounters
As a junior, the reviewer knew this opening as the Dunst opening. I first met the Dunst on 18 January 1975 in a simul in London against the late and great Tony Miles, a year before he became the first UK-born, over-the-board chess GM. The game transposed into the Four Knights opening and I was inevitably steadily outplayed by Miles, who won a pawn with a neat back rank combination in a major piece middlegame. Unexpectedly, Miles faltered in a winning rook and pawn endgame at move 47, wasting a vital tempo, allowing an excited junior to escape with a draw. My next encounter with the Dunst was a few months later against another strong Birmingham player. This time, booked up, I played the so called refutation with 1…d5 reaching this position:
Ball-Webb After10.Nh4
The inexperienced junior, as Black, came up with the positional howler 10…f5? but managed to draw again when my opponent blundered by opting to exchange into an optically good, but drawn king and pawn endgame. This line is covered in the book, 10…f6 is certainly a better move, although the author prefers 10.Nd2 for White.
A callow player as Black may regard the Trojan Knight as just another unusual opening move which aims to avoid main line theory. On the contrary, as the author points out, 1.Nc3 is a cunning move full of transpositional possibilities whereby the second player can end up in an unfamiliar opening.
I have faced the Trojan Knight on 15 occasions replying 1…e5 in my first game, 1…d5 in my second outing and 1…c5 in subsequent encounters.
The reviewer has opted for the Trojan Knight as White in a total of 15 games; the transposition statistics are of interest:
Sicilian (4 games)
French (2 games)
Caro-Kann (1 game)
Vienna (1 game)
Czech Pirc (1 game)
Irregular queen’s pawn (1 game)
1…b6 1 (game)
Trojan Knight main line 1…d5 2.e4 d4 (1 game)
Trojan Knight main line 1…e5 2.Nf3 Nc6 3.d4 (3 games)
This small sample shows the variety of branches available.
The book is logically divided into 6 parts:
PART I – 1…e5
PART II – 1…d5 2.e4 d4
PART III – 1…d5 2.e4 dxe4
PART IV – 1…d5 – Caro-Kann, French & Alekhine Style
PART V – 1…c5 – Sicilian Style
PART VI – Other First Moves
PART I – 1…e5
This is the natural response which was the move played by the reviewer on first meeting 1.Nc3.
After the following natural moves 1.Nc3 e5 2.Nf3 Nc6 3.d4 exd4 4.Nxd4 this position is reached:
1…e 5 Main Line
This position obviously has affinities with the Scotch Game and of course can transpose if both players acquiesce. Black can can get into difficulties very quickly here with a sloppy move. A few examples given are:
4…Qf6? (played in some lines of the Scotch) 5. Ndb5! winning as c7 collapses.
4… Qh4? 5.Ndb5! (winning)
4…g6? (looks natural to fianchetto, akin to Larsen’s fianchetto variation of the Philidor Defence) 5.Nd5! a6 (5…Bg7 6. Nb5 Be5 7.f4 wins) 6.Bg5! (6.Bf4 is also excellent) 6…f6 7.Bf4 d6 8.e4 Bg7 9.h4 with a clear advantage
4…d5?! (looks natural) 5.Bf4! a6 (5…Bb4 6.Nxc6 Bxc3+ 7.bxc3 bxc6 8.Qd4! with a big plus) 6. e4 with a definite edge
4…Bb4!? is interesting, White can gain an edge with the Scotch like move 5.Nxc6! bxc6 (5…dxc6 is obviously weaker) 6. Qd4! winning the bishop pair or forcing the horrid 6…Bf8?!
Black should interject the capture on c3 in the last line, after 4…Bb4!? 5.Nxc6 Bxc3+ 6. bxc3 bxc6 7.Qd4! Nf6 8.Bg5
PositionAfter8.Qd4
White has a small edge. A typical continuation could be 8…h6 9.Bxf6 Qxf6 10.Qxf6 gxf6 11. g3 Rb8 12.Bg2 Ke7 13.Kd2 Ba6
Larsen-Christiansen Denmark 2000
Now 14.Rhb1! with a slight edge to White in a complex endgame.
4…Bc5 is the best move along with 4…Nf6.
4…Bc5
The author offers three decent alternatives for white:
5.Be3
5.Nxc6
5.Nf5
5.Nb3 Bb6 6.e4 transposes a Scotch Game main line.
After 5.Nf5 Qf6, the author offers two interesting alternatives 6.g4 and 6.e4. He claims that 6.g4 is very strong, but the author’s analysis has a significant hole. After 6.g4 Bb4 7.Bd2 Nge7 8.e4:
8.e4
The author offers the anaemic 8…Nxf5 for Black, after 9.gxf5 Qh4 10.Qf3 Black is in real trouble. The reviewer smelt a rat here as Nxf5 looks too compliant: a quick check with Stockfish reveals 8…d5! equalising. This is a rare significant oversight by the author. Clearly the reviewer has not checked 450+ pages of dense variations but intuition has to be used to choose the positions to use the engine.
6.e4! is better as the author points out leading to Scotch positions where White has a space advantage and although the position is only fractionally better for White, it is easier to play for the first player.
4…Nf6 seems to be the most natural developing move. 5.Bg5! keeps the game in lesser known channels and is better than 5.e4.
5.Bg5
Black has to be careful here, not to slip into an inferior position.
The passive 5…Be7 allows 6.Nf5! and White has a definite advantage.
The natural 5…d5? allows 6.Bxf6! and White has a distinct edge.
The natural 5…Bc5! is ok setting up veiled threats against f2. 6.e3! Nxd4 (6…0-0 7.Nd5! and white is a little better) 7.exd4 Be7 Now 8.Qd2 is an improvement on the author’s 8.Qf3 leading to a small advantage to White.
The pin 5…Bb4 is certainly playable, 6.Nxc6 leads to a small White edge.
PART II – 1…d5 2.e4 d4
If there is a problem with 1.Nc3, it is definitely this variation which is critical as Black gains space and time. One of the crucial lines is 1.Nc3 d5 2.e4 d4 3. Nce2 (3.Nb1 Nf6!) 3…e5 4.Ng3 (4.f4 Nc6! 5.Nf3 Bg4!) Be6! 5.Nf3 (5.c3 Nc6!) 5…f6!
Best 5…f6
This line is the reason that the reviewer gave up on 1.Nc3.
White can try 6.Bb5+ c6 7.Be2!? (7.Ba4 Na6! 8.Bb3 Bxb3! 9.axb3 d3! 10.0-0 Nb4 11.cxd3 Nxb4 12.Ne1 Nh6 and Black has an edge.) 7…g6 (keeping the knight out of f5) 8.0-0 Qd7 9.b4!? Nh6 (9…Bxb4 10.c3! dxc3 11.d4 is better for White as Black’s development is lacking.) and Black is slightly better.
I hope that this short review gives the reader a glimpse into the complexities of this opening. My only small criticism of the book is that the author sometimes puts the best moves in an editorial side line but I realise this is to keep the featured game as the main line.
In summary, this is an excellent book.
FM Richard Webb, Basingstoke, Hampshire, 28th April 2024
FM Richard Webb
Book Details :
Hardcover : 475 pages
Publisher:Thinkers Publishing; 1st edition (1 Mar. 2024)
DragonMasters volume 1 charts the history of the most exciting and dangerous opening known to chess – the Dragon Variation of the Sicilian Defense.
Unlike almost all other books on the Dragon, the focus is not purely on theoretical development. Instead, the author has combined the most historically important games, the famous players who chose to fight either side (sometimes both sides!) of the opening, and the most unexpected and interesting stories featuring the Dragon. World Champions, contenders of the crown, code-breakers, revolutionaries in every sense of the world – all feature in this remarkable and entirely unique look into the history of an opening variation. as the ancient may say: Here be Dragons!
About the Author:
Andrew Burnett is a Scottish FM who represented his country on several occasions. He is the author of cult classic Streetfighting Chess and his love of the Dragon opening stretches back to his teenage years when he was looking to escape 1.e4 e5! He is currently working on the second volume of DragonMasters.
This book is volume 1 of a labour of love devoted to the history, praxis, and famous players who have unleashed the fury of the Dragon Variation or fought to quench the fire of the wyvern.
Volume 1 covers the origin of the Dragon to 1973.
The front and back cover is an engaging, colourful picture.
This publication is not a theoretical treatise on the latest developments in the Sicilian Dragon, although it does give theoretical analyses in relation to historical variations and famous clashes with some references to modern variations and theory.
Many great players have had the Dragon in their regular repertoire, although the reviewer was surprised to find a game of Mikhail Tal’s on the black side, as I had the impression that Tal always preferred the white side. Perhaps the result of the game in this book influenced Tal’s choice: he got crushed. The reviewer will show this amusing brevity later.
The author, Andrew Burnett has a sub-variation in the Modern Variation 12.Kb1 named after him viz:
Chapter 1 – In the beginning
Chapter 2 – Bird’s Folly
Chapter 3 – The World’s Finest Discover The Dragon
Chapter 4 – DragonMasters and DragonAmateurs
Chapter 5 – Hypermodernism and beyond
Chapter 6 – Botvinnik’s Trilogy
Chapter 7 – The War Years
Chapter 8 – The Post-War Years
Chapter 9 – When Giants take sides
Chapter 10 – Revolution in the 60s?
Chapter 11 – The Yugoslav Attack
Chapter 12 – DragonMasters and DragonWriters
Chapter 13 – Candidates and Contenders
Chapter 14 – The English Connection
Chapter 15 – The Dragon is Dead! Long Live the Dragon?
In the preface, Andrew Burnett shows a famous Dragon game which inspired the author to take up the Dragon; it also happens to be one of my favourites viz. Plaskett – Watson from Brighton 1983:
This position had been included in some theoretical treatises of the time with the +- symbol as White’s threat of Bxf6 and Qxh7# looks unstoppable. Jonathon Mestel had looked further and spotted 18…Bxg4! which muddies the waters. (As an aside, Stockfish 16 gives 18…Bxg4! as a draw and 18…Nh5! as a draw. This just shows the richness of chess and amazing hidden resources.)
19.Bxf6 Bh5! Simply blocking the h-file, giving Black time to continue with his attack. Jim Plaskett now goes wrong which is unsurprising as he must have been shocked by Black’s revelation.
20. Bd4? losing but only 20.Rxh5! equalises
Plaskett-Watson 20.Rxh5!
Best play after 20.Rxh5! leads to an unexpected repetition draw viz:
As is so often the case in these double edged lines, the game fizzles out to an exciting draw. Brilliant stuff.
The game continuation was a massacre 20…e5! 21.Rxh5 gxh5 22. Qg5 Qb4 23.Bd3 Qxd4 24. Nd5 Qf2+ 25. Be2 Rxc2+ 26.Kxc2 Qxe2+ 27.Kc3 Qxf3+ 28.Kc4 Qb3#
Plaskett-Watson End
Chapter 1 introduces the first games featuring a Sicilian with a black, kingside fianchetto.
The reviewer was under the false impression that Louis Paulsen was the first to play a Sicilian with a kingside fianchetto. Although Paulsen did play some Dragons including beating Steinitz in London in 1862, it was Marmaduke Wyvill who played the first recorded “high-level Dragon” in 1851 at the celebrated London International tournament. We all remember Adolf Anderssen winning that tournament but do we recall whom he defeated in the final? It was Wyvill.
Some of these first Sicilian fianchetto games don’t resemble the modern Sicilian Dragon move orders and are full of basic strategic mistakes but do give insights into the development of the variation and the Sicilian defence in general. Game 3 of the book demonstrates Paulsen’s win over Steinitz with an hyper accelerated Dragon although he was lost out of the opening!
Louis Paulsen was one of the great pioneers of the Sicilian Defence, not just developing the variation named after him.
Chapter 2 concentrates on Henry Bird’s contribution to early Dragon Praxis.
He was the first player to play the modern Dragon move order:
1.e4 c5 2.Nf3 d6 3.d4 cxd4 4.Nxd4 Nf6 5.Nc3 g6
As the author points out, his score with the Dragon was 16 losses, 10 wins and 9 draws which is not brilliant, but taking into account he was playing against the world’s best, it is a respectable Dragon legacy.
Game 7 shows a titanic struggle with Joseph Blackburne. This is the position after the opening:
Blackburne-Bird
This could be a modern game with white playing a fairly inept Classical Variation, but making sensible developing moves leaving the main struggle to the middlegame. Bird played the somewhat dubious 14…Qh5?! (better is the natural 14…Nd7 which is clearly equal). Blackburne responded with the impatient move 15.Bxf6 (Simply 15.Qf2 or 15.Rd3 leaves white with a slightly more comfortable position) 15…Bxf5 16.Nd5 Qe5 is equal. The players fought out a exciting draw to move 77. Buy the book to the see the game.
Chapter 3 introduces some of the first games with top players riding the Dragon such as Emmanuel Lasker.
This chapter features some greats such as Tarrasch, Pillsbury and Emmanuel Lasker playing the Dragon at the end of the 19th century and the beginning of the 20th century. The game below shows a typical Dragon trap.
White now played a natural looking move that loses 10.Qd2?? Ne4! 11.Nc6 Qxc3! (Easy to overlook) 12.Qxc3 Nxc3 13. bxc3 Bxc6 (Black is completely winning, a pawn up with a much better pawn structure)
Brody-Pillsbury-11…Qxc3
Chapter 4 shows some early games with masters v amateurs.
The first game in this chapter is famous tussle Lasker – Napier at Cambridge Springs 1904. This game is an extremely tactical queenless middlegame and is well worth a look.
Another game covered is a loss by Lasker to a modern idea of an exchange sacrifice on c3 in a simultaneous display. This idea had been seen before but this version is so thematic, it must be shown:
13…Rxc3! (Winning as White’s position falls apart) 14. bxc3 Nxe4 15.Bd3 Nxc3 16.Qe1 Nxd3 17.Qd3 Nc5 18.f6!? (A desperate try)
Lasker-MacKay-18.f6
18…exf6 19.gxf6 Ne4 (19…Bxf6 wins as well) and Black won on move 34.
Chapter 5 features the introduction of two major Dragon lines.
They are 10…Qc8 in the Classical Variation and the DragonDorf played by another great Sicilian pioneer Miguel Najdorf.
The first variation is shown with a famous game Reti -Tartakower
Dragon-Classical-Tartakower-Var
The game continued 11.h3 Ne8 ?! (A modern master would shudder at this move, the natural 11…Rd8 is better, Reti won a good positional game)
The game Reissner – Najdorf from Warsaw 1934 introduces the Dragadorf which Simon Williams reintroduced many decades later.
The game began 1.e4 c5 2.Nf3 d6 3.d4 cxd4 4.Nxd4 Nf6 5.Nc3 g6 6.Be3 Bg7 7.f3 0-0 8.Qd2 a6? (Black cannot play this slowly after castling, if Black wishes to play this way, he must not castle early).
Dragadorf Castling too early
Stockfish already gives White a big advantage. Najdorf did win this game as White did not play incisively enough. See the book to look at these two interesting games.
Chapter 6 features the famous Alekhine-Botvinnik melee from Nottingham 1936 resulting in an exciting short draw.
10…d5!? (The modern preference is for 10…Rc8 when Black may already be better) 11.f5 Bc8 12.exd5 Nb4
Rabinovich-Attack-12…Nb4
A critical position 13.d6!? (13.Bf3! is much stronger leading to a significant White advantage) 13…Qxd6 (leading to a forced perpetual) 14. Bc5 Qf4! 15.Rf1 Qxh2 16.Bxb4 Nxg4 17.Bxg4 Qg3+ 18. Rf2 (Any winning attempt is suicidal) Qg1+ 19.Rf1 Qg3+ 20.Rf2 Qg1+ Draw agreed
Chapter 7 introduces the Levenfish Variation with Mikhail Tal falling victim.
Game 31 showcases the game that introduced the Levenfish Variation at the highest level: Levenfish – Rabinovich Leningrad 1939. The author’s commentary on this game is full of excellent analysis showing many of the traps in the Levenfish and some brilliant white victories. Two of the greatest attacking players have games in this variation including a crushing win by Nezhmetdinov and a crushing loss for Tal. First the Tal miniature:
6…Nc6! (6…Bg7!? is dangerous for Black, but just about playable with care, but 6…Nc6 equalises easily, so why play an inferior risky move?)
7.Nxc6 bxc6 8. e5 (This looks dangerous but is a paper tiger) Nd7! 9.exd6 exd6 10.Be3
Levenfish-Variation-10.Be3
10…Qe7?! (10…Be7 is slightly better for black already, the pawn on f4 weakens White’s position) 11.Qd4! Nf6?! (11…Bg7 is hardly better: 12.Qxg7 Qxe3+ 13.Be2 Rf8 14.Rf1 Nb6 15.Rd1 is better for white despite white’s king on e1 as Black is behind in development and has a weaker pawn structure with black squared weaknesses.) 12.0-0-0 Bg7
Levenfish-Variation-Start-of-Crushing-Attack
White has a significant lead in development which he exploits ruthlessly in the style of his opponent:
13.Qxd6! (sacrificing a piece with check) Qxe3+ 14.Kb1 Bd7? (14…Qb6! makes it harder for White but his attack is just too strong) 15.Bb5! (A classic clearance: 15…cxb5 16.Rhe1 wins the queen and although Black has a rook and two bishops for the queen and pawn, his lack of development is fatal) 15…Qb6 16.Rhe1+ Kd8 17.Bxc6 Rb8 (threatening mate but too late) 18. Qe7+ Kc7 19.Rxd7+ Kc8
Mate-in-4
20.Bb5 (20.Nb5! is quicker mating in four moves, Klavins chooses a prosaic win going into a trivially won endgame) Rb7 21.Rxb7 Qxb7 22.Qxb7+ 1-0
Now the Nezhmetdinov game:
1.e4 c5 2.Nf3 d6 3.d4 cxd4 4.Nxd4 Nf6 5.Nc3 g6 6.f4 Bg7?! (Risky) 7.e5! dxe5? (The only decent move here is the surprising 7…Nh5 with the idea 8.g4? Nxf4 9.Bxf4 dxe5 regaining the piece with interest, better for White is 8.Bb5+ Bd7 9.Qe2! with an edge as Black still has to solve the problem of the h5 knight, 9.e6!? looks good but 9…fxe6 10.Nxe6 Bxc3+ 11.bxc3 Qc8! is a mess but dynamically equal) 8.fxe5 (This is a very dangerous position for the unwary)
Levenfish after 8.fxe5
8…Nd5? (8…Ng4?? 9.Bb5+ wins 9…Bd7 10.Qxg4 wins a piece or 9…Kf8 10.Ne6+ wins the queen. 8…Nfd7 is relatively best 9.e6! Ne5! 10.exf7+ gives a White a pleasant edge but Black can fight) 9.Bb5+ Kf8 10. 0-0 (Black is totally lost) Bxe5 (accelerating the inevitable defeat, and allowing an attractive finish, 10…Nc6 lasts longer) 11.Bh6+ Kg8 12. Nxd5 Qxd5 13.Nf5! Qc5+ 14.Be3 Qc7 15.Nh6+ 1-0
Levenfish-13.Nf5!
Chapter 8 features a famous victory by a British player, William Winter over David Bronstein in the England – USSR radio match in 1946.
1.e4 c5 2.Nf3 d6 3.d4 cxd4 4.Nxd4 Nf6 5.Nc3 g6 6.Be3 Bg7 7.f3 Nc6 8.Qd2 0-0 9.Nb3!? (Not the most challenging line) 9…Be6 10.Nd5 Bxe6 (Stockfish also likes 10…Rc8 with both moves giving Black a slight edge, but removing the pesky knight now is understandable) 11.exd5 Ne5
Bronstein-Winter-11…Ne5
12. Be2? (12.0-0-0 is better but Black is at least equal) Qc7 13.0-0 (13…a5! is also good but the move played is an obvious thematic Sicilian move) Nc4 14.Bxc4 Qxc4 15. Rad1?! (The wrong rook, White needs the queen’s rook on the queenside for defence, showing how badly the game is going) 15…Rfc8! 16.Rf2 Nd7 (16…a5! increases Black’s advantage to decisive proportions) 17.Bg5!? (Trying to mix things up, but 17.c3 is better, then Black has 17…a5 with a typical Sicilian initiative and advantage) 17..Bxb2 18.Bxe7 Nb6? (Bronstein’s gamble with Bg5 has paid off as Black goes wrong, much better is 18…Bc3! 19.Qd3 Qb4 maintains a big Black advantage) 19.Bxd6 Rd8
Bronstein-Winter-20.Na5
20. Na5?? (A horrible move losing the game, 20.Qb4 or 20.Qf4 holds the balance) 20…Qa6! 21.Qf4 Rxd6 22.c4 Bg7 23.Rfd2 Bh6 24. Rd3 Rad8 25.a4 Bf6 26.Qb5 Qxb5 27.axb5 R6d7 0-1
Chapter 9 introduces some giants into the mix with players such as the great Soviet theoretician Efim Geller who played the Dragon with both colours, and the great Bobby Fischer who was a veritable St George. Fischer famously lost against Cesar Munoz, a Ecuadorean National Master: this game is definitely worth a look.
This chapter also includes the famous Fischer – Larsen clash from Portoroz 1958. The game is in a line that has become topical recently:
This position used to be thought to be slightly better for White with the bishop pair and pressure along the e-file. Modern engines dispute this and reckon Black is more or less equal viz:
Chapter 10 introduces the famous Soltis Variation.
It may not be widely known, but in 1963 Heikki Westerinen introduced the Dragon Soltis Variation to the world, 8 years before Andrew Soltis popularised the variation named after him. This is the stem position:
Soltis-Variation
Westerinen played this line against Bent Larsen, who was one of the protagonists who played the Dragon with both colours. He lost the game, but his opening and early middlegame were fine as he achieved a winning position by move 20: he was outplayed later by a world class player. Buy the book to see analysis of this ground breaking game.
Chapter 11 introduces Geller on the Black side and Anatoly Karpov as a chief Dragon slayer. His game against Gik in the Moscow University championship in 1968 is one of Karpov’s best games.
In this position below Gik made a fatal mistake: 16…Qxc3 no doubt expecting 17.Kb1, so 17.Ne2 came as a rude awakening gaining a crucial tempo, both 16…Nf6 and 16…Rc8 equalise comfortably.
The book analyses this theoretical scuffle in detail.
Chapter 12 is devoted mainly to famous Dragon writers: David Levy and Andrew Soltis.
David Levy, the Scottish IM famously wrote two editions of the Batsford books The Sicilian Dragon. Here Levy faces the former World Champion, Boris Spassky who is in devastating form:
1.e4 c5 2.Nf3 d6 3.d4 cxd4 4.Nxd4 Nf6 5.Nc3 g6 6.Be3 Bg7 7.f3 Nc6 8.Qd2 0-0 9.Bc4 Bd7 10.0-0-0 Qb8?! (A trendy line at the time, which is almost certainly unsound, Stockfish does not rate it.)
Spassky-Levy
11.h4! a5? (This is a horrible move, it loses quickly, Stockfish recommends 11..Ne5 12.Bb3 h5 trying to slow down the attack in Soltis style, but Black’s misplaced queen renders this fruitless) 12.Bh6!? (Not the very best, the simple 12.h5 is even stronger winning quickly) 12…Nxe4? (Black pushes his luck with a flawed combination, better was 12…Nxd4 13.h5! Be6 14.Bxg7 Kxg7 14.Qxd4 with a big plus for White) 13. Nxe4 Bxd4 14.h5! (With a huge winning attack)
Spassky-Levy-14.h5
14…d5 (Desperation, trying to get the queen into the defence) 15.Bxd5 Qxe5 16.Bxf8! (Simple and effective) 16…Qxd5 17.Qh6! Nb4 18.Rxd4! (Removing the last defender) Qxd4 19.Bxe7 1-0
An opening experiment crushed by an attacking great!
Chapter 13 is mainly devoted to two fascinating clashes between Efim Geller and Viktor Korchnoi in their Candidates match in 1971 in Moscow. It also reintroduces Anatoly Karpov who is undoubtedly one of the greatest Dragon slayers, shown in action in a famous tussle with Juergen Dueball at Skopje in 1972. It was Karpov’s endgame skill that won him that game.
The first Geller – Korchnoi shows the good old exchange sacrifice on c3 in all its glory.
Geller-Korchnoi-Moscow-1971
White played the poor 12.Bh6?! provoking Black. 12…Bxh6! 13.Qxh6 Rxc3! 14.bxc3 a5! (14…Qc7 is fine as well)
Black is equal here and has a position that is easier and more fun to play. The game was eventually drawn, but Black achieved a winning game but threw it away in mutual time trouble.
Chapter 14 introduces one of the great Dragon specialists, the late and great Tony Miles.
Here is a exciting scrap with another future GM, Michael Stean.
Michael Stean – Tony Miles Hastings 73/74
1.e4 c5 2.Nf3 d6 3.d4 cxd4 4.Nxd4 Nf6 5.Nc3 g6 6.Be3 Bg7 7.f3 0-0 8.Bc4 Nc6 9.Qd2 Bd7 10.h4 h5 11.0-0-0 Rc8 12.Bb3 Ne5 13.Kb1 Nc4 14.Bxc4 Rxc4 15.Nde2 Qc7 !? (An attempt to avoid the main line theory, 15…b5 is the main line which equalises comfortably as played by Kasparov against Anand 16.Bh6 Qa5 =)
Stean-Miles-15.Qc7
16.Bh6 Be6 17.Bxg7 Kxg7 18.Nf4 Qa5 (This position is equal, but Stean comes up with a faulty plan) 19.Nxe6+ (19.Nce2 is equal) fxe6 20.Rh3?! (20.Ne2 is still equal) Rfc8 21.Rg3?
Rxc3! (Now Black is better) 22.bxc3 Rc6 23.Rg5 e5! (Cutting the rook off)
Stean-Miles-23…e5
Now Black is slightly better, somehow Miles contrived to lose this game.
Chapter 15 is devoted to one of the most famous gladiatorial contests in the Sicilian Dragon: Anatoly Karpov v Viktor Korchnoi Moscow 1974 game 2 of the Candidates final. The winner was to play Bobby Fischer.
At the time, the position before 16.Nde2 was a topical Dragon tabiya. Korchnoi played the natural reply which is already a mistake.
16…Qa5 (16…Re8 is much better and about equal) 17.Bh6 Bxh6 (17…Bh8 18.Bxf8 Kxf8 19.Qe3 is clearly better for White) 18.Qxh6 Rfc8 19.Rd3 R4c5? (The final mistake, 19…Be6 20. 20.g5 Nxh5 21. Nf4 Qe5 22.Nxh5 gxh5 23. Qxh5 Qg7 24.f4 with a clear advantage to White) 20.g5! (Winning) Rxg5 21.Rd5! Rxd5 22.Nxd5 Re8 23.Nef4 Bc6 24.e5!+- Bxd5 25.exf6 exf6 26.Qxh7+ Kf8 27.Qh8+ 1-0 (27… Ke7 28.Nxd5+ Qxd5 29.Re1+)
It is quite possible that the whole game was prepared analysis.
This game really knocked the Dragon for six, but the Dragoneers soon came up with an antidote 16…Re8.
In summary, this is a well thought out book and an enjoyable read with plenty of exciting, fighting chess. Although it is a history of the Dragon, that story is really a microcosm of the development of modern chess from 1850 onwards.
FM Richard Webb, Basingstoke, Hampshire, 1st April 2024
FM Richard Webb
Book Details :
Hardcover : 385 pages
Publisher:Thinkers Publishing; 1st edition (5 Mar. 2024)
The Dragon Sicilian: A Take-No-Prisoners Repertoire Versus 1.E4, Anish Giri, New in Chess / ChessAble, 15th November 2022, ISBN-13 : 978-9493257351
From the publisher:
“The Dragon Sicilian is the perfect choice for club players searching for chaotic and imbalanced positions. This opening manual shows how Black can turn up the heat against 1.e4, and enjoy dynamic winning chances game after game. Top-10 player Anish Giri is the best tutor to bring this complicated opening across to ‘everyday’ club players. Anish serves up his super-GM lines and clearly explains the ideas and strategies behind the moves. So when game time comes, you know exactly which moves to play, at what moment, and how to deliver the knockout blow. Make no mistake: This repertoire’s take-no-prisoners-strategy means you will sometimes reach razor-sharp positions, where both sides must play ‘only moves’. But that’s why you’ll love having Anish Giri as your opening coach. Giri delivers just the right mix of cutting-edge analysis and practical guidance for players of all levels with his trademark witty and down-to-earth teaching style. The Dragon Sicilian also covers all other major systems Black could face, including what to play against Anti-Sicilians such as the Rossolimo, the 2.c3 Alapin, and the Grand-Prix Attack.”
Anish Giri
“Anish Giri became a chess Grandmaster at the age of 14 years, 7 months and 2 days. At the time, in 2009, that meant he was the youngest grandmaster in the World. Starting from the January 2013 list, the Dutch grandmaster was the leading junior player in the FIDE World Rankings. In June 2014 he turned twenty, which ended his junior years. Giri is a top-GM with a 2700-plus ELO rating.”
I am impressed with this colourful book, which is an accessible, lucid introduction to the Sicilian Dragon. The repertoire guide is a well- produced hardback book with an attractive vibrant front cover, good quality paper and many large diagrams, typically two per page and sometimes three making the work pleasant to browse and study.
The back cover blurb on the volume states that the opening manual work is aimed as an introduction for everyday club players, and it succeeds admirably in this respect. This title does not purport to be a major theoretical treatise or a “latest developments” style of publication, however, there is some cutting-edge theory and new ideas, some of which are new to the reviewer, who is a life-long Dragon addict.
The reviewer is not going to do a detailed theoretical critique the lines chosen by Giri for several reasons: time; my knowledge of some of the lines recommended is not sufficiently well-developed yet and thirdly these surveys can often come down to a thicket of engine analysis which can be off putting for less experienced players and does not always enhance understanding: it is important to understand the typical ideas, so when your opponent deviates from the book main lines/engine main lines, you can work out a solution at the board.
Despite my comments above, it is important for any reader of an opening tome, to not blindly follow the lines and take everything as gospel: check with an engine and use other sources.
The book has a short, didactic introduction to the Sicilian Dragon introducing the ideas, and nineteen chapters.
Dragon Starting Position
The book is effectively divided into four sections:
Move orders, Accelerated Dragon and Drago(n)Dorf (two chapters)
Anti-Sicilians (seven chapters)
Yugoslav Attack Section
The first chapter gives a useful overview of the Yugoslav Attack main line 9.Bc4 variation.
This introductory part briefly surveys the other main systems, other than the recommended repertoire, that occur such as the Chinese Dragon, Soltis Variation, Modern Variation, Topalov Variation. This is a useful pointer for the reader to the myriad of Dragon systems.
Chapter 2 Yugoslav Attack 9.Bc4 Nxd4
This part covers the book’s suggestion against 9.Bc4 which is the rare system 9…Nxd4.
Yugoslav9…Nxd4
This system was popular in the late 1950s/early 1960s but fell into disuse after some high-profile white victories, such as Fischer-Larsen Portoroz 1958 and Tal-Portisch European Team Championship 1961.
The idea of the line is to reduce white’s attacking potential by exchanging some pieces. I can see the logic of recommending this line as it is a straightforward system which is not popular, so many white players won’t know how to meet it: white must be accurate to even get a small advantage. The disadvantage is that it could be regarded as passive as black defends a slightly inferior, but defensive ending in the main line.
Black’s move order in this variation is critical as Giri points out: black has just played 12…b5!
Yugoslav12…b5
Giri offers a new twist on this ancient line with an intriguing positional pawn sacrifice in a main line, which has been played successfully in a correspondence game. Buy the book to find out.
Chapter 3 Dragon Main Line Konstantinov’s pawn sacrifice sidelines
This chapter covers the sidelines in the main line after 9.0-0-0 d5
White has a fair number of alternatives to the main line of 10.exd5 which are:
10.Bh6
10.h4
10.Nxc6
10.Kb1
10.Qe1
The last two are definitely the most important with Giri covering these with main-line recommendations which are well known and fine for black.
After 10.Kb1 Nxd4 11.e5! Nf5 12.exf6 exf6 13.Bc5 d4! 14.Bxf8 Qxf8, this position is reached:
10.Kb1 Main Line
Black has sacrificed the exchange for active play: Magnus Carlsen has played this way; a host of games has vindicated black’s approach including Short-Carlsen London 2009 which was drawn after a serious of adventures.
Chapter 4 Dragon main line 9.0-0-0 d5 10.exd5
This chapter is divided into two sections covering the greedy pawn grab and what is probably the main line of the entire Dragon at top level.
The (in)famous pawn grab leads to this position:
Pawn Grab Line
This position has been well known since the 1950s, black now plays 13…Qc7! with equality. White has to be accurate to hold on: as a youngster, I won many quick games in this line with black. The author covers this line well with respected well-known variations for black.
The main, main line occurs after 12.Bd4:
Main Line 12.Bd4
Here Giri offers the old main line 12…e5 which has been under pressure in recent years. He offers an interesting, rare approach which if it holds up is very important for Dragon theory. Buy the book to find out.
Chapter 5 The early 9.g4
The idea behind this line is to prevent 9…d5 whilst avoiding one of the main lines 9.Bc4. the author recommends the well-rehearsed response 9…Be6 which is fine for black.
The second section of the book, chapters 6 to 10 cover the following variations:
Classical 6.Be2
Fianchetto System 6.g3
Levenfish 6.f4
6.Bc4 system
Sixth move sidelines
These lines are perfectly respectable but do not threaten to extinguish the Dragon’s breath. Giri covers these with well-known antidotes. For example, in the Levenfish Variation:
Levenfish
Black has just played 6…Nc6! which neutralises white’s main idea to get in e5 to disrupt black’s development.
The third section has a couple of short chapters on the Accelerated Dragon and the Drago(n)dorf. These are really supplementary chapters which are interesting but do not detract from the main book.
The fourth section has seven chapters on the Anti-Sicilians and covers over half the book which is excellent. These systems are very popular at all levels particularly at club level with the obvious intention to avoid reams of theory: we have all got stuffed on the white side of the Sicilian facing an opponent bristling with theoretical barbs. This part is divided as follows:
The Prins system 5.f3
The Hungarian system 4.Qxd4
Moscow Variation 3.Bb5+
Various 3rd moves
Closed Sicilian
Alapin 2.c3
Other second moves
I particularly like the chapter on the Moscow Variation, which introduced the reviewer to some new lines. As well as that, the author covers some excellent points about the importance of move order in the Maroczy system.
FM Richard Webb, Basingstoke, Hampshire, 27th November 2022
Book Details :
Hardcover : 248 pages
Publisher:ChessAble / New in Chess (27 Sept. 2022)
The Dragon Sicilian: A Take-No-Prisoners Repertoire Versus 1.E4, Anish Giri, New in Chess / ChessAble, 15th November 2022, ISBN-13 : 978-9493257351
We focus on the British Chess Scene Past & Present !
This website uses cookies to improve your experience. We'll assume you're ok with this, but you can opt-out if you wish. Cookie settingsACCEPT
Privacy & Cookies Policy
Privacy Overview
This website uses cookies to improve your experience while you navigate through the website. Out of these cookies, the cookies that are categorized as necessary are stored on your browser as they are as essential for the working of basic functionalities of the website. We also use third-party cookies that help us analyze and understand how you use this website. These cookies will be stored in your browser only with your consent. You also have the option to opt-out of these cookies. But opting out of some of these cookies may have an effect on your browsing experience.
Necessary cookies are absolutely essential for the website to function properly. This category only includes cookies that ensures basic functionalities and security features of the website. These cookies do not store any personal information.
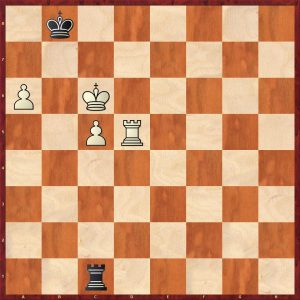
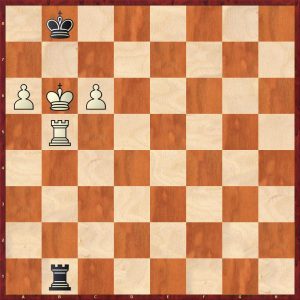
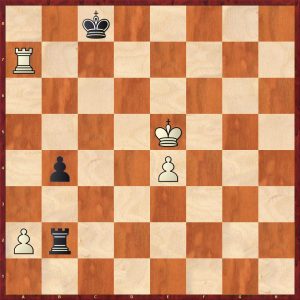
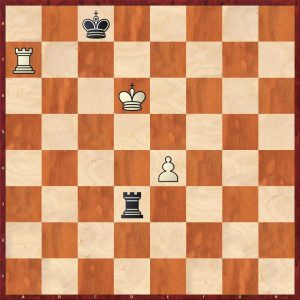
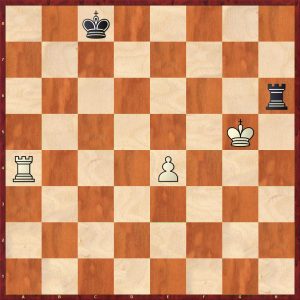
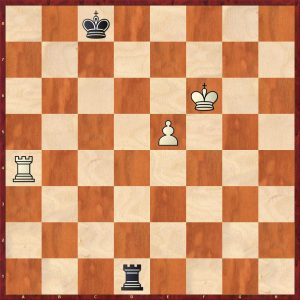

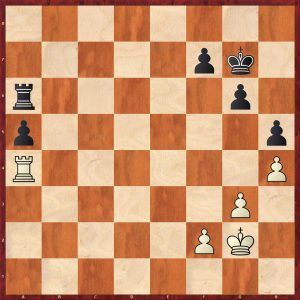
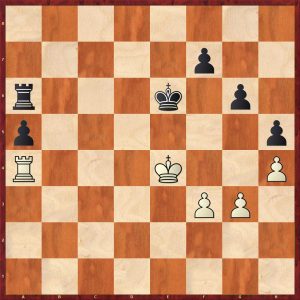
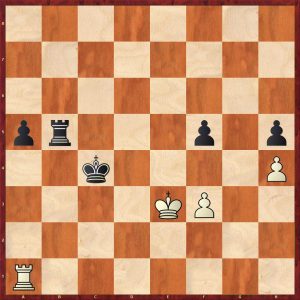
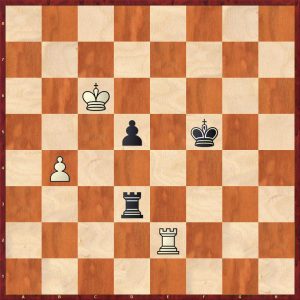
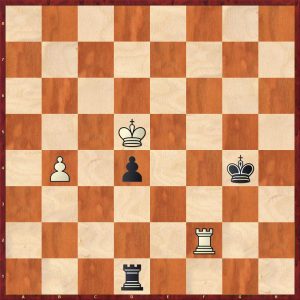
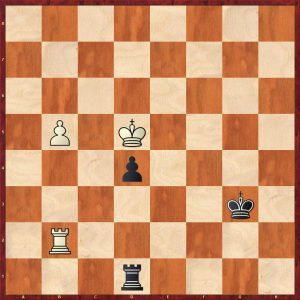

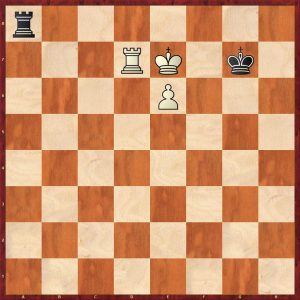
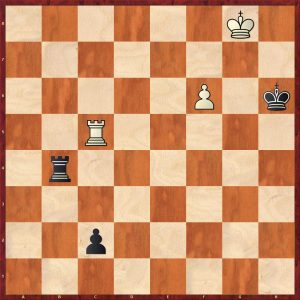


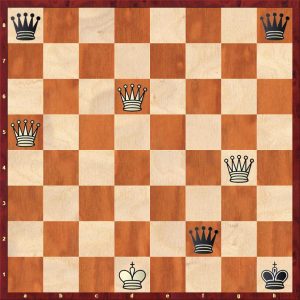
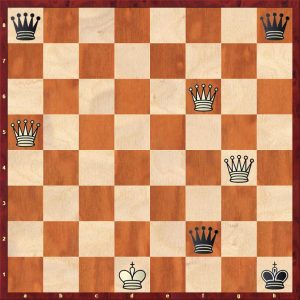
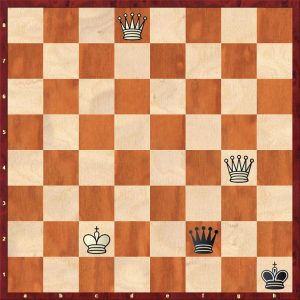
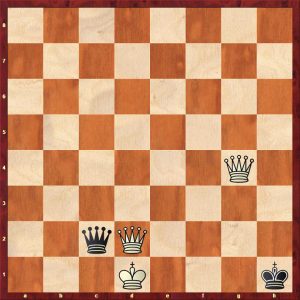
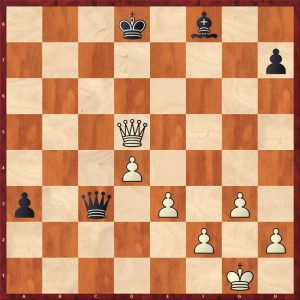
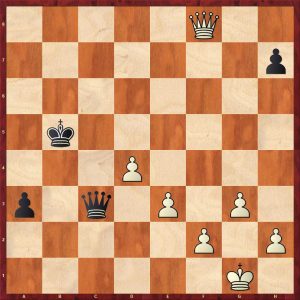
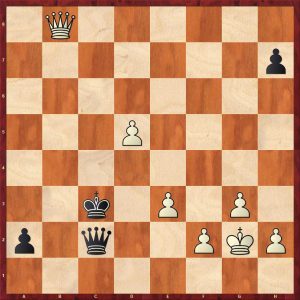
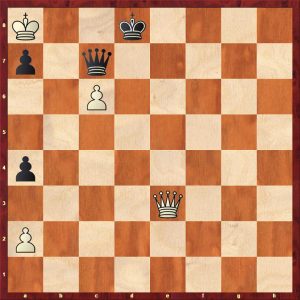
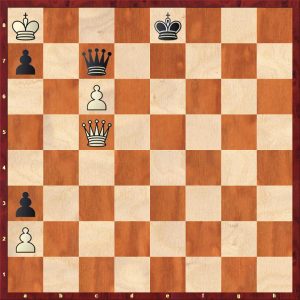
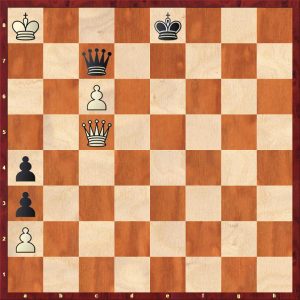
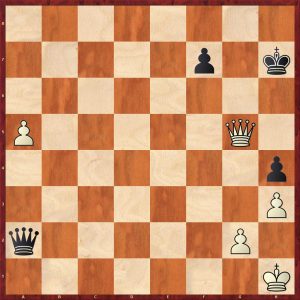
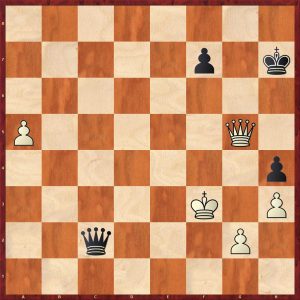
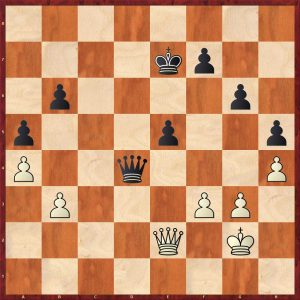
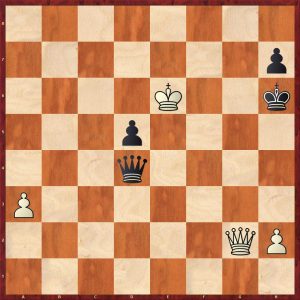
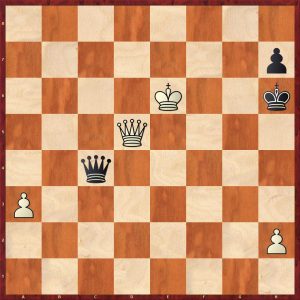
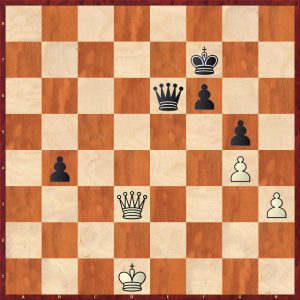
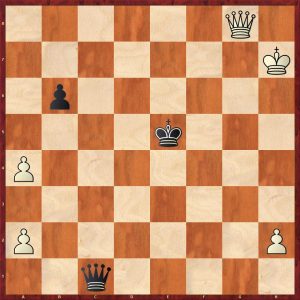
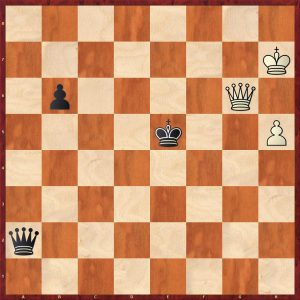
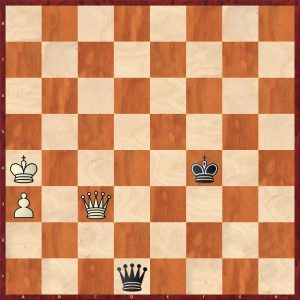
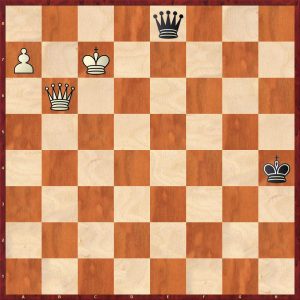
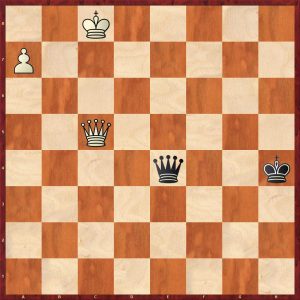
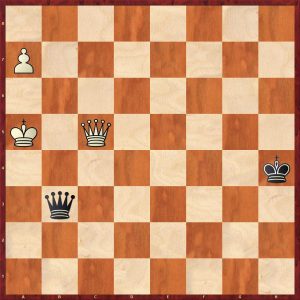
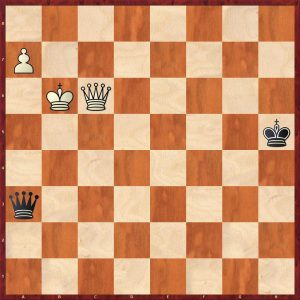
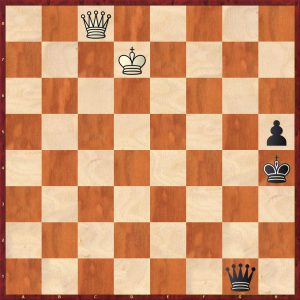
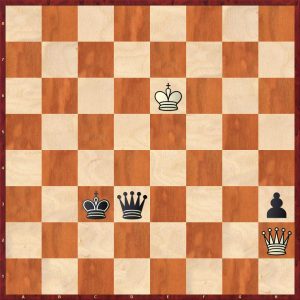
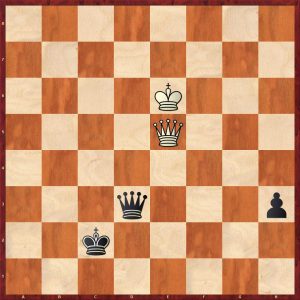
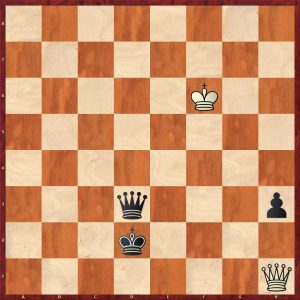

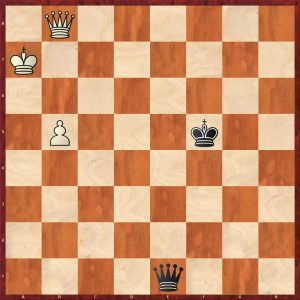
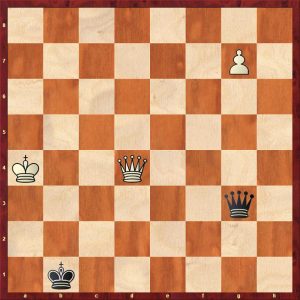
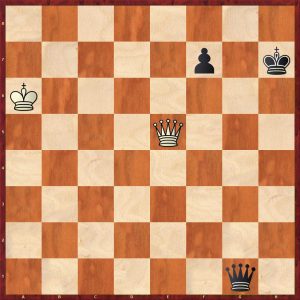
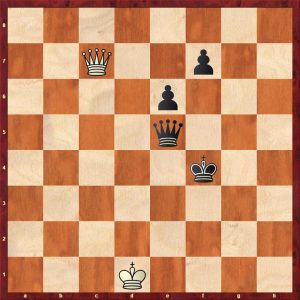
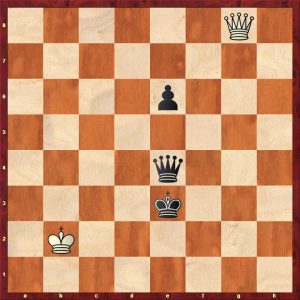
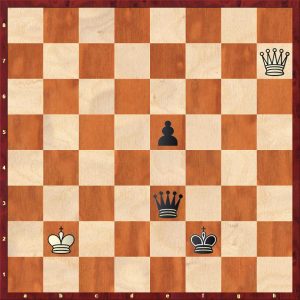
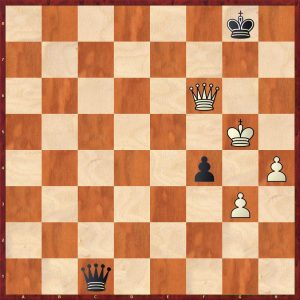
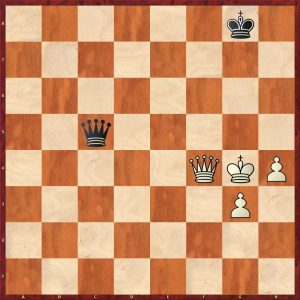

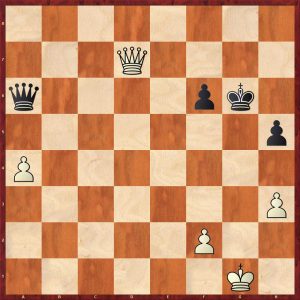
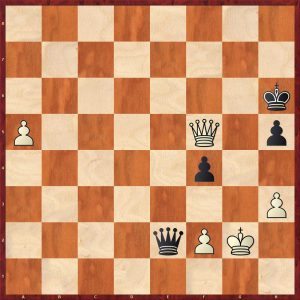
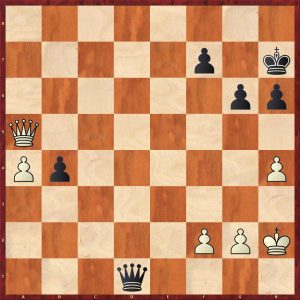
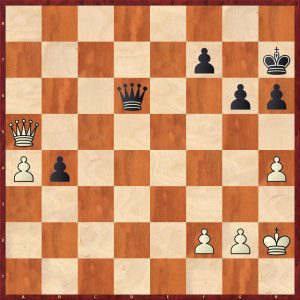
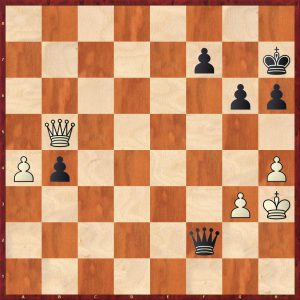
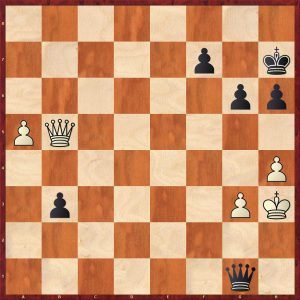
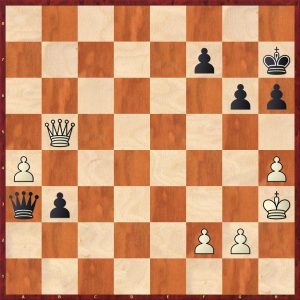
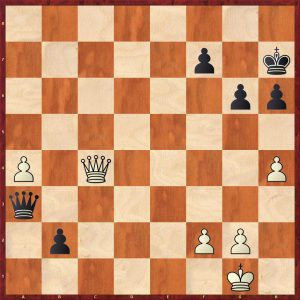
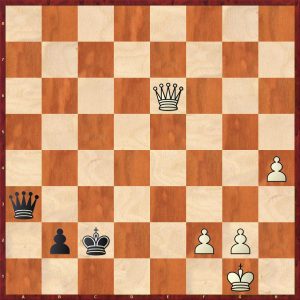
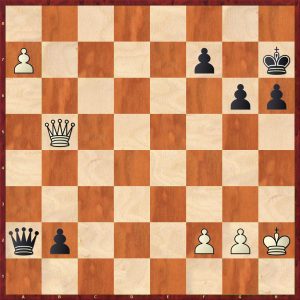
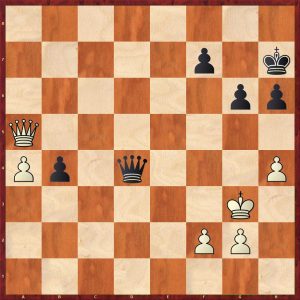
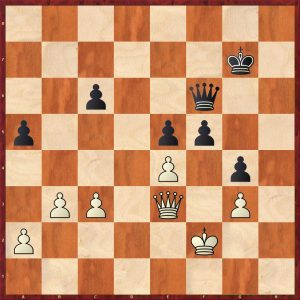
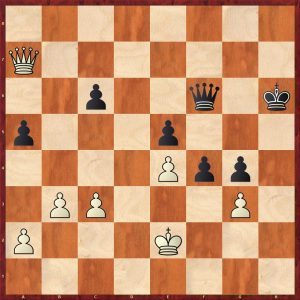
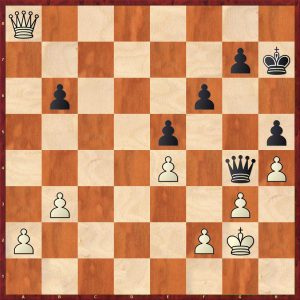
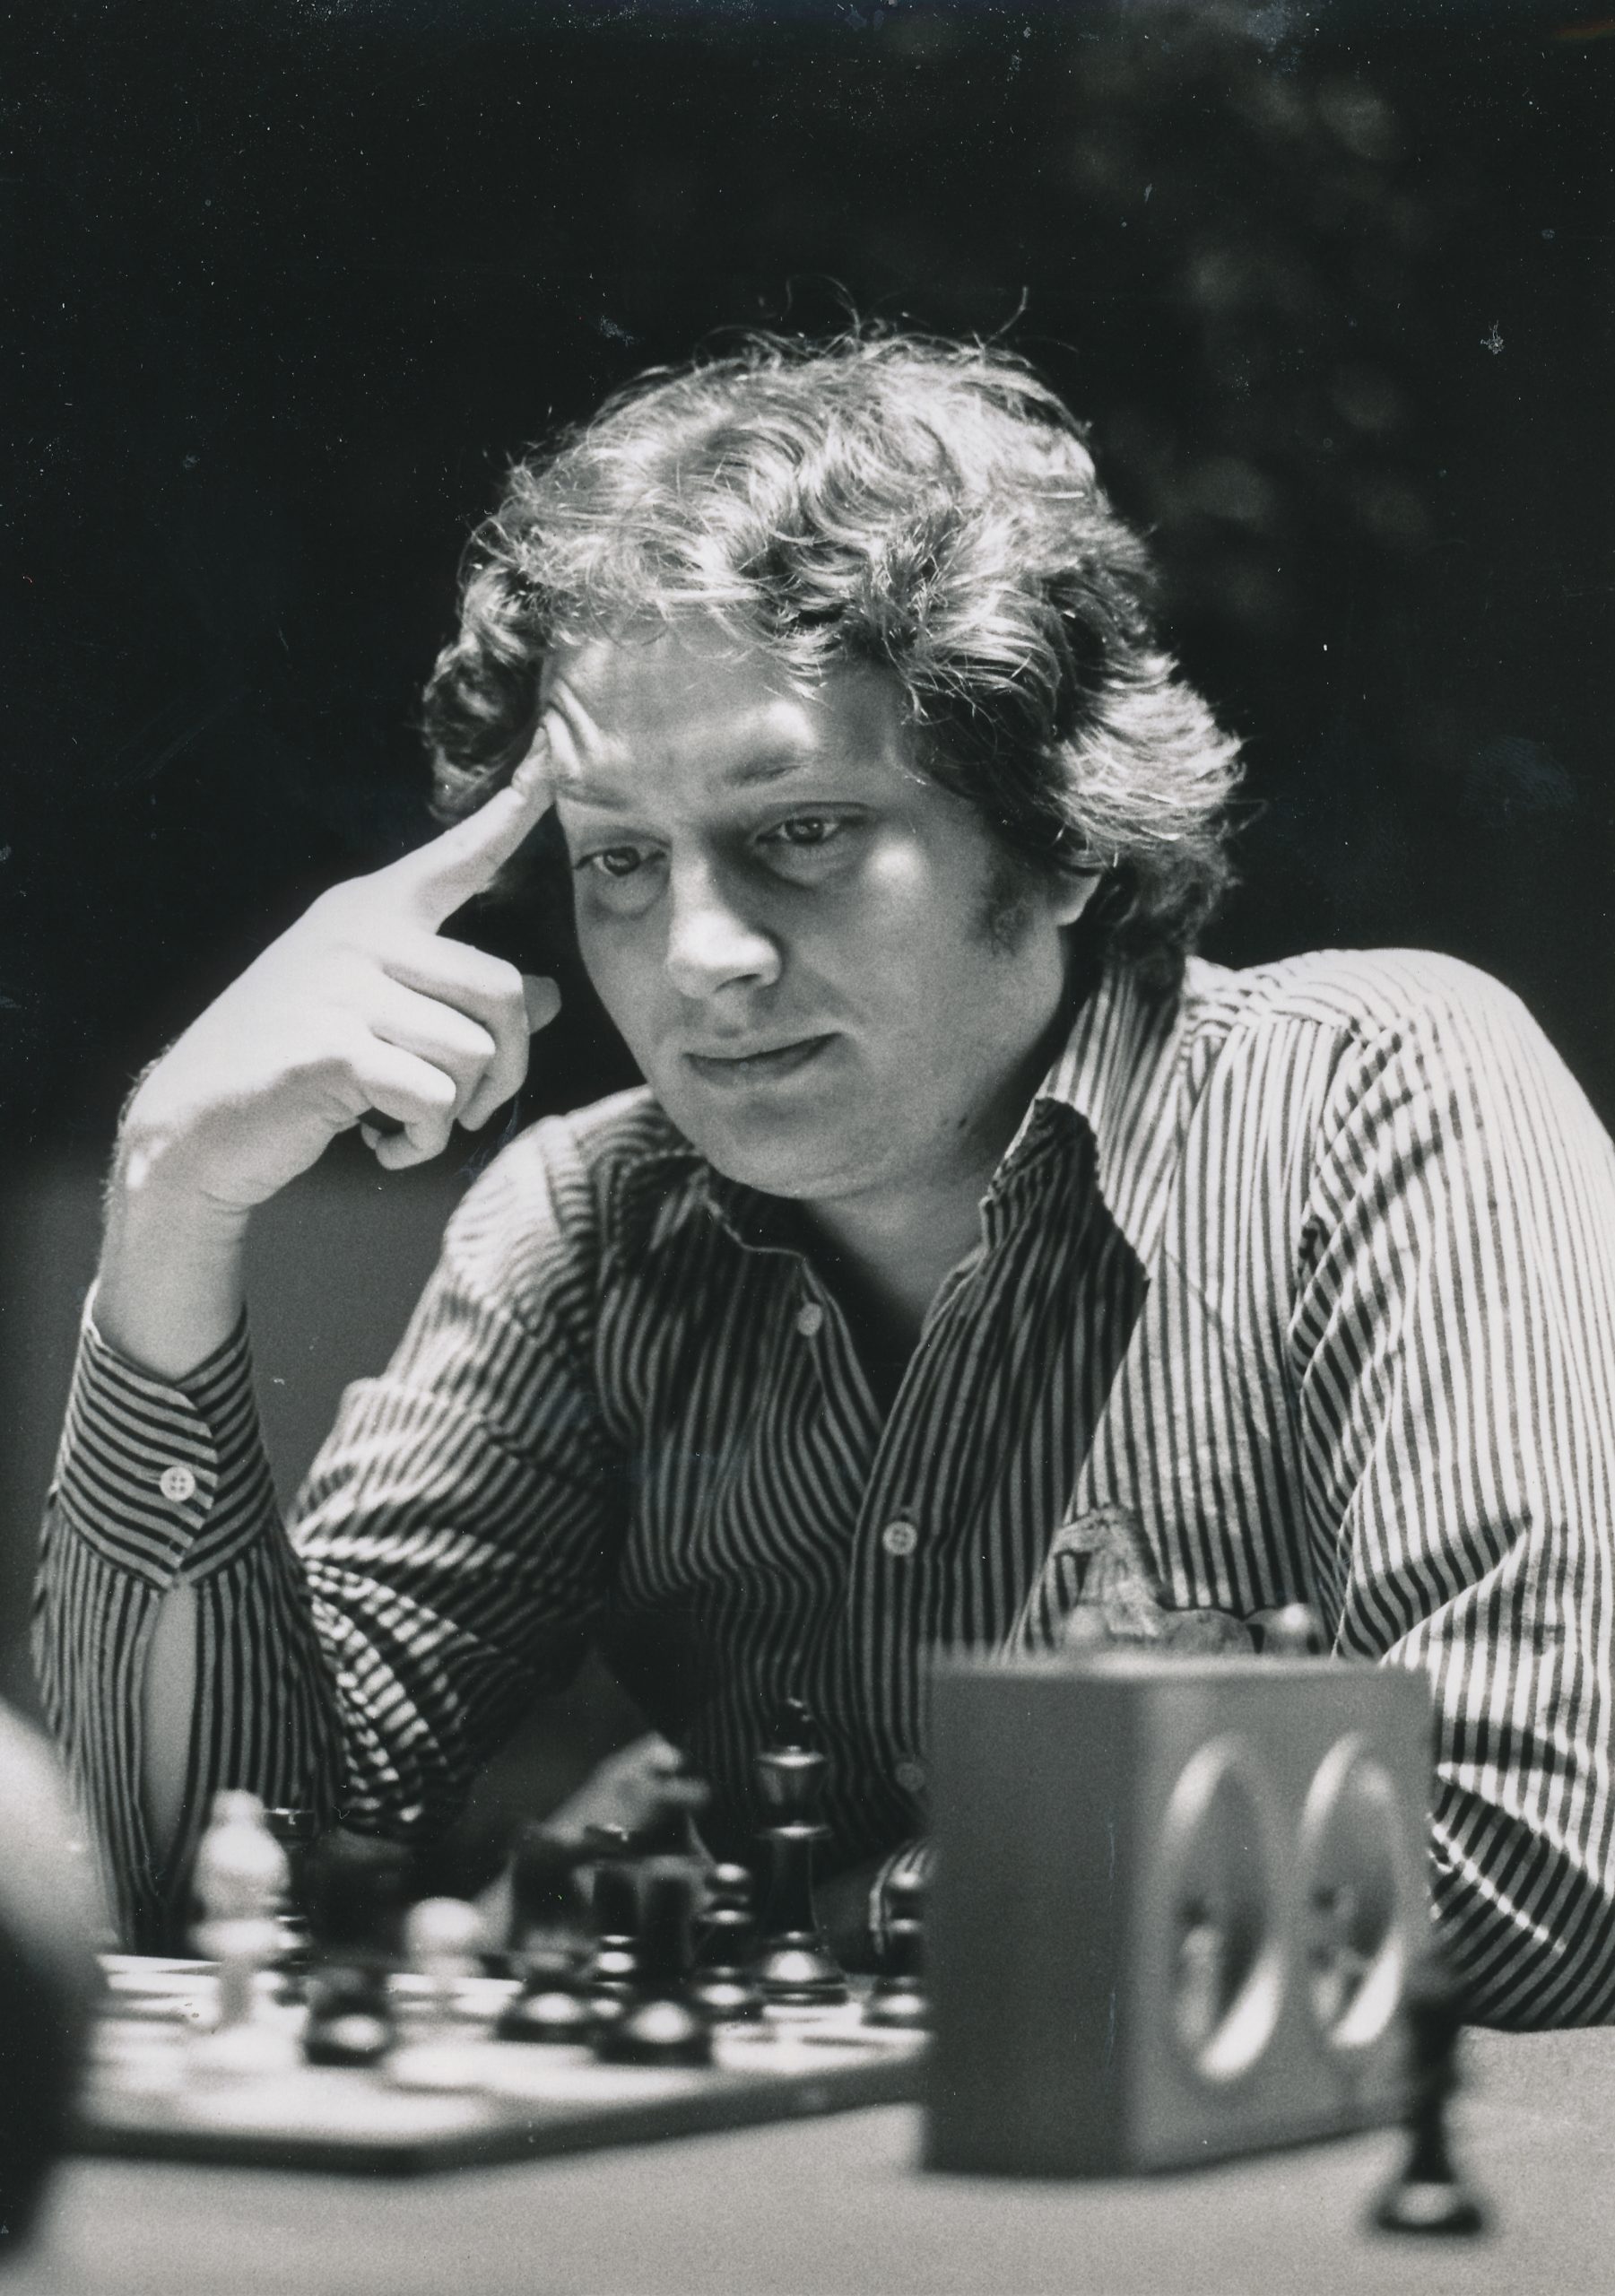

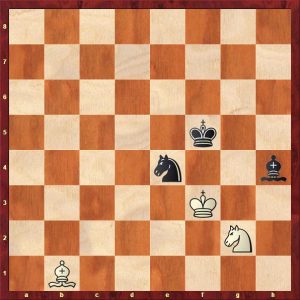
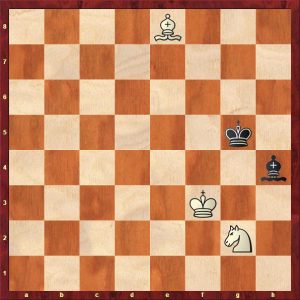
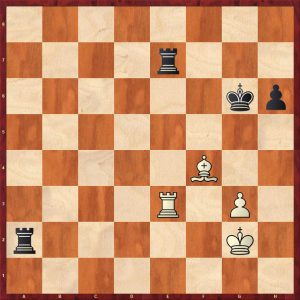
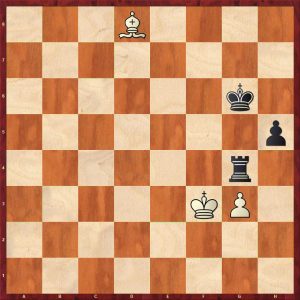
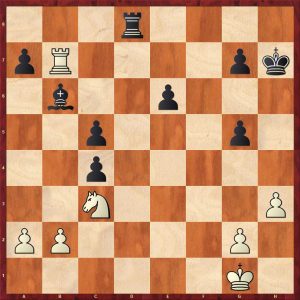
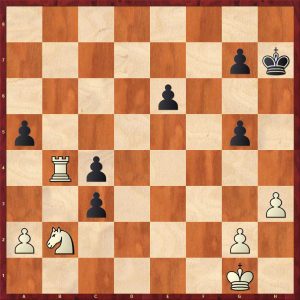
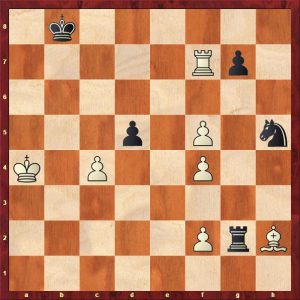
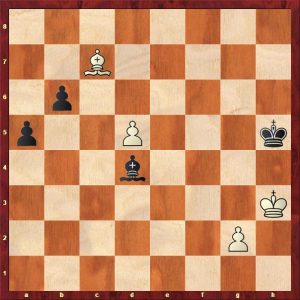
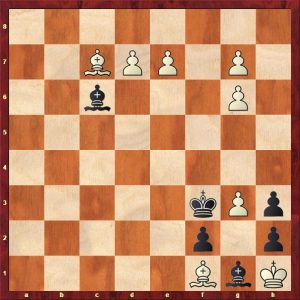
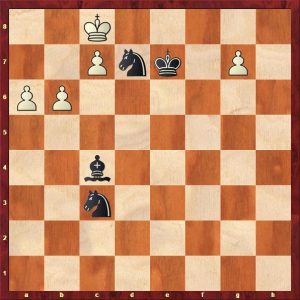
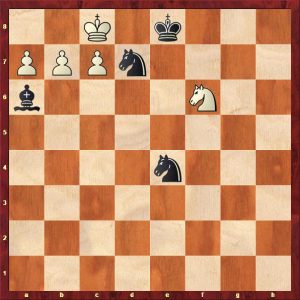
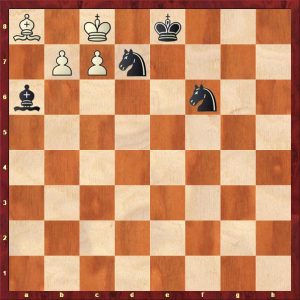
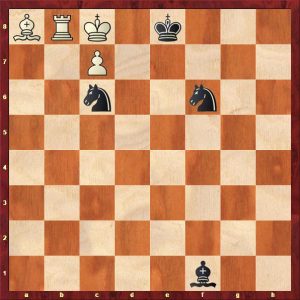
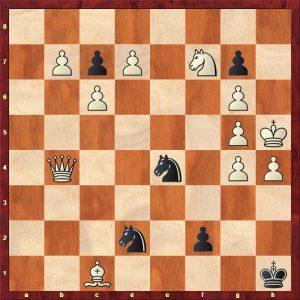
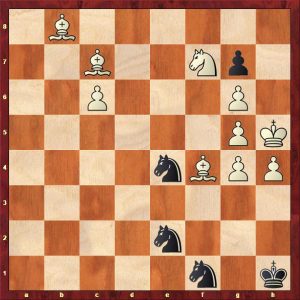
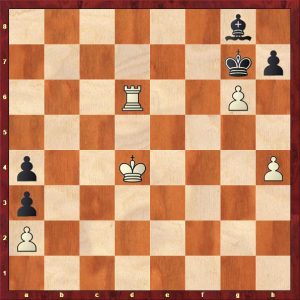
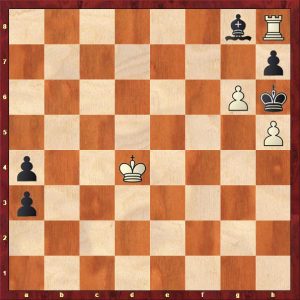
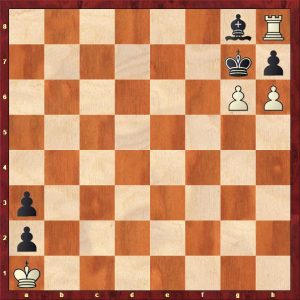

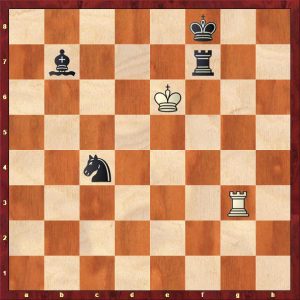
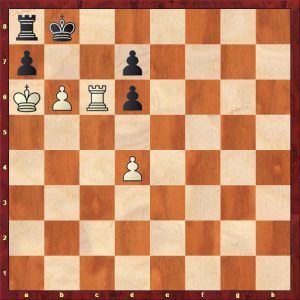
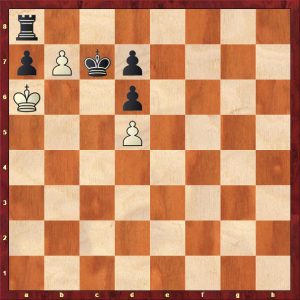
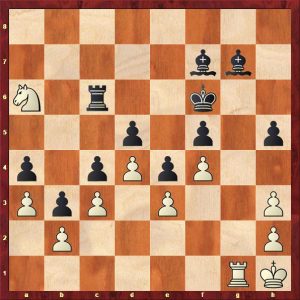
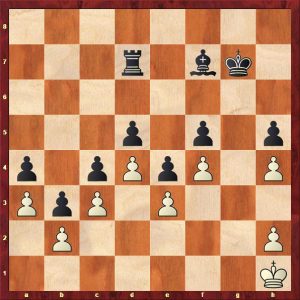
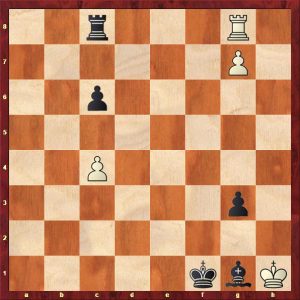
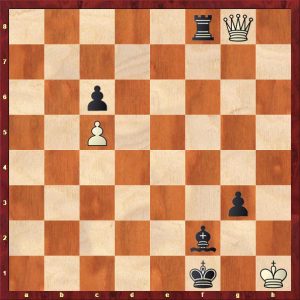
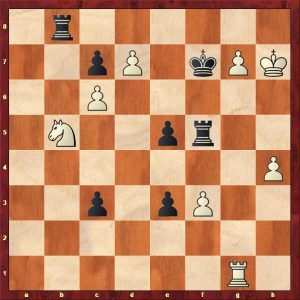
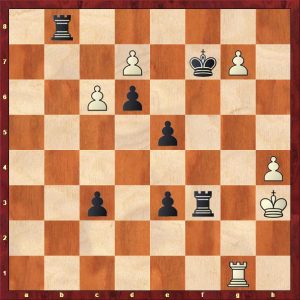
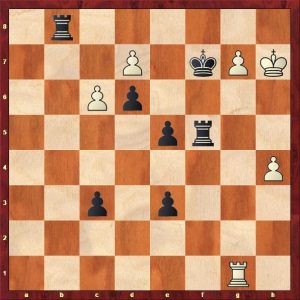
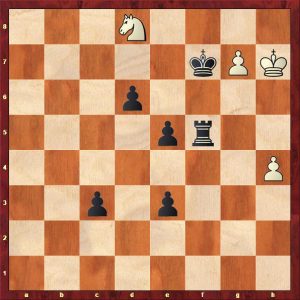
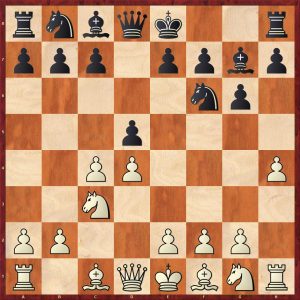
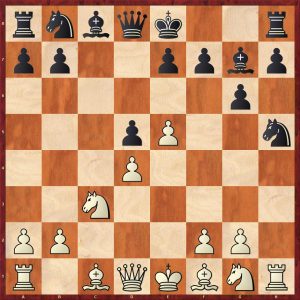
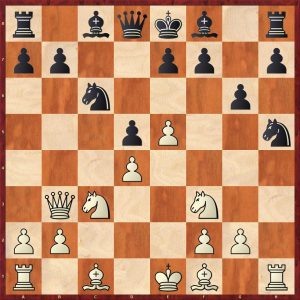
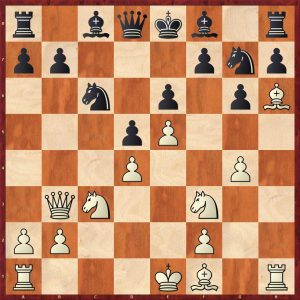
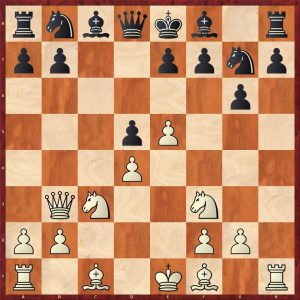
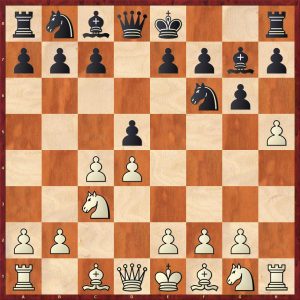
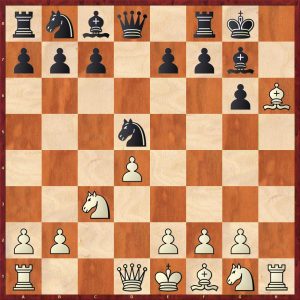
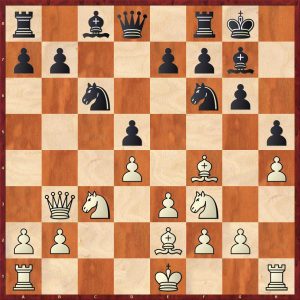
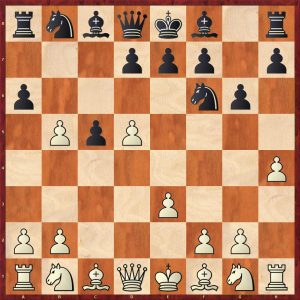
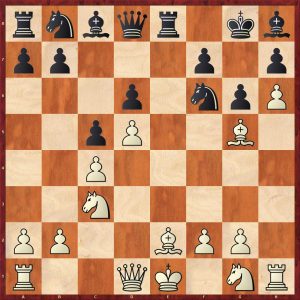
 Understanding Pawn Endgames: Valentin Bogdanov