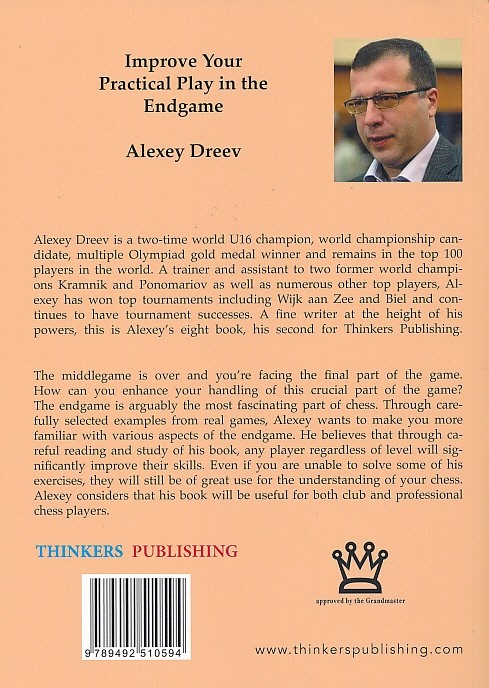
Marvelous Modern Miniatures, Carsten Hansen, Russell Enterprises, December 2020, ISBN-13 : 978-1949859225
From the publisher:
“50% Tactics – 50% Opening Book – 100% Enjoyment! Enter the world of chess miniatures where games are decided in 20 moves or less! Marvelous Modern Miniatures features the largest collection of miniatures chess games played in the last half-century. Over 500 pages of cut and thrust! Although every player is rated at least 2100, the overwhelming majority are strong masters or grandmasters. You will follow them as they do battle with tactical fireworks raging around them. The surprising depth of the annotations (each one of the 2,020 games has meaningful comments) turns this book into a virtual course on tactics. Looking for traps and pitfalls in your favourite openings? You’ll probably find them here. Marvelous Modern Miniatures will improve your tactical skills and alertness and sharpen your opening play. As a bonus, the entire collection is immensely enjoyable!”
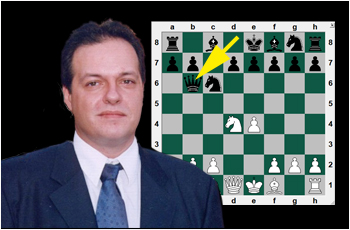
Cartsen Hansen is a Danish FIDE Master, FIDE Trainer and author of twenty-eight chess books on all phases of the game. He is a columnist for American Chess Magazine and Shakbladet.
FM Carsten Hansen
This action packed book is an entertaining selection of opening/early middlegame disasters which includes some miniatures with world class players being crushed in twenty moves or less.
This book is naturally arranged by opening: on starting this book, I went straight to the section on my favourites. I offer four games from the fiery Dragon Variation.
The following game is a celebrated game which features a rare crushing loss for Dragon expert Jonathan Mestel against the late John Littlewood who was a fine feisty attacking player.
John Littlewood (2375) – Jonathan Mestel (2475)
British Championship Chester 1979
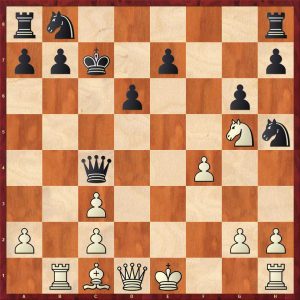
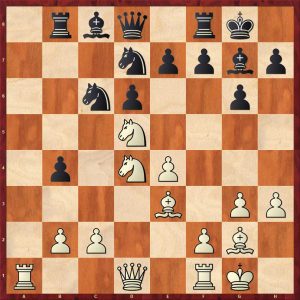
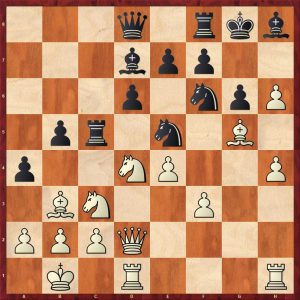
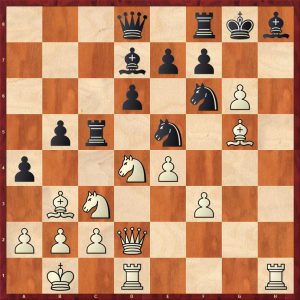
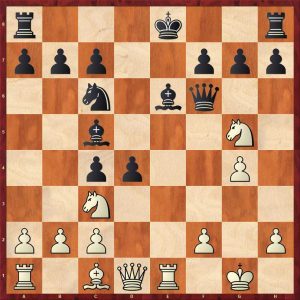
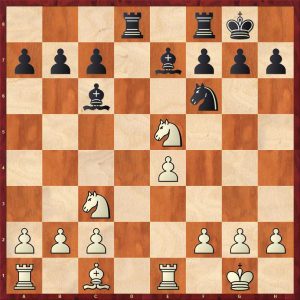
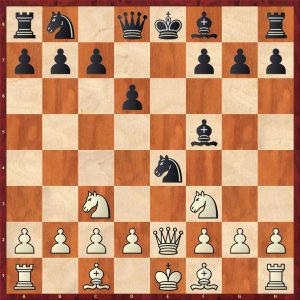
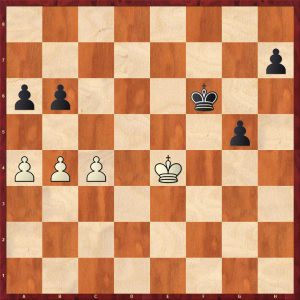
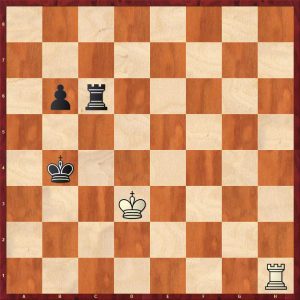
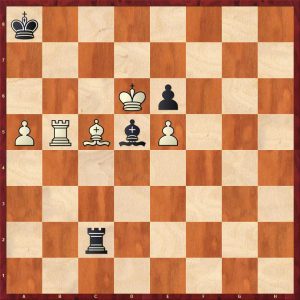
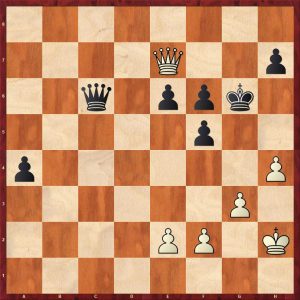
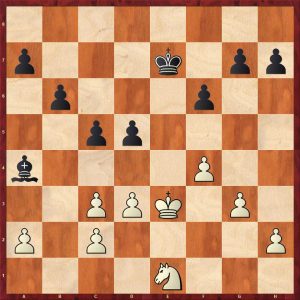
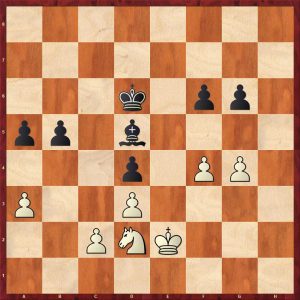
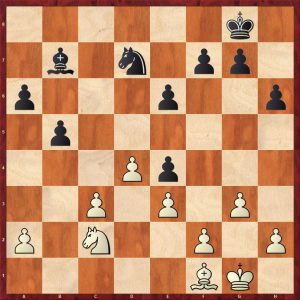
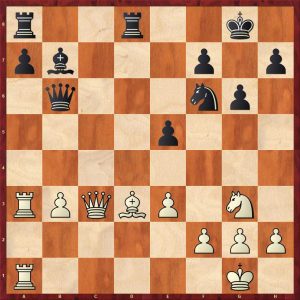
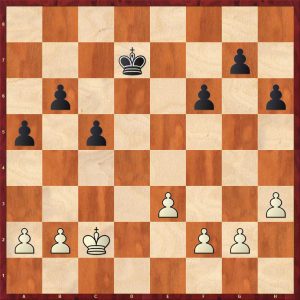
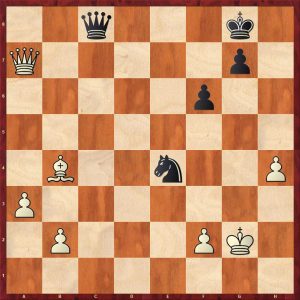
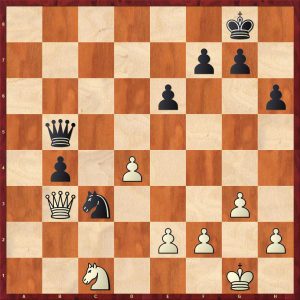
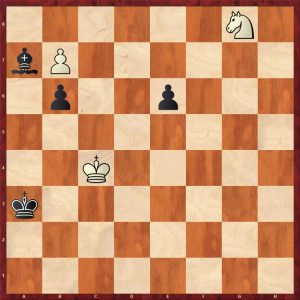
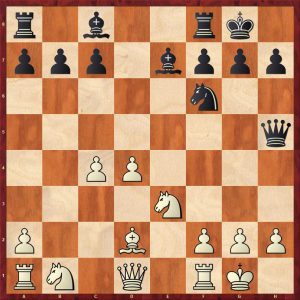
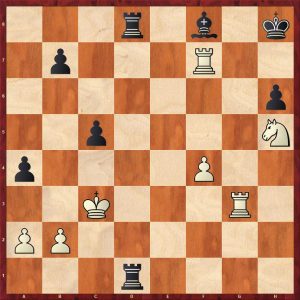
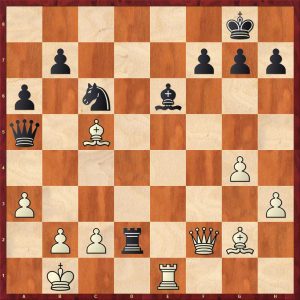
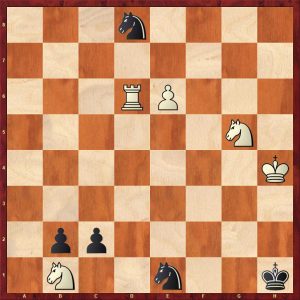
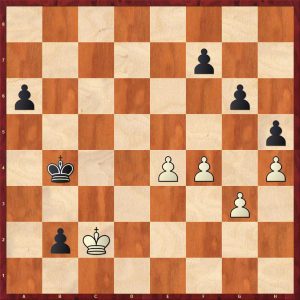
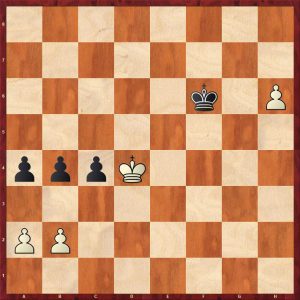
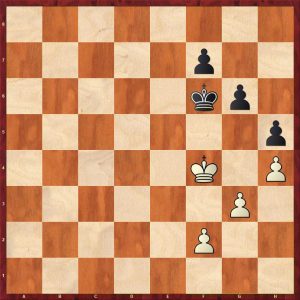
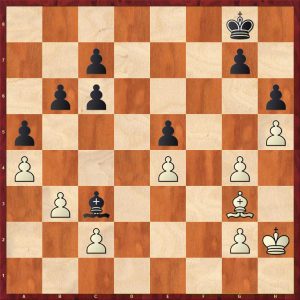
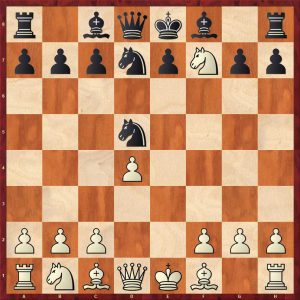
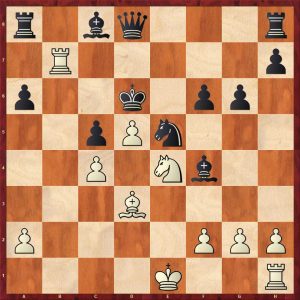
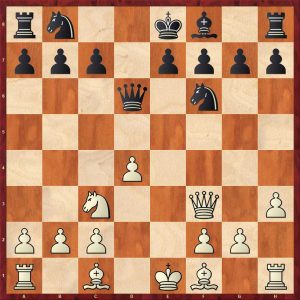
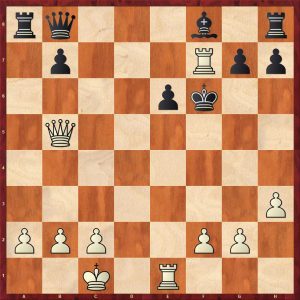
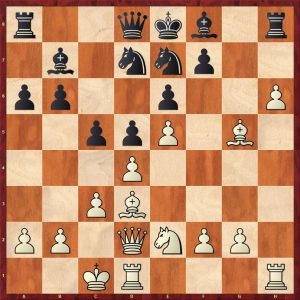
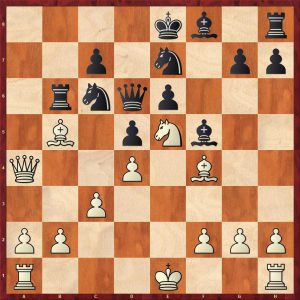
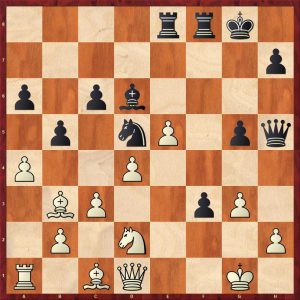
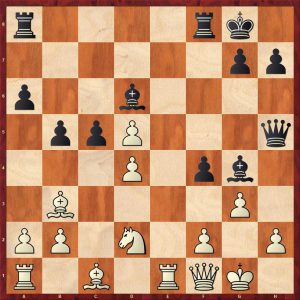
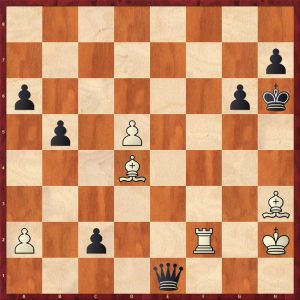
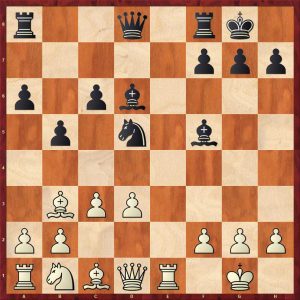
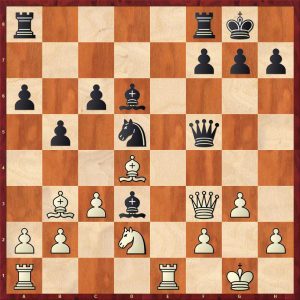
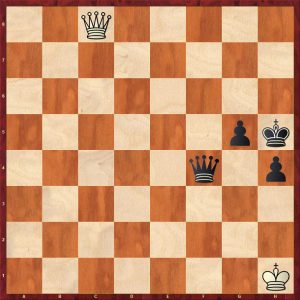
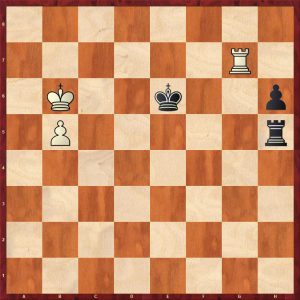
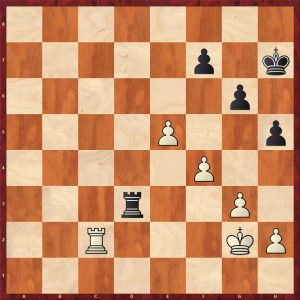
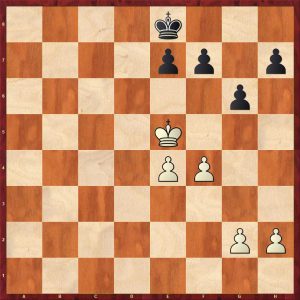
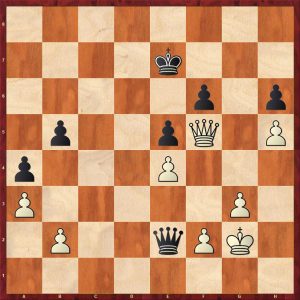
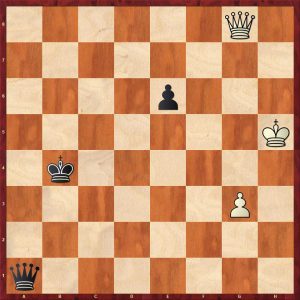
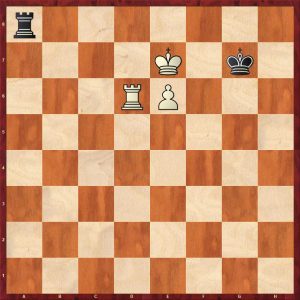
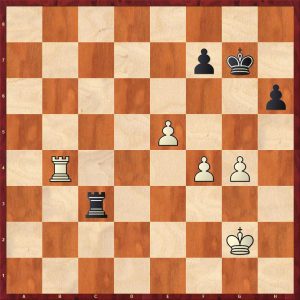
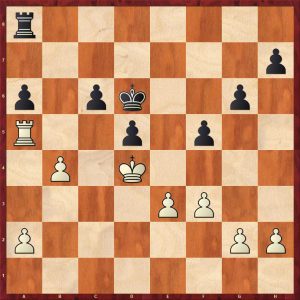
1.e4 c5 2.Nf3 d6 3.d4 Nf6 4.Nc3 cxd4 5.Nxd4 g6 6.f4 The Levenfish variation which is a decent alternative to the highly theoretical Yugoslav Attack. Bg7!? (Better is the standard 6…Nc6) 7.e5 Nh5 8.Bb5+ Bd7 9.e6!? (A dangerous line which must be handled carefully, but 9.Qe2 is better and leads to a white advantage) 9…fxe6 10.Nxe6 Bxc3+ 11.bxc3 Qc8 12.Bxd7+ Kxd7 13.Ng5 Qc4?! (13…Qxc3+ 14.Bd2 Qc4 15.Rb1 b6 16.Rb4 Qd5 17.Qg4+ Qf5 18.Qf3 Nc6 black is slightly better, for example 19.g4 Qc5 20.gxh5 Nxb4 21.Qb7+ Qc7 22.Qxc7+ Kxc7 23.Bxb4 gxh5) 14.Rb1 Kc7
John Littlewood-Mestel Chester 1979 Move 14
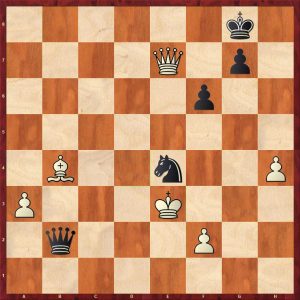
15.Rb4! Qxa2 The queen is very poorly placed here 16.Qe2 Nc6 17.Ne6+ 1-0 (Hopeless is 17…Kc8 18.Rxb7! Qa4 19.Rc7+ Kd8 20.0-0 Rc8 21.Rxc8+ Kxc8 22.f5 Nc6 23.Bg5 with a huge advantage)
John Littlewood-Mestel Chester 1979 Finish
The second featured game in the Dragon variation features a well concealed mistake in the quiet g3 line, which the reviewer had not seen before despite having played the line with both colours.
Vladimir Georgiev (2564) – Evgeni Janev (2487)
Elgoibar 22.12.2001
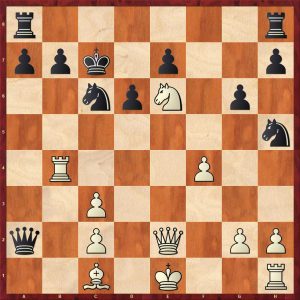
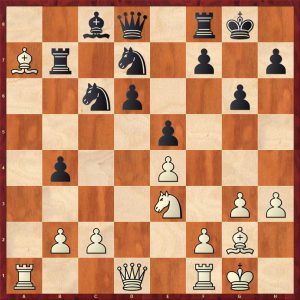
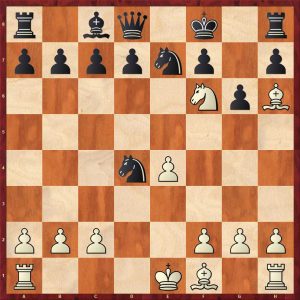
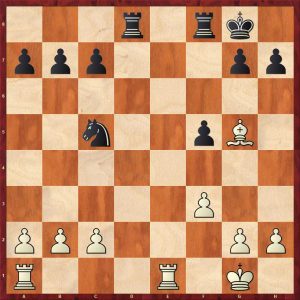
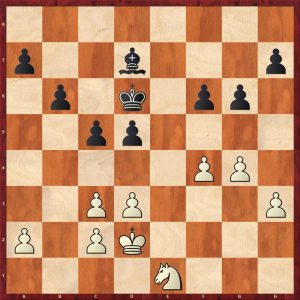
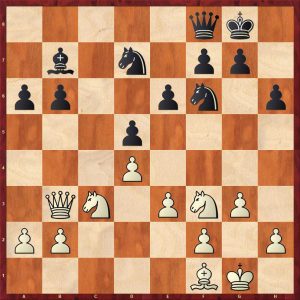
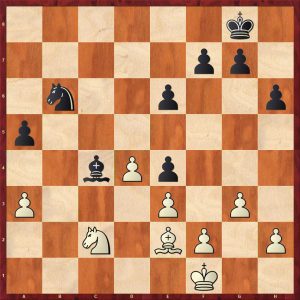
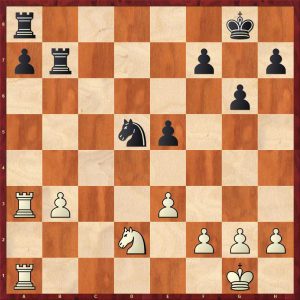
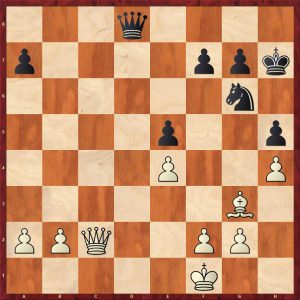
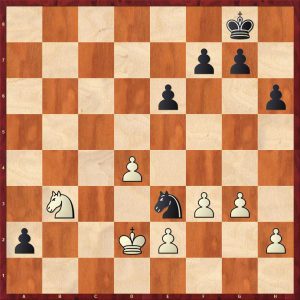
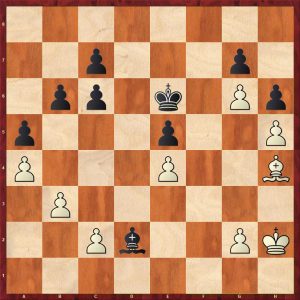
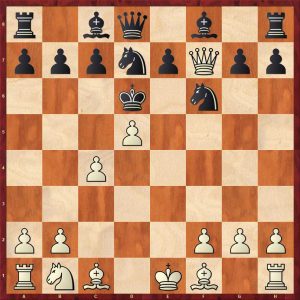
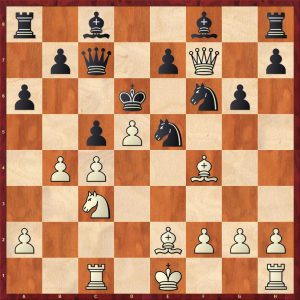
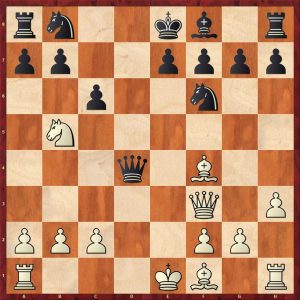
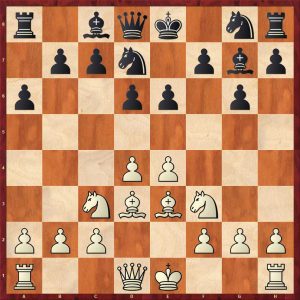
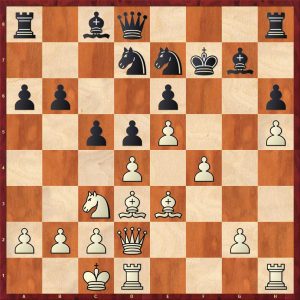
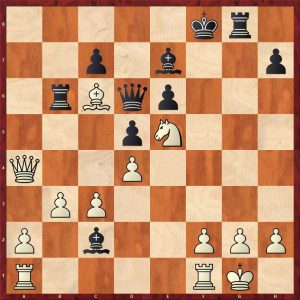
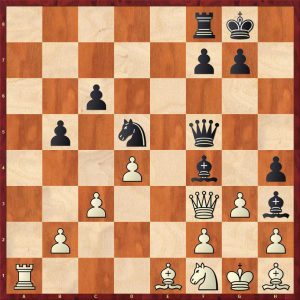
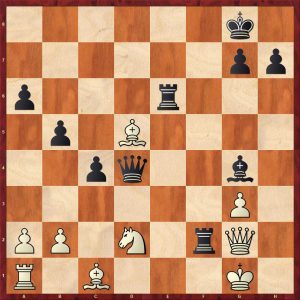
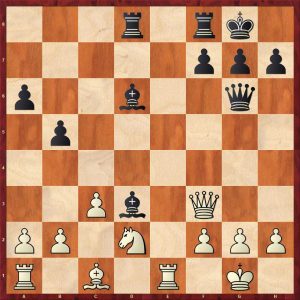
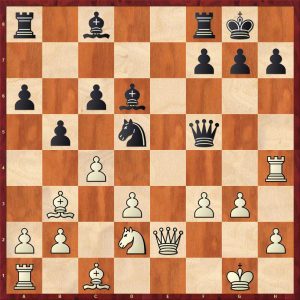
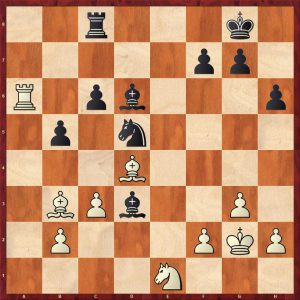
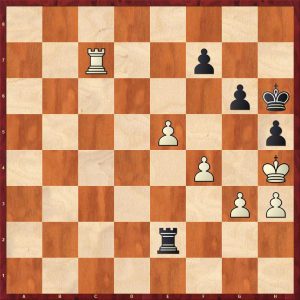
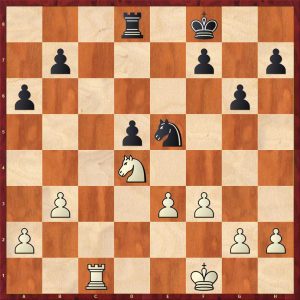
1.Nf3 c5 2.e4 Nc6 3.d4 cxd4 4.Nxd4 g6 5.Nc3 Bg7 6.Nde2 Nf6 7.g3 0-0 8.Bg2 d6 9.0-0 a6 10.a4 Rb8 11.h3 b5 12.axb5 axb5 13.Be3 b4 14.Nd5 Nd7! 15.Nd4? A natural, but it is a well known mistake that is also seen in this setup with the colours reserved in the English Opening.
Georgiev-Janev Elgoibar 2001 Move 15
15…Bxd4! 16.Bxd4 e6 Winning a piece 17.Ne3 e5 18.Ba7 Rb7 Winning the bishop 0-1
Georgiev-Janev Elgoibar 2001 Finish
The next struggle features the Classical Variation of the Dragon. White essays the sharp Stockholm Attack which was venomous in its early days, but the theory was worked out many decades ago.
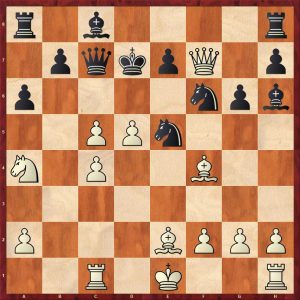
Perez,Robert M (2210) – Esserman,Marc (2453)
US Open Orlando 04.08.2011
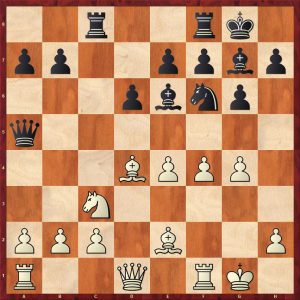
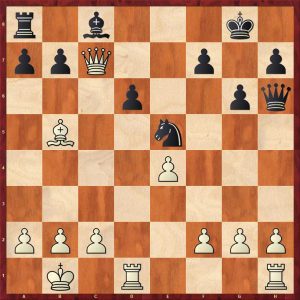
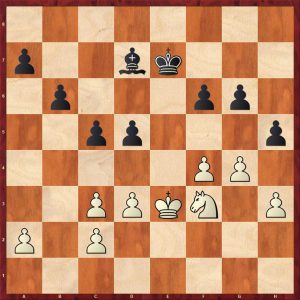
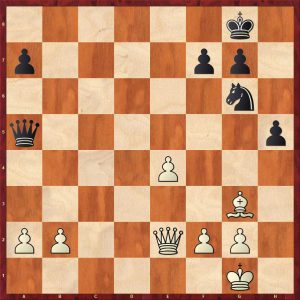
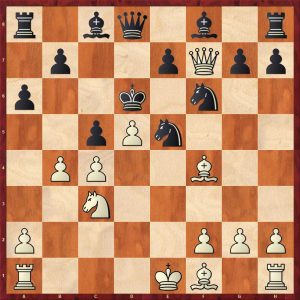
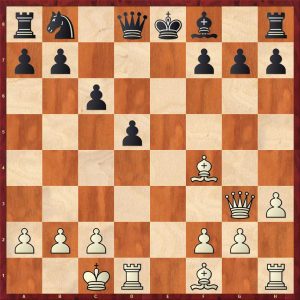
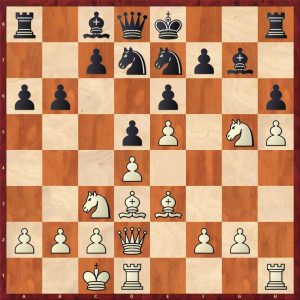
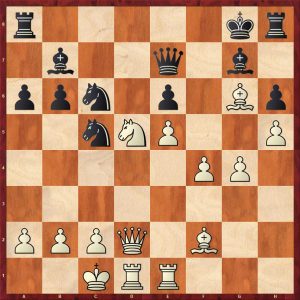
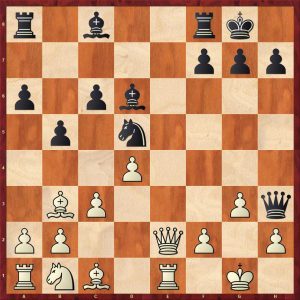
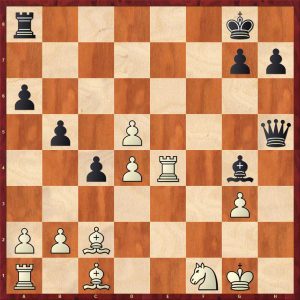
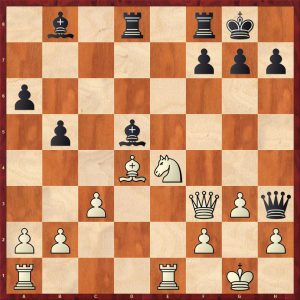
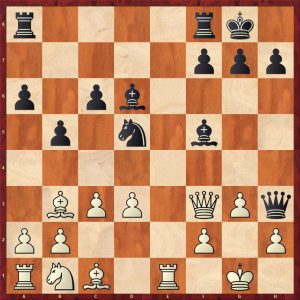
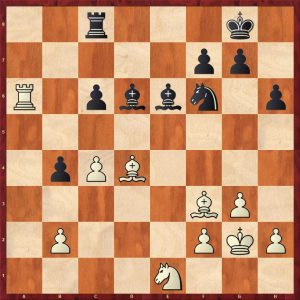
1.e4 c5 2.Nc3 d6 3.f4 Nc6 4.Nf3 g6 5.d4 cxd4 6.Nxd4 Bg7 7.Be3 Nf6 8.Be2 0-0 9.Nb3 Be6 10.0-0 Rc8 11.g4 Na5 12.Nxa5 Qxa5 13.Bd4? [13.f5 Is better but black is at least equal after 13…Bc4]
Perez-Esserman US Open 2011 Move 13
13…Bxg4! 14.Bxg4 Nxg4 15.Nd5 (15.Bxg7 Qh5! The main point: protecting the knight and threatening mate, before recapturing on g7) 15…Bxd4+ 16.Qxd4 e5 17.Qd1 Qc5+ 18.Kg2 Qxd5 0-1 (Black wins the queen back with Ne3+ followed by a crushing rook invasion on c2 a which gives an easily winning double rook ending.)
Perez-Esserman US Open 2011 Finish
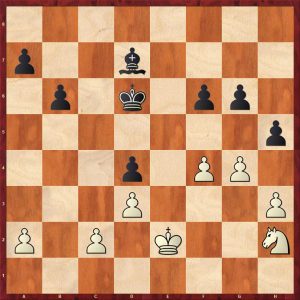
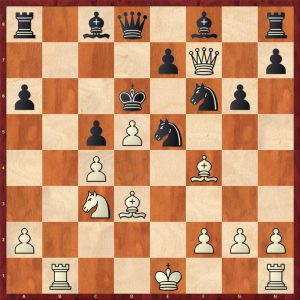
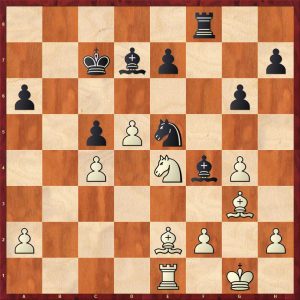
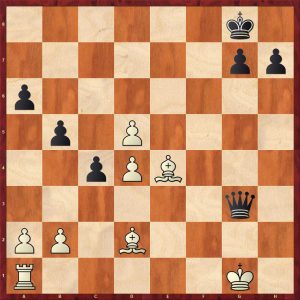
My last example Wyvern offering is from a main line in the highly theoretical Soltis Variation of the Yugoslav Attack.
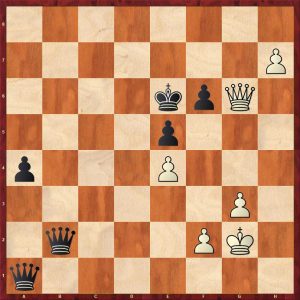
18.h7+ (18.Bd5 is really interesting.) Kxh7?? A bad blunder [18…Nxh7 leads to a complex struggle] 19.h5 Kg8 20.hxg61-0 (Black’s kingside is crumbling with no hope of support: catastrophe on the h-file follows imminently with the black king meeting a grisly execution.)
Todorovic-Brankovic Kladovo 1996 Finish
My next featured game is from an good old fashioned slugfest in the King’s Gambit, Double Muzio Variation and features the refutation to this Victorian romantic opening.
Stephen Brady (2320) – Mark Heidenfeld (2280)
Irish Championship Limerick, 1991
1.e4 e5 2.f4 exf4 3.Nf3 g5 4.Bc4 g4 5.0-0 gxf3 6.Qxf3 Qf6 7.e5 Qxe5 8.Bxf7+ Kxf7 9.d4 Qf5! (The bust, which leads to a large black advantage) 10.g4?? Much too weakening (10.Bxf4 Nf6 11.Nc3 Bg7 12.Rae1 d6 13.Qe2 Nc6 14.Be5 Qg4 15.Bxf6 Bxf6 16.Qxg4 Bxg4 17.Nd5 h5 18.Nxf6 Kg6 19.Nxg4 hxg4 20.Re4 Rhf8 with a winning endgame but black must still display some technique) 10…Qe6?! [10…Qg6! is even better] 11.d5? (Accelerating the loss, 11.Bxf4 is better still much better for black) 11…Bc5+ 12.Kg2 Qg6 13.Bxf4 Nf6 14.Be5
d6! The point of black’s play, the g4-pawn is targeted 15.Bxf6 Bxg4 16.Qf4 Bf3+! 0-1 (Forcing the exchange of queens, leaving black a clear piece to the good.)
The next game features the dangerous Max Lange Attack in the Two Knight’s Variation for the Italian Game.
Kacper Piorun (2457) – Piotr Staniszewski (2383)
Polanica Zdroj Open 21.08.2009
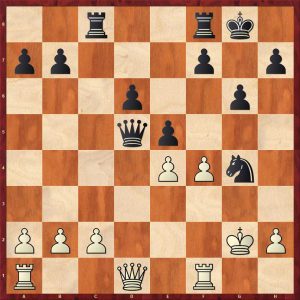
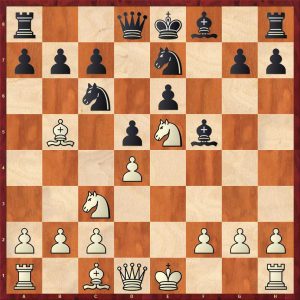
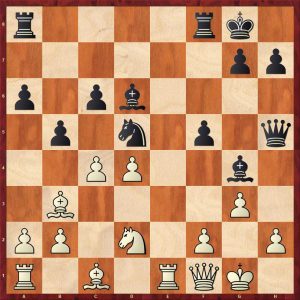
1.e4 e5 2.Nf3 Nc6 3.Bc4 Bc5 4.0-0 Nf6 5.d4 exd4 6.e5 d5 7.exf6 dxc4 8.Re1+ Be6 9.Ng5 Qd5 10.Nc3 Qf5 11.g4 A sideline, 11.Nce4 is the main line: black is fine but must know a lot Qxf6?? A very common mistake (11…Qg6 is fine)
Piorun-Staniszewski Polanica Zdroj 2009 Move 11
12.Nd5 Qd8 13.Rxe6+ fxe6 14.Nxe6 Qd7 15.Ndxc7+ Kf7 16.Ng5+ Kg6 [16…Kg8 is a slight improvement] 17.Qf3 Rad8 18.Nce6 (18.Qe4+ Kf6 19.Qf4+ Kg6 20.Nge6 also wins) 1-0
Piorun-Staniszewski Polanica Zdroj 2009 Move Finish
The next game shows a well known trap is the Scotch which two strong players were unaware of.
Delgado Ramirez (2620) – J. Gemy (2401)
Arica Open 2018 17.12.2018
0-0? Falling into an ancient snare known since 1892. 8.Bxc6 Bxc6 9.dxe5 dxe5 10.Qxd8 Raxd8 11.Nxe5
Popovic- Jesenji Senta 2002 Move 11
Bxe4? Black hopes that he can regain his pawn exploiting white’s weak bank rank 12.Nxe4 Nxe4 13.Nd3 f5 14.f3 Bc5+? 15.Nxc5 Nxc5 16.Bg5! The killer, this has happened many times
Popovic- Jesenji Senta 2002 Move 16
16…Rd7 [16…Rd5 17.c4 followed by Be7] 17.Be7 b6 18.Bxf8 Kxf8 19.Rad11-0
Popovic-Jesenji Senta 2002 Finish
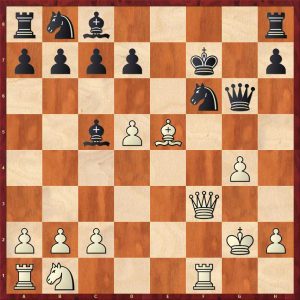
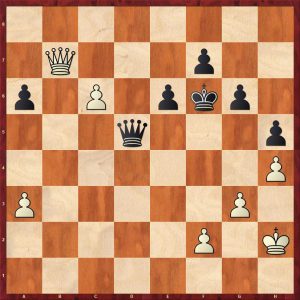
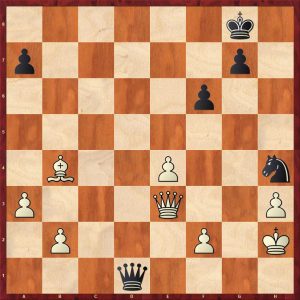
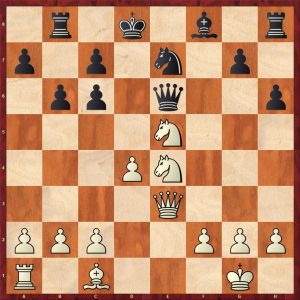
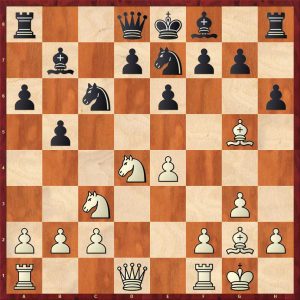
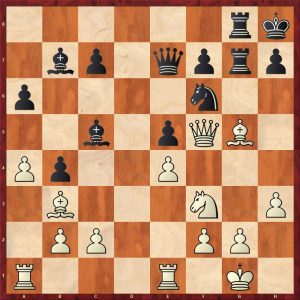
Here is a fine attacking game from the Queen’s Gambit Accepted which shows the dynamic potential in an isolated queen pawn (IQP) middlegame. Here the former world champion Anatoly Karpov is the victim, stuffed in 18 moves.
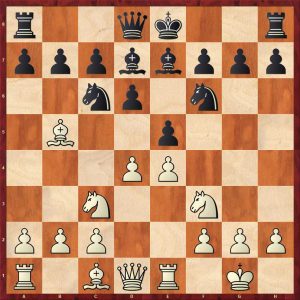
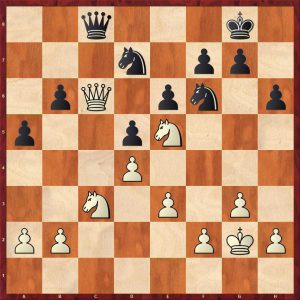
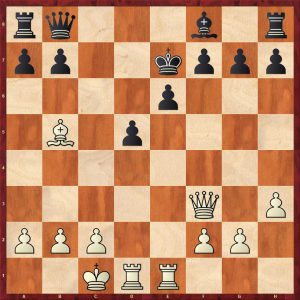
1.Nf3 d5 2.d4 Nf6 3.c4 dxc4 4.e3 e6 5.Bxc4 c5 6.0-0 a6 7.Qe2 cxd4 8.exd4 Be7 9.Nc3 b5 10.Bb3 0-0 11.Bg5 Bb7 12.Rad1 Nc6 13.Rfe1 Nb4? This is quite a difficult line for Black anyway, but his last move is a serious mistake. (13…Na5?! 14.d5! Nxb3 15.dxe6 Qb6 16.axb3 fxe6 17.Nd4 Bd6 18.Qxe6+ Kh8 19.Nf3 Rad8 20.Bf4! Bxf3 21.Rxd6 Rxd6 22.Qxd6 Qxd6 23.Bxd6 Re8 24.Rxe8+ Nxe8 25.Be5+- Boleslavsky-Kotov, Zurich, 1953.;
13…Nd5 14.Nxd5 Bxg5 15.Nb6!? Bronstein. 15…Qxb6 16.Nxg5)
Andersson-Karpov Nykoping rapid 1995 Move 13
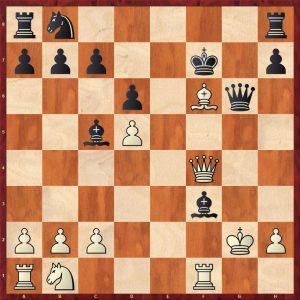
14.d5! This thematic break works really well for White, due to his superior development, in fact this move was analysed long ago by Russian master V. Rauzer! 14…Nfxd5 15.Nxd5 Bxg5 16.Nxb4 Qe7 17.Nd5 Bxd5 18.Bxd5 1-0
Andersson-Karpov Nykoping rapid 1995 Finish
The reviewer’s last offering shows an instructive loss by another former World Champion is just six moves. He followed a previous game Miles-Christansen where both players missed white’s sixth move winning a piece!
Alonso Zapata (2480) – Vishy Anand (2555)
Biel 1988
1.e4 e5 2.Nf3 Nf6 3.Nxe5 d6 4.Nf3 Nxe4 5.Nc3 Bf5?? This had been played by Christiansen against Miles who played 6.Nxe4? [5…Nxc3 is the main line] 6.Qe2 winning a piece 1-0 (6…Qe7 is met by 7. Nd5 whereas 6…d5 is met by 7.d3
Zapata-Anand Biel 1998 Finish
In summary, this is a good read which revealed traps that the reviewer had not seen before. It just shows that even titled players can fall into lost positions very quickly.
I have one small criticism: the reviewer quickly spotted a couple of typos in the book but this does not detract from a didactic book. Look up your favourite openings and you may be surprised!
FM Richard Webb, Chineham, Hampshire, 31st May 2021
The Chess Endgame Exercise Book Paperback, JDM Nunn, Gambit Publications Ltd., 2020
John Nunn has written around thirty books on chess, many of these being some of the finest published in any language : Secrets of Pawnless Endings (1994, Batsford) for example, is easily a candidate for the all time list. John is a director of Gambit Publications Ltd. together with Murray Chandler and Graham Burgess.
GM John Nunn
From the rear cover :
“Everyone knows they should work on their endgame play. So many hard-earned advantages are squandered in ‘simple’ endings… But it’s tough finding a way to study endings that doesn’t send you to sleep and that helps you actually remember and apply what you have learnt.
“While endgame theory books are helpful, active participation by the reader is a great aid to learning. I hope that this book of endgame exercises will encourage readers to put their brains in high gear, both to test themselves and to learn more about the endgame. I have spent several months selecting the 444 exercises in this book from what was initially a much larger collection.” – John Nunn
All major types of endgame are covered, together with a wide-ranging chapter on endgame tactics. Examples are drawn from recent practice or from little-known studies. The emphasis is on understanding and applying endgame principles and rules of thumb. You will learn by experience, but always backed up by Nunn’s expert guidance to ensure that the lessons you take away from the book are correct and useful.”
To get some idea of the book Gambit (via Amazon) provide a “Look Inside” at their Kindle edition.
As you would expect with Gambit, the notation is English short form algebraic using figurines for pieces. A previous criticism (ibid) has been addressed in that each diagram has a W or B “whose move it is” indicator. The diagrams do not have coordinates but this is not likely to be a problem for most.
Here on YouTube John Nunn gives the reader an introduction to the book :
So, what did we think?
This is another superb endgame book by John Nunn. This excellent tome is titled as an exercise book, so the reader will gain most by attempting to solve the puzzles, but there is no compulsion to do this: the book can also be treated as a practical endgame manual.
Most of the positions are from recent actual play and show typical positions that occur in practice and therefore show practical problems and mistakes even by very strong players. In many positions, John Nunn selects two or three obvious candidate moves and asks the reader to choose one. I like this approach as it reflects a real game and the pressure to choose between candidates.
There are some theoretical positions which are shown in many endgame primers. Some studies are included which always expand the reader’s mind by showing the beautiful rich tapestry of chess and should increase the reader’s imagination in practical play.
Each of the first nine chapters has an introductory piece over two pages which is short and pithy introducing some main principles for the forthcoming chapter: for example in the king and pawn ending section, key ideas are presented including:
Shouldering Away
Distant Opposition
Diagonal Opposition
Reserve Tempi
Assessing transitions into Q+P endings
This is followed by the exercises which vary in difficulty from 1-5. This degree of hardness is indicated by a number of stars. Level 1 is solvable by a club player; level 5 will give a Grandmaster a good workout.
Most of the chapters have a special harder exercises section.
The two biggest chapters are king and pawn endings, and rook and pawn endings which reflect their importance and relative occurrence. Many endings reduce down to bare king and pawn endings which most be understood to play the endgame at a half decent level. Rook and pawn endings are the most common as the rooks tend to be developed last: excellence in these endings is a sure sign of a strong player.
The reviewer will show a flavour of positions from the first nine chapters with varying difficulty levels.
Chapter 1 – King and Pawn Endings
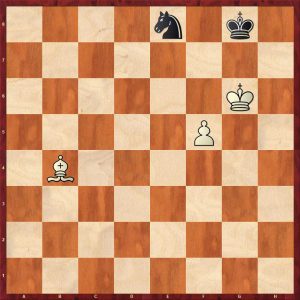
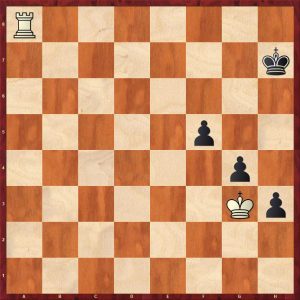
This first position below in the book is a level 1 exercise and an illustration of triangulation.
Triangulation Example 1 White To Move
Black to move here has to move his king losing the d-pawn and the game quickly. But it is white to move and white wins by executing a fundamental manoeuvre as follows:
1.Ke2 Ke6 (1…Kc6 2.Kd2 is no different) 2. Kd2! Kd5 3.Kd3 and now black has the move and is in zugzwang. White has moved his king in a triangle whereas black could only move his king between two squares (because the c5 pawn restricts his manoeuvres).
Shown below is a harder example (level 3) of triangulation.
Triangulation Example 2 White To Move
To the casual observer this position looks to be drawn as both kings are tied up watching the opponent’s connected passed pawns. White’s pawns are further advanced and he can win with a subtle manoeuvre as follows:
Kg4! White must prevent d5 and d4, 1…Kf6 (The toughest defence. 1…d5 loses to 2.Kg5 see below) 2.Kg3! d5 (2…Kg7 3.Kf4 d5 3.Kg5 transposes) 3. Kf4 Zugzwang, black must give way 3…Kg7 4.Kg5 e3 5.h6+ Kg8 6. Kf6 e2 7.h7+ Kh8 8.Kf7 e1=Q 9.g7+ Kxh7 10.g8=Q+ Kh6 11.Qg6#
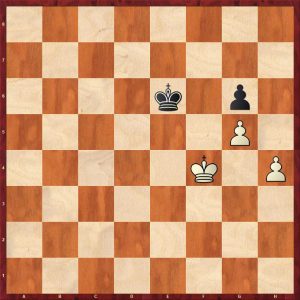
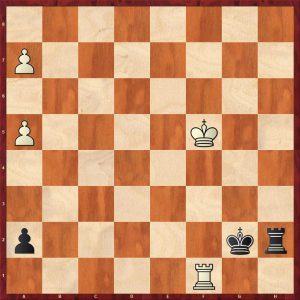
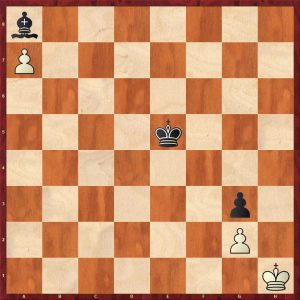
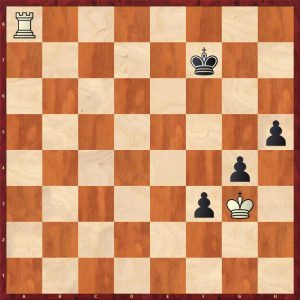
In the basic king and pawn endgame below, the author informs the reader that black has only one move to draw.
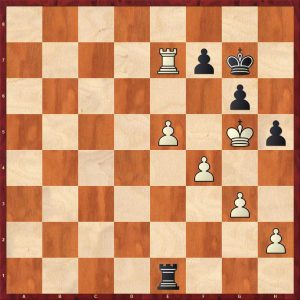
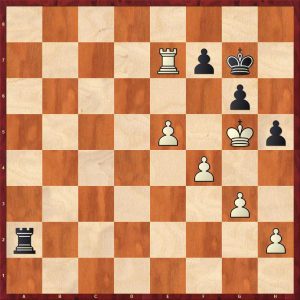
Teiitbaev-Ufimtsev Moscow 2019 Black to move
This position illustrates not only the opposition but also consideration of the opponent’s pawn breaks. White has two winning ideas:
Achieve the position of Ke5 v Ke7 with black to move
Get in the h5 break when black cannot capture and follow up with Kg7 or Kh7 drawing
Black played 1…Kd6? guarding against the first idea but not the second. White won with 2.Kg4 Ke6 3.h5 gxh5+ 4.Kxh5 Kf7 5.Kh6 seizing the critical squares, winning.
To this end only 1…Kf7! draws viz: 2.Ke5 Ke7 seizing the opposition or 2. Kg4 Kf7 meeting 3.h5 with 3…gxh5+ 4.Kxh5 Kg7 drawing
The next example shows an example of the distant opposition at work.
Distant Opposition White To Move
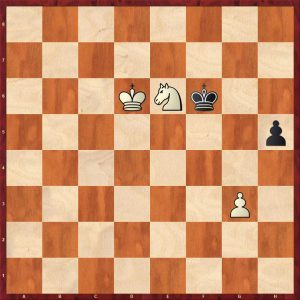
White only has one move to draw: 1.Kh2! (Seizing the distant opposition three squares apart, 1.Kg2? Ke2 2.Kg3 Ke3 3.Kg4 Kf2 4.Kh4 Kf3 5.Kg5 Kg3 wins) 1…Kd3 2.Kh3! Kd4 3.Kh4! Ke4 4.Kg4 Ke3 5.Kg3 Ke2 6.Kg2 Kd2 7.Kh2 holding the draw. White’s king has access to all the squares on the h-file, which why this defence works.
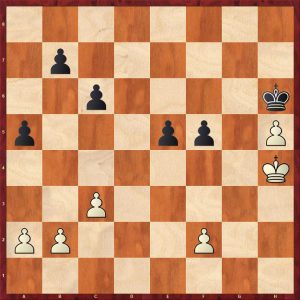
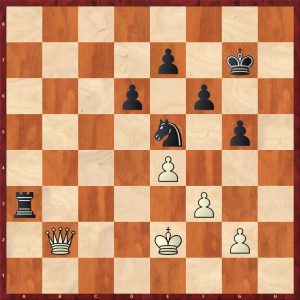
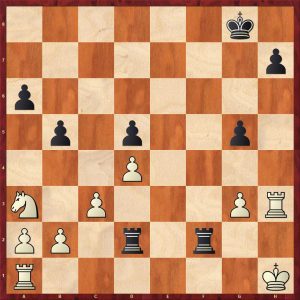
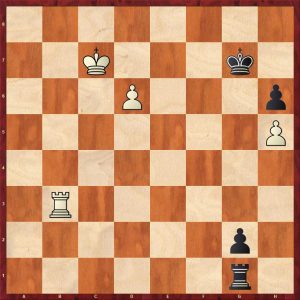
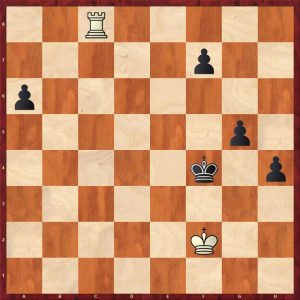
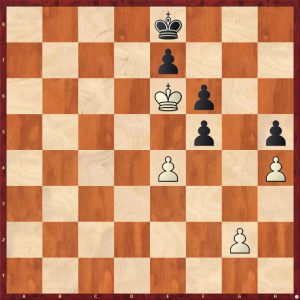
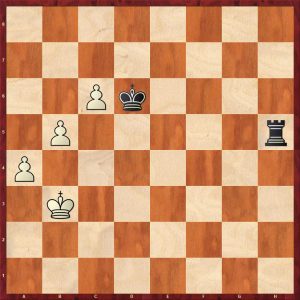
This next struggle (at level 3) shows the importance of reserve tempi and how crucial it is to manage them precisely. This is of course coupled with exact calculation. Neither side wants to move their king as to do so loses the game. Nunn gives the reader an amusing choice between 1…a4, 1…b5 and 1…e4 stating that one loses, one draws and one wins.
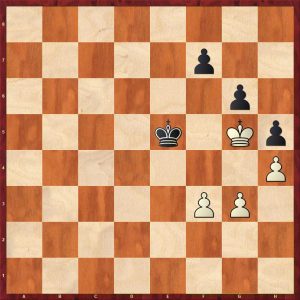
McNally-Patterson Coventry 2019 Black to Move
This is highly instructive as black played the worst move, but white let him escape with a draw!
Black wins with 1…b5! gaining space and ensuring that white runs out of pawn moves first. 2.b3 c5 3.c4 (3.f3 a4!) 3…bxc4 4.bxc4 a4 5.a3 e4 winning the h-pawn 6.Kg3 Kxh5 7.Kf4 Kg6 8.Ke5 Kg5 9.Kd5 Kf4 10.Kxc5 Kf3 11.Kd5 Kxf2 12.c5 e3 13.c6 e2 14.c7 e1=Q 15.c8=Q Qd2+ 16Ke5 f4 with a winning Q ending for black
It is very instructive to look at the other two moves that Nunn suggests: it is all down to exact calculation which is why king and pawn endings are so interesting and difficult!
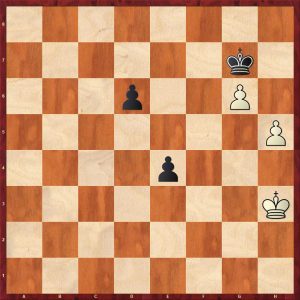
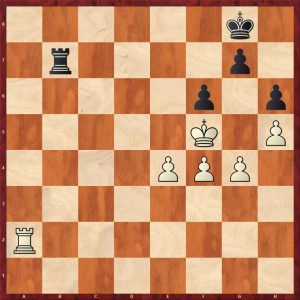
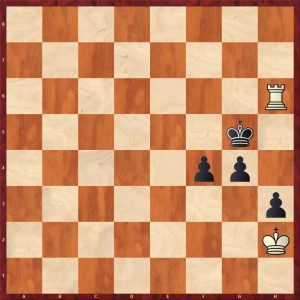
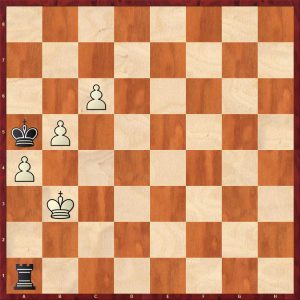
I shall finish the king and pawn examples with a level 5 difficulty example.
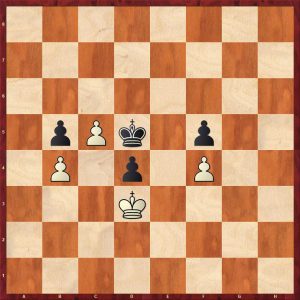
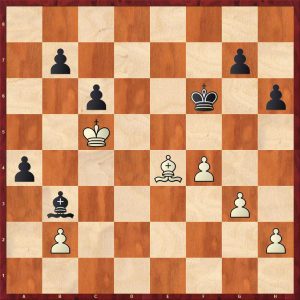
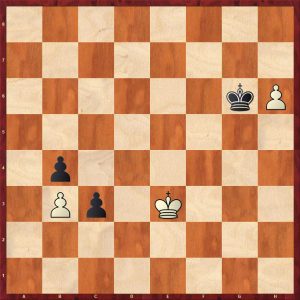
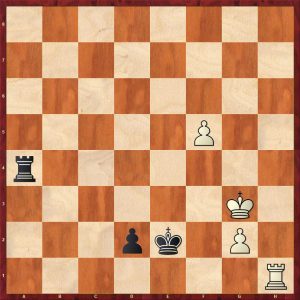
Aguilar Samper-Belmes Buenos Aires 2019 White To Move
How does white draw here? White played 1.Kd5? and lost.
1.c5! b5! (1…bxc5? loses as 2.b5 axb5 3.a5 wins as black cannot catch the a-pawn and his own pawns are too slow. 2.axb5 axb5 White has a protected passed pawn but most play some accurate moves to draw. 3. Kd5!! (3.Kf3? loses to the triangulation technique of the second example above viz: 3…h5 4.Kg3 Kf5 5.Kf3 h4 6.Kg2 g4 7.Kf2 g3+ 8.Kf3 Ke5 9.Kg2 Ke6! 10.Kf3 Kf5 11.Kg2 Kg4 12.c6 h3+ 13.Kg1 Kf3 14.c7 h2+ 15.Kh1 Kf2 16.c8=Q g2+ mates) 3…g4 (3…h5 4.Kd6 h4 5.c6 h3 6.c7 h2 7.c8=Q h1=Q 8. Qe6+ Kg7 9.Qd7+ is a perpetual) 4.Ke4!! A brilliant switchback 4…h5 5.Kf4 Ke6 6.Kg3 Ke5 7.Kh4! Now white oscillates between h4 and g3 drawing, black cannot play his king to g5 as the white c-pawn promotes. The Kd5, Ke4 manoeuvre forced black to advance his pawns in a sub optimal manner allowing white a blockade. A very instructive ending.
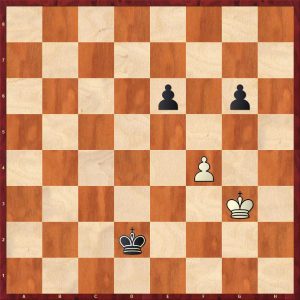
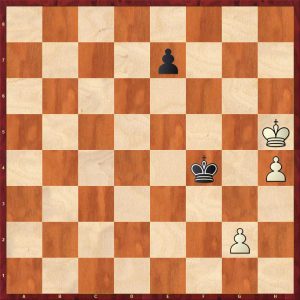
Chapter 2 covers knight endings. The reviewer will give a couple of examples. The type of position below does occur in practice quite often: the stronger side may have won a knight on the queenside by promoting an outside passed passed pawn. How does white win?
Knight Ending Zugzwang Example White To Play
Black is threatening Kf5 followed by Kg4 drawing.
White must play 1.Nd4! Kg5 (threatening Kg4 followed by h4) 2.Ke6! (The obvious 2.Ke5? throws the win away 2…Kg4 3.Nf5 Kg5 zugzwang 4.Ke6 Kg6 zugzwang) 2…Kg4 (2…h4+ 3.Nf3+ wins) 3.Nf5! Kg5 4.Ke5! Zugzwang 4…Kg4 4.Kf6 Kf3 5.Kg5 winning the pawn and the game. This is a very common theme in knight endgames as a knight cannot lose a tempo.
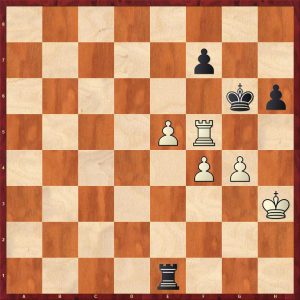
The second knight and pawn example is harder.
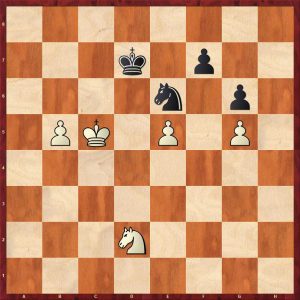
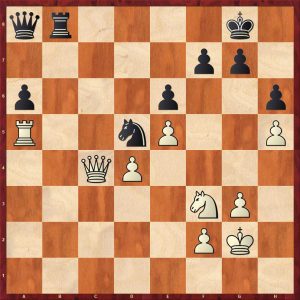
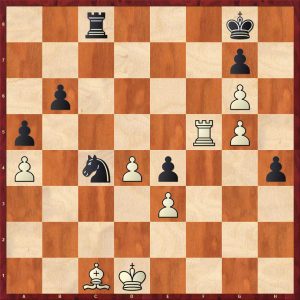
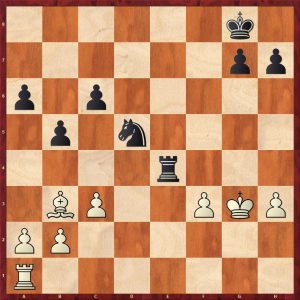
Warakomski-Moranda Katowice 2019 White To Play
White played 1.Kd5 which only draws. It looks logical as it places the king near the kingside ready for a hoped for decisive invasion. However it does not win. Passed pawns must be pushed!
White wins with 1.Kb6! Blocking his own pawn but the king must support the dangerous pawn. 1…Nxg5 2. Kb7 (Keeping the black pieces from their optimal squares. 2.Ka7? Ne6 3.Ne4 Nd4! 4.b6 Nc6+ draws) 2…Ne6 3.Ne4! g5 4.Nf6+ Kd8 5.b6 Nc5+ 6.Ka8! Ke7 7.Ne4! Nd7 8.b7 g4 9.Nc5 wins
Chapter 3 covers bishop endings.
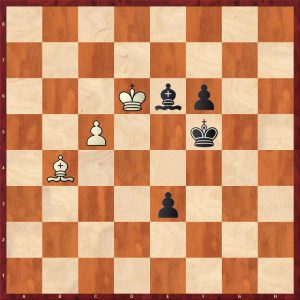
The type of ending below is fairly common and is covered in endgame primer manuals. How does white draw?
Lysenko-Hamitevici 2019 White to move
The key factor here is the presence of the h-pawn which renders this position a draw with accurate defence, because of the edge of the board and stalemating opportunities. A similar position with pawns on the e,f & g files would be won for black.
White lost this game by playing 1.Bb5? but could have drawn as follows:
1.Kg1! (Or 1.Kh1!) Kg3 2. Bd7! (2.Bd5? loses to 2…f2+ 3.Kf1 Kh2) 2…f2+ 3.Kf1 Kf3 4.Bxg4+ Kxg4 5.Kxf2 with a clear draw
The position below is covered in Basic Chess Endings by Fine and other primers on the endgame. How does black to play draw?
Moiseenko-Flom 2019 Black to move
1…Kd5! (Black played 1…Be7? Now white wins with a standard idea. 2.Bd8 Bc3 3.Bh4 Ba5 4.Bg3 and black prevent cannot prevent Bc7 blocking out the bishop and wins) 2. Bd8 Bc3 3.Bh4 Ba5 4.Be1 Bb6 5. Bf2 Ba5 6.Bg3 Kc6 (Just in time to stop Bc7, black draws) =
This chapter also has some excellent examples of opposite coloured bishop endgames which are well worth study. Buy the book to see these.
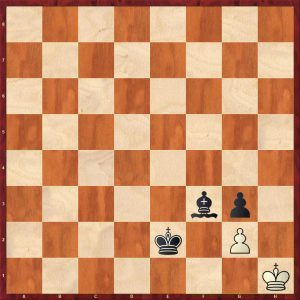
Chapter 4 covers bishop versus knight endings.
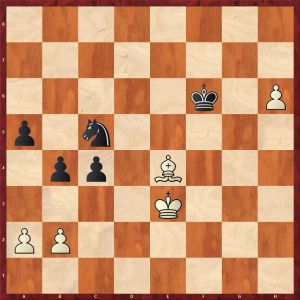
Here is a position that looks desperate for black, so he resigned. But there is a saving resource. His pieces are restricted and near the corner, so….
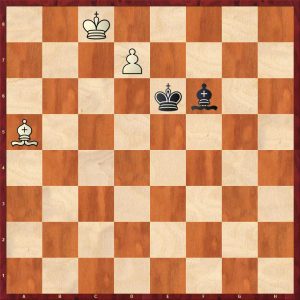
Baklanova-Y.Kim 2019 Black To Move
1…Kh8! (Any knight move allows the f-pawn to advance decisively) draws 2.Kf7 Ng7! 3.Bd4 (3.f6 Nh5 draws) 3…Kh7! draws as 4. Bxg7 is stalemate
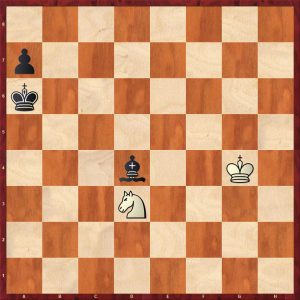
The next fight shows how poorly the knight deals with rook pawns.
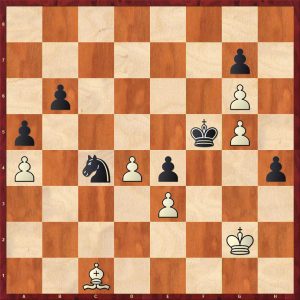
Esipenko-Pershin 2019 Black To Move
Black won with 1…Kb5 2.Kf3 Kc4 3.Ke2 Kc3 Keeping the white king away by shouldering – a common theme in all sorts of endings. Even though the pawn has not moved, white cannot draw! 4.Nf4 Kc2 5.Nd5 a5 (Finally the pawn moves) 6.Nc7 a4 7.Nb5 Be5 8.Na3+ (8.Ke3 Kb3 9.Kd3 Kb4 10.Na7 a3 11.Nc6+ Kc5 12.Na5 a2 13.Nb3+ Kb4 14.Kc2 Bf6 is a win by zugzwang – a common occurrence in B+P v N endings) Kb3 9.Nb1 Bc3 10.Kd1 Ba5 11.Kc1 Bb4 0-1 as 12. Kd1 is met by Kb2 winning easily.
Chapter 5 covers Rook Endings.
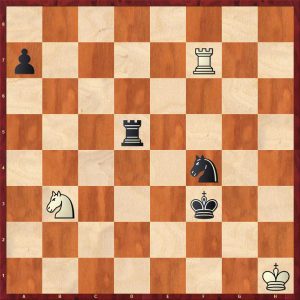
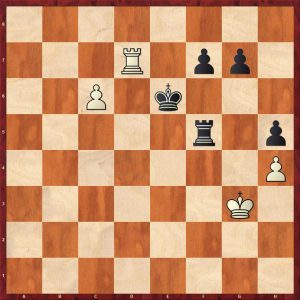
The position shows a common type of position. Nunn asks the question, which is best 1.Rf8+, 1.Rg8 or 1.Ke5?
Ivanisevic-Madl 2018-9 White To Move
The intermediary check gains a tempo which wins: 1.Rf8+! Ke4 Attempting to shoulder barge the white king 2. Rg8! Kf4 3.Kd5 g4 4. Kd4 1-0 as 4…h3 5.Kd3 Kf3 6.Rf8+ Kg2 7.Ke2 Kg1 8.Kf3 g2 9.Kg3 Kh1 10.Rh8+ Kg1 11.Rh2 wins
Which king move should white make in the position below?
Rahmani-Belouadah 2019 White To Move
White played 1.Ke6? and lost because of 1…Re1+ which is similar to the position above. 1.Kg6 draws as white should keep his king on the same side as Black. 1…Kf3 2.f5 Ke4 3.f6 Rg1+ 4.Kh7 Rf1 5.Kg7 Ke5 6.f7 draws
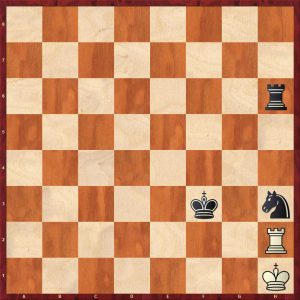
How does black draw in this common type of position?
Hesitation Check Black To Play
1…Re1! 2.f6 (2.Kf6 Kb4! 3.e7 Kc5 4.Kf7 Kd6 draws after 5.f6 Kd7 or 5.e8=Q Rxe8 6.Kxe8 Ke5 draws) 2…Re5!+ (A superb hesitation check which is easy to miss, 2…Rxe6 loses to 3.f7) 3.Kg6 Rxe6 drawing.
One move wins for black in this position. What is it?
Marcelo-Fernandez Garcia 2018-9 Black to Play
1…Rc3+! is the winner. This idea is analysed in “My Sixty Memorable Games” in a Fischer game with Gligorić (with reversed colours). Fischer comments that he spent all night analysing this rook and pawn endgame learning a lot about rook and pawn endgames.
2. Kd2 b5 (now the black rook shields the king from a frontal assault) 3.Rb1+ Rb3 4. Rh1 Ka3 5.Kc2 Rb2+! 6.Kc1 b4 7.Rh8 Rg2 8.Ra8+ Kb3 9.Rb8 Rg1+ 10.Kd2 Rb1! 11.Rb7 Ka2 and white cannot avoid the Lucena position for long.
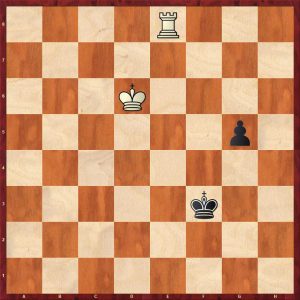
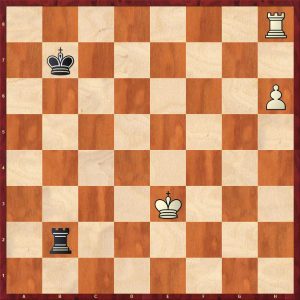
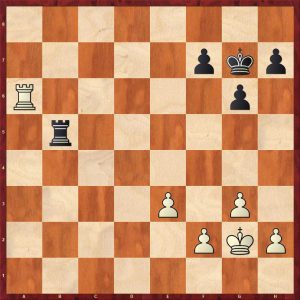
In the example below, Dr Nunn asks which is better 1…Ke8 or 1…Kg8? This is a fundamental rook and pawn position that everyone should know.
Mutovin-Kulik 2019
The black king should move to the short side, so the rook can operate on the long side.
Black played 1…Ke8? which loses 2.Ra8+ Kd7 3.Rf8! The key move 3…Rf2 4.Kg7 Rg2+ 5.Kf7 Rf2 6.f6 and the Lucena will soon be reached.
1… Kg8! would have drawn 2. Ra8+ Kh7 3.Ke6 (3.Rf8 Ra1! preparing flank checks on the long side) 3…Kg7! 4. Ra7+ Kf8 5.Kf6 Kg8 repeating =
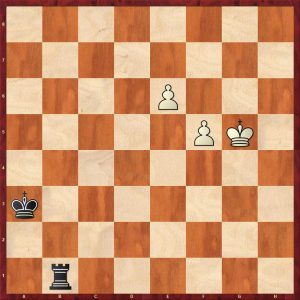
Should black play 1…Rb6, 1…Ka7, 1…Rh2?
Rook Ending Vancura Example
Only 1…Rb6! draws setting up the Vancura position as soon as possible. 2.Kf4 Rc6 3.Kg5 Rc5+ 4.Kg6 Rc6+ 5.Kg7 Rc7+ with a standard Vancura draw. This Vancura draws only works with rook pawns.
Chapter 6 covers Rook and Minor Piece endgames.
I will show three examples of didactic positions.
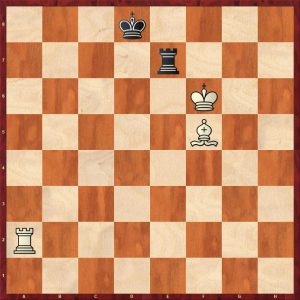
This is a standard theoretical position with the king in the wrong corner (same colour as the bishop).
Edouard-Erdos 4NCL 2018-9
White wins by 1.Kf6! (Black is threatening Bb2 followed by Bg7) 1…Be3 2.Kf7 Ba7 3.Ra6 smoking out the bishop 3…Bb8 4.Ra8 Bc7 5.Rc8 Bf4 (5…Bb6 6.Rc3 Kh6 7.Rc6+ wins the bishop) 6.Rc4 Bg5 7.Rc3 1-0 since 7…Kh6 8.Rh3+ wins the bishop
In the next game we have a rook and opposite colour bishop ending where mating ideas are always on the agenda particularly when a king is on the edge of the board.
Nakamura-Adly Internet 2019 White To Play
White won with 1.Kc7! (Threatening the brutal 2.Rb8#) 1…Bb7 2.a6! winning easily as 2…Rxc5+ 3.Rxc5 Bxa6 4. Ra5 wins
The next example shows the notoriously difficult rook and bishop versus rook ending. The reviewer has had this endgame twice in practice and won both times. This type of position is very common in this ending. Black has only one drawing move. What is it?
This second rank defence is good but cannot always be reached. It does not work when the king is in the corner.
Here is a R v B with the defending king near the safe corner, however, this position is still very dangerous for white, who has one drawing move.
Czopor-Dragun 2019 White To Move
White played 1.Bd5? and lost as follows: 1…Rd7 (Black smokes the bishop out again) 2.Bc6 Rc7 3.Bd5 Rd7 4.Bc6 Rd6 5.Bb5 Rb6 6.Be8 Rb8 7.Bg6 Rh8+ winning 1.Kh5 draws since 1…Kf5 2.Kh4 Kf4 3.Kh3 or Kh5 draws
Chapter 7 covers queen endings.
Here I will give a flavour with four endings. Here white has a strong passed pawn but white’s queen is offside. How does black impede its further advance? This type of position occurs quite frequently.
Dimakiling-Schebler Pattaya 2019 Black To Move
Black played 1…Qc5? (1…Qf3? also loses 2. Qb6 wins) 2.Kg1 Qd4 (or 2…Qc1+ 3.Kg2 winning as black cannot check on the long diagonal) 3.c7 1-0
Black can draw with 1…Qd4! (Harassing white’s king and stopping Qb6) 2.Kg1 Qd1+ 3.Kg2 Qd5+ draws as 4.f3 Qd2+ 5.Kh3 Qc1 draws
The next position shows how dangerous a queen can be: don’t forget she is a potent mating force! Black is a pawn up but white’s next few moves show how immaterial that is.
There are many games, even in GM praxis where the stronger side falls into a mating net trying to a avoid a perpetual.
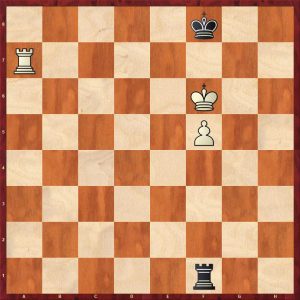
The next game shows the notorious Q + rook’s pawn v Q ending.
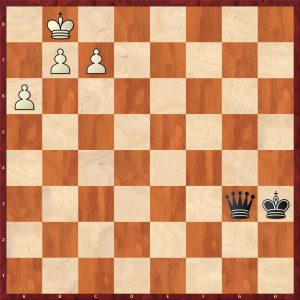
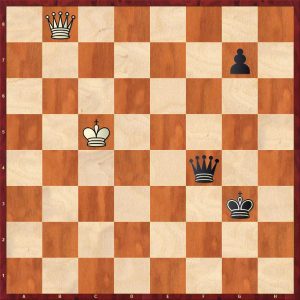
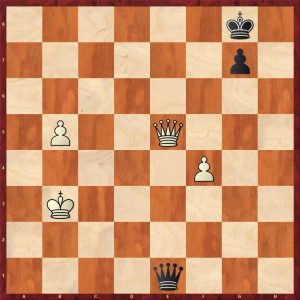
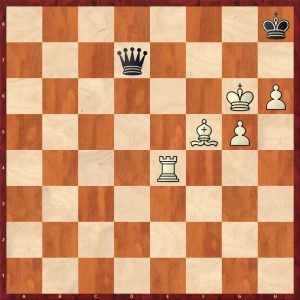
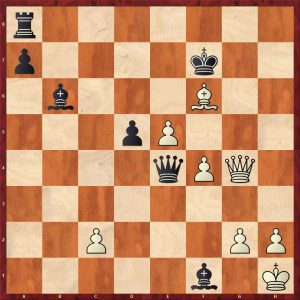
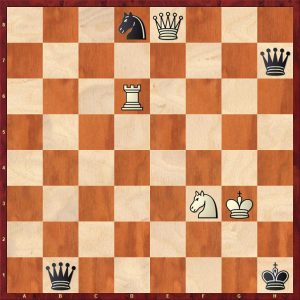
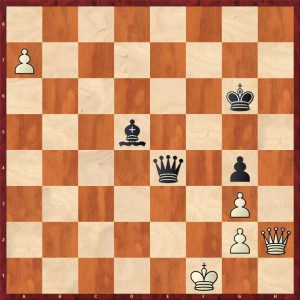
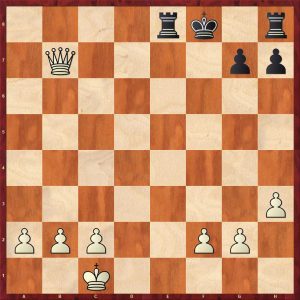
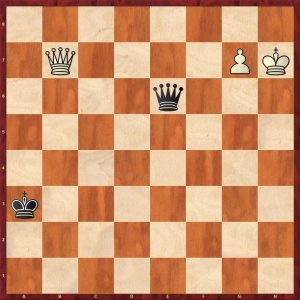
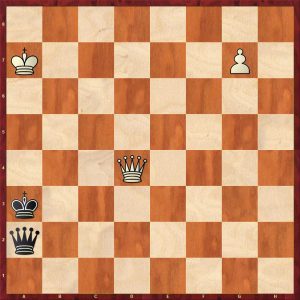
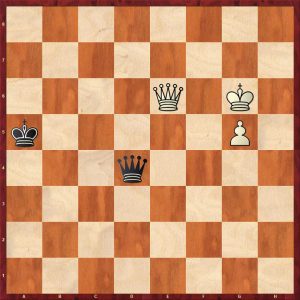
Here black has placed his king onto a very poor square. Black should have put his king in the a1 corner area to draw. Even then, the defending side has to be very accurate. How does white win?
Sanal-Szustakowski Graz 2019 White To Play
Black’s king is very vulnerable to a cross check. White should move his king towards the 4th rank to exploit black’s king position. So:
1.Qf5! (1.Kg7? only draws, don’t forget a queen can shepherd home a pawn without its king’s help, so white plays his king towards the rank that black’s king is on) 1…Qg2+ 2.Kf6 Qb2+ 3.Kg5 (Black has no more checks) 3…Qh8 4.Qd7+ (4.h7 is quicker) 4…Ka3 (4…Kb3 lasts longer) 5.Qe7+ Ka4 6.h7 Qb8 7.Qd7+ Kb3 8.Qd3+ Ka4 9.Qd4+ wins 1-0
Notice how black’s king position obstructs the scope of his own queen and allows a cross check.
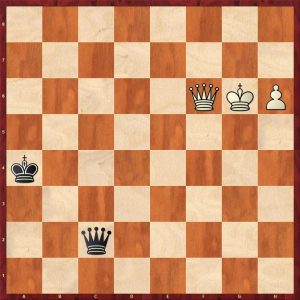
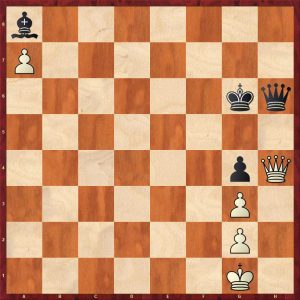
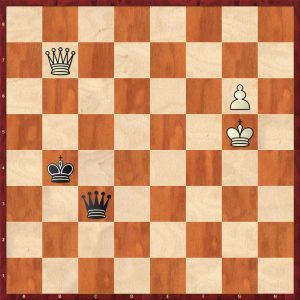
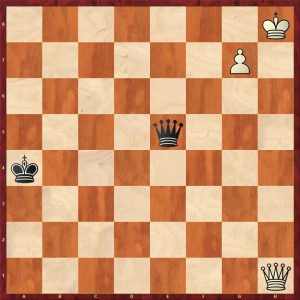
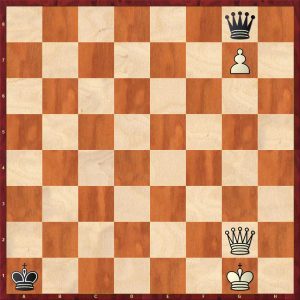
Here is an unusual position which looks hopeless for black as white’s king looks safe and a7 followed by a8=Q looks inevitable. However, black can draw!
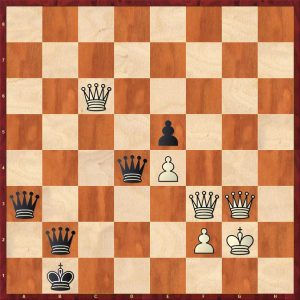
Q v 3 Pawns Black to move
1…Kg2! Getting the king out of way to avoid any potential cross checks. 2.a7 Kf3! ( or 2…Kf2) 3.a8=Q Qg8+ 4.c8=Q Qg3+ 5.Qc7 Qg8+ 6.Ka7 Qa2+ 7.Kb6 Qb3+ 8.Kc5 Qc2+! 9.Kd6 Qg6+ 10.Kd5 Qe4+ with a draw by perpetual despite white being a queen and a pawn up!
Chapter 8 is Endings With Queens And Other Pieces
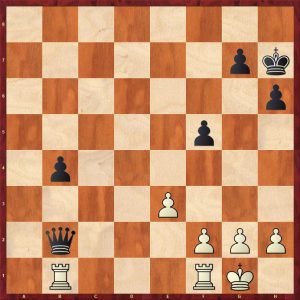
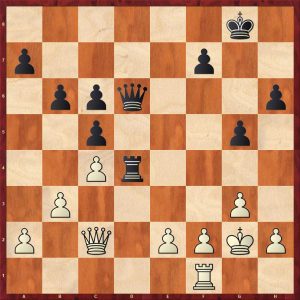
The position below is a fairly common type of position. It looks as though white can double the rooks on the b-pawn and win it followed by ganging up on the kingside pawns winning. Black can prevent this with accurate defence. How?
Dottling-Merkel Germany 2018-9 Black To Play
Black played 1…Qa3? and lost 2.Rfe1 wins as 3.Re2 and 4.Reb2 followed by 5.Rxb4 cannot be prevented. 1…Qd2? also loses to 2.Rb3, but 1..Qc3! holds; white is surprisingly unable to organise his rooks to win the b-pawn. 2. Rfe1 Qd2! 3.Kf1 Qd3+ 4.Kg1 Qd2 5.Red1 Qc2 6.Rdc1 Qd2 and white is not making any progress.
Here is a rampant rook situation. White’s king is stalemated, so he is continually offering his rook with check for stalemate. Quite often there is a king manoeuvre to get out of the checks. How does black win here?
Mwale-Makoto Sandton Blitz 2019 Black To Play
Black played 1…Kf5? 2.Rg5+! Oops, skewering the queen, drawing instantly.
A win was to be had with 1…Kh5 (or 1…Kh6) 2.Rh4+ (2.Rg5+ Qxg5 lifts the stalemate) 2…Kg6 3.Rh6+ (3.Rg4 Qg5 wins) 3…Kf7 4.Rh7+ (4.Rxf6+ Ke7 5. Re6+ Kd8 ends the checks) 4…Ke6 5.Re7+ Kf5 6.Re5+ Qxe5 wins)
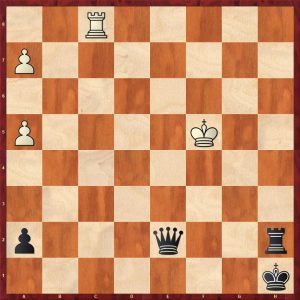
Here is a theoretical Q v R+P ending. Nunn puts the poser: which is better 1…Rc2 or 1…Rc8?
The reviewer feels a bit smug as he knew the answer to this one.
Enders-W. Watson Bundesliga 2018-9
Black played 1…Rc2? which is a blunder because white’s king can now cross the c-file: 2.Qb1+! Kc3 3.Kc5 b3 4.Qe1+! Rd2 (4…Kd3+ 5.Kb4 b2 6.Qb1 Kd2 7.Kb3 and he pawn falls) 5.Qc1+ Rc2 6.Qe3+ Kb2 7.Kb4 winning the pawn and the game.
1…Rc8! Draws 2.Qd1+ Ka3! 3.Qd3+ Kb2 4.Qd4+ Ka3 holding the draw
Chapter 9 Endgame Tactics
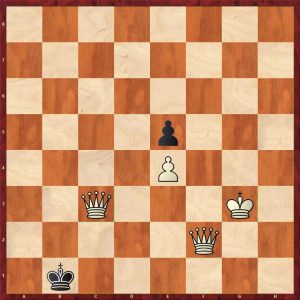
White played 1.Kf3 allowing 1…Kh4 and black consolidated his advantage to win. What did white miss?
Presalovic-Vrabel Slovakia 2018-9
White missed a beautiful draw with 1.Qd8+ Kg4 (1…Kh6 does not help) 2.Qd1+!! Rxd1 stalemate in mid board. Very study like.
The tenth and final chapter is the test chapter.
In summary a really good book to improve the reader’s endgame knowledge and analytical skills.
FM Richard Webb, Chineham, Hampshire, 30th May 2021
Technical Decision Making in Chess : Boris Gelfand
Technical Decision Making in Chess, Boris Gelfand, Quality Chess, 2021, ISBN-13 : 978-1784830649
From the Publisher’s Foreword:
“In Technical Decision Making in Chess former World Championship Challenger Boris Gelfand discusses his path to decision making in endgames and positions where one side possesses a structural or material advantage.
This investigation into a top Grandmaster’s technical understanding will illuminate difficult parts of the game that many players find elusive. Concepts like the “Zone of one mistake” are certain to be a revelation to many.”
From the back cover:
“In Decision Making in Major Piece Endings former World Championship Challenger Boris Gelfand discusses his path to decision making in endgames involving rooks or queens, as well as the neglected “4th phase”. Countless games are decided by good or bad technique in such endgames, so readers are certain to benefit from the insights of a word-class Grandmaster on this vital topic.
Grandmaster Boris Gelfand has been an elite player for over 30 years, winning the World Cup, Olympiad Gold, the Candidates and many other top tournaments.”
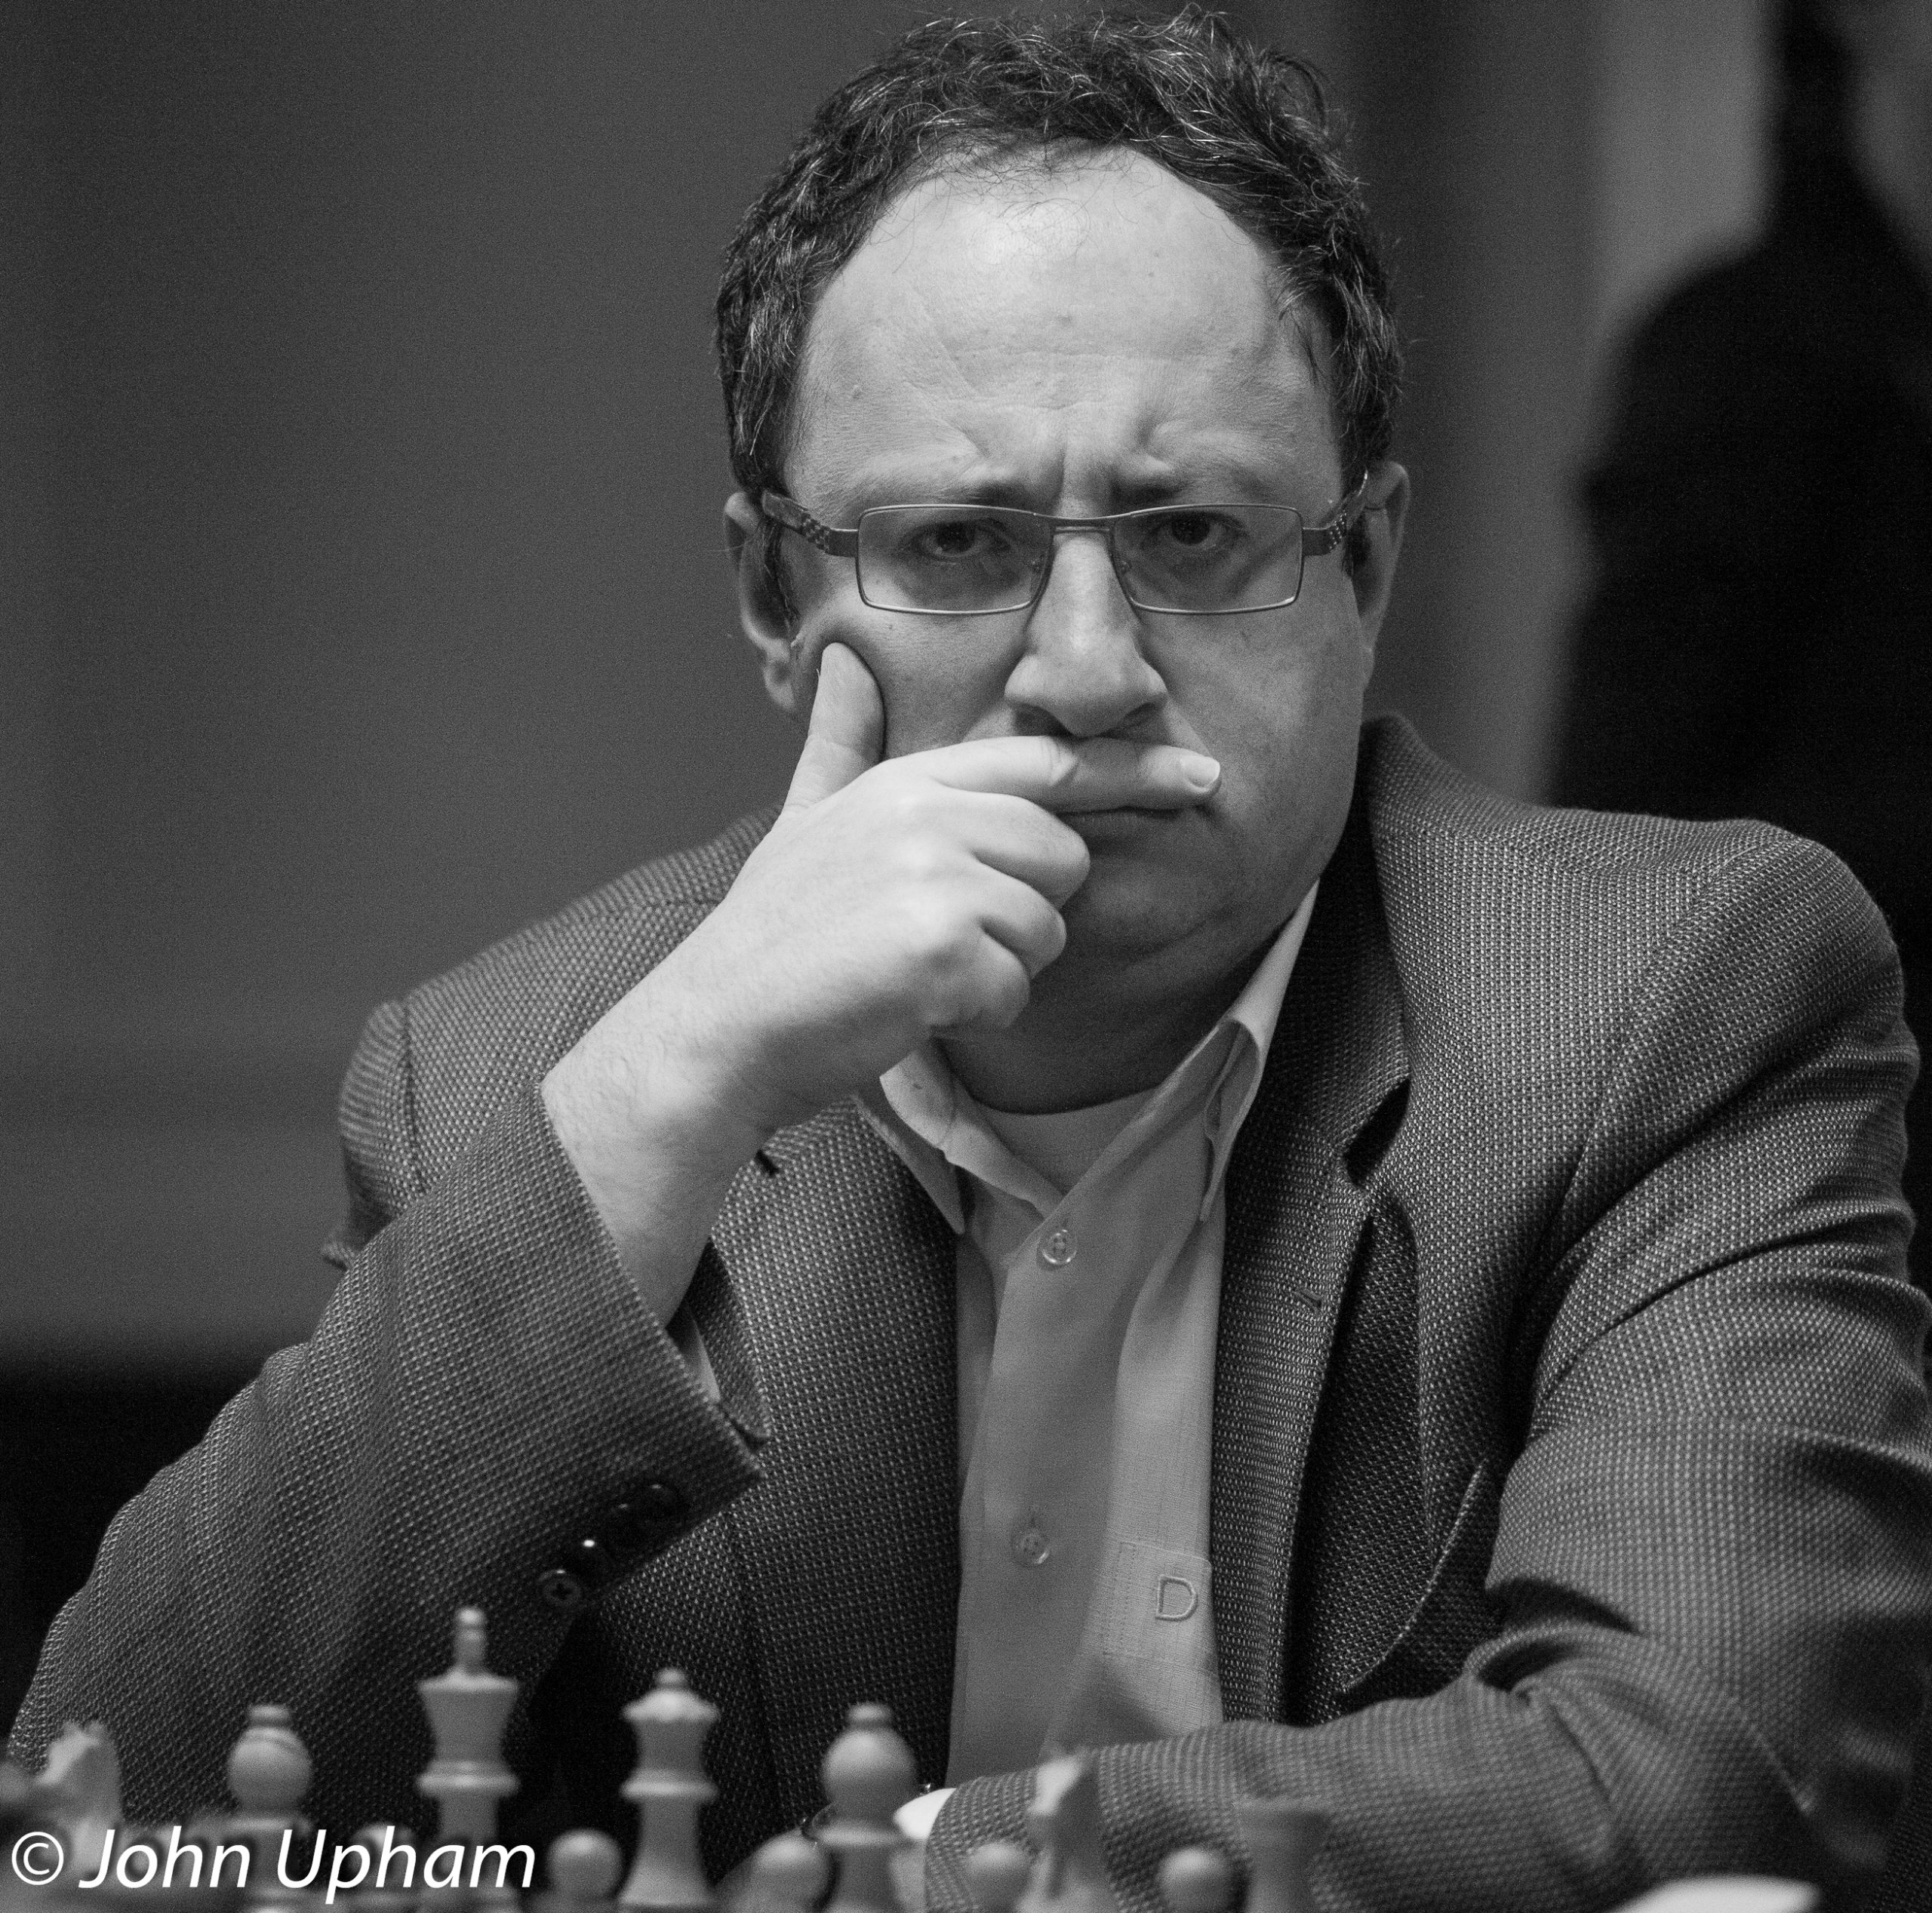
Boris Gelfand, FIDE Grand Prix, London, 2013, Courtesy of John Upham Photography
Grandmaster Jacob Aagaard is the only chess writer to have won all the major awards for chess writing.
GM Jacob Aagaard takes on all-comers!
Reaction to previous volumes in the series:
In 2015 Positional Decision Making In Chess won the ECF Book of the Year award.
“The most interesting chess book I have read in the last quarter-century.” Mikhail Shereshevsky on Positional Decision Making in Chess.
This new Quality Chess publication Technical Decision Making In Chess uses high quality paper and the printing is clear. The book can easily be laid flat next to the board and does not require weights to prevent it from “self-closing” (a particular bugbear of ours !). Each diagram is clear and the instructional text is typeset in two column format, which, we find, enables the reader to maintain their place easily. Figurine algebraic notation is used throughout and the diagrams are placed adjacent to the relevant text and each major diagram at the beginning of a chapter has a “to move” indicator. Where a “to move” indicator is not present, it is obvious which colour is to move from the accompanying moves in a variation.
Each chapter is introduced with a contemporary photograph of a player or players or a tournament scene which launches each chapter in a engaging manner. This is followed by a Diagram Preview page which shows the critical analytical diagrams in the following chapter and invites the reader to practise their analysis and decision making! If you can work out most of the variations you are stronger than a world champion.
The introduction of this book makes it clear that this book is about “positions where the main goal is the conversion of a static advantage. (A static or long term advantage can be anything from a weakness to better pieces to an actual material advantage.) The flip side is included in this, meaning when it is the opponent who is trying to convert an advantage and we are trying to resist.”
It is not an endgame primer or manual on basic endgames as there are plenty of these theoretical works already in existence: the author’s particular favourites are named.
The author suggests how to best use the book by first analysing the endgames without a chess engine and/or tablebases to prevent lazy thinking by relying too heavily on engine assessments without understanding: “I just want to say that any active work with the the engine, where you are probing, analysing, asking questions, examining and so on, is useful. Any passive submission to the engine evaluations is likely to make you a worse player.”
“The key question for us has not been which line wins. but why the line is winning.”
The chapter themes are not the usual themes that are found in other endgame books, for example arranged by material, except for the last chapter on opposite bishop endgames. Boris Gelfand shows the vast majority of the endgames in relation to the whole game including the opening and middlegame transitions. This is the modern way to study endgames and gives a much deeper understanding of chess in general and is the approach of a Grandmaster.
Chapter 1 Akiba Showing The Way
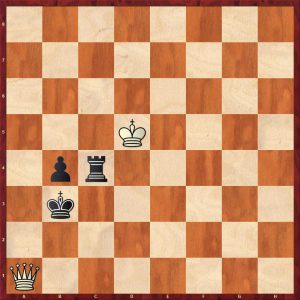
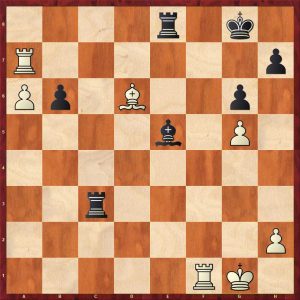
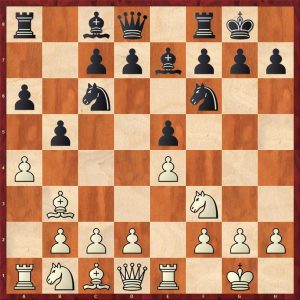
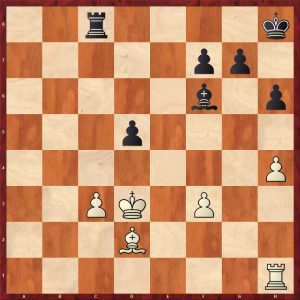
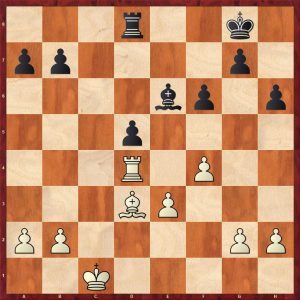
In this chapter, Boris showcases the great endgame skill of Akiba Rubinstein in his famous game versus Richard Reti at Gothenburg 1920. It is black to move in the position below which is included in Reuben Fine’s Basic Chess Endings and many other endgame manuals. Black is clearly better with multiple advantages:
Better pawn structure on the queen side, the c2 pawn needs constant vigilance. The white a2 is also a significant weakness.
Better minor piece
More space
Better pawn structure on the kingside: the white kingside is full of holes, hence black’s best move given below
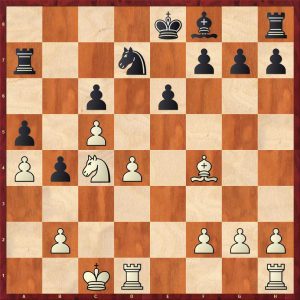
Richard Reti-Akiba Rubinstein Gothenburg 1920 Move 30
30…Bd7! was the strongest move, fixing the white pawns on the dark squares. They are not in danger from the bishop, but they are unable to prevent the black king from penetrating the position, which is the greatest problem for white.
Rubinstein made one bad move in this game: 30…Ke6? 31.g4! Now white can draw with accurate play, but in practice, he missed the drawing ideas.
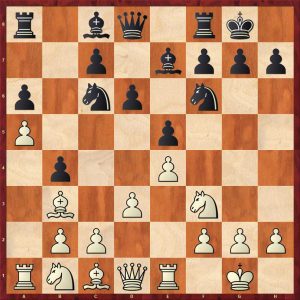
31…Kd6 32.h3 g6 33.Kd2 Bd7
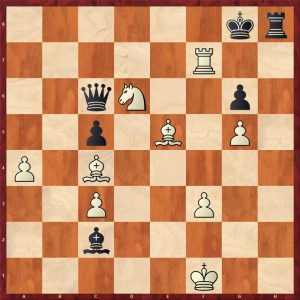
Richard Reti-Akiba Rubinstein Gothenburg 1920 Move 33
34.Nf3 Better is 34.Ng2! The idea is simple. White wants to play d3-d4 and Ne3, when he has managed to plug the holes on the light squares on the kingside to a significant degree. 34…d4 is critical, cutting across this idea. 35.cxd4 cxd4 36.c4 dxc3+ 37.Kxc3 This looks to be good for black as he has a potential outside passed pawn on the queenside, but white can apparently hold! 37…g5 38.f5 Bc6 39.Ne3 Bf3 40.d4 Kc6 41.a3 and white draws. This is extremely instructive and should be studied carefully.
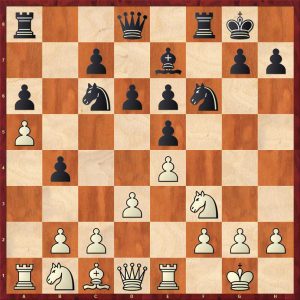
The game continued 34…Ke7 Another idea is 34…h6 35.Ke3 g5 and Gelfand shows that white has a lot of fantastic resources to just hold the game. Buy the book to find out how! 35.Ke3 h5
Richard Reti-Akiba Rubinstein Gothenburg 1920 Move 35
Reti now placed a horridly passive move 36.Nh2? which definitely loses. His last chance was a far sighted pawn sacrifice to draw as follows: 36.Nh4! Kf7 37.gxh5! gxh5 38.f5! Ke7 39.Ng6+ Kd6 40.h4! Bxf5 41.Nf4 Bg4 42.d4! and white has created an effective fortress. Black cannot make progress as he loses a pawn.
36…Kd6 37.Ke2? (37.gxh5 gxh5 38.h4 is tougher, but does not hold. 38…Bh3! The domination theme, a sample line is 39.Nf3 Ke6! 40. Nh2 b5 41.Kf2 Kd6 42.Ke3 a5 43.Nf3 Ke6 44.Nh2 a5 45.Kf2 (45.a3? Kf5 with the idea of b4 creating an outside a-pawn wins quickly) a3! 46.Ke3 Kf5 47.Kf3 Kg6 48.Ke3 d4+ 49.cxd4 Be6 50.Kd2 Bxa2 and black wins as the blockade does not hold.
The game continued 37…d4! Fixing a2 and c2 and widening the bridgehead for the king and bishop. 38.cxd4 cxd4
Richard Reti-Akiba Rubinstein Gothenburg 1920 Move 38
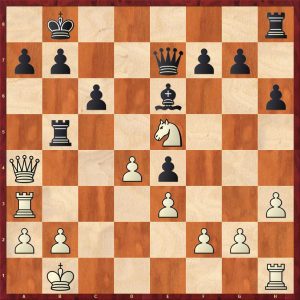
White lost quickly as follows 39.Kd2 hxg4 40.hxg4 Bc6 41.Ke2 Bd5 42.a3 b5 43.Nf1 a5 44.Nd2
Richard Reti-Akiba Rubinstein-Gothenburg 1920 Move 44
Now black won with the thematic 44…a4! forcing the creation of a passed a-pawn. We all know that knights are very poor at dealing with passed rook pawns. 45.Ne4+(45.Nb1 Kc5 46.c3 Ba2 wins) Bxe4 46.dxe4 b4 47.Kd2 bxa3 48.Kc1 g5 0-1
This ending is worthy of close study, not just to enjoy Rubinstein’s great technique, but also to discover hidden resources in difficult positions: a variation on the theory of infinite resistance.
Chapter 2 Turning Points
This section covers two interesting Gelfand games, one of which he wins and one he loses. As the chapter heading indicates, the key theme is recognising critical points in a game. The section culminates in the analysis of a fascinating same colour bishop endgame from the second game that was holdable by the inferior side.
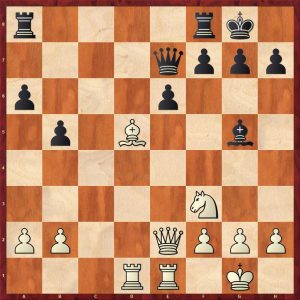
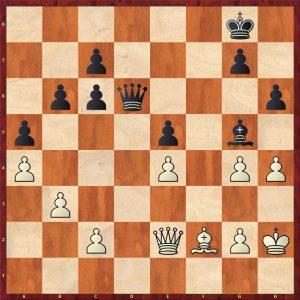
Ivanchuk-Gelfand Wijk aan Zee 2012 Move 20
This is a middlegame position from a Catalan opening. Gelfand comments along the lines of white (Ivanchuk) is a little better with a better bishop and a bit more space. The important factor is that the position is easier to play for white and white risks little by playing on. Black’s main problem is the decision about when to stay passive (waiting) or go active. This general issue is covered more in chapter 3.
It is hard to believe that a player of Ivanchuk’s standard ends up in a losing position after only six more moves!
White played 21.Nel?! (Hoping to get the knight to b4 an apply some pressure. The simple and natural 21.Bd3 was better. After 21…Qd6 white can try 22.Ne5, 21…Qc8 with the idea of a5 and Ba6 exchanging the semi-bad bishop is logical. 22.Qa3 Qf8 23.Qa4 Qc8 24.Kg2 a5 25.Bb5 Ba6 26.Bxa6 Qaa6 27.Ne5 Qc8 28.Qc6 and white is better in the inevitable double knight ending.
Ivanchuk-Gelfand Wijk aan Zee 2012 Variation Move 28
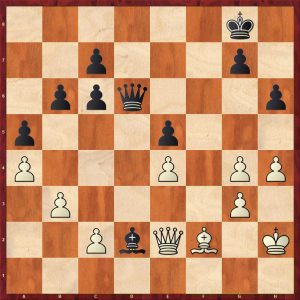
The game continued 21…Qc8 22.Nc2 Ne4! 23.Nxe4 dxe4
Ivanchuk-Gelfand Wijk aan Zee 2012 Move 23
White probably mistakenly thought this pawn structure transformation was in his favour. This is incorrect. The e4-pawn is fixed on the colour of the bishop, however, the e4 pawn gives a space advantage, the d5 square and a pivot for a pawn storm on the king side.
White should probably play 24.a4 then Bd5 25.Qc3 Qxc3 26.bxc3 White is optically better but 26…Bb7! 27.Nb4 Nb8! Black is going to bring his king over and hold. White played 24.Qc3? Qxc3 25.Bxc3 b5! This looks dangerous putting another pawn on the colour of the bishop, but white’s bishop is also hemmed in by black’s pawns and black has a significant space advantage.
Ivanchuk-Gelfand Wijk aan Zee 2012 Move 25
This is the crucial turning point of the game. White should have objectively realised that he had gone wrong and looked for way to draw. 26.c4 looks reasonable, but after bxc4 27.Bxc4 Nb6 28.Be2 a5 29.Kf1 Bd5 30.a3 Bc4!? white is a fraction worse. Black has rid himself of the semi-bad bishop and has a space advantage in a knight endgame.
Ivanchuk-Gelfand Wijk aan Zee 2012 Variation Move 30
White played 26.a4? (See two diagrams back above, gifting black an outside passed a-pawn) and duly lost. An horrendous positional error from a world class player. Black combined the passed a-pawn distraction with a general advance on the king side to create entry points for his king and win.
In the second game, the aforementioned bishop ending reached this critical position.
Gelfand-Wang Sochi 2008 Move 43
White played 44.h4? which loses. 44.Kb6! would have drawn. The analysis is complicated but black’s best try is 44…Ke6 (44…Bd1 also leads to draw by a single tempo) 45.Bg6 Kd6 46.Be4 c5 47.Kb5 Bd5 48.Bxd5 Kxd5 49.Kxa4 h5 50. Kb5 c4 51.Kb6 Ke4 52.Kxb7 Kf3 53.Kc6 Kg2 54.Kc5 Kxh2 55.Kxc4 Kxg3 56.b4 h4 57.b5 h3 58.b6 h2 59.b7 h1=Q 60.b8=Q Qe4+ 61.Kc5 Qxf4 (see below) with a theoretical draw but still a practical challenge. The companion volume Decision Making in Major Piece Endings covers this type of ending.
Gelfand-Wang Sochi 2008 Variation Move 61
This whole bishop ending is worthy of close study as white has some amazing ideas to hold an ending that just looks lost.
Chapter 3 covers the important topic of active or passive defence.
Gelfand demonstrates this theme with a complex double rook and knight endgame. Here is a position a few moves before that endgame, where black missed a chance to equalise comfortably.
Gelfand-Pelletier Biel 2001 Move 23
Gelfand points out that active defence with 23…Nd5! forces easy equality. 24.Qxe5 Nxe3! 25.Be4= (25.Qxe3? Qxe3 26.fxe3 Rxd3 27.Rxa7 Rxa7 28.Rxa7 Rxb3 and black is playing for a win)
Black played the passive 23…Qc6?! forcing a queen exchange. This is a common mistake when a (weaker) player wants a draw and exchanges pieces with small concessions 24.Qxc6 Bxc6 25.Bf1! Rdb8?! (26…Rab8! is more active when white can win a pawn but has great technical difficulties) 26.Bc4?! ( 26.Ra6! Rb6 27.Bc4 Bd5 28.Bxd5 Nxd5 29.Rxb6 Nxb6 30.Ra5! White is definitely in plus equals mode playing for two results.) 26…Bd5?! (26…Bb5 equalises) 27.Nxd5 Nxd5 28.Ne4 Rb4 29. Nd2! Rb7 Reaching the position below.
Gelfand-Pelletier Biel 2002 Move 29
White played 30.Ra5 which sets a small trap. 30.g4! was probably better gaining space and attempting to isolate the e5 pawn from its friends. Black played the obvious 30…Rd8?! activating the rook (30…Nc3 is better). After the game move, white has an edge and it’s very instructive to see how Gelfand increases his advantage in a practical game with mistakes from both sides.
Chapter 4 covers the common idea of A Bad Plan is Better than No Plan.
Here is a complex middlegame position.
Gelfand-Harikrishna 2014 Move 21
The penalties of planless play are amply demonstrated in the middlegame between moves 21-30 where planless play by black spoils an equal position resulting in a difficult heavy piece middlegame and subsequent losing king and pawn ending.
Gelfand-Harikrishna 2014 Move 30Gelfand-Harikrishna Wijk aan Zee 2014
White to move on move 40. What would you play? 40.a4! springs to mind spoiling black’s majority and winning.
Chapter 5 is all about long games with an increment.
Gelfand demonstrates two games, the first is a complex rook and knight endgame; the second of which is a very long queen and minor piece ending with an extra pawn.
This queen and minor piece ending has just arisen after white forced the exchange of rooks a few moves ago.
Gelfand-Grachev Moscow 2016 Move 34
White played 34.Qe2? which is a blunder. 34.Kg1 is obviously better, 34…Nxh4 35.Bxe5 activates the bishop increasing white’s advantage. 34…Kg8? Missing 34…Nf4! 35. Qf3 (35.Bxf4 Qxh4! threatening mate) 35.Kg1 Qd2 with loads of counterplay 35.Kg1 Nxh4 36. Bxe5 Qa5 37.Bg3 Ng6
Gelfand-Grachev Moscow 2016 Move 37
White has increased his advantage by activating his bishop.
I shall show a couple of other positions from this instructive game with Gelfand’s pithy comments. Black sacrifices the h-pawn to open up the white king.
Gelfand-Grachev Moscow 2016 Move 44
White played 45.Qg3?! instead of the consolidating 45.Bc3! “White consolidates and is on the way to winning the game. In these long games where it is very hard to spot the critical moments, because every moment is a mini-version of it, inaccuracies are bound to happen. This is why it is important to analyse the games and improve our feeling for how to spend our time, how to organise our pieces, how to organise our thinking and how to control the opponent’s counterplay. A lot of happens subconsciously. We analyse the games, find out what actually happened, compared to our experience during the game, and our feeling for the details will be slightly better the next time around.”
At move 49 this position was reached:
Gelfand-Grachev-Moscow 2016 Move 49
Gelfand played 50.Qe3!? a perfectly decent move. Gelfand comments that the computer suggests 50.Kf3 Qf5+ 51.Ke2 Qe5 52.Qe7 Qxb2+ 53.Ke3 reaching this position:
Gelfand-Grachev Moscow 2016 Variation Move 53
The knight is lost after 53…Nxf2 54.Qe6+ Kh8 55.Qc8+ Kh7 56.Qf5+ A brilliant line.
Gelfand makes a wise and honest observation: “Obviously this is the type of thing the engine does much better than a human. Finding a tactic in a position where there are a large number of possibilities. No human can go 2-3 moves deep in all lines and see these types of options. So, all in all, I pay attention to this kind of information, but I do not regret not seeing it.”
At move 101 (see position below), Boris comments: “At this point I was confident that I would win. I knew what I should do. The queen controls everything and the white king can go forward. White is also winning in this position if there are no f- or g- pawns on the board….White can also play f5-f6, creating a situation where the black king is exposed, liniting the number of checks Black is able to give. The general idea is basic: White will aim to put the queen in-between on one of these checks, spiking the black king, forcing the exchange of queens.”
Gelfand-Grachev Moscow 2016 Move 101
Having read the relevant section in the companion volume “Decision Making In Major Piece Endings” even the reviewer would be confident of victory in this technical position.
Chapter 6 When is the Right Time to Run?
This chapter is about “situations in both the middlegame and the endgame, where both players had to make decisions about when to improve their position and target the opponent’s resources and when to roll the dice and attack the king or let passed pawns roll. This is perhaps the most essential theme in top level chess, as a good feeling for what kind of action is needed in various positions, when to calculate and when simply to improve the position, is worth many points.”
Gelfand demonstrates this with a complex rook and knight ending.
Gelfand also brings out a pertinent comment about computer evaluations in this section. This is a position from a short variation in that game:
Navara-Gelfand Prague 2006 Variation Move 26
Boris says “Stockfish helpfully tells us that the position is still equal. But is it really? Black is full control of the d-file and can penetrate to the second rank…..Black is much more comfortable….”
Objectively, a strong engine would hold as white, but who would choose white?
Chapter 7 Choosing the Right Transformations
This chapter shows a complex queen and knight ending which is really interesting considering all the transformations to knight endings.
Caruana-Gelfand Amsterdam 2010 Move 30
Black played a technical, far reaching move 30…Qg5! forcing 31.e3 and the weakening of the f3 square. Gelfand stresses the point that black cannot win on the queenside alone and must create weaknesses on the kingside. Gelfand analyses the alternative 30…Qa6 to a probable win giving some superb analysis including a brilliant positional knight sacrifice creating passed a- and h-pawns which is definitely worth studying:
Caruana-Gelfand Amsterdam 2010 Variation Move 37
37…Nf1+ 38.Ke1 Nxh2 39. Kf2 Kf8! 40. Kg2 Nxf3 41.Kxf3 (41.exf3 h5 ensures a passed h-pawn) f5! Black wins by a tempo.
Chapter 8 – Karjakin
This game is a technical queenless middlegame in the Chebanenko.
This position gives a flavour of the struggle:
Gelfand-Karjakin Nalchik 2009 Move 20
White is clearly better, but how does white proceed here? Buy the book to find out.
Chapters 9 and 10 are titled Stalemate and Stalemated respectively.
Here is an amusing finish:
Ponkratov-Bacrot Berlin 2015 Move 34
Black is under the cosh with a killing rook discovery on the cards.
Bacrot played 34…Bd3+!! 35.Bxd3 Qd5 36.Bc4 Renewing the threats. 36…Rh1+ 37.Kg2 Qd2+! 38.Kxh1 Qg2+ stalemate
Chapter 11 The Relevance Of Endgame Studies
This chapter is good and the title is self explanatory. Solving endgame studies is useful for getting a feel for the potential of the pieces – not only in the endgame. Endgame studies are the artistic side of chess. Here is an instructive and entertaining study composed by Sergey Tkachenko & Boris Gelfand:
Sergey Tkachenko & Boris Gelfand 2017.
I will not give the solution, but there is a beautiful zugzwang, so buy the book to find out!
Chapter 12 Geometry
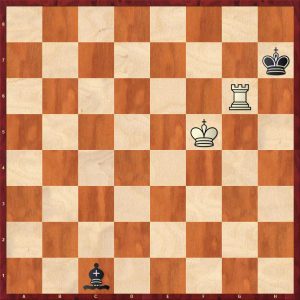
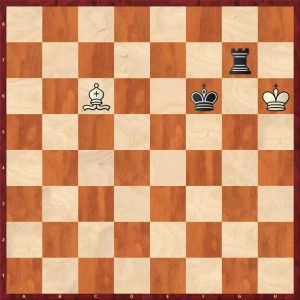
This chapter has an intriguing title but covers mainly R+N v R and positions with R v N or B with just a few pawns. Here is a good example:
Mamedyarov-Gelfand Pamplona 2004 Move 64
White is in great danger here with his monarch in the corner. 65. Rxa7 loses as it unpins the knight allowing the prosaic mate 65..Rh5+ 66. Kg1 Ne2+ 67.Kf1 Rh1# The move that springs to mind is 65.Kg1. In fact this does draw as does 65.Kh2.
White actually played 65.Nd4+? to distract the black rook, so he could capture the a7-pawn. After 65…Rxd4 66.Rxa7 black has a pretty win with 66…Rd6! 67.Ra2 (67.Rf7 Kg3 68.Rg7+ Ng6! shuts out the rook and mates) 67…Rh6+ 68. Rh2 Nh3! with a beautiful zugzwang that I have not seen before.
Mamedyarov-Gelfand Pamplona-2004 Move 68
69.Rh2 Nf2+ 70.Kg1 Rh1#
Chapter 13 – Endings with Opposite Coloured Bishops
This is one of the reviewer’s favourite chapters as it shows the immense complexity of such endgames.
Leko-Gelfand Dortmund 1996 Move 71
White has just played 71.Bxb4 and reached the haven of an opposite coloured bishop endgame. This is quite a common type of position reached in practice. This position is a draw but it is difficult and a world class player of Peter Leko’s standard did not succeed in practice. Buy the book to find out how black won and how white could have drawn.
To summarise this is a very good technical book with many instructive games with deep analysis and didactic commentary. The book is clearly aimed at aspiring FIDE2000+ (ECF175+) players and above.
FM Richard Webb, Chineham, Hampshire, May 12th 2021
Desert Island Chess Puzzle Omnibus, Adams, Nunn, Burgess, So, Gambit Publications Ltd., 2021, ISBN-13 : 978-1911465652
From the publisher:
“If you had to choose a single luxury chess item to take to a desert island, then how about this: a superb selection of 400 puzzles to solve? Each author has carefully chosen 100 original positions, graded by difficulty and theme into four sections of 25. The emphasis throughout is on entertainment, instruction and inspiration. The solutions pinpoint lessons to be learnt and explain why plausible but incorrect solutions fail.”
“This book is written by an all-star team of authors. Wesley So is the reigning Fischer Random World Champion, the 2017 US Champion and the winner of the 2016 Grand Chess Tour. Michael Adams has been the top British player for the last quarter of a century and was a finalist in the 2004 FIDE World Championship. John Nunn is a three-time winner of both the World Solving Championship and the British Chess Federation Book of the Year Award. Graham Burgess is Gambit’s Editorial Director and the author of 30 books.”
Each author supplies 100 puzzles broken up into four chapters which progressively get harder. There are a few specialist chapters such as Graham Burgess’ Opening Themes which is one of my favourite parts.
The reviewer will kick-off by demonstrating some of the puzzle posers from Michael Adams’ section.
Black has just moved his to queen to h5 to offer the exchange of queens. What did he miss?
Ray Robson-Eugene Perelshteyn Lubbock 2010
Solution: Black overlooked the stunning rejoinder: 14.Nd5! winning the bishop on e7. Black cannot move his queen to defend the bishop. If black tries 14…Qxd1, the intermezzo 15.Nxe7+ followed by recapturing the queen, wins a piece. Black cannot retreat the bishop with 14…Bd8 as 15.Nxf6+ followed by 16.Qxh5 wins black’s queen.
The next position reminds the reviewer of a game he won with this tactical idea in an early club match as a junior.
White has just played Ra5 going after the a-pawn. What did he overlook?
Boris Gulko-Michael Adams Internet 2020
Adams unleashed the devastating 37…Ne3+ exploiting the seventh rook for his rook. After 38. fxe3 Rb2+ white resigned because of 39. Kh3 Qxf3 40. Qc8+ Kh7 followed by a quick massacre of the white king.
In the next position, white has a clear advantage with a big lead in development. White played 20.Qd7 and won easily. Can you spot a quicker and more elegant route to victory?
Laurent Fressinet-Vladimir Malaniuk Bastia 2010
20. Re8+ Bxe8 21.Qg3+ kills black prettily on the diagonals 21…Qe5 22.Qxe5#
In the next position, black is threatening the brutal Rc1#. How does white get the knife in first?
White wins with a common mating pattern: 42.Rh7+ Kxh7 43.Nf6+ Kh8 44.Rg8#
This next position was from a marathon blitz game. White has slowly edged his pawns forward and has just played 215. Re4. What was black’s response to abruptly end the game?
Vasily Ivanchuk-Peter Leko Moscow blitz 2007
Peter Leko found the incisive 215…Qf7+ 216.Kxf7 stalemate, ending the torture.
In the next puzzle, black has just played Rd8. What was white’s crisp response?
Nigel Short, a brilliant tactician, missed a golden opportunity here. What is white’s best move?
Nigel Short-Jan Timman London 2008
The rampant white knights stomp all over black with 19.Nd6! threatening 20.Nxc6+ and Nf7+ 19…Nd5 (19…Qxd6 20. Nf7+ wins the queen, or 19…cxd6 20.Nc6+ Kd7 21.Nxb8+ also captures the queen) 20.Nxc6+ Kd7 21.Nxb8+ Kxd6 22. Qa3+ c5 23. Bd2 white has a material advantage and a virulent attack.
The next position shows a classic over press in a drawn ending. White has just played his queen from b8 to b2. How did black punish this careless move?
Klaus Bischoff-Mark Quinn Dun Laoghaire 2010
Black used the power of his centralised steed to fork the queen with the knight 65…Re3+! 0-1 After 66.Qxe3 Nc4+ snares the lady, 66. Kd1 Re1+ also captures the queen, similarly 66.Kf1 Re1+ wins
Black has just played the active Rd2. How did white exploit this?
Michael Adams-John Nunn European Internet Blitz 2003
26. Rxe6! exploits the weak back rank. 1-0 as 26…Rxf2 27.Re8# & 26…fxe6 27.Qf8#
In this next position white baled out with a perpetual. How could white win with a beautiful geometrical sequence?
Ivan Saric-Vidmantas Malisauskas Novi Sad 2009
47.Qd7+ Kg6 48.f5+ Qxf5 black’s queen blocks his own king 49.Qg7+ Kh5 50.g4+ Qxg4 once again the queen gets in the way 51.Qh7# Very pretty
The next section is by John Nunn who is a brilliant problem solver having won the world problem solving championship three times. I shall show a couple of beautiful studies from his chapter on Advanced Tactics, Endings And Studies.
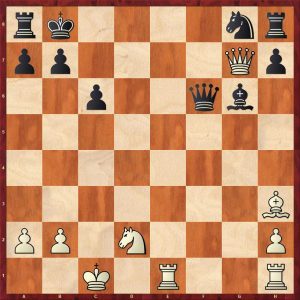
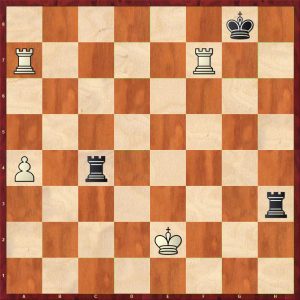
White to play and win.
Arpad Rusz The Problemist 2019
1.Rc1+! The obvious 1.a8=Q+ loses to 1…Kg1 2.Rc1+ Qf1+! 3.Rxf1+ Kxf1 4.Qa6+ Kg1 5.Qg6+ Rg2 6.Qf6 otherwise the pawn queens 6…Rf2+ skewers the queen and wins
1…Qf1+!! (1…Kg2 2.a8=Q+ Qf3+ 3.Qxf3+ Kxf3 4.Rc3+ Ke2 5.Ra3 and white wins the rook ending) 2.Rxf1+ Kg2
Arpad Rusz The Problemist 2019 Move 3
3.Rh1!! (Deflecting either the black king or rook to an inferior square, 3.a8=Q+ loses as above) 3…Kxh1 (3…Rxh1 4. a8=Q+ Kh2 5. Qh8+ followed by Qg8+ winning the dangerous black pawn and the game) 4.a8=Q+ Kg1 (4…Rg2 5.Qh8+ Kg1 6.a6 wins) 5.Qg8+ Rg2 6. Qh8 stopping the pawn and white wins
Here is another brilliant problem. I could not solve this one, but just sit back and enjoy!
Mario Matous Dresden Olympiad Tourney 2008
e7 cxb1=Q 2. e8=Q Nf3+! (To give access to h7 for a black queen) 3. Nxf3 Qh7+ 4. Kg3 b1=Q Black seems to have everything under control with the two queens poised to kill
Mario Matous Dresden Olympiad Tourney 2009 Move 5
5.Qe4!! Putting white’s queen en prise and forking the two queens. Black cannot take the queen because of a deadly rook check. 5…Qg1+ (5…Qg7+ 6.Ng5+ Qxe4 7.Rd1+ mates) 6.Nxg1 Qxe4 7.Nf3 black has no decent check to avoid mate. 7…Qxf3+ 8.Kxf3 with an easy RvN winning ending as black’s king is stuck in the corner, separated from the knight, for example 8…Nb7 9.Rd7 Nc5 10.Rd5 Ne6 11.Kg3 mating.
Section three is by Graham Burgess. The Opening Themes chapter is an instructive set of puzzles based on tactical possibilities in the opening. The reviewer had not seen these exact positions before, but a lot of the themes are common ideas and traps in the opening.
Black has just played the active and provactive Nb4. How should white deal with the threat to the d-pawn?
Igor Kovalenko-Axel Bachmann World Blitz Ch Berlin 2015
9.c3! Nbxd5 10. e4 and the knight is lost. 9.e4 is also good based on the same idea.
A typical position from the Sicilian. Black has just kicked the bishop with h6, before deciding how to complete his development. How does white cut across this plan?
Finally an old trap in the Slav Defence. White has just played 12.e4. What is black’s surprising reply?
Zdenko Kozul-Miguel Illescas Erevan Olympiad 1996
12…Nc5!! 13.dxc5 dxe4 14.Qxd8 (14.Qe3 exf3 is bad for white as well) Rfxd8 white loses back the piece and will be a pawn down 15.Na4 (15.Nxe4 Nxe4 16.Be3 Nxc5 and 15.Be3 exf3 16.gxf3 Rd3 leave black in a superb position) 15…exf3 16.Rfd1 Rd3 with a huge plus.
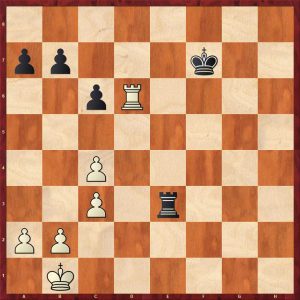
Finally, I will show a complex king and pawn ending given by Wesley So. Black to play – how does he capitalise on his better pawn structure and better king?
Alexander Grishchuk-Wesley-So Leuven rapid 2018
The first few moves are obvious 31…Kg6 32.Ke2 Kg5 33.Kf3 f5 34.gxf5
Now what should black play?
Buy the book to find out.
In summary, this is a superb puzzle book with a varied pot-pourri of problems such as opening traps, pure tactics, attacking ideas, defensive ideas, endings, and studies with a varying degree of difficulty to suit all standards. An excellent book for not just junior training but for players of all standards to hone their tactical skills.
FM Richard Webb, Chineham, Hampshire, 30th April 2021
FM Richard Webb
Book Details :
Hardcover :320 pages
Publisher: Gambit Publications Ltd (16 Dec. 2020)
Language: English
ISBN-10:1911465651
ISBN-13:978-1911465652
Product Dimensions: 17.15 x 1.65 x 24.77 cm
This physical book is also available as an eBook and as an App book from Gambit.
To Exchange or Not?, Eduardas Rozentalis, Thinker’s Publishing, 8th December 2020, ISBN-13 : 978-9492510945
From the publisher:
“When should we exchange a piece in the endgame and when should we keep it? Why is it so important? How to make a right choice? Different types of endings and guidance on how to make the correct decision were the subject of my book The Correct Exchange in the Endgame. Two editions were very well accepted by chess players of different levels. I am especially happy that many chess coaches and teachers found it useful for their training programs.
The book was announced as a silver winner of the Boleslavsky Award 2016 by the FIDE Trainer’s Commission. Many readers and coaches expressed a wish to see more instructive exercises, so together with Thinkers Publishing we decided to make an exercise book. It can be widely used by chess teachers in schools, coaches in chess clubs and all chess players.
Trying to solve 120 instructive exercises and then going through the correct solutions, you will certainly improve your decision-making ability and analysing skills, as well as enrich your knowledge and understanding of the final stage of the chess game.”
GM Eduardas Rozentalis at the Jersey International, 2013.
From the publisher:
“Lithuanian Grandmaster Rozentalis lifetimes achievements in chess are enormous. We mostly remember him being champion of Lithuania in 1981 and 2002, 3 times champion of the Young Masters of the USSR, 1984-85-87, World Youth Team champion in 1985 and World Senior Team champion in 2014. In between 1985 until now, he won 85 international tournaments, played for many European different club teams and in 10 Chess Olympiads for Lithuania. This is his second book for Thinkers Publishing. His first, ‘The Correct Exchange in the Endgame’, became a great success and was nominated as ‘FIDE CHESS BOOK 2016’.”
End of blurb…
There are two short introductory sections: a preface and an introduction that clarify the purpose of the book as an exercise book with 120 endgame positions to solve. The problems are all concerned with exchanging issues: exchange a piece or not; which piece to exchange; when and where to exchange.
The main workbook is divided up into six chapters based on three increasing levels of difficulty for the problems:
Warm Up
Warm Up Solutions
Intermediate
Intermediate Solutions
Advanced
Advanced Solutions
There are forty exercises from real games at each complexity level, presented as four problems per page. Many of the positions are from Rozentalis’ own games. Each solution chapter demonstrates the answers with typically one to two pages of analysis for each solution accompanied by two to three diagrams.
The problems cover all types of piece configurations in endgames from single piece endgames through to complex multi piece endgames. The problems vary in their nature with these typical example themes:
Pure tactics
Calculation (for example pawn races in king and pawn endgames)
Knowledge of basic endgames
Exploitation of weaknesses
Suppression of counterplay
Positional considerations
The reviewer will show some positions from each problem chapter to give a flavour of the coverage.
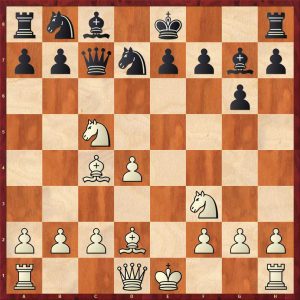
Here is the first position in the book demonstrating an exchange to exploit pawn weaknesses and suppress counterplay:
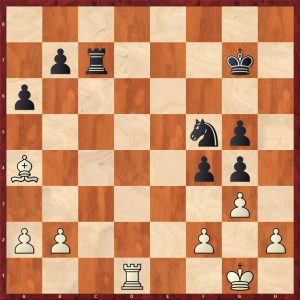
E.Rozentalis-P.-Jaracz-Augustow-1996-Move-41
The problem posed is should white exchange rooks or not?
General positional considerations say that a rook and bishop are slightly better than a rook and knight in an endgame: this advantage is regarded as a “grindable” endgame advantage by good endgame players. However, in this position black has numerous pawn weaknesses on both sides of the board, that can be exploited by the active bishop in an open position: namely a fixed g4 pawn and a vulnerable pawn chain on a6/b7. Black’s rook is also active on the c-file, if white moves his rook along the d-file to say 41.Rd5 Rc1+ is annoying for white.
41.Rd7+! exchanging rooks to exploit black pawn weaknesses and prevent counterplay by black with his rook.
41…Rxd7 42.Bxd7 Nd6 This loses the pawn on g4, but 42…Kf6 43.Bc8 wins either the b7 pawn or the g4 with a technically winning endgame
43. Bxg4 fxg3 44. fxg3! Capturing with the f-pawn, not the h-pawn to eventually make a distant passed pawn on the h-file which makes black’s defence even more difficult. White now has a straightforward technical win.
44…a5 45.Kf2 Nc4 46. b3 Ne5 47. 47.Be2 Kf6 48. Ke3 Kf5 49. Kd4 g4 Black tries to block the white pawns, and hopes for Nf3 as some point, but the g4 will just become another target.
50.Kd5 b6 After 50…Nf3, white wins with 51.h3!
51.a4 Zugzwang, if 51…Nf3 52.h3! wins, if the knight moves to say d7 or f7, white’s king penetrates decisively on the queen side.
51…Kf6 52.Ke4 1-0 (The g-pawn drops after Kf4 and Bxg4)
E.Rozentalis-P.-Jaracz-Augustow-1996-Move-51
The second example shows a common tactical theme to simplify to a winning king and pawn endgame.
B.Wyczling-E.Rozentalis-Warsaw-2008-Move 44
Black has achieved a lot in this endgame with the better placed pieces and a far more potent pawn majority, plus the white knight is utterly dominated. Black’s next move achieves a transformation that quickly decides the game.
44…Bxb2! 45.Nxb2 (45.axb4+ makes no difference: 45…Kxb4 46.Nxb2 c3+ wins)
45…c3+ 46.Kc2 axb2 47.axb4+ Kxb4
The white king has to deal with the black’s passed a-pawn, while the black king goes to the kingside for a delicious meal of white pawns.
B.Wyczling-E.Rozentalis-Warsaw-2008-Move-47
Here is another position showing that exchanging the opponent’s most active piece is always an important consideration.
E.Bareev-E.Rozentalis-Tallinn-1986-Move-44
White has a very active rook which holds his position together. If white was to move, he would play Rf4 collecting black’s dangerous passed pawn.
But it black to move and he played 44…Rf8! (44…h3 allows 45.Rf2 and white fights on) and white resigned 0-1. Why did he resign?
If the white rook avoids the exchange, for example 45.Rd5, then after 45…h3 the black cannot be stopped.
Exchanging rooks is hopeless as the black knight dominates the bad bishop. Black’s passed pawn will distract the white king, while the black king mops up the weak white g-pawns:
Here is a cautionary tale regarding transitioning into a king and pawn ending. White had been pressing for a while, playing on for the win with an outside passed pawn and the better minor piece. It did not occur to him that he could lose, but just watch, enjoy and learn!
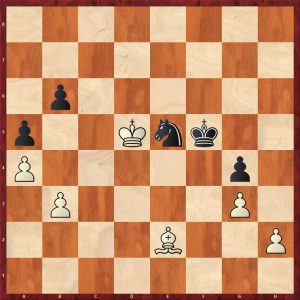
V.Malisauskas-T.Laurusas-Vilnius-2014-Move-46
46.Kd4? (A poor move, over pressing, but white can still draw. Safer was 46. Bc2 b3 47.axb3 cxb3 48.Bd1 Na4 with a simple draw)
46…Nxe4 47. Kxe4?? (The losing move as white’s king is too far away to prevent a classic pawn breakthrough which is covered in all good endgame primer manuals. White must have lost his sense of danger. 47. Kxc4! Kg6 48.Kb5 with a quick draw as the knight cannot prevent the exchange of both queenside pawns.)
47…a4 48.Ke3 Only now did white realise that after 48.Kd4
one of the black pawns queens in a well known and instructive motif: 48…c3! 49.bxc3 b3 50. axb3 a3! winning.
After the game move of 48.Ke3 black played 48…c3 which wins. The players agreed a draw in this position! An amazing escape for white, particularly as both players were at least IM strength (2400+).
To see why black is winning, analyse on.
49.b3 (Forced as 49.bxc3 allows 49…b3! queening a pawn as in the variation above) 49…axb3 50.axb3 Kg6
The key idea breaking into white’s position: black’s king seizes the critical squares and wins the b3 pawn by force.
56.Kxc2 Ke2 winning easily.
Now, the reviewer will showcase three positions from the intermediate problems chapter.
Here is a transitioning problem.
E.Rozentalis-A.Weindl-Stockholm-1990-Move-75
Black played the very poor 75…Qxh4?? throwing away a win. Was this bad evaluation or a lack of knowledge? If black hadn’t played so quickly, he would have easily found the win by retaining his much more active queen: 75…Qe3+ 76.Kf1 (76.Kh1 Qe2 mates, exploiting white’s passive queen) 76…Qe4 77.Qh2 Bd5! bringing the bishop into the attack and either mates or wins both g-pawns with check.
The game continued: 76.gxh4 g3 77.h5+ Kxh5 78.Kh1 Kg5 79. Kg1 Kf4 80. Kh1 0.5-0.5
E.Rozentalis-A.Weindl-Stockholm-1990-Move-80
This is a well known fortress draw, once again covered in Fine’s BCE and other good endgame books. Black can collect the a-pawn and bring his king over the kingside but the white fortress cannot be breached. A decent effort is put the black king on e1, e2 or e3 and wait for the white king to move into the corner and try the poisoned offer of the bishop on f3 viz 89…Bf3!?
If white rids himself of the turbulent priest, then 90…Kf2 wins for black. However, the calm 91. Kg1! from white, ignoring the proferred prelate, draws for white. Note that with a knight instead of a bishop, this would be winning for black as white must capture!
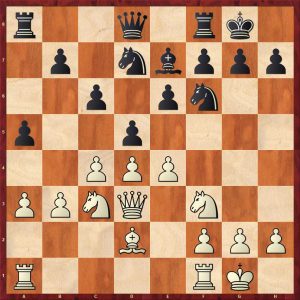
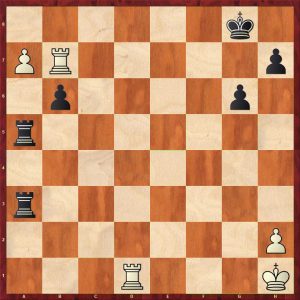
The next position shows a complex position with two rooks and a minor piece each. The attacking power and mating potential of two rooks is well known, particularly in conjunction with the absolute seventh. The example aptly demonstrates this.
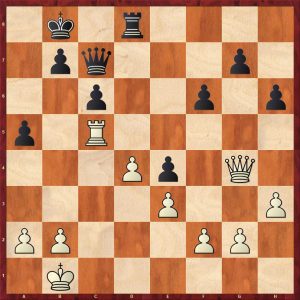
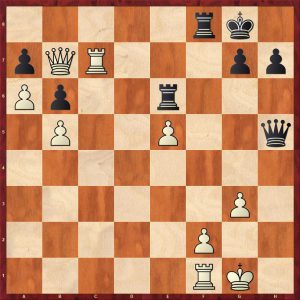
E.Rozentalis-E.Deutsch-Jerusalem-2017-Move-33
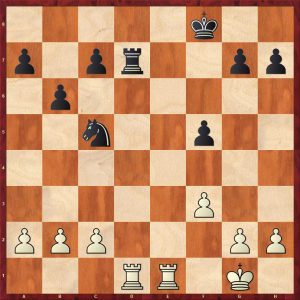
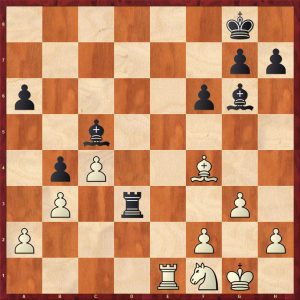
White has a massive passed a-pawn and is winning. White continued with 33.Be7 and did win pretty quickly. There is however, a simpler and cleaner win:
33.Bxe5! Rxe5 34. Rb7 Rxg5+ (34…Re8 35.a7 Rcc8 36.Rxb6 Ra8 37.Rb7 followed by Rfb1 & Rb8 wins) 35.Kh1 Ra5 (black does not have time to attack white’s king as the a-pawn is too fast) 36.a7 Rca3 (Stopping the pawn, but…)
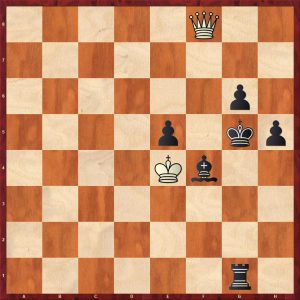
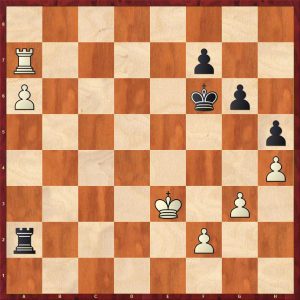
Here is a really educational ending about hidden dangers in so called drawn endings. Here white has an extra pawn in a Q+4 v Q+3 with all the pawns on one side. This is a drawn ending, but the stronger side can torture the opponent for a long time. To put this position into context, the last two moves were 81.Qd8+ Kg7?
V.Kortschnoj-A.lukin-Stockholm-2004-Move-82
White played an unexpected, but amazing move, which is not obvious unless you have seen similar ideas before.
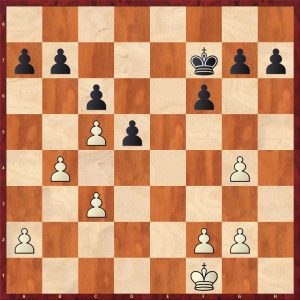
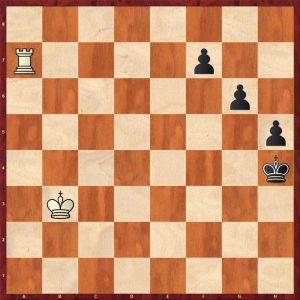
82.Qf6+!! (Giving up the extra pawn to force a pawn ending with a better king.) Qxf6 83. exf6+ Kxf6 84.Kf4
V.Kortschnoj-A.lukin-Stockholm-2004-Move-84
Zugzwang! Black is totally lost. Black’s king must move one way and white’s king goes the other way. White exploits the weakness on h5 and his reserve tempi with the f-pawn.
86…Ke6 87.f4! The black king must retreat and white plays f5 destroying the pawn structure and wins the h-pawn with a simple technical win. 1-0
To finish, the reviewer will demonstrate one of the advanced problems. This is an exchanging problem in a Q+B ending.
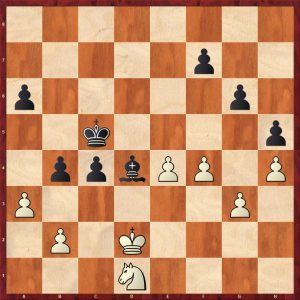
D.Harika-Ju-WenjunLausanne-2020-Move-25
The ending is complex with both sides having a spoiled pawn majority. White has the better bishop as black has many pawns fixed on black squares. White may have difficulty getting into black’s position as the position is fairly blocked. Black can hold but must be careful. Black forced the play with 25…Qd2? which was the wrong decision as white can win with a clever bishop manoeuvre, ruining black’s potential fortress, clearly overlooked by black.
25…Bf4+! was the correct move which looks like a pointless check but is extremely subtle. White must reply 26.g3 to make progress which restricts white’s own bishop: a quick h5 and Bh4 is no longer available. If 26.Kh3 Kf7 27.Qf3 Kg8 and black simply waits. 26…Bd2
D.Harika-Ju-WenjunLausanne-2020-Variation-Move-27
If white goes for a queen exchange hoping to the win the better bishop ending, black is safe after 27.Qd3 (27.Qc4+ Kf8 is ok) 27…Qxd3 28.cxd3 c5 followed by c6 and white can never break through and it is a fortress.
In the game, white took the queens off with 26.Qxd2 Bxd2 27.Bg3! (Black probably expected 27.h5 Kf7 28.Bh4 Bg5 with a clear draw.) 27…Bc3 (The bishop is distracted to defend the e-pawn) 28.h5! Opening the way for the white bishop. Black has a nightmare bishop ending which cannot be saved as he has far too many weaknesses.
D.Harika-Ju-Wenjun Lausanne-2020-Move-28
28…Kf7 29.Bh4 (Threatening the Bd8) Ke6 30. g5 Bd2 31.gxh6 was played which wins easily as white has undoubled his pawn and black still has the weak h6 pawn. However 31.g6! wins more quickly fixing the g7 pawn. The main point is that Kd7 from black allows Bf6! in reply.
D.Harika-Ju-WenjunLausanne-2020-Variation-Move-31
If black plays 31…Bb4, 32.Bd8 Bd6 (32…Kd7 33.Bf6) 33. Kh3 Zugzwang, eventually black will have to lose a pawn and the game.
All in all, this is an very good endgame puzzle book to work through. Players of all standards will learn a lot from attempting to solve the positions followed by studying the solutions which are well structured and easy to follow.
FM Richard Webb, Chineham, Hampshire, 26th April 2021
Grandmaster Repertoire : 1.e4 vs Minor Defences, Parimarjan Negi, Quality Chess, 2020
From the Publisher :
“The fifth volume of the Grandmaster Repertoire – 1.e4 series provides a top-class repertoire against the Alekhine, Scandinavian, Pirc and Modern Defenses, plus various offbeat alternatives Black may try. Negi’s latest work continues the winning formula of his previous books: the 1.e4 repertoire is founded on established main lines and turbo-charged with the innovative ideas of a world-class theoretician, making this an essential addition to the library of every ambitious chess player.”
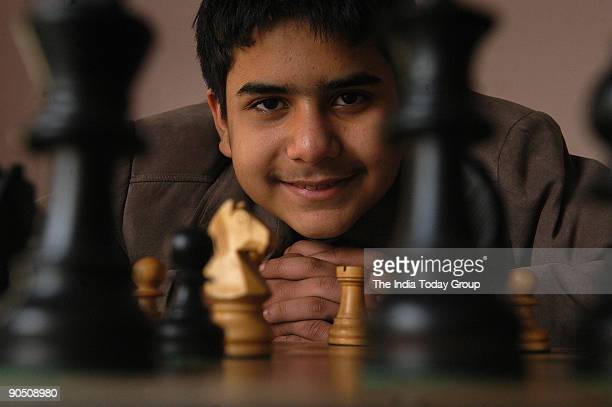
GM Parimarjan Negi
I suspect that some of the keen proponents of these openings would strongly disagree that their pet opening is a minor defence to e4. Indeed, the popularity of some of these defences, in particular, the Scandinavian, would suggest that these openings are not easy for white to meet and the first player has to work hard to gain an advantage out of the opening. The sheer size of this volume shows that these so called lesser defences are pretty resilient.
This is where this book comes in, the quality of the analysis is impressive and there are plenty of original suggestions backed up by concrete lines and analysis which will arm the white player with much material. There is plenty of explanatory text that elucidates the main positional ideas in each chapter. The author pays particular attention to move order considerations which are particularly pertinent in the Pirc/Modern complex of openings.
As the title suggests, this is a book written from a 1.e4 white player’s point of view but there are many instances where Negi gives alternative variations for the first player to try. The suggested repertoire is generally dynamic and attacking but there are plenty of lines where white nurses a space advantage and positional pressure.
The book is divided into four sections:
Alekhine
Scandinavian
Pirc/Modern
Miscellaneous
Each section in then partitioned into logical chapters covering the major variations. The author skillfully manages transpositions with good cross references.
The first section on the Alekhine recommends the solid, Modern Variation with 4.Nf3 which is usually played at GM level. One particular line that has fascinated me for years is the variation 1.e4 Nf6 2.e5 Nd5 3. d4 d6 4.Nf3 dxe5 5.Nf3 Nd7 where black goads white into the tempting 6.Nf7. Bent Larsen tried this against Bobby Fischer in a blitz game in 1966 and was duly crushed. This line has been in the repertoire of some decent players and white, even when handled by an IM, has gone wrong and not pressed home the attack. The following game demonstrates this, but in the notes gives the refutation to this provocative fifth move. The author acknowledges that some of the analysis is taken from a book by John Shaw.
Eric Prie – Igor Alexandre Nataf Andorra op 15th 1997
1. e4 Nf6 2. e5 Nd5 3. d4 d6 4. Nf3 dxe5 5. Nxe5 Nd7? A provocative move, Bent Larsen famously played this in a blitz game v Bobby Fischer in 1966 and was crushed. 6. Nxf7
An engine discovery, winning stylishly 16… Bh6 17. Rb7! Bd7 (17… Bxf4 18. Qxf6+ exf6 19. Ne4# Is the pretty point!
Prie-Nataf(Variation Move 19)
or17… Bxb7 18. Qe6+ Kc7 19. Bxe5+ Wins trivially) 18. Bg3 Rb8 19. Rxb8 Qxb8 20. O-O Qf8 21. Re1 Nfg4 22. Qf3!! Qxf3 23. gxf3 Rf8 24. Ne4+ Kc7 25. fxg4 Bf4 26. Be2 White has a winning endgame but some technique is still required to convert the extra pawn.)
Prie-Nataf(Variation Move 26)
14. Rc1 g6 15. Be2 Qc7
Prie-Nataf(Move 15)
16. Na4? This is poor (16. bxc5+! Winning but care is still required. Qxc5 17. Bxe5+! Kxe5 18. O-O White a winning attack: Intending a combination of Rfe1, Na4, Bf3 and c4-c5, an example variation is given: Bh6 19. Na4 Qa3 20. Rc3 Qxa4 21. Qxe7+ Kd4 22. Rd3+ wins) 16… Bh6 ! 17. bxc5+? The final mistake (17. Bxe5+ Kxe5 18. f4+ Bxf4 19. Rd1 Bf5 20. g3 Raf8 21. gxf4+ Kd6 22. Qg7 b6 Black is probably better, but white can still fight) 17… Kd7
Prie-Nataf(Move 15)
Now white is dead, the queens’s come off and he is left a piece down.} 18. Qe6+ Ke8 19. Qxe5 Bxf4 20. Qxc7 Bxc7 21. Nb6 Rb8 22. Bf3 Nd7 23. Nxd7 Ba5+ 24. Ke2 Bxd7 25. Kd3 Bb4 26. c6 bxc6 27. dxc6 Bf5+ 28. Ke2 Bc5 0-1
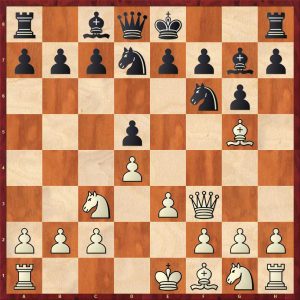
The second section deals with the Scandinavian. The Pytel variation 3…Qd6 is very trendy and this is one of the first chapters that I turned to. Here is an entertaining win by white in the 5…Bg4 line.
c6 ( 7… Nc6 8. Bf4 is good for white) 8. Bf4 Qd8 (8… Qxd4 9. Nb5! Is more or less winning)
Horvath-Fauland(Variation)
9. d5! A crushing blow opening up the position for the better developed side
Horvath-Fauland(Move 9)
Nxd5 (9… cxd5 10. Bxb8 Followed by Bb5+
leads to major problems for black) 10. O-O-O e6 11. Nxd5 cxd5 (11… exd5 12.Qg3! Black finds it impossible to develop)
Horvath-Fauland(Variation2)
12. Bxb8 Qxb8 13. Bb5+ Ke7 14. Rhe1
Horvath-Fauland(Move 14)
a6 (14… g6 Is too slow 15. Rxd5 Bh6+ 16. Kb1 Rd8 17. Rxd8 Qxd8 18. Rd1 winning) 15. Qxd5! The play is now totally forcing. White has a forced mate or win of queen. axb5 16. Qg5+ Ke8 17. Qxb5+ Ke7 18. Qg5+ Ke8 19. Qb5+ Ke7 20. Rd7+ Kf6 21. Rxf7+!
Horvath-Fauland(Move 21)
Kxf7 22. Qd7+ Be7 23. Qxe6+ Kf8 24. Qxe7+ Kg8 25. Qe6+ Kf8 26. Qf5+ Kg8 27. Qd5+ Kf8 28. Qf5+ Kg8 29. Re7 Qe8 30. Qd5+ Kf8 31. Rxe8+ Rxe8 32. Qxb7 Black should have resigned here
The third sections deals with the Pirc/Modern complex. The repertoire suggested is the 150 Attack but is far more subtle than that, as white varies his setup according to the myriad black setups available. Below, is an instructive, thematic win by the editor, Andrew Greet.
The final section is on miscellaneous opening such as Owen’s Defence and the Nimzowitsch Defence.
I give an example of an offbeat line that is outrageous but not easy to refute, particularly in a blitz game. In this game, a 2400 player shows how to crush it.
7…a6 (7… Qd6 8. Bf4 Is horrid for black) 8. Ba4 b5? (8…
Rb8 9. Bg5!Qd6 10. f4! b5 11. Bb3 Nc8?! (11… h6 Black can stay
in the game albeit with a lousy position) 12. Bxe7 Nxe7 13. O-O
Simple development leaves white with a big plus, or 13.g4) 9. Nxb5 axb5 10. Bxb5 Qd6 11. c3 Ra6 12. Bf4! Rb613. Qa4
Santo Roman-Palleja(Move 13)
13…Bc2 14. b3 g5 15. Bxg5 Rg8 16. Bxe7 Bxe7 17. Bxc6+ Kf8 18. O-O Black struggled on until move 37 but could have resigned here
The Modernized Marshall Attack, Thinkers Publishing, 2020, Milos Pavlovic
Grandmaster Milos Pavlovic was born in Belgrade in 1964 and was Yugoslav Champion in 2002. He is a well known theoretician specialising in opening theory and has written many chess books and magazine articles. Previously we have reviewed The Modernized Stonewall Defence and The Modernized Colle-Zukertort Attack by this author.
GM Milos Pavlovic
From the publisher :
“his book is about the Marshall Attack and the lines which can be grouped together under the banner of the so-called Anti-Marshall. The theory has developed so much in the last decade that there is more than enough material to be going on with just in those areas, but I also decided to include a detailed look at an important line in the Exchange Variation. Black’s key concept in the Marshall is giving up a central pawn in return for activity, and I have tried to give as many lines as possible which adhere closely to this principle. Why is this so significant? Well, for starters, usually in the Ruy Lopez Black is looking for long, slow games in solid, closed positions. The Marshall flips this on its head and Black tries to accelerate the play and radically change the character of the game at an early stage. Let’s briefly discuss the material of the book itself and the lines that I have decided to give. First of all, I started off with the standard Marshall Attack, after the initial moves: 1.e4 e5 2.Nf3 Nc6 3.Bb5 a6 4.Ba4 Nf6 5.0-0 Be7 6.Re1 b5 7.Bb3 0-0 8.c3 d5. I have given direct analysis wherever possible and I have tried to cover all the essential lines. Of course, with the passing of the years and the continual development of theory we can see how the popularity of some positions has shifted and, in some cases, how certain lines have simply been rendered obsolete. I also discovered, to my surprise, that there are still new, unexplored, and interesting paths for further analysis.”
As with every recent Thinkers Publishing publication high quality paper is used and the printing is clear. The book can easily be laid flat next to the board and does not require weights to prevent it from “self-closing” (a particular bugbear of ours !). Each diagram is clear and the instructional text is typeset in two column format, which, we find, enables the reader to maintain their place easily. Figurine algebraic notation is used throughout and the diagrams are placed adjacent to the relevant text and each diagram has a “to move” indicator.
After decades of incinerating opponents with the Sicilian Dragon, the reviewer’s addiction to the wyvern is waning after meeting many well primed, prepared, Saint Georges.
This good, action packed book on the modern Marshall attack is the answer to the reviewer’s quest for an aggressive new opening against 1.e4. The issue of well prepared adversaries will not go away with databases and engines and the Marshall is just as susceptible to deep preparation, but this guide will give the reader a very good grounding. The Marshall pawn sacrifice is clearly sound and the fact that the Anti-Marshall section of this book is the biggest part shows that the top players clearly agree that Frank Marshall’s concept is still alive and burning.
As the name of this volume suggests, it does not cover all variations of the Marshall; to do that would require a huge series of tomes. The publication concentrates on the topical lines although some important discarded variations are given for completeness and to show typical ideas. The book does not cover old lines such as the “Internet Refutation” and the “Pawn Push Variation”.
The book is definitely written from a black point of view. Although it is not a traditional black to play and win and/or neutralise white’s advantage repertoire. The publication does have some future proofing built in, because in certain key variations, multiple black alternatives are given. This not only reflects trendy theory but if a line is busted, there is a fallback.
There is plenty of original analysis given with some very long lines that the reader should check carefully with a strong engine. The same goes for any book of this type. The reviewer has not found any major analytic howlers yet, but I have only scratched the surface. Occasionally, the writer claims that a move is new when in actual fact, it has been known for over ten years.
The book is divided into three parts:
Part 1 – The Marshall Attack with d4 (traditional Marshall)
Part 2 – The Marshall Attack with d3
Part 3 – The Anti-Marshall
Each part is then divided into four to six chapters which are of an appropriate length for easy reading. Where necessary sub-chapters are introduced which are well structured and easy to find.
To whet the readers’ appetites, here are some exciting positions from Part 1:
Bg4 16. Qf1 Qh5 17. Nd2 f5 Probably best sharpening the game with a typical Marshall thrust (17… Rae8 is an alternative) 18. c4
Ivanchuk-Leko(Move18)
18. f3 is the main line now. 18… f4 19. cxd5 c5! An excellent zwischenzug
Ivanchuk-Leko(Move19)
20. Re4 This leads to a
complex draw with best play. 20. Re5 Is not advised and loses as follows: Bxe5 21. dxe5
fxg3 22. hxg3 Rae8 White’s lack of development costs him 23. e6 c4 24. Bc2
Qxd5 25. Be4 Qd4 26. Qg2 Rxe6 27. Bd5 Rxf2! A pretty finish, winning
Qh3 White has a pile of material for
the queen, but his lack of development prevents him from exploiting it. 25. Re3 Rf8 26. Bd2 Bf3 27. Rxf3 Rxf3 28. Be4 Rxg3+ 29. Nxg3 Qxg3+
Ivanchuk-Leko(Move29)
30. Bg2? A suicidal winning attempt 30. Kf1 Qh3+ 31. Ke2 Qh2+ 32. Ke3 Qh3+ Is a draw by perpetual:
Ivanchuk-Leko(Variation2)
30… Qd3 Black is winning as the white pieces lack
coordination and the black queen is a perfect shepherdess for the passed pawns 31. Be1 Qxd4+ 32. Bf2 Qxb2 33. Rf1 Qd2 34. Bc5 g6 35. Rf8+ Kg7 36. Rf2 Qd1+ 37. Rf1 Qd2 38. Kh2 c3 39. Rf2 Qe1 40. Bd4+ Kh6 41. Bh3 c2 0-1
Ivanchuk-Leko(FinalPosition)
Some fascinating positions from Part 2 (Marshall accepted with d3) follow:
(13… Qh4 14. g3 Qh3 15. Re4!? Testing black’s setup.}Nf6 16. Rh4 Qf5 17. Nd2 Is the critical line Ng4 18. f3 Ne3 19. Qe2 Nd5 20. c4 Is a crucial try)
Vachier Lagrave-Aronian(Variation1)
14. Qf3 Qh4 (14… Qf6 Leads to an inferior endgame for
black. No one plays the Marshall for this! 15. Nd2 Qg6 16. Bd1 Bxd3 17. Ne4
Bxe4 18. Qxe4 Qxe4 19. Rxe4 Rae8 20. Rxe8 Rxe8 21. Kf1)
Vachier Lagrave-Aronian(Variation2)
15. g3 Qh3
Vachier Lagrave-Aronian(Move15)
16. Be3 White gives back the pawn to develop and achieve a small edge but black is ok with accurate play. (16. Nd2 Leads by force to a well known endgame which is drawn if black is careful. Rae8 17. Ne4 Bg4 18. Qg2 Qxg2+ 19.
Kxg2 f5 20. h3 Bh5 21. Bf4 Bxf4 22. gxf4 fxe4 23. dxe4 Bf3+! 24. Kxf3 Rxf4+
25. Kg3 Rfxe4 26. Rxe4 Rxe4 27. f3)
Vachier Lagrave-Aronian(Variation3)
16… Bxd3 17. Nd2 Qf5 18. Bd4 A modern Marshall tabiya, perhaps white has a very small edge)
Bxc4 Black has completely equalised. The ending is a straightforward draw at elite level 31. Rxc6 Rxc6 32. Bxc6 Kf8 33. Nc2 Nd5 34. Kf3 g6 35. Ne3 Nxe3 36. Bxe3 g5 37. Ke4 Ke7 38. Kd4 Be2 39. Bb7 f6 40. f4 gxf4 41. Bxf4 Bxf4 42. gxf4 Kd6 43. h4 1/2-1/2
Part 3 covers the Anti-Marshalls which are by their nature, more of positional manoeuvring battles. However, Ding Liren succeeded in sharpening up this game. What did he play here?
Inarkiev-Ding Liren
The final game is an all British bout showing David Howell versus Michael Adams, who is another famous Marshall pro.
8…b4 The modern choice. (8…Bb7 is an alternative
but commits the bishop rather early.)
9. d3 d6 10. a5 A key strategic move, but black is fine.
Howell-Adams(Move 10)
Be6 11. Bxe6 Popular at the moment. White is hoping to achieve c3 and d4 to show the weakness of black’s centre. 11. Nbd2 This is an important alternative 11… fxe6
Howell-Adams(Move 11)
12. Nbd2 d5 (12… Rb8 and 12… Qe8 are both
important alternatives) 13. c3 Bc5 14. Nb3 Ba7 15. Be3 bxc3 16. bxc3 dxe4 17.dxe4 Qxd1 18. Raxd1 Rab8 19. Nc5 Bxc5 20. Bxc5 Rfd8 21. Rxd8+
Howell-Adams(Move 21)
21… Rxd8 Black has exchanged pieces and achieved a slight edge. 22. Kf1 h6 23. Bb4 Kf7 24. h4 Ke8 25. Ke2 Nxe4 26. Kf1 Nd2+ 27. Nxd2 Rxd2 28. Re4 h5 29. Re3 Rd5 30. Rg3 Kf7 Black has an advantage here, but Michael Adams must have had an off day here. 31. Rf3+ Kg6 32. Rg3+ Kh7 33. Rf3 Nxb4 34. cxb4 c5 35. bxc5 Rxc5 36. Ra3 Kg6 37. Rg3+ Kh6 38. Ra3 Rc4 39. Rb3 Rc5 40. Rb6 Rxa5 41. Rxe6+ Kh7 42. Ke2 Kg8 43. Re7 Kh7 44. Re6 Kg8 45. Re7 Kf8 46. Rc7 Ra4 1/2-1/2
There is an extensive appendix covering the Exchange Variation which initially looked out of place to the reviewer, but on reflection it has good coverage of a decent suggestion.
My overall summary of this book: very good.
FM Richard Webb, Chineham, Hampshire, 29th November 2020
Decision Making In Major Piece Endings : Boris Gelfand
Decision Making In Major Piece Endings, Boris Gelfand, Quality Chess, 2020
From the Publisher’s Foreword:
“This is the fourth book in the Decision Making In Chess series. It was written over the last couple of years. A lot of work has gone into this book and the accompanying volume Technical Decision Making In Chess, which deals with a wider range of technical topics, whereas this book focuses on positions without minor pieces.
It has been four years since the publication of Dynamic Decision Making in Chess and certainly there will be one person out there wondering what happened to us and why the third volume was taking so long to complete. I hope that the content alone of these two books will answer that question.”
From the back cover:
“In Decision Making in Major Piece Endings former World Championship Challenger Boris Gelfand discusses his path to decision making in endgames involving rooks or queens, as well as the neglected “4th phase”. Countless games are decided by good or bad technique in such endgames, so readers are certain to benefit from the insights of a word-class Grandmaster on this vital topic.
Grandmaster Boris Gelfand has been an elite player for over 30 years, winning the World Cup, Olympiad Gold, the Candidates and many other top tournaments. Grandmaster Jacob Aagaard is the only chess writer to have won all the major awards for chess writing. ”
Boris Gelfand, FIDE Grand Prix, London, 2013, Courtesy of John Upham Photography
Reaction to previous volumes in the series:
In 2015 Positional Decision Making In Chess won the ECF Book of the Year award.
“The most interesting chess book I have read in the last quarter-century.” Mikhail Shereshevsky on Positional Decision Making in Chess.
This new Quality Chess publication Decision Making In Major Piece Endings uses high quality paper and the printing is clear. The book can easily be laid flat next to the board and does not require weights to prevent it from “self-closing” (a particular bugbear of ours !). Each diagram is clear and the instructional text is typeset in two column format, which, we find, enables the reader to maintain their place easily. Figurine algebraic notation is used throughout and the diagrams are placed adjacent to the relevant text and each major diagram has a “to move” indicator. Where a “to move” indicator is not present, it is obvious which colour is to move from the accompanying moves in a variation.
Each chapter is introduced with a contemporary photograph of a player or players or a tournament scene which launches each chapter in a engaging manner. This is followed by a Diagram Preview page which shows the critical analytical diagrams in the following chapter and invites the reader to practise their analysis and decision making! If you can work out most of the variations you are a world champion.
The introduction of this book makes it clear that this book is not an endgame primer or manual on basic major piece endgames as there are plenty of these theoretical works already in existence. Knowledge of very basic rook and pawn endgames such as the Lucena and Vancura positions is assumed. This book is “about decision making at the board and learning from your games – and those of others. In this book I will discuss topics that have arisen in some of the most interesting games without minor pieces during my career. We will encounter rook endings, queen endgames and games in what Romanovsky called the fourth phase, which is essentially later middlegames/early endings where only major pieces remain.”
The introduction also guides the reader on how to study the endgame: 1. knowledge of basic positions and their key variations and ideas must be known; 2. improving deep analytical skills; 3. development of intuition. This book concentrates on improving items 2 & 3 above. The author suggests how to best use the book by first analysing the endgames without a chess engine and/or tablebases to prevent lazy thinking by relying too heavily on engine assessments without understanding.
Despite the fact that the introduction claims that this book is not an endgame primer, there are a couple of excellent chapters on theoretical endgames. They are covered from a practical point of view and Gelfand draws out the key defensive ideas by concentrating on patterns and key positions. More on these chapters later. There are other basic endgame positions interspersed in other chapters which are reached from long variations but are nevertheless didactic as the theoretical endgames are shown in context within the whole endgame and the reader is clearly shown how these positions can be reached in practice.
Here is an critical position from the game Julian Hodgson – Boris Gelfand played at Groningen 1996. Both players misevaluated this ending as they both thought that black was easily winning. At the time, endgame theory agreed with them. Modern tablebases give this as a clear draw as black cannot hide his king from the checks with accurate defensive play from white.
Hodgson-Gelfand 1996
The game continued 86.Qe8+? The losing mistake. The black king escapes the checks by stepping in front of the pawns. 86.Qe6!, the most natural waiting move was still drawing. (86.Qd7! also draws). 86…Qf8 87. Qe2+ g4 88. Qe5+ Kh6 89. Qe6+ Kg5 90. Qe5+ Qf5 91.Qg7+ Kf4 92. Qc7+ Qe5 93. Qf7+ with a draw. 86… Kg4 87. Qe6+ Qf5 88.Qc4+ Kg3 89. Qc7+ Qf4 0-1
The author makes the point that if white had known that the endgame was a draw, and knew a few general ideas, he would have probably drawn the game. But when you think it is lost, psychologically it is impossible to hold it, particularly in an increment finish. A lot of the top players do not think in terms of lost or not: they concentrate on looking for ideas (to make life difficult for the opponent).
Chapter 1 – The Importance of Analysis
The title of the chapter is self explanatory and Gelfand stresses the need to study complicated endgames in depth and understand all the nuances. There are some superb examples of brilliant analysis. Here is one such position where Gelfand did not discover the right idea until 2018:
Suetin-Portisch 1973 (variation)
It is black to play, clearly 60…d1=Q 61. Rxd1 Kxd1 62. Kf3 is not good enough to win. Black to play can win with 60…Rc4!! 61. Rb1 Rc1 62. Rb2 Rf1!! cutting the king off from the e-file (62…Ke3? 63. Rxd2 Kxd2 64.Kf4 draws shouldering the black king) 63. Kg4 Ke3 64. Rxd2 Kxd2 65. Kg5 Ke3 wins as black’s king is now available to hunt the pawns down.
Chapter 2 Do Not Hurry
The “Do not hurry” concept is a key concept that I first encountered in Shereshevsky’s classic Endgame Strategy. In the position below, this principle can be demonstrated aptly.
Giberto Hernandez Guerrero-Gelfand
Converting this position is covered in detail with a key discussion on exchanges which is enlightening.
This rook ending could have occurred and black’s winning’s manoeuvre is instructive:
Gilberto Hernandez Guerrero-Gelfand Variation
63…Rc5 64. Rc7 Rc3+ 65. Kf2 Rc4 66.Kg3 Now the black rook has been optimally placed, it is time to improve the king to the maximum, while keeping the best possible pawn structure, which is to keep the pawn on g7 and play …f6, so that White does not have Rc8 followed by c6-c7. If the pawn would be on g6 in that position, Rg8 would eventually come and save a draw. The best black would achieve is f- and h- pawns, but not in favourable circumstances. With the pawn on g7, …Rxc7 will always come as a response to Rg8 and black wins trivially. 66…Kf6 67.Kh3 Kg6 68.Kg3 f6 And black wins after either 69.Kh3 Kh6! followed by the advance of the g-pawn, or 69.Rc8 Kf5! and the advance of the king.
Chapter 3 – Three Surprisingly Complicated Rook Endgames
This is a variation from an interesting rook and pawn endgame Boris Gelfand – Lars Bo Hansen Wijk aan Zee 1993:
Gelfand-Hansen (variation)
White wins with the instructive 64.Rc7!! preparing to cut black’s king off along the fifth rank 64…Rh1 65.Rc5! and if 65…Kd6 66.Rc6+, white can then simply queen the b pawn winning black’s rook whilst black’s king is unable to support his own pawn.
Here is another common type of position taken from a variation in the game Gelfand-Vladimir Kramnik Zurich 2017. White is clearly much better as his king supports his pawn and black’s king is not in the game. But how does white win?
Gelfand-Kramnik Variation
The answer is simple once you see it. 48.Rc3!! Kf6 49. Rc2! and wins
Chapter 4 Two Defensive Methods in Rook Endings
This chapter is one of the theoretical chapters which covers rook and four against three all on one side and rook against three connected passed pawns. This section is well constructed with coverage of all the major positions and ideas in the 4 v 3 ending.
Some famous games are included which must be present in every treatise on rook endings. Here is one such ending from: Mikhail Botvinnik v Miguel Najdorf Moscow 1956:
Botvinnik-Najdorf Moscow 1956
White is winning here because he can create a passed e-pawn and he has fixed the pawn structure with h5 leaving an entry point for the king on g6. The game continued 61…Kf7 62. Ra5 Rc7 63. Rd5 Ra7 64. e5 fxe5 65. fxe5 Ke7 66.e6 Ra4 67. g5! providing cover for the king 67…hxg5 68.Rd7+ Kf8 69.Rf7+ Kg8 70.Kg6 g4 71.h6! gxh6 72.e7 Ra8 73.Rf6 There is no defence to Rd6 and Rd8 with mate.
The celebrated endgame Capablanca-Yates Hastings 1930 is of course covered in great detail. The analysis of the famous position is covered in great depth showing the defender’s best defence which is tricky to crack. It is revealing to note that even the great Cuban World Champion let the win slip at one point. I suggest that the reader buys the book to study this superb analysis.
Capablanca-Yates Hastings 1930
The position below is the celebrated game Piket-Kasparov Internet 2000 because Kasparov misplayed a drawn endgame so badly. We must not be too hard on the former World Champion as it was a rapid game and Kasparov is a superb endgame player.
Piket-Kasparov Move 42 Internet 2000
The game continued: 42.Kh3 Re3 43.Kh4 Kg7?! Black does not have to let the white king into g5. 43…Kh6! 44.Rc7 Re2! 45h3
Piket-Kasparov Variation 1
Now, 45…Rxe5! 46.Rxf7 Re4 47.g4 Rxf4! forces a quick draw.
The game continued: 44.Kg5 Re1? (The final mistake: black can hold with 44…Ra3 45.Rc7 Ra5 and white is stymied) 45.Rc7 Re2 46.Re7 Ra2 The following variation is the key to why white is winning: 46…Re1
Piket-Kasparov Variation 2
47.e6! Rxe6 48.Rxe6 fxe6 49.h3 Despite material equality, black is lost as he is in zugzwang. 49…Kf7 50.Kh6 Kf6 51.g4 h4 52.g5+ Kf5 53.Kg7 Kxf4 54.Kxg6 e5 55.Kf6 e4 56.g6 e3 57.g7 e2 58.g8=Q e1=Q 59.Qg4+ Ke3 60.Qe6+ exchanging queens and winning
In the game, black lost in a similar manner to Botvinnik-Najdorf:
47.f5! gxf5 48.e6 h4 49.Rxf7+ Kg8 50. Kf6 1-0
Piket-Kasparov Move 47
The final two positions in this chapter concern Rook v 3 connected passed pawns.
Rook v 3 pawns (1)
White to move wins with 1.Rf8, black to move draws only with 1…Kg7! preventing the rook from moving behind the base of the chain.
Similarly in the mirror position, white to move wins with 1.Rh8, black to move draws with 1…Kg7!
The core of the book (chapters 5 to 8) is a series of four chapters deeply analysing three rook and pawn endgames of Gelfand’s against world class opposition. The games are shown in their entirety which is the modern way to study endgames in relation to the opening and middlegame.
Gelfand-Kasimdzhanov Variation
This position from a variation in the game Gelfand-Kasimdzhanov from Baku 2014 caught my eye. Black to play – what should he do? 59…Kf5!! The obvious move is to push the pawns with 59…g4. Let’s see what happens: 60.Rc6! f5 61.Rxa6 Kg5 62.Rb6 h3 63.Kg3 f4+ 64.Kh2 Kf4 65.Rh6+ Kg5
Gelfand-Kasimdzhanov Variation2
66.Rh8! Kf5 67. Rg8! Black is in zugzwang and loses all the pawns.
60.Rc6 a5 61. Rc5+ Kg6 62.Rxa5 f5 and black prevents the rook from reaching f8. This is obvious when one has knowledge of the basic endgame rook v 3 connected pawns shown above! The author has shown an excellent example of knowing your basics being applied to a real live game.
Chapter 9 Queen Endings with a g- or h- pawn
This is one of the reviewer’s favourite chapters as it combines endgame theory with practical examples showing that even strong GMs do not know how to defend these endings correctly. Even when players know where to put their defending king, choosing the correct check to draw is not obvious!
Here is a position from Gelfand-Jobava from Dortmund 2006.
The reviewer loves this endgame.
Gelfand-Jobava (Move 50)
This king and pawn ending is clearly drawn but white is pressing with a more advanced king. White played 50.h4 setting a subtle trap. 50…h5?? losing, incredible to believe but it is true. 50…Kd7 draws, for example 51.g4 f6+ 52.Kd5 e6+ 53.Kc5 h6 54. e5 fxe5 55.fxe5 Kc7 seizing the opposition and drawing 51.f5! f6+ 52.Ke6 gxf5
Gelfand-Jobava (Move 53)
Now white played 53. e5!! which had been completed missed by black (automatic recapture syndrome) fxe5 54.Kxe5 Kd7 55.Kxf5 Kd6 56.Kg5 Ke5 57.Kxh5 Kf4
Gelfand-Jobava (Move 57)
Now white can enter a winning queen endgame with 58.Kg6!
White did not play the endgame perfectly, and after many adventures this position was reached at move 87. Black is drawing here if he places his king in the drawing zone which is the far corner diagonally opposite where the g pawn is hoping to queen i.e. a1.
Gelfand-Jobava (Move 87)
87… Ka5? was played which loses. I am surprised that a strong GM moved his king the wrong way. 87…Ka3 draws but the draw is not simple. 88.g7 and now black can draw with an accurate sequence of moves that are not obvious. 87… Qe5+ (the obvious 87… Qg3+ loses in 41 moves) 89.Kg6 Qe6+ 90.Kh7 reaching the drawn position below.
Gelfand-Jobava (Variation Move 90)
90…Qf5+ 91.Kg8 Qf4! (only move) draws, 90…Qh3+ 91.Kg8 Qf5! (91…Qe6+ loses) also draws
The game continued 88.g7 Qe5+ 89.Kg6 Qe6+ 90.Kh7 Qf5+ 91.Kg8 Ka4 92. Qh1 Qc8+ 93. Kh7 Qf5+ 94. Kh8 Qe5 reaching the position below:
Gelfand-Jobava (Move 95)
Now 95.Qh3! wins cutting off he black king from the drawing zone. Gelfand won the game easily after another 18 moves. The best defence involves white winning by transitioning through the two diagrams below exploiting black’s king position to misplace the black queen. Absolutely fascinating stuff.
This section is entertaining with some really exciting and amusing positions. Here is one such position:
David Anton Guijaro-Alejandro Franco Alonso
This looks like a fairly standard queen and pawn ending. Black is a pawn down but is to play and played the obvious capture 55…Qxb2? which is simply too slow. 55…b4! was the drawing move. White has two tries: 56.axb4 is the only real winning attempt but falls short: 56…Qxb2 57. Qh7+ Ke6 58. Qxh6 a3 59. Qg6 a2 60.h6 a1=Q 61.h7 Qe2! forcing white to take a perpetual. Or 56. Qh7+ Ke6 57. Qxh6 Qxe4+ 58. Kh2 Qe2 with sufficient counterplay against the white king to draw. The game continued: 56.Qh7+ Ke6 57. Qxh6 b4 58. Qg6 bxa3 59. h6 a2 60. h7 a1=Q reaching the position below.
Two queens each
61. Qf5+? Driving the king towards safety: 61.h8=Q wins instantly, with a quick mate.) Kd6 62. h8=Q Kc5! 63. Qf8+ Kc4 64. Qe6+ Kd3 65. Qfxf6 Qd4 66.Qf3+ Kd2 67. Qh6+ Kc2 68.Qc6+ (the computer prefers 68.Qe2+ Kc3 69.Qc6+ Kb4 70. Qb7+ Ka3 71. Qe7+ Kb3 72. Qf7+ Kb4 73.g4 and white is winning) Kb1 69. g4 Qab2 70.g5 a3 71. g6 a2 72. g7 a1=Q 73. g8=Q Qaa3 74. Qgg3 ? (74. Qcf6 keeps the advantage) reaching this position:
3 queens each
This is the beautiful but sad moment of the game. Black played 74…Qxf3+? and went on to lose quickly. 74…Qdxf2+!! draws by sacrificing all three queens for stalemate, for example 75. Qfxf2 Qxg3+ 76. Kxg3 Qc3+ 77. Qxc3 stalemate. Fantastic! Who says there is no humour in chess ?
Stalemate
Chapter 11 – Full Circle
This chapter covers the famous game Botvinnik-Minev Amsterdam 1954 which goes into a celebrated Q + g pawn v Q ending which Botvinnik won from a drawn position. As Boris Gelfand points out, once we know that an article written by Paul Keres in the 1947-1949 Soviet Yearbook recommended that black place the king on a4, black’s moves become completely understandable.
Botvinnik-Minev
56.Qg4+ Ka5? This is still a draw but modern knowledge recommends Ka3 heading towards the opposite corner. 57.Qxe6 Qh8+ 58.Kg6 Qc3 59.g4 Qd2 60.g5 Qd4? Centralisation looks good, but in fact loses. 60…Ka4! was best, several other moves also draw.
Botvinnik-Minev Move 60
Now 61. Qf5+? allowing black to draw. 61. Kh7! Qh4+ 62.Qh6 followed by g6, the black king is too far from the a1 corner 61…Ka4 62. Kh5 Qh8+ 63. Kg4 Qh1? The final mistake, after this Botvinnik wins with no slip-ups. Buy the book to find out how. 63…Ka3! was correct.
Chapter 12 – Conversion in the 4th Phase
This chapter covers a complex Q and double rook late middlegame which reveals the complexities of such positions. The game clearly shows that a sustained initiative is so potent.
This is a critical position from the game Gelfand-Edouard. Black is under the cosh but can defend with 35…Qxe5! 36. Qxa7 Rg6! 35.Qb7 Rxg3+! 36.fxg3 Qe3+! 37. Kh2 Qh6+ with a perpetual check.
Gelfand-Edouard
The penultimate chapter is a series of studies which are elegant and instructive. There is a particularly beautiful study by Darko Hlebec. Buy the book to appreciate the beauty of chess.
The final chapter is a series of rook exercises which are extremely didactic. If you can solve all of these, you are a World Champion.
I heartily recommend this superb book on major piece endgames which is a labour of love and hard work. It combines practical examples with coverage of basic endgame positions.
FM Richard Webb, Chineham, Hampshire, 16th November 2020
Your Jungle Guide to Rook Endings : Efstratios Grivas
“After a bad opening, there is hope for the middle game. After a bad middle game, there is hope for the endgame. But once you are in the endgame, the moment of truth has arrived.” – Edmar Mednis
GM Efstratios Grivas
“Efstratios Grivas (30.03.1966) is a highly experienced chess trainer and chess author. He has been awarded by the International Chess Federation (FIDE) the titles of International Chess Grandmaster, FIDE Senior Trainer, International Chess Arbiter and International Chess Organiser.
His main successes over the board are the Silver Medal Olympiad 1998 (3rd Board), the Gold Medal European Team Championship 1989 (3rd Board) and the 4th Position World Junior Championship U.20 1985. He has also won 5 Balkan Medals (2 Gold – 1 Silver – 2 Bronze) and he was 3 times Winner of the International ‘Acropolis’ Tournament. He has also in his credit the 28 times first position in Greek Individual & Team Championships and he has won various international tournaments as well. He has been awarded five FIDE Medals in the Annual FIDE Awards (Winner of the FIDE Boleslavsky Medal 2009 & 2015 (best author) – Winner of the FIDE Euwe Medal 2011 & 2012 (best junior trainer) – Winner of the FIDE Razuvaev Medal 2014 (Trainers’ education) and has been a professional Lecturer at FIDE Seminars for Training & Certifying Trainers.
He has written more than 100 Books in Arabic, English, Greek, Italian, Spanish & Turkish. Since 2009 he is the Secretary of the FIDE Trainers’ Commission and since 2012 the Director of the FIDE Grivas Chess International Academy (Athens).”
From the rear cover :
“To learn and to play endgames well the chess player must love endgames’ – Lev Psakhis. Different kinds of endgames have specific characteristics and rules. Every serious player must know many typical positions and main principles of all types of endings. That knowledge should help us during the game, but it is not enough to become a good player, not yet. There just too many different endings, some of them with two or more pieces, some are very complex. To be comfortable and play well those complex endings require specific knowledge and specific ways of thinking. We will call it ‘endgame thinking’.
I chose to write a book on advanced rook endings as I simply did not wish to write another book that would be like the many already available. I have done my best to present analysis and articles I have written over the past 10-15 years. Th is work has been presented in my daily coaching sessions, seminars, workshops, etc. The material has helped a lot of trainees to develop into quite strong players gaining international titles and championships. Now, it is your turn to taste and enjoy it!”
As with every recent Thinkers Publishing publication high quality paper is used and the printing is clear. The book can easily be laid flat next to the board and does not require weights to prevent it from “self-closing” (a particular bugbear of ours !). Each diagram is clear and the instructional text is typeset in two column format, which, we find, enables the reader to maintain their place easily. Figurine algebraic notation is used throughout and the diagrams are placed adjacent to the relevant text and each diagram has a “to move” indicator.
This is a superb book packed full of instructive examples which I cannot praise enough. The book has clearly been extensively researched with Efstratios Grivas showcasing his credentials as a world class trainer.
The book starts off with four well thought out introductory sections: 1. The Endgame which briefly discusses the historical literature and computer evolution of the endgames. In this section, the author introduces his useful boxed SOS Tips which remind the reader of the salient points of a particular lesson or section.
2. The Golden Rules Of the Endgame which every player should know. I like the way that Grivas acknowledges other authors’ contributions to the evolution of our endgame understanding and this is clearly shown here and in Chapter 4 Extra Passed Pawn.
3. Rook Endgame Principles which lists the five main rules of rook endgames which is particularly useful for less experienced players.
4.Evaluation – Plan – Execution which discusses the role of planning followed by an excellent seven point SOS tip box.
Now we come to the meat of the book which is divided into nine chapters:
Chapter 1 – basic knowledge which covers the Lucena, Philidor and Vancura positions and their offshoots. If you only read one chapter of any book on rook endgames, I suggest this one.
Diagram 13 shows that even a future current world champion can blunder in a basic position:
Levon Aronian v Magnus Carlsen
This is a drawn ending as black’s king is on the short side and his rook has sufficient checking distance.
Aronian’s last move was the cunning waiting move 73.Rd7-d6!
The only drawing move here is 73… Kg6! for example, if 74.Rd7 Kg7 75.Kd6+ Kf6 76. e7 Kf7=
Carlsen replied with the “obvious” check 73… Ra7+ and resigned instantly after 74. Ke8. He resigned because of 74… Ra8+ 75.Rd8 Ra6 76.e7
The reviewer can say that he knew this trap from Levenfish & Smyslov and admits to feeling slightly smug!
Chapter 2 is entitled Extraordinary endings and covers three interesting and diverse areas:
Rook and A + H pawns v Rook
Rook vs 3 connected pawns
2 Rooks v R + 3 connected pawns
My preference would have been to restructure this chapter as Rook v Pawns and put the other two sections into later separate chapters. Nevertheless all the material is extremely useful. The ending of Rook v 3 pawns is fairly common and the diagram below shows a typical occurrence:
Colin Crouch – Luke McShane England 1999
This is an “optimal drawn position” (Grivas). White must prevent the rook from getting behind the pawns which wins for black.
White played 68.Kb4? which loses, keeping the king on the second or third rank was fine. 68… Rh4+? (68…Rh3 or Rh1 wins) 69. Kb3 Kc5 70. Ka3! Kb6 71. Kb3 Kc5 72. Ka3! Rh3+ 73. Kb2 Kb6 74. Ka2! (only move) Ka5 75. Kb2 Rg3 76. Kc2? (76.Ka2! Kc4 77.c7 Ra3+ 78.Kb2 Rb3+ 79.Ka2 with a perpetual check) Rg4? (76…Kb4 wins 77.Kd2 Rg8! 78.Kd3 Kxa4 79. Kc4 Ka5 8-.Kc5 Rg5+ wins) 77. Kb3 Rb4+ 78. Kc3! Rb1 79. Kc2 Rf1 80. Kb3? (80.Kb2 draws) Ra1! winning
Chapter 3 Same Side is one of the core chapters which deals with pawn up positions when all the pawns are on one side. These positions occur very frequently and are sometimes misplayed by world class players. I like the way the author systematically discusses the different structures with drawing and winning mechanisms and then shows pertintent examples from real games. Diagram 51 discusses the famous endgame Capablanca – Yates Hastings 1930 in great depth which shows that even the great Cuban player made several mistakes after achieving a winning game from a drawn 4 v 3 endgame shown below. A quick flavour of the coverage is given below.
Capablanca – Yates Hastings 1930
The game continued 38…Rb4, 39.Ra5 Rc4 (39…h5! is the standard move to ease the defence.) 40.g4! squeezing, but black can still hold 40… h6 41. Kg3 Rc1 42. Kg2 Rc4 43. Rd5 Ra4 44. f4 Ra2+ 45. Kg3 Re2 46.Re5 Re1 47. Kf2 Rh1 48. Kg2 Re1 49. h4 Kf6?! (49…f6 is more precise reaching a known drawn position) 50.h5 Re2+ 51. Kf3 Re1 Re1 52. Ra5 Kg7 53. hxg6 Kxg6! (53…fxg6? loses 54. Ra7+ Kg8 55. e4 Rf1+ 56.Ke3 Rg1 57.f5! Rxg4 58.f6 winning with two passed pawns) 54. e4 Rf1+ 55.Kg3 Rg1+ 56. Kh3 Rf1 57. Rf5 reaching the diagram below:
Capablanca Yates Hastings 1930
57… Re1? (black must play 57…f6 to draw) 58. e5! Re3+ 59.Kg2! Ra3 60.Rf6+ Kg7 reaching a well lnown won position 61. Rb6? (61.Rd6 wins protecting the king from side checks) Re3? 61…Ra4! leads to a complex draw 62. Rb4? (62. Rb1 still wins but Rb8 does not win) Rc3 reaching the position below:
Chpater 4 Extra Passed Pawn is the second core chapter of the book and is easily the longest and most complex chapter. Despite this, detailed study of this section will reap rich rewards. The theory of these endings has evolved significantly since the books by Fine and Levenfish/Smyslov. Diagram 78 shows a typical position with a extra rook’s pawn with the stronger side having the rook in front of the pawn. This position looks to be an easy draw but beware: it is a draw but the position is complex and the drawing lines are complex! One slip and the game slips away.
Bacrot – Robson, Khanty-Mansiysk, 2011
Black played a waiting move which is fatal 59…Ke6? (59…Ra4! or 59…g5! draws) White blundered in turn playing 60.Ra8? ( White could have won with a beautiful and instructive variation starting with 60. Kd4! see diagram below):
Bacrot – Robson, Khanty-Mansiysk, 2011
60…Rxf2 (looks as though it draws, but it does not) 61. Rc7 Ra2 62. a7 Kf5 63. Kc4!! Kg4 64. Kb3! Ra6 65. Rc4+ Kxg3 66. Ra4 Rxa7 67. Rxa7 Kxh4 reaching a key position shown below:
Bacrot – Robson, Khanty-Mansiysk, 2011
White wins with the amazing 68. Kc3!! (68.Rxf7 only draws 68…Kg3 holds) 68…Kg3 (68…f5 69. Kd3 g5 70.Rf7 f4 71.Rf5!! Kg4 72. Ra5 h4 73. Ke2 wins) 69. Kd3 h4 70. Ke2! wins
After 60. Ra8 the game was eventually won by white after many errors by both sides.
Chapter 5 Shattering covers endings where one side has a positional advantage consisting of the better pawn structure. A typical position is diagram 118 which is from the famous game Flohr – Vidmar Nottingham 1936.
Flohr – Vidmar, Nottingham, 1936
Black rather injudiciously exchanged knights with 29…Nc6? 30. Nxc6 Rc8 31. Rc5? (better is 31.Ke2 bxc6 (31…Rxc6 loses the king and pawn ending after 32.Rxc6 bxc6 33.b4!) 32.Rc5) 31…bxc6? (31…Rxc6! 32. Rxd5 Rc2 probably draws) 32. Ke2! Ke7 33.Kd3 Kd6 34. Ra5! Ra8 35. Kd4 f5 36. b4 reaching the position below:
Flohr-Vidmar, Nottingham, 1936
36…Rb8? and Flohr won a brilliant ending. However as Grivas shows, black could have drawn by executing a better plan on move 36 by defending his weak a6 pawn with his king 36…Kc7! 37. Kc5 Kb7 38. Kd6 Re8 39.Ra3 g5! for example 40.Rc3 f4! 41. exf4 gxf4 42. Rxc6 Rd8+ 43. Kc5 d4 44. Re6 d3 45. Re1 Rg8=
Chapter 6 Isolani covers the handling of rook endings playing against isolated central pawns. Diagram 132 covers the game Szabo Penrose from the European Team Championship in Bath 1973.
Szabo – Penrose, Bath, 1973
This is a superbly handled ending by Szabo who probes carefully and forces resignation within twenty moves – a textbook example with excellent notes by the author.
Chapter 7 Drawn Endings covers the reasons for losing drawn positions which happens to very strong players. An excellent example is diagram 140.
Topalov-Gelfand, Linares, 2010
It is hard to believe that a world class player of Gelfand’s standard could lose such a position but Grivas shows how with his usual exemplary commentary.
Chapter 8 Four Rooks is one of the chapters that makes this book stand out – few authors have covered this topic in any depth although Fine in BCE does give some examples. Grivas starts the chapter with five sets of educational SOS tips which the reviewer really likes. Diagram 143 shows a example of good defence in a position that looks diffcult with black’s king trapped on the back rank:
Miljanic – Grivas, 1983
The author conducts an almost flawless defence to hold this difficult position – buy the book to find out how.
The final chapter 9 Various Concepts discusses Lasker’s steps, trapped rooks and the Loman move. If you don’t know about Lasker’s steps or the Loman move – buy the book to learn more!
FM Richard Webb, Chineham, Hampshire, 20th July 2020
FM Richard Webb
Book Details :
Paperback : 400 pages
Publisher: Thinkers Publishing; 01 edition (19 May 2020)
Improve Your Practical Play in the Endgame : Alexey Dreev
Improve Your Practical Play in the Endgame
“After a bad opening, there is hope for the middle game. After a bad middle game, there is hope for the endgame. But once you are in the endgame, the moment of truth has arrived.” – Edmar Mednis
GM Alexey Dreev
From Wikipedia :
Alexey Sergeyevich Dreev (Russian: Алексей Сергеевич Дреев; born 30 January 1969[1]) is a Russian chess player. He was awarded the title Grandmaster by FIDE in 1989.
While being a promising young chess talent, he was for a period coached by the world-class chess trainer Mark Dvoretsky.
As with every recent Thinkers Publishing publication high quality paper is used and the printing is clear. The book can easily be laid flat next to the board and does not require weights to prevent it from “self-closing” (a particular bugbear of ours !). Each diagram is clear and the instructional text is typeset in two column format, which, we find, enables the reader to maintain their place easily. Figurine algebraic notation is used throughout and the diagrams are placed adjacent to the relevant text and each diagram has a “to move” indicator.
There is no index which, unfortunately, is a standard feature of Thinkers Publishing books. Also missing is a bibliography.
This author of this book is Alexey Dreev, super GM who reached the quarter finals of the candidates in 1991.
This excellent book is packed full of instructive, exciting endgames, taken from top level games, including many of Dreev’s own games
extensively analysed with short pithy didactic comments.
Many of the examples are complex and require serious study to really gain the understanding of practical endgames.
This book is a pleasure to read with an excellent layout and plenty of diagrams making it easy to peruse anywhere.
The book is divided up into six chapters, but not on piece configurations (except for chapter 5) but on aspects of play:
Particular Endgames,
Defence,
Hidden Resources,
Prophylaxis,
Pawn Endgames and Transitioning into Pawn Endgames,
Converting
Each chapter has eight or nine examples analysed in depth followed by a similar number of exercises which will really test the reader;
I did get a few right without moving any pieces.
One of favourite chapters is Particular Endgames which mostly covers positions with material imbalance such as Q v pieces
which the vast majority of players would find fascinating. There is an excellent example no 3 showing the use of a space advantage in B+2Ns endgame.
Following is the first example in the Chapter on Defence and a new perspective on a famous game.
My other favourite chapter is Pawn Endgames and Transitioning into Pawn Endgames which shows the rich complexity of king and pawn endgames
and the crucial importance of this topic.
In my experience, this transition is commonly mishandled by players of all standards: I have spoiled winning endgames in this area and I have seen countless games spoiled by poor play in pawn endgames, so study of this chapter will reap rich rewards for a reader.
FM Richard Webb, Chineham, Hampshire, 17th January 2020
We focus on the British Chess Scene Past & Present !
This website uses cookies to improve your experience. We'll assume you're ok with this, but you can opt-out if you wish. Cookie settingsACCEPT
Privacy & Cookies Policy
Privacy Overview
This website uses cookies to improve your experience while you navigate through the website. Out of these cookies, the cookies that are categorized as necessary are stored on your browser as they are as essential for the working of basic functionalities of the website. We also use third-party cookies that help us analyze and understand how you use this website. These cookies will be stored in your browser only with your consent. You also have the option to opt-out of these cookies. But opting out of some of these cookies may have an effect on your browsing experience.
Necessary cookies are absolutely essential for the website to function properly. This category only includes cookies that ensures basic functionalities and security features of the website. These cookies do not store any personal information.