Category Archives: Advanced

Understanding Queen Endgames

Understanding Queen Endgames, Karsten Müller & Yakov Kanoval, Russell Enterprises (24 Mar. 2021), ISBN-13 ‏ : ‎ 978-1949859317
From the publisher:

The Daunting Domain of Queen Endgames Explained! Knowing the abilities and limitations of the powerful queen is very valuable for mastering the secrets of the royal game, and this can be studied best in the endgame.

Queen endgames are very difficult, if only for purely mathematical reasons  the queen is the most mobile piece in chess, and the amount of possible options is incomparably higher than in any other type of endgames.

This book follows a dual philosophy as in the three previous works by the same authors: Understanding Rook Endgames, Understanding Minor Piece Endgames and Understanding Rook vs. Minor Piece Endgames. The 7-piece endings are dealt with in great detail. They are often so complex that pre-tablebase analysis almost always contains errors. Many new discoveries are revealed here. But to really understand the fight of a queen against a queen or minor pieces with rooks, these theoretical positions are of course not enough. So subchapters on the principles of each material configuration have been added.

All in all, this fantastic book is already on my (very short) “must study” list for chessplayers of different levels, including the top ten! I want to thank the authors for the courage which is required just to start working on such a complex topic, as well as for the very high quality of their work, which will endure for decades to come and will be very useful for many future generations of chessplayers. The foreword is by Vladimir Kramnik,14th World Chess Champion”

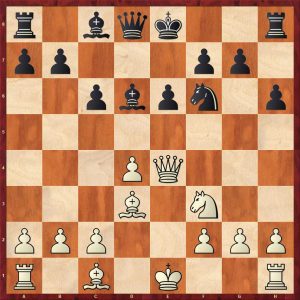
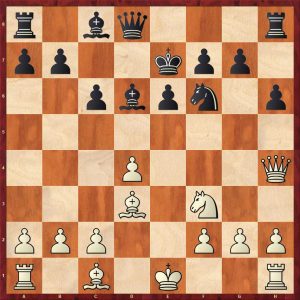
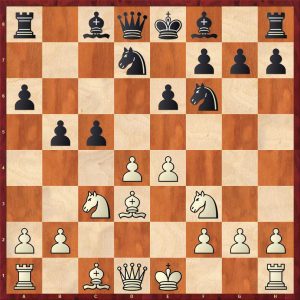
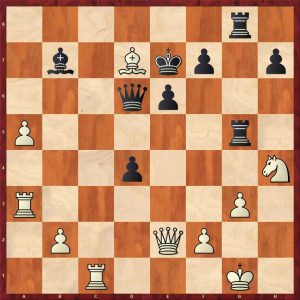
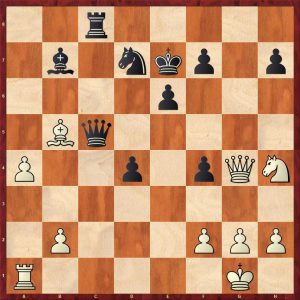
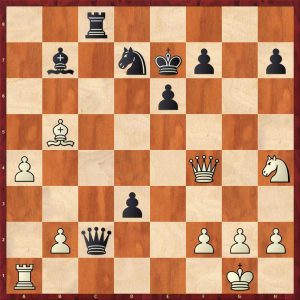
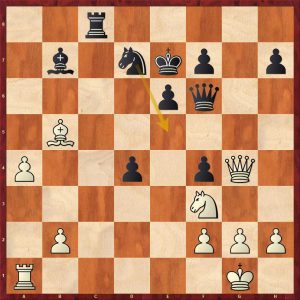
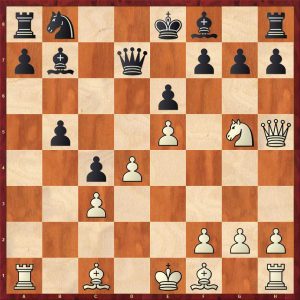
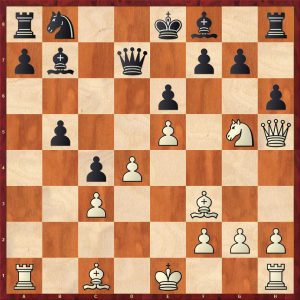
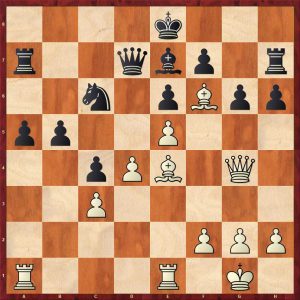
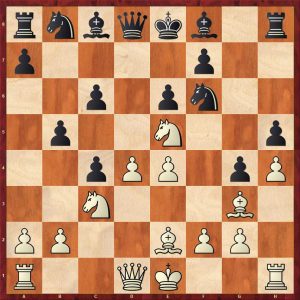
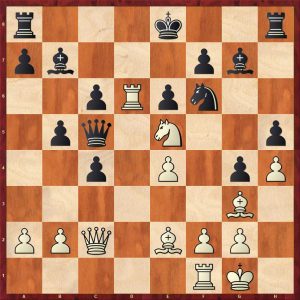
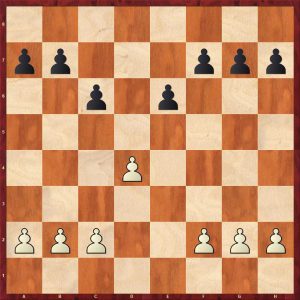
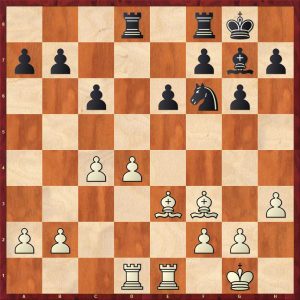
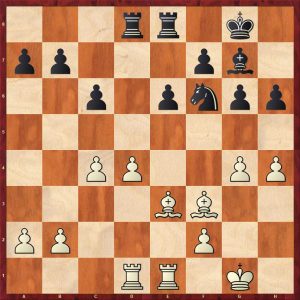
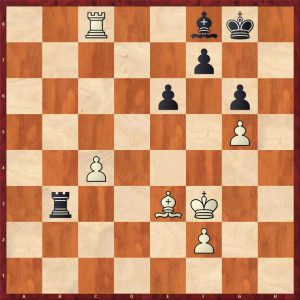
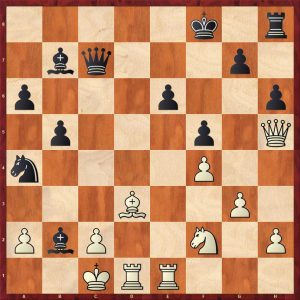
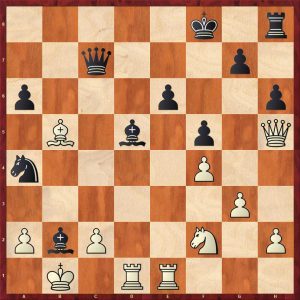
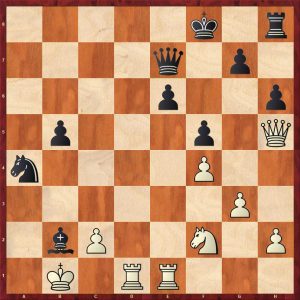
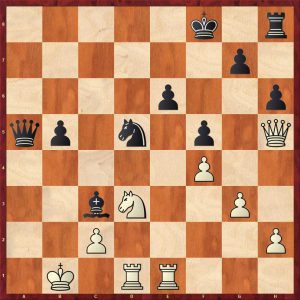
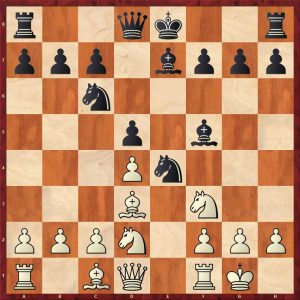
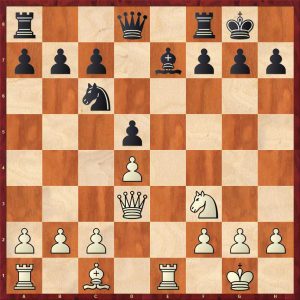
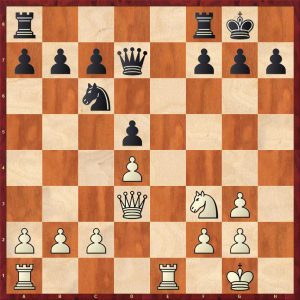
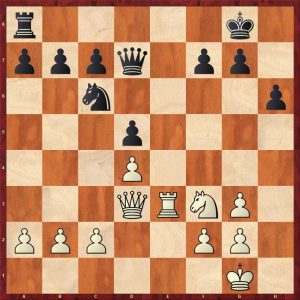
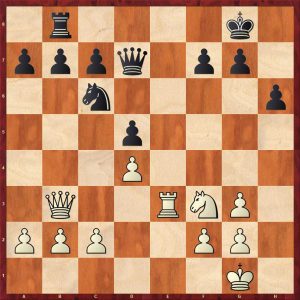
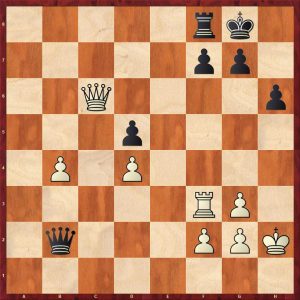
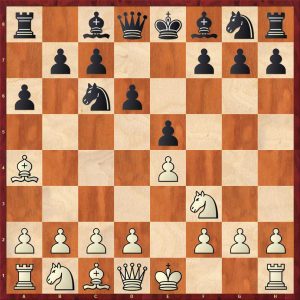
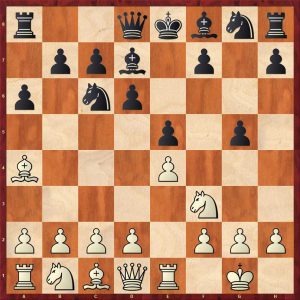
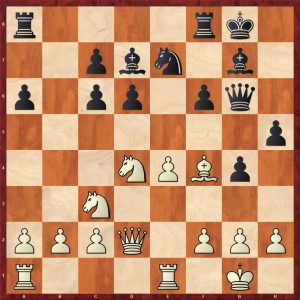
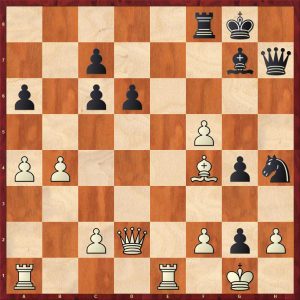
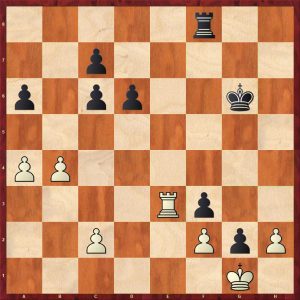
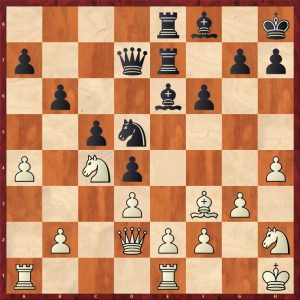
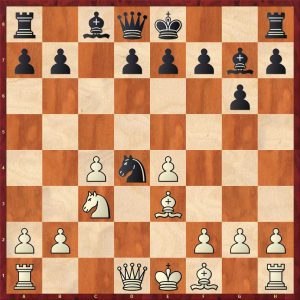
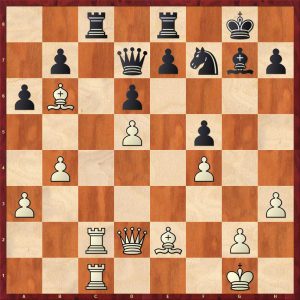
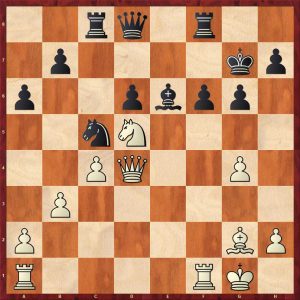
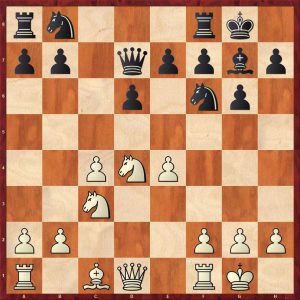
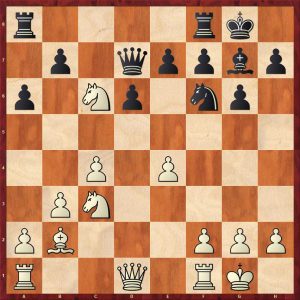
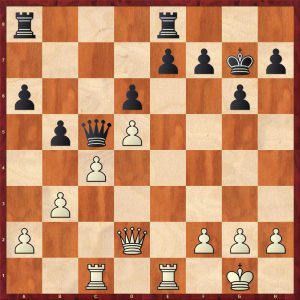
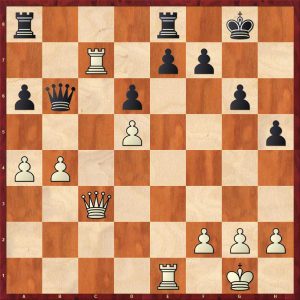
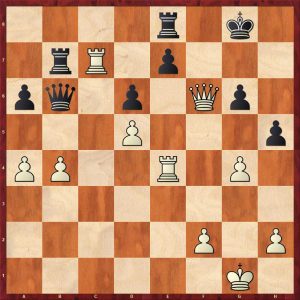
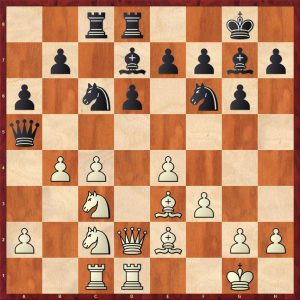
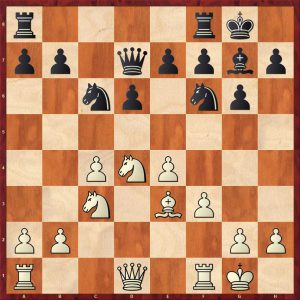
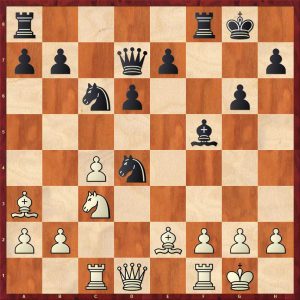
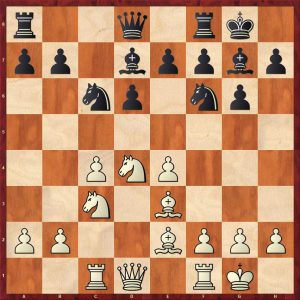
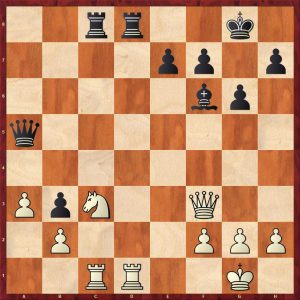
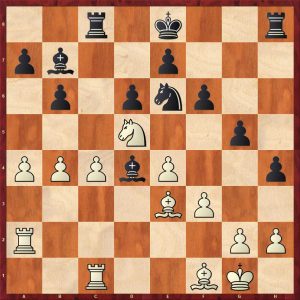
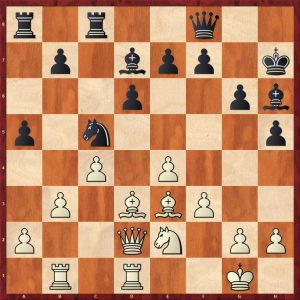
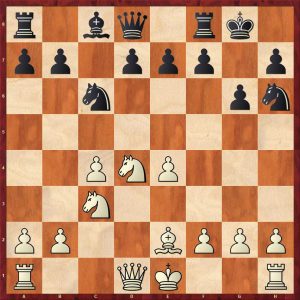
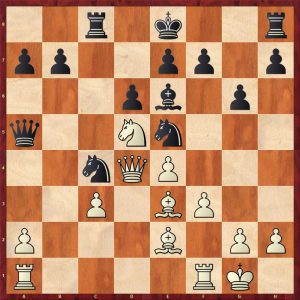
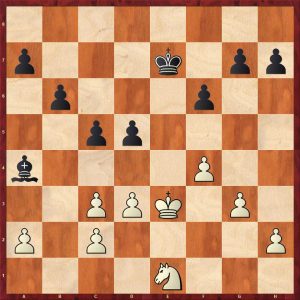
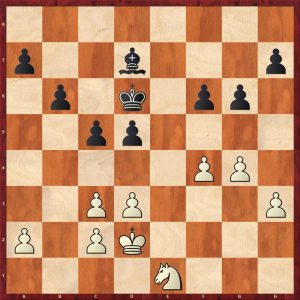
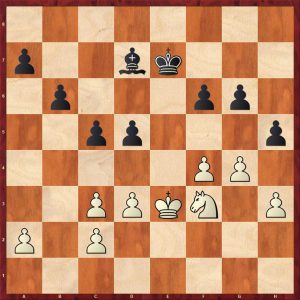
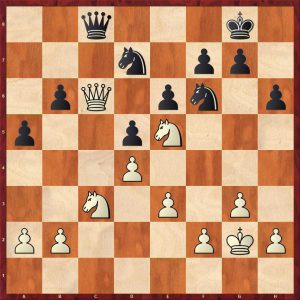
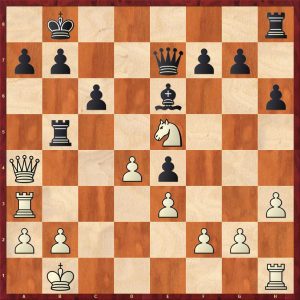
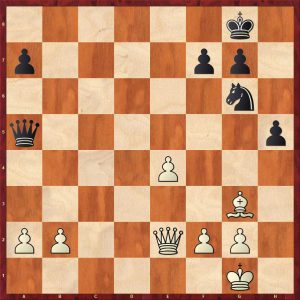
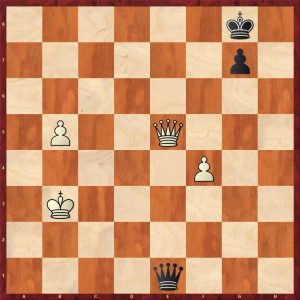
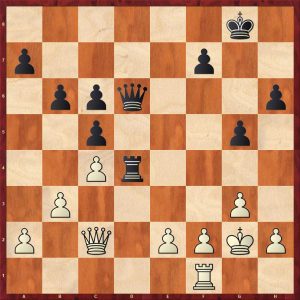
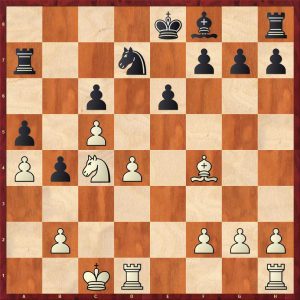
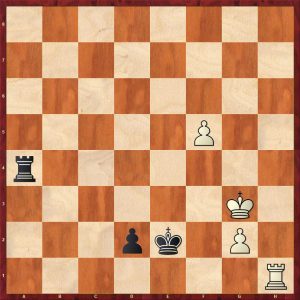
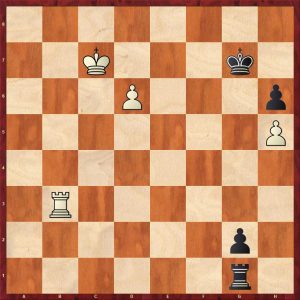
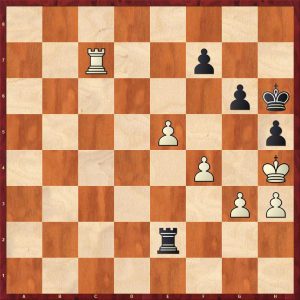
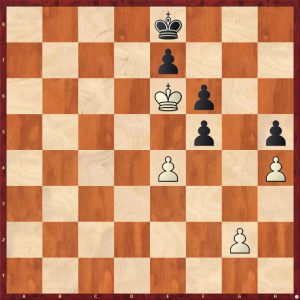
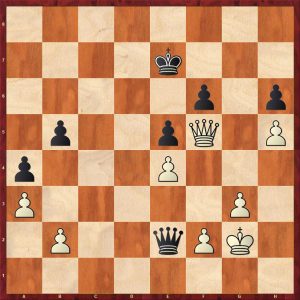
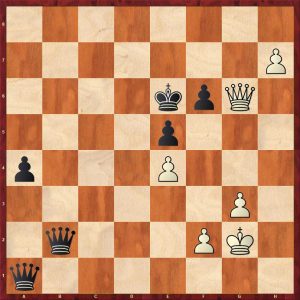
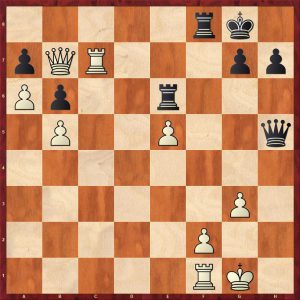
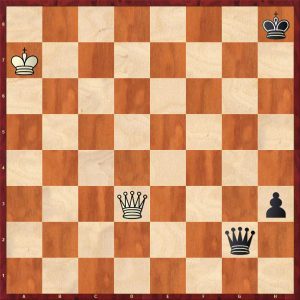
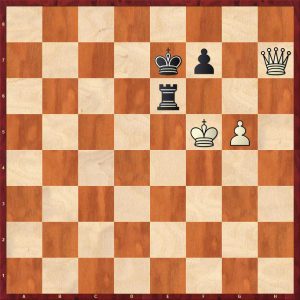
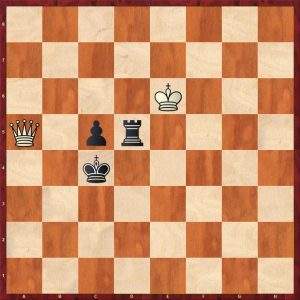
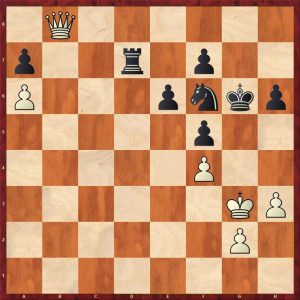
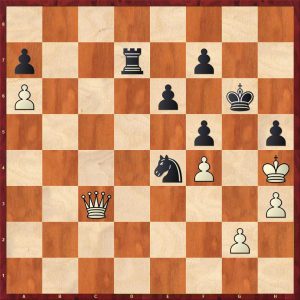
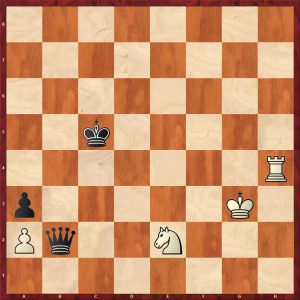
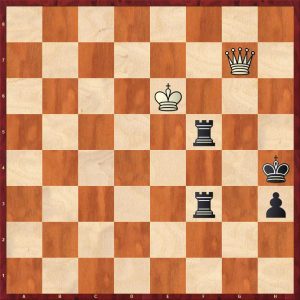
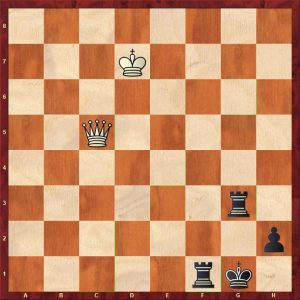
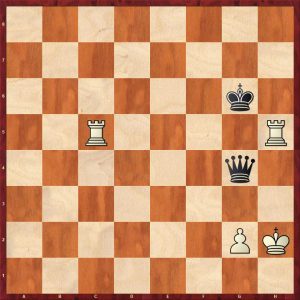
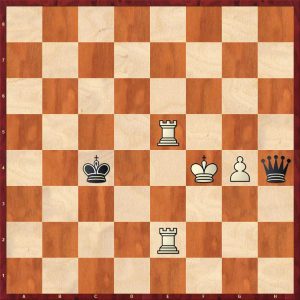
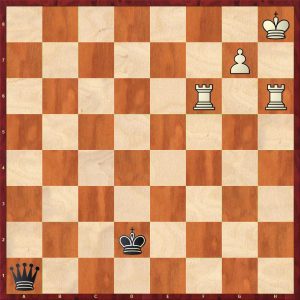
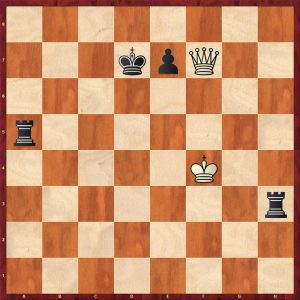
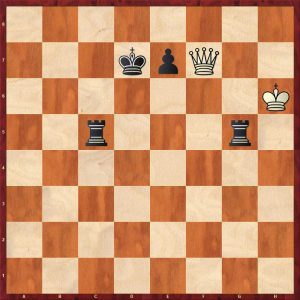
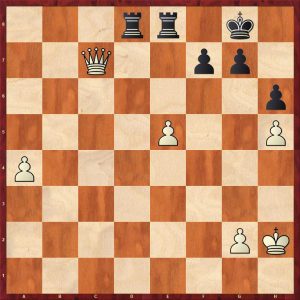
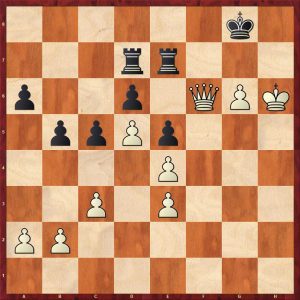
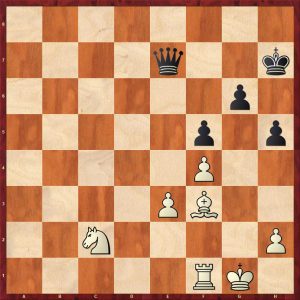
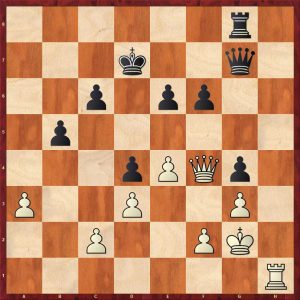
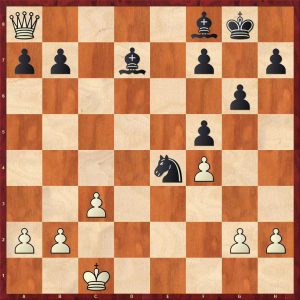
This titanic technical endgame tome is a  Magnum Opus with a forward by former World Champion Vladimir Kramnik. The complexity of queen endings is obvious as the queen is the most mobile piece and the number of  variations becomes vast after only a few ply. This is probably the reason that this is the first work to cover queen endings in great depth. The complexity of these endgames is shown by a famous game from Vladimir Kramnik’s World Championship match versus Peter Leko in 2004. The first game of that match reached this position:

Leko-Kramnik World Championship 2014(1) Move 44 White to move

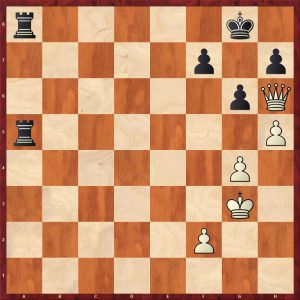
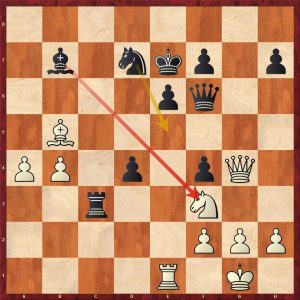
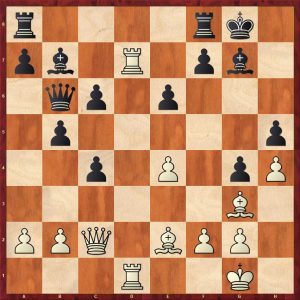
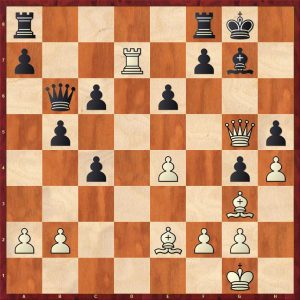
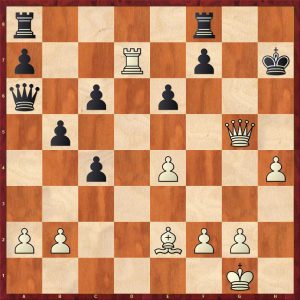
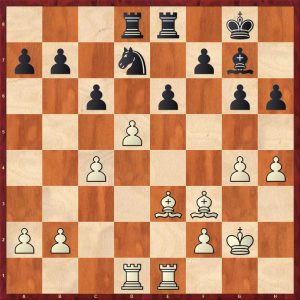
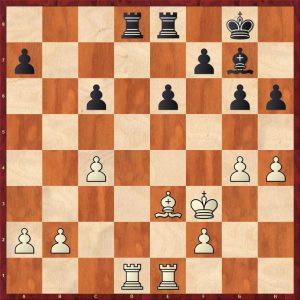
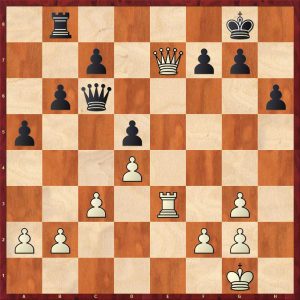
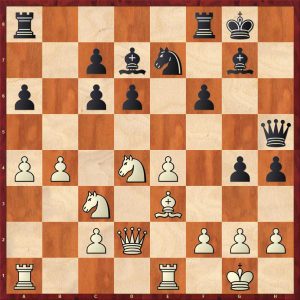
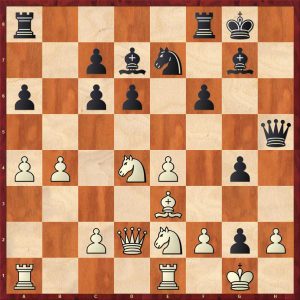
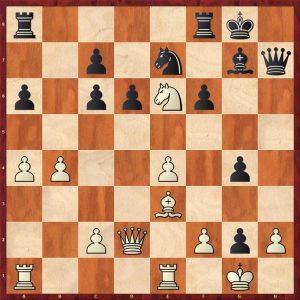
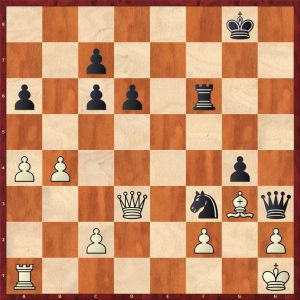
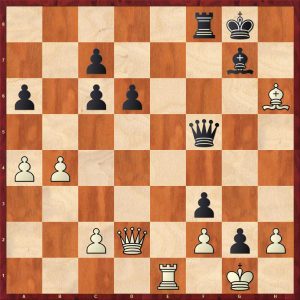
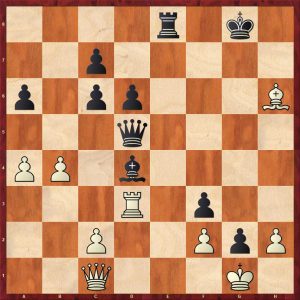
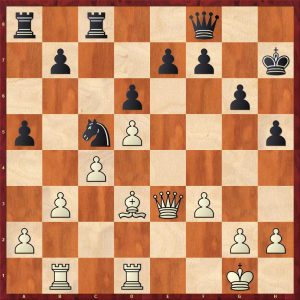
White played 44.Qf4??  which loses as demonstrated by Kramnik in the game and is covered in this book 44…g5! 45.Qf6 h6! winning, the point being that 46.Qxh6 loses the queen to 46…R8a6! After 45…h6 White cannot prevent Black from manoeuvring his rooks to win the kingside pawns. The natural move is 44.hxg6 exchanging pawns to reduce material which was thought, at the time, to draw. In fact Black stills retains winning chances. As the position has eight men the result is still not known definitively – this shows the richness of such endgames.

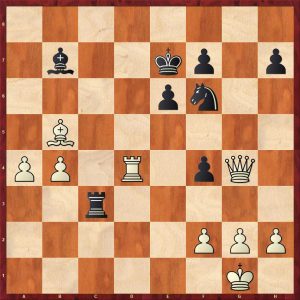
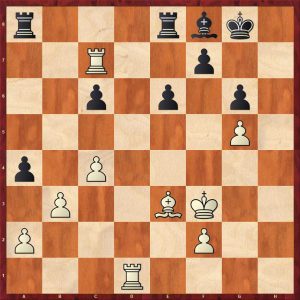
This publication also covers endgames that have had little coverage in the past such as Two Rooks + Pawn  v Queen.

Most first quick skim of the book did concern me slightly as I noticed some diagrams followed by 100+ moves with no annotations. On a deeper perusal, I realised that these examples are included as “longest wins” for certain material combinations. This emulates John Nunn’s longest wins in “Secrets of Pawnless Endings”. There is plenty of well annotated material within  practical games to bring out key ideas, for example the techniques to break down fortresses are examined in detail.

The book has ten main chapters traditionally based on piece configuration:

  • Chapter 1 Queen vs. Pawn
  • Chapter 2 Queen vs. Queen
  • Chapter 3 Queen vs. Rook
  • Chapter 4 Queen vs. Rook and Knight
  • Chapter 5 Queen vs. Rook and Bishop
  • Chapter 6 Queen vs. Two Rooks
  • Chapter 7 Queen vs. Rook and Two Minor Pieces
  • Chapter 8 Queen and Minor Piece vs. Queen (and Minor Piece)
  • Chapter 9 Queen and Rook vs. Queen and Rook
  • Chapter 10 Queen vs. Minor Pieces

Each chapter ends with some fruitful exercises to check if you were paying attention. The solutions are given near the end of the book.

Chapter 1 Queen vs. Pawn

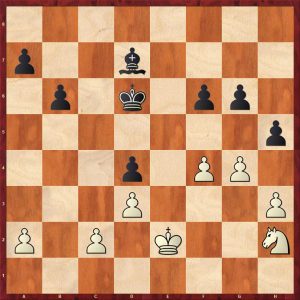
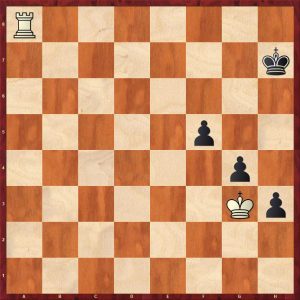
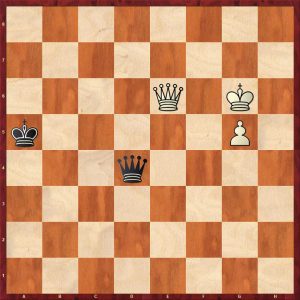
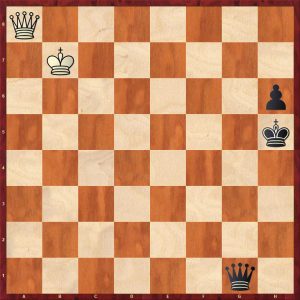
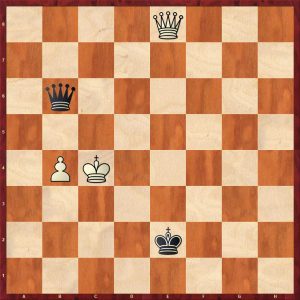
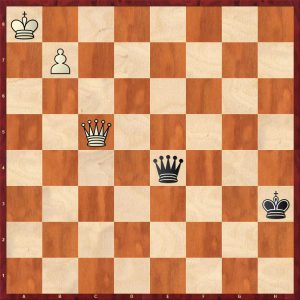
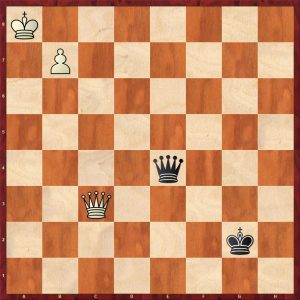
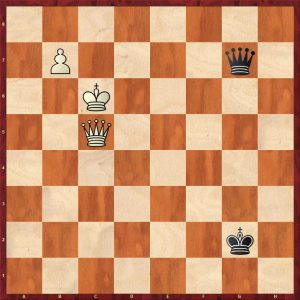
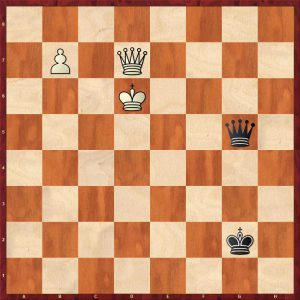
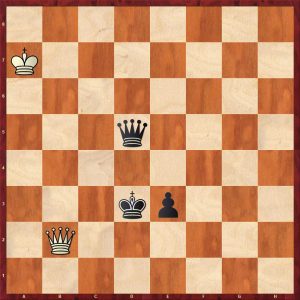
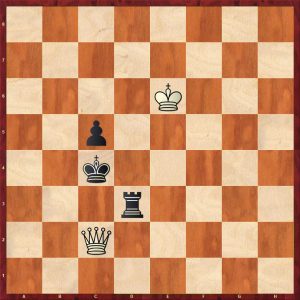
This chapter obviously concentrates on the cases where the pawn is on the seventh rank. Here is the end of a Troitzky study:

Troitzky 1935 (end of study) White to draw

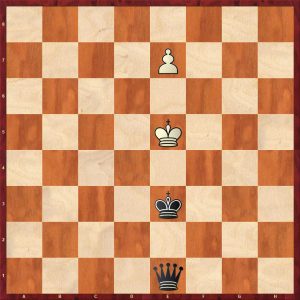
1.Ke6!! and whichever way Black’s king goes, White moves into his shadow drawing: 1…Kf4+ 2.Kf7! draws or 1…Kd4+ 2.Kd7 draws

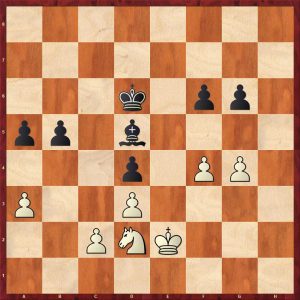
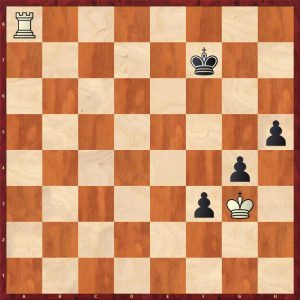
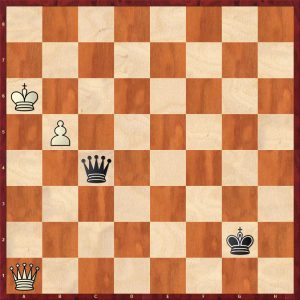
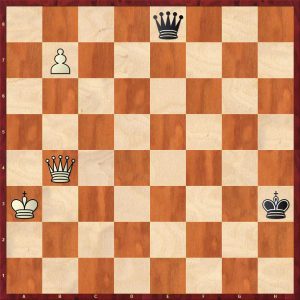
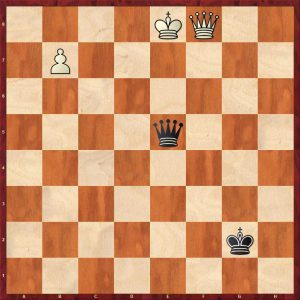
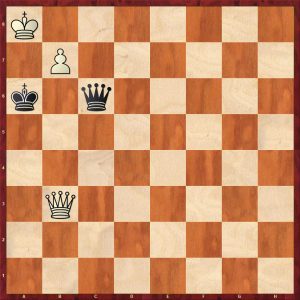
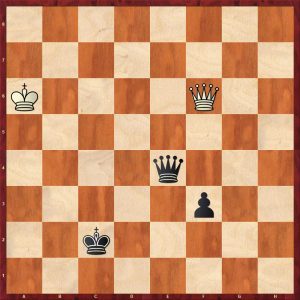
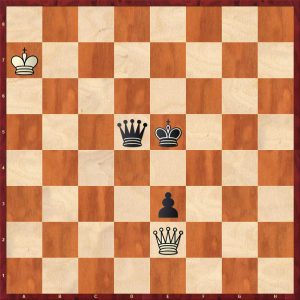
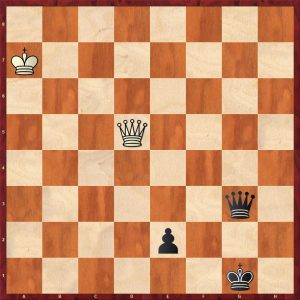
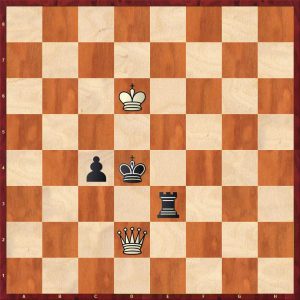
This next position looks arcane but the reviewer has has this position twice in blitz, once as the attacking side and once as the defending side: in both cases the defence was accurate to hold the draw.

Q v P (king outside winning zone) White to move

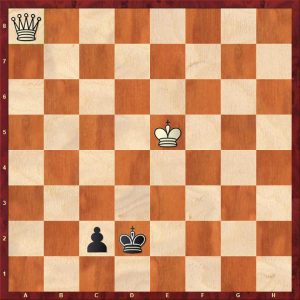
White cannot win despite the proximity of his king. White can try 1.Qd5+ 1…Ke1!! is the only move to draw, 1…Ke2 loses to 2.Qa2! Kd1 3.Kd4! c1Q 4.Kd3 mating. White can also try 1.Qa2 Kc3!! is the only move to draw, 1…Kd1 2.Kd4! c1=Q 3.Kd3 mating.

This chapter goes on to cover many types of position with far advanced pawns against a queen.

Chapter 2 Queen versus Queen

Naturally the authors start with the notoriously difficult ending Queen and Pawn vs. Queen: their comment is “This can be very deep and tricky if the defending king can’t get in front of the pawn.”  Certainly an understatement as many strong GMs have gone down in drawn endings.  A whole volume could be dedicated to this fascinating endgame.

The authors systematically cover the rook’s pawn, knight’s pawn, bishop’s pawn and centre pawns. Some useful general rules are given for each pawn:

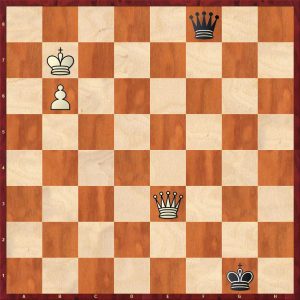
“Rook Pawn – In this case, the drawing zone for the defending king is usually quite large when the pawn is not far advanced, as the rook pawn does not provide good shelter. But the zone gets smaller as the pawn advances, and the main drawing zone is in the corner farthest from the queening square.”

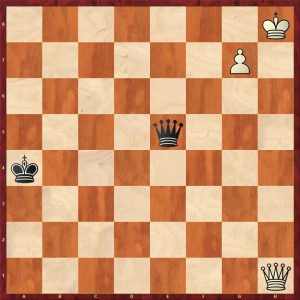
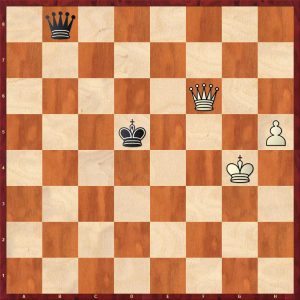
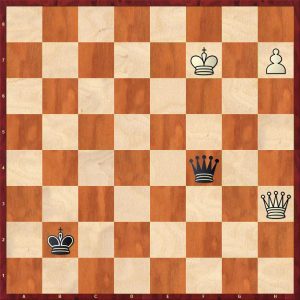
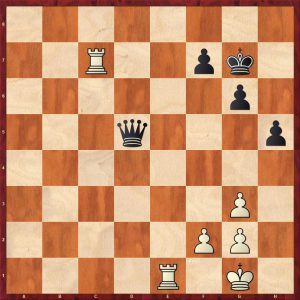
A didactic example from Carlsen-Gashimov Monaco 2011 is given:

Carlsen-Gashimov Monaco 2011 Move 59 Black to play

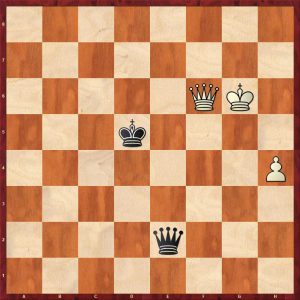
Black’s king is badly placed restricting his own queen, so he should run to the a1-corner as fast as he can. 59…Kc5!? 60.h5 Qe8+ 61.Kh6 Kd5?! 61…Kb4 going closer to the drawing zone is more logical 62.Kg5 Qg8+ 63.Kf4 Qb8+ 64.Kg4

Carlsen-Gashimov Monaco 2011 Move 64 Black to play

64…Qb4+! An excellent move preserving the draw., 64…Qa7? loses to 65.Qf4!! cutting the Black king off from the a1-drawing zone and winning in the long run. It looks as though Black’s king might get near the pawn, but that is an illusion: he just restricts his own queen’s movements. 65.Kg5 Qd2+ 66.Kg6 Kc4 67.h6 Qg2+ 68.Kf7 Qb7+ 69.Kg8 Qb8+ 70.Qf8 Qg3+ 71.Kh8 Qe5+ 72.Qg7 Qe4 73.h7

Carlsen-Gashimov Monaco 2011 Move 73 Black to play

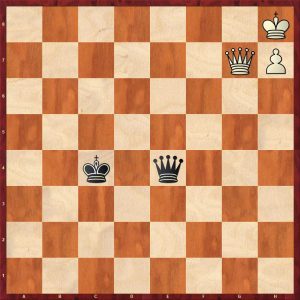
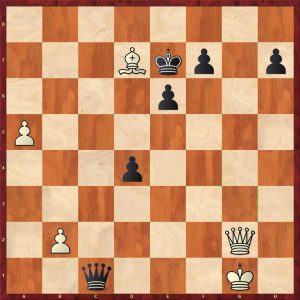
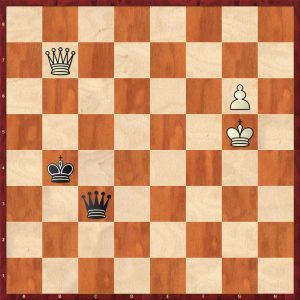
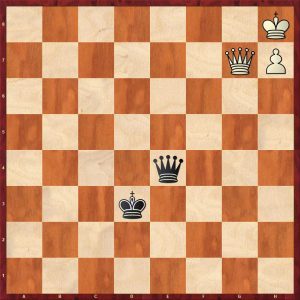
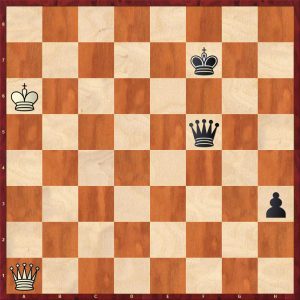
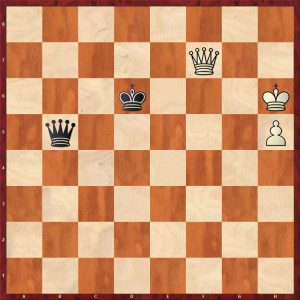
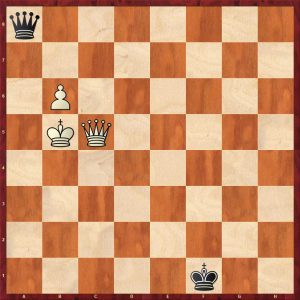
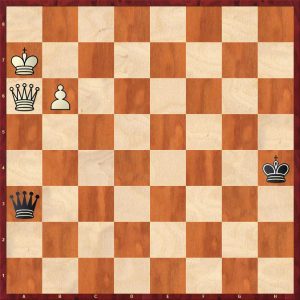
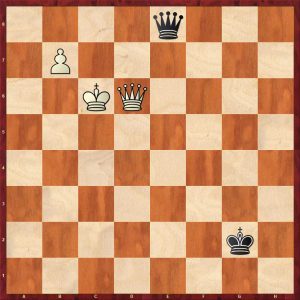
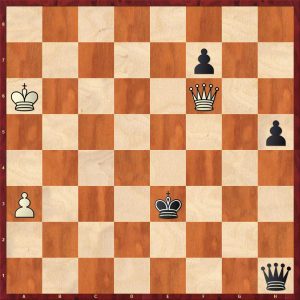
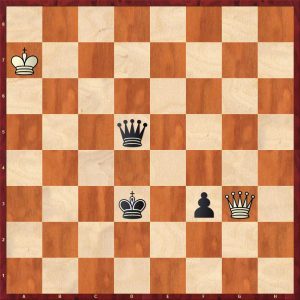
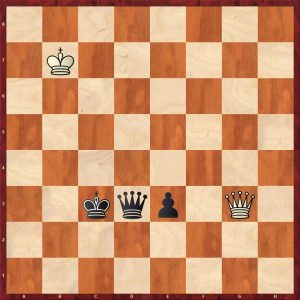
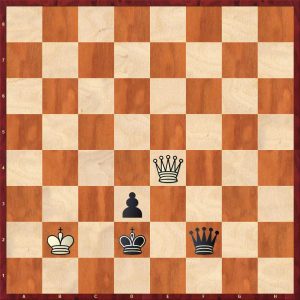
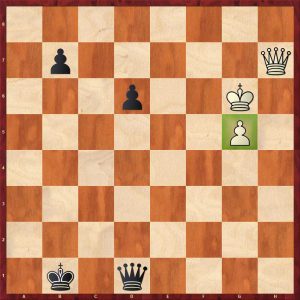
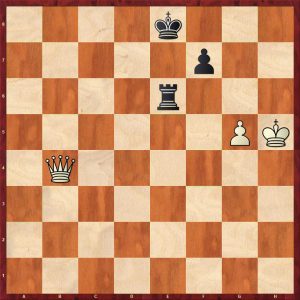
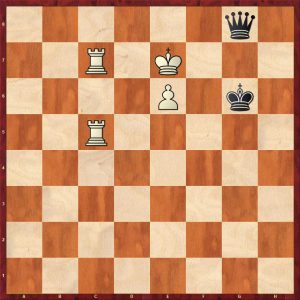
This a typical position from this ending, white has pushed the pawn to the seventh rank with his king hiding in the corner in front of the pawn. This is a tablebase draw but this has been known for many decades before the advent of tablebases.

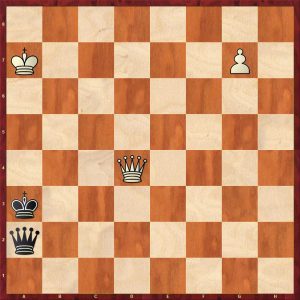
73…Kd3?? loses, a bad mistake from a 2700 GM. 73…Kb3! draws but accuracy is still required. 74.Qf7+ (74.Kg8 Qe8+ 75. Qf8 Qg6+ 76.Kh8 Kc2=) 74…Kb2

Carlsen-Gashimov Monaco 2011 Variation 1 Move 75 White to play

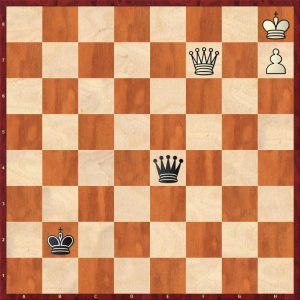
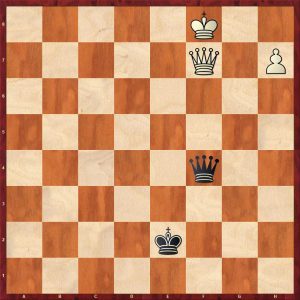
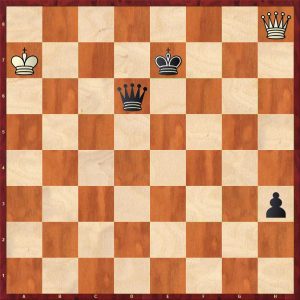
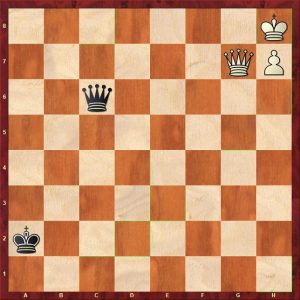
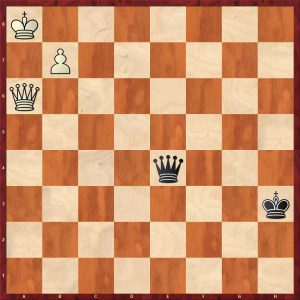
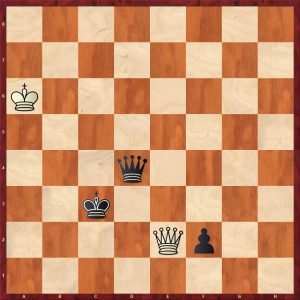
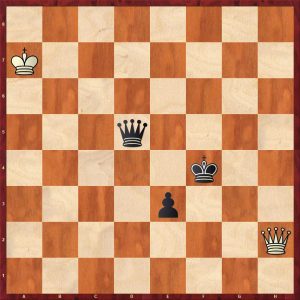
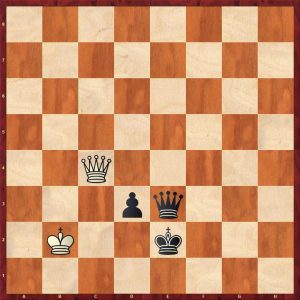
This is the type of position that Black is aiming for. The authors explain why it is drawn with a pithy comment: “and White can’t win as the king must move too far from the pawn to move into a countercheck position.” For example: 75.Kg7 Qg4+ 76.Qg6 Qd7+ 77.Kh6 Qd2+ 78.Qg5 Qd6+ 79.Kh5

Carlsen-Gashimov Monaco 2011 Variation 1 Move 79 Black to play

Another excellent explanation from the authors: “White’s king wants to go to h1 or h2 to make counterchecks possible, but the pieces are then too far apart” (and un-coordinated) e.g. 79…Qd1+ 80.Qg4 Qh1+ 81.Kg6 Qc6+ 82.Kg5 Qd5+ 83.Qf5 Qg2+ 84.Kh4

Carlsen-Gashimov Monaco 2011 Variation 1 Move 84 Black to play

84…Qh2+ 85.Qh3 Qf4+ 86.Kh5 Qe5+ 87.Kg6 Qd6+ 88.Kf7 Qf4+ drawn

Carlsen-Gashimov Monaco 2011 Variation 1 Move 89 White to play

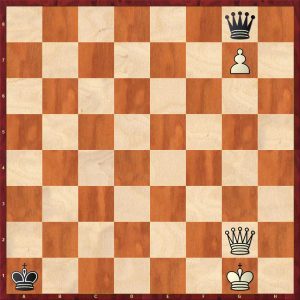
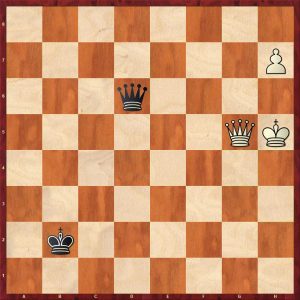
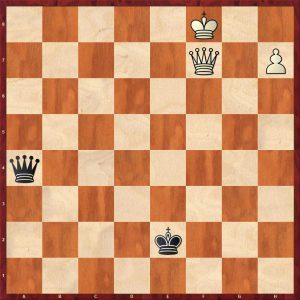
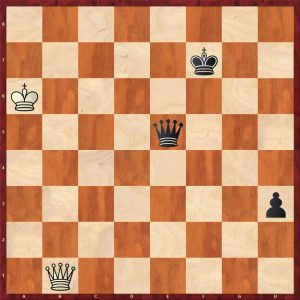
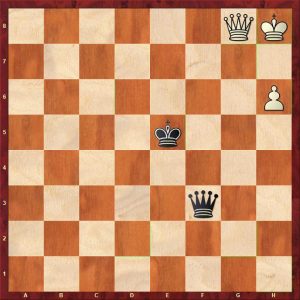
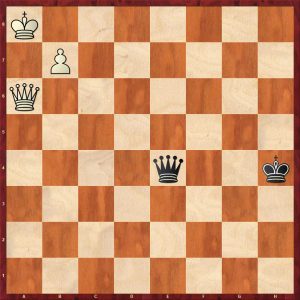
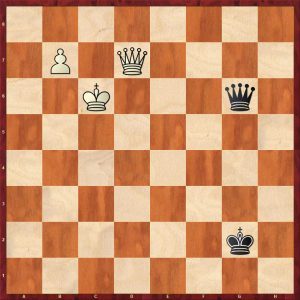
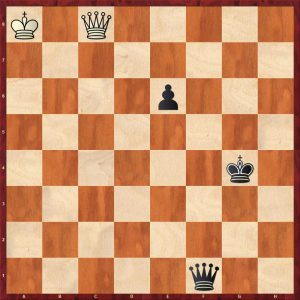
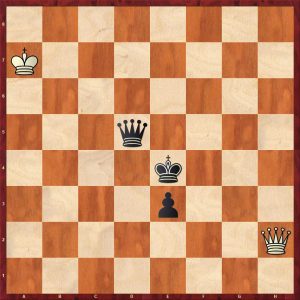
Black to the game after 73…Kd3??

Carlsen-Gashimov Monaco 2011 Move 74 White to play

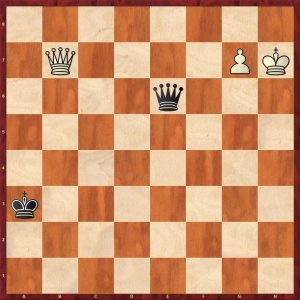
74.Qd7+ Ke2?! (74…Kc2 lasts longer but does not save the game anymore: buy the book to find out how White wins) 75.Kg8 White is going to shuffle his king along to the adjacent file to Black’s king to setup a crosscheck: 75…Qg6+ 76.Kf8 Qh6+ 77.Qg7 Qf4+ 78.Qf7

Carlsen-Gashimov Move 78 Black to play

78…Qh6+ Notice how Black’s choice of checks are severely restricted because of his king’s placement 79.Ke7 Qh4+ 80.Ke8 Qa4+ 81.Kf8! Now we can see again why Black’s king is badly placed: Black has no good checks.

Carlsen-Gashimov Monaco 2011 Move 81 Black to play

81…Qd4 82.Qh5+ Kf2 83.h8Q Qd6+ 84.Kf7 Qd7+ 85.Kg6 1-0

A very important ending to study and learn from a World Champion.

Muller & Konoval give an example of good defence with the king in the drawing zone where the defending side does not let the draw slip at any point:

Markowski-Piket Istanbul 2000 Move 57 White to play
Markowski – Piket Istanbul 2000 Move 57 White to play

Piket played 57.Qe8+ and drew: buy the book to see the excellent defensive effort.

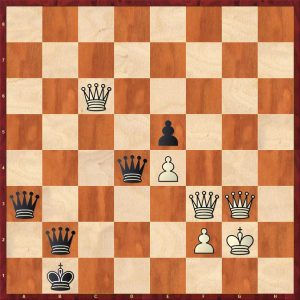
Here is an old game where modern tablebases really show how difficult these endgames are:

Ed. Lasker-Marshall USA 1923 Move 80 White to play

White played 80.Qc1? The amazing 80.Qh1!! is the only move to draw, for example 80…Qd7 81.Qf3+ Ke8 82.Qa8+ Ke7 83.Qh8! Qd6+ 84.Ka7!

Ed. Lasker-Marshall USA 1923 Variation 1 Move 84 Black to play

Drawing, a beautiful geometric display of the queen’s power with the white queen moving around all the corners in a few moves. 80…Qe5! 81. Qb1

Ed. Lasker-Marshall USA 1923 Move 81 Black to play

81…Qf6+? (A mistake improving White’s king for free particularly as White’s checks are restricted because of potential cross checks, the natural 81…h2! wins, e.g.: 82.Qb7+ Kf6 83.Qf3+ Ke7 84.Qb7+ Kd8 85.Qa8+ Kd7 86.Qb7+? Qc7 and white has no good check, so he loses) 82.Ka7!  and white drew with excellent defence 82…Kg7 83.Qg1+ Kh7 84.Qe3 Qa1+ 85.Kb8 Qb2+ 86.Ka7 Qg2 87.Qd3+ 87…Kh8 Although White’s king is in the drawing zone, Black’s king is on a neighbouring rank making counterchecks possible, so white played 88.Ka6! (88.Qe3 also draws)

Ed. Lasker-Marshall USA 1923 Move 88 White to play

88…h2 89.Qd8+ Kh7 90.Qc7+! Staying on the h2-pawn so Black cannot interpose the queen, and White drew 14 moves later by repetition.

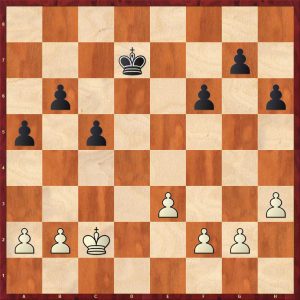
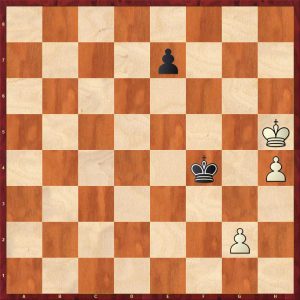
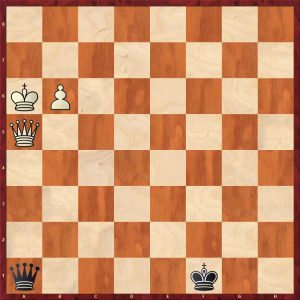
If the defending king can get in front or very near the pawn, it should do so:

Bakutin-Novitzkij Tula 2000 Move 63 White to play
Bakutin – Novitzkij Tula 2000 Move 63 White to play

63.Kd3! h5 64.Ke2! now the draw is easy as white does not fear a queen exchange.

Sometimes the defending king has to keep both options open: here is a brilliant example:

Dominguez Perez - Nakamura Thessaloniki 2013 Move 60 Black to move
Dominguez Perez – Nakamura Thessaloniki 2013 Move 60 Black to move

Black looks to be in trouble as his king is a long way from the drawing zone and will interfere with his queen. However Nakamura found 60…Ke5!! 61.Kg7 Qc6! Keeping Black’s options open 62.h6

After 62.Qg6 Qb7+ 63.Kh8 Qa8+ 64.Qg8 Qc6 65.Qg5+ Black changes plans and runs to the drawing zone as White’s king is badly placed in front of the pawn, he just has time to do this 65…Kd4!! 66.Qg7+ Kc4 67.h6 Kb3 68.h7 Ka2=

Dominguez Perez - Nakamura Thessaloniki 2013 Variation Move 69 White to move
Dominguez Perez – Nakamura Thessaloniki 2013 Variation Move 69 White to move

62… Qg2+ 63.Qg6 Qb7+ 64.Qf7 Qg2+ 65.Kh8 Qa8+ 66.Qg8 Qf3

Dominguez Perez - Nakamura Thessaloniki 2013 Move 67 White to move
Dominguez Perez – Nakamura Thessaloniki 2013 Move 67 White to move

67.Qg6 (67.h7 Qh5 68.Qg7+ Ke6! draws as Black’s king cramps White’s pieces.) 67…Qf8+ 68.Kh7 Qf3 69.Qg7+ Ke6 70.Kg8  Qh5 71.h7 Qe8+ 72.Qf8 Qg6+ 73.Kh8 Qf7 drawn

Knight Pawn – “With a knight pawn, play is similar to a rook pawn, but the winning chances are better as the pawn provides  better shelter. There is still a drawing zone in the far corner.”

The play is complex and there are many subtleties with slight differences being crucial as we shall see below.

Here is a superb example of drawing technique from Negi-Postny Helsingor 2009:

Negi-Postny Helsingor 2009 Move 63 Black to move

Where does Black put his king? 63…Kf1! (63…Kd2? loses in 91 moves as the king is cut off from the drawing zone!) 64.b5 Qc7+ 65.Kd5 Qb7+ 66.Qc6 Qf7+ 67.Kd6 Qf4+ 68.Kd7 Qf7+ 69.Kc8 Qf8+ 70.Kb7 Qe7+ 71.Qc7 Qe4+ 72.Ka6 Qa4+ 73.Qa5 Qc4 74.Qa1+ Kg2

Negi-Postny Helsingor 2009 Move 75 White to move

Black’s king has reached the drawing zone. It is still very easy to go wrong.

75.Qb2+ Kh1 76.Qh8+ Kg1 77.Qg7+ Kh1 78.Qb7+ Kh2 79.Qc6 Qa2+ 80.Kb7 Kg1 81.Qc1+ Kf2 82.Qc5+ Kf1 83.b6  Postny comments :The pawn has reached the 6th rank already, although it is still a draw theoretically. For the defensive side it’s very easy to go astray, but, somehow I managed to give the right checks. 83…Qg2+ 84.Ka6 Qa8+ 85.Kb5 A crucial position, Black’s king is temporarily out of the drawing zone and cannot go back immediately.

Negi-Postny Helsingor 2009 Move 85 Black to move

85…Qe8+!  The only move to draw 86.Ka5 Qe1+ 87.Ka6 Qa1+ 88.Qa5

Negi-Postny Helsingor 2009 Move 88 Black to move

88…Qf6! 89.Qb5+ Kg1 90.Qc5+ Kh1 91.Ka7 Qa1+ 92.Kb7 Qg7+ 93.Qc7 Qf8 94.Qd7 Qf2 95.Qd5+ Kg1 96.Qg5+ Kh1 97.Kc6 Qc2+ 98.Kd6 Qh2+ 99.Qe5 Qh6+ 100.Kc5 Qc1+ 101.Kd5 Qd2+ 102.Qd4 Qg5+ 103.Kc4 Qc1+ 104.Qc3 Qf1+ 105.Kb4 Qb1+ 106.Qb3 Qe1+ 107.Kb5 Qe5+ 108.Ka6 Qa1+ 109.Kb7 Qg7+ 110.Kc6 Qf6+ 111.Kc5 Qe7+ 112.Kd4 Qf6+ 113.Kd3 Qf5+ 114.Kc3 Qe5+ 115.Kb4 Qe1+ 116.Qc3 Qb1+ 117.Ka5 Qa2+ 118.Kb5 Qd5+ 119.Qc5 Qd3+ 120.Kc6 Qg6+ 121.Kb7 Qf7+ 122.Ka6 Qa2+ 123.Qa5 Qe2+ 124.Ka7 Qf2 125.Qd5+ Kg1 126.Kb7 Qf8 127.Qd4+ Kh1 128.Qe4+ Kg1 129.Qe3+

Negi-Postny Helsingor 2009 Move 129 Black to move

Postny comments again: For a moment I thought that I was losing. The queen covered the a3 square, and Kb7-a7 followed by the pawn advance just one move before the fifty move rule seems inevitable. But… 129…Kh1! 130.Ka7 Qf2!! This stalemate trick saves the game. 131.Qe4+ Kg1 132.Kb7 Qf7+ 133.Kc6 Draw due to the fifty move rule. ½-½

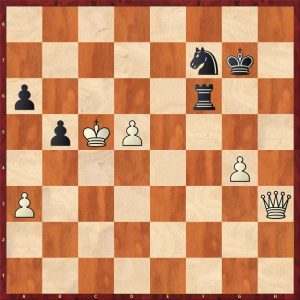
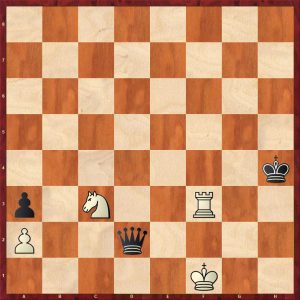
The next example shows how difficult this ending really is:

Oddone - Espinoza Asuncion 2009 Move 77 Black to play
Oddone – Espinoza Asuncion 2009 Move 77 Black to play

Black’s king is not yet in the drawing zone. Black played the obvious check 77…Qe7+? which loses 77…Qe3! (77..Qc5? loses to 78.Qd3!) does draw, e.g. 78.Ka8 Kh3 79.b7 Qe4 80.Ka7 Qd4+ 81.Qb6 Qa1+ 82.Qa6 Qd4+ 83.Ka8 Qe4

Oddone - Espinoza Asuncion 2009 Variation Move 84 White to play
Oddone – Espinoza Asuncion 2009 Variation Move 84 White to play

This is drawn despite Black’s king not being in the drawing zone but it is close enough! 84.Qa2!? cutting the Black king off from the drawing zone (by analogy with the line below) does not win here.

Back to the game 78.b7 Qe3+ 79.Ka8 Qe4

Oddone - Espinoza Asuncion 2009 Move 80 White to play
Oddone – Espinoza Asuncion 2009 Move 80 White to play

80.Qb5? 80.Qa3!! cutting the king off from the drawing zone wins, followed by moving White’s king down to the same rank as Black’s king which is similar to the line below 80…Qf3? (80…Kg3! draws) 81.Qb4+ Kh3 82.Qc5?! Qe4

Oddone - Espinoza Asuncion 2009 Move 83 White to play
Oddone – Espinoza Asuncion 2009 Move 83 White to play

83.Qc3+? Sloppy, improving Black’s king for free and the queen is much better placed on c5; it was time to move the White king down to the rank that Black’s king is on: 83.Ka7! wins, e.g. 83…Qa4+ 84.Kb6 Qb3+ 85.Ka6 Qa4+ 86.Qa5 Qc4+ 87.Qb5 Qe6+ 88.Ka5 Qa2+ 89.Kb6 Qf2+ 90.Qc5 Qb2+ 91.Ka6 Qe2+ 92.Ka5 Qa2+ 93.Kb5 Qe2+ 94.Qc4 Qb2+ 95.Qb4 Qe5+ 96.Ka4 Qe8+ 97.Ka3

Oddone - Espinoza Asuncion 2009 Variation 1 Move 97 Black to play
Oddone – Espinoza Asuncion 2009 Variation 1 Move 97 Black to play

97…Qb8 98.Kb3 Kh2 99.Kb2 Qe5+ 100.Kb1 Qf5+ 101.Ka1 wins

Oddone - Espinoza Asuncion 2009 Variation 1 Move 102 Black to play
Oddone – Espinoza Asuncion 2009 Variation 1 Move 102 Black to play

Very instructive. This is a typical winning manoeuvre in queen and pawn vs queen.

Back to the game after 83.Qc3+? Kg2

Oddone - Espinoza Asuncion 2009 Move 84 White to play
Oddone – Espinoza Asuncion 2009 Move 84 White to play

84.Ka7 Qe7 85.Kb6 Qd8+ 86.Qc7 Qd4+ 87.Qc5 Qb2+ 88.Kc7 Qg7+ 89.Kc6

Oddone - Espinoza Asuncion 2009 Move 89 Black to play
Oddone – Espinoza Asuncion 2009 Move 89 Black to play

A key position and a common problem for the defending side, which check should I make? Black choose the wrong check and lost. 89…Qg6+? The authors offer some general advice here: “As Black’s king is on a light square, it was better to operate on dark squares”: 89…Qf6+! Drawing 90.Qd6 Qc3+ 91.Kd7 Qg7+ 92.Qe7 Qd4+ 93.Ke8 White is trying to bring his king across to the same file as Black’s king.  Qh8+ 94.Qf8 Qe5+

Oddone - Espinoza Asuncion 2009 Variation 2 Move 95 White to play
Oddone – Espinoza Asuncion 2009 Variation 2 Move 95 White to play

95.Kf7 loses the pawn to a fork 95…Qd5+ drawing instantly

Back to the game, after 89…Qg6+? 90.Qd6 Qe8+?!

Oddone - Espinoza Asuncion 2009 Move 91 White to play
Oddone – Espinoza Asuncion 2009 Move 91 White to play

91.Qd7?! (91. Kb6! Qe3+ 92. Kc7 Qa7 Kc8 wins quickly, now we see why Black’s queen should operate on the dark squares) 91…Qg6+

Oddone - Espinoza Asuncion 2009 Move 92 White to play
Oddone – Espinoza Asuncion 2009 Move 92 White to play

92. Kd5? White could have centralised the queen and effected a memorable manoeuvre to win 92.Qd6! Qc2+ 93.Kd7 Qh7+ 94.Qe7 Qd3+ 95.Ke8 Qg6+ 96. Kf8 Qf5+ 97.Kg8 Qd5+ 98.Kh8 Qh5+ 99.Qh7 winning

Oddone - Espinoza Asuncion 2009 Variation 3 Move 99 Black to play
Oddone – Espinoza Asuncion 2009 Variation 3 Move 99 Black to play

Notice that this winning motif is effectively the same idea as the king manoeuvre down the a-file and b-files rotated ninety degrees!

In the game: 92…Qd3+ 93.Ke6 Qg6+ 94.Ke5 Qg5+ 95.Ke4 Qg6+! 96.Ke5 Qg5+ 97.Kd6

Oddone - Espinoza Asuncion 2009 Move 97 Black to play
Oddone – Espinoza Asuncion 2009 Move 97 Black to play

97…Qf6+? The final mistake allowing White to improve his queen. 97…Qf4+ 98.Kc6 Qa4+ 99.Kc7 Qa5+ 100.Kc8 Qc5+ draws 98.Qe6! 98…Qd8+?! 99.Kc6 Qh8 100.Qa2+ Kf1 101.Qb1+ and queens the pawn, White won 4 moves later.

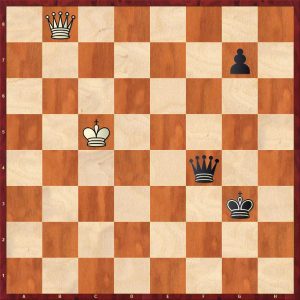
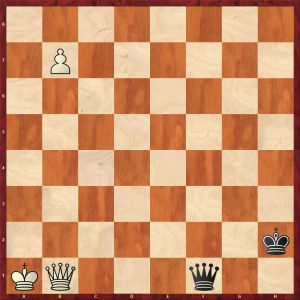
Here is a pretty study showing  a neat idea:

Van Vliet 1888
Van Vliet 1888

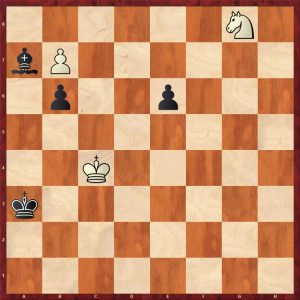
How does White break the pin to get his pawn home?

1.Qb4! mutual zugzwang 1…Qh1 (1…Qd5 2.Qa4+ Kb6 3.Qb3+ Qxb3 4.b8Q+ wins; 1…Qf3 2.Qa4+ Kb6 3.Qb3+ wins; 1…Qg2 2.Qa3+Kb5 3.Qb2+ wins) 2.Qa3+ Kb6 3.Qb2+ Ka6 4.Qa2+ Kb5 5.Qb1+ Qxb1 6.b8Q+ skewering the queen

Amazingly this idea occurred in a game and White  missed the neat win, but won anyway.
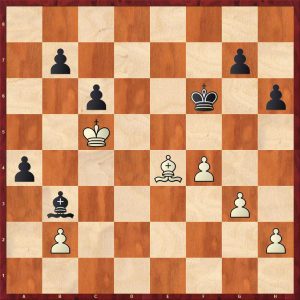
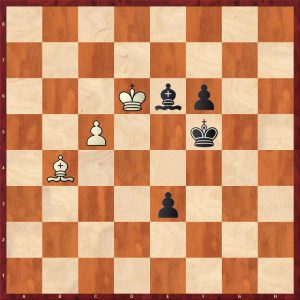
Bishop Pawn

This is completely different. If the defending king can’t get in front of the pawn or at least very near the pawn, the attacker usually wins as there is no drawing zone in the far corner. This is best pawn for the superior side.

Matamoros Franco - Bologan 2005 Move 65 White to play
Matamoros Franco – Bologan 2005 Move 65 White to play

White played 65.Qe5+? (A bad mistake from a 2500 player, 65.Qc3+ draws as Black’s queen is poorly placed.) 65…Qe4! Black gives up his h-pawn to centralise his queen and get his f-pawn going 66.Qxh5 f5 White has restored material equality but is now lost as the centralised Black queen is dominant and the f-pawn is much more dangerous than White’s a-pawn. 67.Qh3+ Kd2 68.Qh2+ Kc3 69.Kb5 f4 70.Qh8+ Kb3 71.Qf8 f3 72.Qf7+ Kxa3 Black has eliminated the a-pawn which wasn’t strictly necessary. The win is simple from here as Black’s queen is so well placed.

Matamoros Franco - Bologan 2005 Move 73 White to play
Matamoros Franco – Bologan 2005 Move 73 White to play

73.Qf8+ Kb2 74.Qf6+ Kc2 75.Ka6?! Accelerating the loss. When the kings are close to each other on files or ranks, the stronger side should always be on the look out for a sequence to exchange queens.

Matamoros Franco - Bologan 2005 Move 75 Black to play
Matamoros Franco – Bologan 2005 Move 75 Black to play

75…Qd5?! (Black could have exchanged queens with 75…Qd3+! 76.Kb7 Qb3+ 77.Ka8 Qa3+ 78.Kb7 Qb2+) 76,Qf4 Kd3 77.Qg3 Qc4+ 78.Ka7 Qc5+ 79.Ka8 Qd5+ 80.Ka7 Ke2 81.Qg4 Kd3 82.Qg3

Matamoros Franco - Bologan 2005 Move 82 Black to play
Matamoros Franco – Bologan 2005 Move 82 Black to play

82…Qd4+! 83.Ka6 Ke2 84.Qh3 f2 85.Qh5+ Ke1 86.Qa5+ Kd1 87.Qh5+ Kc2 88.Qe2+ Kc3

Matamoros Franco - Bologan 2005 Move 89 White to play
Matamoros Franco – Bologan 2005 Move 89 White to play

89.Kb7 Qg7+ 0-1 in view of 90.Kb8 Qf8+ 91.Kb7 Qf7+ 92.Kb6 f1Q

A central pawn

This is similar to the bishop’s pawn, but the winning chances are slightly less. There is no drawing zone for the defending king in the far corner:

Miladinovic - Graf Ohrid 2001 Move 68 Black to move
Miladinovic – Graf Ohrid 2001 Move 68 Black to move

There is no chance for a draw here with the central pawn as Black cannot be prevented from advancing the pawn to the queening square: it just requires patience, care and a lot of moves.

Black played 68…Qa1+ (the natural 68…Qf5 unpinning the pawn is better.)

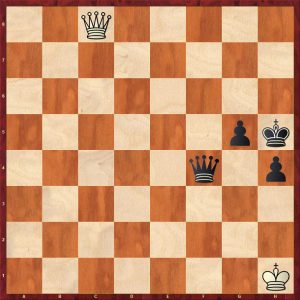
Black played well, not letting the win slip at any point until this position at move 110:

Miladinovic - Graf Ohrid 2001 Move 110 Black to move
Miladinovic – Graf Ohrid 2001 Move 110 Black to move

Black played 110…Kf4?? which throws the win away as white has a brilliant draw utilising the fact that the pawn is unprotected by the queen and the star cross perpetual check. Better was 110…Qb3 protecting the pawn and preparing cover for the king on the queenside viz.: 111.Qh2+ Ke4 112.Qg2+ Kd3 113.Qg6+ Kd2 114.Qg5 Qc4 115.Ka8 Qd4 116.Kb7 Kc3 117.Qg3 Qd3 winning

Miladinovic - Graf Ohrid 2001 Move 118 White to move
Miladinovic – Graf Ohrid 2001 Variation 1 Move 118 White to move

The reviewer makes this observation:

Notice how Black’s king has migrated over to the file adjacent to White’s king ready to setup cross checks in a few moves. This cannot be prevented wherever White’s king is on the board with two exceptions:

  • The weaker side can draw if the defending king gets in front of the pawn
  • or reaches a small drawing zone on the short side of the pawn.

The only other drawing mechanism is to setup the star cross perpetual check or a variant of it which is shown below.

111.Qh2+! Reaching a very important position as White can draw

Miladinovic - Graf Ohrid 2001 Move 111 Black to move
Miladinovic – Graf Ohrid 2001 Move 111 Black to move

111…Kg4 112.Qg1+Kf4 113.Qh2+ Ke4

Miladinovic - Graf Ohrid 2001 Move 114 White to move
Miladinovic – Graf Ohrid 2001 Move 114 White to move

114.Qg2+??  [114.Qh1+!! Kd4 115.Qa1+  Kd3 116.Qd1+ Ke4 117.Qh1+ Ke5 118.Qh5+ Kf5 (118…Kd6 or Ke6 loses the pawn to 119.Qh6+) 119.Qh5+ drawing] 114…Kd4 115.Qb2+ Kd3 Black breaks the perpetual sequence and wins as White’s queen has lost her checking distance

Miladinovic - Graf Ohrid 2001 Move 116 White to move
Miladinovic – Graf Ohrid 2001 Move 116 White to move

116.Qb1+ Ke2 117.Qc2+ Kf3 118.Qc3 Kf2 (quicker is 118…Qd6) 119.Qf6+ Qf3 120.Qd4 Qf5 121.Qh4+ Kf3 122.Qh1+ Ke2 123.Qh2+ Qf2 124.Qh5+ Qf3

Miladinovic - Graf Ohrid 2001 Move 125 White to move
Miladinovic – Graf Ohrid 2001 Move 125 White to move

125.Qh2+? (Centralising with 125.Qe5 was a tougher defence) 125…Kf1 126.Qc2 e2 127.Qc4 Kg2 128.Qg8+ Qg3 129.Qd5+Kg1

Miladinovic - Graf Ohrid 2001 End
Miladinovic – Graf Ohrid 2001 End

Exploiting White king position 0-1

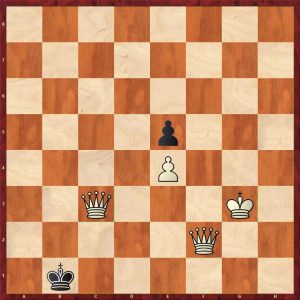
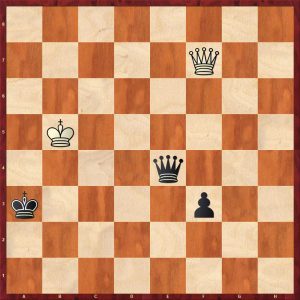
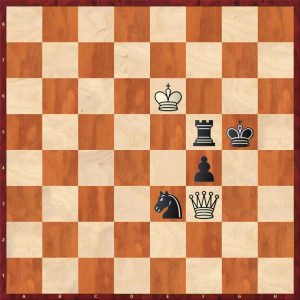
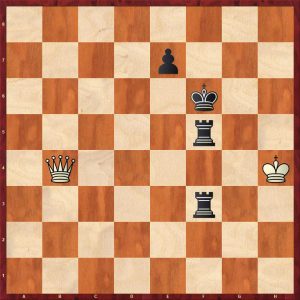
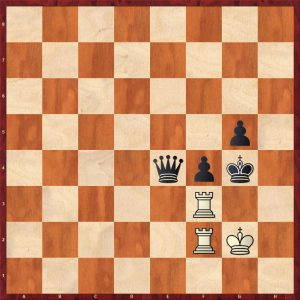
The central pawn does have a small drawing zone for the defending side which is on the short side of the pawn:

Karjakin - Mamedyarov Beijing 2013 Move 91 White to move
Karjakin – Mamedyarov Beijing 2013 Move 91 White to move

This is a theoretical draw as White’s king restricts Black’s king manoeuvres, but White must defend perfectly:

91.Kb3? losing as White’s king can be kicked out of the drawing zone. 91,Qc4 holds for example 91…Qb6+ 92.Ka2 Qa5+ 93.Kb2 Qe5+ 94.Kb1 Qa1+ 95.Kb2 Qe3 96.Qc1+ Ke2 97.Qc4=

Karjakin - Mamedyarov Beijing 2013 Variation Move 97 Black to move
Karjakin – Mamedyarov Beijing 2013 Variation Move 97 Black to move

White’s king covers the queenside and the White queen can hassle Black on the kingside. If Black’s king strays too far on the kingside, Black cannot block a queen check as White will simply exchange queens drawing owing to the proximity of his king to the pawn.

The game continued 91…Qb6+ 92.Kc4 Qa6+  (92…Qc7+ is better 93.Kb3 Qc3+ 94.Ka2 Qa5+ 95.Kb2 Qb5+ 96.Ka3 Kc3 wins) 93.Kb3?! Qb5+ 94.Ka2 Kc3 95.Qe1+ Kc2 0-1 (96.Qf2 d2)

The book covers numerous positions with more pawns.

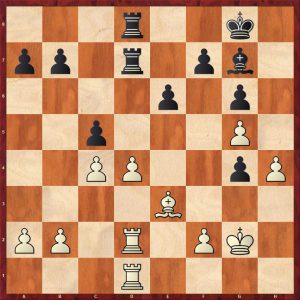
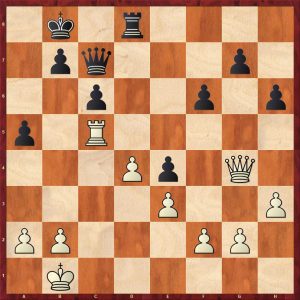
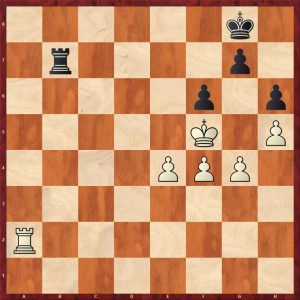
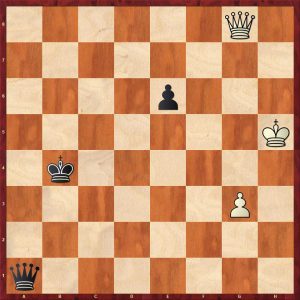
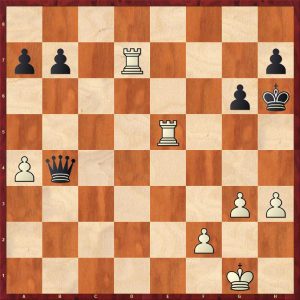
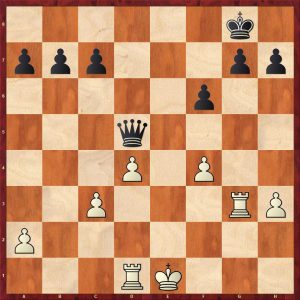
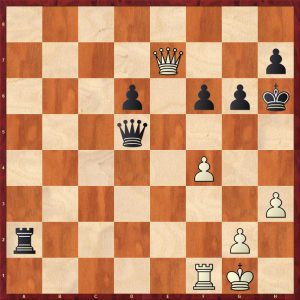
Here is a celebrated game Kasparov v The World Internet 1999.

Kasparov - The World Internet 1999 Move 51 Black to play
Kasparov – The World Internet 1999 Move 51 Black to play

Although Black is a pawn up, White is playing for the win as his g-pawn is the most advanced pawn. The seven piece tablebase confirms this position is a draw but Black is on the edge of losing and most defend perfectly. The game continued 51…b5?! (51,,,Ka1! holds) 52.Kf6+ Kb2? (The final mistake 52…Ka1 was necessary) 53.Qh2+ Ka1 54.Qf4! b4 55.Qxb4 Black is lost as the d-pawn is a hindrance as it obstructs Black’s queen and offers cover to White’s king. Without the d-pawn the position is drawn as show earlier in this review.

Kasparov - The World Internet 1999 Move 54 Black to play
Kasparov – The World Internet 1999 Move 54 Black to play

The ROW did not last much longer and resigned on move 62.

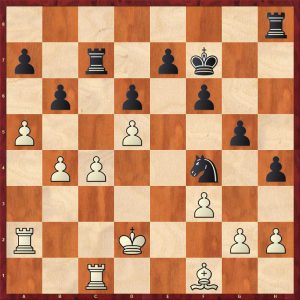
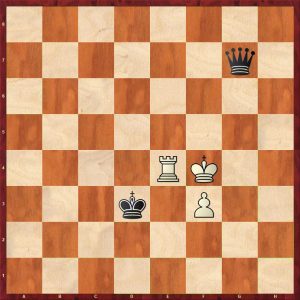
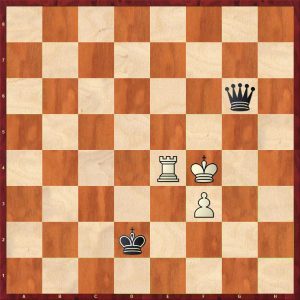
Chapter 3 Queen v Rook

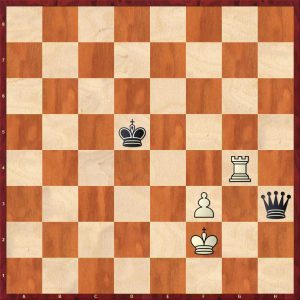
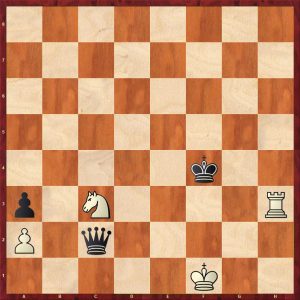
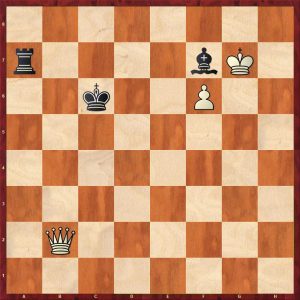
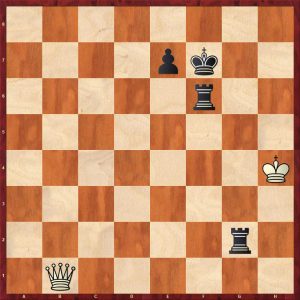
The basic Queen v Rook endgame is covered sufficiently. The authors show how to break the third rank defence:

Queen v Rook Third Rank Defence

The authors observe: “The third rank defence is very difficult to break down if you do not know how, because it requires at least one counter-intuitive move to achieve that. John Nunn suggests the following method:”

1.Qf4! (1.Qg7 does not make progress because of 1…Ke8 2.Qc7 Rh6 3.Ke5 Rg6 and the starting position has been mirrored) 1…Kd7 2.Qa4+! Kc7 3.Qa7+ Forcing Black into the third rank defence 3…Rb7 4.Qc5+ Kb8 5.Kd6 Rg7 6.Qb4+ Rb7 7.Qe4 Rb6+ 8.Kc5 Ka7 9.Qd4 Rb7 10.Kc6+ Ka8 11.Qd5 Kb8 12.Qa5 and Philidor’s position is reached.

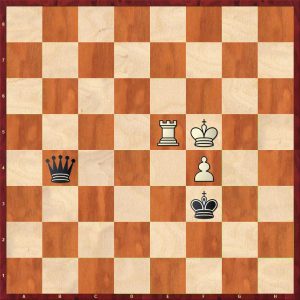
The book covers a multitude of Queen vs Rook + Pawn(s) positions where there are many fortresses  worth knowing and even in the situations where the queen wins, many wins are quite long and complicated. Here is an example of a simple draw.

Queen v Rook+P Fortress

Here White can simply move his rook back and forth between two safe squares e3 & g3.

An additional pawn for Black on g4  makes no difference viz:

Queen v Rook+P Fortress 2

This is clearly drawn as well. However, make a subtle change to the position and place White’s king on e2, then the queen wins:

Agopov - Norri Finland 2012 Move 89 White to move
Agopov – Norri Finland 2012 Move 89 White to move

White played the incomprehensible 89.g6? allowing the simple 89…Rxg6 drawing 89.Qh1! wins as follows: 89…Rg6 90.Qa8 Re6 91.Qa3+ Ke8 92.Kg4 Rg6 93.Kh5 Re6 94.Qb4 zugzwang

Agopov - Norri Finland 2012 Move 94 Black to move
Agopov – Norri Finland 2012 Move 94 Black to move

Black has no good move. One key point is 94…Rg6 95.Qe4+ Kf8 (95…Re6 96.Qxe6 fxe6 97.Kh6 winning) 96.Qxg6 winning

With a further advanced bishop’s pawn, it is no longer a fortress as the attacking king can encircle the weaker side’s position:

Queen v Rook + Pawn Breaking the Fortress

The winning process falls into three phases and zugzwang is the main weapon to achieve these steps:

  1. First the king has to cross the e-file

1.Kf2 Qc7 2.Kg2 Qc2+ 3.Kg1 (3.Kg3 Qd2 4.Rg4 Ke5 5.Re4+ Kd5 and the first phase is complete) 3…Qd2 4.Kf1 Qh2 5.Re2Qg3 6.Rg2 Qh3 7.Kf2 Ke5 8.Rg4 Kd5

Queen v Rook + Pawn Breaking the Fortress Move 9 White to move

2. Next the Black king crosses the fourth rank:

9.Ke2 Qh6 10.Kf2 Qd2+ 11.Kf1 Qe3 12.Kg2 Qe2+ 13.Kg3 Qf1! 14.Re4 Qg1+ 15.Kf4 Qf2! 16.Kg4 Qg2+ 17.Kf4 Qg1!

Queen v Rook + Pawn Breaking the Fortress Move 18 White to move

White is in zugzwang again and most give way. There are two main defences 18.Re5+ and 18.Ra4.

After 18.Re5+ Kd4 19.Re4+ Kd3 The king’s next target is f2 to gobble the pawn 20.Re8 Qd4+ 21.Re4 Qg7!

Queen v Rook + Pawn Breaking the Fortress Move 22 White to move

22.Re3+ Kd3 23.Re4 Qg6!

Queen v Rook + Pawn Breaking the Fortress Move 24 White to move

Next the final phase: Black’s king crosses the e-file to win the pawn.

24.Re5 Qf6+ 25.Rf5 Qd4+ 26.Kg5 Qg7+ 27.Kf4 Ke2 28.Ke4 Kf2 29.f4 Qe7+ 30.Re5 Qb4+ 31.Kf5 Kf3 and the pawn falls

Queen v Rook + Pawn Breaking the Fortress Move 32 White to move

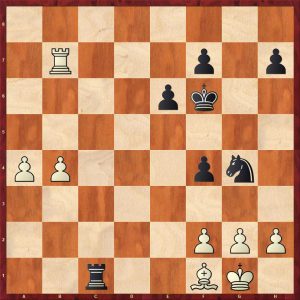
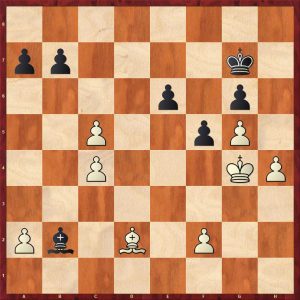
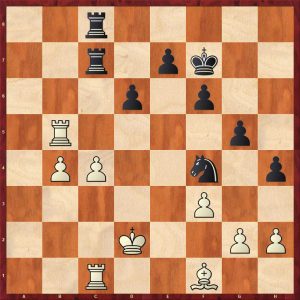
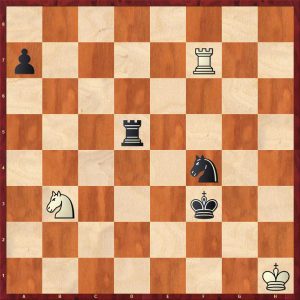
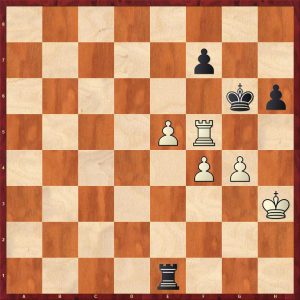
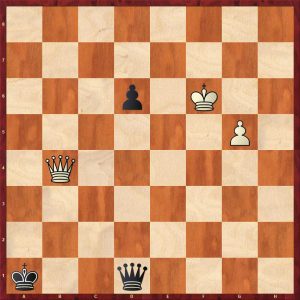
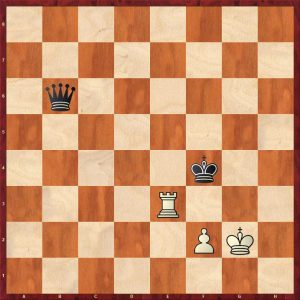
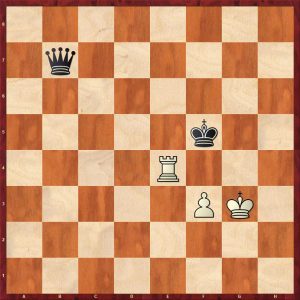
After 18.Ra4, they are two winning methods, Magnus Carlsen shows one of them here in a position with reversed colours:

Carlsen - Matlakov Move 64 White to play
Carlsen – Matlakov Move 64 White to play

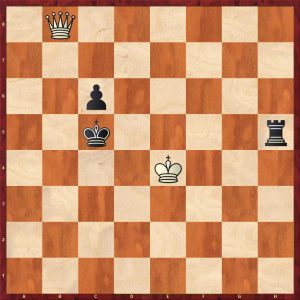
White can win with 64.Kd3 which is quickest according to the tablebase but Carlsen’s method is just as good:

64.Kf4! Rd5 65.Kg4 zugzwang 65…Kc4  (65…Rd4+ 66.Kf5) 66.Qb6! Rd4+ (66…c5?! 67.Qe6 Kd4 Kf4 wins) 67.Kf5 c5 68.Qa5 Rd5+ 69.Ke6 

Carlsen - Matlakov Move 69 Black to play
Carlsen – Matlakov Move 69 Black to play

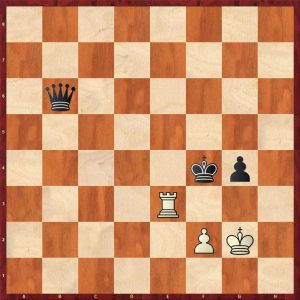
69…Rd4 70.Qa4+ Kc3 71.Qa3+ Kc4 72.Qa5 Rd3 73.Qa4+ Kc3 74.Qa3+ Kc4 75.Qc1+ Kb4 76.Qb2+ Kc4 77.Qc2+

Carlsen - Matlakov Move 77 Black to play
Carlsen – Matlakov Move 77 Black to play

77…Kd4 [77…Rc3 78.Qe4+ Kb3 79.Qb1+! (79.Kd6?? Kb2=) Kc4 80.Kd6 wins] 78.Kd6 c4 79.Qf2+ Re3 80.Qd2+ 1-0

Carlsen - Matlakov Move 80 Black to play
Carlsen – Matlakov Move 80 Black to play

because 80…Rd3 (80…Ke4 81.Qd5+ wins) 81.Qf4+ Kc3+ 82.Kc5 wins

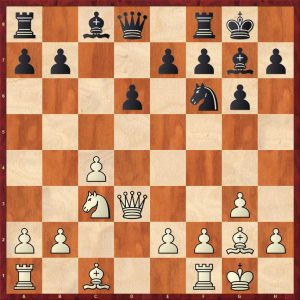
Chapter 4 Queen versus Rook and Knight

Fortresses are an important topic here.

Gelfand-Anand Moscow 2012 Move 37 Black to move

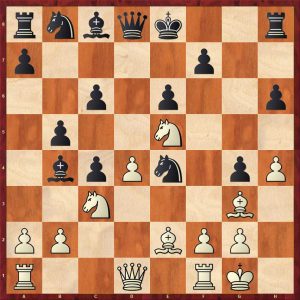
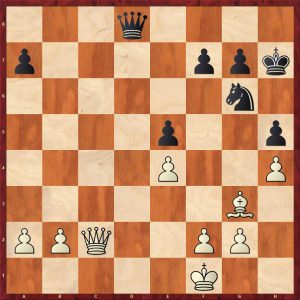
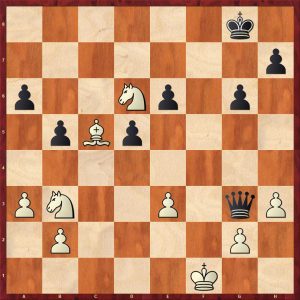
Here Black has a fortress. White’s obvious pawn lever is g4, so Black stops it with 37…h5! Can White exploit the g5 square? 38.Kh4 Kh6 39.Qb2 Kg6 40.Qc3 Ne4

Gelfand-Anand Moscow 2012 Move 41 White to move

41.Qc8 (41.Qf3 Nf6 42.Qg3+ Kh7 43.Qg5?? Ne4 44.Qxh5+ Kg7 45.g4 Rd8 46.gxf5 Rh8 wins for Black!) 41…Nf6 42.Qb8 R37 43.g4 hxg4 44.hxg4 fxg4 45.Qe5

Gelfand-Anand Moscow 2012 Move 45 Black to move

45…Ng8! 46.Qg5+ Kh7 47.Qxg4 f6 48.Qg2 Kh8 49.Qe4 Kg7 drawn

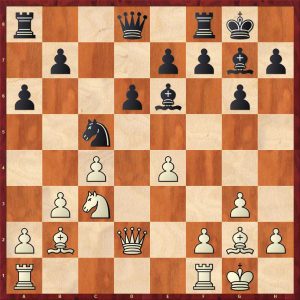
Techniques to destroy fortresses are examined:

Kasparov - Ivanchuk Frankfurt 1998 Move 69 White to move
Kasparov – Ivanchuk Frankfurt 1998 Move 69 White to move

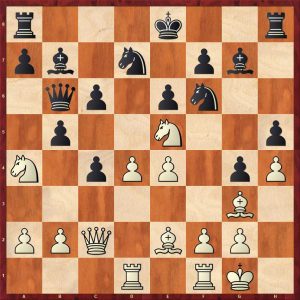
Here the rook and knight have a temporary blockade of two passed pawns. A pawn sacrifice disrupts the coordination of Black’s pieces: 69.g5!?  Nxg5?! (69…Rg6 is tougher) 70.Qg4? (A rare mistake from the former World Champion 70.Qg3! breaks the blockade 70…Rg6 71.Qe5+ Kf7 72.d6 wins; 70…Kh6 71.Qh4+ Kg6 72.d6 wins) 70…Rg6 71.Kb4 Nf7 72,Qd4+ drawn

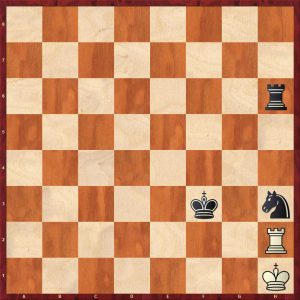
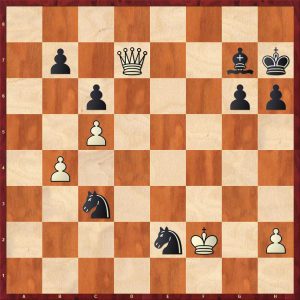
Here a blockade could have been broken by clever manoeuvring:

Brameyer - Pitzl Dresden 2010 Move 52 Black to play
Brameyer – Pitzl Dresden 2010 Move 52 Black to play

This looks desperate for white who looks to be close to zugzwang. Black continued 52…Kg4?  allowing White to escape

52…Qf5! 53,Kg2 Qg4+ 54.Kh2 Qg5 55.Rd3 Qg6 56.Ne2+ Ke4 57.Rh3 Qf6+ 58.Nc3+ Kd4 59.Ne2+ Kc4 60.Kg3 Qb2 61.Rh4+ Kc5 wins

Brameyer - Pitzl Dresden 2010 Variation Move 62 White to play
Brameyer – Pitzl Dresden 2010 Variation Move 62 White to play

53.Re3! Qd2 54.Rg3+! Kh4 55.Rf3 mutual zugzwang and white held on for a draw

Brameyer - Pitzl Dresden 2010 Move 55 Black to play
Brameyer – Pitzl Dresden 2010 Move 55 Black to play

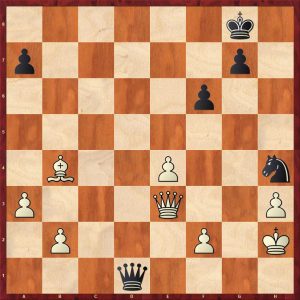
Queen vs Rook + Knight + Pawn

Beukema-Hausrath Dieren 2017 Move 110 White to move
Beukema – Hausrath Dieren 2017 Move 110 White to move

It is hard to believe that White can lose to here. White played 110.Qe2? which does lose and he lost quickly missing a draw when Black erred. (110.Qb7 holds along with 4 other moves) 110…Rf6+ does win for Black. Buy the book to find out how.

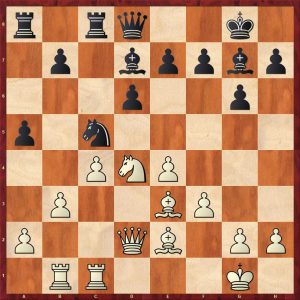
Chapter 5 Queen versus Rook and Bishop

Babula - Blatny Stare Mesto 1992 Move 69 Black to move
Babula – Blatny Stare Mesto 1992 Move 69 Black to move

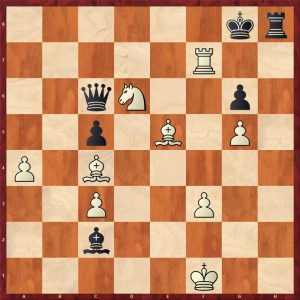
It is hard to believe that White can win this position as the f7 square is covered by both rook and bishop and all Black’s pieces are safe and coordinated.  White failed to win this game in practice; he tried for 16 moves and gave up. However, White can force the pawn through or win a piece in 43 moves. This is a good example where computer generation of tablebases has really enhanced the understanding of the endgame and found  sophisticated winning manoeuvres in positions like these. The key piece in this type of position is the attacker’s king.

Chapter 6 Queen vs Two Rooks

The authors summarise this material imbalance thus “The rooks are slightly superior materially speaking, but this does not make them favourites automatically. It is very important, if they can get static control and their king can hide. The queen on the other hand often wants to start dynamics to overload the rooks and destroy their coordination and harmony.”

The ending of two Rooks + P v Q is covered in some depth, the theory of which is completely new to the reviewer and probably new to the reader.

The most important factor is whether the attacking king can find hiding places. This often depends on where the defending king is. It has some similarities with queen and pawn vs queen endings:

Vovk - Savchenko Move 90 White to play
Vovk – Savchenko Move 90 White to play

With a rook’s pawn, generally if White’s king is away from the action (near the pawn), the game is drawn, but it is not so easy to give a main drawing zone which was possible in the queen and rook’s pawn or knight’s pawn versus queen case, but d7 seems to be a a good square but it does not always draw.

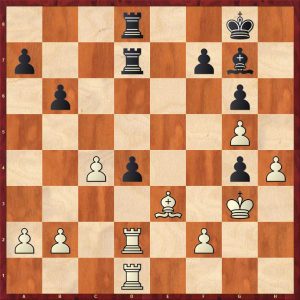
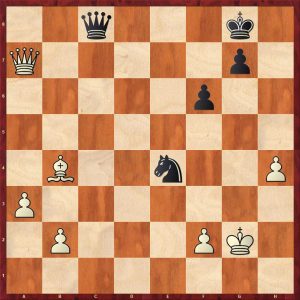
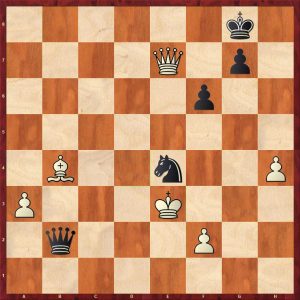
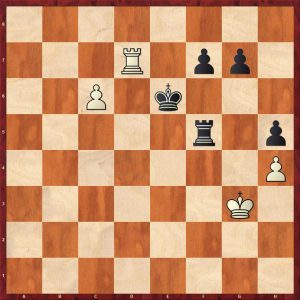
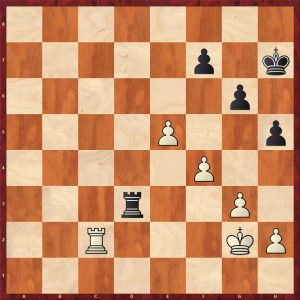
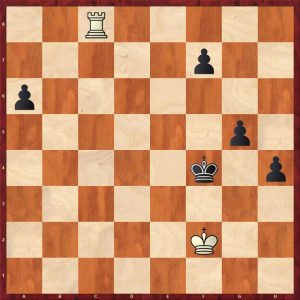
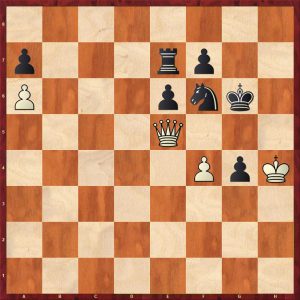
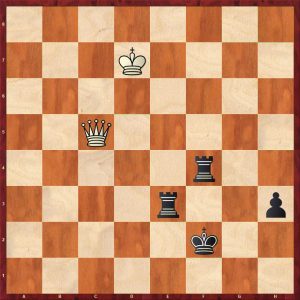
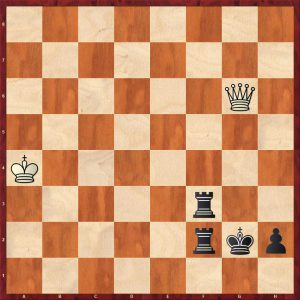
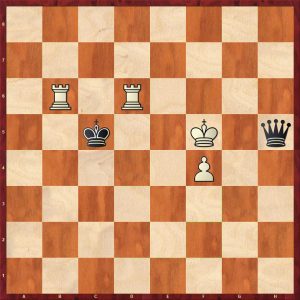
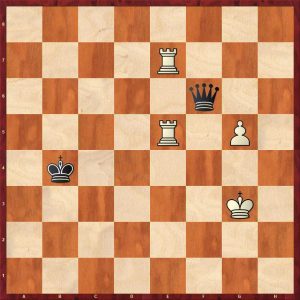
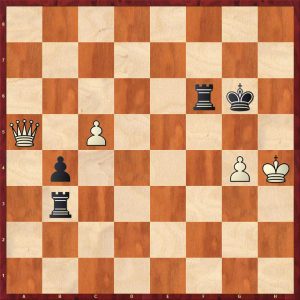
Matters are very complex and the wins are often very long as this game shows:

90.Qg8? losing

90.Qd4+ holds 90…R5f4 91.Qd8+ Kg3 92.Qg5+ (92.Qg8+ loses in 117 moves) 92…Kf2 93.Qc5+ Re3+ 94.Kd7

Vovk - Savchenko Variation 1 Move 94 Black to play
Vovk – Savchenko Variation 1 Move 94 Black to play

The tablebases give this position as a draw after 94…h2 95.Qh5! Kg2 96.Qg5+ Rg3 97.Qxf4 h1Q 98.Qd2+ Kh3 99.Qh6+ with a perpetual

Vovk - Savchenko Variation 1 Move 98 Black to play
Vovk – Savchenko Variation 1 Move 98 Black to play

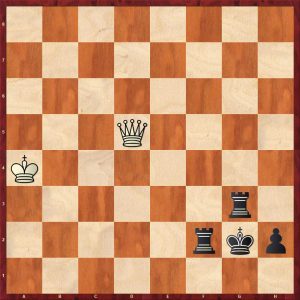
Back to the game: 90…h2 91. Qg2?! (91.Qh7+ is tougher losing in 92 moves) 91…Rf2 92.Qh1?! Kh3 93.Qa8?! Rf8 94.Qb7?!

Vovk - Savchenko Move 94 Black to play
Vovk – Savchenko Move 94 Black to play

94…R2f7?! (Black missed a quick win 94…Re2+ 95.Kd6 Rd8+ 96.Kc5 Rc2+ 97.Kb4 Rb2+ winning the queen) 95.Qb3+?! Rf3?! 96.Qb1 Re8+ 97.Kd7 Here White loses despite the king being on d7.

Vovk - Savchenko Move 97 Black to play
Vovk – Savchenko Move 97 Black to play

97…Ree3?  A natural move, throwing away the win, 97…Rh8! wins in 46 moves 98.Kd6? This was White’s last chance to draw: Black won on move 114  0-1

98.Qh7+ seizes the draw 98…Kg2 99.Qc2+ Rf2 100.Qc6+ Ref3 101.Qg6+ Rg3 102.Qc6+ Kg1 102.Qc1+ Rf1 103.Qc5+ drawing

Vovk - Savchenko Variation 2 Move 104 Black to play
Vovk – Savchenko Variation 2 Move 104 Black to play

As the reader can see, this endgame is very complex, even harder than queen + pawn v queen.

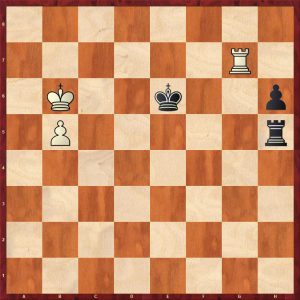
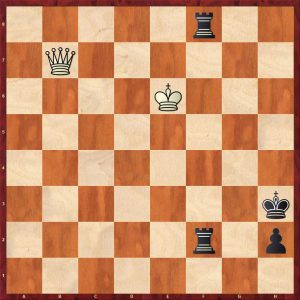
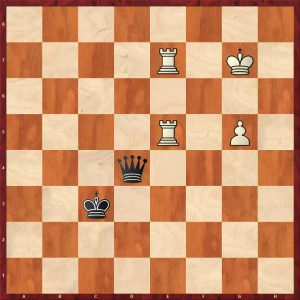
Here is example with the king hiding in front of the rook’s pawn in the corner:

Tiviakov - Van der Wiel Leiden 2011 Move 108 Black to move
Tiviakov – Van der Wiel Leiden 2011 Move 108 Black to move

Black played 108…Rb1+? throwing away the win which was to be had with 108…Kg1 in 125 moves! 109.Ka4 now White is holding and Tiviakov defends perfectly:

109… Rf1 110.Qe4 Kg1 111.Qe3+ Rgf2 112.Qg5+ Kh1 113.Qd5+ Rf3 114.Qc6 Kg2 115.Qc2+ R1f2 116.Qg6+

Tiviakov - Van der Wiel Leiden 2011 Move 116 Black to move
Tiviakov – Van der Wiel Leiden 2011 Move 116 Black to move

116…Rg3 117.Qe4+ Rff3 118.Qc2+ Kg1 119.Qd1+ Rf1 120.Qd4+ Kg2 121.Qe4+ Rff3 122.Qc2+ Kg1 123.Qd1+ Rf1 124.Qd4+ Rf2 125.Qd1+ Kg2 126.Qd5+

Tiviakov - Van der Wiel Leiden 2011 Move 126 Black to move
Tiviakov – Van der Wiel Leiden 2011 Move 126 Black to move

126…Rgf3 127.Qg5+ (127.Qg8+ loses after 127…Kf1) Kf1 128.Qc1+ Ke2 129.Qc2+ Ke3 130.Qc3+ Ke4 131.Qc4+ Kf5 132.Qf7+ Ke5 133.Qc7+ Kd4 134.Qd6+ Kc3 135.Qa3+ Kc2 ½-½

The knight’s pawn is the best pawn for the attacker. The attacker wins, if reasonably well placed and coordinated and the king safe:

Van der Wiel - Winants Brussels 1987 Move 74 Black to move
Van der Wiel – Winants Brussels 1987 Move 74 Black to move

White won quickly in about 20 moves after 74…Qf4+ 75.Kg1 Qe3+ 76.Kh1

There is no safe place for the defender’s king with a knight’s pawn.

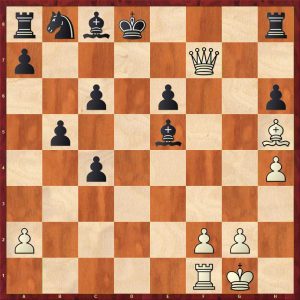
The bishop’s pawn is surprisingly different. Here a few draws exist. One occurs with the defending king on the long side in a good position:

Markowski - Gdanski Warsaw 2002 Variation Move 69 White to move
Markowski – Gdanski Warsaw 2002 Variation Move 69 White to move

This is a theoretical draw. White can try 69.R5d4+

Or 69.Ke5 Qg7+ 70.Ke6 Qh6+ 71.Kd7 Qg7+ 72.Kc6 Qf6+ 73.Rd6 Qf5 74.R2d5 Qc8+=

Markowski - Gdanski Warsaw 2002 Variation 3 Move 75 White to move
Markowski – Gdanski Warsaw 2002 Variation 3 Move 75 White to move

69…Ka5! (69…Kb3? loses in 107 moves) 70.Rd6 Kb4 71.Rb2+ Kc5 72.Rbb6 Qe2+ 73.Kf5 Qh5+ =

Markowski - Gdanski Warsaw 2002 Variation 2 Move 74 White to move
Markowski – Gdanski Warsaw 2002 Variation 2 Move 74 White to move

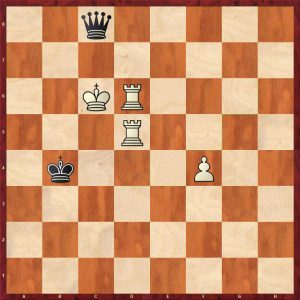
White a knight’s pawn this setup does not draw because Black’s queen is too restricted on the short side:

2R+P v Q Instructive example

1,R5e4+ Kb5 2.Re7 Qf6+ 3.Kg3 Qc3+ 4.R2e3 Qf6 5.R3e5+ Kb4 6.g5

2R+P v Q Instructive example move 6

6…Qf1 7.Kg4 Qd1+ 8.Re2 Kc3 9.Kh5 Qh1+ 10.Kg6 Qd5 11.R2e6 Qd3+ 12.Kg7 Qd4+ 13.Re5

2R+P v Q Instructive example move 13

13…Kc2 14.g6 Kd2 15.Kg8 Qd6 16.g7 Qb8+ 17.Kf7 Qb3+ 18.R5e6 Qf3+ 19.Rf6 Qd5+ 20.Ree6

2R+P v Q Instructive example move 20

20…Qb7+ 21.Kg8 Qh1 22.Rh6 Qa8+ 23.Kh7 Qa7 24.Kh8 Qa1 25.Ref6 winning

2R+P v Q Instructive example final

If the reader has played through this ending, it was remarkably simple to win.

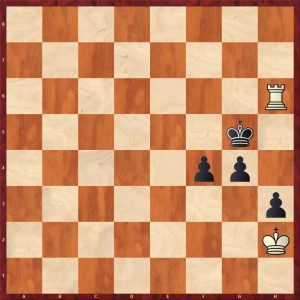
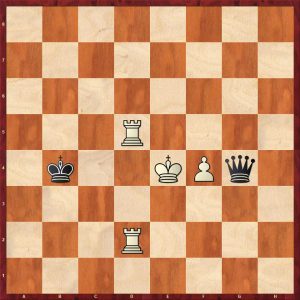
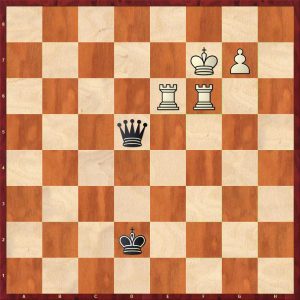
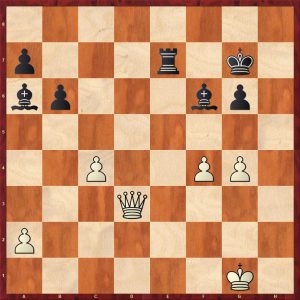
With a central pawn, there is no fortress on the short side for the defending king:

2R+Central P v Q Instructive example

This is winning after 1.Kd7 Qg7+ 2.e7

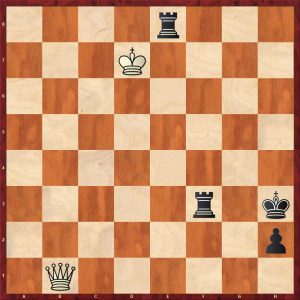
In general, the queen can draw when the defending king is well placed and the attacker cannot coordinate and safeguard the king. This can be very complicated and not easy to calculate:

Zwakala - De Abreu Boksburg 2018 Move 71 White to play
Zwakala – De Abreu Boksburg 2018 Move 71 White to play

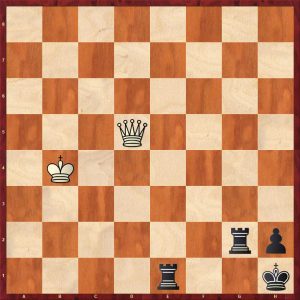
White’s king is trapped on the edge but White can just hold: 71.Qb6+ Kf7 72.Kg4 R5f4+ 73.Kg5 Rf6 74.Qb1 Rg3+ 75.Kh4 Rg2 75.Kh4 Rg2

Zwakala - De Abreu Boksburg 2018 Move 76 White to play
Zwakala – De Abreu Boksburg 2018 Move 76 White to play

76.Qb3+ and lost quickly 76.Qh7+! draws 76…Kf8 77.Qh8+ Rg8 78.Qh5 e5 79.Kh3 Rg7 80.Qh4 Kf7 81.Qc4+ Re6 82.Qc7+ Re7 83.Qc4+ Kf6 84.Qc6+ Re6 85.Qf3+ =

Here is a game from the early Fischer. His opponent played 90..Kd6? and Fischer defended perfectly to draw.

Fischer - Matthai Montreal 1956 Move 90 Black to move
Fischer – Matthai Montreal 1956 Move 90 Black to move

Black could have hunted down the White king as follows: 90…Rc3 91.Kg4 Ra4+ 92.Kh5 Rc5+ 93.Kh6 Rh4+ 94.Kg6 Rg4+ 95.Kh6 Rgg5

Fischer - Matthai Montreal 1956 Variation Move 96 White to move
Fischer – Matthai Montreal 1956 Variation Move 96 White to move

96.Qa2 Ke8 97.Qa8+ Kf7 98.Qa2+ Rcd5

Fischer - Matthai Montreal 1956 Variation Final
Fischer – Matthai Montreal 1956 Variation Final

After 99.Qf2+ Rgf5 winning as 100…Rh5+ follows

General case with more pawns

In general the rooks want static control and the queen dynamic. It is extremely important for the rooks to coordinate. Examples of positions where the two rooks are better are shown below.

The reviewer gives some typical positions with a quick assessment: buy the book to go through the analysis.

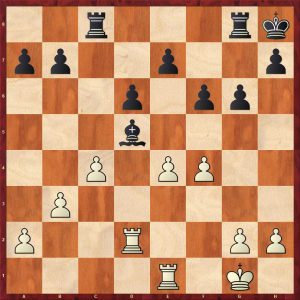
In this position below the rooks have full board control. White wins easily.

Hole - Thomassen Oslo 2011 Move 35 Black to move
Hole – Thomassen Oslo 2011 Move 35 Black to move

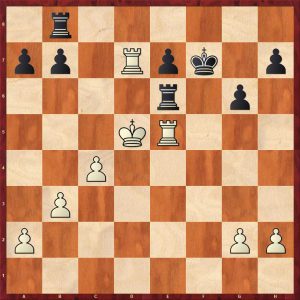
In the position below the rooks are coordinated and white’s weak isolated pawns are easy pickings for the rooks. Black won quickly.

Shirov - Anand Linares 1998 Move 41 Black to move
Shirov – Anand Linares 1998 Move 41 Black to move

In the next position, white has just played 43.Re1 threatening Ree7, Black has to weaken his pawns to prevent the immediate loss of the f7-pawn. This is enough for white to win.

Kramnik - Andreikin Tromso 2013 Move 43 Black to move
Kramnik – Andreikin Tromso 2013 Move 43 Black to move

The queen needs targets to start dynamic play. Good for the queen are weak pawns, an exposed king, uncoordinated rooks and of course dangerous friendly passed pawns.

Queen + two connected passed pawns usually beat two rooks. The defensive setup with the rooks doubled up against the more advanced pawn can be difficult to break down. The position below is winning but takes nearly 50 moves against best defence!

Murdiza - Rozentalis Cappelle-la-Grande 2004 Move 59 Black to move
Murdiza – Rozentalis Cappelle-la-Grande 2004 Move 59 Black to move

The position below is winning for the queen as the rooks are uncoordinated and the queen has a dangerous passed c-pawn.

McShane - Mamedov Astand 2019 Move 45 White to move
McShane – Mamedov Astana 2019 Move 45 White to move

In this position the passed pawn dominates the rooks but Black is still holding out. The key to winning this game is to open a second front on the queenside to widen the bridgehead for the queen. Hence 48.c4!

Shirov - Short Yerevan 1996 Move 48 White to move
Shirov – Short Yerevan 1996 Move 48 White to move

In the next position Black has a small material advantage with two connected passed pawns. The easiest way to win is to open a second front on the queenside and create fresh White pawn weaknesses, hence 35…a5!

Giri - Aronian Leuven 2018 Move 35 Black to move
Giri – Aronian Leuven 2018 Move 35 Black to move

In the next example, there is rough material equality but the queen is winning here as White’s rooks are uncoordinated, his king is exposed and he has lots of weak pawns.

Amanov - Adams Wheeling 2012 Move 30 White to move
Amanov – Adams Wheeling 2012 Move 30 White to move

Chapter 7 – Queen versus Rook and Two Minor Pieces

Surprisingly the author does not cover the  endgame with no pawns as R+B+N v Q is drawn but is difficult to hold.

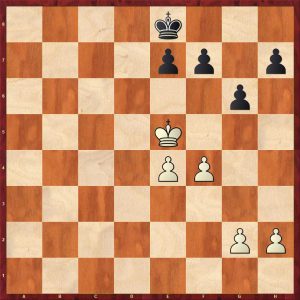
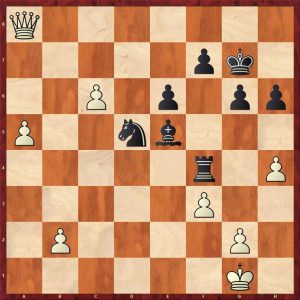
The pieces seek static control. In the position below, Black is winning but needs squares for his pieces, hence 34…g5!? After 35.fxg5 Bxg5 Black is winning as White’s pawns are going to drop off in the long run.

Vitiugov - Lysyj Kazan 2014 Move 34 Black to move
Vitiugov – Lysyj Kazan 2014 Move 34 Black to move

In the next example, the position is static with the pieces controlling everything. The queen has no targets and White’s king is safe. White will slowly and surely improve his pieces and pick off Black’s pawns.

Grischuk - Topalov Linares 2010 Move 47 Black to move
Grischuk – Topalov Linares 2010 Move 47 Black to move

In the next example, the queen has passed pawns, but they are all separated and effectively isolated, so Black’s well coordinated pieces can just collect the apple harvest after 34…Rb4!

Caruana - Le St Louis 2017 Move 34 Black to move
Caruana – Le St Louis 2017 Move 34 Black to move

The queen loves dynamic play with an exposed enemy king.

A good example is below where queen and 3 pawns fight a rook and two bishops with an exposed king. After 24.Qe6 Black is struggling to coordinate and finish development. Black put up stiff resistance but the defensive task proved too much and White won.

Karpov - Speelman Reykjavik 1991 Move 24 White to move
Karpov – Speelman Reykjavik 1991 Move 24 White to move

In the next game, a queen and two connected passed pawns supported by the king face an uncoordinated rook, bishop and knight. The queen wins effortlessly.

Kramnik - Aronian Zurich 2012 Move 30 Black to move
Kramnik – Aronian Zurich 2012 Move 30 Black to move

Chapter 8 Queen an Minor Piece vs Queen (and Minor Piece)

This topic is covered well with sections on:

  • Queen + Knight v Queen
  • Queen + Knight + Pawns v Queen + Pawns
  • Queen + Bishop v queen
  • Queen + Bishop + Pawns v Queen + pawns
  • Queen + Knight endings
  • Queen + Bishop (same colour) endings
  • Queen + Bishop (opposite colour) endings
  • Queen + Knight v Queen + bishop endings

This is particularly good chapter.

Chapter 9 Queen  + Rook  v Queen + Rook

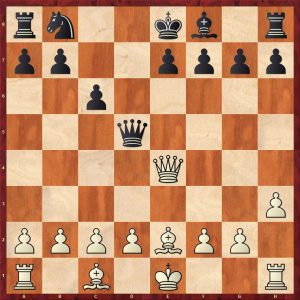
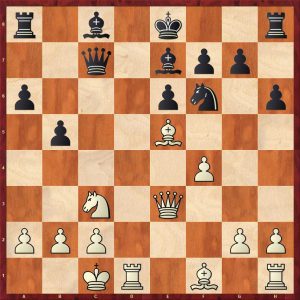
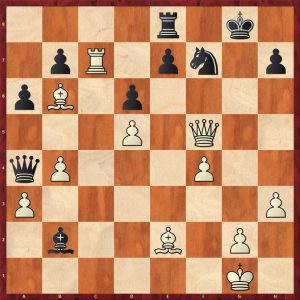
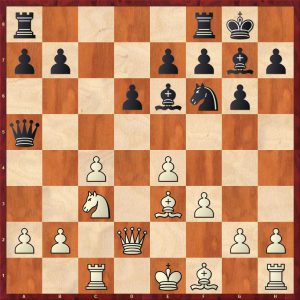
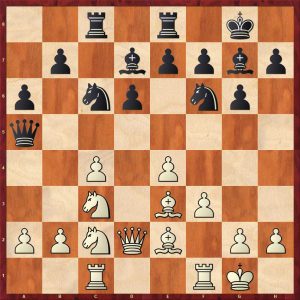
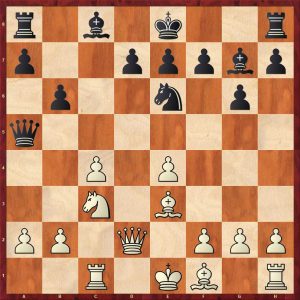
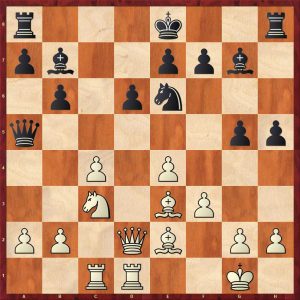
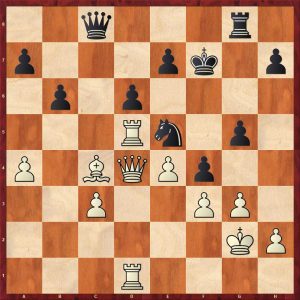
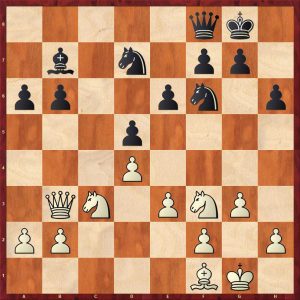
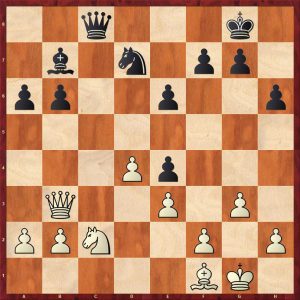
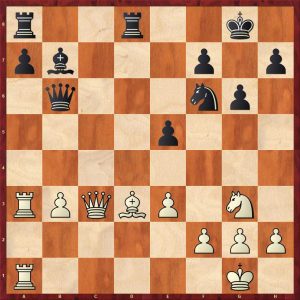
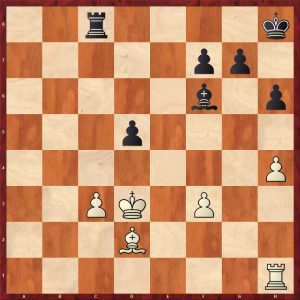
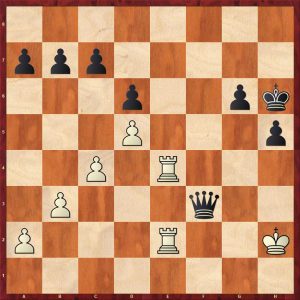
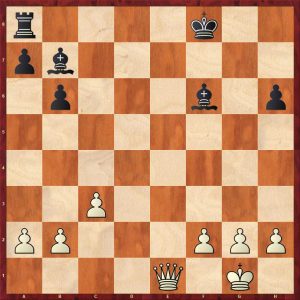
This piece combination is a really a mixture of middlegame and endgame themes. King safety is paramount. In this game White’s king is safe whereas Black’s king is looking potentially vulnerable.

Fischer - Benko 1959 Move 33 White to move
Fischer – Benko 1959 Move 33 White to move

Fischer played the incisive 33.a4!! to open up files for his rook. If 33…b4 34.Rh5!

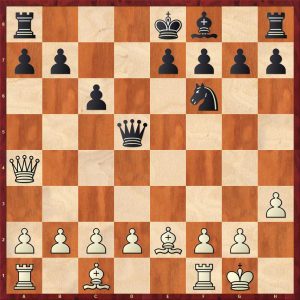
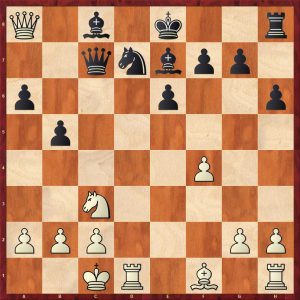
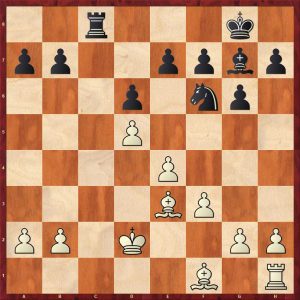
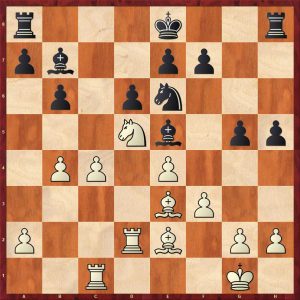
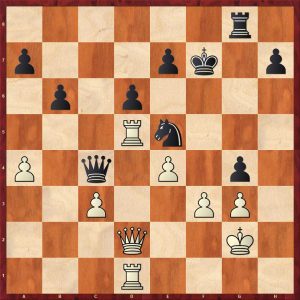
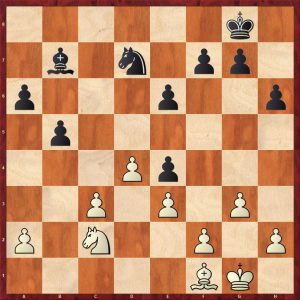
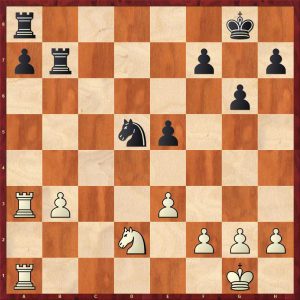
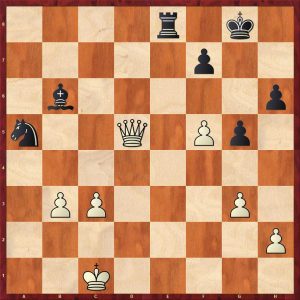
There is another Fischer game below. White had to play 35.Rf3. However after 35.Qf8+? Kh5 Black’s king entered the fray with decisive effect. After 36.g4+ Kh4 37.Qxf6+ Kxh3 it was all over.

Blau - Fischer Varna 1962 Move 35 White to move
Blau – Fischer Varna 1962 Move 35 White to move

Chapter 10 Queen vs. Minor pieces

The interesting endgames of queen v 2 minor pieces with no pawns are covered.

The endgame of queen v two knights with pawns is covered showing typical winning methods:

  • Overloading the knights which can only defend a limited front
  • King invasion
  • Zugzwang

Some successful fortresses are also demonstrated.

The endgame of queen v two bishops with pawns is also covered. Positions with mutual passed pawns are shown demonstrating the power of the queen. Some fortresses are shown of course.

The endgame of queen v knight and bishop with pawns is also covered. Positions with fortresses are covered with methods of breaching them covered.

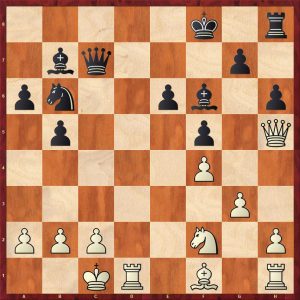
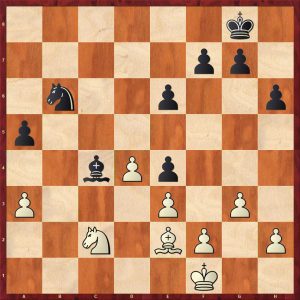
Queen versus three minor pieces is by far the most interesting endgame covered with this rough material equality.

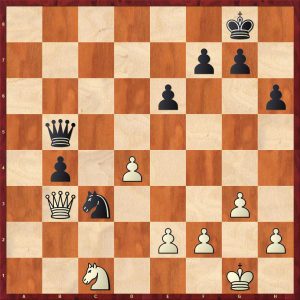
In this sort of position where the pieces are uncoordinated, the queen wins:

Berkes - Indjic Valjevo 2018 Move 36 Black to move
Berkes – Indjic Valjevo 2018 Move 36 Black to move

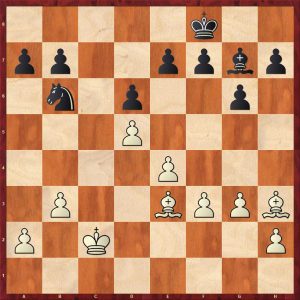
If the pieces are coordinated and their king is safe, they have good winning chances.

Lautier - Gurevich Munich 1993 Move 53 White to move
Lautier – Gurevich Munich 1993 Move 53 White to move

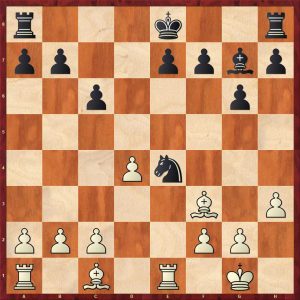
White misfired with 53.b5? (53.Qxb7 holds a draw) 53…Nd4! wins as the pieces gain static control. Eventually all the queenside pawns were exchanged and Black won on the kingside.

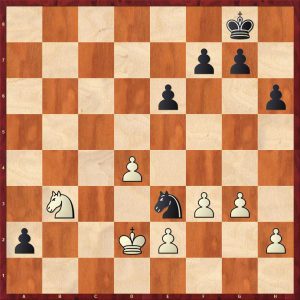
If the minor pieces have control even with a pawn apiece, the pieces have winning chances:

Gustafsson - Svane Bonn 2011 Move 50 Black to move
Gustafsson – Svane Bonn 2011 Move 50 Black to move

Black played 50…Qc1+? and lost the pawn and the game. 50…Qg1 just holds!

The next position is one of dynamic equality:

Nisipeanu - Radjabov Bazna Move 30 Black to move
Nisipeanu – Radjabov Bazna Move 30 Black to move

30…Bc6! 31.Qxa7 Nc5=

Chapter 11 is a pot pourri of fascinating positions that do not belong elsewhere in the book.

Chapter 12 covers some endgame studies. Every endgame book should include some studies to enhance the readers’ imaginations.

The book ends with comprehensive solutions to the exercises set in each chapter.

In summary, this is an excellent book which requires a lot of time to absorb. Some sections are much easier to absorb than others, for example the sections on two rooks v queen in the general case with many pawns is excellent and would be useful for club players and above.  The chapter on queen and minor piece v queen and minor piece with many pawns is also superb. The more difficult sections such as queen and pawn v queen are definitely worth studying and are fascinating in themselves.

FM Richard Webb
FM Richard Webb

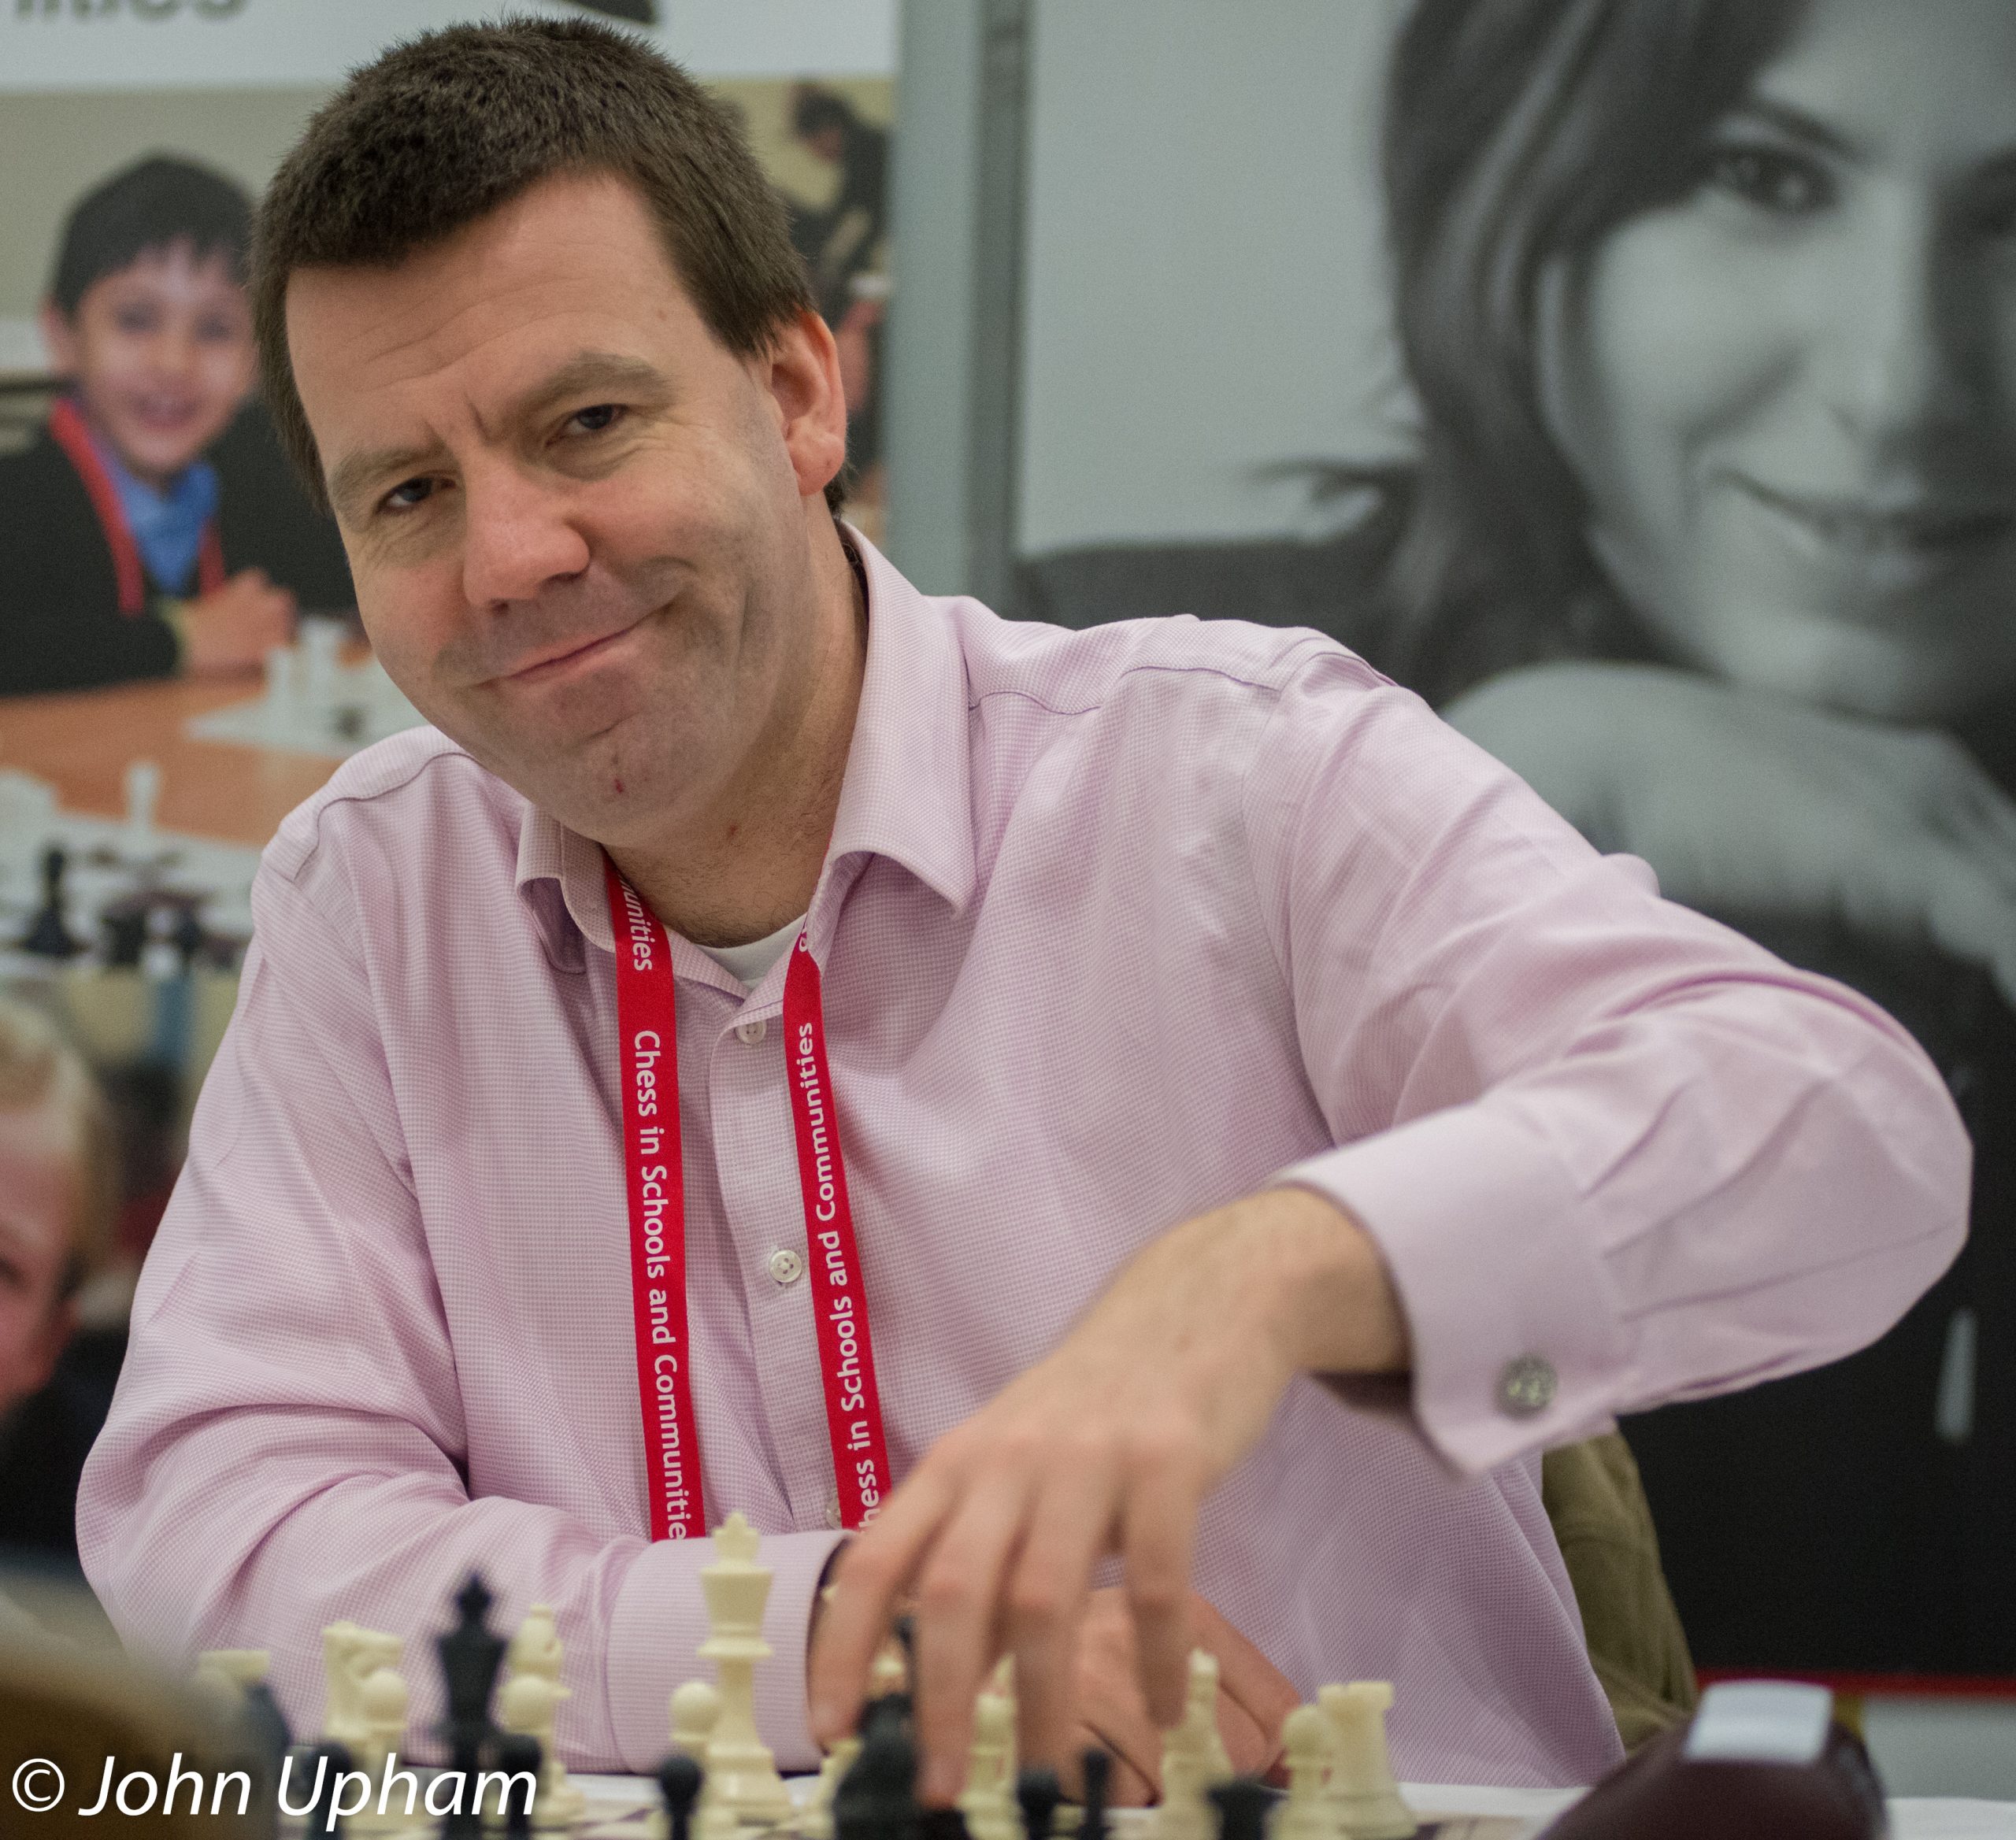
FM Richard Webb, Basingstoke, Hampshire, 11th August 2021

Book Details :

  • Hardcover : 272 pages
  • Publisher:Russell Enterprises (24 Mar. 2021)
  • Language: English
  • ISBN-10:1949859312
  • ISBN-13:978-1949859317
  • Product Dimensions: ‎15.24 x 1.27 x 22.86 cm

Official web site of Russell Enterprises

Understanding Queen Endgames, Karsten Müller & Yakov Kanoval, Russell Enterprises (24 Mar. 2021), ISBN-13 ‏ : ‎ 978-1949859317
 Save as PDF

Chess Middlegame Strategies – Strategy Meets Dynamics, Volume 3

Chess Middlegame Strategies - Strategy Meets Dynamics Volume 3, Ivan Sokolov, Thinker's Publishing. 2019, ISBN-13 ‏ : ‎ 978-9492510600
Chess Middlegame Strategies – Strategy Meets Dynamics Volume 3, Ivan Sokolov, Thinker’s Publishing. 2019, ISBN-13 ‏ : ‎ 978-9492510600

From the publisher:

“After his first two most successful volumes of Chess Middlegame Strategies, Ivan Solokov explores in his final volume ideas related to the symbiosis of the strategic and dynamic elements of chess. He combined the most exceptional ideas, strategies and positional play essentials. These three volumes will give you a serious head start when studying and playing a middlegame. A book and series that cannot be missed in any serious chess library!”

GM Ivan Sokolov
GM Ivan Sokolov

“Grandmaster Ivan Sokolov is considered one of the best chess authors winning many chess tournaments and writing many bestselling chess books. At the moment he is coaching worldwide the most chess talented youngsters.”

This interesting book has seven diverse chapters on middlegame strategies:

  • Karpov’s king in the centre
  • Geller/Tolush gambit plans & ideas
  • Anti-Moscow Typical plans and ideas
  • Space versus flexibility
  • Positional exchange sacrifice
  • Open file
  • G-pawn structures

Chapters two and three do cover two sets of related positions and are rather specialised in terms of the opening. The other chapters are rather more generic in nature.

It is well known that opening preparation these days is very deep with the use of chess engines. Many variations of sharp openings played at the top level are effectively analysed to the end of the game now, for example resulting in a perpetual or an equal ending. Although this book does cover some games in sharp tactical openings, it does not make the mistake of providing a sea of complex variations with little explanation: Sokolov has made a good effort to extract out some of the key ideas in these dynamic battles.

Chapter 1 Karpov’s king in the centre

Karpov employed the “king in the centre” idea in his favourite Caro-Kann defence. The celebrated game Kamsky – Karpov Dortmund 1993 shows this idea.

Kamsky-Karpov Dortmund 1993 Move 10

In the position white has more space and an intention to attack on the kingside, so white played 11.Qh4?! Black looks to have a problem with his king as castling kingside will be “castling into it” with white’s bishops and queen ready for action there. Karpov came up with an ingenious solution: 11…Ke7!

Suddenly black threatens 12…g5! and the white aggressively placed queen becomes a liability.

The idea only works because white’s queen is misplaced on h4 and is vulnerable to attack. In the famous game against Kamsky, white is really forced to sacrifice a pawn with 12.Ne5! Bxe5 13.dxe5 Qa5+ 14.c3 Qxe5+ when white has sufficient compensation but no more. 12.Bf4 is pretty insipid, after 12…Bb4+ 13.Bd2 Bxd2 14.Kxd2 Qa5+ 15.c3 c5 with equal chances.

The reviewer is not going to cover this game in detail in his review as this is a well known game. If the reader is not familiar with this game, then buy the book to get good coverage of an instructive struggle.

In subsequent games in this variation, white played 10.Qe2! keeping the queen centralised.

The reviewer was particularly impressed with the following game by Vishy Anand against Vladimir Kramnik in the World Championship match in Bonn 2008.  Anand’s preparation and superior play in the Meran variation effectively won him the match. The book covers one of Anand’s wins in this variation using the “king in the centre” strategy.

Kramnik, Vladimir – Anand, Viswanathan
World Championship Bonn (5) 2008

1.d4 d5 2.c4 c6 3.Nf3 Nf6 4.Nc3 e6 5.e3 Nbd7 6.Bd3  dxc4 7.Bxc4 b5 8.Bd3 a6  9.e4 c5

Kramnik-Anand Wch Bonn 2008 Move 10
Kramnik-Anand World Ch Game 5 Bonn 2008 Move 10

10.e5 cxd4 11.Nxb5 axb5 12.exf6 gxf6 13.0-0 13…Qb6 14.Qe2

Kramnik-Anand Wch Bonn 2008 Move 14
Kramnik-Anand World Ch Game 5 Bonn 2008 Move 14

This is a key position in just one of the main lines in the Meran variation.

14…Bb7  (The main line, 14…b4 is interesting) 15.Bxb5 Rg8!? (Anand is the first to deviate from Game 3 which he won, and present Kramnik with a new surprise instead of 15…Bd6. Kramnik’s choice in the previous game was the natural 16.Rd1 Rg8 17.g3 Rg4 18.Bf4 Bxf4 19.Nxd4 At this moment Anand was an hour(!) up on the clock, but now he had his first long think 19…h5!? 20.Nxe6 fxe6 21.Rxd7 Kf8 22.Qd3 Rg7! 23.Rxg7 Kxg7 24.gxf4 Rd8 Kramnik – Anand WCh Bonn (3) 2008) 16.Bf4 Bd6 17.Bg3 Black has good counterplay on the g-file f5 (Anand continues to harass the Bg3) 18.Rfc1!?  f4 19.Bh4

Kramnik-Anand World Ch Game 5 Bonn 2008 Move 19

19…Be7! The bishop’s role on d6 is over, so it returns to free the e7-square for Black’s king  20.a4 Bxh4 21.Nxh4

Kramnik-Anand World Ch Game 5 Bonn 2008 Move 21

Ke7! The possible threat to g2 again enters the equation. 22.Ra3

White boosts his third rank, but on the other hand disconnects his rooks and Black can turn his attention to the c-pawn. The radical 22.g3!? should be considered. This weakens the long diagonal, but removing the pawn from g2 enables White to play more actively, a possible line is 22…fxg3 23.hxg3 Rg5 24.Bxd7

Kramnik-Anand World Ch Game 5 Bonn 2008 Variation Move 24

24…Rag8! 25. a5 (25.Bb5?? loses to 25…d3 followed by Rxg3+) Qd6 26.Ra3

Kramnik-Anand World Ch Game 5 Bonn 2008 Variation Move 26

26…Rxg3+ 27.fxg3+ Rxg3+ 28.Rxg3+ Qxg3+ 29.Ng2 Bxg2 30.Qxg2 Qe3+ 31.Kh2 Qh6+ 32.Kg3 Qxc1=

Kramnik-Anand World Ch Game 5 Bonn 2008 Variation Move 33

Black will pick up the dangerous a-pawn with Qc7+ or Qg5+ leading to an unbalanced but roughly level ending.

Back to the game.

22…Rac8 23.Rxc8  Rxc8 24.Ra1 Qc5 25.Qg4

Kramnik-Anand World Ch Game 5 Bonn 2008 Variation Move 33

25…Qe5

Black intuitively keeps his queen closer to his king. Another interesting computer alternative is 25…Qc2!? to support the d4-pawn 26.Qxf4 d3!

Kramnik-Anand World Ch Game 5 Bonn 2008 Variation 2 Move 27

and it’s already reasonable to bail out with 27.Nf5+ exf5 28.Re1+ Kf8 (28…Be4 leads to an equal ending) 29.Bxd7 d2 30.Qh6+ Kg8 31.Qg5+ with a draw by perpetual

26.Nf3 Qf6 This move is also connected with a hidden trap.

Kramnik-Anand World Ch Game 5 Bonn 2008 Move 27

27.Re1 [27.Nxd4? Qxd4 28.Rd1 Nf6 29.Rxd4 Nxg4 30.Rd7+ Kf6 31.Rxb7 Rc1+ 32.Bf1 Ne3!-+ Surprisingly enough, this motif occurs later in the game!; harmless is 27.Bxd7 Kxd7 28.Nxd4 Ke7 29.Rd1 Rc4= Best is 27.Ne1! improving the knight. Kramnik still wants more and keeps the tension.] 27…Rc5!? 28.b4 Rc3 Setting a beautiful trap.

Kramnik-Anand World Ch Game 5 Bonn 2008 Move 29

29.Nxd4?? (Black’s forces already exert unpleasant pressure, but the text-move is an unforced and decisive tactical miscalculation. 29.Nd2!? still leads to a murky position and the outcome of the game remains open.) 29…Qxd4 30.Rd1 Nf6! 31.Rxd4

Kramnik-Anand World Ch Game 5 Bonn 2008 Move 31

Nxg4 32.Rd7+ Kf6 33.Rxb7 Rc1+ 34.Bf1

Kramnik-Anand World Ch Game 5 Bonn 2008 Move 34

Ne3! winning 35.fxe3 (35.h3 Rxf1+ 36.Kh2 Rxf2-+) 35…fxe3 The pawn queens 0-1

Chapter 2 Geller/Tolush Gambit Plans & Ideas

Here is a an early Kasparov game which demonstrates white’s attacking potential in this line.

Kasparov – Petursson
Valetta 1980

1.d4 d5 2.c4 c6 3.Nf3 Nf6 4.Nc3 dxc4 5.e4 b5 6.e5 Nd5 7.a4 e6 8.axb5 Nxc3 9.bxc3 cxb5 10.Ng5 Bb7 11.Qh5 Qd7

Kasparov-Petursson Valetta 1980 Move 12

12.Be2

A previous Kasparov game went 12.Nxh7?  (a well known blunder nowadays) 12…Nc6! Black leads in development and the tactics work for him as well. White is probably lost already!

Kasparov-Petursson Valetta 1980 Variation Move 13

13.Nxf8 Qxd4! leads to a huge advantage to black

Kasparov-Petursson Valetta 1980 Variation Move 14

Kasparov’s opponent missed 13…Qxd4!, played 13…Rxh5? and Kasparov went on to win

13.Nf6+? gxf6 14.Qxh8 also loses

Kasparov-Petursson Valetta 1980 Variation 2 Move 14

14…Nxd4! 15.cxd4 Qxd4 16.Ra2 0-0-0 winning

Kasparov-Petursson Valetta 1980 Variation 2 Move 17

Back to the main game

12…h6 13.Bf3

Kasparov-Petursson Valetta 1980 Move 13

Nc6  (13…g6 weakens black’s kingside, after 14.Qh3 Nc6 15.Ne4 0-0-0 16.Be3! leads a white advantage)14.0-0 Nd8 Black is defending his weaknesses and avoiding the weakening g6 but his development is lacking 15.Ne4 a5

Kasparov-Petursson Valetta 1980 Move 15

16.Bg5 (16.Qg4! was more accurate, 16…Rh7 17.Re1 and black has problems developing) Bd5 17.Rfe1 Nc6 18.Bh4 Ra7 19.Qg4

Kasparov-Petursson Valetta 1980 Move 19

Rh7 20.Nd6+! Bxd6

Kasparov-Petursson Valetta 1980 Move 21

21.Bxd5 (21.exd6 is very strong as well)  Be7 22.Be4 g6 23.Bf6 Black’s rooks are horribly disconnected

Kasparov-Petursson Valetta 1980 Move 23

Kf8 24.Qf3 Nd8 25.d5! Opening up files for white’s better placed rooks: black crumbles quickly exd5 26.Bxd5 Qf5 27.Qe3

Kasparov-Petursson Valetta 1980 Move 27

Rd7 28.Rad1 Bxf6 29.exf6 Ne6 30.Be4 Rxd1 31.Bxf5 Rxe1+ 32.Qxe1 gxf5

Kasparov-Petursson Valetta 1980 Move 33

33.Qe5! A lovely centralising move to win the game 33…Kg8 34.Qg3+ 1-0

Chapter 3 Anti Moscow Gambit Plans & Ideas

The reviewer shows one of the author’s fine wins.

Sokolov – Novikov
Antwerp 1997

1.d4 d5 2.c4 e6 3.Nf3 Nf6 4.Nc3 c6 5.Bg5 h6 The Moscow Variation 6.Bh4 dxc4 7.e4 g5 8.Bg3 b5 The starting tabiya of the Anti-Moscow Gambit

Sokolov-Novikov Move 9

9.h4!? (9.Be2 and 9.Qc2 are the main alternatives)
 9…g4 (9…b4!? 10.Na4!) 10.Ne5 h5

10…Bb4 leads to a very complex game. 11.Be2 Nxe4! 12.0-0

Sokolov-Novikov Variation 1 Move 12

12,,,Nxc3 13.bxc3 bxc3 14.Bxg4 Bxa1 15.Bh5 Qxd4 16.Qf3 Qxe5! 17.Bxe5 Bxe5 18.Qf7+ Kd8

Sokolov-Novikov Variation 1 Move 19

Stockfish helpfully gives this as = (0.00) and gives a bizarre line 19.Re1 Bc3 20.Re3 Ba1 21.Re1= Who says computers don’t have a sense of humour?

Back to the main game

11.Be2

Sokolov-Novikov Move 12

Bb7 (11…b4 is risky 12.Na4 Nxe4 13.Bxc4!) 12.0-0 Nbd7 13.Qc2 Bg7 14.Rad1 Qb6!? 15.Na4!

Sokolov-Novikov Move 15

15…Qa5?!

Best is15…bxa4! 16.Nxc4 Qb4 17.e5 17…Nd5 18.a3 Qb3 19.Qxb3 axb3 20.Nd6+ Ke7 21.Nxb7 a5 22.Rc1

Sokolov-Novikov Variation 2 Move 22

White is better, but black has got the queens off.

16.Nc5 Nxc5 17.dxc5 Qb4 18.Rd6 Qxc5 Black grabs another pawn

Sokolov-Novikov Move 19

19.Rfd1 0-0 White trades off a key defender of the black king 20.Nd7! Nxd7 21.Rxd7 Qb6 (21…Bc8 22.Bd6 Qb6 23.Bxf8)

Sokolov-Novikov Move 22

Black is completely passive. White just needs to bring his queen into the killing zone.

22.Qc1!+- 22…Bc8 23.Qg5! (Threatening 24.Be5) 23…Bxd7 24.Rxd7 (25.Be5 is a terrible threat)

Sokolov-Novikov Move 24

24…Kh7 25.Qxh5+ Kg8 26.Bc7! 26…Qa6 27.Qxg4 Kh7 28.Qh5+ Kg8 29.Qg5 Kh8 30.Be5 Exchanging off the final bodyguard Bxe5 31.Qxe5+ Kh7 32.Qh5+ Kg7 33.Qg5+ Kh7 

Sokolov-Novikov Final

34.Bh5 1-0

Chapter 4 Space versus Flexibility

This section covers the technique of exploiting a space advantage in a common type of pawn structure shown below:

Pawn Structure (Chapter 4)

This structure can arise from a variety of openings such as the Caro-Kann, Scandinavian, French and the Meran system in the Slav.

White clearly has more space and quite often the bishop pair as black has exchanged off his white squared bishop.

White’s natural plan is to play c4 and d5 opening up the position for the bishop pair. The game shows a didactic game where white exploits his space advantage and skillfully transforms advantages.

Short – L’Ami
Staunton Memorial London 2009

1.e4 c6 2.Nc3 d5 3.Nf3 Bg4 4.h3 Bxf3 5.Qxf3 Nf6 6.Be2 dxe4 7.Nxe4 Nxe4 8.Qxe4 Qd5

Short-L'Ami London 2009 Move 9
Short-L’Ami London 2009 Move 9

9.Qg4 Nd7 10.0-0 Nf6 11.Qa4

Short-L'Ami London 2009 Move 12
Short-L’Ami London 2009 Move 12

White declines the exchange of queens again. Black can now force a queen exchange, but should he? White won the game without black making an obvious mistake. So this suggests that black should keep the queens on.

11…Qe4 12.Qxe4 Nxe4 13.Re1 g6 14.d4 Bg7 15.Bf3

Short-L'Ami London 2009 Move 15
Short-L’Ami London 2009 Move 15

15…Nf6 (15…Nd6 is another idea to hamper d5 from white 16.Bf4 Rd8 17.Rad1 Bf6 18.b3 Nf5 19.c3 h5 white can still play g4 with an edge)16.c4 White’s plan is straightforward, push d5

16…Rd8 17.Be3 0-0 18.Rad1 e6

Short-L'Ami London 2009 Move 19
Short-L’Ami London 2009 Move 19

19.g4! A typical space gaining move with the intention of kicking black’s knight away with g5  h6 20.h4?! (20.Kg2! was more accurate, see below) 20…Rfe8?!

20…h5!? would have given black better chances than the game, but white still retains good winning chances 21.g5 Ng4 22.Bxg4 hxg4 Black’s g-pawn will fall, but black has time to counterattack the d-pawn 23.Kg2 Rd7 24.Rd2 Rfd8 25.Red1 c5!

Short-L'Ami Variation Variation Move 26
Short-L’Ami Variation Variation Move 26

26.d5! (26.dxc5? leads to a clear draw Rxd2 27.Rxd2 Rxd2 28.Bxd2 Bxb2 29.Kg3 Kg7 30.Kxg4 f5+ Black draws as white’s extra doubled isolated pawn is not enough to win the bishop ending: see below)

Short-L'Ami Variation Move 31
Short-L’Ami Variation Move 31

26…exd5 27.Bxc5! b6 28.Be3 d4 29.Kg3 and white is winning the g-pawn with good winning chances, but there is work to do.

Short-L'Ami Variation Variation Move 29
Short-L’Ami Variation Variation Move 29

Back to the game.

Short-L'Ami London 2009 Move 21
Short-L’Ami London 2009 Move 21

21.Kg2 Do not hurry: improve the king, although 21.g5 also gains an advantage 21…Nd7 22.d5! At last the breakthrough

Short-L'Ami London 2009 Move 22
Short-L’Ami London 2009 Move 22

22…Ne5 23.dxc6 Nxf3 24.Kxf3 bxc6

Short-L'Ami London 2009 Move 25
Short-L’Ami London 2009 Move 25

White transforms his advantages: the bishop pair has gone but his better pawn structure and more active pieces prove decisive: first he grabs the d-file because of black’s weak a7-pawn

25.b3! a5 26.g5 (26.Bb6 is also good, but do not hurry: fix black’s kingside first limiting black’s kingside counterplay which is good technique) hxg5 27.hxg5 Ra8 28.Rd7 Bf8 29.Red1 a4 Hoping for play down the a-file 30.Rc7

Short-L'Ami London 2009 Move 30
Short-L’Ami London 2009 Move 30

axb3 31.axb3 Rec8 32.Rdd7 Rxc7 33.Rxc7 Rb8 34.Rxc6 Rxb3 35.Rc8 Winning a second pawn

Short-L'Ami London 2009 Move 35
Short-L’Ami London 2009 Move 35

f5 36.gxf6 Kf7 37.Ke4 Rb7 38.Bd4 g5 39.c5 Rb1 40.c6 Rc1 41.Be3 1-0

A really educational game.

Chapter 5 Positional Exchange Sacrifice

This chapter covers positional exchange sacrifices which is one of the key chapters in this book.

The most famous positional exchange sacrifice is probably Rxc3! in the Sicilian Defence. This is not covered in this book as it is so well known.

The following game covers an interesting exchange sacrifice in one of the old main lines of the Sicilian Richter-Rauzer variation. Kramnik’s concept in this game effectively killed off this line for white.

Ivanchuk – Kramnik
Dos Hermanas 1996

1.e4 c5 2.Nf3 Nc6 3.d4 cxd4 4.Nxd4 Nf6 5.Nc3 d6 6.Bg5 e6 7.Qd2 a6 8.0-0-0 h6 9.Be3 Be7 10.f4 Nxd4 11.Bxd4 b5 12.Qe3 Qc7 13.e5 dxe5 14.Bxe5

Ivanchuk-Kramnik Dos Hermanas Move 14

14…Ng4!? A new move at the time, and a very interesting idea, black sacrifices an exchange in order to get a strong initiative, when white loses many tempi with his queen (14…Qa5 is a sound alternative) 15.Qf3 15…Nxe5 16.Qxa8 (16.fxe5 Bb7 is better for black) 16…Nd7

Ivanchuk-Kramnik Dos Hermanas 1996 Move 17

Black has plenty of compensation for the exchange: a powerful pair of bishops and white will lose time with his queen.

17.g3? (17.Qe4 is probably best 17…Bb7 18.Qd4 Nf6 when black definitely has sufficient compensation with his great bishops) 17…Nb6 18.Qf3  18…Bb7 19.Ne4

Ivanchuk-Kramnik Dos Hermanas 1996 Move 19

19…f5!! (19…0-0 is good, but the move played whips up a powerful attack even more quickly) 20.Qh5+ 20…Kf8 21.Nf2 Bf6!

Ivanchuk-Kramnik Dos Hermanas 1996 Move 22

White has a dearth of pieces defending his king. Black now has a typical winning Sicilian attack against the poorly defended white king. Look at white’s pieces stuck on the kingside. Regaining the exchange by 21…Bxh1 was not necessary: play for mate!

22.Bd3 Na4 23.Rhe1 23…Bxb2+!

Ivanchuk-Kramnik Dos Hermanas 1996 Move 24

24.Kb1 24…Bd5! Bringing in the other bishop into the attack with decisive effect 25.Bxb5! (25.Bxf5 25…Bxa2+! 26.Kxa2 Qc4+ 27.Kb1 Nc3+ 28.Kxb2 Qb4+ 29.Kc1 Na2#)

Ivanchuk-Kramnik Dos Hermanas 1996 Move 25

25…Bxa2+! (Not 25…axb5?? 26.Rxd5 winning for white) 26.Kxa2 axb5 27.Kb1 (27.Rxe6? 27…Qc4+ 28.Kb1 Nc3+ 29.Kxb2 Qb4+ 30.Kc1 Na2#) 27…Qa5?

27…Qe7! was much stronger threatening 28…Nc3+ 29.Kxb2 Qb4+ 30.Kc1 Na2#,

Ivanchuk-Kramnik Dos Hermanas 1996 Variation Move 28

28.Rd8+ giving up a whole rook is the only way to avoid immediate mate: 28…Qxd8 29.Re6 Bf6 wins

28.Nd3? (28.c3!! would have possibly held, when white can get to an ending a pawn down with drawing chances: buy the book to find out how) 28…Ba3!

Ivanchuk-Kramnik Dos Hermanas 1996 Move 29

White’s king is doomed 29.Ka2 (29.c3 Nxc3+ 30.Kc2 Nxd1 winning) 29…Nc3+ 30.Kb3 30…Nd5 31.Ka2 (31.Rxe6 31…Qa4+ 32.Ka2 Nc3+ 33.Ka1 Bc1#) 31…Bb4+ 32.Kb1 Bc3

Ivanchuk-Kramnik Dos Hermanas 1996 End

0-1

A superb exchange sacrifice comfortably equalising. White could have held but defending a virulent attack over the board is nigh impossible.

Chapter 6 Open File

This section covers the topic of the open file. Many different types of position are demonstrated including pure attacking chess sacrificing  a pawn or two or a piece to open files against an uncastled king.

Subtle positional struggles are also covered.  In this latter vein, the reviewer was particularly impressed with a smooth win by Michael Adams shown below.

Adams – Wang
42nd Olympiad 2016 Baku 2016

1.e4 e5 2.Nf3 Nf6 3.Nxe5 d6 4.Nf3 Nxe4 5.d4 d5 6.Bd3 Nc6 7.0-0 Be7 8.Nbd2 Bf5

Adams-Wang Baku 2016 Move 9

This is a main line in the Petroff Defence. White now exchanges some minor pieces to gain control of the e-file. White sometimes executes this strategy in the Ruy Lopez anti-Berlin variation.

9.Re1 Nxd2 10.Qxd2 Bxd3 11.Qxd3 0-0

Adams-Wang Baku 2016 Move 12

This position looks pretty equal which is undoubtedly the case, however, white has a slight lead in development and control of the e-file which make white’s position easier to play. Recently Carlsen and other top players have played these types of positions to win with success. Black must defend very precisely as shown by this game.

12.Bf4 White chooses a plan that involves the exchange of bishops and retaining control of the e-file. An alternative plan is 12.c3 followed by queenside expansion with b4 12…Bd6 13.Bg3 Bxg3 14.hxg3 Qd7

Adams-Wang Baku 2016 Move 15

15.Re3 Rfe8 16.Rae1 Rxe3 17.Rxe3 h6 (17…Re8?? runs into 18.Qf5! winning a pawn and the game, exploiting the weak bank rank)

Adams-Wang Baku 2016 Move 18

18.Qb3 Rb8

Adams-Wang Baku 2016 Move 19

19.Ne5 White exchanges knights to dominate the e-file Qd6 20.Nxc6 Qxc6 21.c3 a5 22.Qa3 b6 23.Qe7 White now dominates the e-file. What does white do next?  The logical plan is to attack on the kingside by advancing the kingside pawns to expose black’s king and use white’s more active pieces to mate black. Black decides to pre-empt this plan by correctly creating counterplay on the queenside.

Adams-Wang Baku 2016 Move 23

b5! 24.a3 b4 25.axb4 axb4 26.cxb4

Adams-Wang Baku 2016 Move 26

Black is closer to the draw, but must be very precise to exchange off the queenside pawns.

Qc1+? (A natural check but this probably loses, 26…Qb6! was the exact move required: 27.Rf3 f6 28.Rc3 Qxd4! 29. Rxc7 Qd1+ 30.Kh2 Qh5+ with a draw by perpetual check) 27.Kh2 Qxb2

Adams-Wang Baku 2016 Move 28

28.Rf3? (Gifting black a chance to save the game, 28.Qxc7 Qxb4 29. Re5! wins a pawn under favourable circumstances, although white must display some technique to convert) Rf8? (28…f6! draws viz. 29. Qxc7 Qxb4 30.Rf5 Qb6! forcing a queen trade 31. Qxb6 Rxb6 32. Rxd5 Rb2 33.f3 Rd2 with a drawn rook ending but black will have to demonstrate sound technique to hold this ending a pawn down) 29.Qc5 c6 30.Qxc6

Adams-Wang Baku 2016 Move 30

So white has won a pawn: black may be lost even with best play, but he can make things difficult for white.

Qxd4? (31…Qxb4! 32. Qxd5 offers black chances to draw but the presence of queens makes things much harder for the defending side. With the queens off and black’s rook on d2, black would be drawing) 31.b5 This pawn runs very fast, the d-pawn offers no real counterplay Qe5 32.b6 Re8 Black threatens mate in two

Adams-Wang Baku 2016 Move 33

33.Rf4 Qe6 34.Qb7?!

blocking the passed pawn doesn’t look right. More accurate for white was 34.Qc7! After 34…Qe7 we reach:

Adams-Wang Baku 2016 Variation Move 35

35.Qa7! wins nicely, for example 35…Qxa7 36.bxa7 Ra8 37.Ra4 White’s king is in the square of the d-pawn, so black is totally lost.

34…g5 35.Ra4 Qe2? (35…Kg7 getting the king off the back rank was the only hope to fight on) 36.f3 d4

37.Ra8 was quicker and more forceful, 37…d3

Adams-Wang Baku 2016 Variation Move 38

38.Qc6! Rxa8 38.Qxa8+ Kh7 39. b7 d2 40.b8Q d1Q 41.Qg8#

37.Qd7 Qe7 38.Qxe7 Rxe7

Adams-Wang Baku 2016 Move 39

39.Ra7! The b-pawn costs black his rook 1-0

An instructive win with white elegantly exploiting a very small advantage. Notice how one mistake on move 26 loses black the game. It is surprising that black is already in the “zone of one mistake” from a seemingly innocuous opening.

Chapter 7 G-Pawn Strategies

This section covers the early aggressive push of the g-pawn against a castled king. This occurs in many different openings.

The Neo-Steinitz is not popular in modern GM praxis although  Keres and Portisch did play this opening. Mamedyarov is a very aggressive player who plays the Neo-Steinitz. The following game is a slugfest.

Grischuk – Mamedyarov
Hersonissos 2017

1.e4 e5 2.Nf3 Nc6 3.Bb5 a6 4.Ba4 d6

Grischuk-Mamedyarov Hersonissos Move 5

5.0-0 Bd7 6.Re1 (6.d4, c3 or c4 are more common) g5! This idea is perfectly sound, it was introduced by Portisch in 1968 against Kortschnoi.

Grischuk-Mamedyarov Hersonissos Move 7

7.Bxc6 (7.d4 is possible but will probably transpose into the game) bxc6! 8.d4 g4 9.Nfd2 exd4 10.Nb3

Grischuk-Mamedyarov Hersonissos Move 10

10…Ne7 (10…c5 is too greedy, after 11.c3 white has plenty of compensation for the pawn) 11.Nxd4 Bg7 12.Nc3 0-0 13.Bg5 f6 14.Be3 Qe8

Grischuk-Mamedyarov Hersonissos Move 15

Black will move his queen over to the kingside and push his pawns for a direct attack

15.Qd3? This move and the next just lose time, clearly white was unsure of his correct plan 15…Qf7 16.Qd2 Qg6 (16…c5! 17.Nde2 Bc6 followed by f5 looks great for black) 17.Bf4 h5

Grischuk-Mamedyarov Hersonissos Move 18

18.b4 h4 19.a4 Qh5 20.Be3

Grischuk-Mamedyarov Hersonissos 2017 Move 20

h3 (20…f5! was perhaps even stronger: 21.exf5 h3! 22.Ne4 hxg2 23.Ng3 Qh3 the main threat is to move a rook to the h-file) 21.Nce2! (21.g3 fails to 21…f5 22.Bf4 fxe4 23. Rxe4 Qf7 with 24…Ng6 to follow and white crumbles) hxg2

Grischuk-Mamedyarov Hersonissos Move 21

 22.Nf4 Qh7!? An exchange sacrifice, 22…Qf7 was also very good for black 23.Nfe6 Bxe6 24.Nxe6

Grischuk-Mamedyarov Hersonissos 2017 Move 24

Ng6! The knight is heading to f3  25.Nxf8 Rxf8 26.Bf4! (26.Ra3 f5! 27.Bd4 f4 and black’s attack is crashing through) f5 (26…Nh4 is answered by 27.Ra3) 27.exf5 Nh4

Grischuk-Mamedyarov Hersonissos Move 28

28.Ra3?

The final mistake, 28.Qd3! was essential and white can just save the game, one line is 28…Bxa1 29. Rxa1 Rxf5! 30.Bg3 Nf3+ 31. Kxg2 Qh3+ 32.Kh1 Rf6! Threatening Rh6

Grischuk-Mamedyarov Hersonissos 2017 Variation Move 33

33.Qe4! Kf8 34.b5! Qh5! 35.Kg2! Rh6 36.Qf4+ Kg7 37.bxa6 Qh3+ 38.Kh1 Re6 39.a7 Ne1 40.Qg5+ Kh7 41. Qf5+ Kg7 draw by perpetual

Grischuk-Mamedyarov Hersonissos 2017 Variation Move 42

28… Qxf5 29.Bg5 Nf3+ 30.Rxf3 gxf3 31.Bh6

Grischuk-Mamedyarov Hersonissos Move 31

31…Qd5? 

A mistake 31…Qf6 forces a winning rook ending: 32.Bxg7 Kxg7 33. Qd3 Rh8 34.Qe4 Qh4. 35.Qe7+ Qxe7 36.Rxe7+ Kg6 37.Re3 Rf8 winning

Grischuk-Mamedyarov Hersonissos Variation Move 38

32.Qc1 (32.Qe3! gives white some hope) Bc3 33.Re3 (33.Rd1 also loses  Qh5 34. Rd3 Be5 35.Qg5+ Qxg5 36.Bxg5 Rf5 37.Bh4 Kf7 winning) Bd4 34.Rd3 Re8

Grischuk-Mamedyarov Hersonissos Move 35

35.c3

35.Be3 leads to a lost queen ending 35…Bxe3 36.Rxe3 Rxe3 37.fxe3 Qc4

Grischuk-Mamedyarov Hersonissos Variation 2 Move 38

The threat of  38…Qe2 is decisive.

35… Bxf2+ 36.Kxf2 Re2+

Grischuk-Mamedyarov Hersonissos End

The checks run out after 37.Kg1 Qxd3 38.Qg5+ Kf7 39.Qg7+ Ke8 40.Qf8+ Kd7 and the black king escapes to b7  0-1

This book is aimed at grades 160+ players although aspiring players with lower ratings would benefit from reading this book.

To summarise, this is an good read with lots of educational games demonstrating the themes in each chapter. My only minor criticism is chapters 2 & 3 are very specialised handling middlegames from two particular opening systems. The other chapters handle more generic themes.

FM Richard Webb, Basingstoke, Hampshire, 5th July 2021

Book Details :

  • Hardcover : 326 pages
  • Publisher:Thinkers Publishing; 1st edition (17 Dec. 2019)
  • Language: English
  • ISBN-10:949251060X
  • ISBN-13:978-9492510600
  • Product Dimensions: 17.02 x 1.27 x 23.37 cm

Official web site of Thinkers Publishing

Chess Middlegame Strategies - Strategy Meets Dynamics Volume 3, Ivan Sokolov, Thinker's Publishing. 2019, ISBN-13 ‏ : ‎ 978-9492510600
Chess Middlegame Strategies – Strategy Meets Dynamics Volume 3, Ivan Sokolov, Thinker’s Publishing. 2019, ISBN-13 ‏ : ‎ 978-9492510600
 Save as PDF

Understanding Maroczy Structures

Understanding Maroczy Structures, Adrian Bohdanovych Mikhalchishin and Georg Mohr, Thinker's Publishing, 2019, ISBN-13 ‏ : ‎ 978-9492510549
Understanding Maroczy Structures, Adrian Bohdanovych Mikhalchishin and Georg Mohr, Thinker’s Publishing, 2019, ISBN-13 ‏ : ‎ 978-9492510549

From the publisher:

“Using carefully selected examples, the authors want to make you familiar with the strategic ideas behind the famous Maroczy bind. These plans arising from both colours, are a must for your arsenal of chess knowledge and understanding.”

FIDE Senior Trainer GM Adrian Mikhalchishin

“Adrian Bohdanovych Mikhalchishin was born in Lvov, Ukraine in 1954 and became a Grandmaster in 1978. In 1995 he took Slovenian citizenship and became a FIDE Senior Trainer from 2002 and was chairman of FIDE Trainers Commission from 2009. Adrian was a trainer of many famous chess players. Amongst others he was in Anatoly Karpov’s team during matches with Garry Kasparov. He has worked with Maja Chiburdanidze, Nana Aleksandria, the Polgar sisters, Alisa Maric and Nana Dzagnidze. He was coach and captain of the national teams of Slovenia and the Netherlands. In recent years he has been coach of the Turkish woman team. He has written many chess books and thousands of articles for many chess magazines.”

“Georg Mohr was born in Maribor, Slovenia in 1965 becoming a Grandmaster in 1997. He joined as a member of the FIDE Trainers Commission from 2002, becoming a FIDE Senior Trainer in 2004 and a FIDE International Organizer in 2011. Georg has been a professional chess trainer for many years. He was coach and captain of Slovenian national team from 2003 – 2010 and since 2011 he has been Turkish national youth trainer. He is a chess writer and was editor of Slovenian chess magazine Šahovska Misel from 1999 and editor of Fide Trainers Commission trainers’ surveys. He is also an organiser of chess events acting as tournament director of the European Club Cup (Rogaška Slatina 2011), the World Youth Championship (Maribor 2012) and the World Senior Championship (Bled 2018).”

 FIDE Senior Trainer Georg Mohr
FIDE Senior Trainer Georg Mohr

Looking at the title of this book, Understanding Maroczy Structures, it appears to be an abstruse book on a specialised middlegame structure which many club players will know by name. They will be able to describe the tusks on c4 and e4 and probably have lost a game horribly against a stronger player who squeezed the life out of them like a hungry reticulated python.  Chess like a reticulated python has beautiful patterns: this book covers all the major ideas and patterns in the Maroczy structures. The reader may be thinking: I don’t play these systems for either colour, it’s of no relevance to me. The reviewer begs to differ: many general, important middlegame themes are demonstrated in this book such as:

  • Avoiding exchanges to keep the opponent cramped
  • Exchanging pieces to relieve cramp
  • Use of knight outposts
  • Using a space advantage to attack on the queenside
  • Using a space advantage to attack the king
  • Using the bishop pair
  • Pawn levers to attack the opponent’s pawn structure & relieve cramp
  • Opening up the position to exploit a space advantage and better placed pieces
  • Bad bishops and weak colour complexes

This book is not a repertoire bible for playing the Maroczy bind; it is a examination of the typical middlegame strategies for both sides in these complex and interesting positions. It is definitely harder to play for the side playing against the Maroczy structures.

The book is structured into five sections and sixteen chapters.

Section 1 Introduction to the Maroczy is divided into three logical foundation chapters:

Chapter 1 What is the Maroczy Structure?

This chapter covers the typical move orders to reach Maroczy bind structures including the Rubinstein variation of the Symmetrical English opening which is a reversed Maroczy.

Here is the most well known incarnation of the Maroczy bind arising from an Accelerated Dragon.

Maroczy Bind
Maroczy Bind

Here is the reversed Maroczy mentioned above:

Reversed Maroczy Bind

This chapter enumerates the possible ways that a Maroczy structure can be reached which is usually through the Sicilian Defence (many different ways), English Opening and King’s Indian Defences.

Chapter 2 Typical Positions

This short chapter shows typical positions concentrating mainly on some key decisions & strategies:

  • White’s decision whether to defend his knight on d4 or retreat it to c2
  • White’s white squared bishop development to e2, d3 or more rarely g2
  • Defending the e-pawn with f3 or Bd3
  • Black’s dark square strategy
  • Recapturing on d5 with the e-pawn, c-pawn or a piece
  • The potential weakness of the d4 square

All these topics are covered in subsequent chapters.

Chapter 3 History

Akiba Rubinstein was one of the first players to master Maroczy structures; Mikhail Botvinnik stated that he learnt how to play these positions by studying Rubinstein’s games.

Here is a masterclass by the first Soviet World Champion in his younger days:

Lisitsin – Botvinnik
Leningrad Championship 1932

1.Nf3 c5 2.c4 Nf6 3.g3 d5 4.cxd5 Nxd5 5.Bg2 Nc6 6.0-0 e5 reaching the Rubinstein variation of the Symmetrical English. White now embarks on a slow development scheme which is too passive and not played by modern masters.

Lisitsin-Botvinnik Leningrad 1932 Move 7

7.d3 Be7 8.Nbd2 0-0 9.Nc4 f6 10.Be3 Be6 11.a4 The trouble with this move and white’s plan is that the b4 break is now never available. The other two possible breaks to achieve counterplay in Maroczy structures are f4 or e3/d4, both of which are impossible to achieve in a satisfactory manner with white’s slow, flawed development scheme.

Lisitsin-Botvinnik Leningrad 1932 Move 11

11…Qd7 12.Qd2 b6 13.Rfc1 Rac8 both sides have developed their pieces but black already has a distinct edge and a far easier position to play. White’s next seven moves are pure faffing and he clearly does not know what to do.

Lisitsin-Botvinnik Leningrad 1932 Move 14

14.Qd1 Kh8 15.Bd2 Rfd8 16.Qb3 Nc7 17.Bc3 Rb8 18.Qc2 Nd5 19.Nfd2 Rbc8 20.Nf1 After several moves of shadow boxing, black has a distinct advantage and now acts.

Lisitsin-Botvinnik Leningrad 1932 Move 20

20…Nd4 21.Qd1 Bg4! A typical idea pressuring the e-pawn. White must remove the powerful knight or play the equally unpalatable f3

22.Bxd4 exd4 The recapture with the e-pawn exposes white’s e2- pawn to potential pressure from black’s rooks. Notice how Botvinnik skilfully manoeuvres to arrange this.

23.Qd2 Bf8 24.Re1 Re8 25.h4 Bh3 26.Bf3 Re7 27.Nh2 Rce8 28.Kh1 Be6! White has no counterplay and must simply wait for the reticulated python to tighten its coils.

Lisitsin-Botvinnik Leningrad 1932 Move 29

29.b3 Nb4 (not 29…Nc3? when white has 30.e4!) 30.Bg2 Bd5 Attempting to exchange a key defender of the king 31.Nf3 Rf7! Further masterful manoeuvring points more black pieces  at white’s kingside 32.Kh2 Bd6 33.Bh3 Qd8 34.Rab1 Rfe7 35.Ng1 Bc7 36.Na3 Bb7 Compare the respective activity of each side’s pieces. It is not surprising that white collapses quickly.

Lisitsin-Botvinnik Leningrad 1932 Move 37

37.Bg2 Bxg2 38.Kxg2 Nd5 39.Nc2 Qd6 40.Na3 Ne3+ 41.Kh1 Ng4! with numerous murderous threats

Lisitsin-Botvinnik Leningrad 1932 Move 42

42.Qf4 total desperation and hopeless Qxf4 43.gxf4 Nxf2+ 44.Kg2 Nxd3 0-1

An absolute crush of Georgy Lisitsin who was Leningrad champion three times.

Section 2 Typical Methods of play for White consists of four chapters covering:

  • Attack on the queenside with b2,(b3),b4 aiming to limit the activity of black’s pieces
  • Attack on the kingside: f2-f4-f5
  • Play Nd5 and after its capture, respond with cxd5 or exd5 or capture on d5 with a piece
  • Withdrawing the d4 knight to c2, b3 or e2 with a queenside attack

Chapter 4 covers white’s queenside attacking plans involving b4.

The follower encounter shows an ideal strategic white win.

Knaak – Walter
East German Championship Erfurt, 1973

1.c4 c5 2.Nf3 g6 3.d4 cxd4 4.Nxd4 Bg7 5.e4 Nc6 6.Be3 Nf6 7.Nc3 By transposition, an Accelerated Sicilian Dragon has been reached. Black plays a popular variation to exchange a pair of knights.

Knaak-Walter Erfurt 1973 Move 7

Ng4 8.Qxg4 Nxd4 9.Qd1

Knaak-Walter Erfurt 1973 Move 9

9…Nc6 Black normally retreats the knight to e6 here. 9…e5 is an interesting try. 10.Qd2 Qa5 11.Rc1! (Black was threatening Bxc3, another key strategy) d6 12.Be2 Be6 13.0-0 Rc8 14.a3 0-0

Knaak-Walter Erfurt 1973 Move 15

15.Rc2! (White effects a smart manoeuvre to prepare b2-b4) Rfe8 16.Rb1! a6 17.b4!

Knaak-Walter Erfurt 1973 Move 17

Qd8 (Black cannot take the a3 pawn: after 17…Qxa3 18. Nd1! followed by 19.Ra2 wins the queen) 18.Rbc1 Ne5 Black looks to have play against the c4 pawn, but white’s next move squashes any black hopes of counterplay.

Knaak-Walter Erfurt 1973 Move 19

19.Nd5! Bxd5 The knight has to be removed 20.cxd5 (As white’s rooks are already doubled opening the c-file is very strong 20…Qd7 21.h3! (Stopping any ideas of Ng4) 21… f5 Desperately seeking some play 22.f4! A typical reaction pushing the knight back 22…Nf7 23.exf5 gxf5 24.Bb6! (Another thematic idea dominating the c7 square)

Knaak-Walter Erfurt 1973 Move 24

Bf6 25.Rc7 Rxc7 26.Rxc7 The rook penetrates with decisive attack. The black king is soon on the menu. Qa4 27.Qd3 Bb2 28.Qxf5 (The attack is soon decisive)

Knaak-Walter Erfurt 1973 Move 28

Qxa3 29.Bh5 Bf6 30.Qe6 Rf8 31.Qg4+ Ng5 32.fxg5 1-0

Chapter 5 covers white’s attacking options on the kingside.

The game below shows a Maroczy Bind position being reached from a transposition into a Symmetrical English with an exemplary attacking display from a former World Champion.

Smyslov  – Timman
Moscow 1981

1.d4 Nf6 2.Nf3 g6 3.g3 c5 4.Bg2 cxd4 5.Nxd4 Bg7 6.c4 Nc6 7.Nc3 Nxd4 8.Qxd4 0-0 9.0-0 d6 10.Qd3 This position is a well known variation of the English Symmetrical which is definitely better for white.

Smyslov-Timman Moscow 1981 Move 10

Bf5?! (This idea is now known to be inaccurate. Better is 10…Rb8, 10…a6 or 10…Ng4 but white retains an advantage in all cases)
11.e4 Be6 12.b3 12…a6 13.Bb2 Nd7 14.Qd2! 14…Nc5 (14…Qa5 15.Rfd1 Rfc8 16.Nd5!±)

Smyslov-Timman Moscow 1981 Move 15

15.f4! Rc8? (Careless, underestimating white’s attacking chances, better is 15…f5 16.exf5 Bxf5 17.Nd5 when white has a clear advantage, but black can fight on) 16.f5 Bd7 17.f6!±  (Obviously missed by Timman)

Smyslov-Timman Moscow 1981 Move 17

exf6 (17…Bxf6 18.Rxf6! exf6 19.Nd5±) 18.Nd5 f5 19.exf5 Bxf5 (19…gxf5!? 20.Bxg7 Kxg7 21.Qd4+ f6±) 20.Bxg7 Kxg7 21.Qd4+ f6 22.g4! Be6 (22…Ne6 23.Qd1!+- as the bishop is trapped )

Smyslov-Timman Moscow 1981 Move 23

23.Nxf6! Rxf6 24.g5+- Bf5 25.Rad1 b5 26.cxb5 axb5 27.gxf6+ Qxf6 28.Qxf6+ Kxf6 29.Rxd6+ Ne6 30.Rb6 Rc5 31.Re1 1-0

Chapter 6 A leap to d5

This chapter covers the white’s knight leap to d5 and white’s three possible responses to its capture:

  • Taking cxd5
  • Taking exd5
  • Taking with a piece x d5

Lev Polugaevsky was considered an expert on the white side of the Maroczy bind. Here is a didactic game of his demonstrating the power of cxd5 and the use of the bishop pair. This is a common type of win in the Maroczy bind,  so this game is worth studying carefully.

This game also demonstrates that entering a vastly inferior endgame with no chance of counterplay is poor judgement particularly against a very strong technical player: the speculative 12…Qxa2 keeping the queens on had to be tried.

Polugaevsky – Ostojic
Belgrade 1969

1.c4 g6 2.e4 c5 3.Nf3 Nc6 4.d4 cxd4 5.Nxd4 Nf6 6.Nc3 Nxd4 7.Qxd4 d6 8.Be3 Bg7 9.f3 0-0 10.Qd2 Be6 11.Rc1 Qa5

Polugaevsky-Ostojic Belgrade 1969 Move 12

12.Nd5! Qxd2+? (Black should have tried the complicated 12…Qxa2 13.Nxe7+ Kh8 14.Be2 with a white edge)13.Kxd2 Bxd5 (13…Nxd5 14. cxd5 Bd7 15.Rc7+- a decisive penetration to the seventh rank) 14.cxd5 Rfc8 15.Rxc8+ Rxc8

Polugaevsky-Ostojic Belgrade 1969 Move 16

16.g3! (A typical move activating the white squared bishop) Rc7 (16…b6 17.Bh3 Rc7 18.Rc1 Ne8 19.b4 Rxc1 20.Kxc1 Nc7 21.Bd7! wins as in Gheorghiu – Szilagyi  Varna 1971 – another game well worth studying in this book) 17.Bh3 Nd7 18.Rc1! (Exchanging rooks enables white to carve up the black queenside) Rxc1 19.Kxc1 Nb6 20.Kc2 Kf8 21.b3 The simple plan of a4-a5 is unstoppable

Polugaevsky-Ostojics Move 21

Ke8 22.a4 Kd8 23.a5 Nc8 24.Bxc8 Kxc8 25.Bxa7 (White effortlessly wins the bishop ending a pawn up) e6 26.Kd3 exd5 27.exd5 Bb2 28.Kc4 Bc1 29.Kb5 Kc7 30.Bb6+ Kd7 31.a6 bxa6+ 32.Kxa6 Bd2 33.Ba5 1-0

Recapturing with exd5 is also a common strategy which has already been showcased with a Botvinnik win earlier in the review. Here is a more modern example between two 2700+ players with a crisp finish.

Notice that the white squared bishops are exchanged very early. It is not clear which side this favours. White gets rid of his potential bad bishop, but his c-pawn can be vulnerable. Black has exchanged a minor piece relieving his cramp.

Bacrot – Giri
Bundesliga 2013

1.e4 c5 2.Nf3 d6 3.Bb5+ Bd7 4.c4!? Nf6 5.Nc3 g6 6.0-0 Bg7 7.d4 cxd4 8.Nxd4 0-0 9.Bxd7 Qxd7 Reaching a standard position from the Moscow Variation.

Bacrot-Giri Emsdetten 2013 Move 10

10.b3 (10.f3 preparing Be3 allows the clever 10…Rc8 11.b3 d5!! equalising 12.exd5 Nxd5! 13.Nxd5 e6=) Nc6 11.Bb2 a6 (11…e6 followed by Rfd8 and d5 should be considered and is another standard idea to break up the Maroczy bind) 12.Nxc6

Bacrot-Giri Emsdetten 2013 Move 12

Qxc6?! (12…bxc6 13. Re1 Qc7 is better as black has a better share of the centre controlling d5 with his c-pawn) 13.Nd5! Nxd5?! (Better was 13…Rfe8 14.Nxf6 Bxf6 15.Bxf6 exf6 followed by Re6 when white has a slight edge) 14.exd5 Qc5 15.Bxg7 Kxg7 16.Re1 With heavy pieces the pressure on e7 is very uncomfortable, Black’s play with b5 turns out to be illusory. White’s space advantage spearheaded by the d5-pawn effectively splits black’s position into two compartments, thus facilitating a direct attack on black’s king. It is very difficult for black to funnel his pieces across to defend his kingside.

Bacrot-Giri Emsdetten 2013 Move 16

Rfe8  (Black had to play 16…e5 allowing 17.dxe6 fxe6 when white has very easy play against the e6 and d6 pawns, but at least black gains breathing space, opens the f-file for his rook and he can defend his king 17.Qd2! (White has a host of ideas after this multi-purpose queen move: Rac1 & b4, c5 or Re4, Rae1 and Rh4) b5? (Again 17…e5 had to be played) 18.Rac1! (Compare the activity of each side’s rooks, white prepares b4 and c5 creating a dangerous passed pawn)

Bacrot-Giri Emsdetten 2013 Move 18

Qa7?! (18…b4 is probably better, but white will turn his attention to the kingside) 19.b4! bxc4 20.Rxc4 h5 (20…Rac8 21.Qc3+ is a neat fork) 21.Qc3+ Kg8 22.Rc7 Qb6 23.a4! (Stopping any play with a5, because white replies b5!)

Bacrot-Giri Emsdetten 2013 Move 23

Rab8 24.Re4 f6 25.g4 Rb7? Desperation

Bacrot-Giri Emsdetten 2013 Move 26

26.Qxf6! A lovely combination to finish  1-0

Taking with a piece on d5 is demonstrated with another famous Botvinnik victory.

Botvinnik-Toran Palma de Mallorca 1967 Move 22

Botvinnik to move continued 22.Rxd5! The strategical idea is simple: utilise the pawn level e4-e5 to smash up black’s pawn structure and penetrate with the more active rooks.

22…Rc6?! (Better is 22…Rc7 defending the 7th rank 23.e5 dxe5 24.fxe5 f5 25.Red1 Rgc8 with chances to hold, but white is for choice) 23.e5 dxe5 24.fxe5 Re6 25.Kf2 Rf8 26.Rd7! fxe5+ 27.Ke3 Rb8 28.Ke4 Kg8 29.Kd5 Kf7 30.Rxe5 White has an enormous advantage

Botvinnik-Toran Palma de Mallorca 1967 Move 30

30…Rd6+ 31.Rxd6 exd6 32.Kxd6 Rd8+ 33.Kc7 Rd2 34.Kxb7 Rxg2 35.c5 Rxh2 36.c6 Rc2 37.b4 1-0

Chapter 7 covers the retreat of the white knight from d4 to avoid freeing exchanges for black. Here is a thematic game played by Nigel Short.

Short – Felgaer
Buenos Aires 2001

1.e4 c5 2.Nf3 Nc6 3.d4 cxd4 4.Nxd4 g6 5.c4 Bg7 6.Be3 Nf6 7.Nc3 0-0 8.Be2 d6 9.0-0 Bd7 10.Nc2 (White withdraws the knight to prevent black exchanging)

Short-Felgaer Buenos Aires 2001 Move 10

a6 (10…Qa5?  just encourages white expansion viz: 11. f4 Rac8 12.Rb1! a5 13.b4 Qd8 14. Qd3 and white has a big advantage) 11.f3 A typical move to shore up the e4-pawn allowing the c3-knight to eye up b5 preventing b5 by black Rc8 12.Rc1 Re8 13.Qd2 Qa5

Short-Felgaer Buenos Aires 2001 Move 13

14.Rfd1! Ne5 [14…Red8 15.b4!

Short-Felgaer Buenos Aires 2001 Variation Move 15

A typical tactic based on the undefended e7-pawn, if 15…Nxb4? 16.Nd5! Nc6 17.Qxa5 Nxa5 18.Nxe7+ and 19.Nxc8 winning, so 15…Qh5 is forced when 16.Nd5 leaves white better.

15.b4 (15.c5! is even better: dxc5 16.f4 Neg4 17.e5 winning) 15…Qd8 16.Na3

Short-Felgaer Buenos Aires 2001 Move 16

Short enjoys a solid space advantage, but his pawns will require full piece support. 16…a5 [16…Bc6 17.b5 axb5 18.cxb5 Bd7 19.b6 white is better] 17.b5 Be6 17…b6?

Short-Felgaer Buenos Aires 2001 Variation Move 17

18.Na4! Rb8 19.Bd4 Qc7 20.Qe3+- wins the weak b6-pawn] 18.Na4 Nfd7 (18…Ned7 19.b6±) 19.b6!

Short-Felgaer Buenos Aires 2001 Move 19

White has a huge advantage that he duly converted.

Part 3 covers Typical Methods of Play For Black and is an important chapter if you are intending to face the Maroczy Bind.

Black has four strategies to combat the Maroczy, each of which is covered in a separate chapter:

  • e6 & d5 attacking both tusks simultaneously
  • b5 undermining the c4 pawn
  • f5 undermining the e4-pawn
  • dark square strategy

Chapter 8

The e6-d5 central strike commonly occurs in the Maroczy structure reached via the Moscow Variation of the Sicilian Defence. Here is an example played by World Champion Garry Kasparov.

Akopian – Kasparov
Bled  2002

1.e4 c5 2.Nf3 d6 3.Bb5+ Bd7 4.Bxd7+ Qxd7 5.c4 Nc6 6.d4 cxd4 7.Nxd4 Nf6 8.Nc3 g6 9.f3 Bg7 10.Be3 0-0 11.0-0

Akopian-Kasparov Bled 2002 Move 10
Akopian-Kasparov Bled 2002 Move 11

a6!? (Normal is 11…Qd8 intending Qa5 to activate the queen on the dark squares) 12.a4 e6 Again Qd8 is possible 13.Rc1 Ne5 14.b3 (14.Qe2 Rfc8! 15. b3 d5! = is another Kasparov game)

Akopian-Kasparov Bled 2002 Move 14

d5 15.cxd5 exd5 16.Nxd5 Nxd5 17.exd5 Rfe8 18.Bf2 Qxd5 19.Qc2

Akopian-Kasparov Bled 2002 Move 19

Ng4 20.fxg4 Bxd4 21.Qc4 Bxf2+ 22.Rxf2 Qxc4 23.Rxc4 Re7 24.h4 ½-½

Chapter 9 covers the f7-f5 strike. Here is a superb game by the young Boris Spassky before he became World Champion.

Furman – Spassky
USSR Championship Moscow 1957

1.Nf3 c5 2.c4 g6 3.e4 Bg7 4.d4 cxd4 5.Nxd4 Nc6 6.Be3 Nh6 7.Nc3 0-0 8.Be2

Furman-Spassky Moscow 1957 Move 8

8…f5! Attacking the e4 tusk

9.exf5 [9.Bxh6!? is playable: 9…Bxh6 10. exf5 Nxd4 11. Qxd4 Rxf5 (11…gxf5 12.0-0 Bg7 13.Qd2 and black has problems with the c8 bishop) 12. 0-0 Bg7 13.Qd3 white has an initiative] 9…Bxd4! 10. Bxd4?! (10.Bxh6 is probably better 10…Rxf5 11.0-0 d6 12.Qd2 and black again has problems with the c8 bishop) 10.Bxd4 Nxf5 11.Bc5 The bishop is driven to an awkward place  d6 12.Ba3 Nfd4! (Making way for the white squared bishop) 13.0-0 Bf5 14.Rc1 Qd7 Intending to double on the f-file with his rooks

Furman-Spassky Moscow 1957 Move 15

15.Nd5?! White should have improved his bishop on a3 viz: 15.b3 Rf7 16.Bb2 Raf8

Furman-Spassky Moscow 1957 Variation Move 17

17.Nb5! Exchanging off the powerful knight 17…Nxe2+ 18.Qe2 and white is slightly better owing to the great bishop on b2

Rf7 16.b3 Raf8 17.Bb2 e5! Cementing the wonderful steed

Furman-Spassky Moscow 1957 Move 18

18.b4 (The prophylactic 18.f3 is better) Be6! 19.Bd3 Bg4!!

Furman-Spassky Moscow 1957 Move 20

20.f3 (20.Qd2 Bf3! 21. h3 Qd8!! 22. Qh6 Be2 wins the exchange) 20…Bxf3! 21.gxf3 Nxf3+ 22.Kh1 Qh3! 23.Rf2 Ne1!!

Furman-Spassky Moscow 1957 Finish

0-1

Chapter 10 covers the a6-b5 break. Here is a game showing a typical white inaccuracy allowing black counterplay.

Ehrenfeuch – Neverov
Warsaw 1992

1.Nf3 Nf6 2.c4 g6 3.Nc3 Bg7 4.e4 d6 5.Be2 0-0 6.0-0 c5 7.d4 cxd4 8.Nxd4 Nc6 9.Be3 Bd7 10.Rc1

Ehrenfeucht-Neverov Warsaw 1992 Move 10

a6 The usual plan here is to exchange knights, play the bishop to c6 and attempt to exchange dark squared bishops with Nd7 11.Qd2?! (11.f3! had to be played to overprotect the e-pawn)  b5! Of course 12.cxb5 Nxd4 13.Bxd4 axb5 A massive change has occurred, black has plenty of space on the queenside, he has equalised.

Ehrenfeucht-Neverov Warsaw 1992 Move 14

14.a3 Qa5 (Threatening 15…Nxe4!) 15.Rc2 Bc6

Ehrenfeucht-Neverov Warsaw 1992 Move 16

16.Qe3?! (16.Nd5 Bxd5 17.exd5 Qxd2 18.Rxd2 is approximately equal) Rfb8! Threatening to trap white’s bishop with e5 17.e5 dxe5 18.Bxe5 Rd8 19.Bf3 Rac8 20.Rd1 Bxf3 21.Qxf3

Ehrenfeucht-Neverov Warsaw 1992 Move 21

b4! A typical minority attack 22.Bxf6 b3! A superb Zwischenzug 23.Rcc1 Bxf6 Black has huge pressure on the white queenside with a dragon bishop breathing fire, white is busted

Ehrenfeucht-Neverov Warsaw 1992 Move 24

24.h3 Rxd1+ 25.Qxd1 Qg5 26.h4 Qxh4 27.Qxb3 Be5 28.Qb7 Qh2+ 29.Kf1 Rb8 30.Qxe7 Qh1+ 31.Ke2 Qxc1 32.Qxe5 Qxb2+ 33.Kd3 Rd8+ 34.Kc4 Rc8+ 35.Kd3 Qxa3 36.g4 h6 0-1

Chapter 11 Dark-squared strategy is one of the most interesting chapters and should be studied carefully. I shall showcase a good tussle between World Champion Anatoly Karpov and Bent Larsen.

Karpov – Larsen
Brussels 1987

1.e4 c5 2.Nf3 Nc6 3.d4 cxd4 4.Nxd4 g6 5.c4 Bg7 6.Be3 Nf6 7.Nc3 Ng4 8.Qxg4 Nxd4 9.Qd1 Ne6 10.Qd2 Qa5 11.Rc1 b6

Karpov-Larsen Brussels 1987 Move 12

12.Be2 Bb7 13.f3 h5 14.0-0 g5 15.Rfd1 d6 (White has achieved nothing, a3 & b4 does not trouble black’s queen as it can move to the lovely central square e5, so white transitions into an ending)

Karpov-Larsen Brussels 1987 Move 16

16.Nd5 Qxd2 17.Rxd2 Be5 18.b4 hoping for c5

Karpov-Larsen Brussels 1987 Move 18

Rc8 19.a4 h4! 20.Bf1 f6 21.Ra2 Hoping for a5 21…Bd4! Getting the dark squared bishops off

Karpov-Larsen Brussels 1987 Move 22

22.Kf2 Kf7 23.a5 Bxd5 24.exd5 Bxe3+ 25.Kxe3 Nf4

Karpov-Larsen Brussels 1987 Move 26

26.Kd2 Rc7 27.axb6 axb6 28.Ra6 Rhc8 29.Rxb6 Nxd5 30.Rb5 Nf4 with equal play

Karpov-Larsen Brussels 1987 Move 31

31.Ra5 Ng6 32.c5 Ne5 33.Rc3 dxc5 34.bxc5 Rb8 35.Bb5 Rd8+ 36.Ke2 Nc6 37.Bxc6 Rxc6 38.g3 Rd4 39.Rb5 hxg3 40.hxg3 Rd5 41.g4 Rc7 42.Ke3 e6 43.Rc2 Ke7 44.Rc3 Kf7 45.Rc2 f5 46.gxf5 exf5 47.Kf2 Kg7 ½-½

The game Serper – Sorenson Tunja 1989 is well worth study.

Serper-Sorensen Tunja 1989 Move 19

19…Qf8 (carrying out a sophisticated plan to exchange black squared bishops with Qf8, h5, Kh7 and Bh6) 20.Rd1 h5 21.Bd3 Kh7 22.Ne3 Bh6

Serper-Sorensen Tunja 1989 Move 23

23.Nf4 Bc6 24. Nd5 Bxc6 25.exd5 Bxe3+ 26.Qxe3

Serper-Sorensen Tunja 1989 Move 26

Black has to relieve the pressure on the e-pawn by playing e6 at some point.

Re8 27.Bc2 e6 28.dxe6 Rxe6 29.Qd2 b6 30.Re1 Rae8 31.a3 Rxe1+ 32.Rxe1 Rxe1+ 33.Qxe1 Qg7

Serper-Sorensen Tunja 1989 Move 34

Black has a winning positional advantage owing to the passive bishop and weak dark squares. The queen and knight combine well.

34.h4!? Too weakening Qb2 35.Qd1 Qxa3 36.f4 Ne6! 37.Qxh5+ Kg7 38.Qd1 Qc5+ 39.Kf1 Nxf4 40.Qf3 Qe5 41.g3 Ne6 42.Bd1 Nd4 43.Qd3 Nf5 44.Kf2 Qc5+ 0-1

Part IV covers some general techniques consisting of three chapters.

Chapter 12 considers an unusual move, early in the Accelerated Dragon. Here is game by Dragon specialist Tiviakov.

Beshukov – Tiviakov Saint Vincent 2000

1.e4 c5 2.Nf3 Nc6 3.d4 cxd4 4.Nxd4 g6 5.c4

Beshukov-Tiviakov Saint Vincent 2000 Move 5

5…Bh6!? 6.Bxh6 Nxh6 7.Nc3 0-0 (7…d6 could be played) 8.Be2

Beshukov-Tiviakov Saint Vincent 2000 Move 8

d6 (8…f5!? is worth considering) 9.Qd2 [9.0-0 Be6!? (9…f5!?) ] 9…Ng4 [9…Kg7] 10.Bxg4 [10.0-0 Nge5=] 10…Bxg4 11.h3?! (11.0-0 Be6 (11…Qb6!?; 11…Rc8) ] 11…Be6 12.b3 Black has equalised

Beshukov-Tiviakov Saint Vincent 2000 Move 12

Qb6 [ Black has equalised, also possible is 12…Nxd4 13.Qxd4 Qa5=;
12…Qa5!? …a6, b5] 13.Nc2 [13.Rd1 Nxd4 14.Qxd4 Qxd4 15.Rxd4=] 13…a6 [13…f5!?;
13…Qc5!?] 14.Ne3 Qc5 […b5] 15.Rc1 Qe5 [15…Rac8] 16.0-0 Qf4 [16…g5!?] ½-½

Beshukov-Tiviakov Saint Vincent 2000 Finish

Chapter 13 Capturing Bg7xc3! is all about giving up the dark squared bishop to wreck white’s queenside pawn structure.

Polugaevsky- Averbakh Leningrad 1960 illustrates this strategy well.

Polugaevsky – Averbakh
Soviet Championship Leningrad 1960

1.c4 c5 2.Nc3 Nc6 3.Nf3 g6 4.d4 cxd4 5.Nxd4 Bg7 6.Nc2 d6

Polugaevsky-Averbakh Leningrad 1960 Move 7

7.e4 (7.Bd2 is less double edged) Bxc3+ !? (The enterprising exchange of black’s fianchettoed bishop for a knight to smash up white’s queenside) 8.bxc3 Nf6 9.f3 Qa5 (Attacking the weak pawns: black’s king is safer in the middle for now. It is imperative for black to attack the weak c-pawns as soon as possible)

Polugaevsky-Averbakh Leningrad 1960 Move 10

10.Bd2 Bd7! Getting the queenside pieces into play quickly 11.Be2 Rc8 12.Ne3 Be6! Now the bishop can safely move to e6 without being harassed by the knight  13.Nd5 Nd7! (An excellent manoeuvre to hold the c5 and e5 squares and target the c4-pawn) 14.0-0 Nce5 15.Be3 White gives up the front c-pawn hoping to benefit from increased scope for his white squared bishop. White cannot attack on the kingside as black has not put his king there.

Polugaevsky-Averbakh Leningrad 1960 Move 15

Nxc4 16.Qd4 Nde5!

Polugaevsky-Averbakh Leningrad 1960 Move 17

17.Bf2 (17.f4 is met by 17..Nxe3 18.Nxe3 Qxc3) g5! Blockading the dark squares 18.a4 Rc5 19.Rfd1 Rg8 20.Rdb1 b6 21.Nb4 f5 22.Qd1

Polugaevsky-Averbakh Leningrad 1960 Move 22

f4! Black has been offering his rook for the dark squared bishop as this bishop holds white’s dark squares together 23.Bxc5 Qxc5+ 24.Qd4 Kf7 25.Nd5 Na5 26.Rb5 Qc8 Black retains the queens as 26..Qxd4 is clearly a blunder

Polugaevsky-Averbakh Leningrad 1960 Move 27

27.Rd1 Rd8 28.g3 Bxd5 29.Rxd5 Rg8 30.Kg2 Nac4 31.Bxc4

Polugaevsky-Averbakh Leningrad 1960 Move 31

Qxc4! 32.Qd2? (32.Kf2 is better when the game is roughly equal)  fxg3 33.hxg3 g4! Destroying white’s kingside winning the game

Polugaevsky-Averbakh Leningrad 1960 Move 35

34.Qf4+ Ke8 35.fxg4 Qe2+ 36.Kh3 Rxg4 37.Qf5 Rg6 38.Rf1 Rh6+ 0-1

Chapter 14 Play for the bishop pair covers white’s strategy of gaining the bishop pair by playing Nd5 forcing Bxd5. The reviewer has already covered one game demonstrating this idea Polugaevsky-Ostojic. This chapter covers further instructive examples.

Chapter 15 Playing without the light-squared bishop gives another game in the Moscow Variation of the Sicilian Variation. The reviewer has already shown some typical ideas in this line with some of Garry Kasparov’s games.

Chapter 16 shows some typical tactical strikes in the Maroczy. Buy the book to find out about these lightning strikes.

The final section 5 covers games by the world champions in the Maroczy. This is a great way to round off the book showcasing efforts by the great champions.

In summary this is an excellent book on Maroczy structures covering all the major strategies for both sides with some exemplary games showcasing the ideas.

FM Richard Webb, Basingstoke, Hampshire, 1st July 2021

Book Details :

  • Hardcover : 296 pages
  • Publisher: Thinkers Publishing; 1st edition (1st July 2019)
  • Language: English
  • ISBN-10:9492510545
  • ISBN-13:978-9492510549
  • Product Dimensions: 17.27 x 1.78 x 23.11 cm

Official web site of Thinkers Publishing

Understanding Maroczy Structures, Adrian Bohdanovych Mikhalchishin and Georg Mohr, Thinker's Publishing, 2019, ISBN-13 ‏ : ‎ 978-9492510549
Understanding Maroczy Structures, Adrian Bohdanovych Mikhalchishin and Georg Mohr, Thinker’s Publishing, 2019, ISBN-13 ‏ : ‎ 978-9492510549
 Save as PDF

Technical Decision Making in Chess

Technical Decision Making in Chess : Boris Gelfand

Technical Decision Making in Chess, Boris Gelfand, Quality Chess, 2021, ISBN-13 : 978-1784830649

From the Publisher’s Foreword:

“In Technical Decision Making in Chess former World Championship Challenger Boris Gelfand discusses his path to decision making in endgames and positions where one side possesses a structural or material advantage.
This investigation into a top Grandmaster’s technical understanding will illuminate difficult parts of the game that many players find elusive. Concepts like the “Zone of one mistake” are certain to be a revelation to many.”

From the back cover:

“In Decision Making in Major Piece Endings former World Championship Challenger Boris Gelfand discusses his path to decision making in endgames involving rooks or queens, as well as the neglected “4th phase”. Countless games are decided by good or bad technique in such endgames, so readers are certain to benefit from the insights of a word-class Grandmaster on this vital topic.

Grandmaster Boris Gelfand has been an elite player for over 30 years, winning the World Cup, Olympiad Gold, the Candidates and many other top tournaments.”

Boris Gelfand, FIDE Grand Prix, London, 2013, Courtesy of John Upham Photography

Grandmaster Jacob Aagaard is the only chess writer to have won all the major awards for chess writing.

GM Jacob Aagaard
GM Jacob Aagaard takes on all-comers!

Reaction to previous volumes in the series:

In 2015 Positional Decision Making In Chess won the ECF Book of the Year award.

“The most interesting chess book I have read in the last quarter-century.” Mikhail Shereshevsky on Positional Decision Making in Chess.

This new Quality Chess publication Technical Decision Making In Chess uses high quality paper and the printing is clear. The book can easily be laid flat next to the board and does not require weights to prevent it from “self-closing” (a particular bugbear of ours !). Each diagram is clear and the instructional text is typeset in two column format, which, we find, enables the reader to maintain their place easily. Figurine algebraic notation is used throughout and the diagrams are placed adjacent to the relevant text and each major diagram at the beginning of a chapter has a “to move” indicator. Where a “to move” indicator is not present, it is obvious which colour is to move from the accompanying moves in a variation.

Each chapter is introduced with a contemporary photograph of a player or players or a tournament  scene which  launches each chapter in a engaging manner. This is followed by a Diagram Preview page which shows the critical analytical diagrams in the following chapter and invites the reader to practise their analysis and decision making! If you can work out most of the variations you are stronger than a world champion.

The introduction of this book makes it clear that this book is about “positions where the main goal is the conversion of a static advantage. (A static or long term advantage can be anything from a weakness to better pieces to an actual material advantage.) The flip side is included in this, meaning when it is the opponent who is trying to convert an advantage and we are trying to resist.”

It is not an endgame primer or manual on basic endgames as there are plenty of these theoretical works already in existence: the author’s particular favourites are named.

The author suggests how to best use the book by first analysing the endgames without a chess engine and/or tablebases to prevent lazy thinking by relying too heavily on engine assessments without understanding: “I just want to say that any active work with the the engine, where you are probing, analysing, asking questions, examining and so on, is useful. Any passive submission to the engine evaluations is likely to make you a worse player.”

“The key question for us has not been which line wins. but why the line is winning.”

The chapter themes are not the usual themes that are found in other endgame books, for example arranged by material, except for the last chapter on opposite bishop endgames. Boris Gelfand shows the vast majority of the endgames in relation to the whole game including the opening and middlegame transitions. This is the modern way to study endgames and gives a much deeper understanding of chess in general and is the approach of a Grandmaster.

Chapter 1 Akiba Showing The Way

In this chapter, Boris showcases the great endgame skill of Akiba Rubinstein in his famous game versus Richard Reti at Gothenburg 1920. It is black to move in the position below which is included in Reuben Fine’s Basic Chess Endings and many other endgame manuals. Black is clearly better with multiple advantages:

  • Better pawn structure on the queen side, the c2 pawn needs constant vigilance. The white a2 is also a significant weakness.
  • Better minor piece
  • More space
  • Better pawn structure on the kingside: the white kingside is full of holes, hence black’s best move given below
Richard-Reti-Akiba-Rubinstein-Gothenburg-1920-Move-30
Richard Reti-Akiba Rubinstein Gothenburg 1920 Move 30

30…Bd7! was the strongest move, fixing the white pawns on the dark squares. They are not in danger from the bishop, but they are unable to prevent the black king from penetrating the position, which is the greatest problem for white.

Rubinstein made one bad move in this game: 30…Ke6? 31.g4! Now white can draw with accurate play, but in practice, he missed the drawing ideas.

31…Kd6 32.h3 g6 33.Kd2 Bd7

Richard-Reti-Akiba-Rubinstein-Gothenburg-1920-Move-33
Richard Reti-Akiba Rubinstein Gothenburg 1920 Move 33

34.Nf3 Better is 34.Ng2! The idea is simple. White wants to play d3-d4 and Ne3, when he has managed to plug the holes on the light squares on the kingside to a significant degree. 34…d4 is critical, cutting across this idea. 35.cxd4 cxd4 36.c4 dxc3+ 37.Kxc3 This looks to be good for black as he has a potential outside passed pawn on the queenside, but white can apparently hold! 37…g5 38.f5 Bc6 39.Ne3 Bf3 40.d4 Kc6 41.a3 and white draws. This is extremely instructive and should be studied carefully.

The game continued 34…Ke7 Another idea is 34…h6 35.Ke3 g5 and Gelfand shows that white has a lot of fantastic resources to just hold the game. Buy the book to find out how! 35.Ke3 h5

Richard-Reti-Akiba-Rubinstein-Gothenburg-1920-Move-35
Richard Reti-Akiba Rubinstein Gothenburg 1920 Move 35

Reti now placed a horridly passive move 36.Nh2? which definitely loses. His last chance was a far sighted pawn sacrifice to draw as follows: 36.Nh4! Kf7 37.gxh5! gxh5 38.f5! Ke7 39.Ng6+ Kd6 40.h4! Bxf5 41.Nf4 Bg4 42.d4! and white has created an effective fortress. Black cannot make progress as he loses a pawn.

36…Kd6 37.Ke2? (37.gxh5 gxh5 38.h4 is tougher, but does not hold. 38…Bh3! The domination theme, a sample line is 39.Nf3 Ke6! 40. Nh2 b5 41.Kf2 Kd6 42.Ke3 a5 43.Nf3 Ke6 44.Nh2 a5 45.Kf2 (45.a3? Kf5 with the idea of b4 creating an outside a-pawn wins quickly) a3! 46.Ke3 Kf5 47.Kf3 Kg6 48.Ke3 d4+ 49.cxd4 Be6 50.Kd2 Bxa2 and black wins as the blockade does not hold.

The game continued 37…d4! Fixing a2 and c2 and widening the bridgehead for the king and bishop. 38.cxd4  cxd4

Richard-Reti-Akiba-Rubinstein-Gothenburg-1920-Move-38
Richard Reti-Akiba Rubinstein Gothenburg 1920 Move 38

White lost quickly as follows 39.Kd2 hxg4 40.hxg4 Bc6 41.Ke2 Bd5 42.a3 b5 43.Nf1 a5 44.Nd2

Richard-Reti-Akiba-Rubinstein-Gothenburg-1920-Move-44
Richard Reti-Akiba Rubinstein-Gothenburg 1920 Move 44

Now black won with the thematic 44…a4! forcing the creation of a passed a-pawn. We all know that knights are very poor at dealing with passed rook pawns. 45.Ne4+(45.Nb1 Kc5 46.c3 Ba2 wins) Bxe4 46.dxe4 b4 47.Kd2 bxa3 48.Kc1 g5 0-1

This ending is worthy of close study, not just to enjoy Rubinstein’s great technique, but also to discover hidden resources in difficult positions: a variation on the theory of infinite resistance.

Chapter 2 Turning Points

This section covers two interesting Gelfand games, one of which he wins and one he loses. As the chapter heading indicates, the key theme is recognising critical points in a game. The section culminates in the analysis of a fascinating same colour bishop endgame from the second game that was holdable by the inferior side.

Ivanchuk-Gelfand-Wijk-aan-Zee-2012-Move-20
Ivanchuk-Gelfand Wijk aan Zee 2012 Move 20

This is a middlegame position from a Catalan opening. Gelfand comments along the lines of white (Ivanchuk) is a little better with a better bishop and a bit more space. The important factor is that the position is easier to play for white and white risks little by playing on. Black’s main problem is the decision about when to stay passive (waiting) or go active. This general issue is covered more in chapter 3.

It is hard to believe that a player of Ivanchuk’s standard ends up in a losing position after only six more moves!

White played 21.Nel?! (Hoping to get the knight to b4 an apply some pressure. The simple and  natural 21.Bd3 was better. After 21…Qd6 white can try 22.Ne5, 21…Qc8 with the idea of a5 and Ba6 exchanging the semi-bad bishop is logical. 22.Qa3 Qf8 23.Qa4 Qc8 24.Kg2 a5 25.Bb5 Ba6 26.Bxa6 Qaa6 27.Ne5 Qc8 28.Qc6 and white is better in the inevitable double knight ending.

Ivanchuk-Gelfand-Wijk-aan-Zee-2012-Variation-Move-28
Ivanchuk-Gelfand Wijk aan Zee 2012 Variation Move 28

The game continued 21…Qc8 22.Nc2 Ne4! 23.Nxe4 dxe4

Ivanchuk-Gelfand-Wijk-aan-Zee-2012-Move-23
Ivanchuk-Gelfand Wijk aan Zee 2012 Move 23

White probably mistakenly thought this pawn structure transformation was in his favour. This is incorrect. The e4-pawn is fixed on the colour of the bishop, however, the e4 pawn gives a space advantage, the d5 square and a pivot for a pawn storm on the king side.

White should probably play 24.a4 then Bd5 25.Qc3 Qxc3 26.bxc3 White is optically better but 26…Bb7! 27.Nb4 Nb8! Black is going to bring his king over and hold. White played 24.Qc3? Qxc3 25.Bxc3 b5! This looks dangerous putting another pawn on the colour of the bishop, but white’s bishop is also hemmed in by black’s pawns and black has a significant space advantage.

Ivanchuk-Gelfand-Wijk-aan-Zee-2012-Move-25
Ivanchuk-Gelfand Wijk aan Zee 2012 Move 25

This is the crucial turning point of the game. White should have objectively realised that he had gone wrong and looked for  way to draw. 26.c4 looks reasonable, but after bxc4 27.Bxc4 Nb6 28.Be2 a5 29.Kf1 Bd5 30.a3 Bc4!? white is a fraction worse. Black has rid himself of the semi-bad bishop and has a space advantage in a knight endgame.

Ivanchuk-Gelfand-Wijk-aan-Zee-2012-Variation-Move-30
Ivanchuk-Gelfand Wijk aan Zee 2012 Variation Move 30

White played 26.a4? (See two diagrams back above, gifting black an outside passed a-pawn) and duly lost. An horrendous positional error from a world class player. Black combined the passed a-pawn distraction with a general advance on the king side to create entry points for his king and win.

In the second game, the aforementioned bishop ending reached this critical position.

Gelfand-Wang-Sochi-2008-Move-43
Gelfand-Wang Sochi 2008 Move 43

White played 44.h4? which loses. 44.Kb6! would have drawn. The analysis is complicated but black’s best try is 44…Ke6 (44…Bd1 also leads to draw by a single tempo) 45.Bg6 Kd6 46.Be4 c5 47.Kb5 Bd5 48.Bxd5 Kxd5 49.Kxa4 h5 50. Kb5 c4 51.Kb6 Ke4 52.Kxb7 Kf3 53.Kc6 Kg2 54.Kc5 Kxh2 55.Kxc4 Kxg3 56.b4 h4 57.b5 h3 58.b6 h2 59.b7 h1=Q 60.b8=Q Qe4+ 61.Kc5 Qxf4 (see below) with a theoretical draw but still a practical challenge. The companion volume Decision Making in Major Piece Endings covers this type of ending.

Gelfand-Wang-Sochi-2008-Variation-Move-61
Gelfand-Wang Sochi 2008 Variation Move 61

This whole bishop ending is worthy of close study as white has some amazing ideas to hold an ending that just looks lost.

Chapter 3 covers the important topic of active or passive defence.

Gelfand demonstrates this theme  with a complex double rook and knight endgame. Here is a position a few moves before that endgame, where black missed a chance to equalise comfortably.

Gelfand-Pelletier-Biel-2001-Move-23
Gelfand-Pelletier Biel 2001 Move 23

Gelfand points out that active defence with 23…Nd5! forces easy equality. 24.Qxe5 Nxe3! 25.Be4= (25.Qxe3? Qxe3 26.fxe3 Rxd3 27.Rxa7 Rxa7 28.Rxa7 Rxb3 and black is playing for a win)

Black played the passive 23…Qc6?! forcing a queen exchange. This is a common mistake when a (weaker) player wants a draw and exchanges pieces with small concessions 24.Qxc6 Bxc6 25.Bf1! Rdb8?! (26…Rab8! is more active when white can win a pawn but has great technical difficulties) 26.Bc4?! ( 26.Ra6! Rb6 27.Bc4 Bd5 28.Bxd5 Nxd5 29.Rxb6 Nxb6 30.Ra5! White is definitely in plus equals mode playing for two results.) 26…Bd5?! (26…Bb5 equalises) 27.Nxd5 Nxd5 28.Ne4 Rb4 29. Nd2! Rb7 Reaching the position below.

Gelfand-Pelletier-Biel-2002-Move-29
Gelfand-Pelletier Biel 2002 Move 29

White played 30.Ra5 which sets a small trap. 30.g4! was probably better gaining space and attempting to isolate the e5 pawn from its friends. Black played the obvious 30…Rd8?! activating the rook (30…Nc3 is better). After the game move, white has an edge and it’s very instructive to see how Gelfand increases his advantage in a practical game with mistakes from both sides.

Chapter 4 covers the common idea of A Bad Plan is Better than No Plan.

Here is a complex middlegame position.

Gelfand-Harikrishna-2014-Move-21
Gelfand-Harikrishna 2014 Move 21

The penalties of planless play are amply demonstrated in the middlegame between moves 21-30 where planless play by black spoils an equal position resulting in a difficult heavy piece middlegame and subsequent losing  king and pawn ending.

Gelfand-Harikrishna-2014-Move-30
Gelfand-Harikrishna 2014 Move 30
Gelfand-Harikrishna-Wijk-aan-Zee-2014
Gelfand-Harikrishna Wijk aan Zee 2014

White to move on move 40. What would you play? 40.a4! springs to mind spoiling black’s majority and winning.

Chapter 5 is all about long games with an increment.

Gelfand demonstrates two games, the first is a complex rook and knight endgame; the second of which is a very long queen and minor piece ending with an extra pawn.

This queen and minor piece ending has just arisen after white forced the exchange of rooks a few moves ago.

Gelfand-Grachev-Moscow-2016-Move-34
Gelfand-Grachev Moscow 2016 Move 34

White played 34.Qe2? which is a blunder. 34.Kg1 is obviously better, 34…Nxh4 35.Bxe5 activates the bishop increasing white’s advantage. 34…Kg8? Missing 34…Nf4! 35. Qf3 (35.Bxf4 Qxh4! threatening mate) 35.Kg1 Qd2 with loads of counterplay 35.Kg1 Nxh4 36. Bxe5 Qa5 37.Bg3 Ng6

Gelfand-Grachev-Moscow-2016-Move-37
Gelfand-Grachev Moscow 2016 Move 37

White has increased his advantage by activating his bishop.

I shall show a couple of other positions from this instructive game with Gelfand’s pithy comments. Black sacrifices the h-pawn to open up the white king.

Gelfand-Grachev-Moscow-2016-Move-44
Gelfand-Grachev Moscow 2016 Move 44

White played 45.Qg3?! instead of the consolidating 45.Bc3! “White consolidates and is on the way to winning the game. In these long games where it is very hard to spot the critical moments, because every moment is a mini-version of it, inaccuracies are bound to happen. This is why it is important to analyse the games and improve our feeling for how to spend our time, how to organise our pieces, how to organise our thinking and how to control the opponent’s counterplay. A lot of happens subconsciously. We analyse the games, find out what actually happened, compared to our experience during the game, and our feeling for the details will be slightly better the next time around.”

At move 49 this position was reached:

Gelfand-Grachev-Moscow-2016-Move-49
Gelfand-Grachev-Moscow 2016 Move 49

Gelfand played 50.Qe3!? a perfectly decent move.  Gelfand comments that the computer suggests 50.Kf3 Qf5+ 51.Ke2 Qe5 52.Qe7 Qxb2+ 53.Ke3 reaching this position:

Gelfand-Grachev-Moscow-2016-Variation-Move-53
Gelfand-Grachev Moscow 2016 Variation Move 53

The knight is lost after 53…Nxf2 54.Qe6+ Kh8 55.Qc8+ Kh7 56.Qf5+ A brilliant line.

Gelfand makes a wise and honest observation: “Obviously this is the type of thing the engine does much better than a human. Finding a tactic in a position where there are a large number of possibilities. No human can go 2-3 moves deep in all lines and see these types of options. So, all in all, I pay attention to this kind of information, but I do not regret not seeing it.”

At move 101 (see position below), Boris comments: “At this point I was confident that I would win. I knew what I should do. The queen controls everything and the white king can go forward. White is also winning in this position if there are no f- or g- pawns on the board….White can also play f5-f6, creating a situation where the black king is exposed, liniting the number of checks Black is able to give. The general idea is basic: White will aim to put the queen in-between on one of these checks, spiking the black king, forcing the exchange of queens.”

Gelfand-Grachev-Moscow-2016-Move-101
Gelfand-Grachev Moscow 2016 Move 101

Having read the relevant section in the companion volume “Decision Making In Major Piece Endings”  even the reviewer would be confident of victory in this technical position.

Chapter 6 When is the Right Time to Run?

This chapter is about “situations in both the middlegame and the endgame, where both players had to make decisions about when to improve their position and target the opponent’s resources and when to roll the dice and attack the king or let passed pawns roll. This is perhaps the most essential theme in top level chess, as a good feeling for what kind of action is needed in various positions, when to calculate and when simply to improve the position, is worth many points.”

Gelfand demonstrates this with a complex rook and knight ending.

Gelfand also brings out a pertinent comment about computer evaluations in this section. This is a position from a short variation in that game:

Navara-Gelfand-Prague-2006-Variation-Move-26
Navara-Gelfand Prague 2006 Variation Move 26

Boris says “Stockfish helpfully tells us that the position is still equal. But is it really? Black is full control of the d-file and can penetrate to the second rank…..Black is much more comfortable….”

Objectively, a strong engine would hold as white, but who would choose white?

Chapter 7 Choosing the Right Transformations

This chapter shows a complex queen and knight ending which is really interesting considering all the transformations to knight endings.

 Caruana-Gelfand-Amsterdam-2010-Move-30

Caruana-Gelfand Amsterdam 2010 Move 30

Black played a technical, far reaching move 30…Qg5! forcing 31.e3 and the weakening of the f3 square. Gelfand stresses the point that black cannot win on the queenside alone and must create weaknesses on the kingside. Gelfand analyses the alternative 30…Qa6 to a probable win giving some superb analysis including a brilliant positional knight sacrifice creating passed a- and h-pawns which is definitely worth studying:

Caruana-Gelfand-Amsterdam-2010-Variation-Move-37
Caruana-Gelfand Amsterdam 2010 Variation Move 37

37…Nf1+ 38.Ke1 Nxh2 39. Kf2 Kf8! 40. Kg2 Nxf3 41.Kxf3 (41.exf3 h5 ensures a passed h-pawn) f5! Black wins by a tempo.

Chapter 8 – Karjakin

This game is a technical queenless middlegame in the Chebanenko.

This position gives a flavour of the struggle:

Gelfand-Karjakin-Nalchik-2009-Move-20
Gelfand-Karjakin Nalchik 2009 Move 20

White is clearly better, but how does white proceed here? Buy the book to find out.

Chapters 9 and 10 are titled Stalemate and Stalemated respectively.

Here is an amusing finish:

Ponkratov-Bacrot-Berlin-2015-Move-34
Ponkratov-Bacrot Berlin 2015 Move 34

Black is under the cosh with a killing rook discovery on the cards.

Bacrot played 34…Bd3+!! 35.Bxd3 Qd5 36.Bc4 Renewing the threats. 36…Rh1+ 37.Kg2 Qd2+! 38.Kxh1 Qg2+ stalemate

Chapter 11 The Relevance Of Endgame Studies

This chapter is good and the title is self explanatory. Solving endgame studies is useful for getting a feel for the potential of the pieces – not only in the endgame. Endgame studies are the artistic side of chess. Here is an instructive and entertaining study composed by Sergey Tkachenko & Boris Gelfand:

Sergey-Tkachenko-Boris-Gelfand-2017
Sergey Tkachenko & Boris Gelfand 2017.

I will not give the solution, but there is a beautiful zugzwang, so buy the book to find out!

Chapter 12 Geometry

This chapter has an intriguing title but covers mainly R+N v R and positions with R v N or B with just a few pawns. Here is  a good example:

Mamedyarov-Gelfand-Pamplona-2004-Move-64
Mamedyarov-Gelfand Pamplona 2004 Move 64

White is in great danger here with his monarch in the corner. 65. Rxa7 loses as it unpins the knight allowing the prosaic mate 65..Rh5+ 66. Kg1 Ne2+ 67.Kf1 Rh1# The move that springs to mind is 65.Kg1. In fact this does draw as does 65.Kh2.

White actually played 65.Nd4+? to distract the black rook, so he could capture the a7-pawn. After 65…Rxd4 66.Rxa7 black has a pretty win with 66…Rd6! 67.Ra2 (67.Rf7 Kg3 68.Rg7+ Ng6! shuts out the rook and mates) 67…Rh6+ 68. Rh2 Nh3! with a beautiful zugzwang that I have not seen before.

Mamedyarov-Gelfand-Pamplona-2004-Move-68
Mamedyarov-Gelfand Pamplona-2004 Move 68

69.Rh2 Nf2+ 70.Kg1 Rh1#

Chapter 13  – Endings with Opposite Coloured Bishops

This is one of the reviewer’s favourite chapters as it shows the immense complexity of such endgames.

Leko-Gelfand-Dortmund-1996-Move-71
Leko-Gelfand Dortmund 1996 Move 71

White has just played 71.Bxb4 and reached the haven of an opposite coloured bishop endgame. This is quite a common type of position reached in practice. This position is a draw but it is difficult and a world class player of Peter Leko’s standard did not succeed in practice. Buy the book to find out how black won and how white could have drawn.

To summarise this is a very good technical book with many instructive games with deep analysis and didactic commentary.  The book is clearly aimed at aspiring FIDE2000+ (ECF175+) players and above.

FM Richard Webb, Chineham, Hampshire, May 12th 2021

FM Richard Webb
FM Richard Webb
  • Paperback : 320 pages
  • Publisher:Quality Chess UK LLP (28 April 2021)
  • Language: English
  • ISBN-10:178483064X
  • ISBN-13:978-1784830649
  • Product Dimensions: 17.35 x 1.52 x 24.16 cm

Official web site of Quality Chess

Technical Decision Making in Chess, Boris Gelfand, Quality Chess, 2021, ISBN-13 : 978-1784830649
 Save as PDF

Decision Making in Major Piece Endings

Decision Making In Major Piece Endings : Boris Gelfand

Decision Making In Major Piece Endings, Boris Gelfand, Quality Chess, 2020

From the Publisher’s Foreword:

“This is the fourth book in the Decision Making In Chess series. It was written over the last couple of years. A lot of work has gone into this book and the accompanying volume Technical Decision Making In Chess, which deals with a wider range of technical topics, whereas this book focuses on positions without minor pieces.

It has been four years since the publication of Dynamic Decision Making in Chess and certainly there will be one person out there wondering what happened to us and why the third volume was taking so long to complete. I hope that the content alone of these two books will answer that question.”

From the back cover:

“In Decision Making in Major Piece Endings former World Championship Challenger Boris Gelfand discusses his path to decision making in endgames involving rooks or queens, as well as the neglected “4th phase”. Countless games are decided by good or bad technique in such endgames, so readers are certain to benefit from the insights of a word-class Grandmaster on this vital topic.

Grandmaster Boris Gelfand has been an elite player for over 30 years, winning the World Cup, Olympiad Gold, the Candidates and many other top tournaments. Grandmaster Jacob Aagaard is the only chess writer to have won all the major awards for chess writing. ”

Boris Gelfand, FIDE Grand Prix, London, 2013, Courtesy of John Upham Photography

Reaction to previous volumes in the series:

In 2015 Positional Decision Making In Chess won the ECF Book of the Year award.

“The most interesting chess book I have read in the last quarter-century.” Mikhail Shereshevsky on Positional Decision Making in Chess.

This new Quality Chess publication Decision Making In Major Piece Endings uses high quality paper and the printing is clear. The book can easily be laid flat next to the board and does not require weights to prevent it from “self-closing” (a particular bugbear of ours !). Each diagram is clear and the instructional text is typeset in two column format, which, we find, enables the reader to maintain their place easily. Figurine algebraic notation is used throughout and the diagrams are placed adjacent to the relevant text and each major diagram has a “to move” indicator. Where a “to move” indicator is not present, it is obvious which colour is to move from the accompanying moves in a variation.

Each chapter is introduced with a contemporary photograph of a player or players or a tournament  scene which  launches each chapter in a engaging manner. This is followed by a Diagram Preview page which shows the critical analytical diagrams in the following chapter and invites the reader to practise their analysis and decision making! If you can work out most of the variations you are a world champion.

The introduction of this book makes it clear that this book is not an endgame primer or manual on basic major piece endgames as there are plenty of these theoretical works already in existence.  Knowledge of very basic rook and pawn endgames such as the Lucena and Vancura positions is assumed.  This book is “about decision making at the board and learning from your games – and those of others. In this book I will discuss topics that have arisen in some of the most interesting games without minor pieces during my career. We will encounter rook endings, queen endgames and games in what Romanovsky called the fourth phase, which is essentially later middlegames/early endings where only major pieces remain.”

The introduction also guides the reader on how to study the endgame: 1. knowledge of basic positions and their key variations and ideas must be known; 2. improving deep analytical skills; 3.  development of intuition. This book concentrates on improving items 2 & 3 above. The author suggests how to best use the book by first analysing the endgames without a chess engine and/or tablebases to prevent lazy thinking by relying too heavily on engine assessments without understanding.

Despite the fact that the introduction claims that this book is not an endgame primer, there are a couple of excellent chapters on theoretical endgames. They are covered from a practical point of view and Gelfand draws out the key defensive ideas by concentrating on patterns and key positions.   More on these chapters later. There are other basic endgame positions interspersed in other chapters which are reached from long variations but are nevertheless didactic as the theoretical endgames are shown in context within the whole endgame and the reader is clearly shown how these positions can be reached in practice.

Here is an critical position from the game Julian Hodgson – Boris Gelfand played at Groningen 1996. Both players misevaluated this ending as they both thought that black was easily winning. At the time, endgame theory agreed with them. Modern tablebases give this as a clear draw as black cannot hide his king from the checks with accurate defensive play from white.

Hodgson-Gelfand 1996

The game continued 86.Qe8+? The losing mistake. The black king escapes the checks by stepping in front of the pawns. 86.Qe6!, the most natural waiting move was still drawing. (86.Qd7! also draws). 86…Qf8 87. Qe2+ g4 88. Qe5+ Kh6 89. Qe6+ Kg5 90. Qe5+ Qf5 91.Qg7+ Kf4 92. Qc7+ Qe5 93. Qf7+ with a draw. 86… Kg4 87. Qe6+ Qf5 88.Qc4+ Kg3 89. Qc7+ Qf4 0-1

The author makes the point that if white had known that the endgame was a draw, and knew a few general ideas, he would have probably drawn the game. But when you think it is lost, psychologically it is impossible to hold it, particularly in an increment finish. A lot of the top players do not think in terms of lost or not: they concentrate on looking for ideas (to make life difficult for the opponent).

Chapter 1  – The Importance of Analysis

The title of the chapter is self explanatory and Gelfand stresses the need to study complicated endgames in depth and understand all the nuances. There are some superb examples of brilliant analysis. Here is one such position where Gelfand did not discover the right idea until 2018:

Suetin-Portisch 1973
Suetin-Portisch 1973 (variation)

It is black to play, clearly 60…d1=Q 61. Rxd1 Kxd1 62. Kf3  is not good enough to win. Black to play can win with 60…Rc4!! 61. Rb1 Rc1 62. Rb2 Rf1!!  cutting the king off from the e-file (62…Ke3? 63. Rxd2 Kxd2 64.Kf4 draws shouldering the black king) 63. Kg4 Ke3 64. Rxd2 Kxd2 65. Kg5 Ke3 wins as black’s king is now available to hunt the pawns down.

Chapter 2 Do Not Hurry

The “Do not hurry” concept is a key concept that I first encountered in Shereshevsky’s classic Endgame Strategy. In the position below, this principle can be demonstrated aptly.

Giberto Hernandez Guerrero-Gelfand

Converting this position is covered in detail with a key discussion on exchanges which is enlightening.

This rook ending could have occurred and black’s winning’s manoeuvre is instructive:

Gilberto Hernandez Guerrero-Gelfand Merida 2003
Gilberto Hernandez Guerrero-Gelfand Variation

63…Rc5 64. Rc7 Rc3+ 65. Kf2 Rc4 66.Kg3 Now the black rook has been optimally placed, it is time to improve the king to the maximum, while keeping the best possible pawn structure, which is to keep the pawn on g7 and play …f6, so that White does not have Rc8 followed by c6-c7. If the pawn would be on g6 in that position, Rg8 would  eventually come and save a draw. The best black would achieve is f- and h- pawns, but not in favourable circumstances. With the pawn on g7, …Rxc7 will always come as a response to Rg8 and black wins trivially. 66…Kf6 67.Kh3 Kg6 68.Kg3 f6 And black wins after either 69.Kh3 Kh6! followed by the advance of the g-pawn, or 69.Rc8 Kf5! and the advance of the king.

Chapter 3 – Three Surprisingly Complicated Rook Endgames

This is a variation from an interesting rook and pawn endgame Boris Gelfand – Lars Bo Hansen Wijk aan Zee 1993:

Gelfand-Hansen (variation)

White wins with the instructive 64.Rc7!! preparing to cut black’s king off along the fifth rank 64…Rh1 65.Rc5! and if 65…Kd6 66.Rc6+, white can then simply queen the b pawn winning black’s rook whilst black’s king is unable to support his own pawn.

Here is another common type of position taken from a variation in the game Gelfand-Vladimir Kramnik Zurich 2017. White is clearly much better as his king supports his pawn and black’s king is not in the game. But how does white win?

Gelfand-Kramnik Variation

The answer is simple once you see it. 48.Rc3!! Kf6 49. Rc2! and wins

Chapter 4 Two Defensive Methods in Rook Endings

This chapter is one of the theoretical chapters which covers rook and four against three all on one side and rook against three connected passed pawns. This section is well constructed with coverage of all the major positions and ideas in the 4 v 3 ending.

Some famous games are included which must be present in every treatise on rook endings. Here is one such ending from: Mikhail Botvinnik v Miguel Najdorf Moscow 1956:

Botvinnik-Najdorf Moscow 1956

White is winning here because he can create a passed e-pawn and he has fixed the pawn structure with h5 leaving an entry point for the king on g6. The game continued 61…Kf7 62. Ra5 Rc7 63. Rd5 Ra7 64. e5 fxe5 65. fxe5 Ke7 66.e6 Ra4 67. g5! providing cover for the king 67…hxg5 68.Rd7+ Kf8 69.Rf7+ Kg8 70.Kg6 g4 71.h6! gxh6 72.e7 Ra8 73.Rf6 There is no defence to Rd6 and Rd8 with mate.

The celebrated endgame Capablanca-Yates Hastings 1930 is of course covered in great detail. The analysis of the famous position is covered in great depth showing the defender’s best defence which is tricky to crack. It is revealing to note that even the great Cuban World Champion let the win slip at one point. I suggest that the reader buys the book to study this superb analysis.

Capablanca-Yates Hastings 1930

The position below is the celebrated game Piket-Kasparov Internet 2000 because Kasparov misplayed a drawn endgame so badly. We must not be too hard on the former World Champion as it was a rapid game and Kasparov is a superb endgame player.

Piket-Kasparov Move 42 Internet 2000

The game continued: 42.Kh3 Re3 43.Kh4 Kg7?! Black does not have to let the white king into g5. 43…Kh6! 44.Rc7 Re2! 45h3

Piket-Kasparov Move 42 Internet 2000
Piket-Kasparov Variation 1

Now, 45…Rxe5! 46.Rxf7 Re4 47.g4 Rxf4! forces a quick draw.

The game continued: 44.Kg5 Re1? (The final mistake: black can hold with 44…Ra3 45.Rc7 Ra5 and white is stymied) 45.Rc7 Re2 46.Re7 Ra2 The following variation is the key to why white is winning: 46…Re1

Piket-Kasparov Move 42 Internet 2000
Piket-Kasparov Variation 2

47.e6! Rxe6 48.Rxe6 fxe6 49.h3 Despite material equality, black is lost as he is in zugzwang. 49…Kf7 50.Kh6 Kf6 51.g4 h4 52.g5+ Kf5 53.Kg7 Kxf4 54.Kxg6 e5 55.Kf6 e4 56.g6 e3 57.g7 e2 58.g8=Q e1=Q 59.Qg4+ Ke3 60.Qe6+ exchanging queens and winning

In the game, black lost in a similar manner to Botvinnik-Najdorf:

47.f5! gxf5 48.e6 h4 49.Rxf7+ Kg8 50. Kf6 1-0

Piket-Kasparov Move 47

The final two positions in this chapter concern Rook v 3 connected passed pawns.

Rook v 3 pawns (1)
Rook v 3 pawns (1)

White to move wins with 1.Rf8, black to move draws only with 1…Kg7! preventing the rook from moving behind the base of the chain.

Similarly in the mirror position, white to move wins with 1.Rh8, black to move draws with 1…Kg7!

The core of the book (chapters 5 to 8) is a series of four chapters deeply analysing three rook and pawn endgames of Gelfand’s against world class opposition. The games are shown in their entirety which is the modern way to study endgames in relation to the opening and middlegame.

Gelfand-Kasimdzhanov Variation

This position from a variation in the game Gelfand-Kasimdzhanov from Baku 2014 caught my eye. Black to play – what should he do? 59…Kf5!! The obvious move is to push the pawns with 59…g4. Let’s see what happens: 60.Rc6! f5 61.Rxa6 Kg5 62.Rb6 h3 63.Kg3 f4+ 64.Kh2 Kf4 65.Rh6+ Kg5

Gelfand-Kasimdzhanov Variation2

66.Rh8! Kf5 67. Rg8! Black is in zugzwang and loses all the pawns.

60.Rc6 a5 61. Rc5+ Kg6 62.Rxa5 f5 and black prevents the rook from reaching f8. This is obvious when one has knowledge of the basic endgame rook v 3 connected pawns shown above! The author has shown an excellent example of knowing your basics being applied to a real live game.

Chapter 9 Queen Endings with a g- or h- pawn

This is one of the reviewer’s favourite chapters as it combines endgame theory with practical examples showing that even strong GMs do not know how to defend these endings correctly. Even when players know where to put their defending king, choosing the correct check to draw is not obvious!

Here is a position from Gelfand-Jobava from Dortmund 2006.

The reviewer loves this endgame.

Gelfand-Jobava (Move 50)

This king and pawn ending is clearly drawn but white is pressing with a more advanced king. White played 50.h4 setting a subtle trap. 50…h5?? losing, incredible to believe but it is true. 50…Kd7 draws, for example 51.g4 f6+ 52.Kd5 e6+ 53.Kc5 h6 54. e5 fxe5 55.fxe5 Kc7 seizing the opposition and drawing 51.f5! f6+ 52.Ke6 gxf5

Gelfand-Jobava (Move 53)

Now white played 53. e5!! which had been completed missed by black (automatic recapture syndrome) fxe5 54.Kxe5 Kd7 55.Kxf5 Kd6 56.Kg5 Ke5 57.Kxh5 Kf4

Gelfand-Jobava (Move 57)

Now white can enter a winning queen endgame with 58.Kg6!

White did not play the endgame perfectly, and after many adventures this position was reached at move 87. Black is drawing here if he places his king in the drawing zone which is the far corner diagonally opposite where the g pawn is hoping to queen i.e. a1.

Gelfand-Jobava (Move 87)

87… Ka5? was played which loses. I am surprised that a strong GM moved his king the wrong way. 87…Ka3 draws but the draw is not simple. 88.g7 and now black can draw with an accurate sequence of moves that are not obvious. 87… Qe5+ (the obvious 87… Qg3+ loses in 41 moves) 89.Kg6 Qe6+ 90.Kh7 reaching the drawn position below.

Gelfand-Jobava (Move 90)
Gelfand-Jobava (Variation Move 90)

90…Qf5+ 91.Kg8 Qf4! (only move) draws, 90…Qh3+ 91.Kg8 Qf5! (91…Qe6+ loses) also draws

The game continued 88.g7 Qe5+ 89.Kg6 Qe6+ 90.Kh7 Qf5+ 91.Kg8 Ka4 92. Qh1 Qc8+ 93. Kh7 Qf5+ 94. Kh8 Qe5 reaching the position below:

Gelfand-Jobava (Move 95)

Now 95.Qh3! wins cutting off he black king from the drawing zone. Gelfand won  the game easily after another 18 moves. The best defence involves white winning by transitioning through the two diagrams below exploiting black’s king position to misplace the black queen. Absolutely fascinating stuff.

Gelfand-Jobava (Move 116 variation)
Gelfand-Jobava (Move 133 variation)

Chapter 10 – Multiple Queens

This section is entertaining with some really exciting and amusing positions. Here is one such position:

David Anton Guijaro-Alejandro Franco Alonso

This looks like a fairly standard queen and pawn ending. Black is  a pawn down but is to play and played the obvious capture 55…Qxb2? which is simply too slow. 55…b4! was the drawing move.  White has two tries: 56.axb4  is the only real winning attempt but falls short: 56…Qxb2 57. Qh7+ Ke6 58. Qxh6 a3 59. Qg6 a2 60.h6 a1=Q 61.h7 Qe2! forcing white to take a perpetual. Or 56. Qh7+ Ke6 57. Qxh6 Qxe4+ 58. Kh2 Qe2 with sufficient counterplay against the white king to draw. The game continued: 56.Qh7+ Ke6 57. Qxh6 b4 58. Qg6 bxa3 59. h6 a2 60. h7 a1=Q reaching the position below.

After move 60
Two queens each

61. Qf5+?  Driving the king towards safety: 61.h8=Q wins instantly, with a quick mate.) Kd6 62. h8=Q Kc5! 63. Qf8+ Kc4 64. Qe6+ Kd3 65. Qfxf6 Qd4 66.Qf3+ Kd2 67. Qh6+ Kc2 68.Qc6+ (the computer prefers 68.Qe2+ Kc3 69.Qc6+ Kb4 70. Qb7+ Ka3 71. Qe7+ Kb3 72. Qf7+ Kb4 73.g4 and white is winning)  Kb1 69. g4 Qab2 70.g5 a3 71. g6 a2 72. g7 a1=Q 73. g8=Q Qaa3 74. Qgg3 ? (74. Qcf6 keeps the advantage) reaching this position:

3 queens each

This is the beautiful but sad moment of the game. Black played 74…Qxf3+? and went on to lose quickly. 74…Qdxf2+!! draws by sacrificing all three queens for stalemate, for example 75. Qfxf2 Qxg3+ 76. Kxg3 Qc3+ 77. Qxc3 stalemate. Fantastic! Who says there is no humour in chess ?

Stalemate

Chapter 11 – Full Circle

This chapter covers the famous game Botvinnik-Minev Amsterdam 1954 which goes into a celebrated Q + g pawn v Q ending which Botvinnik won from a drawn position. As Boris Gelfand points out, once we know that an article written by Paul Keres in the 1947-1949 Soviet Yearbook  recommended that black place the king on a4, black’s moves become completely understandable.

Botvinnik-Minev
Botvinnik-Minev

56.Qg4+ Ka5? This is still a draw but modern knowledge recommends Ka3 heading towards the opposite corner. 57.Qxe6 Qh8+ 58.Kg6 Qc3 59.g4 Qd2 60.g5 Qd4? Centralisation looks good, but in fact loses. 60…Ka4! was best, several other moves also draw.

Botvinnik-Minev Move 60

Now 61. Qf5+? allowing black to draw. 61. Kh7! Qh4+ 62.Qh6 followed by g6, the black king is too far from the a1 corner 61…Ka4 62. Kh5 Qh8+ 63. Kg4 Qh1? The final mistake, after this Botvinnik wins with no slip-ups. Buy the book to find out how. 63…Ka3! was correct.

Chapter 12 – Conversion in the 4th Phase

This chapter covers a complex Q and double rook late middlegame which reveals the complexities of such positions. The game clearly shows that a sustained initiative is so potent.

This is a critical position from the game Gelfand-Edouard. Black is under the cosh but can defend with 35…Qxe5! 36. Qxa7 Rg6! 35.Qb7 Rxg3+! 36.fxg3 Qe3+! 37. Kh2 Qh6+ with a perpetual check.

Gelfand-Edouard
Gelfand-Edouard

The penultimate chapter is a series of studies which are elegant and instructive. There is a particularly beautiful study by Darko Hlebec. Buy the book to appreciate the beauty of chess.

The final chapter is a series of  rook exercises which are extremely didactic. If you can solve all of these, you are a World Champion.

I heartily recommend this superb book on major piece endgames which is a labour of love and hard work. It combines practical examples with coverage of basic endgame positions.

FM Richard Webb, Chineham, Hampshire, 16th November 2020

FM Richard Webb
FM Richard Webb
  • Paperback : 320 pages
  • Publisher:Quality Chess UK LLP (28 April 2021)
  • Language: English
  • ISBN-10: 1784831395
  • ISBN-13: 978-1784831394
  • Product Dimensions: 17.2 x 1.55 x 24.43 cm

Official web site of Quality Chess

Decision Making In Major Piece Endings, Boris Gelfand, Quality Chess, 2020
 Save as PDF