Secrets of Queen Endgames: Ferenc Berkes and Tibor Karolyi
From the publisher:
“A revolutionary new work on a notoriously challenging type of chess endgame
Queen endgames can seem unfathomably complicated. Computers have provided complete information for some of the basic queen and pawn endings, but human understanding has proved elusive.
In this ground-breaking work, two Hungarian authors have gone to extraordinary lengths to explain strategies and methods in queen endgames. Rather than a random series of checks, we can now understand king and queen triangulations that gradually bring the pieces to the squares they need to be to engineer the killer tactic that completes the process. Berkes and Karolyi have devised guidelines that help us judge what we need to aim for, and provided a broad set of tools to help us achieve these goals.
Going beyond previous texts, the authors have used not just seven-man tablebases and modern engines, but the specialized program FinalGen to delve with the same certainty into endgames with many more pawns. But most of all, they have spent thousands of hours seeking to present the whole truth about queen endings in human terms. Their wide-ranging discussion of shelters is especially instructive.”
- A definitive guide to a fundamental class of endgames
- Explains all types of endings with queens and pawns
- A wealth of guidelines for handling positions with many pawns
- Spectacular and previously unpublished endgame studies
- Thoroughly up to date, with more than 1000 chess diagrams
Ferenc Berkes is a grandmaster from Hungary. A former World Under-18 Champion, he was won the championship of his country on eight occasions. He plays team chess in several European leagues. IM Tibor Karolyi is also from Hungary. His many pupils have included super-GMs Peter Leko and Judit Polgar, and he is a highly experienced chess writer.
To get some idea of the book Gambit (via Amazon) provide a “Look Inside” at their Kindle edition. As you would expect with Gambit, the notation is English short form algebraic using figurines for pieces. A previous criticism (ibid) has been addressed in that each diagram has a W or B “whose move it is” indicator.
The book is divided into 9 chapters as follows :
- Extreme Tactics in Queen Endings
- Tools in Queen Endings
Technical Queen Endgames - Queen and Pawn vs Queen
- All the Pawns on the Same Side
- Extra Outside Passed Pawn
Practical and Strategic Queen Endgames - The Pawn
- The Queen
- The King
- Complex Queen Endgames
Here on YouTube John Nunn gives the reader an introduction to the book :
This book is a superb tour de force covering a complex subject that has not been covered so extensively before. My short review cannot really do justice to this magnus opus.
The book is aimed at expert players, probably 2200 and above. The vast majority of GMs would learn a lot from this book. Despite these comments, it is the reviewer’s opinion that any aspiring, improving player would benefit from reading the more general chapters 1, 2, 5, 6, 7, 8. The pure technical chapters 3 and 4 are certainly more abstruse but very instructive: the authors don’t just give long variations but intersperse these with pithy, useful comments.
The short first chapter really introduces the power of the queen with a mixture of studies and over the board positions.
Chapter 1: Extreme Tactics in Queen Endings
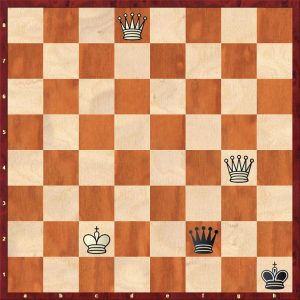
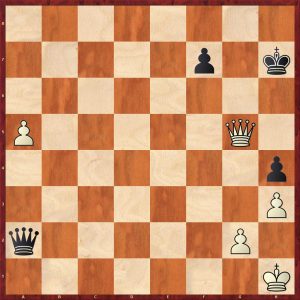
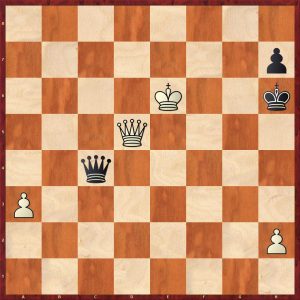
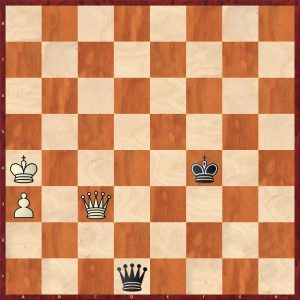
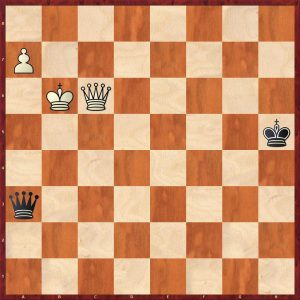
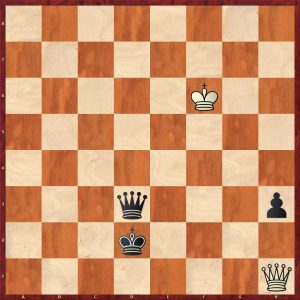
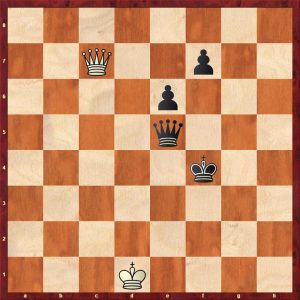
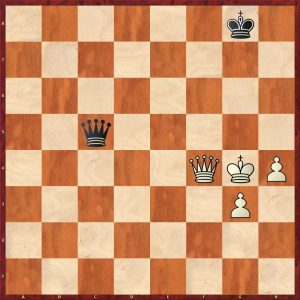
Here is an amazing and stunning study by Rusz:
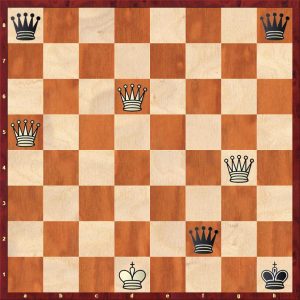
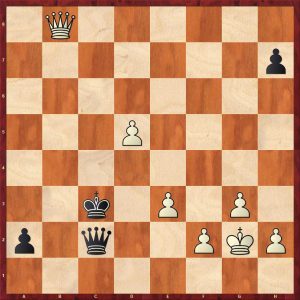
Black is threatening to mate with Qa1+, so white plays 1.Qf6!!
Amazingly, this is a position of mutual zugzwang as White to play only draws, whereas Black to play loses. It is hard to believe that in an open position with three queens each, having the move is a disadvantage!
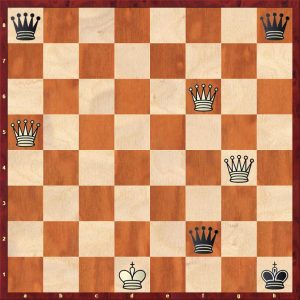
Black can try 1…Qad8_ 2.Qaxd8 Qxd8+ 3.Qxd8 Qf1+ 4.Kc2 Qf2+
5.Qd2 (The careless 5.Kb3? allows a standard trick 5…Qg3+ 6.Qxg3 stalemate, always watch out for this type of idea in queen endings) 5…Qc5+ 6.Kd1 Qc2+
7.Ke2! Black has run out of useful checks, so white wins
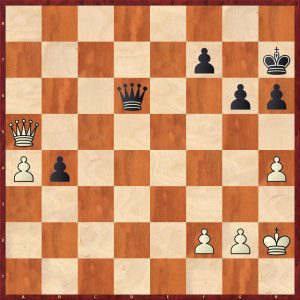
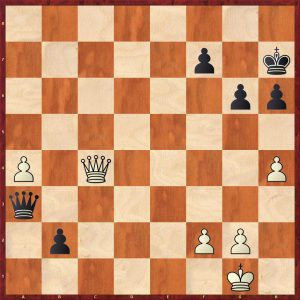
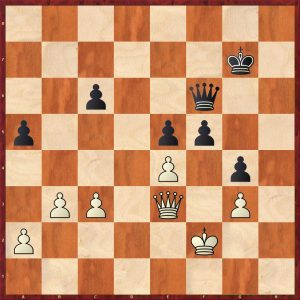
Here is a practical example showing many important principles in queen and pawn endings:
White has three pawns for a bishop, but the most important feature of the position is black’s far advanced passed a-pawn. In queen endgames, it’s the degree of advancement of passed pawns that is all important, not the number of pawns. Black correctly shed the bishop with his next move:
42…Kc7! 43.Qf7+ Kb6 44. Qxf8 Kb5!
White is three pawns up but is totally lost. White’s only potentially useful pawn is the d-pawn as it’s closest to queening, but white is just too far behind in the race. Black’s king will shelter behind the white’s pawns, there is no chance of a perpetual check.
45.Qe8+ Kb4 46.Qb8+ Ka4 47.Qg8 Trying to bar the king’s progress, but to no avail. 47…Qc2! (47…Qb3 also wins) 48.Qe8+ Kb4 49.Qb8+ Kc3 50.Kg2 a2 51.d5 Using a little tactic to prevent queening and putting black under a little pressure
51…Qb2? A poor move deactivating the queen allowing white an amazing draw which he misses, the obvious 51…Qe4+ 52.Kh3 Qxd5 eliminating white’s counterplay, followed by putting the king behind white’s pawns wins easily, 51…Qd1! also wins watching White’s d-pawn and preparing to promote, after 52.Qe5+ Kc2 53.Qe4+ Kb3 54.d6 a1=Q wins as does 54…Qxd6
White missed a clever draw and black won after a slugfest in a four queen ending. Buy the book to see this entertainment.
Chapter 2: Tools in Queen Endings
This is an excellent toolbox chapter that covers the follows topics:
The Queen Triangulates
Cutting Off the King
Batteries and Discovered Checks
Pinning Down a Piece
Exploiting the Opponent’s Harmful Pawn
Zugzwangs
These ideas are absolutely key themes in queen endings. This section is definitely worthy of examination.
The reviewer will show examples from many of the themes in turn:
The Queen Triangulates
The author explains the concept concisely:
“In queen endings, there are more zugzwangs than most players would assume. We shall see many examples where the attacker’s king manoeuvres to give up the right to move – a familiar theme from pawn endings, but more surprising with queens on the board. But the queen itself can also lose a tempo by a form of triangulation. It usually happens when the defender’s king is in danger.”
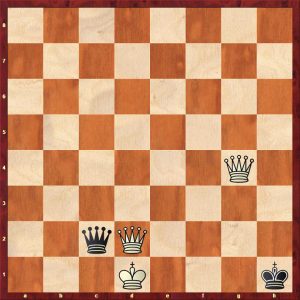
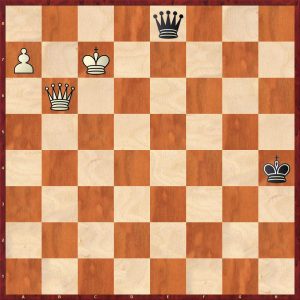
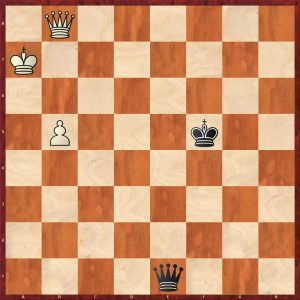
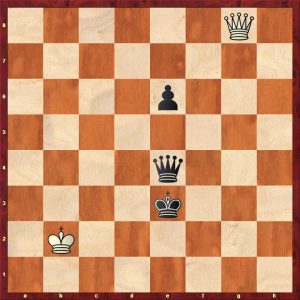
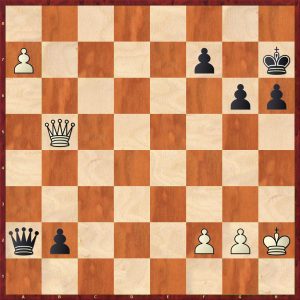
Here is another Rusz study showing this idea:
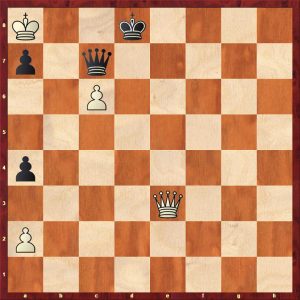
This positions look ok for black as he has White’s passed pawn under control. 1.Qg5+ Ke8 2.Qc5! 2…a3! 3.Qe3+! Kd8 4.Qg5+ Ke8 5.Qc5! completing the first triangulation
5…a6 forced 6.Qe3+ Kd8 7.Qg5+ Ke8 8.Qc5! another triangulation completed 8…a5 9.Qe3+ Kd8 10.Qg5+ Ke8 11.Qc5! a4 12. Qe3+ Kd8 13.Qg5+ Ke8 14.Qc5! zugzwang wins
14…Qc8+ (14…Kd8 15.Qf8# ends the suffering) 15.Ka7 Qc7+ 16.Ka6 wins black’s pawns and the game
Cutting Off the King
This principle can be used by the stronger side or the weaker side to prevent the opposing king getting to a desirable area. For example, the stronger side can use this technique in Q+P v Q to cut off the defender’s king from a drawing zone. The example below shows the defending side successfully using this theme in an over the board game:
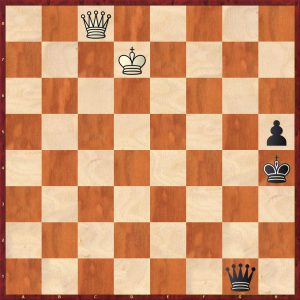
White has just taken the pawn on g5, black can now draw with an accurate sequence of checks: 46…Qb1+ 47.Kh2 Qb8+ 48.Kg1 Qb1+ 49.Kh2 Qb8+ 50.Kg1 Qb1+ 51.Kf2 Qc2+ 52.Kf3
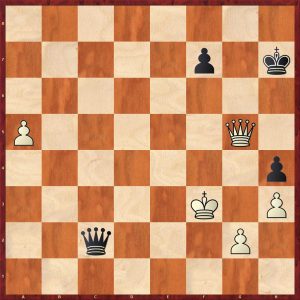
Black must choose the right check here to draw: 52…Qd1+! (the sloppy 52…Qd3+ 53.Kg4! allows white to approach the h-pawn and win the game) 53.Ke4 Qa4+! not allowing the king to cross the fifth rank 54.Ke3 Qb3+ 55.Kd2 Qb2+ 56.Ke1 Qb1+ 57.Ke2 Qe4+ 58.Qe3 Qxg2+ Black has regained his pawn and drew comfortably
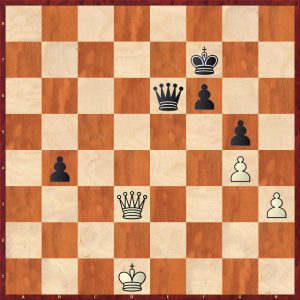
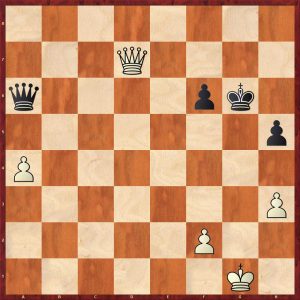
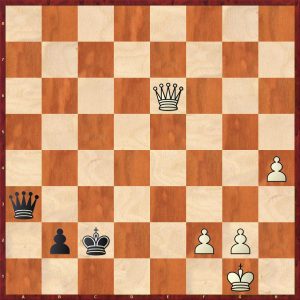
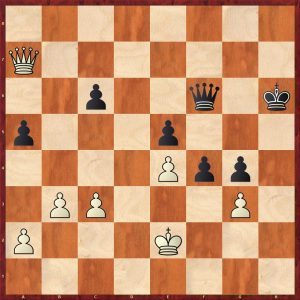
In this famous ending, Black is winning with an extra pawn and centralised queen. He played 62..f5? mobilising the pawn majority
Better was 62…Kd6! activating the king trying to cross over to white’s queenside pawns: white cannot defend against the twin threats of the king invasion and the advance of the kingside pawn majority. After 62…f5? white took the opportunity to make Black’s life very difficult 63.Qb5! cutting the king off from white’s queenside. White missed a probable difficult draw and black eventually won.
Batteries and Discovered Checks
From the author: “Powerful ideas in queen endings include forcing an exchange of queens and launching an attack on the enemy king. Usually the queen harasses the enemy ling by giving checks, but sometimes setting up a battery is stronger than the immediate check. Players often miss such an opportunity, or the potential to play for it. The attacker typically uses a battery to attack the opponent’s king or to win a tempo and stop the opponent’s queen from continuously checking by stepping out the check with a cross check.”
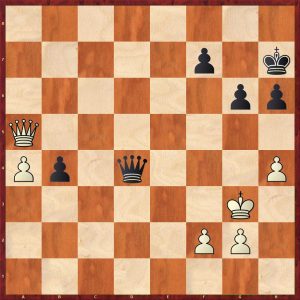
This practical example is instructive:
White played 57.Qxd5 winning a pawn, 57… Qe3+ (black can also draw with the flashy 57…Qf6+ or 57…Qg4+ or 57…Qa4+) 58.Kf6 Qf2+ (58…Qf3!+ draws easily, 59.Qxf3 is stalemate, and 59.Kf6 Qc3+ draws) 59. Qf5 Qh4+ 60.Ke6 Qc4+ 61. Qd5 This position is getting difficult for black, but there are still six drawing moves, Black choose a terrible check 61…Qa6??+ 62.Qd6! setting up a deadly battery 62…Qe2+ 63.Kd5+ 1-0 as white exchanges queens
Pinning Down a Piece
White played 104.Kc2? and lost . Portisch missed a brilliant move here 104.Qd4!! which amazingly draws, after 104…b3 105.Qd3! attacks the pawn and paralyses the Black queen.
Exploiting the Opponent’s Harmful Pawn
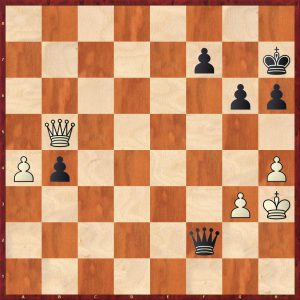
There are many example in the ending Q+P v Q+P where the defending side (player with the pawn that’s least advanced) loses because the extra pawn is harmful blocking defender’s queen checks and/or providing shelter to the stronger side’s king. An example is given below:
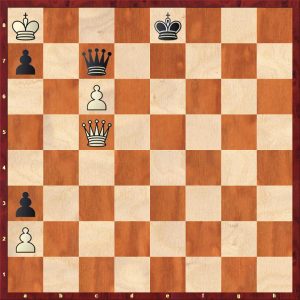
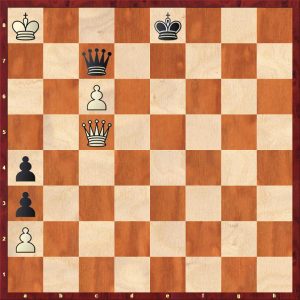
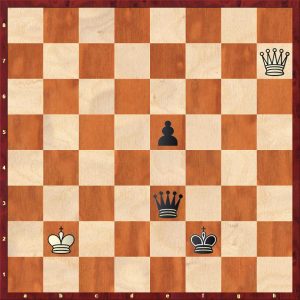
White played 43.Qb8+ which wins but Boleslavsky messed up later on. In some ways 43.h4 is simpler. A possible line is 43.h4 Qc2+ 44. Qg6 Qxa4 45.h5 Qxa2 reaching this position:
Without Black’s b-pawn this is a tablebase draw but not easy in practice. With the b-pawn, Black is losing after 46.Kg7!! The pawn blocks the g1-a7 diagonal.
The next huge section of the book is all about Technical Endgames.
Chapter 3: Queen and Pawn vs Queen
This is in some ways the core of the book with 65 pages devoted to this basic ending. But it is anything but basic!
Each pawn is covered in turn starting with the rook’s pawn working towards the centre pawn. Within each pawn’s section, positions are covered from the second rank to the seventh rank. It is certainly a systematic approach.
It is clear that the least favourable pawn is the rook’s pawn, followed by the knight’s pawn. It may surprise some readers to know that the bishop’s pawn is the most favourable.
Rook’s Pawn
These are the authors’ conclusions:
“The closer the pawn get to promotion, the harder it becomes to hold.
In the case of a white a7-pawn:
Black’s safest option is to get really close to the pawn, at least to the d-file.
The h1-corner is a draw for black’s king, but in practice the defence will require a lot of concentration.
The a1-corner is the second least difficult location for the defender’s king.
In case the black king gets trapped in the h8-corner, there is only one mutual zugzwang position that might save the defender.”
The reviewer will show a few positions:
This position is a tablebase draw particularly as black’s king is fairly close to the h1 corner.
White played 90.Kb4
The author adds a didactic comment: “Ever since the famous Minev -Botvinnik game in 1954, we know the player with the extra pawn should look to put his king on the same or neighbouring file or rank as the opponent’s king. This creates chances for a cross check or to set up a battery.”
The game continued for another 61 moves until this position was reached:
Black’s king is not ideally placed, but he can draw with the correct check. Black played 151…Qe7+? (151…Qf7+ draws as 152.Kc8 is met by 152…Qf5+ drawing, Gelfand has made an observation, if in doubt check on the opposite colour square to your king, obviously this not a hard and fast rule) 152.Kc8! Black has run out of checks because of the king on h4. White now plays superbly to bring home the full point fully exploiting the badly placed black king 152…Qe4 153.Qc5!
153…Qe6+ 154.Kc7 Qf7+ 155.Kb6 Qb3+ 156.Ka5!
A standard winning technique in Q+P v Q The author comments thus: “White approaches the rank of Black’s king. Now 156…Qa2+ would be the last check, as it is met by 157.Kb5. from this point, the win is easy, as White can promote after some checks.”
156…Qf3 157.Qc4+ Kh5 158.Kb6 Qf6+ 159.Qc6 Qd8+ 160.Kb7 Qe7+ 161.Ka6 Qa3+ 162.Kb6 exploiting black’s king position again, there are no more checks, so 1-0
The reviewer adds an observation: when the black king is in or near the h1-corner, it is much harder for White to manoeuvre his king to an adjoining rank/file and keep his pieces coordinated as well as the pawn safe.
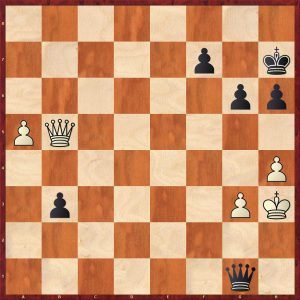
This is a tablebase draw as white’s king is close to the best corner (a8) but an experienced top GM still lost this position thirty moves later. This shows how hard it is in practice. The book has some excellent coverage of this endgame viz:
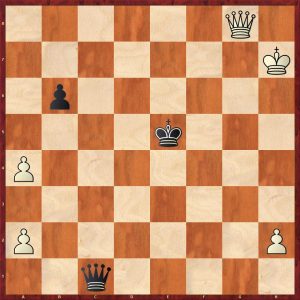
This position is still a draw.
“White should also wait with 85.Ke5, or he could move closer to the corner with 85.Kf7 or 85.Kf6”
White played the obvious centralising check 85.Qe5+? which loses, black replied with the 85…Kc2? (85…Kd2! wins: the analysis is worth looking at just to see the process as Black uses triangulation and White’s poorly placed king to escape the checks, get the book to find out)
In this position White can draw. Over to the authors: “86.Qf4!! is the right move. But why? If it Black’s turn to move in the diagram, Qf3 would cut off the white king and win. The queen on f4 stops that. If 86…Kd1 87.Kf7!= (87.Kf6 also draws) 87…Qe2 88.Qd4+ only move 88…Kc2 89.Qa4+ holds or 89.Qc5+ or 89.Qf4! h2 90.Qa4+ draws”
This subtle, underlying battle of the cut off is amazing. The game continued with 86.Qh2+? Kd1! Once again the king approaches the neighbouring file of the enemy king 87.Qh1+ Kd2 88.Kf6 (the authors note that if white’s king could move to the c-file he would draw, the win after 88.Ke7 is very instructive as black triangulates again, get the book to find out how)
Timman misses a fairly simple idea to win quickly here 88…Qg3! He played 88…Qe3? This throws away all the hard work. White can draw with 89.Qh2+ and then run with the king towards the h8 corner. White blundered with 89.Kf5? A fatigue blunder allowing 89…Qf2+ 90.Ke5 Qe1+ exchanging queens 0-1
Knight’s Pawn
This is the authors’ observations:
“This situation occurs more often in practice than Q+P v Q with other pawns. This type of pawn has some unique features. for example, the attacker’s king has more scope for hiding near the pawn then it does behind a rook’s pawn, but less room compared to a bishop’s pawn. There is a drawing zone that often exists for the defender’s king in the far corner from the promotion square.”
The reviewer adds the proviso: but even this depends on the exact position of the queens of course.

This is position from an unknown composer/player. Surprisingly White wins here even with the black king so close. White plays 20.Qc6! which is a standard cut off move. The winning process here takes 75 moves with perfect defence. There are some mind boggling triangulations with white’s king to wrong foot the black queen. Buy the book to find out how.
Here is a position with a knight’s pawn on the fifth rank.
White wins here with the brilliant 74.Qf8+ Kg4 75.Qa3!! cutting black’s king off from the drawing zone. Zurakhov played 74.Qc8? throwing away the win but he won anyway on move 119.
Once the knight’s pawn reaches the seventh rank, the defender’s king has to stay in the opposite corner. This is the type of position the attacking side should aim for:
Apparently with a g-pawn on g7, the d4 is vitally important for the stronger side’s queen.
Bishop’s Pawn
There is no drawing zone for the defender’s king (unless of course the king can get in front of the pawn).
This is a technical win for Black: 55…Qg4! is an excellent cut-off preparing to activate the king. Uhlmann played this ending well not letting the win slip at any point. This ending is worth close study.
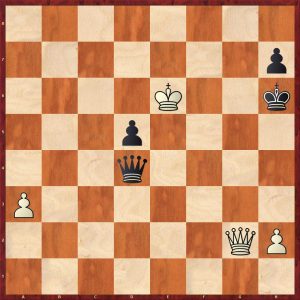
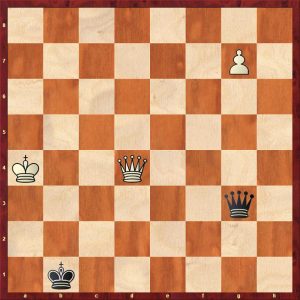
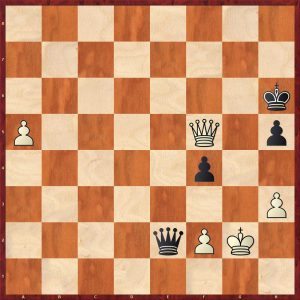
Centre Pawn
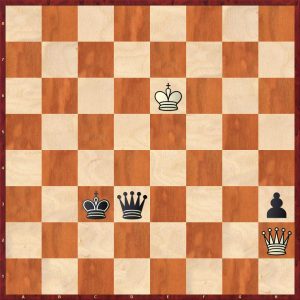
1.Qxf7+ Ke3! the only winning move.
If white’s king was on h1, he would draw as his king would be in the small drawing zone on the short side of the pawn. 2.Qg8 Qd5+ (a series of queen checks to force white’s king to the unfavourable long side of the pawn) 3. Kc1 Qh1+ 4.Kb2 Qe4!
5. Qg1+ Ke2 6.Qh2+ Kc3 7.Qg3+ Qe3! 8.Qg6+ Kd2 9.Qc2 Ke1 10.Qb1+ Kf2 stopping the checks, notice how white’s own king impedes his own queen 11.Qh7 e5
Nunn comments: “The general theory of queen and pawn against queen tells us that this position is probably winning, because with the centre pawn there is no drawing zone for the white king in a remote corner, and if the defender’s king cannot move in front of the pawn then his chances are grim.”
Chapter 4: All the Pawns on the Same Side
This is a systematic analysis of all the different pawn configurations and is a really technical. For mortals like me, this will take many months to take in, but is nonetheless really interesting.
One surprising conclusion is that a two pawn advantage Q and rook’s pawn + knight’s pawn [gh-0] v Q is drawn in many positions if the defender’s queen and king are actively placed.
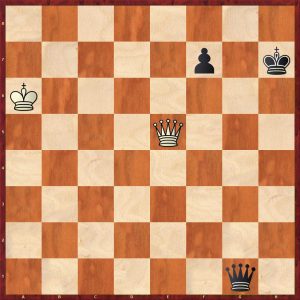
Here is a practical example:
How should White capture the Black pawn? On general principles, it looks better to capture with the queen retaining two connected passed pawns. Here both captures win, but generally Q+f+h pawns v Q is a win unless there is an immediate perpetual. Q+g+h pawns v Q is drawn in many cases. After 69.Qxf4?! Qc5+ 70.Kg4? White has thrown the win away:
Black played 70…Qc8+ which draws as does 70…Qa7, 70…Qc3, 70…Qc6
The game was drawn after both sides made mistakes. Instead of 70.Kg4?, 70.Kg6! wins.
This ending is truly complex and worthy of study. Buy the book to find out more.
Chapter 5: Extra Outside Passed Pawn
This is divided into four natural subsections:
Passed Rook’s Pawn
Passed Knight’s Pawn
Passed Bishop’s Pawn
Passed Centre Pawn
The author concentrates on the passed rook’s pawn:
“Firstly, they occur more often than other passed pawns, as is also the case in rook endings. Secondly, the defender has much better drawing chances compared to positions with a c-pawn for example, because the stronger side’s king can’t find shelter around the rook’s pawn. If the attacker’s queen is busy defending the king from checks, there is little capacity left to help the rook’s pawn advance. On the opposite wing from the passed rook’s pawn, exchange of pawns tend to favour the defending side for several reasons:
1) They increase the chance of perpetual check.
2) Less frequently, it may even be possible to simplify to a queen and pawn versus queen endgame by exchanging off all the kingside pawns.”
Here is an excellent demonstration by the strongest player in the world:

Carlsen played the neat 33.Bd5! (33.Qb2+ Kg8 34.a3 Qd3 black is very active and white cannot make progress) 33…Bxd5 34. Qe5+ f6? A serious mistake from a top player as it weakens the king’s shelter. Chapter 8 gives lots of advice and examples about shelters. Much better was 34…Kg8 35.Qxd5 Qa3 36.Qb3 Qc1+ 37.Kg2 h5 38.gxh5 Qg5+ 39.Kh2 Qxh5 and black can hold. 35.Qxd5 h5 (Trying to weaken White’s kingside) 36.gxh5 gxh5 37.Qd7+ Kg6 38.a4
Although both Kings’ shelters have been partially wrecked, Black’s exposed king is more significant as the game continuation shows. 38…Qe2 39.Qd5! Centralisation 39…f5 Black is trying to block in the White king, but this move exposes his own king even more 40.a5 f4 41.Kg2! Kh6 42.Qf5
42…Qc4 43.Kf3 winning another pawn, so 1-0
Notice how Black’s pawn advances brought down his downfall.
The last four chapters are in a section of the book on
Practical and Strategic Queen Endgames
Chapter 6: The Pawn
The following ideas are discussed:
Breakthrough
Promoting With Check
Reducing the Number of Pawns in Order to Hold the Draw
Pushing a Pawn to Force an Exchange of Queens
Connected Passed Pawns
Gaining Space
Races
Races when Both Sides Have Only One Pawn
Quality vs Quantity
Doubled Pawns
An example from the Quality vs Quantity subsection is given below.
The author states “It’s a well-known and common saying that in queen endgames, ‘it’s not the number of pawns that counts, but their quantity!’ In other types of endgames, the principle of strength in numbers map apply more often, but less so in queen endings.”
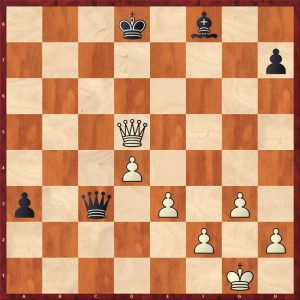
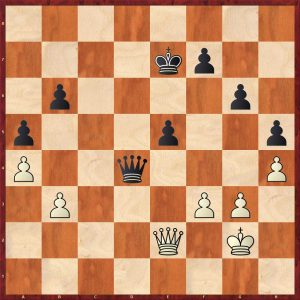
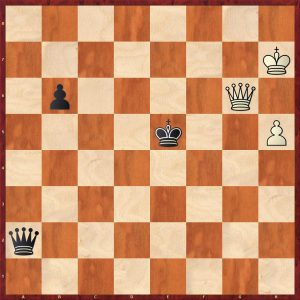
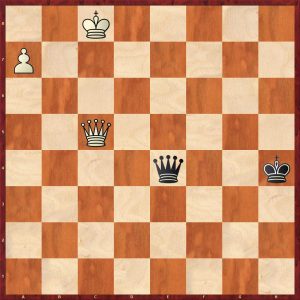
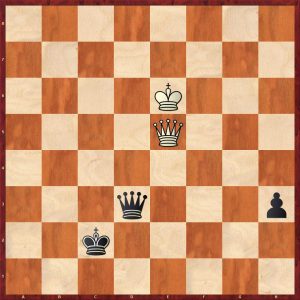
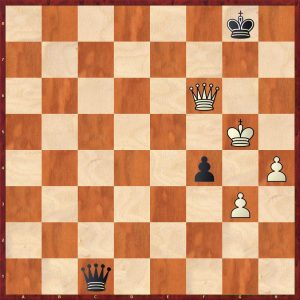
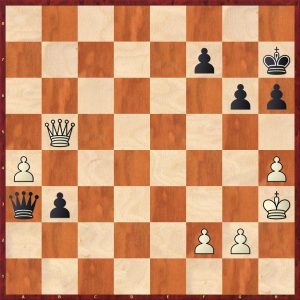
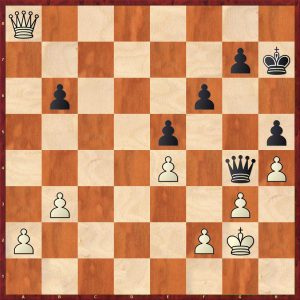
This ending has been quoted often:
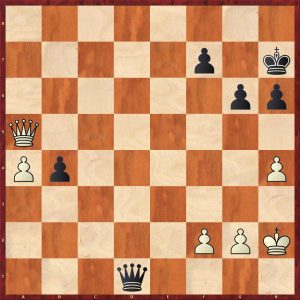
Euwe played the natural centralising move 41…Qd4? which is multi functional, but surprisingly throws away the win. The h4-pawn is not important here. There is a win with a very subtle move 41…Qd6!!+ which looks like a superfluous check, but forces white to weaken his position.
White now has an invidious choice on how to spoil his position, g3 weakens the king’s shelter and both king moves have their disadvantages. Let’s look at each alternative.
a) 42. g3? Qd4! Now this move gains in strength as white would like to take the f2 pawn exposing White’s king fatally 43.Qb5 Qxf2+ 44.Kh3
Black has two different wins here 44…Qf3! (44…Qf5+ also wins) 45.Kh2 (45.Qxb4? Qh1+ 46.Kg4 Qf1! forcing mate or win of queen) 45…b3 46.a5 Qf2+ 47.Kh3 Qg1! winning
48.Qxb3 Qh1+ 49.Kg4 f5+ 50.Kf4 Qe4#
b) 42.Kh3 b3 43.Qb5 (43.Qc3 Qd7+ exploits White’s wins exposed king, winning the a-pawn) Qa3!! This is unconventional move, putting the queen on the side, but it exploits the exposed White king: the threat of a discovered check is fatal for white.
If 44.Qb7 a2+ 45.Kh2 Qa2 wins
If 44.a5 b2+ 45. g3 Qa2 wins as well as 45…Qf3
If 44.h5 b2+ 45.f3 g5 46.Qf5+ Kg7 47.Qe5+ Kg8 48.Qb8+ Kh7 49.Qb7 Qa2 wins
c) 42.Kg1 b3 43.Qb5 Qa3 44.Qc4! b2!!
Black gives up three pawns to get his king out of the checks. This is a brilliant example of quality over quantity. 45. Qxf7+ Kh8 46.Qf6+ Kg8 47.Qxg6+ Kf8 48.Qxh6+ Ke7 49.Qg7+ Ke6 50.Qg8+ Kd5 51.Qg7+ Kd5 52.Qf7+ Kg4 53.Qg7+ Kc4 54.Qf7+ Kc3 55.Qf3+! Kb4 56.Qb7+ Kxa4 57.Qa6+ Kb3 58.Qe6+ Kc2
Now after the obvious 59.Qe2+ black plays 59…Kb1!!
The author explains why this wins: “Although Black is two pawns down and apparently has no shelter, he can win. The white king has to give up the back rank due to threats of crosschecks, after which the black king can find shelter on f1! For this reason, sacrificing the f2-pawn is inevitable. Then, in marvellous variations, White, can be forced into zugzwang where he either loses his h-pawn or is force to play Kh3, which means that the black king can find a shelter on g1, which decides the battle.”
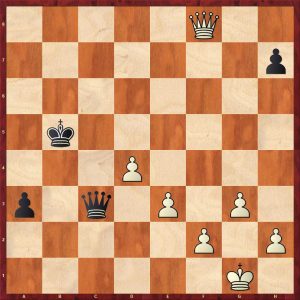
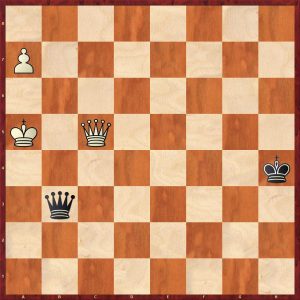
Back to the game continuation, after 41…Qd4? 42.Kg3? White defends a pawn with little value and exposes his king fatally. 42.Qb5! draws easily viz: 42…Qxh4+ 43.Kg1 Qe4 44.a5 Qb1+ 45.Kh2 b3 46.Qb7 Kg7 47.a6 Qa2 48.a7 b2= The best Black can achieve here is Q+3 v Q+2 all on one side which is a draw.
After 42.Kg3? this is the position:
Black exploited the exposed white king as follows: 42…b3 43.Qb5 b2 44.Qb3 Kg7! winning 45.f4 (Other moves lose as well, for example 45.a5 Qe5+ 46.Kf3 Qf5+) 45… Qd2 0-1
A really instructive game.
Chapter 7: The Queen
The following ideas are discussed:
Exchanging Queens
Zwischenzugs
Passive and Active Queens
Neutralizing Queens
The Queen has Multiple Tasks
Restraining an Enemy Passed Pawn from Behind
Superfluous Checks
The reviewer will show an example on the topic of superfluous checks. The author explains: “In many positions there is no clear plan to implement, and in this case having the move in an over-the-board game creates tension. Rather than finding something constructive to do, or at least find a move that doesn’t compromise their position, players often insert an exchange or a pointless check. Either can harm their position.”
This position is objectively equal, although Black’s position looks slightly superior as his pawn majority has been mobilised. White’s pieces are well placed. 37.b4 is equal, but simpler is probably 37.exf5 Qxf5+ 38.Ke2 Qc2+ 39.Qd2 Qe4+ 40.Qe3 is equal, Black has no realistic winning chances.
White played 37.Ke2?! So Black responded with the obvious 37..f4 gaining space and creating a passed pawn 38.Qa7+? The superfluous check that loses. The author quotes John Nunn here: “Nunn pinpoints the basic truth that many people think they must keep giving checks in queen endings. this is one of the most common conceptual mistakes.” 38.Qd3! holds 38…Kg6 39.b4! getting the queen side pawns going draws 38…Kh6
After two poor strategic moves, White is totally lost. After 39.Qd7? (39.Qf2 is more resilient but still loses after 39…Kg5) 39…fxg3! won easily as Black’s king can shelter near his passed pawn.
Chapter 8: The King
These topics are covered:
Attacking The King
Stalemate
Avoiding Stalemate
Perpetual Check
Shelters
The section on Shelters is really important and is broken down into 9 further sub-sections:
The Importance of a Good Shelter
Weakening Our Own Shelter
Failing To Reach a Shelter
Invading and Destroying Shelters
Unusual Shelters
Leaving The Shelter to Support Pawns on the Other Wing
Leaving the Shelter to Exchange Queens
Leaving The Shelter to Win a Pawn
Breaking Open The Shelter with Pawn Sacrifices
Here is an example from the Weakening Our Own Shelter section.
The great Tal made a serious mistake here in a winning queen endgame 40.f3? Voluntarily weakening his king’s shelter: a poor move from a great player. 40.Qd5 centralising the queen wins easily 40…Qc8 41.Qd2 b5 42.Qb4 wins or 40…b5 41.a4 wins 40…Qd7 41.Qd5 Qc7 42.Qd2 b5 43.a3 (43.a4 bxa4 44.bxa4 Qc4 45.a5 Kg6 holding) Qc5 44.Qa2 Qc1 draw agreed
Chapter 9 Complex Queen Endgames rounds off the book with the study of some intricate endings.
This is a great book and is thoroughly recommended. Be prepared to put in some hard work.
FM Richard Webb, Chineham, Hampshire, 17th June 2024
Book Details :
- Hardcover : 384 pages
- Publisher: Gambit Publications (27 Nov. 2023)
- Language: English
- ISBN-10: 1805040634
- ISBN-13: 978-1805040637
- Product Dimensions: 15.6 x 2.69 x 23.39 cm
Official web site of Gambit Publications Ltd.
 Save as PDF