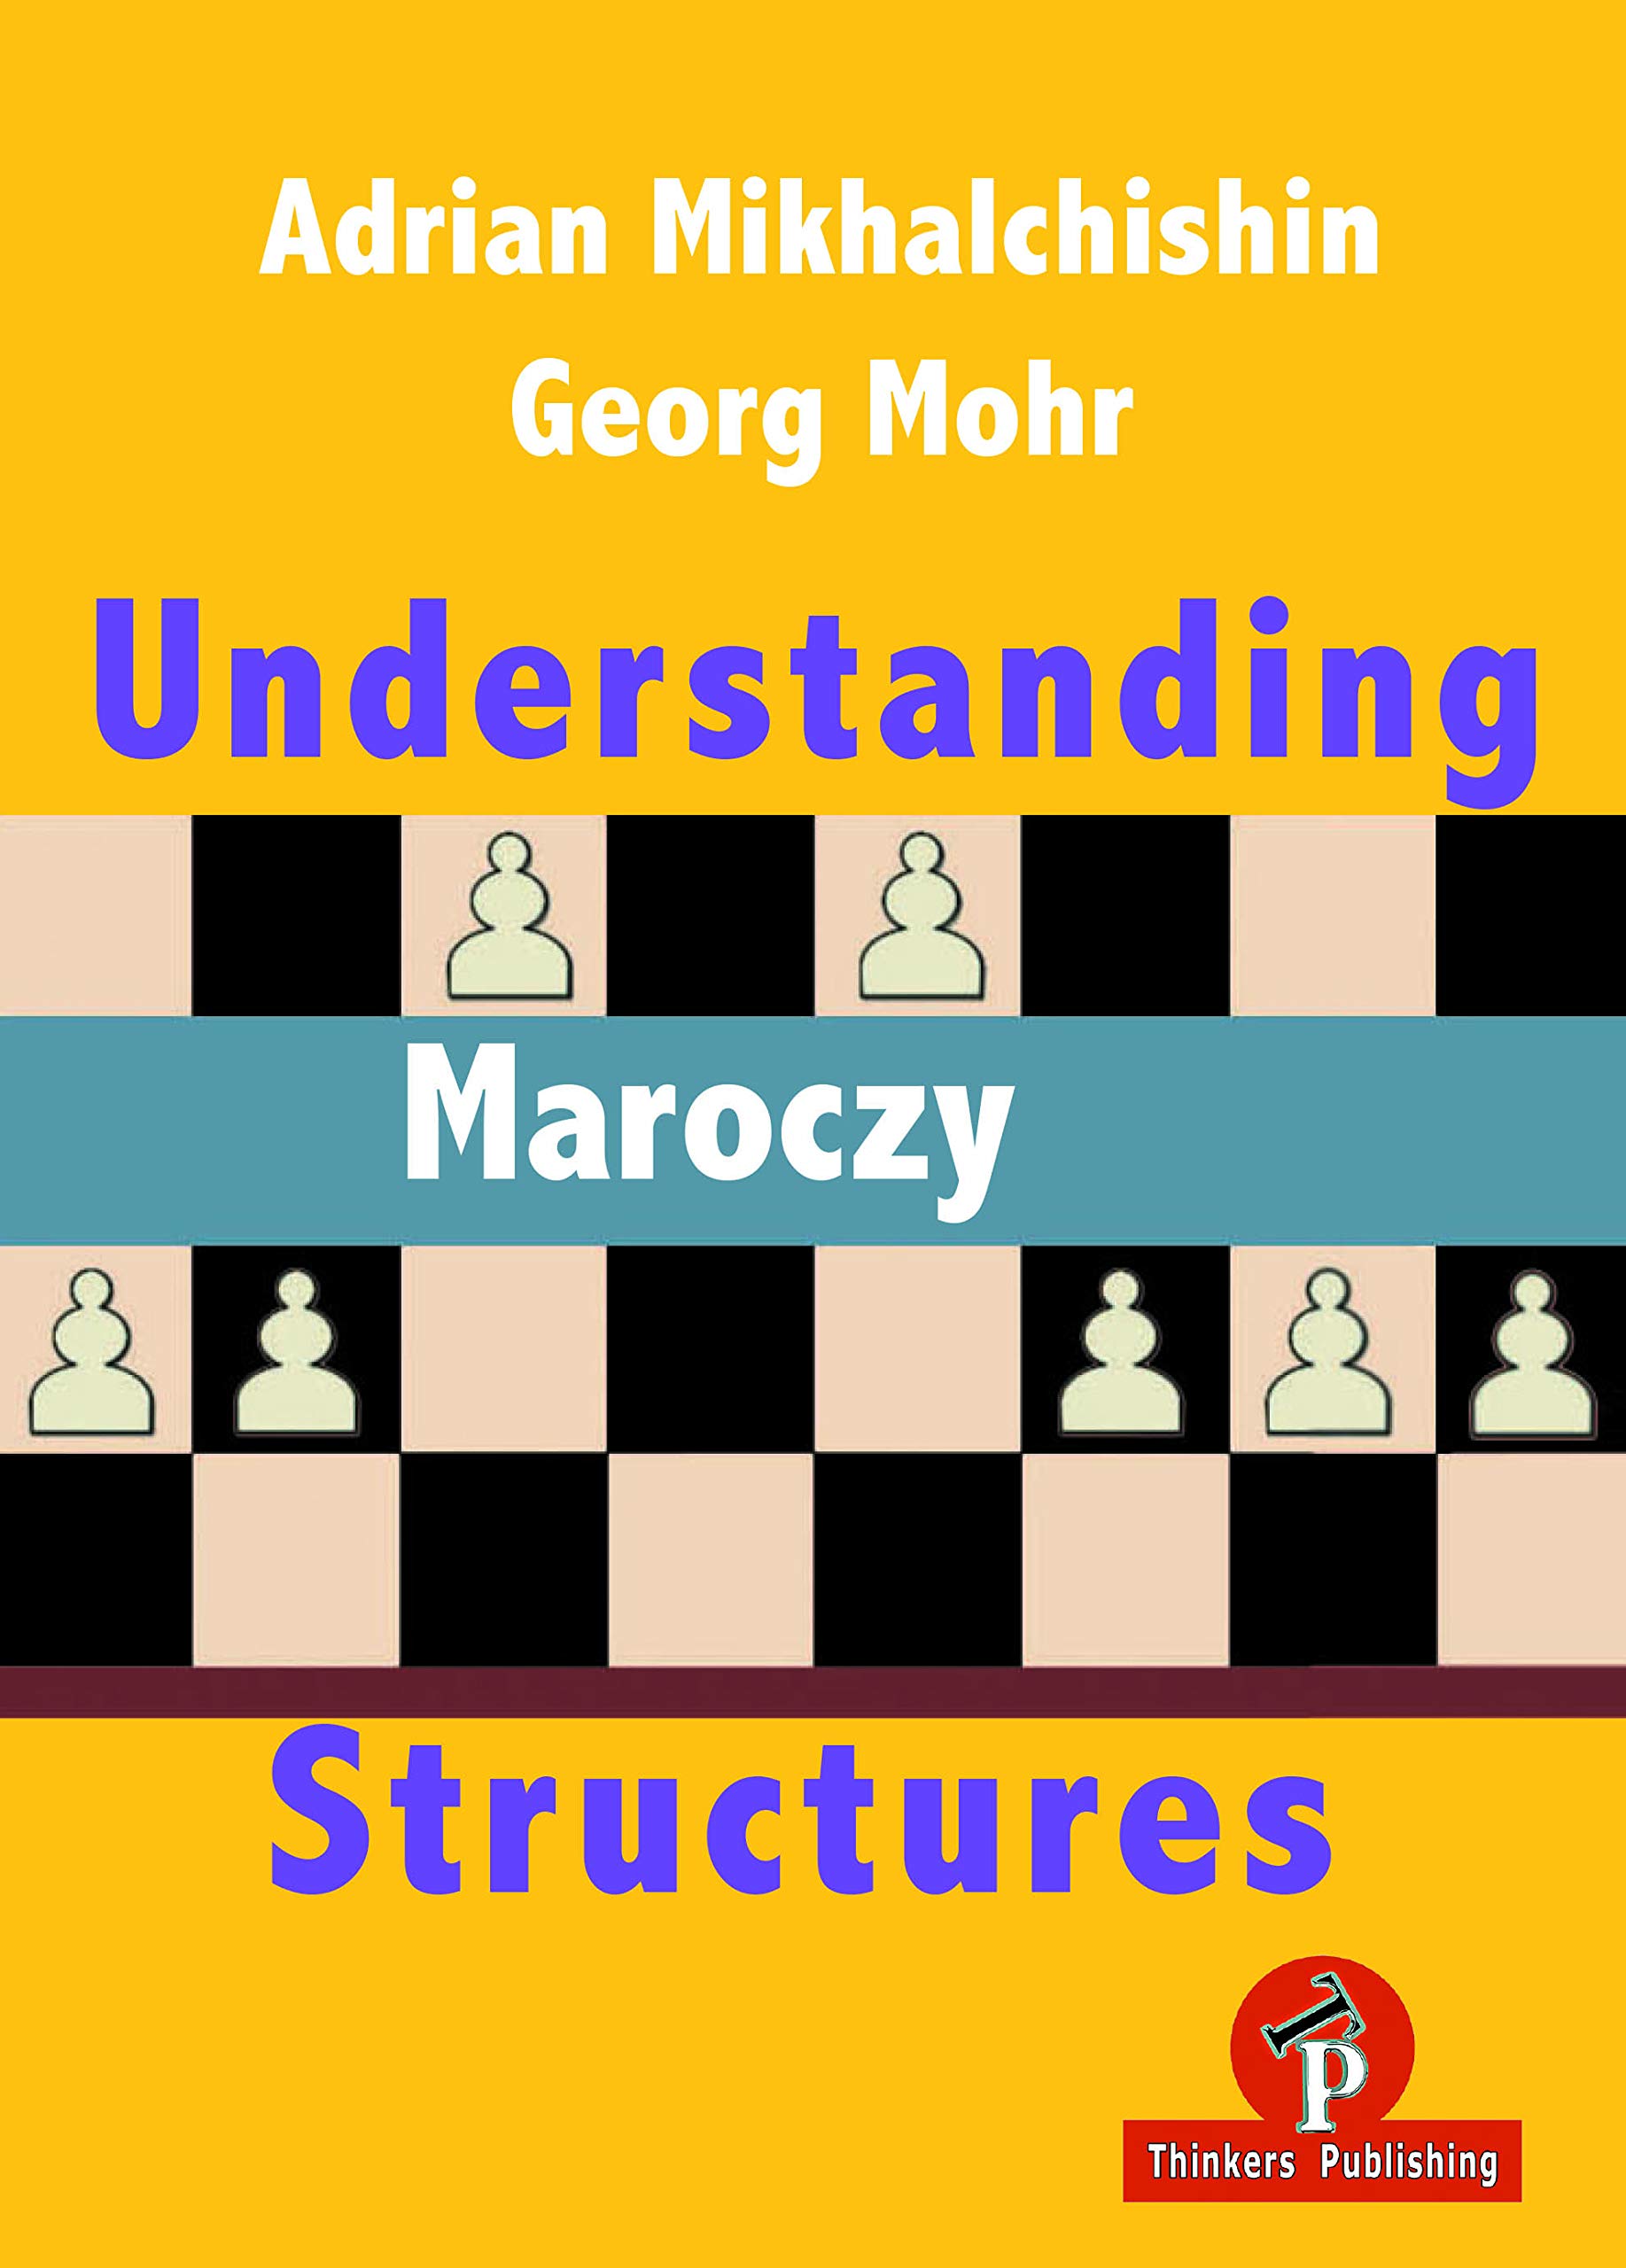
From the publisher:
“Using carefully selected examples, the authors want to make you familiar with the strategic ideas behind the famous Maroczy bind. These plans arising from both colours, are a must for your arsenal of chess knowledge and understanding.”
“Adrian Bohdanovych Mikhalchishin was born in Lvov, Ukraine in 1954 and became a Grandmaster in 1978. In 1995 he took Slovenian citizenship and became a FIDE Senior Trainer from 2002 and was chairman of FIDE Trainers Commission from 2009. Adrian was a trainer of many famous chess players. Amongst others he was in Anatoly Karpov’s team during matches with Garry Kasparov. He has worked with Maja Chiburdanidze, Nana Aleksandria, the Polgar sisters, Alisa Maric and Nana Dzagnidze. He was coach and captain of the national teams of Slovenia and the Netherlands. In recent years he has been coach of the Turkish woman team. He has written many chess books and thousands of articles for many chess magazines.”
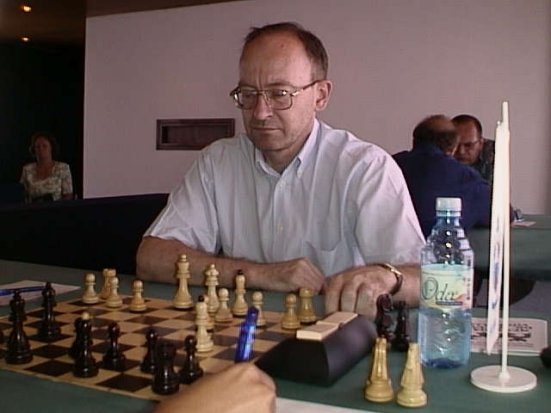
“Georg Mohr was born in Maribor, Slovenia in 1965 becoming a Grandmaster in 1997. He joined as a member of the FIDE Trainers Commission from 2002, becoming a FIDE Senior Trainer in 2004 and a FIDE International Organizer in 2011. Georg has been a professional chess trainer for many years. He was coach and captain of Slovenian national team from 2003 – 2010 and since 2011 he has been Turkish national youth trainer. He is a chess writer and was editor of Slovenian chess magazine Šahovska Misel from 1999 and editor of Fide Trainers Commission trainers’ surveys. He is also an organiser of chess events acting as tournament director of the European Club Cup (Rogaška Slatina 2011), the World Youth Championship (Maribor 2012) and the World Senior Championship (Bled 2018).”

Looking at the title of this book, Understanding Maroczy Structures, it appears to be an abstruse book on a specialised middlegame structure which many club players will know by name. They will be able to describe the tusks on c4 and e4 and probably have lost a game horribly against a stronger player who squeezed the life out of them like a hungry reticulated python. Chess like a reticulated python has beautiful patterns: this book covers all the major ideas and patterns in the Maroczy structures. The reader may be thinking: I don’t play these systems for either colour, it’s of no relevance to me. The reviewer begs to differ: many general, important middlegame themes are demonstrated in this book such as:
- Avoiding exchanges to keep the opponent cramped
- Exchanging pieces to relieve cramp
- Use of knight outposts
- Using a space advantage to attack on the queenside
- Using a space advantage to attack the king
- Using the bishop pair
- Pawn levers to attack the opponent’s pawn structure & relieve cramp
- Opening up the position to exploit a space advantage and better placed pieces
- Bad bishops and weak colour complexes
This book is not a repertoire bible for playing the Maroczy bind; it is a examination of the typical middlegame strategies for both sides in these complex and interesting positions. It is definitely harder to play for the side playing against the Maroczy structures.
The book is structured into five sections and sixteen chapters.
Section 1 Introduction to the Maroczy is divided into three logical foundation chapters:
Chapter 1 What is the Maroczy Structure?
This chapter covers the typical move orders to reach Maroczy bind structures including the Rubinstein variation of the Symmetrical English opening which is a reversed Maroczy.
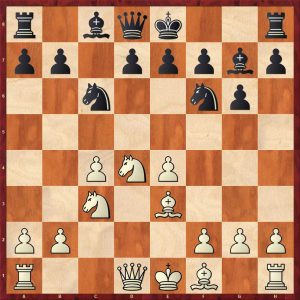
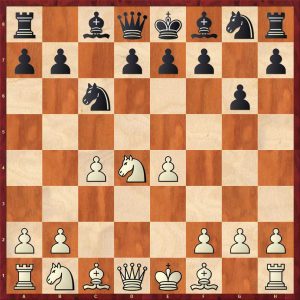
Here is the most well known incarnation of the Maroczy bind arising from an Accelerated Dragon.

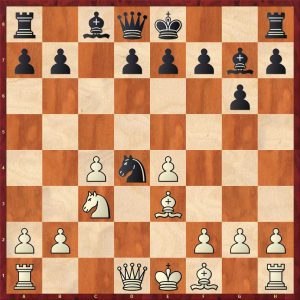
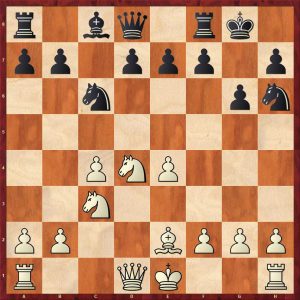
Here is the reversed Maroczy mentioned above:
This chapter enumerates the possible ways that a Maroczy structure can be reached which is usually through the Sicilian Defence (many different ways), English Opening and King’s Indian Defences.
Chapter 2 Typical Positions
This short chapter shows typical positions concentrating mainly on some key decisions & strategies:
- White’s decision whether to defend his knight on d4 or retreat it to c2
- White’s white squared bishop development to e2, d3 or more rarely g2
- Defending the e-pawn with f3 or Bd3
- Black’s dark square strategy
- Recapturing on d5 with the e-pawn, c-pawn or a piece
- The potential weakness of the d4 square
All these topics are covered in subsequent chapters.
Chapter 3 History
Akiba Rubinstein was one of the first players to master Maroczy structures; Mikhail Botvinnik stated that he learnt how to play these positions by studying Rubinstein’s games.
Here is a masterclass by the first Soviet World Champion in his younger days:
Lisitsin – Botvinnik
Leningrad Championship 1932
1.Nf3 c5 2.c4 Nf6 3.g3 d5 4.cxd5 Nxd5 5.Bg2 Nc6 6.0-0 e5 reaching the Rubinstein variation of the Symmetrical English. White now embarks on a slow development scheme which is too passive and not played by modern masters.

7.d3 Be7 8.Nbd2 0-0 9.Nc4 f6 10.Be3 Be6 11.a4 The trouble with this move and white’s plan is that the b4 break is now never available. The other two possible breaks to achieve counterplay in Maroczy structures are f4 or e3/d4, both of which are impossible to achieve in a satisfactory manner with white’s slow, flawed development scheme.

11…Qd7 12.Qd2 b6 13.Rfc1 Rac8 both sides have developed their pieces but black already has a distinct edge and a far easier position to play. White’s next seven moves are pure faffing and he clearly does not know what to do.

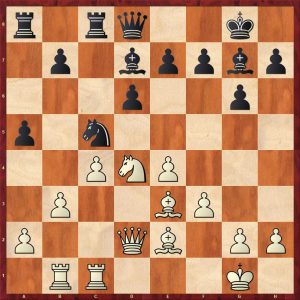
14.Qd1 Kh8 15.Bd2 Rfd8 16.Qb3 Nc7 17.Bc3 Rb8 18.Qc2 Nd5 19.Nfd2 Rbc8 20.Nf1 After several moves of shadow boxing, black has a distinct advantage and now acts.
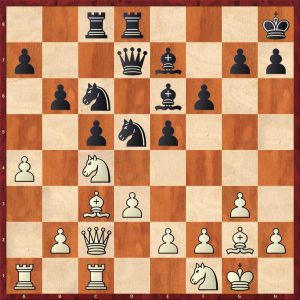
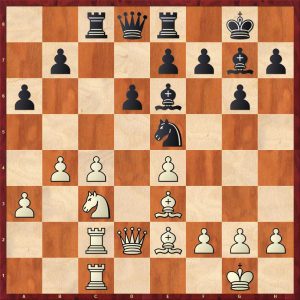
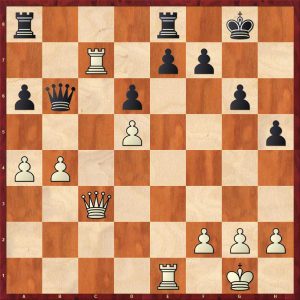
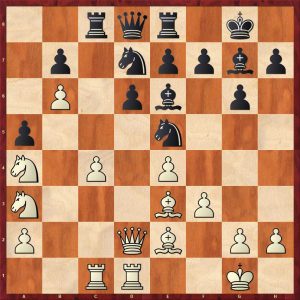
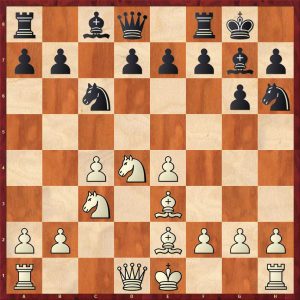
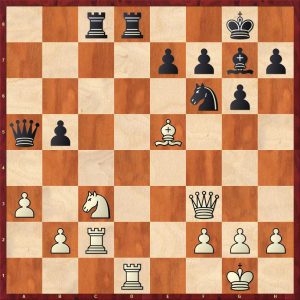
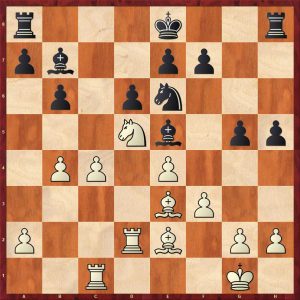
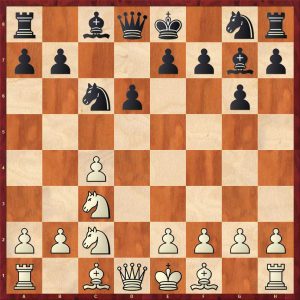
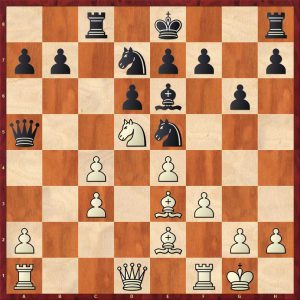
20…Nd4 21.Qd1 Bg4! A typical idea pressuring the e-pawn. White must remove the powerful knight or play the equally unpalatable f3
22.Bxd4 exd4 The recapture with the e-pawn exposes white’s e2- pawn to potential pressure from black’s rooks. Notice how Botvinnik skilfully manoeuvres to arrange this.
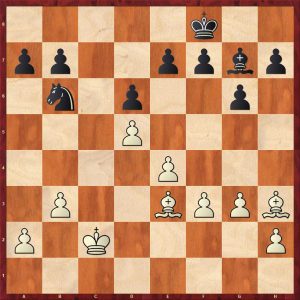
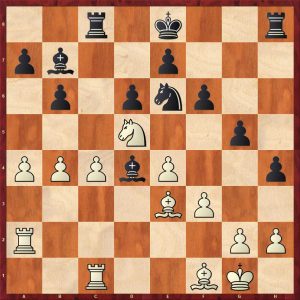
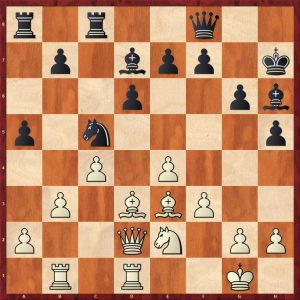
23.Qd2 Bf8 24.Re1 Re8 25.h4 Bh3 26.Bf3 Re7 27.Nh2 Rce8 28.Kh1 Be6! White has no counterplay and must simply wait for the reticulated python to tighten its coils.
29.b3 Nb4 (not 29…Nc3? when white has 30.e4!) 30.Bg2 Bd5 Attempting to exchange a key defender of the king 31.Nf3 Rf7! Further masterful manoeuvring points more black pieces at white’s kingside 32.Kh2 Bd6 33.Bh3 Qd8 34.Rab1 Rfe7 35.Ng1 Bc7 36.Na3 Bb7 Compare the respective activity of each side’s pieces. It is not surprising that white collapses quickly.
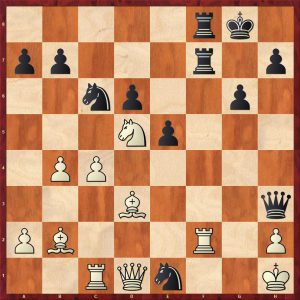
37.Bg2 Bxg2 38.Kxg2 Nd5 39.Nc2 Qd6 40.Na3 Ne3+ 41.Kh1 Ng4! with numerous murderous threats
42.Qf4 total desperation and hopeless Qxf4 43.gxf4 Nxf2+ 44.Kg2 Nxd3 0-1
An absolute crush of Georgy Lisitsin who was Leningrad champion three times.
Section 2 Typical Methods of play for White consists of four chapters covering:
- Attack on the queenside with b2,(b3),b4 aiming to limit the activity of black’s pieces
- Attack on the kingside: f2-f4-f5
- Play Nd5 and after its capture, respond with cxd5 or exd5 or capture on d5 with a piece
- Withdrawing the d4 knight to c2, b3 or e2 with a queenside attack
Chapter 4 covers white’s queenside attacking plans involving b4.
The follower encounter shows an ideal strategic white win.
Knaak – Walter
East German Championship Erfurt, 1973
1.c4 c5 2.Nf3 g6 3.d4 cxd4 4.Nxd4 Bg7 5.e4 Nc6 6.Be3 Nf6 7.Nc3 By transposition, an Accelerated Sicilian Dragon has been reached. Black plays a popular variation to exchange a pair of knights.
Ng4 8.Qxg4 Nxd4 9.Qd1
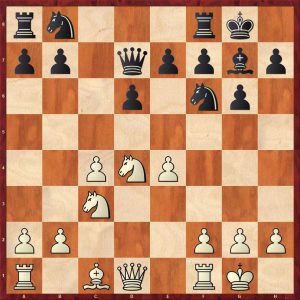
9…Nc6 Black normally retreats the knight to e6 here. 9…e5 is an interesting try. 10.Qd2 Qa5 11.Rc1! (Black was threatening Bxc3, another key strategy) d6 12.Be2 Be6 13.0-0 Rc8 14.a3 0-0
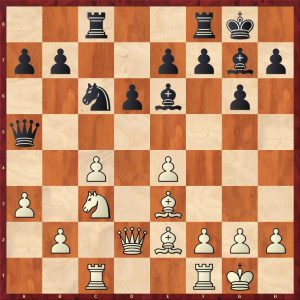
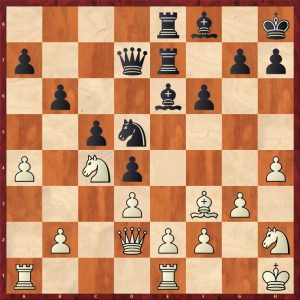
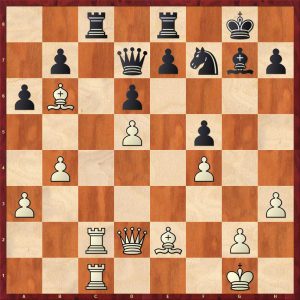
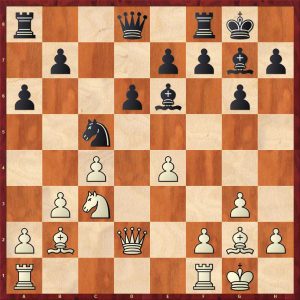
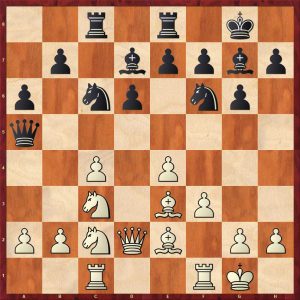
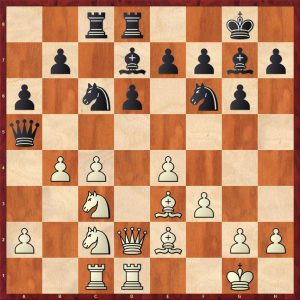
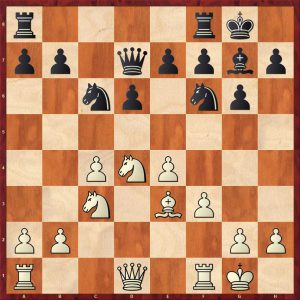
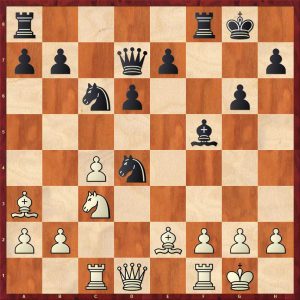
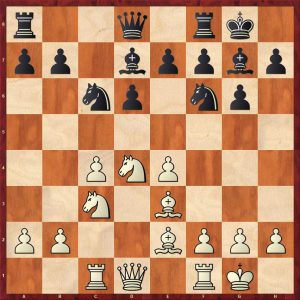
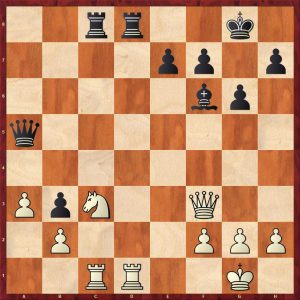
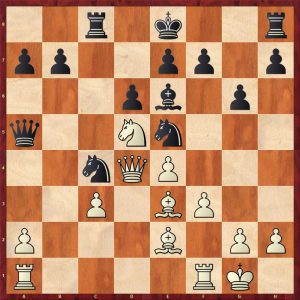
15.Rc2! (White effects a smart manoeuvre to prepare b2-b4) Rfe8 16.Rb1! a6 17.b4!
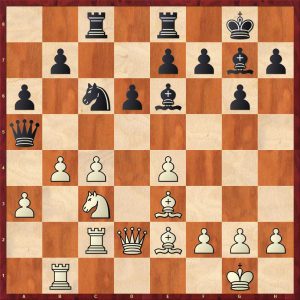
Qd8 (Black cannot take the a3 pawn: after 17…Qxa3 18. Nd1! followed by 19.Ra2 wins the queen) 18.Rbc1 Ne5 Black looks to have play against the c4 pawn, but white’s next move squashes any black hopes of counterplay.
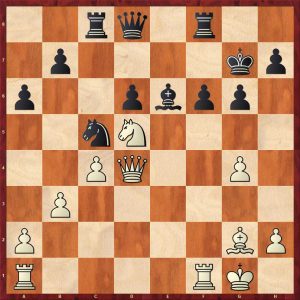
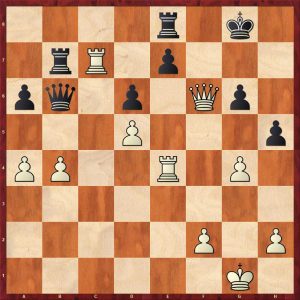
19.Nd5! Bxd5 The knight has to be removed 20.cxd5 (As white’s rooks are already doubled opening the c-file is very strong 20…Qd7 21.h3! (Stopping any ideas of Ng4) 21… f5 Desperately seeking some play 22.f4! A typical reaction pushing the knight back 22…Nf7 23.exf5 gxf5 24.Bb6! (Another thematic idea dominating the c7 square)
Bf6 25.Rc7 Rxc7 26.Rxc7 The rook penetrates with decisive attack. The black king is soon on the menu. Qa4 27.Qd3 Bb2 28.Qxf5 (The attack is soon decisive)
Qxa3 29.Bh5 Bf6 30.Qe6 Rf8 31.Qg4+ Ng5 32.fxg5 1-0
Chapter 5 covers white’s attacking options on the kingside.
The game below shows a Maroczy Bind position being reached from a transposition into a Symmetrical English with an exemplary attacking display from a former World Champion.
Smyslov – Timman
Moscow 1981
1.d4 Nf6 2.Nf3 g6 3.g3 c5 4.Bg2 cxd4 5.Nxd4 Bg7 6.c4 Nc6 7.Nc3 Nxd4 8.Qxd4 0-0 9.0-0 d6 10.Qd3 This position is a well known variation of the English Symmetrical which is definitely better for white.
Bf5?! (This idea is now known to be inaccurate. Better is 10…Rb8, 10…a6 or 10…Ng4 but white retains an advantage in all cases)
11.e4 Be6 12.b3 12…a6 13.Bb2 Nd7 14.Qd2! 14…Nc5 (14…Qa5 15.Rfd1 Rfc8 16.Nd5!±)
15.f4! Rc8? (Careless, underestimating white’s attacking chances, better is 15…f5 16.exf5 Bxf5 17.Nd5 when white has a clear advantage, but black can fight on) 16.f5 Bd7 17.f6!± (Obviously missed by Timman)

exf6 (17…Bxf6 18.Rxf6! exf6 19.Nd5±) 18.Nd5 f5 19.exf5 Bxf5 (19…gxf5!? 20.Bxg7 Kxg7 21.Qd4+ f6±) 20.Bxg7 Kxg7 21.Qd4+ f6 22.g4! Be6 (22…Ne6 23.Qd1!+- as the bishop is trapped )
23.Nxf6! Rxf6 24.g5+- Bf5 25.Rad1 b5 26.cxb5 axb5 27.gxf6+ Qxf6 28.Qxf6+ Kxf6 29.Rxd6+ Ne6 30.Rb6 Rc5 31.Re1 1-0
Chapter 6 A leap to d5
This chapter covers the white’s knight leap to d5 and white’s three possible responses to its capture:
- Taking cxd5
- Taking exd5
- Taking with a piece x d5
Lev Polugaevsky was considered an expert on the white side of the Maroczy bind. Here is a didactic game of his demonstrating the power of cxd5 and the use of the bishop pair. This is a common type of win in the Maroczy bind, so this game is worth studying carefully.
This game also demonstrates that entering a vastly inferior endgame with no chance of counterplay is poor judgement particularly against a very strong technical player: the speculative 12…Qxa2 keeping the queens on had to be tried.
Polugaevsky – Ostojic
Belgrade 1969
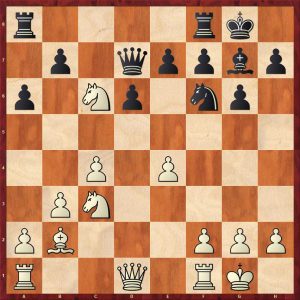
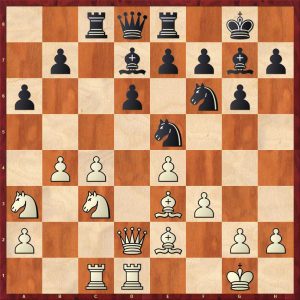
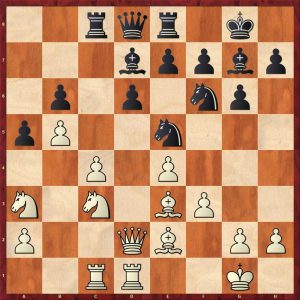
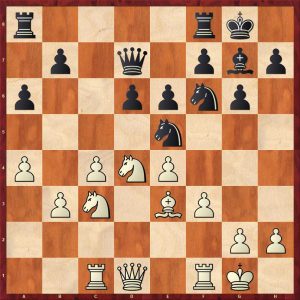
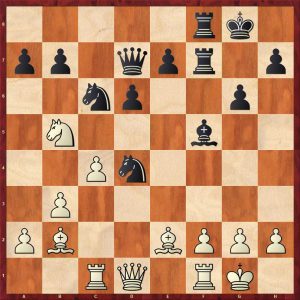
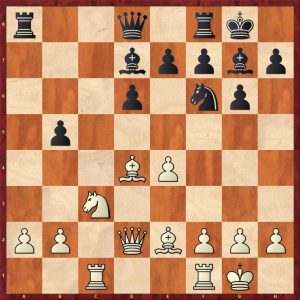
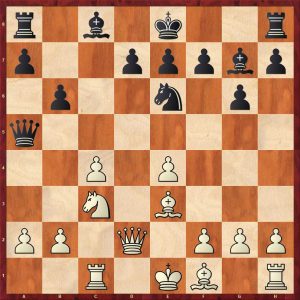
1.c4 g6 2.e4 c5 3.Nf3 Nc6 4.d4 cxd4 5.Nxd4 Nf6 6.Nc3 Nxd4 7.Qxd4 d6 8.Be3 Bg7 9.f3 0-0 10.Qd2 Be6 11.Rc1 Qa5
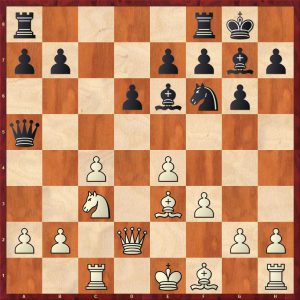
12.Nd5! Qxd2+? (Black should have tried the complicated 12…Qxa2 13.Nxe7+ Kh8 14.Be2 with a white edge)13.Kxd2 Bxd5 (13…Nxd5 14. cxd5 Bd7 15.Rc7+- a decisive penetration to the seventh rank) 14.cxd5 Rfc8 15.Rxc8+ Rxc8
16.g3! (A typical move activating the white squared bishop) Rc7 (16…b6 17.Bh3 Rc7 18.Rc1 Ne8 19.b4 Rxc1 20.Kxc1 Nc7 21.Bd7! wins as in Gheorghiu – Szilagyi Varna 1971 – another game well worth studying in this book) 17.Bh3 Nd7 18.Rc1! (Exchanging rooks enables white to carve up the black queenside) Rxc1 19.Kxc1 Nb6 20.Kc2 Kf8 21.b3 The simple plan of a4-a5 is unstoppable
Ke8 22.a4 Kd8 23.a5 Nc8 24.Bxc8 Kxc8 25.Bxa7 (White effortlessly wins the bishop ending a pawn up) e6 26.Kd3 exd5 27.exd5 Bb2 28.Kc4 Bc1 29.Kb5 Kc7 30.Bb6+ Kd7 31.a6 bxa6+ 32.Kxa6 Bd2 33.Ba5 1-0
Recapturing with exd5 is also a common strategy which has already been showcased with a Botvinnik win earlier in the review. Here is a more modern example between two 2700+ players with a crisp finish.
Notice that the white squared bishops are exchanged very early. It is not clear which side this favours. White gets rid of his potential bad bishop, but his c-pawn can be vulnerable. Black has exchanged a minor piece relieving his cramp.
Bacrot – Giri
Bundesliga 2013
1.e4 c5 2.Nf3 d6 3.Bb5+ Bd7 4.c4!? Nf6 5.Nc3 g6 6.0-0 Bg7 7.d4 cxd4 8.Nxd4 0-0 9.Bxd7 Qxd7 Reaching a standard position from the Moscow Variation.
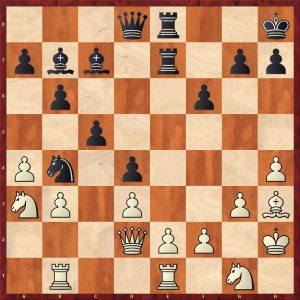
10.b3 (10.f3 preparing Be3 allows the clever 10…Rc8 11.b3 d5!! equalising 12.exd5 Nxd5! 13.Nxd5 e6=) Nc6 11.Bb2 a6 (11…e6 followed by Rfd8 and d5 should be considered and is another standard idea to break up the Maroczy bind) 12.Nxc6
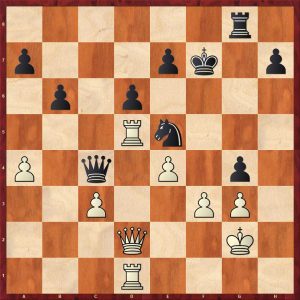
Qxc6?! (12…bxc6 13. Re1 Qc7 is better as black has a better share of the centre controlling d5 with his c-pawn) 13.Nd5! Nxd5?! (Better was 13…Rfe8 14.Nxf6 Bxf6 15.Bxf6 exf6 followed by Re6 when white has a slight edge) 14.exd5 Qc5 15.Bxg7 Kxg7 16.Re1 With heavy pieces the pressure on e7 is very uncomfortable, Black’s play with b5 turns out to be illusory. White’s space advantage spearheaded by the d5-pawn effectively splits black’s position into two compartments, thus facilitating a direct attack on black’s king. It is very difficult for black to funnel his pieces across to defend his kingside.

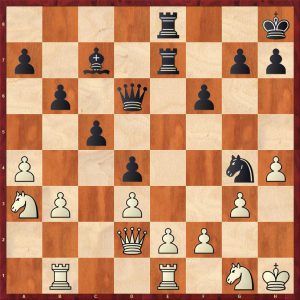
Rfe8 (Black had to play 16…e5 allowing 17.dxe6 fxe6 when white has very easy play against the e6 and d6 pawns, but at least black gains breathing space, opens the f-file for his rook and he can defend his king 17.Qd2! (White has a host of ideas after this multi-purpose queen move: Rac1 & b4, c5 or Re4, Rae1 and Rh4) b5? (Again 17…e5 had to be played) 18.Rac1! (Compare the activity of each side’s rooks, white prepares b4 and c5 creating a dangerous passed pawn)
Qa7?! (18…b4 is probably better, but white will turn his attention to the kingside) 19.b4! bxc4 20.Rxc4 h5 (20…Rac8 21.Qc3+ is a neat fork) 21.Qc3+ Kg8 22.Rc7 Qb6 23.a4! (Stopping any play with a5, because white replies b5!)
Rab8 24.Re4 f6 25.g4 Rb7? Desperation
26.Qxf6! A lovely combination to finish 1-0
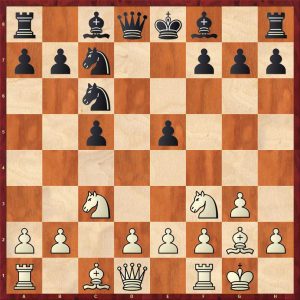
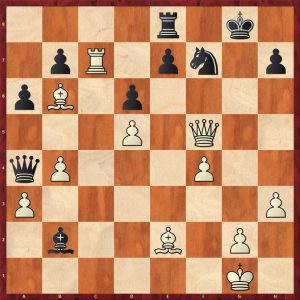
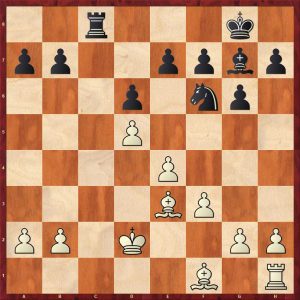
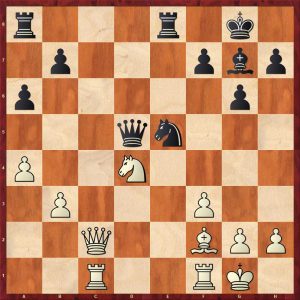
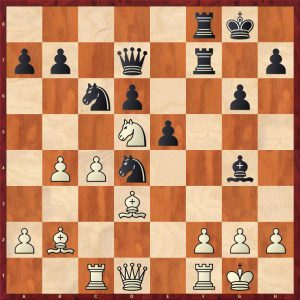
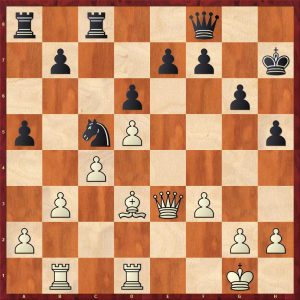
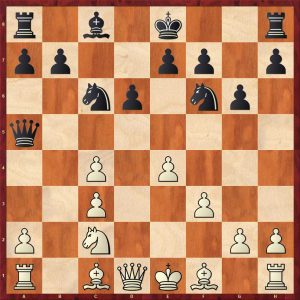
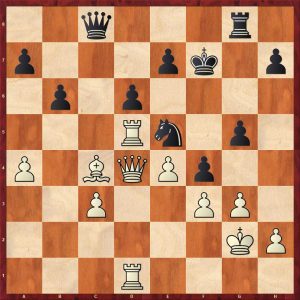
Taking with a piece on d5 is demonstrated with another famous Botvinnik victory.
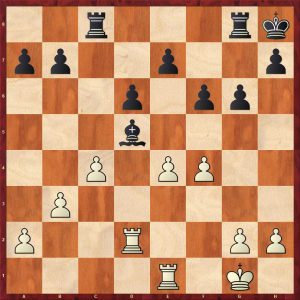
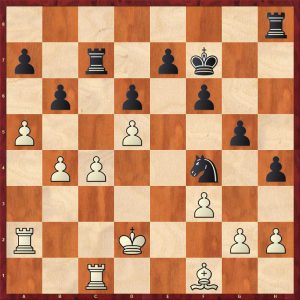
Botvinnik to move continued 22.Rxd5! The strategical idea is simple: utilise the pawn level e4-e5 to smash up black’s pawn structure and penetrate with the more active rooks.
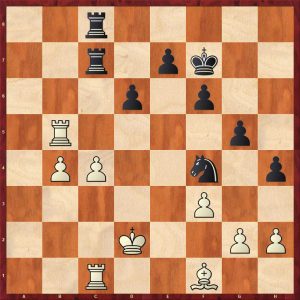
22…Rc6?! (Better is 22…Rc7 defending the 7th rank 23.e5 dxe5 24.fxe5 f5 25.Red1 Rgc8 with chances to hold, but white is for choice) 23.e5 dxe5 24.fxe5 Re6 25.Kf2 Rf8 26.Rd7! fxe5+ 27.Ke3 Rb8 28.Ke4 Kg8 29.Kd5 Kf7 30.Rxe5 White has an enormous advantage
30…Rd6+ 31.Rxd6 exd6 32.Kxd6 Rd8+ 33.Kc7 Rd2 34.Kxb7 Rxg2 35.c5 Rxh2 36.c6 Rc2 37.b4 1-0
Chapter 7 covers the retreat of the white knight from d4 to avoid freeing exchanges for black. Here is a thematic game played by Nigel Short.
Short – Felgaer
Buenos Aires 2001
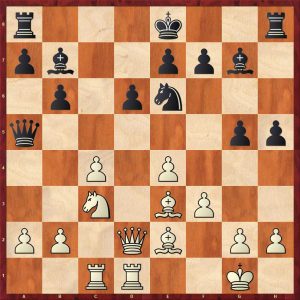
1.e4 c5 2.Nf3 Nc6 3.d4 cxd4 4.Nxd4 g6 5.c4 Bg7 6.Be3 Nf6 7.Nc3 0-0 8.Be2 d6 9.0-0 Bd7 10.Nc2 (White withdraws the knight to prevent black exchanging)

a6 (10…Qa5? just encourages white expansion viz: 11. f4 Rac8 12.Rb1! a5 13.b4 Qd8 14. Qd3 and white has a big advantage) 11.f3 A typical move to shore up the e4-pawn allowing the c3-knight to eye up b5 preventing b5 by black Rc8 12.Rc1 Re8 13.Qd2 Qa5
14.Rfd1! Ne5 [14…Red8 15.b4!
A typical tactic based on the undefended e7-pawn, if 15…Nxb4? 16.Nd5! Nc6 17.Qxa5 Nxa5 18.Nxe7+ and 19.Nxc8 winning, so 15…Qh5 is forced when 16.Nd5 leaves white better.
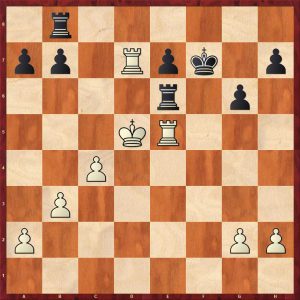
15.b4 (15.c5! is even better: dxc5 16.f4 Neg4 17.e5 winning) 15…Qd8 16.Na3
Short enjoys a solid space advantage, but his pawns will require full piece support. 16…a5 [16…Bc6 17.b5 axb5 18.cxb5 Bd7 19.b6 white is better] 17.b5 Be6 17…b6?
18.Na4! Rb8 19.Bd4 Qc7 20.Qe3+- wins the weak b6-pawn] 18.Na4 Nfd7 (18…Ned7 19.b6±) 19.b6!
White has a huge advantage that he duly converted.
Part 3 covers Typical Methods of Play For Black and is an important chapter if you are intending to face the Maroczy Bind.
Black has four strategies to combat the Maroczy, each of which is covered in a separate chapter:
- e6 & d5 attacking both tusks simultaneously
- b5 undermining the c4 pawn
- f5 undermining the e4-pawn
- dark square strategy
Chapter 8
The e6-d5 central strike commonly occurs in the Maroczy structure reached via the Moscow Variation of the Sicilian Defence. Here is an example played by World Champion Garry Kasparov.
Akopian – Kasparov
Bled 2002
1.e4 c5 2.Nf3 d6 3.Bb5+ Bd7 4.Bxd7+ Qxd7 5.c4 Nc6 6.d4 cxd4 7.Nxd4 Nf6 8.Nc3 g6 9.f3 Bg7 10.Be3 0-0 11.0-0
a6!? (Normal is 11…Qd8 intending Qa5 to activate the queen on the dark squares) 12.a4 e6 Again Qd8 is possible 13.Rc1 Ne5 14.b3 (14.Qe2 Rfc8! 15. b3 d5! = is another Kasparov game)
d5 15.cxd5 exd5 16.Nxd5 Nxd5 17.exd5 Rfe8 18.Bf2 Qxd5 19.Qc2
Ng4 20.fxg4 Bxd4 21.Qc4 Bxf2+ 22.Rxf2 Qxc4 23.Rxc4 Re7 24.h4 ½-½
Chapter 9 covers the f7-f5 strike. Here is a superb game by the young Boris Spassky before he became World Champion.
Furman – Spassky
USSR Championship Moscow 1957
1.Nf3 c5 2.c4 g6 3.e4 Bg7 4.d4 cxd4 5.Nxd4 Nc6 6.Be3 Nh6 7.Nc3 0-0 8.Be2
8…f5! Attacking the e4 tusk
9.exf5 [9.Bxh6!? is playable: 9…Bxh6 10. exf5 Nxd4 11. Qxd4 Rxf5 (11…gxf5 12.0-0 Bg7 13.Qd2 and black has problems with the c8 bishop) 12. 0-0 Bg7 13.Qd3 white has an initiative] 9…Bxd4! 10. Bxd4?! (10.Bxh6 is probably better 10…Rxf5 11.0-0 d6 12.Qd2 and black again has problems with the c8 bishop) 10.Bxd4 Nxf5 11.Bc5 The bishop is driven to an awkward place d6 12.Ba3 Nfd4! (Making way for the white squared bishop) 13.0-0 Bf5 14.Rc1 Qd7 Intending to double on the f-file with his rooks
15.Nd5?! White should have improved his bishop on a3 viz: 15.b3 Rf7 16.Bb2 Raf8
17.Nb5! Exchanging off the powerful knight 17…Nxe2+ 18.Qe2 and white is slightly better owing to the great bishop on b2
Rf7 16.b3 Raf8 17.Bb2 e5! Cementing the wonderful steed

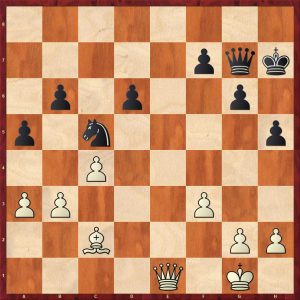
18.b4 (The prophylactic 18.f3 is better) Be6! 19.Bd3 Bg4!!
20.f3 (20.Qd2 Bf3! 21. h3 Qd8!! 22. Qh6 Be2 wins the exchange) 20…Bxf3! 21.gxf3 Nxf3+ 22.Kh1 Qh3! 23.Rf2 Ne1!!
0-1
Chapter 10 covers the a6-b5 break. Here is a game showing a typical white inaccuracy allowing black counterplay.
Ehrenfeuch – Neverov
Warsaw 1992
1.Nf3 Nf6 2.c4 g6 3.Nc3 Bg7 4.e4 d6 5.Be2 0-0 6.0-0 c5 7.d4 cxd4 8.Nxd4 Nc6 9.Be3 Bd7 10.Rc1
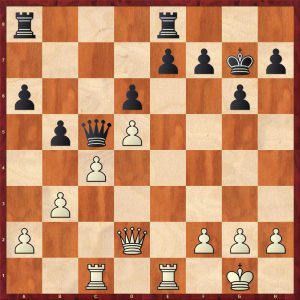
a6 The usual plan here is to exchange knights, play the bishop to c6 and attempt to exchange dark squared bishops with Nd7 11.Qd2?! (11.f3! had to be played to overprotect the e-pawn) b5! Of course 12.cxb5 Nxd4 13.Bxd4 axb5 A massive change has occurred, black has plenty of space on the queenside, he has equalised.
14.a3 Qa5 (Threatening 15…Nxe4!) 15.Rc2 Bc6
16.Qe3?! (16.Nd5 Bxd5 17.exd5 Qxd2 18.Rxd2 is approximately equal) Rfb8! Threatening to trap white’s bishop with e5 17.e5 dxe5 18.Bxe5 Rd8 19.Bf3 Rac8 20.Rd1 Bxf3 21.Qxf3
b4! A typical minority attack 22.Bxf6 b3! A superb Zwischenzug 23.Rcc1 Bxf6 Black has huge pressure on the white queenside with a dragon bishop breathing fire, white is busted
24.h3 Rxd1+ 25.Qxd1 Qg5 26.h4 Qxh4 27.Qxb3 Be5 28.Qb7 Qh2+ 29.Kf1 Rb8 30.Qxe7 Qh1+ 31.Ke2 Qxc1 32.Qxe5 Qxb2+ 33.Kd3 Rd8+ 34.Kc4 Rc8+ 35.Kd3 Qxa3 36.g4 h6 0-1
Chapter 11 Dark-squared strategy is one of the most interesting chapters and should be studied carefully. I shall showcase a good tussle between World Champion Anatoly Karpov and Bent Larsen.
Karpov – Larsen
Brussels 1987
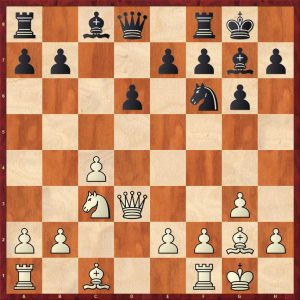
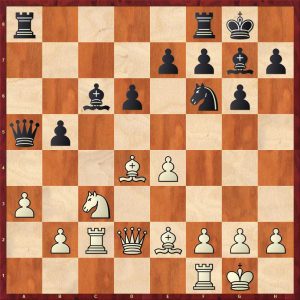
1.e4 c5 2.Nf3 Nc6 3.d4 cxd4 4.Nxd4 g6 5.c4 Bg7 6.Be3 Nf6 7.Nc3 Ng4 8.Qxg4 Nxd4 9.Qd1 Ne6 10.Qd2 Qa5 11.Rc1 b6
12.Be2 Bb7 13.f3 h5 14.0-0 g5 15.Rfd1 d6 (White has achieved nothing, a3 & b4 does not trouble black’s queen as it can move to the lovely central square e5, so white transitions into an ending)
16.Nd5 Qxd2 17.Rxd2 Be5 18.b4 hoping for c5
Rc8 19.a4 h4! 20.Bf1 f6 21.Ra2 Hoping for a5 21…Bd4! Getting the dark squared bishops off
22.Kf2 Kf7 23.a5 Bxd5 24.exd5 Bxe3+ 25.Kxe3 Nf4
26.Kd2 Rc7 27.axb6 axb6 28.Ra6 Rhc8 29.Rxb6 Nxd5 30.Rb5 Nf4 with equal play
31.Ra5 Ng6 32.c5 Ne5 33.Rc3 dxc5 34.bxc5 Rb8 35.Bb5 Rd8+ 36.Ke2 Nc6 37.Bxc6 Rxc6 38.g3 Rd4 39.Rb5 hxg3 40.hxg3 Rd5 41.g4 Rc7 42.Ke3 e6 43.Rc2 Ke7 44.Rc3 Kf7 45.Rc2 f5 46.gxf5 exf5 47.Kf2 Kg7 ½-½
The game Serper – Sorenson Tunja 1989 is well worth study.
19…Qf8 (carrying out a sophisticated plan to exchange black squared bishops with Qf8, h5, Kh7 and Bh6) 20.Rd1 h5 21.Bd3 Kh7 22.Ne3 Bh6
23.Nf4 Bc6 24. Nd5 Bxc6 25.exd5 Bxe3+ 26.Qxe3
Black has to relieve the pressure on the e-pawn by playing e6 at some point.
Re8 27.Bc2 e6 28.dxe6 Rxe6 29.Qd2 b6 30.Re1 Rae8 31.a3 Rxe1+ 32.Rxe1 Rxe1+ 33.Qxe1 Qg7
Black has a winning positional advantage owing to the passive bishop and weak dark squares. The queen and knight combine well.
34.h4!? Too weakening Qb2 35.Qd1 Qxa3 36.f4 Ne6! 37.Qxh5+ Kg7 38.Qd1 Qc5+ 39.Kf1 Nxf4 40.Qf3 Qe5 41.g3 Ne6 42.Bd1 Nd4 43.Qd3 Nf5 44.Kf2 Qc5+ 0-1
Part IV covers some general techniques consisting of three chapters.
Chapter 12 considers an unusual move, early in the Accelerated Dragon. Here is game by Dragon specialist Tiviakov.
Beshukov – Tiviakov Saint Vincent 2000
1.e4 c5 2.Nf3 Nc6 3.d4 cxd4 4.Nxd4 g6 5.c4
5…Bh6!? 6.Bxh6 Nxh6 7.Nc3 0-0 (7…d6 could be played) 8.Be2
d6 (8…f5!? is worth considering) 9.Qd2 [9.0-0 Be6!? (9…f5!?) ] 9…Ng4 [9…Kg7] 10.Bxg4 [10.0-0 Nge5=] 10…Bxg4 11.h3?! (11.0-0 Be6 (11…Qb6!?; 11…Rc8) ] 11…Be6 12.b3 Black has equalised

Qb6 [ Black has equalised, also possible is 12…Nxd4 13.Qxd4 Qa5=;
12…Qa5!? …a6, b5] 13.Nc2 [13.Rd1 Nxd4 14.Qxd4 Qxd4 15.Rxd4=] 13…a6 [13…f5!?;
13…Qc5!?] 14.Ne3 Qc5 […b5] 15.Rc1 Qe5 [15…Rac8] 16.0-0 Qf4 [16…g5!?] ½-½

Chapter 13 Capturing Bg7xc3! is all about giving up the dark squared bishop to wreck white’s queenside pawn structure.
Polugaevsky- Averbakh Leningrad 1960 illustrates this strategy well.
Polugaevsky – Averbakh
Soviet Championship Leningrad 1960
1.c4 c5 2.Nc3 Nc6 3.Nf3 g6 4.d4 cxd4 5.Nxd4 Bg7 6.Nc2 d6
7.e4 (7.Bd2 is less double edged) Bxc3+ !? (The enterprising exchange of black’s fianchettoed bishop for a knight to smash up white’s queenside) 8.bxc3 Nf6 9.f3 Qa5 (Attacking the weak pawns: black’s king is safer in the middle for now. It is imperative for black to attack the weak c-pawns as soon as possible)
10.Bd2 Bd7! Getting the queenside pieces into play quickly 11.Be2 Rc8 12.Ne3 Be6! Now the bishop can safely move to e6 without being harassed by the knight 13.Nd5 Nd7! (An excellent manoeuvre to hold the c5 and e5 squares and target the c4-pawn) 14.0-0 Nce5 15.Be3 White gives up the front c-pawn hoping to benefit from increased scope for his white squared bishop. White cannot attack on the kingside as black has not put his king there.
Nxc4 16.Qd4 Nde5!
17.Bf2 (17.f4 is met by 17..Nxe3 18.Nxe3 Qxc3) g5! Blockading the dark squares 18.a4 Rc5 19.Rfd1 Rg8 20.Rdb1 b6 21.Nb4 f5 22.Qd1

f4! Black has been offering his rook for the dark squared bishop as this bishop holds white’s dark squares together 23.Bxc5 Qxc5+ 24.Qd4 Kf7 25.Nd5 Na5 26.Rb5 Qc8 Black retains the queens as 26..Qxd4 is clearly a blunder

27.Rd1 Rd8 28.g3 Bxd5 29.Rxd5 Rg8 30.Kg2 Nac4 31.Bxc4
Qxc4! 32.Qd2? (32.Kf2 is better when the game is roughly equal) fxg3 33.hxg3 g4! Destroying white’s kingside winning the game
34.Qf4+ Ke8 35.fxg4 Qe2+ 36.Kh3 Rxg4 37.Qf5 Rg6 38.Rf1 Rh6+ 0-1
Chapter 14 Play for the bishop pair covers white’s strategy of gaining the bishop pair by playing Nd5 forcing Bxd5. The reviewer has already covered one game demonstrating this idea Polugaevsky-Ostojic. This chapter covers further instructive examples.
Chapter 15 Playing without the light-squared bishop gives another game in the Moscow Variation of the Sicilian Variation. The reviewer has already shown some typical ideas in this line with some of Garry Kasparov’s games.
Chapter 16 shows some typical tactical strikes in the Maroczy. Buy the book to find out about these lightning strikes.
The final section 5 covers games by the world champions in the Maroczy. This is a great way to round off the book showcasing efforts by the great champions.
In summary this is an excellent book on Maroczy structures covering all the major strategies for both sides with some exemplary games showcasing the ideas.
FM Richard Webb, Basingstoke, Hampshire, 1st July 2021
Book Details :
- Hardcover : 296 pages
- Publisher: Thinkers Publishing; 1st edition (1st July 2019)
- Language: English
- ISBN-10:9492510545
- ISBN-13:978-9492510549
- Product Dimensions: 17.27 x 1.78 x 23.11 cm
Official web site of Thinkers Publishing