“Magnus Carlsen’s brilliant endgame play is one of the key reasons for his success. The World Chess Champion can win positions which look drawn to anybody else. And more than any other player, he is able to save bad endings.
For this second volume of Magnus Carlsen Endgame Virtuoso, International Master Tibor Karolyi has selected Carlsen’s best endgames from 2018-2022, whereas the first volume covered 1999-2017. Reviewing these new games and explaining what Magnus was doing, the author was thoroughly impressed. Even Carlsen, who in 2017 was already the best endgame player of all time with Anatoly Karpov, had managed to improve his skills further.
Carlsen has it all. He can find deep ideas, play very technically, and is exceptionally well-versed in strategic and tactical endgames. The author is convinced that this new selection contains even better and more instructive games than Volume one.
Karolyi explains the general ideas in the games and gives concrete variations. Exploring these annotated endgames, you will soon get a good sense of what is happening. You will find out that Carlsen does not rush unless it is necessary. You will learn how Carlsen increases the pressure and uses all available resources. And you will see that sooner or later, his opponents will start playing second-best moves, feeling uncomfortable, following up with some dubious decisions, and, finally, cracking.
Endgame Virtuoso Magnus Carlsen – Volume 2 is a highly instructive, inspiring and entertaining book. It will help you appreciate Magnus’ endgame magic and improve your skills in this important game phase.”
About the Author:
“International Master Tibor Károlyi was Hungarian Champion in 1984 and is renowned as both an author and a trainer. He won the Guardian Chess Book of the Year prize in 2007.”
You will probably agree that endings are increasingly important – at all levels – in chess today, and that Magnus Carlsen is the strongest human endgame player in the history of chess. So everyone will benefit from studying his endings.
It’s not quite as simple as that, though. The problem is that today’s top GM games are played at a level way beyond the comprehension of average club players. If you’re looking for a book that will do more to improve your endings, I’d recommend this book which was the subject of my last review.
On the other hand, studying the games of the world’s leading players will give you a wider appreciation of chess culture, and, with the guidance of a skilled instructor to provide excellent annotations, you’ll undoubtedly learn something as well as being inspired, in a more general way, to improve your chess.
In this book you’re in the safe hands of IM Tibor Karolyi, one of the best and most experienced annotators in the business, and one who has a particular gift for making difficult positional concepts comprehensible to the average player.
The first volume of this series covered Carlsen’s earlier career. Here we have 104 endgames from 2018 up to 2022, taken from games played at all time controls. As in my last review, the author takes a pretty broad view of what constitutes an ending.
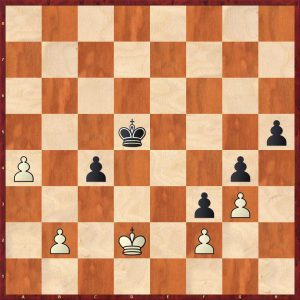
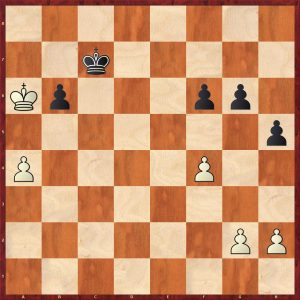
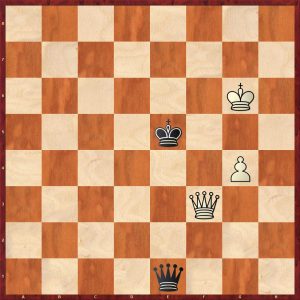
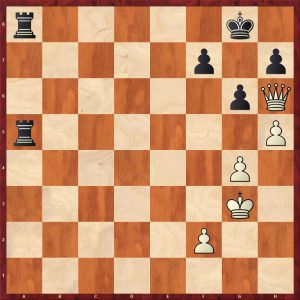
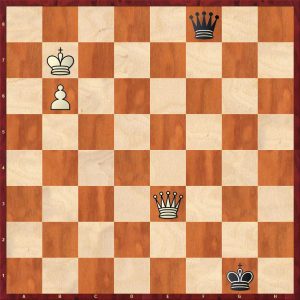
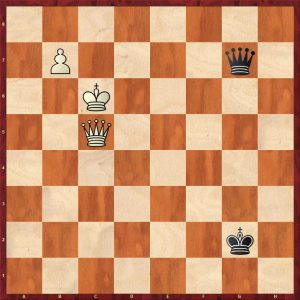
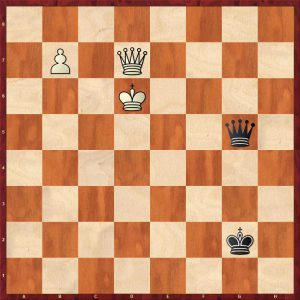
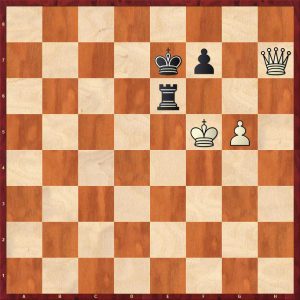
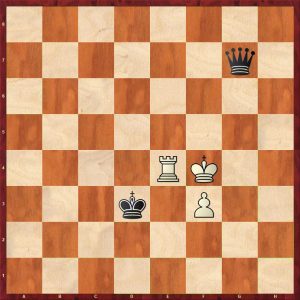
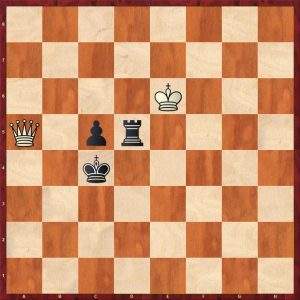
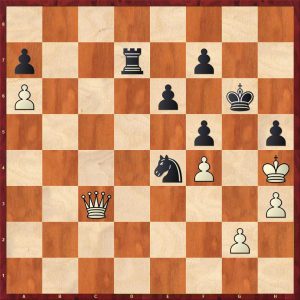
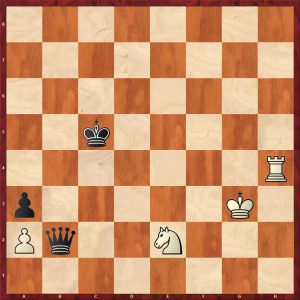
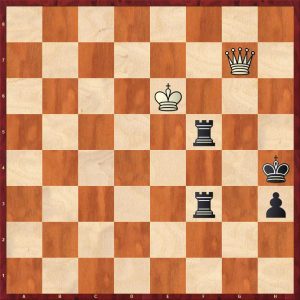
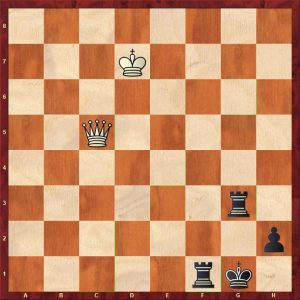
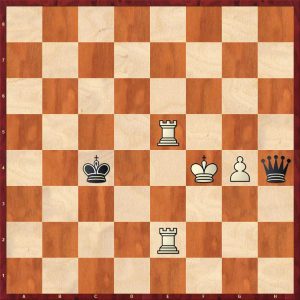
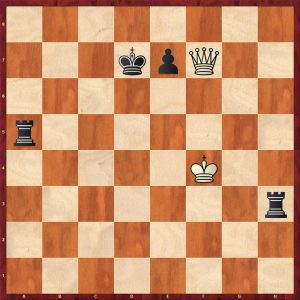
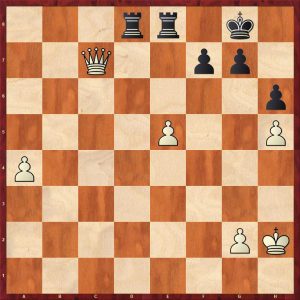
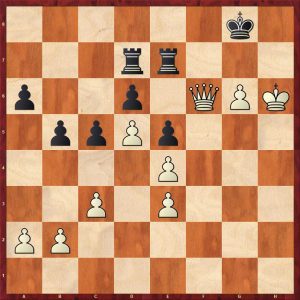
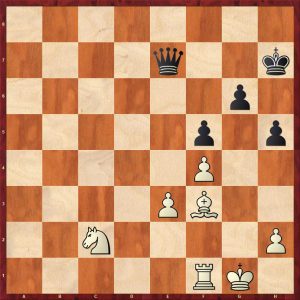
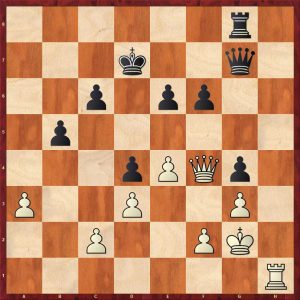
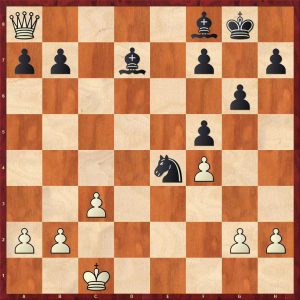
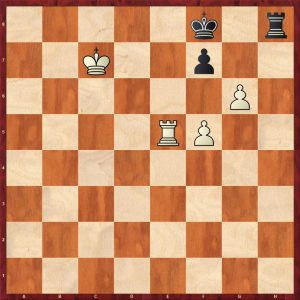
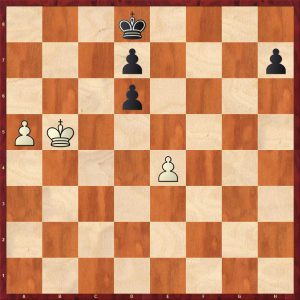
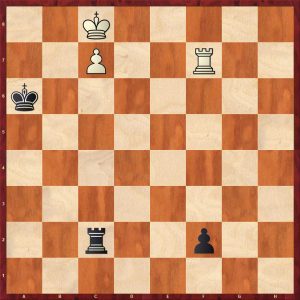
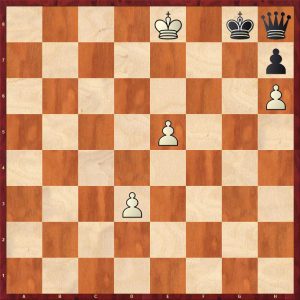
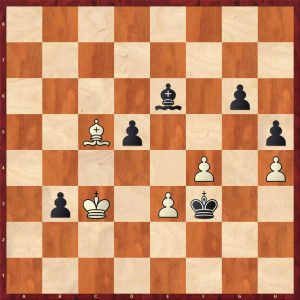
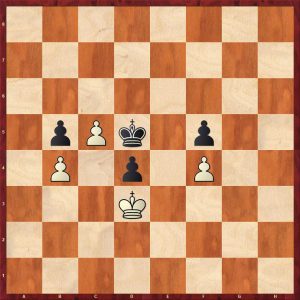
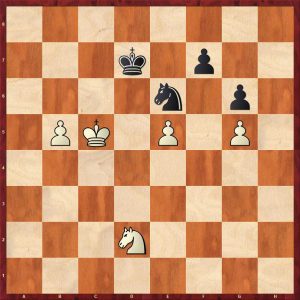
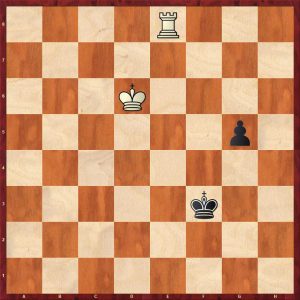
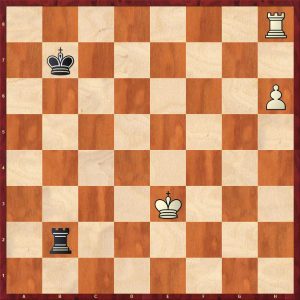
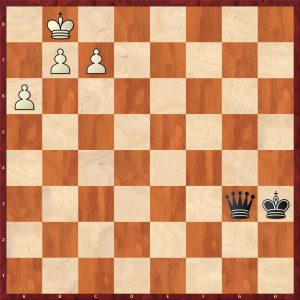
Here, for example, is a position where Magnus missed the best continuation.
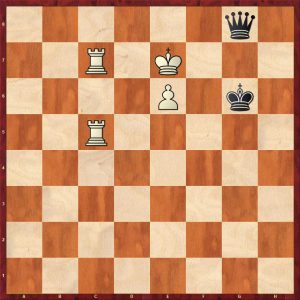
This is taken from the first play-off game in the 2018 Carlsen – Caruana World Championship match.
Carlsen played the obvious 24. Bxe6+, winning a pawn and, eventually, the game, although Caruana missed drawing chances on a few occasions.
He missed the very difficult 24. Rxd4!! Kf7 25. Kh1!!, a great prophylactic move according to Karolyi, so that an eventual Nxf3 won’t be check, when Black would have had no defence to Red1 followed by Rd6. This fascinating ending is analysed extensively over 3½ pages.
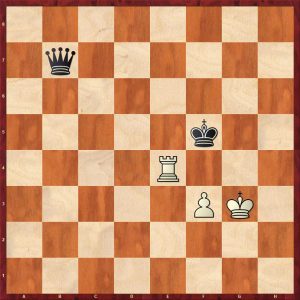
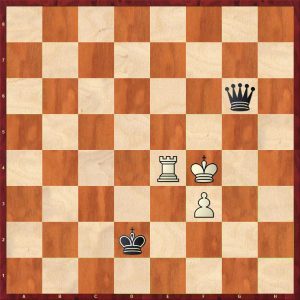
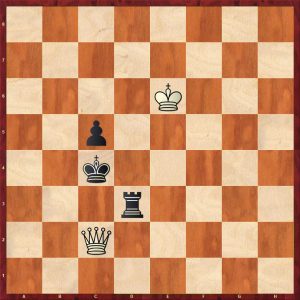
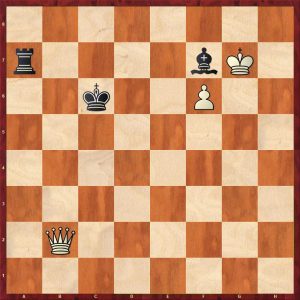
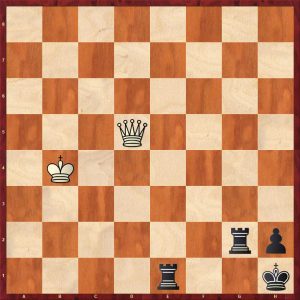
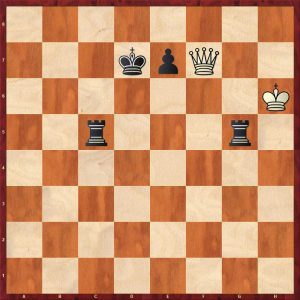
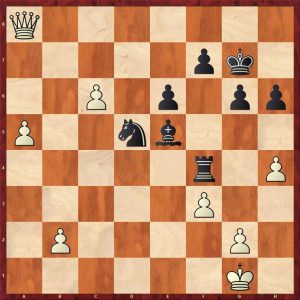
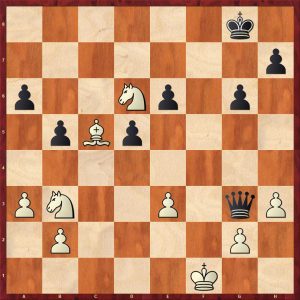
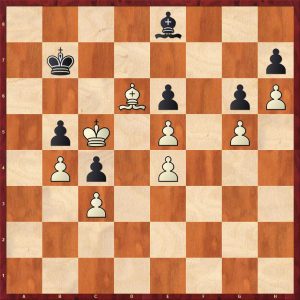
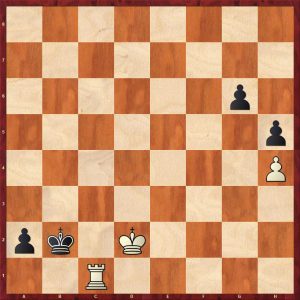
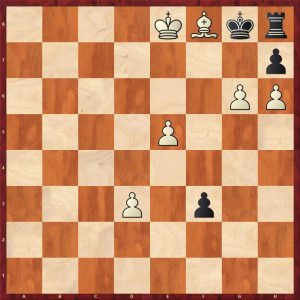
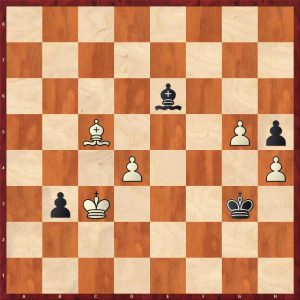
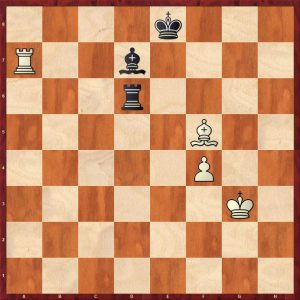
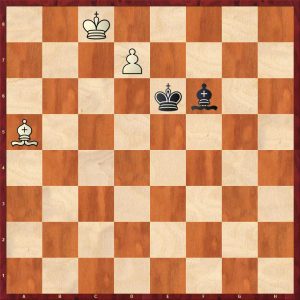
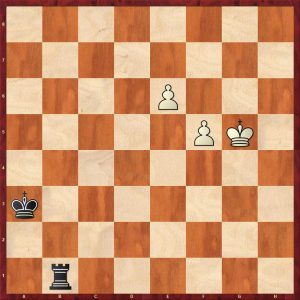
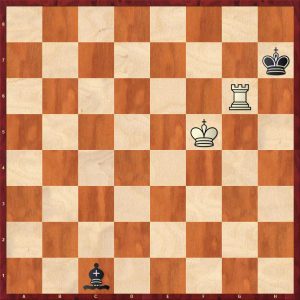
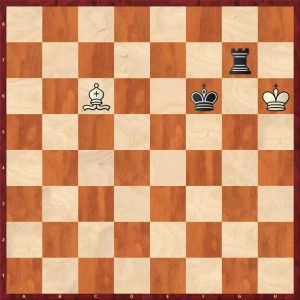
Black against Vallejo Pons (Karlsruhe/Baden-Baden 2019), Carlsen reached a pawnless ending with RB against BN.
You might think this is drawn, but Carlsen knew that, with the opposing bishops on different colour squares, Black is winning. If you buy this book you can see for yourself how he brought home the full point – and how his opponent could have made it harder for him.
Karolyi tells us that Fischer could have reached a similar ending against Browne (Rovinj/Zagreb 1970), but his annotations suggested that he believed the ending to be drawn.
This game, from move 12 to its conclusion 60 moves later, is covered in 4½ pages here.
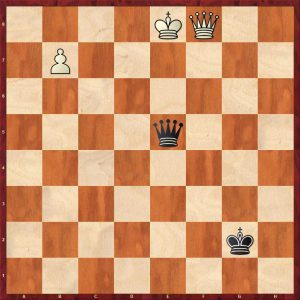
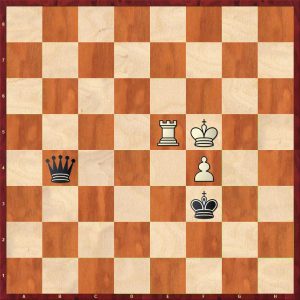
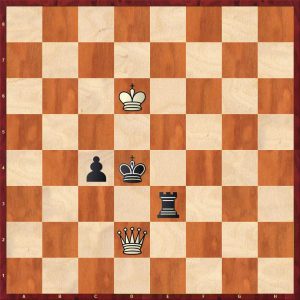
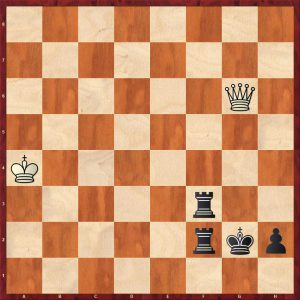
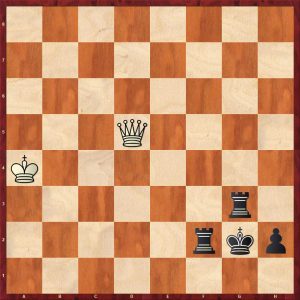
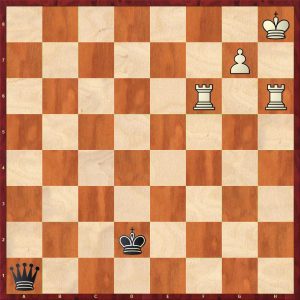
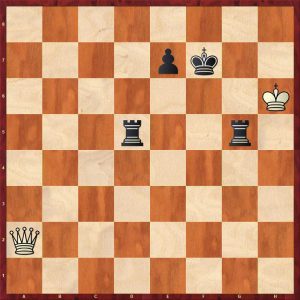
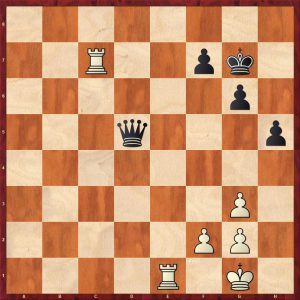
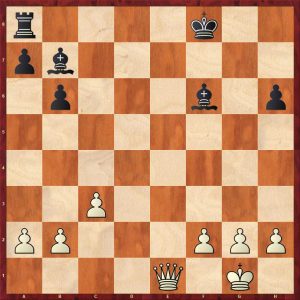
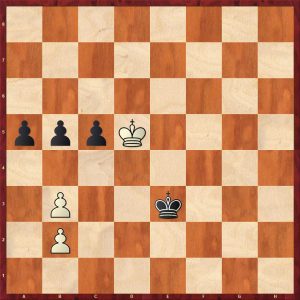
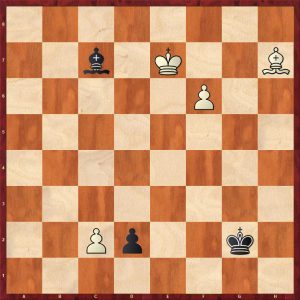
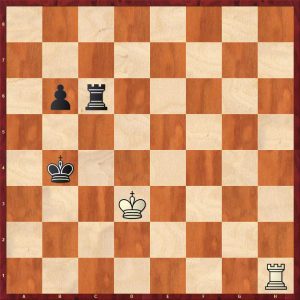
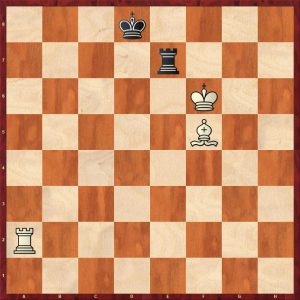
It’s striking how often Magnus plays for mate with very limited material on the board.
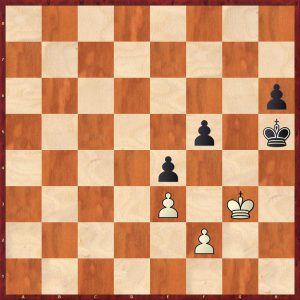
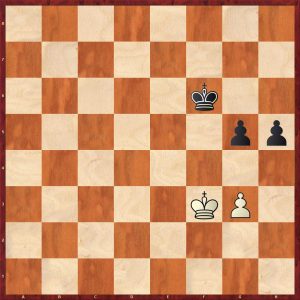
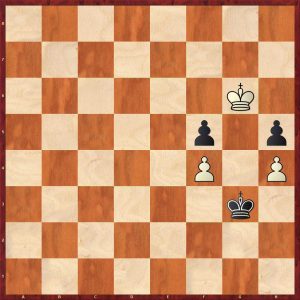
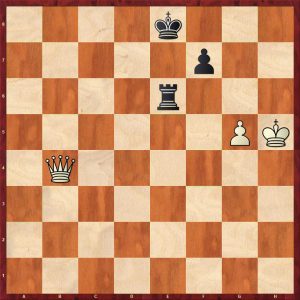
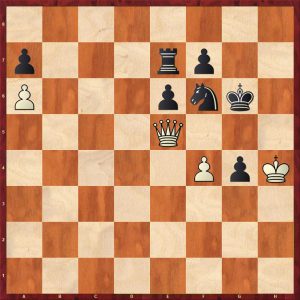
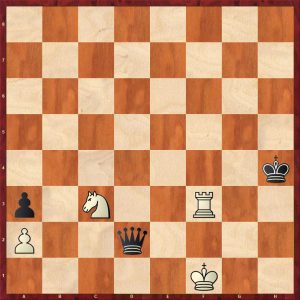
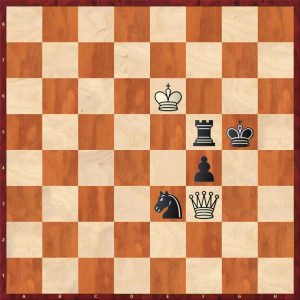
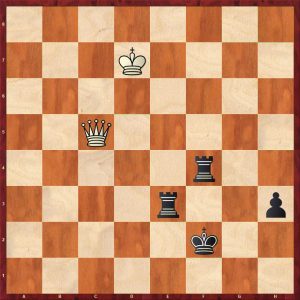
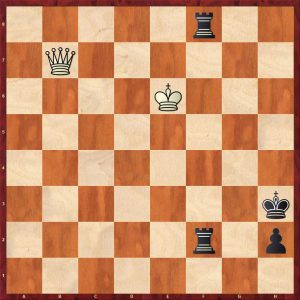
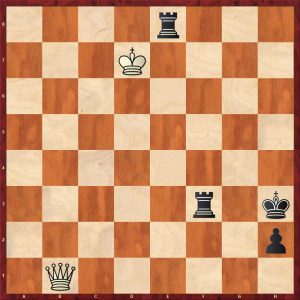
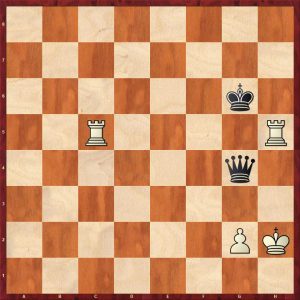
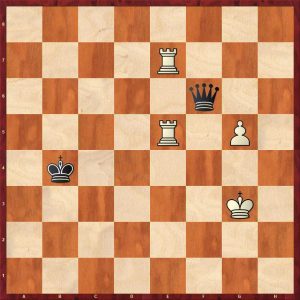
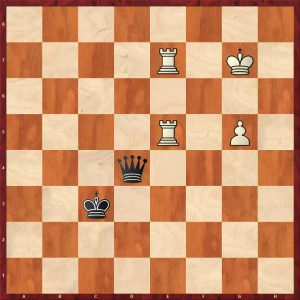
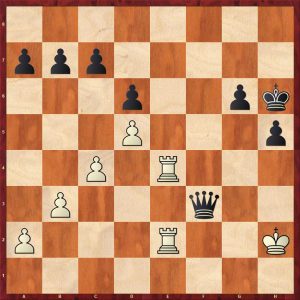
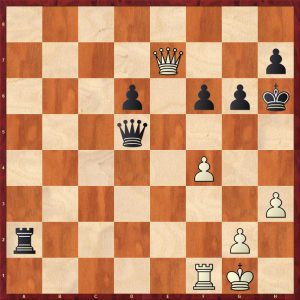
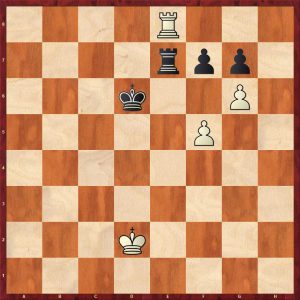
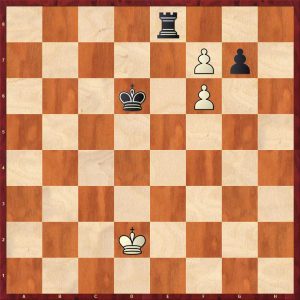
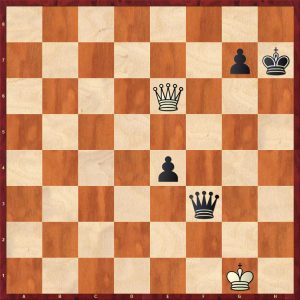
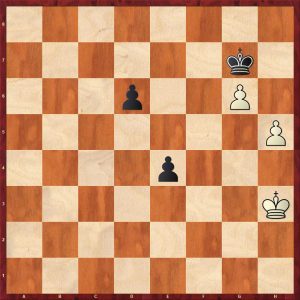
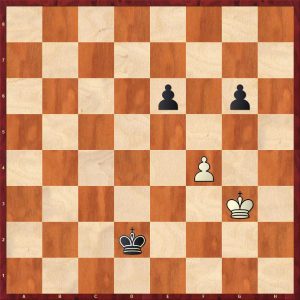
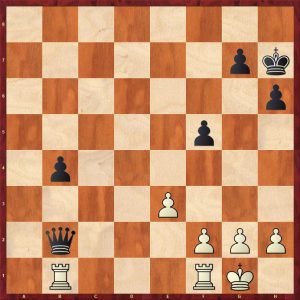
Here, our hero was black in an Armageddon game against Nepomniachtchi (Stavanger 2021).
Nepo erred by playing 52. Bg7? here (Ke2 would have held), which Magnus met with 52… Rh1, with Rh2+ to follow.
Along with the games you also get a running commentary on Carlsen’s tournament performances over the period, helpfully putting the games into context as well as providing some gripping reading.
At the end of the book there’s an informative interview with Carlsen’s long-term second Peter Heine Nielsen, along with a useful Endgame Classification index and the expected index of names.
What you don’t get here is the opportunity for interactive learning. Unlike in many books from this publisher, there are no quizzes at the start of each chapter, nor does the author stop every few moves to ask you questions. You might well consider this not to be a problem in a book of this nature.
As usual from New in Chess, the production values are excellent. The English, although not always totally idiomatic, reads fluently. If you’re looking for a book on Carlsen’s endgames, and there are many reasons why you should be, you won’t be disappointed with this volume. You might also want to buy Volume 1 as well, and, in a few years time, Volume 3.
I consider this a first class book written by one of the best annotators in the business. While players of, say, 2000+ strength will perhaps learn most from it, all club standard players will find Carlsen’s endgames, especially as explained here, both instructive and inspirational.
If you want to look further before making up your mind you can find some sample pages here.
Richard James, Twickenham 18th October 2024
. Richard James
Book Details:
Softcover: 256 pages
Publisher: New In Chess; 1st edition (23 March 2023)
“There are many books devoted to basic endgames, even from the Middle Ages. Principles of typical endgames (such as keeping the rook behind a passed pawn, not setting pawns on the same colored squares as your bishop’s, distant pawns being more dangerous than central ones etc.) are well known too. But what about “complex endgames”? I have in mind endgames with at least two pieces on each side; well I don’t find them often nor sufficiently well-explained in the past! It is exactly this fact (together with my passion and great endgame experience) that has motivated me to write this book (many friends simply call me “Endgame Wizard” ).
Over two decades of working as a coach has confirmed my opinion that endgames are the biggest problem for young players. Today, in the computer era with a lot of information easily provided, youngsters all over the world rather play blitz, or solve some tactical puzzles in a manner that is “the faster the better” (or even spend time on some other chess disciplines). All of this neglects the basis of chess – the importance of endgames! It is not uncommon that everyday you can be witness to some strange endgame misunderstanding, even at the top level.
This is why I consider some of my favorite endgame books based on logic as the best I’ve ever read – I learned the endgame from some of the best endgame players and authors. And this is why I want to fill that gap in chess literature and to share my devotion, ideas, principles, opinions with you! I hope you will enjoy this material and I am pretty sure you will broaden your endgame horizons.”
About the author:
Born in Cuprija, Serbia, 05 August 1977
Started chess at four years old watching father and his brother playing
Entered first chess club “Radnicki” Cuprija at seven
Fide Master in 1994
Serbian youth champion in 1995
Champion of the Belgrade University in 2001 and 2002
Won countless times the Serbian team championship (in youth competition as well)
IM since 2014
FIDE TRAINER since 2015
Winner of many open, blitz, rapid and internet events
Professional coach for more than 15 years
Author and contributor for American Chess Magazine since 2019
This is his 4th book for Thinkers Publishing.
From the back cover:
IM Zlatanovic will bring something new to your chess library. In our computer era, focus is usually on openings. Watching recent broadcasts, the new generation would rather choose games of a certain opening and look for an interesting idea or even a brilliant novelty. I offer, and recommend, a different concept altogether, based on the famous Soviet school of chess. The focus should be on understanding strategical concepts, principles and underlying logic. Fashionable opening lines will be forgotten (or re-evaluated) sooner or later, but understanding cannot be lost, and can only be upgraded. It is sad to see some players that are well equipped with opening lines, who are unable to realise a big positional advantage in an endgame. So, our advice is con concentrate on Strategy and Logic.
This new series of books are highly recommended for club players, advanced players and masters, although even higher rated players may also find it useful! There is no doubt that lower rated players will learn a lot about thinking processes and decision making, while some logical principles can be put to use by more advanced players too.
What is an endgame? Engines tend to tell you you’re in the endgame when neither player has more than two major/minor pieces on the board. You might, of course, consider BNN v BNN to be more like an ending than QR v QR. Me, I have no very strong views on the subject. Zlatanovic seems to take a very broad view of what constitutes an ending.
This, then, is a practical, rather than a theoretical book. If you want to know how to play KRB v KR, for example, you’ll need to look elsewhere. We have 188 positions, all of which start with at least two major/minor pieces, many with three, and some with almost the whole complement of pieces. Most of the positions come without queens. So what we have here is something much more than just an endgame manual. You could see it as a guide to positional play in the late middlegame, or even, in some cases, the opening.
The range of sources is impressively wide: from Steinitz in 1883 through to Zlatanovic himself in 2021. From grandmasters to amateurs. From world championship matches to online blitz games. While there are a few very familiar examples (although they’ll always be new to somebody) there will be a lot which you almost certainly won’t have seen before. Here, then, is an author, unlike many who only use a small number of sources for their books, who clearly has an exceptional knowledge of chess and its literature.
He explains in the preface that he has divided the material into 15 chapters, starting with the most important principles and gradually moving on to the most specific principles.
We have:
The Center
The Active King
Open Files
The Bishop Pair
Activity & Harmony
Space Advantage
Key Squares
Pawn Majority
Pawn Weaknesses
Two Weaknesses & Playing on Both Sides
Opposite-Colored Bishops
Exchange Problems
Do Not Rush
Schematic Thinking
Restriction & Prophylaxis
These chapters represent an increasingly important aspect of chess. Even relatively low rated amateurs these days can play the opening well and avoid tactical oversights in relatively simple positions. Incremental time limits mean that games are more likely to be decided by positional factors in the ending than in the days of mad time scrambles or, when I was learning the game, by the adjudicator.
I’d suggest, then, that this could be a very valuable book for anyone of average club standard or above wanting to improve their game. Let’s take a look inside.
Each chapter starts with a brief introduction. Here, as a fairly random example, is that for Chapter 8 (Pawn Majority).
Of course the natural goal of pawn play is the creation of a passed pawn and its promotion! However, this does not happen often!
The logical prerequisite to creating a passed pawn is to have a majority. Of course, with balanced material there would be majorities for both players, on different wings. Which majority is better? Well generally, it is clear that a 2:1 majority is “the best one”. Not only because it can easily create a passer, but even more importantly, it is because of the fact that the passer will be a distant one – it should deflect the opponent’s army (and king!) which would lead to progress and to gaining material on the opposite flank!
You may have already seen this approach a multitude of times. However what about other majorities? Is a 3:2 always better than a 4:3 majority? What about doubled pawns? What about exchanging pieces? Is it better to have more or fewer pieces kept on the board in a situation with mutual majorities? All these answers can be found in this chapter. And a lot of others besides!
I’ll quickly show you a few of Zlatanovic’s examples.
This is Botvinnik – Rabinovich (Leningrad 1934).
Let’s start this chapter with a relatively simple example. White has the better majority – 3:2, which is usually better than 4:3. However the point is that Black has separated a- and c-pawns and it looks like the majority will soon transform to an even better version for White: 2:1.
Later in the chapter: Smyslov – Szabo (Hastings 1955).
White is dominant although it may look as if Black is okay. White’s queenside majority is the key positional factor here, especially after fixing the b7-pawn. Black cannot easily advance it to b6 because of c6, and even exchanging it would create the a-passer. With his next move White opens up the key diagonal and attacks b7.
For my final example, we’re still in the opening, with most of the pieces still on the board. White has to decide on his 12th move in Erenburg – Murariu (Las Palmas 2003).
Here is a more complex example. White has many advantages: better development, more space and a better majority. However the advantage is not large. Black hasn’t made a single bad move – he is ready to place his king on e7 and finish development soon. In such situations active play is extremely important.
Is this position really an ending? Probably not. Does it matter? Again, probably not. If you want to see what happened next in these games, along with Zlatanovic’s explanations you’ll have to buy the book.
You might think the title is slightly misleading, and I might well agree with you, although I’m not sure I could come up with anything better. In some respects this is a modern book on a modern subject but in other respects it might be seem as slightly old-fashioned, and perhaps none the worse for that. The annotations throughout are based on practical considerations rather than computer analysis. Whereas other publishers promote active learning by offering puzzles at the start of each chapter or stopping to ask questions after every few moves, there’s nothing of that nature here.
You could just read the book, or, if you prefer, cover up the moves and try to guess the continuation. You could also set up the positions and play them out against a training partner, your chess coach or a computer.
The production standards are high, although, as you might have realised from the brief quotes above, the English is not always as idiomatic as one might like. There’s also some inconsistency in naming conventions – sometimes using just the player’s initial, sometimes the first name, sometimes also the middle initial and sometimes the full name. It probably won’t bother you but I find that sort of thing slightly annoying. The book also, inevitably, fails the Yates test (he was Fred Dewhirst, not Frederick Dewhurst). We have an index of games at the end, but an index of players might also have been useful.
In spite of these minor reservations I really enjoyed this book and think that, if you’re an above average club standard player, it will add an extra dimension to your play. Even stronger players will, I suspect, find much of value as well. I’d also consider it an invaluable resource for chess coaches working at this level: it’s evident from the book that the author must be an outstanding teacher.
Zlatanovic has clearly put an enormous amount of thought into how the book should be structured and done a lot of research into finding the most suitable examples to include, and should be congratulated on having produced an excellent book. If you agree with him (as I do) that, at least at club level, understanding is much more important than memory, I’d recommend you to take a look.
Rook Endgames from Morphy to Carlsen: Valentin Bogdanov
From the publisher:
“So, you want to improve your rook endings? Good choice, as they occur more often in your games than your favourite opening lines!
Allow vastly experienced trainer Valentin Bogdanov to assist. However, we are not headed for the classroom, but to the tournament hall! We shall witness tense moments as the greatest champions in chess history battle their way through all manner of rook endings: tactical, strategic and technical. Your coach will be whispering in your ear, explaining what is happening and giving the theoretical background. You will also be getting the benefit of modern computer analysis, which X-rays these classic games for errors and missed resources in a way that was not possible even a few years ago. A feast of astonishing analysis awaits!
We shall see that even the best players make a surprising number of errors in rook endings. This should give us heart to fight even in the most desperate of situations, and motivate us to study these endgames so we can pick up the many half-points and even full points that our opponents will surely offer up to us.
By emphasizing the most common themes and areas where players go astray, Bogdanov helps us determine which parts of those technical endgame manuals that are sitting on our shelves are most worth thumbing through. This book can also simply be enjoyed as a stroll through chess history – you will be amazed how many key turning-points occurred in rook endgames!
The players featured in this book include all 17 official world champions, the 3 ‘uncrowned kings’ who preceded them, and a selection of 8 other outstanding players. There are 384 examples in total. The book is completed with a selection of 68 exercise positions, and detailed indexes of themes and players.”
About the author, Valentin Bogdanov
“International Master Valentin Bogdanov has vast experience as a chess trainer, and is from Ukraine. His pupils include Moskalenko, Savchenko and Drozdovsky, and he has acted as a second for the well-known grandmaster and theoretician Viacheslav Eingorn since the late 1970s. For more than 50 years he has been a teacher at the chess school in Odesa (Ukraine), and in 2016 won the European Over-65 Championship. In the same year he also qualified as an International Arbiter and has since then officiated over a great many chess events in his country. This is his fifth book for Gambit.”
Here, on YouTube John Nunn gives the reader an introduction to the book:
This book is an excellent publication on rook endgames. It is packed full of an instructive examples from practical games which makes the material more accessible than a book of purely theoretical positions. There are a lot of fresh examples that are new to the reviewer which makes the book particularly novel. The book is probably aimed at 2000+ players although any aspiring player would glean lots of useful guidelines on playing rook endings from this tome. There is an excellent “Index Of Themes” at the back.
The reviewer will show six examples from the book.
Position 10
Steinitz-Blackburne Vienna 1898 Position after 80…Rc2
There are many positions with R+2P v R with a and c pawns that are drawn. This position is winning with care. Steinitz inexplicably played 81.a7+? believing that seizing c7 for the king would win. 81…Kxa7! 82.Kc7 Rh1! 83.c6 Rh7+ drawing with flank checks.
The natural 81.Kd7! wins easily, for example 81…Rh1 82.c6 Rh7+ 83.Kd6 Rh6+ 84.Kc5 Rh1 85.Kb6 Rb1+ 86.Rb5
Steinitz-Blackburne Vienna 1898 Variation after 86.Rb5
Larsen-Tal Candidates (9) Bled 1965 Position after 52.Kxe5
Black hurries to force a drawn R+P v R endgame, but is mistaken. 52…b3? 52…Rh2 or Re2 is much better 53.axb3! Rxb3 54.Kd6 Rd3+
Larsen-Tal Candidates (9) Bled 1965 Position after 54…Rd3+
White played 55.Ke6? throwing away the win, 55.Ke7! wins controlling d8, after 55…Rh3 intending flank checks 56.Ra4 Rh7+ 57.Kf6 Rh6+ (57..Kd8 58.Ra8+) 58.Kg5
Larsen-Tal Candidates (9) Bled 1965 Variation after 58.Kg5
58…Rd6 otherwise, white will cut black’s king off with Rd4 59.e5 Rd1 60.Kf6! winning because black’s rook can only work on the short side as his king is on the long side
Larsen-Tal Candidates (9) Bled 1965 Variation after 60.Kf6
Position 116
Unzicker-Petrosian Varna Olympiad 1962 Position after 47.Kg2
This position is deceptive 47…Rb6 (47…Rb5 allows 48.Rd6 and the rook gets behind the pawn and white probably draws) 48.Ra4 Ra6? for once placing the rook behind the pawn does not win as the a-pawn is only on the fourth rank! 48…Rb5! 49.Rc4 Kf6! and black’s active king wins the game as it can support the a-pawn quickly
Unzicker-Petrosian Varna Olympiad 1962 Position after 48…Ra6
49.Kf3? natural but 49.f3! and 50.g4! seeking counterplay draws 49…Kf6 50.Ke4 Ke6 natural, but 50…Re6+ and Re5 activating the rook wins 51.f3! white advances the kingside pawns to get counterplay which draws with accurate play.
Unzicker-Petrosian Varna Olympiad 1962 Position after 51.f3
Unzicker-Petrosian Varna Olympiad 1962 Position after 62…Kc4
White has defended well but now makes a fatal mistake 63.Rc1+ draws as the black king has to retreat, 63.Kf4? Kc3! The a-pawn is too strong 64.Kg5 Kb2 65.Re1 f4+! 66.Kxf4 a4! 67.Ke4 a3 68.f4 a2 winning
Position 131
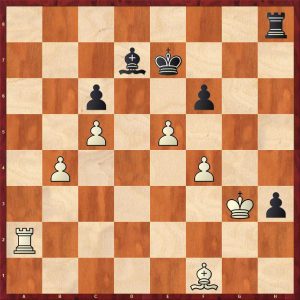
Fischer-Bisguier UA Ch New York 1958-9 Position after 70.b4
Bisguier had an appalling record against Fischer, gaining a single win and a single draw against the young Bobby. He lost the other thirteen games including this one.
White has an edge as black’s king is a long way from the b-pawn, but he can draw with careful defence. 70…d4? (Sloppy, black can draw easily with 70…Rb3! 71.Kc5 Rb1 72.Rd2 Ke6!) 71.Kd5! a clever switchback probably missed by Black 71…Rd1 72.Rf2+! The point forcing the black king further away 72…Kg4
Fischer-Bisguier UA Ch New York 1958-9 Position after 72…Kg4
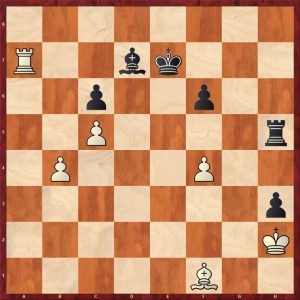
Now Fischer goes astray, 73.Kc4? White can win with 73.b5! Kg3 (73…Rb1 74.Kc4 d3 75.Rd2! Rc1+ 76.Kc5! Rc1+ 77.Kb6 Rc3 78.Ka5 and Black loses the d-pawn and the game) 74.Rb2! winning
Fischer-Bisguier UA Ch New York 1958-9 Variation 1 Position after 74.Rb2
After 73.Kc4? played in the game:
Fischer-Bisguier UA Ch New York 1958-9 Position after 73.Kc4
Bisguier came up with a faulty plan 73…d3?74.Kc3! winning the pawn after Rd2 and as the Black king is cut off by two files, the ensuing R+P v P is easily won
73…Kg3! draws 74.Rf5 (74.Rb2 Kf4 75.b5 Ke3 draws), 74…d3! 75.Kc3 d2! 76.b5 Kg4! 77. Rd5 Kf4! draws as capturing the d2-pawn allows a drawn K+P v K ending.
So much play with only 6 pieces!
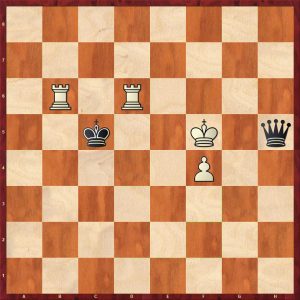
Position 200
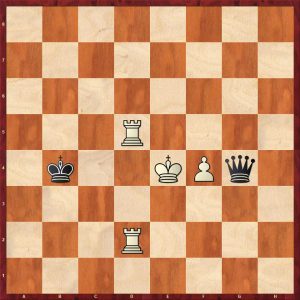
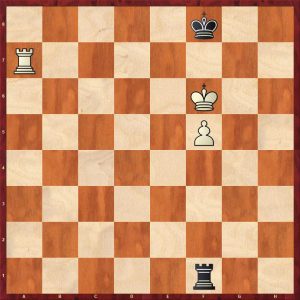
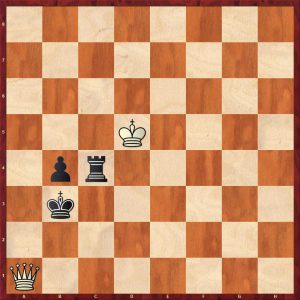
Aronian-Carlsen Moscow 2006 Position after 72…Ra8
Aronian played the cunning waiting move 73.Rd6 testing the young Magnus. This trap is also covered in Rook Endings by Levenfish & Smyslov. Black played the natural check 73…Ra7+? which loses. After 74.Ke8! Carlsen resigned. Only 73…Kg6! draws.
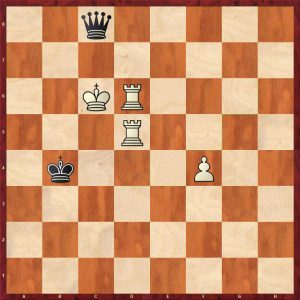
Position 293
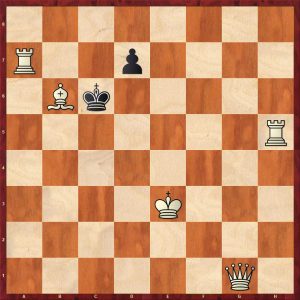
Jansa-Geller Budapest (team event) 1970 Position after 66…Rxb4
White won here using a famous systematic manoeuvre called Lasker’s steps. 67.Rxc2? throws away the win as Black’s flank checks with the rook draw, so 67.f7! Rg4+ 68.Kh8 Rf4 69.Rc6+ Kh5 70.Kg7 Rg4+ 71.Kh7 Rf4 72.Rc5+ Kh4 73.Kg7 Rg4+ 74.Kf6 Rf4+ 75.Ke6 Re4+ 76.Kf5 Re2 77.Kg6 Rg2+ 78.Kh6 Rf2 79.Rc4+ Kh3 80.Kg6 Rg2+ 81.Kh5 Rf2 82.Rc3+ Kh2 83.Rxc2! queening the pawn. Now White just has to win Q v R.
This short review cannot really do justice to this book. I do highly recommend it. The graded exercises at the end are tricky , even the so called easy ones!
FM Richard Webb, Chineham, Hampshire, 6th July 2024
Rook Endgames from Morphy to Carlsen, Valentin Bogdanov, Gambit Publications (1 April 2024), ISBN-13: 978-1805040712Rook Endgames from Morphy to Carlsen, Valentin Bogdanov, Gambit Publications (1 April 2024), ISBN-13: 978-1805040712
Secrets of Queen Endgames: Ferenc Berkes and Tibor Karolyi
From the publisher:
“A revolutionary new work on a notoriously challenging type of chess endgame
Queen endgames can seem unfathomably complicated. Computers have provided complete information for some of the basic queen and pawn endings, but human understanding has proved elusive.
In this ground-breaking work, two Hungarian authors have gone to extraordinary lengths to explain strategies and methods in queen endgames. Rather than a random series of checks, we can now understand king and queen triangulations that gradually bring the pieces to the squares they need to be to engineer the killer tactic that completes the process. Berkes and Karolyi have devised guidelines that help us judge what we need to aim for, and provided a broad set of tools to help us achieve these goals.
Going beyond previous texts, the authors have used not just seven-man tablebases and modern engines, but the specialized program FinalGen to delve with the same certainty into endgames with many more pawns. But most of all, they have spent thousands of hours seeking to present the whole truth about queen endings in human terms. Their wide-ranging discussion of shelters is especially instructive.”
A definitive guide to a fundamental class of endgames
Explains all types of endings with queens and pawns
A wealth of guidelines for handling positions with many pawns
Spectacular and previously unpublished endgame studies
Thoroughly up to date, with more than 1000 chess diagrams
Ferenc Berkes is a grandmaster from Hungary. A former World Under-18 Champion, he was won the championship of his country on eight occasions. He plays team chess in several European leagues. IM Tibor Karolyi is also from Hungary. His many pupils have included super-GMs Peter Leko and Judit Polgar, and he is a highly experienced chess writer.
To get some idea of the book Gambit (via Amazon) provide a “Look Inside” at their Kindle edition. As you would expect with Gambit, the notation is English short form algebraic using figurines for pieces. A previous criticism (ibid) has been addressed in that each diagram has a W or B “whose move it is” indicator.
The book is divided into 9 chapters as follows :
Extreme Tactics in Queen Endings
Tools in Queen Endings Technical Queen Endgames
Queen and Pawn vs Queen
All the Pawns on the Same Side
Extra Outside Passed Pawn Practical and Strategic Queen Endgames
The Pawn
The Queen
The King
Complex Queen Endgames
Here on YouTube John Nunn gives the reader an introduction to the book :
This book is a superb tour de force covering a complex subject that has not been covered so extensively before. My short review cannot really do justice to this magnus opus.
The book is aimed at expert players, probably 2200 and above. The vast majority of GMs would learn a lot from this book. Despite these comments, it is the reviewer’s opinion that any aspiring, improving player would benefit from reading the more general chapters 1, 2, 5, 6, 7, 8. The pure technical chapters 3 and 4 are certainly more abstruse but very instructive: the authors don’t just give long variations but intersperse these with pithy, useful comments.
The short first chapter really introduces the power of the queen with a mixture of studies and over the board positions.
Chapter 1: Extreme Tactics in Queen Endings
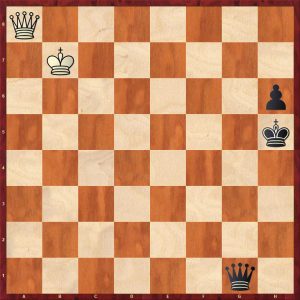
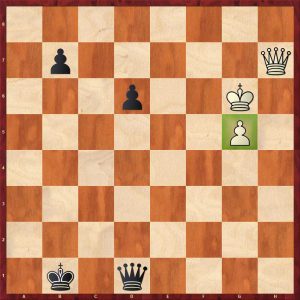
Here is an amazing and stunning study by Rusz:
Rusz 2022 White to play and win
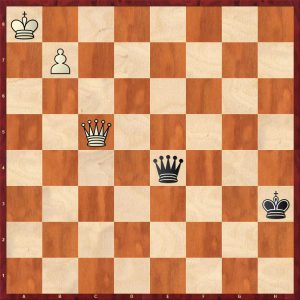
Black is threatening to mate with Qa1+, so white plays 1.Qf6!!
Rusz 2022 Position after 1.Qf6 mutual zugzwang Black to move
Amazingly, this is a position of mutual zugzwang as White to play only draws, whereas Black to play loses. It is hard to believe that in an open position with three queens each, having the move is a disadvantage!
Black can try 1…Qad8_ 2.Qaxd8 Qxd8+ 3.Qxd8 Qf1+ 4.Kc2 Qf2+
Rusz 2022 Position after 4…Qf2+ White to move
5.Qd2 (The careless 5.Kb3? allows a standard trick 5…Qg3+ 6.Qxg3 stalemate, always watch out for this type of idea in queen endings) 5…Qc5+ 6.Kd1 Qc2+
Rusz 2022 Position after 6…Qc2+ White to move
7.Ke2! Black has run out of useful checks, so white wins
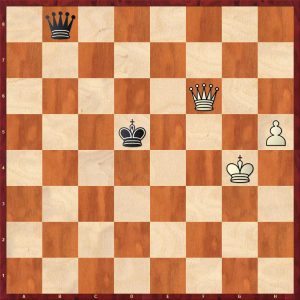
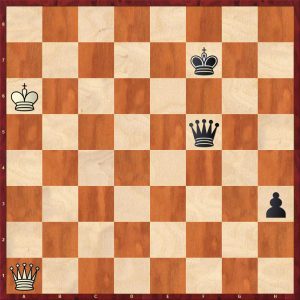
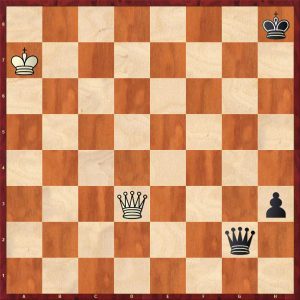
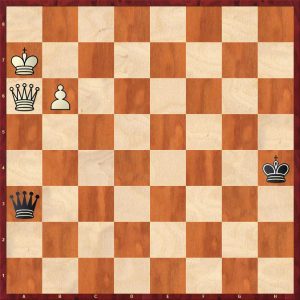
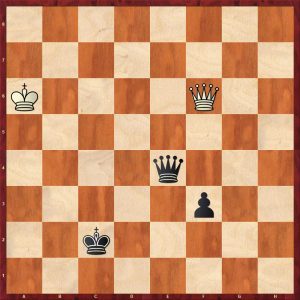
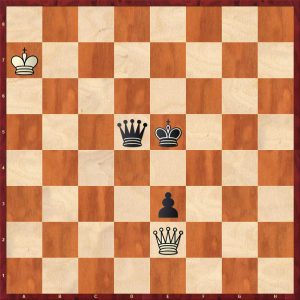
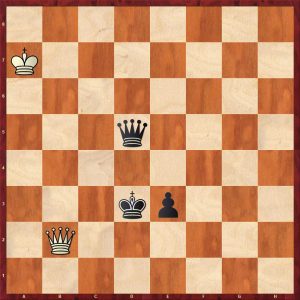
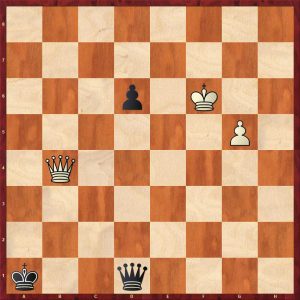
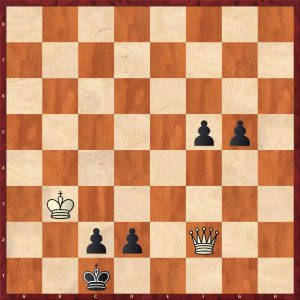
Here is a practical example showing many important principles in queen and pawn endings:
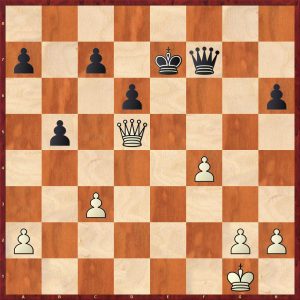
Percivaldi – Thybo Danish League 2021-2 Position after 42.Qd5+ Black to move
White has three pawns for a bishop, but the most important feature of the position is black’s far advanced passed a-pawn. In queen endgames, it’s the degree of advancement of passed pawns that is all important, not the number of pawns. Black correctly shed the bishop with his next move:
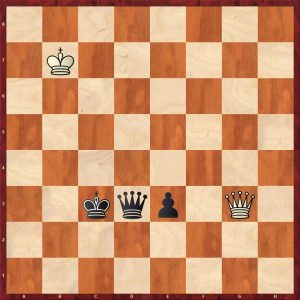
42…Kc7! 43.Qf7+ Kb6 44. Qxf8 Kb5!
Percivaldi-Thybo Danish League 2021-2 Position after 44…Kb5 White to move
White is three pawns up but is totally lost. White’s only potentially useful pawn is the d-pawn as it’s closest to queening, but white is just too far behind in the race. Black’s king will shelter behind the white’s pawns, there is no chance of a perpetual check.
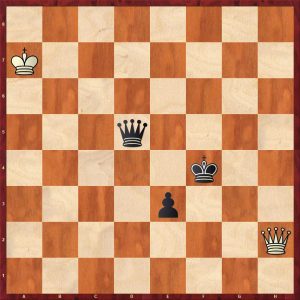
45.Qe8+ Kb4 46.Qb8+ Ka4 47.Qg8 Trying to bar the king’s progress, but to no avail. 47…Qc2! (47…Qb3 also wins) 48.Qe8+ Kb4 49.Qb8+ Kc3 50.Kg2 a2 51.d5 Using a little tactic to prevent queening and putting black under a little pressure
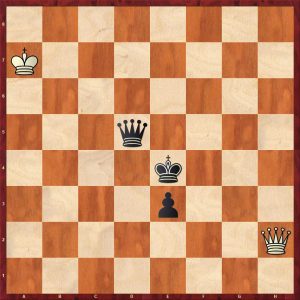
Percivaldi-Thybo Danish League 2021-2 Position after 51.d5 Black to move
51…Qb2? A poor move deactivating the queen allowing white an amazing draw which he misses, the obvious 51…Qe4+ 52.Kh3 Qxd5 eliminating white’s counterplay, followed by putting the king behind white’s pawns wins easily, 51…Qd1! also wins watching White’s d-pawn and preparing to promote, after 52.Qe5+ Kc2 53.Qe4+ Kb3 54.d6 a1=Q wins as does 54…Qxd6
White missed a clever draw and black won after a slugfest in a four queen ending. Buy the book to see this entertainment.
Chapter 2: Tools in Queen Endings
This is an excellent toolbox chapter that covers the follows topics:
The Queen Triangulates
Cutting Off the King
Batteries and Discovered Checks
Pinning Down a Piece
Exploiting the Opponent’s Harmful Pawn
Zugzwangs
These ideas are absolutely key themes in queen endings. This section is definitely worthy of examination.
The reviewer will show examples from many of the themes in turn:
The Queen Triangulates
The author explains the concept concisely:
“In queen endings, there are more zugzwangs than most players would assume. We shall see many examples where the attacker’s king manoeuvres to give up the right to move – a familiar theme from pawn endings, but more surprising with queens on the board. But the queen itself can also lose a tempo by a form of triangulation. It usually happens when the defender’s king is in danger.”
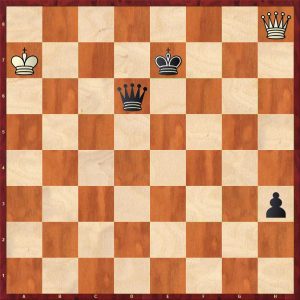
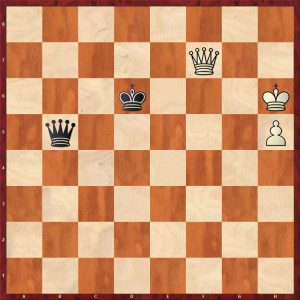
Here is another Rusz study showing this idea:
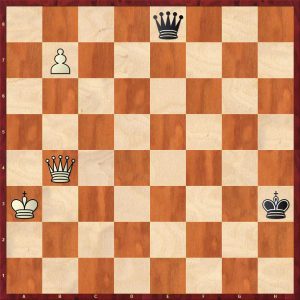
Rusz 2022 Queen Triangulation White to play and win
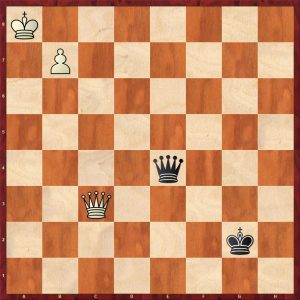
This positions look ok for black as he has White’s passed pawn under control. 1.Qg5+ Ke8 2.Qc5! 2…a3! 3.Qe3+! Kd8 4.Qg5+ Ke8 5.Qc5! completing the first triangulation
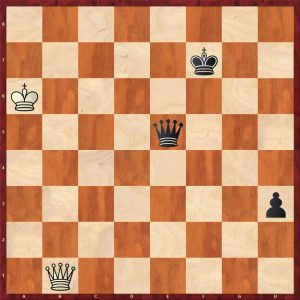
Rusz 2022 Queen Triangulation Position after 5.Qc5 Black to play
Rusz 2022 Queen Triangulation Position after 14.Qc5 Black to play
14…Qc8+ (14…Kd8 15.Qf8# ends the suffering) 15.Ka7 Qc7+ 16.Ka6 wins black’s pawns and the game
Cutting Off the King
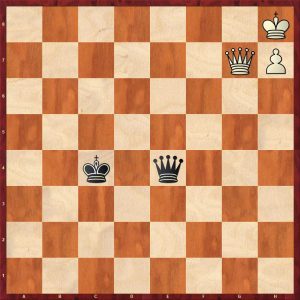
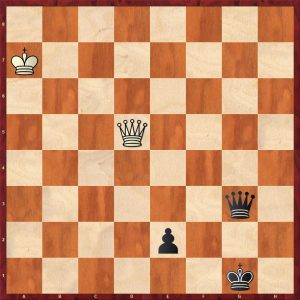
This principle can be used by the stronger side or the weaker side to prevent the opposing king getting to a desirable area. For example, the stronger side can use this technique in Q+P v Q to cut off the defender’s king from a drawing zone. The example below shows the defending side successfully using this theme in an over the board game:
Lupulescu – Sarakauskas After move 46.Qxg5 Black to play
White has just taken the pawn on g5, black can now draw with an accurate sequence of checks: 46…Qb1+ 47.Kh2 Qb8+ 48.Kg1 Qb1+ 49.Kh2 Qb8+ 50.Kg1 Qb1+ 51.Kf2 Qc2+ 52.Kf3
Lupulescu – Sarakauskas After move 52.Kf3 Black to play
Black must choose the right check here to draw: 52…Qd1+! (the sloppy 52…Qd3+ 53.Kg4! allows white to approach the h-pawn and win the game) 53.Ke4 Qa4+! not allowing the king to cross the fifth rank 54.Ke3 Qb3+ 55.Kd2 Qb2+ 56.Ke1 Qb1+ 57.Ke2 Qe4+ 58.Qe3 Qxg2+ Black has regained his pawn and drew comfortably
In this famous ending, Black is winning with an extra pawn and centralised queen. He played 62..f5? mobilising the pawn majority
Pillsbury – Burn Vienna 1898 Position after 62.Qe2 Black to move
Better was 62…Kd6! activating the king trying to cross over to white’s queenside pawns: white cannot defend against the twin threats of the king invasion and the advance of the kingside pawn majority. After 62…f5? white took the opportunity to make Black’s life very difficult 63.Qb5! cutting the king off from white’s queenside. White missed a probable difficult draw and black eventually won.
Batteries and Discovered Checks
From the author: “Powerful ideas in queen endings include forcing an exchange of queens and launching an attack on the enemy king. Usually the queen harasses the enemy ling by giving checks, but sometimes setting up a battery is stronger than the immediate check. Players often miss such an opportunity, or the potential to play for it. The attacker typically uses a battery to attack the opponent’s king or to win a tempo and stop the opponent’s queen from continuously checking by stepping out the check with a cross check.”
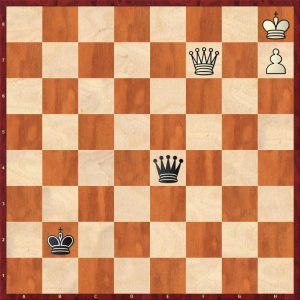
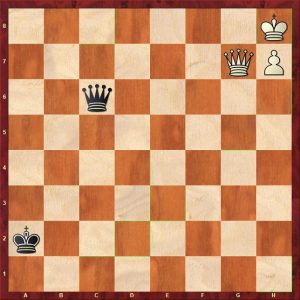
This practical example is instructive:
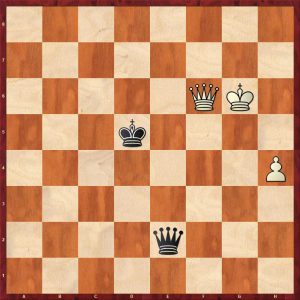
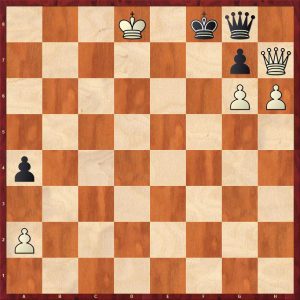
Ni Hua – Berkes Taiyuan 2006 Position after 56…Kh6 White to move
White played 57.Qxd5 winning a pawn, 57… Qe3+ (black can also draw with the flashy 57…Qf6+ or 57…Qg4+ or 57…Qa4+) 58.Kf6 Qf2+ (58…Qf3!+ draws easily, 59.Qxf3 is stalemate, and 59.Kf6 Qc3+ draws) 59. Qf5 Qh4+ 60.Ke6 Qc4+ 61. Qd5 This position is getting difficult for black, but there are still six drawing moves, Black choose a terrible check 61…Qa6??+ 62.Qd6! setting up a deadly battery 62…Qe2+ 63.Kd5+1-0 as white exchanges queens
Ni Hua – Berkes Taiyuan 2006 Position after 61.Qd5 Black to move
Pinning Down a Piece
Portisch – Morovic Dubai Olympiad 1986 Position after 103…Qe6 White to move
White played 104.Kc2? and lost . Portisch missed a brilliant move here 104.Qd4!! which amazingly draws, after 104…b3 105.Qd3! attacks the pawn and paralyses the Black queen.
Exploiting the Opponent’s Harmful Pawn
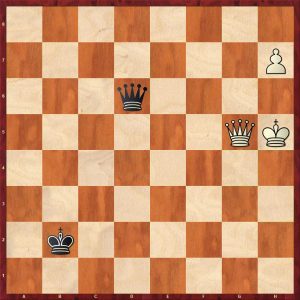
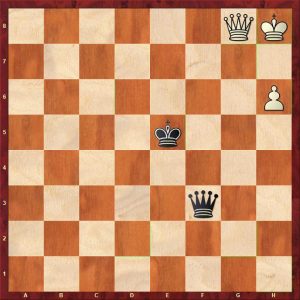
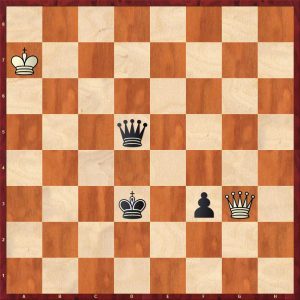
There are many example in the ending Q+P v Q+P where the defending side (player with the pawn that’s least advanced) loses because the extra pawn is harmful blocking defender’s queen checks and/or providing shelter to the stronger side’s king. An example is given below:
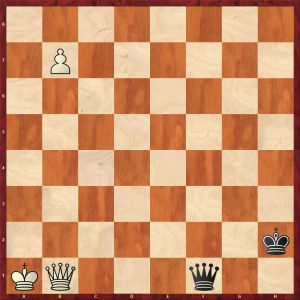
Boleslavsky – Taimanov Zurich Candidates 1953 Position after 42…c1Q White to move
White played 43.Qb8+ which wins but Boleslavsky messed up later on. In some ways 43.h4 is simpler. A possible line is 43.h4 Qc2+ 44. Qg6 Qxa4 45.h5 Qxa2 reaching this position:
Boleslavsky – Taimanov Zurich Candidates 1953 Variation position after 45…Qxa2 White to move
Without Black’s b-pawn this is a tablebase draw but not easy in practice. With the b-pawn, Black is losing after 46.Kg7!! The pawn blocks the g1-a7 diagonal.
The next huge section of the book is all about Technical Endgames.
Chapter 3: Queen and Pawn vs Queen
This is in some ways the core of the book with 65 pages devoted to this basic ending. But it is anything but basic!
Each pawn is covered in turn starting with the rook’s pawn working towards the centre pawn. Within each pawn’s section, positions are covered from the second rank to the seventh rank. It is certainly a systematic approach.
It is clear that the least favourable pawn is the rook’s pawn, followed by the knight’s pawn. It may surprise some readers to know that the bishop’s pawn is the most favourable.
Rook’s Pawn
These are the authors’ conclusions:
“The closer the pawn get to promotion, the harder it becomes to hold.
In the case of a white a7-pawn:
Black’s safest option is to get really close to the pawn, at least to the d-file.
The h1-corner is a draw for black’s king, but in practice the defence will require a lot of concentration.
The a1-corner is the second least difficult location for the defender’s king.
In case the black king gets trapped in the h8-corner, there is only one mutual zugzwang position that might save the defender.”
The reviewer will show a few positions:
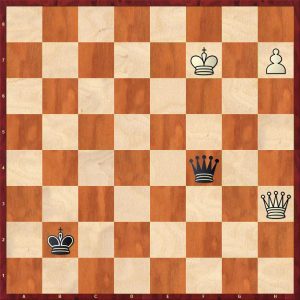
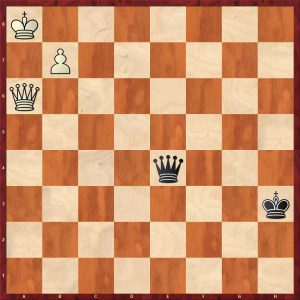
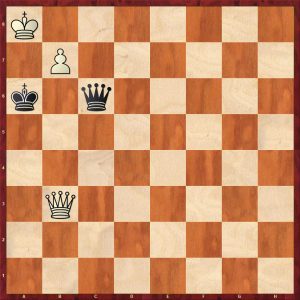
Honfi – Toth Budapest Ch 1966 Position after 89…Qd1+ White to play
This position is a tablebase draw particularly as black’s king is fairly close to the h1 corner.
White played 90.Kb4 The author adds a didactic comment: “Ever since the famous Minev -Botvinnik game in 1954, we know the player with the extra pawn should look to put his king on the same or neighbouring file or rank as the opponent’s king. This creates chances for a cross check or to set up a battery.”
The game continued for another 61 moves until this position was reached:
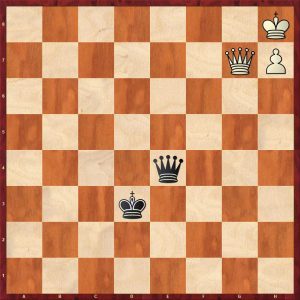
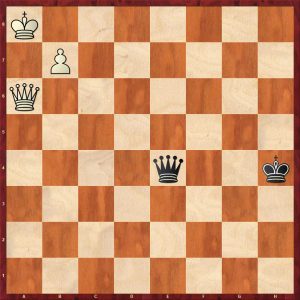
Honfi – Toth Budapest Ch 1966 Position after 151.Kc7 Black to play
Black’s king is not ideally placed, but he can draw with the correct check. Black played 151…Qe7+? (151…Qf7+ draws as 152.Kc8 is met by 152…Qf5+ drawing, Gelfand has made an observation, if in doubt check on the opposite colour square to your king, obviously this not a hard and fast rule) 152.Kc8! Black has run out of checks because of the king on h4. White now plays superbly to bring home the full point fully exploiting the badly placed black king 152…Qe4 153.Qc5!
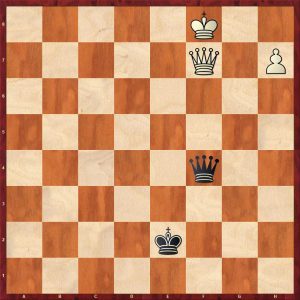
Honfi – Toth Budapest Ch 1966 Position after 153.Qc5
153…Qe6+ 154.Kc7 Qf7+ 155.Kb6 Qb3+ 156.Ka5!
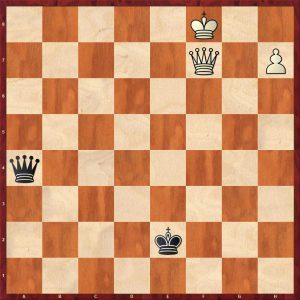
Honfi – Toth Budapest Ch 1966 Position after 156.Ka5
A standard winning technique in Q+P v Q The author comments thus: “White approaches the rank of Black’s king. Now 156…Qa2+ would be the last check, as it is met by 157.Kb5. from this point, the win is easy, as White can promote after some checks.”
156…Qf3 157.Qc4+ Kh5 158.Kb6 Qf6+ 159.Qc6 Qd8+ 160.Kb7 Qe7+ 161.Ka6 Qa3+ 162.Kb6 exploiting black’s king position again, there are no more checks, so 1-0
Honfi – Toth Budapest Ch 1966 Position after 162.Kb6
The reviewer adds an observation: when the black king is in or near the h1-corner, it is much harder for White to manoeuvre his king to an adjoining rank/file and keep his pieces coordinated as well as the pawn safe.
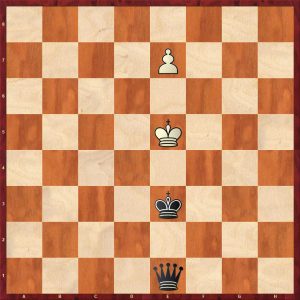
Gligoric – Timman Bugojno 1980 Position after 60…g1Q White to play
This is a tablebase draw as white’s king is close to the best corner (a8) but an experienced top GM still lost this position thirty moves later. This shows how hard it is in practice. The book has some excellent coverage of this endgame viz:
Gligoric – Timman Bugojno 1980 Position after 84…Kc3 White to move
This position is still a draw.
“White should also wait with 85.Ke5, or he could move closer to the corner with 85.Kf7 or 85.Kf6”
White played the obvious centralising check 85.Qe5+? which loses, black replied with the 85…Kc2? (85…Kd2! wins: the analysis is worth looking at just to see the process as Black uses triangulation and White’s poorly placed king to escape the checks, get the book to find out)
Gligoric – Timman Bugojno 1980 Position after 85…Kc2 White to play
In this position White can draw. Over to the authors: “86.Qf4!! is the right move. But why? If it Black’s turn to move in the diagram, Qf3 would cut off the white king and win. The queen on f4 stops that. If 86…Kd1 87.Kf7!= (87.Kf6 also draws) 87…Qe2 88.Qd4+ only move 88…Kc2 89.Qa4+ holds or 89.Qc5+ or 89.Qf4! h2 90.Qa4+ draws”
This subtle, underlying battle of the cut off is amazing. The game continued with 86.Qh2+? Kd1! Once again the king approaches the neighbouring file of the enemy king 87.Qh1+ Kd2 88.Kf6 (the authors note that if white’s king could move to the c-file he would draw, the win after 88.Ke7 is very instructive as black triangulates again, get the book to find out how)
Gligoric – Timman Bugojno 1980 Position after 88.Kf6 Black to move
Timman misses a fairly simple idea to win quickly here 88…Qg3! He played 88…Qe3? This throws away all the hard work. White can draw with 89.Qh2+ and then run with the king towards the h8 corner. White blundered with 89.Kf5? A fatigue blunder allowing 89…Qf2+ 90.Ke5 Qe1+ exchanging queens 0-1
Knight’s Pawn
This is the authors’ observations:
“This situation occurs more often in practice than Q+P v Q with other pawns. This type of pawn has some unique features. for example, the attacker’s king has more scope for hiding near the pawn then it does behind a rook’s pawn, but less room compared to a bishop’s pawn. There is a drawing zone that often exists for the defender’s king in the far corner from the promotion square.”
The reviewer adds the proviso: but even this depends on the exact position of the queens of course.
Lenart position after 19…Qxh3
This is position from an unknown composer/player. Surprisingly White wins here even with the black king so close. White plays 20.Qc6! which is a standard cut off move. The winning process here takes 75 moves with perfect defence. There are some mind boggling triangulations with white’s king to wrong foot the black queen. Buy the book to find out how.
Here is a position with a knight’s pawn on the fifth rank.
Zurakhov – Boleslavsky Riga 1955 Position after 73…e1Q White to play
White wins here with the brilliant 74.Qf8+ Kg4 75.Qa3!! cutting black’s king off from the drawing zone. Zurakhov played 74.Qc8? throwing away the win but he won anyway on move 119.
Once the knight’s pawn reaches the seventh rank, the defender’s king has to stay in the opposite corner. This is the type of position the attacking side should aim for:
Cheron 1968 Black to play loses
Apparently with a g-pawn on g7, the d4 is vitally important for the stronger side’s queen.
Bishop’s Pawn
There is no drawing zone for the defender’s king (unless of course the king can get in front of the pawn).
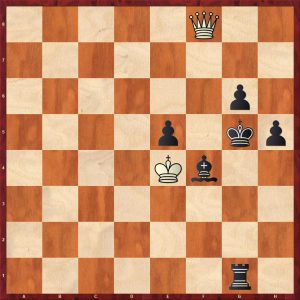
Velimirovic – Uhlmann Arandjelovac Zonal play-off 1976 Position after 55.Kxa6
This is a technical win for Black: 55…Qg4! is an excellent cut-off preparing to activate the king. Uhlmann played this ending well not letting the win slip at any point. This ending is worth close study.
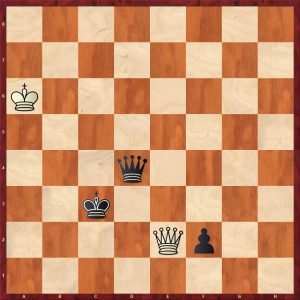
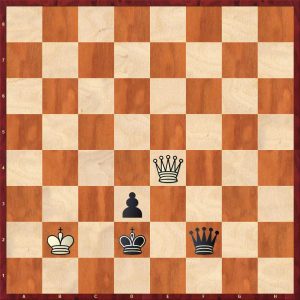
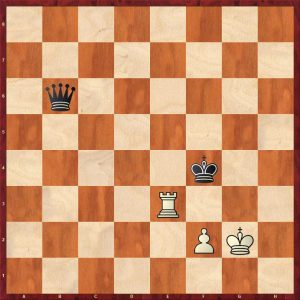
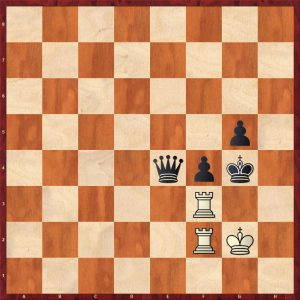
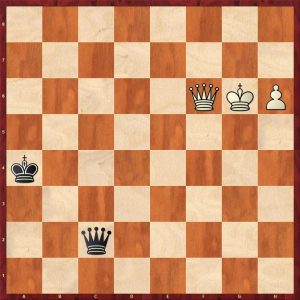
Centre Pawn
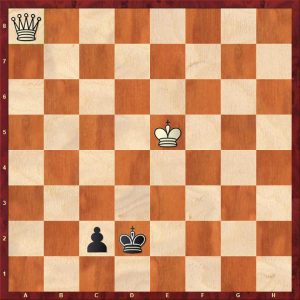
Jevtic – Vujacic (analysis) Belgrade 2008
1.Qxf7+ Ke3! the only winning move.
If white’s king was on h1, he would draw as his king would be in the small drawing zone on the short side of the pawn. 2.Qg8 Qd5+ (a series of queen checks to force white’s king to the unfavourable long side of the pawn) 3. Kc1 Qh1+ 4.Kb2 Qe4!
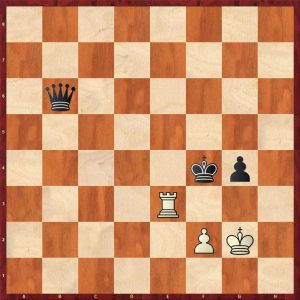
Jevtic – Vujacic (analysis) Belgrade 2008 Position after 4…Qe4 White to move
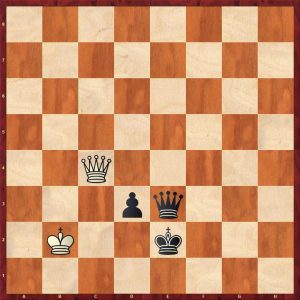
5. Qg1+ Ke2 6.Qh2+ Kc3 7.Qg3+ Qe3! 8.Qg6+ Kd2 9.Qc2 Ke1 10.Qb1+ Kf2 stopping the checks, notice how white’s own king impedes his own queen 11.Qh7 e5
Jevtic – Vujacic (analysis) Belgrade 2008 Position after 11…e5 White to move
Nunn comments: “The general theory of queen and pawn against queen tells us that this position is probably winning, because with the centre pawn there is no drawing zone for the white king in a remote corner, and if the defender’s king cannot move in front of the pawn then his chances are grim.”
Chapter 4: All the Pawns on the Same Side
This is a systematic analysis of all the different pawn configurations and is a really technical. For mortals like me, this will take many months to take in, but is nonetheless really interesting.
One surprising conclusion is that a two pawn advantage Q and rook’s pawn + knight’s pawn [gh-0] v Q is drawn in many positions if the defender’s queen and king are actively placed.
Here is a practical example:
Atanasov – Spiridonov Ruse 1978 Position after 68…Kg8 White to move
How should White capture the Black pawn? On general principles, it looks better to capture with the queen retaining two connected passed pawns. Here both captures win, but generally Q+f+h pawns v Q is a win unless there is an immediate perpetual. Q+g+h pawns v Q is drawn in many cases. After 69.Qxf4?! Qc5+ 70.Kg4? White has thrown the win away:
Atanasov – Spiridonov Ruse 1978 Position after 70.Kg4
Black played 70…Qc8+ which draws as does 70…Qa7, 70…Qc3, 70…Qc6
The game was drawn after both sides made mistakes. Instead of 70.Kg4?, 70.Kg6! wins.
This ending is truly complex and worthy of study. Buy the book to find out more.
Chapter 5: Extra Outside Passed Pawn This is divided into four natural subsections:
Passed Rook’s Pawn
Passed Knight’s Pawn
Passed Bishop’s Pawn
Passed Centre Pawn
The author concentrates on the passed rook’s pawn:
“Firstly, they occur more often than other passed pawns, as is also the case in rook endings. Secondly, the defender has much better drawing chances compared to positions with a c-pawn for example, because the stronger side’s king can’t find shelter around the rook’s pawn. If the attacker’s queen is busy defending the king from checks, there is little capacity left to help the rook’s pawn advance. On the opposite wing from the passed rook’s pawn, exchange of pawns tend to favour the defending side for several reasons:
1) They increase the chance of perpetual check.
2) Less frequently, it may even be possible to simplify to a queen and pawn versus queen endgame by exchanging off all the kingside pawns.”
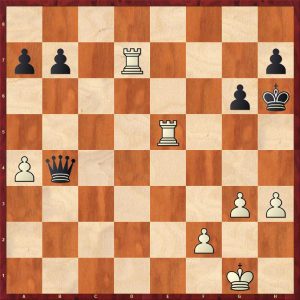
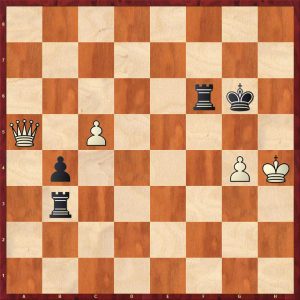
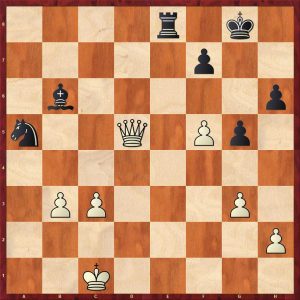
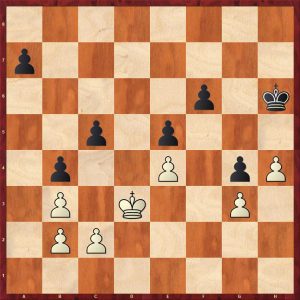
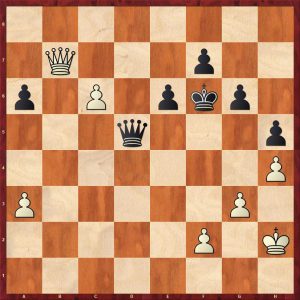
Here is an excellent demonstration by the strongest player in the world:
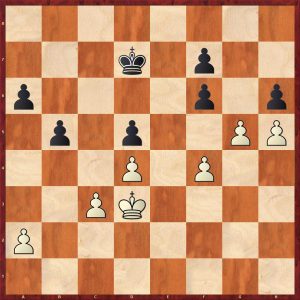
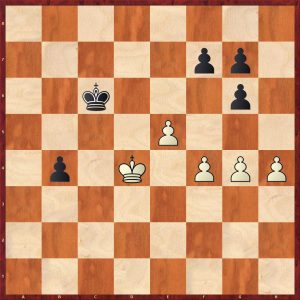
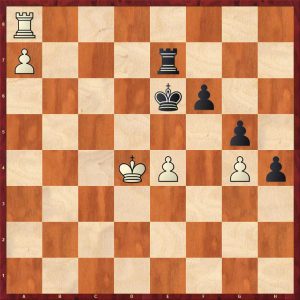
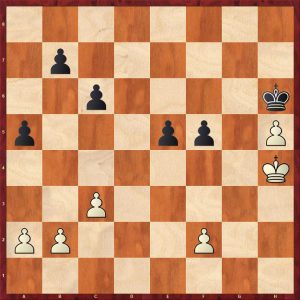
Carlsen – Vachier-Lagrave Karlsruhe/Baden-Baden 2019 Position after 32…Kg7 White to play
Carlsen played the neat 33.Bd5! (33.Qb2+ Kg8 34.a3 Qd3 black is very active and white cannot make progress) 33…Bxd5 34. Qe5+ f6? A serious mistake from a top player as it weakens the king’s shelter. Chapter 8 gives lots of advice and examples about shelters. Much better was 34…Kg8 35.Qxd5 Qa3 36.Qb3 Qc1+ 37.Kg2 h5 38.gxh5 Qg5+ 39.Kh2 Qxh5 and black can hold. 35.Qxd5 h5 (Trying to weaken White’s kingside) 36.gxh5 gxh5 37.Qd7+ Kg6 38.a4
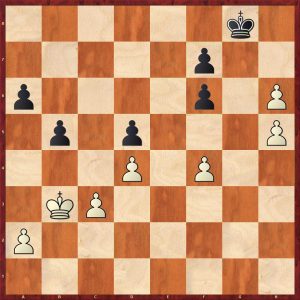
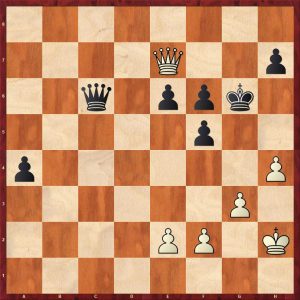
Carlsen – Vachier-Lagrave Karlsruhe/Baden-Baden 2019 Position after 38.a4 Black to play
Although both Kings’ shelters have been partially wrecked, Black’s exposed king is more significant as the game continuation shows. 38…Qe2 39.Qd5! Centralisation 39…f5 Black is trying to block in the White king, but this move exposes his own king even more 40.a5 f4 41.Kg2! Kh6 42.Qf5
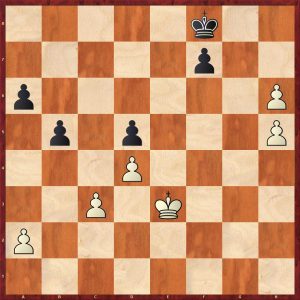
Carlsen – Vachier-Lagrave Karlsruhe/Baden-Baden 2019 Position after 42.Qf5 Black to play
42…Qc4 43.Kf3 winning another pawn, so 1-0
Notice how Black’s pawn advances brought down his downfall.
The last four chapters are in a section of the book on Practical and Strategic Queen Endgames
Chapter 6: The Pawn
The following ideas are discussed:
Breakthrough
Promoting With Check
Reducing the Number of Pawns in Order to Hold the Draw
Pushing a Pawn to Force an Exchange of Queens
Connected Passed Pawns
Gaining Space
Races
Races when Both Sides Have Only One Pawn
Quality vs Quantity
Doubled Pawns
An example from the Quality vs Quantity subsection is given below.
The author states “It’s a well-known and common saying that in queen endgames, ‘it’s not the number of pawns that counts, but their quantity!’ In other types of endgames, the principle of strength in numbers map apply more often, but less so in queen endings.”
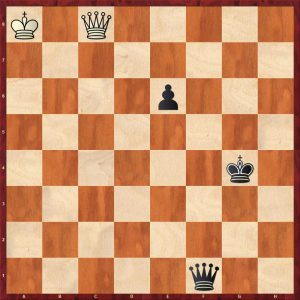
This ending has been quoted often:
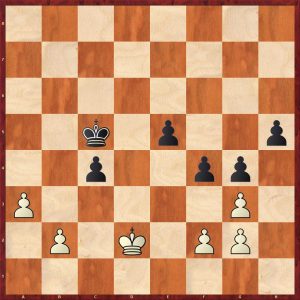
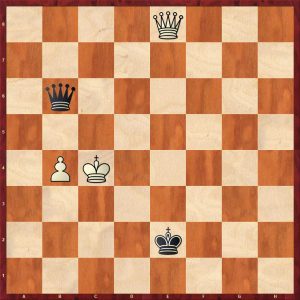
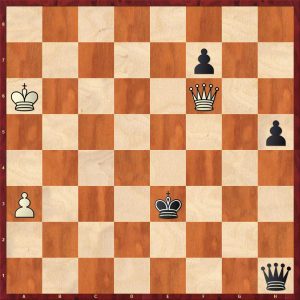
Stahlberg – Euwe Stockholm Olympiad 1937 Position after 41.Kh2 Black to play
Euwe played the natural centralising move 41…Qd4? which is multi functional, but surprisingly throws away the win. The h4-pawn is not important here. There is a win with a very subtle move 41…Qd6!!+ which looks like a superfluous check, but forces white to weaken his position.
Stahlberg – Euwe Stockholm Olympiad 1937 Position after 41…Qd6+ White to play
White now has an invidious choice on how to spoil his position, g3 weakens the king’s shelter and both king moves have their disadvantages. Let’s look at each alternative.
a) 42. g3? Qd4! Now this move gains in strength as white would like to take the f2 pawn exposing White’s king fatally 43.Qb5 Qxf2+ 44.Kh3
Stahlberg – Euwe Stockholm Olympiad 1937 Variation A Position after 44.Kh3 Black to play
Black has two different wins here 44…Qf3! (44…Qf5+ also wins) 45.Kh2 (45.Qxb4? Qh1+ 46.Kg4 Qf1! forcing mate or win of queen) 45…b3 46.a5 Qf2+ 47.Kh3 Qg1! winning
Stahlberg – Euwe Stockholm Olympiad 1937 Variation A Position after 47…Qg1 White to play
48.Qxb3 Qh1+ 49.Kg4 f5+ 50.Kf4 Qe4#
b) 42.Kh3 b3 43.Qb5 (43.Qc3 Qd7+ exploits White’s wins exposed king, winning the a-pawn) Qa3!! This is unconventional move, putting the queen on the side, but it exploits the exposed White king: the threat of a discovered check is fatal for white.
Stahlberg – Euwe Stockholm Olympiad 1937 Variation B Position after 43…Qa3 White to play
If 44.Qb7 a2+ 45.Kh2 Qa2 wins
If 44.a5 b2+ 45. g3 Qa2 wins as well as 45…Qf3
If 44.h5 b2+ 45.f3 g5 46.Qf5+ Kg7 47.Qe5+ Kg8 48.Qb8+ Kh7 49.Qb7 Qa2 wins
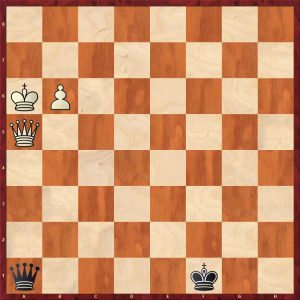
c) 42.Kg1 b3 43.Qb5 Qa3 44.Qc4! b2!!
Stahlberg – Euwe Stockholm Olympiad 1937 Variation C Position after 44…b2 White to play
Black gives up three pawns to get his king out of the checks. This is a brilliant example of quality over quantity. 45. Qxf7+ Kh8 46.Qf6+ Kg8 47.Qxg6+ Kf8 48.Qxh6+ Ke7 49.Qg7+ Ke6 50.Qg8+ Kd5 51.Qg7+ Kd5 52.Qf7+ Kg4 53.Qg7+ Kc4 54.Qf7+ Kc3 55.Qf3+! Kb4 56.Qb7+ Kxa4 57.Qa6+ Kb3 58.Qe6+ Kc2
Stahlberg – Euwe Stockholm Olympiad 1937 Variation C Position after 58…Kc2 White to play
Now after the obvious 59.Qe2+ black plays 59…Kb1!!
The author explains why this wins: “Although Black is two pawns down and apparently has no shelter, he can win. The white king has to give up the back rank due to threats of crosschecks, after which the black king can find shelter on f1! For this reason, sacrificing the f2-pawn is inevitable. Then, in marvellous variations, White, can be forced into zugzwang where he either loses his h-pawn or is force to play Kh3, which means that the black king can find a shelter on g1, which decides the battle.”
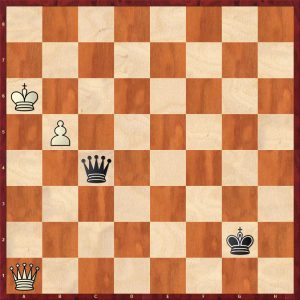
Back to the game continuation, after 41…Qd4? 42.Kg3? White defends a pawn with little value and exposes his king fatally. 42.Qb5! draws easily viz: 42…Qxh4+ 43.Kg1 Qe4 44.a5 Qb1+ 45.Kh2 b3 46.Qb7 Kg7 47.a6 Qa2 48.a7 b2= The best Black can achieve here is Q+3 v Q+2 all on one side which is a draw.
Stahlberg – Euwe Stockholm Olympiad 1937 Missed draw in game Position after 48…b2 White to play
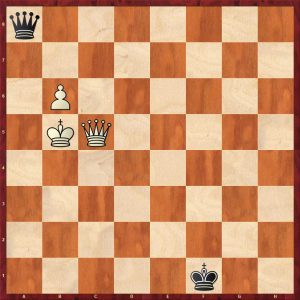
After 42.Kg3? this is the position:
Stahlberg – Euwe Stockholm Olympiad 1937 After fatal mistake 42.Kg3 Black to play
Black exploited the exposed white king as follows: 42…b3 43.Qb5 b2 44.Qb3 Kg7! winning 45.f4 (Other moves lose as well, for example 45.a5 Qe5+ 46.Kf3 Qf5+) 45… Qd2 0-1
A really instructive game.
Chapter 7: The Queen
The following ideas are discussed:
Exchanging Queens
Zwischenzugs
Passive and Active Queens
Neutralizing Queens
The Queen has Multiple Tasks
Restraining an Enemy Passed Pawn from Behind
Superfluous Checks
The reviewer will show an example on the topic of superfluous checks. The author explains: “In many positions there is no clear plan to implement, and in this case having the move in an over-the-board game creates tension. Rather than finding something constructive to do, or at least find a move that doesn’t compromise their position, players often insert an exchange or a pointless check. Either can harm their position.”
Miron – Lupulescu Romanian Team Ch Sovata 2018 Position after 36…Qf6 White to play
This position is objectively equal, although Black’s position looks slightly superior as his pawn majority has been mobilised. White’s pieces are well placed. 37.b4 is equal, but simpler is probably 37.exf5 Qxf5+ 38.Ke2 Qc2+ 39.Qd2 Qe4+ 40.Qe3 is equal, Black has no realistic winning chances.
White played 37.Ke2?! So Black responded with the obvious 37..f4 gaining space and creating a passed pawn 38.Qa7+? The superfluous check that loses. The author quotes John Nunn here: “Nunn pinpoints the basic truth that many people think they must keep giving checks in queen endings. this is one of the most common conceptual mistakes.” 38.Qd3! holds 38…Kg6 39.b4! getting the queen side pawns going draws 38…Kh6
Miron – Lupulescu Romanian Team Ch Sovata 2018 Position after 38…Kh6 White to play
After two poor strategic moves, White is totally lost. After 39.Qd7? (39.Qf2 is more resilient but still loses after 39…Kg5) 39…fxg3! won easily as Black’s king can shelter near his passed pawn.
Chapter 8: The King
These topics are covered:
Attacking The King
Stalemate
Avoiding Stalemate
Perpetual Check
Shelters
The section on Shelters is really important and is broken down into 9 further sub-sections:
The Importance of a Good Shelter
Weakening Our Own Shelter
Failing To Reach a Shelter
Invading and Destroying Shelters
Unusual Shelters
Leaving The Shelter to Support Pawns on the Other Wing
Leaving the Shelter to Exchange Queens
Leaving The Shelter to Win a Pawn
Breaking Open The Shelter with Pawn Sacrifices
Here is an example from the Weakening Our Own Shelter section.
Tal – Tseshkovsky Riga 1981 Position after 39…Qg4 White to play
The great Tal made a serious mistake here in a winning queen endgame 40.f3? Voluntarily weakening his king’s shelter: a poor move from a great player. 40.Qd5 centralising the queen wins easily 40…Qc8 41.Qd2 b5 42.Qb4 wins or 40…b5 41.a4 wins 40…Qd7 41.Qd5 Qc7 42.Qd2 b5 43.a3 (43.a4 bxa4 44.bxa4 Qc4 45.a5 Kg6 holding) Qc5 44.Qa2 Qc1 draw agreed
Chapter 9 Complex Queen Endgames rounds off the book with the study of some intricate endings.
This is a great book and is thoroughly recommended. Be prepared to put in some hard work.
FM Richard Webb, Chineham, Hampshire, 17th June 2024
The Art of the Endgame
My Journeys in the Magical World of Endgame Studies
Revised Edition – with 14 New Studies
by Jan Timman
From the publisher, New in Chess:
“All through his career Jan Timman has been captivated by the mystery and splendour of endgame studies. Even during his most successful and busy years as a world-class player, Timman continued to compose studies and admire those of others. For him, there has never been any doubt that his journeys in this magical world helped him to grow as a player.
In this fascinating book, first published in 2011, Timman has collected studies by other composers and explains in his lucid style how they inspired him to create dozens of brand-new studies.
Timman has revised the book for this new edition. With the help of engines, Timman discovered that a few studies needed to be corrected or had alternative solutions. He removed six studies and replaced another six with better versions. And fourteen new studies have been added, two of which are published here for the first time.”
About the Author, Jan Timman:
“Jan Timman is a former world championship candidate who rose to number two on the FIDE world rankings. He is the author of several highly acclaimed bestsellers, such as Timman’s Titans and Max Euwe’s Best Games. He was awarded the title of FIDE Master of Composition in 2022.”
GM Jan Timman
This book is a gem and I do remember perusing the first edition at a bookstall a while back, now I have a copy of the second edition.
There is no doubt that familiarity with ideas from endgame studies improves a player’s overall chess ability and imagination.
The reviewer was introduced to endgame studies at a tournament in London when he was junior: I was having lunch in the analysis room, when an older gentlemen showed some Harold Lommer studies involving knight promotions which got me hooked. The acquisition of Test Tube Chess by John Roycroft soon followed.
Jan Timman’s book has a variety of positions some of which are really “game like” whilst others are artistic beauties involving for example multiple promotions.
The book is divided into fourteen themed chapters viz:
Chapter 1: Miniature studies
Chapter 2: Rook versus bishop
Chapter 3: Preventing pawn promotion
Chapter 4: Various promotion combinations
Chapter 5: Knight promotions
Chapter 6: Bishop promotions
Chapter 7: Mating patterns
Chapter 8: Stalemate patterns
Chapter 9: Mutual zugzwang
Chapter 10: Building a fortress
Chapter 11: Systematic manoeuvres
Chapter 12: The disappearing trick
Chapter 13: Three themes
Chapter 14: Various endgame studies
The reviewer will show a variety of positions from various subsections.
Chapter 1: Miniature studies
These are positions with no more than seven pieces. This one is particularly beautiful with a mutual zugzwang.
Position 1
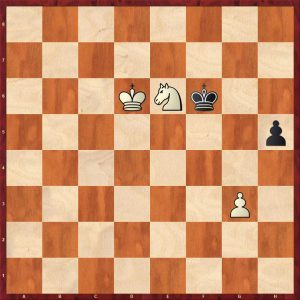
Liburkin, ’64’ 1933 White to play and win
White is a pawn up with black’s king close to the passed pawn, so white needs something special here. 1.Kd1 pins the knight forcing 1…Kf5 2.Ke2 threatening to win the knight. Black bishop’s impedes his king, so he goes after the h-pawn with 2…Bf6 3.Kf3 Bxh4
Liburkin 1934 After 3…Bxh4
If white takes the bishop 4.Nxh4+ Kg5 attacking the knight saves black. So 4.Bxe4+ Kg5 5.Bd5!Kh5 6.Bf7+ Kg5 7.Be8
Liburkin 1934 After 7.Be8
Black is zugzwang and loses the bishop and the game. Note this is a position of mutual zugzwang as white has no good waiting move and cannot win with the move! Very pretty.
Chapter 2: Rook versus bishop
This is the most practical chapter with studies in the complex endgame of R+P v B+P.
Position 18
Reshevsky-Fischer, Los Angeles match (11) Position after 52…Ra2+
This is a celebrated position where Reshevsky played 53.Kf3? with Fischer missing a clear win by exchanging rooks and occupying g4 with his king. Instead Fischer kept the rooks on. White draws with 53.Kh3!
This study was created to show this:
Position 19
Study based on Reshevsky-Fischer game White to play and draw
1.Kg2! Kf5 2.Kh3 Rc4 3.Be7! the only move 3…Rc1 4.Bf8! (The bishop hides itself to prevent a rook check followed by attacking the bishop to allow black to get in Kg4) 4…Rb1 5. Bg7 or 5.Bh6 draws
Chapter 3: Preventing pawn promotion
This is a famous promotion combination from a game which resembles the elegance of a study:
Position 44
Ortueta-Sanz Madrid 1933 Position after 30.h3
Black played 30…Rd2 31.Na4 (31.a4 was better) 31…Rxb2! 32.Nxb2 c3 33.Rxb6 c4!! 34.Rb4 a5!! winning
Ortueta-Sanz Madrid 1933 Position after 34…a5
White cannot prevent the coronation of a new queen.
The great composer, Pogosyants composed a study with a very similar theme:
Position 46
Pogosyants, ‘Themes-64’ 1977 White to play and win
The solution is 1.Bg3 dxc4 2.Rxg7! Nxg7 3.f6 Rxg3 4.f5!! Rg5 5.f4! Nxf5 6.f7 wins
Chapter 4: Various promotion combinations
Position 69
Wotawa Schach Magazin 1951 White to play and win
A game like position. 1.d6 Be5 2.Bb8 threatening d7 winning the bishop, so 2…Bf6 3.d7 Bd8 apparently saving the bishop, but 4.Bg3! a4 5.Bh4! Bxh4 6.g4+ and wins
Chapter 5: Knight promotions
Here is a superb Harold Lommer study with multiple promotions:
Position 96
Lommer, ‘Feuille d’Avis de Lausanne’ 1933 White to play and win
White is threatened with a brutal discovered mate by the black monarch. So 1.d8N Bd5 2.g8B!! (2.g8Q allows black a brilliant defence 2…Ke3+ 3.Qxd5 stalemate!) 2… Be4 3.e8R!! (3.e8Q allows another fantastic defence 3…Kg3+ 4.Qxe4 stalemate!) and wins
A brilliant study has with stunning counterplay.
Position 97 shows a famous Lommer involving 5 knight promotions, but unfortunately after the fourth promotion, there is alternative prosaic win promoting to a queen.
Chapter 6: Bishop promotions
Position 112
Rusinek ‘New Statesman’ 1971 White to play and draw
White has an army of far advanced pawns against 3 minor pieces and a well placed black king.
If black plays 4…Ndxf6 5.Kb8 gets the king out of the mating trap, so 4…Nexf6 5.a8B!! (5.a8=Q? Nd5 followed by Ne7#)
Rusinek 1971 after 5.a8B
White is attempting a self stalemate, so black must release this and rearrange his pieces. 5…Ne5 (5…Bf1 6.b8N! draws) 6.Kb8 Nc6+ 7.Kc8 Bf1 threatening Bh3# 8.b8R!! (8.b8Q? Ba6+ 9.Qb7 Ne4 10.Qxa6 Nd6#, or 8.b8N? Ne7+ 9.Kb7 Bg2+ 10.Ka7 Nc8+ wins the bishop on a8 and the game)
Rusinek 1971 after 8.b8R
8…Ba6+ 9.Rb7! with a draw
Scintillating promotion play.
Position 124
This is a creation of genius and very amusing.
Troitzky, Korolkov 1938-1939 White to play and win
The great Troitzky is involved here. Black threatens a brutal Ng3 mate. 1.Qc3!! (Threatening the key g7 pawn, 1.Qa3? is met by f1N reinforcing the threat on g3 winning for black) 1…Nxc3 2.d8B!! (Not 2.d8Q? Nde4 3.Qxc7 f1N 4.Bf4 Ne2 followed by sacrificing all the knights ending with Qxg3 stalemate) 2…Ne2 3.Bxc7 f1N 4.b8B!! (4.b8Q allows black to sacrifice all the knights on g3 ending with Qg3 stalemate) 4…Ne4 5.B1f4 winning as the three white bishops control the three knights.
Troitzky, Korolkov 1938-1939 Position after 5.B1f4
Who says there is no humour in chess?
Chapter 7: Mating patterns
Here is an elegant study by the author, Jan Timman:
Position 163
Timman 2010 White to play and win
1.h5 preventing Bxa2 as Rd7+ would win easily 1…Kh6 2.Rd8! Bxa2 3.Rh8! Bg8! great counterplay
Timman 2010 Position after 3…Bg8
4.Kc3 a2 5.Kb2 a3+ 6.Ka1 Kg7 7.h6+
Timman 2010 Position after 7.h6+
7…Kxh8 8.g7 mate
Chapter 8: Stalemate patterns
Position 167
Rusinek 1973 White to play and draw
Stalemate looks unlikely here. 1.b6 must be played as white is two pieces down 1…Rf5 2.b7! Rf7+ 3.Kd6 Nc4+ 4.Ke6 Bxb7 5.Rh3+ Kg7 6.Rf3+ Kf8
Rusinek 1973 position after 6…Kf8
7.Rg8+! Kxg8 stalemate!
Chapter 9: Mutual Zugzwang
Position 189
Here is an entertaining position:
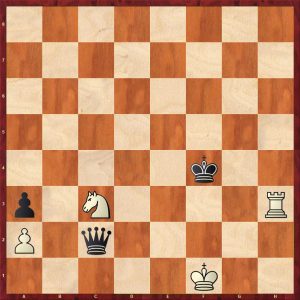
Kliatskin 1924 White to play and win
1.Rc8+ Kxc8 2.b7+ Kb8 3.d5 Kc7
Kliatskin 1924 Position after 3…Kc7
Now only 4.bxa8B! Kb8 5.Bb7 wins with a position of mutual zugzwang
Chapter 10: Building a fortress
Position 203
Smyslov 2005 White to play and draw
The elderly former World Champion, Smyslov, composed this amusing study in his eighties. 1.Nb8 Rd6 2.Nd7+! Rxd7 3.Rxg7! Kxg7 4.h4
Smyslov 2005 Position after 4.h4
After 4…Rd6 5.Kg2 Rg6+ 6.Kh3! black has to move the rook off the g-file to avoid stalemate, so white draws!
Chapter 11: Systematic manoeuvres
Kotov, Mitrofanov 1976 White to play and draw
The reviewer assumes this is the Mitrofanov of Qg5!! fame.
The disappearing trick is a kind of systematic manoeuvre whereby white plays to achieve a particular position without a certain white piece. This is demonstrated below with a neat study.
Position 260
Sochniev, Gurgenidze JT 2004 White to play and win
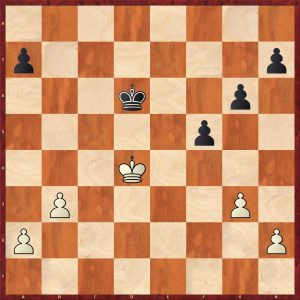
From the publisher, Gambit Publications “Understanding the endgame is fundamental to playing good chess, and at its heart lie positions where just kings and pawns remain on the board.
Even when a pawn ending is not actually reached, the players must often assess ones that could arise from an exchange of pieces. And an error calculating a pawn ending is normally fatal. Questions of pawn-structure, and thus decisions made early in the game, can be fully understood only when we appreciate how they impact the possible pawn endings.
This book takes a practical angle, so is the perfect complement to Secrets of Pawn Endings, which examines their theory in detail. Experienced trainer Bogdanov examines a wealth of pawn endings where strong players made significant errors, and draws lessons and rules of thumb from them.
While we are enjoying the entertaining material in this book, we are painlessly absorbing endgame principles and improving our intuitive decision-making skills. We learn how to calculate and identify key positional elements, and appreciate the beautiful tactics and paradoxical ideas that are unique to the world of pawns.
The Nunn Convention is used throughout the book, and all the material has been checked in detail with modern NNUE-based engines with access to seven-man tablebases.”
International Master Valentin Bogdanov has vast experience as a chess trainer, and is from Ukraine. His pupils include grandmasters Moskalenko, Savchenko and Drozdovsky, and he has acted as a second for the well-known grandmaster and theoretician Viacheslav Eingorn since the late 1970s.
For 50 years he has been a teacher at the chess school in Odesa (Ukraine), and in 2016 won the European Over-65 Championship. In the same year he also qualified as an International Arbiter and has since then officiated over a great many chess events in his country.
This is his fourth book for Gambit.
IM Valentin Bogdanov (UKR)
Before we start our review it is worth watching this video preview from John Nunn and Gambit Publications:
This is a excellent book that has an emphasis on practical king and pawn endgames. All the examples are taken from 1981 onwards which means that the reader will see novel positions rather than a rehash of old favourites. The other fresh approach is the structure of the ten chapters based on themes rather than the number of pawns. This book is not for beginners or very inexperienced club players as it assumes a basic knowledge of elementary pawn endgames. It is aimed at 1750+ chess enthusiasts but ambitious lower rated readers will benefit from some of the easier examples. The more difficult positions will tax GMs. This book would be ideal material for a coach for training purposes to give the students a toolkit of ideas.
The chapter structure is as follows:
Chapter 1: Obvious Errors Chapter 2: Breakthrough Chapter 3: Zugzwang Chapter 4: Opposition and Corresponding Squares Chapter 5:Spare Tempi Chapter 6: The Fight To Promote Chapter 7: Changing the Pawn-Structure Chapter 8: Calculation Chapter 9: Evaluating the Resulting Queen Endings Chapter 10: Positional Play
The reviewer will show examples distributed from all the chapters to give the reader a flavour of this instructional idyll.
Chapter 1: Obvious Errors
Position 21
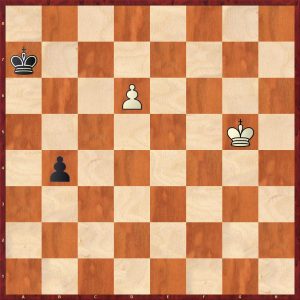
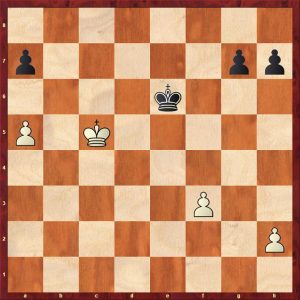
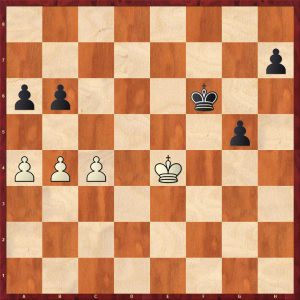
Movsesian-Sadvakasov Calvia Olympiad 2004 White to play
White, Movsesian, a 2600+ GM played the dreadful blunder 59.Kc6? (throwing away a totally winning pawn endgame. 59.Kc5! wins as the threat is to play Kb4 which will preserve white’s remaining pawn as a b-pawn with the king in front and a reserve tempo move of b3, if 59…a3 60.bxa3! Ke7 61. Kc6 Kd8 62.Kb7! and the a-pawn promotes) 59…Ke6 60.Kb5 reaching this position:
Movsesian-Sadvakasov Calvia Olympiad 2004 Move 60 Black to play
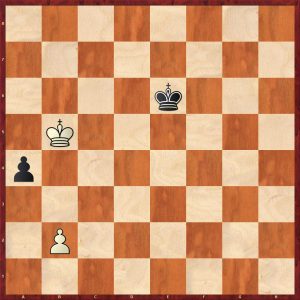
Now, black drew with a common, but nevertheless neat idea: 60…a3! (transforming white’s pawn into a now useless a-pawn, as black’s king is just close enough to draw) 61.bxa3! Kd7! 62.Kb6 Kc8! reaching c8 with an elementary draw
Position 22
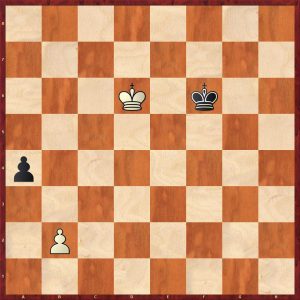
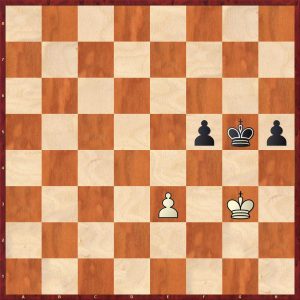
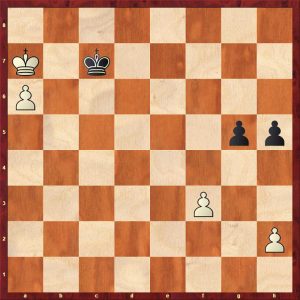
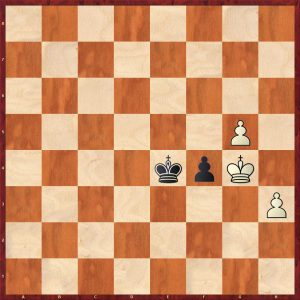
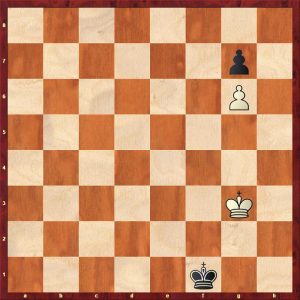
Forcen Esteban – Lagarde Internet rapid 2019 Move 83 Black to play
This position is simpler than the last one. Both players are rated well over 2500! Black is to play here and after the obvious 83..b3, it is crystal clear to a novice player that both sides are going to promote with a draw, even though white promotes first. If 83…Kb7 trying to impede the advance of the d-pawn, white can play 84.Kf6 making sure that the d-pawn does promote with a stone cold draw. Black played 83…Kb8? (Placing the king on the back rank presumably in the mistaken belief that he could stop the white pawn from promoting. 84.Kf6! b3 85.d7! followed by promoting with check, winning the game, thanks to black’s foolish Kb8 move!
Chapter 2: Breakthrough
This is a key topic in pawn endings and there are many beautiful examples. Sometimes, the threat of a breakthrough can limit the opponent’s king manoeuvres, thus winning the game indirectly. Once a player has seen some pretty examples of this theme, they are never forgotten.
Position 33
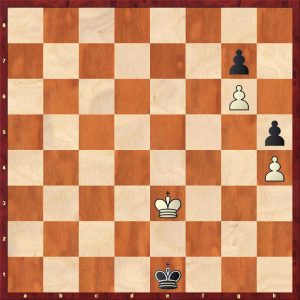
Nikolic-Lautier Reykjavik rapid 2004 White to play
White missed a chance for a standard breakthrough against black’s mangled pawns viz: 35.h5 Kd7 36.g5 reaching this key position:
Nikolic-Lautier Reykjavik rapid 2005 Move 36 Black to move
Now there are two main variations:
A) 36…Ke8 37.gxh6! Kf8 38.Kc2 Kg8 39.Kb3
Nikolic-Lautier Reykjavik rapid 2005 variation A
and white wins the race to get a new queen for example: 39… Kh7 (39…a5 40.a4 breaks through) 40.Kb4 Kxh6 41.Kc5 Kxh5 42.Kxd5 Kg4 43.Kc6 Kxf4 44.d5 wins easily
B) 36…fxg5 37.fxg5! Ke8 38.gxh6! Kf8 39.Ke3
Nikolic-Lautier Reykjavik rapid 2005 variation B
39…Kg8 40.Kf4 Kh7 41.Kg5 winning
Back to the original position: white played 35.Kc2? f5! 36.g5 h5! 37. Kb3 draw agreed
Position 36
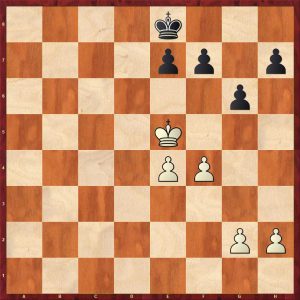
Gashimov-Anastasian Dubai 2003 Move 53 White to play
White has an outside passed a-pawn and was probably dreaming of swapping his a-pawn for black’s c-pawn, leaving black to deal with an outside passed b-pawn, while white’s king mops up the king side pawns winning the game, hence his next move 53.Kc3?
A more alert white player would have spotted the danger of black’s advanced kingside pawns. It might look as though black can only create a passed e-pawn as his extra kingside pawn is on the e-file, but this an illusion: black can now breakthrough creating a pawn configuration that ties down the white king permanently, thus allowing black to win on the queenside. Once seen never forgotten! 53…e4! would have won threatening e3 or f3 winning, if 54.Kd2 f3! 55.gxf3 exf3 reaching a position similar to the game
53…Kd5? 54.a4? Pursing his faulty plan, 54.Kd2! would have drawn 54…e4! 55.Kd2 (55.gxf4 allows an immediate breakthrough 55…e3! 56.fxe3 h4! and the h-pawn queens) 55…f3! 56.gxf3 exf3! reaching this position:
Gashimov-Anastasian Dubai 2003 Move 56 White to play
White’s king is tied down and cannot cross to the c-file as this allows a decisive breakthrough of h4! Therefore black’s king can invade on the queenside with decisive gains viz: 57.Ke3 Kc5 58.Ke4 Kb4 59.Kd4 Kxa4 60.Kxc4 h4 61.b3+ Ka3 62.gxh4 g3! 63.Kd40-1
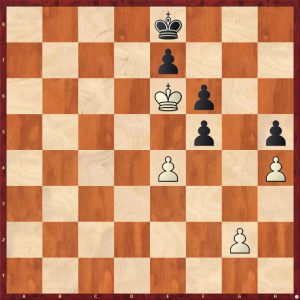
Position 38
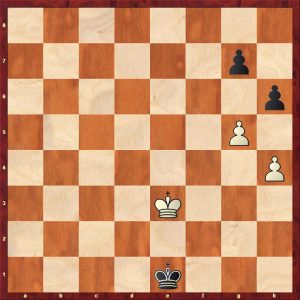
Mamedyarov-Sokolov Hoogeveen 2006 White to play
White missed the elegant 59.f5! b3 60.Kc3! Kd5 61.e6 fxe6 62.f6 62…gxf6 63.h5! and the h-pawn queens.
White played 59.Kc4? and still won after black missed a draw.
Chapter 3: Zugzwang
Here is a subtle example, but nevertheless didactic:
Position 56
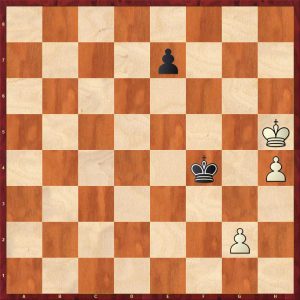
Grabarczyk – Rustemov Koszalin 1997 Black to play
This ending looks like an easy win for black with a extra passed pawn. But be careful! Black played the natural 52…Kg5? which throws away the win. This won’t become clear for a few moves. 52…Kg6! wins 53.f4+ exf3 54.Kxf3! h5 55.Kg3! reaching a position of mutual zugzwang:
Grabarczyk-Rustemov Mutual Zugzwang
If black had played 52…Kg6, white would be on move here and would be lost as 56.Kh3 or 56.Kf3 would be met by 56…h4 and any other king move would allow 56…Kg4 winning easily.
The game continued 55…h4+ 56.Kf3! Kh5 57.Kf4! Kh6 58.e4! h3 59.Kg3 drawn
Chapter 4: Opposition and Corresponding Squares
The introduction to this chapter is excellent explaining the concept of the opposition, the distant opposition, corresponding squares and triangulation.
Here is a simple example from a game between players rated in the 2400s:
Position 70
Heim – Helmers Reykjavik 1981 White to play
White played the “active” 55.Ke4? (55.Kf2! maintaining the distant opposition draws a textbook ending) 55…Ke6! winning the opposition 56. Kf3 Kd5 bypassing 57.Ke3 Ke5! 58.Kf3 Kd4 (another bypass) 59.Kf2 Kd3 60.Kf3 g4+ and white threw in the towel
Chapter 5: Spare Tempi
Position 105
Siugirov – Lupulescu Jerusalem 2015 Black to Play
The author’s explanation of black’s defensive plan here is pithy and pedagogical:
“Black’s defensive plan is to let White take the a7-pawn and then block the king in permanently in front of his own a-pawn. For this idea to work, Black needs a spare tempo on the kingside, as otherwise he will be forced to release the white king from its a-file prison. Immediately fixing the kingside pawns by 43…g5!? secures two such tempi and is the simplest path to a draw viz: 44.Kc6 Ke5 45.Kb7 Kd6! 46.Kxa7 Kc7! 47.h3 h6 48.a6 h5!”
Siugirov – Lupulescu Jerusalem 2016 Trapped king
White does not enough tempi to release his imprisoned king.
In practice Black played 43…Kd7 which retains the draw but mis-defended on the next move and lost.
Interestingly, I had a similar position in a game many decades ago with reversed flanks. I won the game and proudly showed the endgame to a friend, who promptly demonstrated a drawing plan for my opponent identical to this game.
Chapter 6: The Fight To Promote
Mchedlishvili – Jankovic Dubai 2009 White to move
White totally mis-assessed the resulting king and pawn endgame after the exchange of queens here. He probably thought that his connected passed pawns on the kingside were at least a match for black’s queenside majority.
What white missed was that black can create a passed a-pawn and a passed d-pawn (separated by two files) and these pawns can reach the fifth rank safely which means they are unstoppable.
White played the desperate 39.c4 dxc4+ (39…bxc4+ also wins) 40.Kc3 a3 41.h4 Kg6 42.g5 h5 43.Kd2 b4 44.Kc2 c3 white resigned
7: Changing the Pawn-Structure
This is one of the most complex chapters and the hardest to evaluate in practice.
The reviewer will show an excellent example to show a typical idea:
Position 153
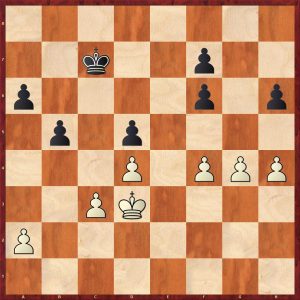
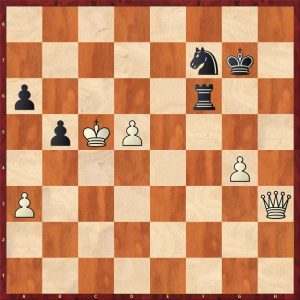
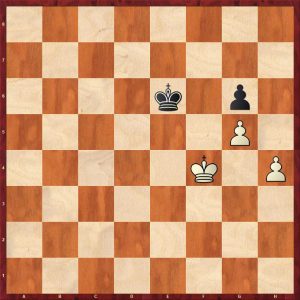
Kasparov – Azmaiparashvili Geropotamos rapid 2003 Black to play
Black played the automatic 46…Kc6? White won with a well known technique exploiting the fact that his king is one move ahead in the race to the kingside 47.h4! f5 48.g3! Kc5 (48…Kc7 49.Ka7 Kc6 50.Kb8 wins) 49.Kb7! and black resigned because of this variation: 49…b5 50.axb5 Kxb5 51.Kc7 Kc4 52.Kd6 Kd3 53.Ke6 Ke3 54.Kf6 Kf3 55.Kxg6! Kxg3
Kasparov – Azmaiparashvili Geropotamos rapid 2004 possible continuation White to play
56.Kg5! winning
Going back to the original position:
Kasparov – Azmaiparashvili Geropotamos rapid 2003 Black to play
Instead of the passive 46…Kc6? black can actively rearrange the kingside pawn structure to draw as follows:
46…h4! 47.Ka7 f5 48.h3
Kasparov – Azmaiparashvili Geropotamos rapid 2004 variation in missed draw Black to play
Kasparov – Azmaiparashvili Geropotamos rapid 2004 variation in missed draw move 57 Black to play
Black draws here with 57…Ke4! 58.Kg5 Ke5! 59.Kxh4 Kf4! 60.g4 (60.g3 Ke3 draws) 60…Ke5! 61.g5 f4! 62.Kg4 Ke4! leads to a drawn Q + h-pawn v Q endgame
Kasparov – Azmaiparashvili Geropotamos rapid 2004 variation in missed draw move 62 White to play
Position 158
The reviewer loves this endgame.
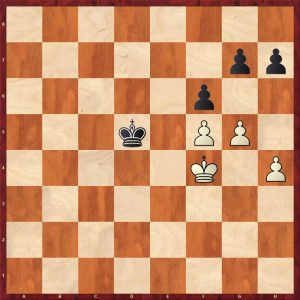
Gelfand-Jobava (Move 50)
This king and pawn ending is clearly drawn but white is pressing with a more advanced king. White played 50.h4 setting a subtle trap. 50…h5? losing, incredible to believe but it is true. 50…Kd7 draws, for example 51.g4 f6+ 52.Kd5 e6+ 53.Kc5 h6 54. e5 fxe5 55.fxe5 Kc7 seizing the opposition and drawing 51.f5! f6+ 52.Ke6! gxf5
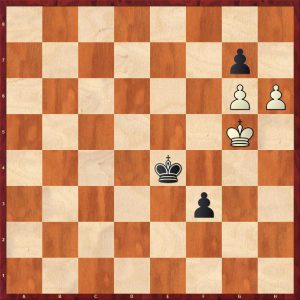
Gelfand-Jobava (Move 53)
Now white played 53. e5! which had been completed missed by black (automatic recapture syndrome) 53… fxe5 54.Kxe5! Kd7 55.Kxf5! Kd6 56.Kg5 Ke5 57.Kxh5! Kf4
Gelfand-Jobava (Move 57)
Now white can enter a winning queen endgame with 58.Kg6! e5 59.h5! e4 60.h6! e3 61.h7! e2! 62.h8Q e1Q
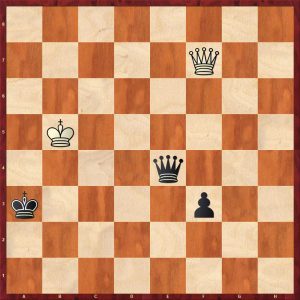
Gelfand – Jobava Dortmund 2006 Queen Ending White to play
This looks drawn as the white g-pawn is only on the second rank and the black king is close to it. However, white has a series of checks to exploit the poor position of the black pieces viz:
63. Qb8+ Kg4 64. Qc8+ Kf4 (64…Kg3 65.Qh3! is the same as the game) 65. Qf5+ Kg3 66.Qh3+ Ke5 67.g4!
Surprisingly this is a tablebase win even though the g-pawn is only on the fourth rank. Looking more closely at the position, black’s pieces are badly placed with the king interfering with the queen. If the black king was in the south west corner, he would draw.
Gelfand did win this game about 50 moves later after mistakes by both sides.
Chapter 8: Calculation
Clearly this is absolutely critical in king and pawn endings. Here is a relatively simple example:
Position 172
Ikonnikov – Liogky Paris 1998 Black to play
Black played the obvious exchange 47…hxg5? which loses trivially 48.hxg5! Kf1 49.Kf3! Kg1 50.Kg3 (50.g6 Kh2 51.Kg4! also wins) 50…Kg1 51.g6! Black resigned as white’s king travels to f7 and black’s cannot get to h6 in time.
Ikonnikov – Liogky Paris 1999 Final Position Black to play
Going back to the start:
Ikonnikov – Liogky Paris 1998
Black can draw with 47…h5! After 48.g6 viz:
Ikonnikov – Liogky Paris 1999 Drawing Line
As soon as white plays Kxh5, black will answer Kf4 stalemate! If white goes after the g-pawn, black draws by going after the h-pawn, for example 48…Kf1 49.Kf4 Kg2 50.Ke5 Kh3 51.Ke6 Kxh4 52.Kf7 Kg3 53.Kg7 h4 54.Kf6 h3 55.g7 h2 56.g8Q+ Kf2 drawing
Chapter 9: Evaluating the Resulting Queen Endings
The introduction to this chapter by the author is a superb summary of the intricacies of these transitions. The reviewer has already given an example from Chapter 7 (position 158), so I will leave the reader to buy the book to sample this chapter.
Chapter 10: Positional Play
Position 259
Radjabov – Ding Liren Internet rapid 2021 Black to play
This looks very difficult for black as not only does white have a potential outside passed pawn but also a better king. He played 52…Kc6? and lost. Buy the book to find out how black can draw or work it for yourself!
In summary, this is a really good book and close study will reap rewards. The book is very well laid out and is easy to read with lots of diagrams. Thoroughly recommended.
FM Richard Webb, Chineham, Hampshire, 30th May 2021
Battle of Endgames, Ray Cannon, Amazon, 9th June, 2021, ISBN-13 : 979-8518031715
From the back cover:
The author has written what he believes to be an original book on the endgame, using a play on words for the title based on the historic battle of Hastings in 1066 which involved William the Conqueror. *****
Ray Cannon, a familiar frequenter of chess tournaments in London and elsewhere, has condensed his copious knowledge into an enjoyably instructive compendium of endgame positions. In tune with the Victorian notion of learning via fun, the reader cannot help but absorb the endgame stratagems that recur in the examples given and emerge as a better player without any conscious effort.
The endgame is a prime arena for the emergence of error through lack of practice, and even elite grandmasters can miss the unsuspected anti-intuitive resource that would have secured the rescue draw or shock win. I would go so far as to say this book would benefit master-standard players. Studying it has all the value of learning one’s times tables but without the repetitive drudgery! The end result is the same: increased knowledge.
Julian Simpole
Jimmy Adams and Ray Cannon at a 2012 meeting in Norwich of the Ken Whyld Association
My good friend Ray Cannon, who was, for many years, an invaluable part of the coaching team at Richmond Junior Club, has written a book which will be useful for all club standard players.
With faster time limits and online play now the norm, endings play a vital part in 21st century chess. A good knowledge of endgame theory and tactics is a fundamental requirement for all serious players.
From the author’s introduction:
Positions in this book have been taken from various sources including my collection of newspaper cuttings that go back to the 1970’s, books, magazines, websites and even from games I had witnessed personally at tournaments. Many have been modified for reasons of clarity and a few I have composed myself. Most of the positions have annotated solutions unless the moves are self-explanatory.
The 1066 diagram positions can be played out against a computer or an opponent but they are best solved using a chess set. You are invited to write down your choice of move for each position on the pages provided before looking up the answers. On the other hand, you may simply prefer to enjoy the instructive content of this book by dipping in and out of its pages.
Endgames may give the appearance of being easy but even the world’s best players misplay them from time to time and some of these missed opportunities from practical play are included among the 1066 stratagems.
The majority of the puzzles are elementary but there are a few that are quite difficult. When solving them, you will detect familiar methods of play. Knowledge of these is often referred to as pattern recognition and this is an important component of learning and improving at chess.
So what you get is 1066 endgame puzzles, or stratagems as Ray prefers to call them. It’s White’s move in positions 1 to 728, and Black’s move in positions 729 to 1066. In each position you’re told whether you’re trying to win or draw, and you know that there’s only one move to achieve your aim.
A few fairly random examples chosen simply by turning to a random page will show you what to expect. I’ll give the answers at the end of the review.
Q482 is a neat draw: White to play.
Q497 is of practical value. Endings with R + f&h pawns against R are very often drawn. How can White win here?
Q533, halfway through the book, has more pieces on the board (too many for an endgame?) and demonstrates the need to know your mating patterns. White to play and win again.
If you enjoyed these puzzles, you’ll certainly enjoy the rest of the book. If you think your students will enjoy these puzzles, you’ll also want to buy this book.
It’s self-published via Amazon so the production qualities are not quite up to the standard you’d expect from leading chess book publishers. However, the diagrams and text are both clear.
Ray has chosen to print the ‘Black to play’ puzzles with the 8th rank at the bottom of the board: not what I or most authors would have chosen but I can see why he did it. There’s a slight problem, though, in that the diagrams are without coordinates, which can make things slightly confusing in positions with few pawns on the board. (The diagrams in the answers to the ‘Black to play’ do have coordinates, though.) I understand the next edition will use diagrams with coordinates throughout.
You might also prefer to write your answers under the diagrams rather than in the pages provided for this purpose at the beginning of the book. I’d also have welcomed an index by material so that I could quickly locate, for example, pawn endings or rook endings.
These are just personal preferences, though. The quality of material is excellent (all positions have been thoroughly engine checked) and Ray Cannon should be congratulated for his efforts in producing a highly instructive puzzle book.
A basic knowledge of endgame theory is assumed, so I would consider the book ideal for anyone rated between about 1500 and 2000, although some of the puzzles will be challenging for stronger players.
Richard James, Twickenham, 17th September 2021
Richard James
Answers:
Q482: 1. f7+ Qxf7 2. Bb3 Qxb3 is stalemate. Or 1… Kxf7 2. Bh5+. In just two moves we have a fork, a skewer, a pin and a stalemate.
Q497: 1. Rg5+ Kxg5 (or 1… Kxh6 2. Rg8) 2. h7 Re1+ 3. Kd6 Rd1+ 4. Ke7 Rh1 5. f8Q wins (as long as you know how to win with queen against rook!)
Q533: 1. Re8+ Rxe8 2. Nf6 Ra7 3. Rxa7 Re7 4. Rxe7 a1Q 5. Rh7# – an Arabian Mate!
Understanding Queen Endgames, Karsten Müller & Yakov Kanoval, Russell Enterprises (24 Mar. 2021), ISBN-13 : 978-1949859317
From the publisher:
The Daunting Domain of Queen Endgames Explained! Knowing the abilities and limitations of the powerful queen is very valuable for mastering the secrets of the royal game, and this can be studied best in the endgame.
Queen endgames are very difficult, if only for purely mathematical reasons the queen is the most mobile piece in chess, and the amount of possible options is incomparably higher than in any other type of endgames.
This book follows a dual philosophy as in the three previous works by the same authors: Understanding Rook Endgames, Understanding Minor Piece Endgames and Understanding Rook vs. Minor Piece Endgames. The 7-piece endings are dealt with in great detail. They are often so complex that pre-tablebase analysis almost always contains errors. Many new discoveries are revealed here. But to really understand the fight of a queen against a queen or minor pieces with rooks, these theoretical positions are of course not enough. So subchapters on the principles of each material configuration have been added.
All in all, this fantastic book is already on my (very short) “must study” list for chessplayers of different levels, including the top ten! I want to thank the authors for the courage which is required just to start working on such a complex topic, as well as for the very high quality of their work, which will endure for decades to come and will be very useful for many future generations of chessplayers. The foreword is by Vladimir Kramnik,14th World Chess Champion”
This titanic technical endgame tome is a Magnum Opus with a forward by former World Champion Vladimir Kramnik. The complexity of queen endings is obvious as the queen is the most mobile piece and the number of variations becomes vast after only a few ply. This is probably the reason that this is the first work to cover queen endings in great depth. The complexity of these endgames is shown by a famous game from Vladimir Kramnik’s World Championship match versus Peter Leko in 2004. The first game of that match reached this position:
Leko-Kramnik World Championship 2014(1) Move 44 White to move
White played 44.Qf4?? which loses as demonstrated by Kramnik in the game and is covered in this book 44…g5! 45.Qf6 h6! winning, the point being that 46.Qxh6 loses the queen to 46…R8a6! After 45…h6 White cannot prevent Black from manoeuvring his rooks to win the kingside pawns. The natural move is 44.hxg6 exchanging pawns to reduce material which was thought, at the time, to draw. In fact Black stills retains winning chances. As the position has eight men the result is still not known definitively – this shows the richness of such endgames.
This publication also covers endgames that have had little coverage in the past such as Two Rooks + Pawn v Queen.
Most first quick skim of the book did concern me slightly as I noticed some diagrams followed by 100+ moves with no annotations. On a deeper perusal, I realised that these examples are included as “longest wins” for certain material combinations. This emulates John Nunn’s longest wins in “Secrets of Pawnless Endings”. There is plenty of well annotated material within practical games to bring out key ideas, for example the techniques to break down fortresses are examined in detail.
The book has ten main chapters traditionally based on piece configuration:
Chapter 1 Queen vs. Pawn
Chapter 2 Queen vs. Queen
Chapter 3 Queen vs. Rook
Chapter 4 Queen vs. Rook and Knight
Chapter 5 Queen vs. Rook and Bishop
Chapter 6 Queen vs. Two Rooks
Chapter 7 Queen vs. Rook and Two Minor Pieces
Chapter 8 Queen and Minor Piece vs. Queen (and Minor Piece)
Chapter 9 Queen and Rook vs. Queen and Rook
Chapter 10 Queen vs. Minor Pieces
Each chapter ends with some fruitful exercises to check if you were paying attention. The solutions are given near the end of the book.
Chapter 1 Queen vs. Pawn
This chapter obviously concentrates on the cases where the pawn is on the seventh rank. Here is the end of a Troitzky study:
Troitzky 1935 (end of study) White to draw
1.Ke6!! and whichever way Black’s king goes, White moves into his shadow drawing: 1…Kf4+ 2.Kf7! draws or 1…Kd4+ 2.Kd7 draws
This next position looks arcane but the reviewer has has this position twice in blitz, once as the attacking side and once as the defending side: in both cases the defence was accurate to hold the draw.
Q v P (king outside winning zone) White to move
White cannot win despite the proximity of his king. White can try 1.Qd5+ 1…Ke1!! is the only move to draw, 1…Ke2 loses to 2.Qa2! Kd1 3.Kd4! c1Q 4.Kd3 mating. White can also try 1.Qa2 Kc3!! is the only move to draw, 1…Kd1 2.Kd4! c1=Q 3.Kd3 mating.
This chapter goes on to cover many types of position with far advanced pawns against a queen.
Chapter 2 Queen versus Queen
Naturally the authors start with the notoriously difficult ending Queen and Pawn vs. Queen: their comment is “This can be very deep and tricky if the defending king can’t get in front of the pawn.” Certainly an understatement as many strong GMs have gone down in drawn endings. A whole volume could be dedicated to this fascinating endgame.
The authors systematically cover the rook’s pawn, knight’s pawn, bishop’s pawn and centre pawns. Some useful general rules are given for each pawn:
“Rook Pawn – In this case, the drawing zone for the defending king is usually quite large when the pawn is not far advanced, as the rook pawn does not provide good shelter. But the zone gets smaller as the pawn advances, and the main drawing zone is in the corner farthest from the queening square.”
A didactic example from Carlsen-Gashimov Monaco 2011 is given:
Carlsen-Gashimov Monaco 2011 Move 59 Black to play
Black’s king is badly placed restricting his own queen, so he should run to the a1-corner as fast as he can. 59…Kc5!? 60.h5 Qe8+ 61.Kh6 Kd5?! 61…Kb4 going closer to the drawing zone is more logical 62.Kg5 Qg8+ 63.Kf4 Qb8+ 64.Kg4
Carlsen-Gashimov Monaco 2011 Move 64 Black to play
64…Qb4+! An excellent move preserving the draw., 64…Qa7? loses to 65.Qf4!! cutting the Black king off from the a1-drawing zone and winning in the long run. It looks as though Black’s king might get near the pawn, but that is an illusion: he just restricts his own queen’s movements. 65.Kg5 Qd2+ 66.Kg6 Kc4 67.h6 Qg2+ 68.Kf7 Qb7+ 69.Kg8 Qb8+ 70.Qf8 Qg3+ 71.Kh8 Qe5+ 72.Qg7 Qe4 73.h7
Carlsen-Gashimov Monaco 2011 Move 73 Black to play
This a typical position from this ending, white has pushed the pawn to the seventh rank with his king hiding in the corner in front of the pawn. This is a tablebase draw but this has been known for many decades before the advent of tablebases.
73…Kd3?? loses, a bad mistake from a 2700 GM. 73…Kb3! draws but accuracy is still required. 74.Qf7+ (74.Kg8 Qe8+ 75. Qf8 Qg6+ 76.Kh8 Kc2=) 74…Kb2
Carlsen-Gashimov Monaco 2011 Variation 1 Move 75 White to play
This is the type of position that Black is aiming for. The authors explain why it is drawn with a pithy comment: “and White can’t win as the king must move too far from the pawn to move into a countercheck position.” For example: 75.Kg7 Qg4+ 76.Qg6 Qd7+ 77.Kh6 Qd2+ 78.Qg5 Qd6+ 79.Kh5
Carlsen-Gashimov Monaco 2011 Variation 1 Move 79 Black to play
Another excellent explanation from the authors: “White’s king wants to go to h1 or h2 to make counterchecks possible, but the pieces are then too far apart” (and un-coordinated) e.g. 79…Qd1+ 80.Qg4 Qh1+ 81.Kg6 Qc6+ 82.Kg5 Qd5+ 83.Qf5 Qg2+ 84.Kh4
Carlsen-Gashimov Monaco 2011 Variation 1 Move 84 Black to play
Carlsen-Gashimov Monaco 2011 Variation 1 Move 89 White to play
Black to the game after 73…Kd3??
Carlsen-Gashimov Monaco 2011 Move 74 White to play
74.Qd7+ Ke2?! (74…Kc2 lasts longer but does not save the game anymore: buy the book to find out how White wins) 75.Kg8 White is going to shuffle his king along to the adjacent file to Black’s king to setup a crosscheck: 75…Qg6+ 76.Kf8 Qh6+ 77.Qg7 Qf4+ 78.Qf7
Carlsen-Gashimov Move 78 Black to play
78…Qh6+ Notice how Black’s choice of checks are severely restricted because of his king’s placement 79.Ke7 Qh4+ 80.Ke8 Qa4+ 81.Kf8! Now we can see again why Black’s king is badly placed: Black has no good checks.
Carlsen-Gashimov Monaco 2011 Move 81 Black to play
A very important ending to study and learn from a World Champion.
Muller & Konoval give an example of good defence with the king in the drawing zone where the defending side does not let the draw slip at any point:
Markowski – Piket Istanbul 2000 Move 57 White to play
Piket played 57.Qe8+ and drew: buy the book to see the excellent defensive effort.
Here is an old game where modern tablebases really show how difficult these endgames are:
Ed. Lasker-Marshall USA 1923 Move 80 White to play
White played 80.Qc1? The amazing 80.Qh1!! is the only move to draw, for example 80…Qd7 81.Qf3+ Ke8 82.Qa8+ Ke7 83.Qh8! Qd6+ 84.Ka7!
Ed. Lasker-Marshall USA 1923 Variation 1 Move 84 Black to play
Drawing, a beautiful geometric display of the queen’s power with the white queen moving around all the corners in a few moves. 80…Qe5! 81. Qb1
Ed. Lasker-Marshall USA 1923 Move 81 Black to play
81…Qf6+? (A mistake improving White’s king for free particularly as White’s checks are restricted because of potential cross checks, the natural 81…h2! wins, e.g.: 82.Qb7+ Kf6 83.Qf3+ Ke7 84.Qb7+ Kd8 85.Qa8+ Kd7 86.Qb7+? Qc7 and white has no good check, so he loses) 82.Ka7! and white drew with excellent defence 82…Kg7 83.Qg1+ Kh7 84.Qe3 Qa1+ 85.Kb8 Qb2+ 86.Ka7 Qg2 87.Qd3+ 87…Kh8 Although White’s king is in the drawing zone, Black’s king is on a neighbouring rank making counterchecks possible, so white played 88.Ka6! (88.Qe3 also draws)
Ed. Lasker-Marshall USA 1923 Move 88 White to play
88…h2 89.Qd8+ Kh7 90.Qc7+! Staying on the h2-pawn so Black cannot interpose the queen, and White drew 14 moves later by repetition.
If the defending king can get in front or very near the pawn, it should do so:
Bakutin – Novitzkij Tula 2000 Move 63 White to play
63.Kd3! h5 64.Ke2! now the draw is easy as white does not fear a queen exchange.
Sometimes the defending king has to keep both options open: here is a brilliant example:
Dominguez Perez – Nakamura Thessaloniki 2013 Move 60 Black to move
Black looks to be in trouble as his king is a long way from the drawing zone and will interfere with his queen. However Nakamura found 60…Ke5!! 61.Kg7 Qc6! Keeping Black’s options open 62.h6
After 62.Qg6 Qb7+ 63.Kh8 Qa8+ 64.Qg8 Qc6 65.Qg5+ Black changes plans and runs to the drawing zone as White’s king is badly placed in front of the pawn, he just has time to do this 65…Kd4!! 66.Qg7+ Kc4 67.h6 Kb3 68.h7 Ka2=
Dominguez Perez – Nakamura Thessaloniki 2013 Variation Move 69 White to move
Dominguez Perez – Nakamura Thessaloniki 2013 Move 67 White to move
67.Qg6 (67.h7 Qh5 68.Qg7+ Ke6! draws as Black’s king cramps White’s pieces.) 67…Qf8+ 68.Kh7 Qf3 69.Qg7+ Ke6 70.Kg8 Qh5 71.h7 Qe8+ 72.Qf8 Qg6+ 73.Kh8 Qf7 drawn
Knight Pawn – “With a knight pawn, play is similar to a rook pawn, but the winning chances are better as the pawn provides better shelter. There is still a drawing zone in the far corner.”
The play is complex and there are many subtleties with slight differences being crucial as we shall see below.
Here is a superb example of drawing technique from Negi-Postny Helsingor 2009:
Negi-Postny Helsingor 2009 Move 63 Black to move
Where does Black put his king? 63…Kf1! (63…Kd2? loses in 91 moves as the king is cut off from the drawing zone!) 64.b5 Qc7+ 65.Kd5 Qb7+ 66.Qc6 Qf7+ 67.Kd6 Qf4+ 68.Kd7 Qf7+ 69.Kc8 Qf8+ 70.Kb7 Qe7+ 71.Qc7 Qe4+ 72.Ka6 Qa4+ 73.Qa5 Qc4 74.Qa1+ Kg2
Negi-Postny Helsingor 2009 Move 75 White to move
Black’s king has reached the drawing zone. It is still very easy to go wrong.
75.Qb2+ Kh1 76.Qh8+ Kg1 77.Qg7+ Kh1 78.Qb7+ Kh2 79.Qc6 Qa2+ 80.Kb7 Kg1 81.Qc1+ Kf2 82.Qc5+ Kf1 83.b6 Postny comments :The pawn has reached the 6th rank already, although it is still a draw theoretically. For the defensive side it’s very easy to go astray, but, somehow I managed to give the right checks. 83…Qg2+ 84.Ka6 Qa8+ 85.Kb5 A crucial position, Black’s king is temporarily out of the drawing zone and cannot go back immediately.
Negi-Postny Helsingor 2009 Move 85 Black to move
85…Qe8+! The only move to draw 86.Ka5 Qe1+ 87.Ka6 Qa1+ 88.Qa5
Postny comments again: For a moment I thought that I was losing. The queen covered the a3 square, and Kb7-a7 followed by the pawn advance just one move before the fifty move rule seems inevitable. But… 129…Kh1! 130.Ka7 Qf2!! This stalemate trick saves the game. 131.Qe4+ Kg1 132.Kb7 Qf7+ 133.Kc6 Draw due to the fifty move rule. ½-½
The next example shows how difficult this ending really is:
Oddone – Espinoza Asuncion 2009 Move 77 Black to play
Black’s king is not yet in the drawing zone. Black played the obvious check 77…Qe7+? which loses 77…Qe3! (77..Qc5? loses to 78.Qd3!) does draw, e.g. 78.Ka8 Kh3 79.b7 Qe4 80.Ka7 Qd4+ 81.Qb6 Qa1+ 82.Qa6 Qd4+ 83.Ka8 Qe4
Oddone – Espinoza Asuncion 2009 Variation Move 84 White to play
This is drawn despite Black’s king not being in the drawing zone but it is close enough! 84.Qa2!? cutting the Black king off from the drawing zone (by analogy with the line below) does not win here.
Back to the game 78.b7 Qe3+ 79.Ka8 Qe4
Oddone – Espinoza Asuncion 2009 Move 80 White to play
80.Qb5? 80.Qa3!! cutting the king off from the drawing zone wins, followed by moving White’s king down to the same rank as Black’s king which is similar to the line below 80…Qf3? (80…Kg3! draws) 81.Qb4+ Kh3 82.Qc5?! Qe4
Oddone – Espinoza Asuncion 2009 Move 83 White to play
83.Qc3+? Sloppy, improving Black’s king for free and the queen is much better placed on c5; it was time to move the White king down to the rank that Black’s king is on: 83.Ka7! wins, e.g. 83…Qa4+ 84.Kb6 Qb3+ 85.Ka6 Qa4+ 86.Qa5 Qc4+ 87.Qb5 Qe6+ 88.Ka5 Qa2+ 89.Kb6 Qf2+ 90.Qc5 Qb2+ 91.Ka6 Qe2+ 92.Ka5 Qa2+ 93.Kb5 Qe2+ 94.Qc4 Qb2+ 95.Qb4 Qe5+ 96.Ka4 Qe8+ 97.Ka3
Oddone – Espinoza Asuncion 2009 Variation 1 Move 97 Black to play
Oddone – Espinoza Asuncion 2009 Move 89 Black to play
A key position and a common problem for the defending side, which check should I make? Black choose the wrong check and lost. 89…Qg6+? The authors offer some general advice here: “As Black’s king is on a light square, it was better to operate on dark squares”: 89…Qf6+! Drawing 90.Qd6 Qc3+ 91.Kd7 Qg7+ 92.Qe7 Qd4+ 93.Ke8 White is trying to bring his king across to the same file as Black’s king. Qh8+ 94.Qf8 Qe5+
Oddone – Espinoza Asuncion 2009 Variation 2 Move 95 White to play
95.Kf7 loses the pawn to a fork 95…Qd5+ drawing instantly
Back to the game, after 89…Qg6+? 90.Qd6 Qe8+?!
Oddone – Espinoza Asuncion 2009 Move 91 White to play
91.Qd7?! (91. Kb6! Qe3+ 92. Kc7 Qa7 Kc8 wins quickly, now we see why Black’s queen should operate on the dark squares) 91…Qg6+
Oddone – Espinoza Asuncion 2009 Move 92 White to play
92. Kd5? White could have centralised the queen and effected a memorable manoeuvre to win 92.Qd6! Qc2+ 93.Kd7 Qh7+ 94.Qe7 Qd3+ 95.Ke8 Qg6+ 96. Kf8 Qf5+ 97.Kg8 Qd5+ 98.Kh8 Qh5+ 99.Qh7 winning
Oddone – Espinoza Asuncion 2009 Variation 3 Move 99 Black to play
Notice that this winning motif is effectively the same idea as the king manoeuvre down the a-file and b-files rotated ninety degrees!
In the game: 92…Qd3+ 93.Ke6 Qg6+ 94.Ke5 Qg5+ 95.Ke4 Qg6+! 96.Ke5 Qg5+ 97.Kd6
Oddone – Espinoza Asuncion 2009 Move 97 Black to play
97…Qf6+? The final mistake allowing White to improve his queen. 97…Qf4+ 98.Kc6 Qa4+ 99.Kc7 Qa5+ 100.Kc8 Qc5+ draws 98.Qe6! 98…Qd8+?! 99.Kc6 Qh8 100.Qa2+ Kf1 101.Qb1+ and queens the pawn, White won 4 moves later.
Here is a pretty study showing a neat idea:
Van Vliet 1888
How does White break the pin to get his pawn home?
Amazingly this idea occurred in a game and White missed the neat win, but won anyway.
Bishop Pawn
This is completely different. If the defending king can’t get in front of the pawn or at least very near the pawn, the attacker usually wins as there is no drawing zone in the far corner. This is best pawn for the superior side.
Matamoros Franco – Bologan 2005 Move 65 White to play
White played 65.Qe5+? (A bad mistake from a 2500 player, 65.Qc3+ draws as Black’s queen is poorly placed.) 65…Qe4! Black gives up his h-pawn to centralise his queen and get his f-pawn going 66.Qxh5 f5 White has restored material equality but is now lost as the centralised Black queen is dominant and the f-pawn is much more dangerous than White’s a-pawn. 67.Qh3+ Kd2 68.Qh2+ Kc3 69.Kb5 f4 70.Qh8+ Kb3 71.Qf8 f3 72.Qf7+ Kxa3 Black has eliminated the a-pawn which wasn’t strictly necessary. The win is simple from here as Black’s queen is so well placed.
Matamoros Franco – Bologan 2005 Move 73 White to play
73.Qf8+ Kb2 74.Qf6+ Kc2 75.Ka6?! Accelerating the loss. When the kings are close to each other on files or ranks, the stronger side should always be on the look out for a sequence to exchange queens.
Matamoros Franco – Bologan 2005 Move 75 Black to play
75…Qd5?! (Black could have exchanged queens with 75…Qd3+! 76.Kb7 Qb3+ 77.Ka8 Qa3+ 78.Kb7 Qb2+) 76,Qf4 Kd3 77.Qg3 Qc4+ 78.Ka7 Qc5+ 79.Ka8 Qd5+ 80.Ka7 Ke2 81.Qg4 Kd3 82.Qg3
Matamoros Franco – Bologan 2005 Move 82 Black to play
Matamoros Franco – Bologan 2005 Move 89 White to play
89.Kb7 Qg7+ 0-1 in view of 90.Kb8 Qf8+ 91.Kb7 Qf7+ 92.Kb6 f1Q
A central pawn
This is similar to the bishop’s pawn, but the winning chances are slightly less. There is no drawing zone for the defending king in the far corner:
Miladinovic – Graf Ohrid 2001 Move 68 Black to move
There is no chance for a draw here with the central pawn as Black cannot be prevented from advancing the pawn to the queening square: it just requires patience, care and a lot of moves.
Black played 68…Qa1+ (the natural 68…Qf5 unpinning the pawn is better.)
Black played well, not letting the win slip at any point until this position at move 110:
Miladinovic – Graf Ohrid 2001 Move 110 Black to move
Black played 110…Kf4?? which throws the win away as white has a brilliant draw utilising the fact that the pawn is unprotected by the queen and the star cross perpetual check. Better was 110…Qb3 protecting the pawn and preparing cover for the king on the queenside viz.: 111.Qh2+ Ke4 112.Qg2+ Kd3 113.Qg6+ Kd2 114.Qg5 Qc4 115.Ka8 Qd4 116.Kb7 Kc3 117.Qg3 Qd3 winning
Miladinovic – Graf Ohrid 2001 Variation 1 Move 118 White to move
The reviewer makes this observation:
Notice how Black’s king has migrated over to the file adjacent to White’s king ready to setup cross checks in a few moves. This cannot be prevented wherever White’s king is on the board with two exceptions:
The weaker side can draw if the defending king gets in front of the pawn
or reaches a small drawing zone on the short side of the pawn.
The only other drawing mechanism is to setup the star cross perpetual check or a variant of it which is shown below.
111.Qh2+! Reaching a very important position as White can draw
Miladinovic – Graf Ohrid 2001 Move 111 Black to move
111…Kg4 112.Qg1+Kf4 113.Qh2+ Ke4
Miladinovic – Graf Ohrid 2001 Move 114 White to move
114.Qg2+?? [114.Qh1+!! Kd4 115.Qa1+ Kd3 116.Qd1+ Ke4 117.Qh1+ Ke5 118.Qh5+ Kf5 (118…Kd6 or Ke6 loses the pawn to 119.Qh6+) 119.Qh5+ drawing] 114…Kd4 115.Qb2+ Kd3 Black breaks the perpetual sequence and wins as White’s queen has lost her checking distance
Miladinovic – Graf Ohrid 2001 Move 116 White to move
Miladinovic – Graf Ohrid 2001 Move 125 White to move
125.Qh2+? (Centralising with 125.Qe5 was a tougher defence) 125…Kf1 126.Qc2 e2 127.Qc4 Kg2 128.Qg8+ Qg3 129.Qd5+Kg1
Miladinovic – Graf Ohrid 2001 End
Exploiting White king position 0-1
The central pawn does have a small drawing zone for the defending side which is on the short side of the pawn:
Karjakin – Mamedyarov Beijing 2013 Move 91 White to move
This is a theoretical draw as White’s king restricts Black’s king manoeuvres, but White must defend perfectly:
91.Kb3? losing as White’s king can be kicked out of the drawing zone. 91,Qc4 holds for example 91…Qb6+ 92.Ka2 Qa5+ 93.Kb2 Qe5+ 94.Kb1 Qa1+ 95.Kb2 Qe3 96.Qc1+ Ke2 97.Qc4=
Karjakin – Mamedyarov Beijing 2013 Variation Move 97 Black to move
White’s king covers the queenside and the White queen can hassle Black on the kingside. If Black’s king strays too far on the kingside, Black cannot block a queen check as White will simply exchange queens drawing owing to the proximity of his king to the pawn.
The game continued 91…Qb6+ 92.Kc4 Qa6+ (92…Qc7+ is better 93.Kb3 Qc3+ 94.Ka2 Qa5+ 95.Kb2 Qb5+ 96.Ka3 Kc3 wins) 93.Kb3?! Qb5+ 94.Ka2 Kc3 95.Qe1+ Kc2 0-1 (96.Qf2 d2)
The book covers numerous positions with more pawns.
Here is a celebrated game Kasparov v The World Internet 1999.
Kasparov – The World Internet 1999 Move 51 Black to play
Although Black is a pawn up, White is playing for the win as his g-pawn is the most advanced pawn. The seven piece tablebase confirms this position is a draw but Black is on the edge of losing and most defend perfectly. The game continued 51…b5?! (51,,,Ka1! holds) 52.Kf6+ Kb2? (The final mistake 52…Ka1 was necessary) 53.Qh2+ Ka1 54.Qf4! b4 55.Qxb4 Black is lost as the d-pawn is a hindrance as it obstructs Black’s queen and offers cover to White’s king. Without the d-pawn the position is drawn as show earlier in this review.
Kasparov – The World Internet 1999 Move 54 Black to play
The ROW did not last much longer and resigned on move 62.
Chapter 3 Queen v Rook
The basic Queen v Rook endgame is covered sufficiently. The authors show how to break the third rank defence:
Queen v Rook Third Rank Defence
The authors observe: “The third rank defence is very difficult to break down if you do not know how, because it requires at least one counter-intuitive move to achieve that. John Nunn suggests the following method:”
1.Qf4! (1.Qg7 does not make progress because of 1…Ke8 2.Qc7 Rh6 3.Ke5 Rg6 and the starting position has been mirrored) 1…Kd7 2.Qa4+! Kc7 3.Qa7+ Forcing Black into the third rank defence 3…Rb7 4.Qc5+ Kb8 5.Kd6 Rg7 6.Qb4+ Rb7 7.Qe4 Rb6+ 8.Kc5 Ka7 9.Qd4 Rb7 10.Kc6+ Ka8 11.Qd5 Kb8 12.Qa5 and Philidor’s position is reached.
The book covers a multitude of Queen vs Rook + Pawn(s) positions where there are many fortresses worth knowing and even in the situations where the queen wins, many wins are quite long and complicated. Here is an example of a simple draw.
Queen v Rook+P Fortress
Here White can simply move his rook back and forth between two safe squares e3 & g3.
An additional pawn for Black on g4 makes no difference viz:
Queen v Rook+P Fortress 2
This is clearly drawn as well. However, make a subtle change to the position and place Black’s king on e7, then the queen wins:
Agopov – Norri Finland 2012 Move 89 White to move
White played the incomprehensible 89.g6? allowing the simple 89…Rxg6 drawing 89.Qh1! wins as follows: 89…Rg6 90.Qa8 Re6 91.Qa3+ Ke8 92.Kg4 Rg6 93.Kh5 Re6 94.Qb4 zugzwang
Agopov – Norri Finland 2012 Move 94 Black to move
Black has no good move. One key point is 94…Rg6 95.Qe4+ Kf8 (95…Re6 96.Qxe6 fxe6 97.Kh6 winning) 96.Qxg6 winning
With a further advanced bishop’s pawn, it is no longer a fortress as the attacking king can encircle the weaker side’s position:
Queen v Rook + Pawn Breaking the Fortress
The winning process falls into three phases and zugzwang is the main weapon to achieve these steps:
First the king has to cross the e-file
1.Kf2 Qc7 2.Kg2 Qc2+ 3.Kg1 (3.Kg3 Qd2 4.Rg4 Ke5 5.Re4+ Kd5 and the first phase is complete) 3…Qd2 4.Kf1 Qh2 5.Re2Qg3 6.Rg2 Qh3 7.Kf2 Ke5 8.Rg4 Kd5
Queen v Rook + Pawn Breaking the Fortress Move 9 White to move
because 80…Rd3 (80…Ke4 81.Qd5+ wins) 81.Qf4+ Kc3+ 82.Kc5 wins
Chapter 4 Queen versus Rook and Knight
Fortresses are an important topic here.
Gelfand-Anand Moscow 2012 Move 37 Black to move
Here Black has a fortress. White’s obvious pawn lever is g4, so Black stops it with 37…h5! Can White exploit the g5 square? 38.Kh4 Kh6 39.Qb2 Kg6 40.Qc3 Ne4
Kasparov – Ivanchuk Frankfurt 1998 Move 69 White to move
Here the rook and knight have a temporary blockade of two passed pawns. A pawn sacrifice disrupts the coordination of Black’s pieces: 69.g5!? Nxg5?! (69…Rg6 is tougher) 70.Qg4? (A rare mistake from the former World Champion 70.Qg3! breaks the blockade 70…Rg6 71.Qe5+ Kf7 72.d6 wins; 70…Kh6 71.Qh4+ Kg6 72.d6 wins) 70…Rg6 71.Kb4 Nf7 72,Qd4+ drawn
Here a blockade could have been broken by clever manoeuvring:
Brameyer – Pitzl Dresden 2010 Move 52 Black to play
This looks desperate for white who looks to be close to zugzwang. Black continued 52…Kg4? allowing White to escape
Brameyer – Pitzl Dresden 2010 Variation Move 62 White to play
53.Re3! Qd2 54.Rg3+! Kh4 55.Rf3 mutual zugzwang and white held on for a draw
Brameyer – Pitzl Dresden 2010 Move 55 Black to play
Queen vs Rook + Knight + Pawn
Beukema – Hausrath Dieren 2017 Move 110 White to move
It is hard to believe that White can lose to here. White played 110.Qe2? which does lose and he lost quickly missing a draw when Black erred. (110.Qb7 holds along with 4 other moves) 110…Rf6+ does win for Black. Buy the book to find out how.
Chapter 5 Queen versus Rook and Bishop
Babula – Blatny Stare Mesto 1992 Move 69 Black to move
It is hard to believe that White can win this position as the f7 square is covered by both rook and bishop and all Black’s pieces are safe and coordinated. White failed to win this game in practice; he tried for 16 moves and gave up. However, White can force the pawn through or win a piece in 43 moves. This is a good example where computer generation of tablebases has really enhanced the understanding of the endgame and found sophisticated winning manoeuvres in positions like these. The key piece in this type of position is the attacker’s king.
Chapter 6 Queen vs Two Rooks
The authors summarise this material imbalance thus “The rooks are slightly superior materially speaking, but this does not make them favourites automatically. It is very important, if they can get static control and their king can hide. The queen on the other hand often wants to start dynamics to overload the rooks and destroy their coordination and harmony.”
The ending of two Rooks + P v Q is covered in some depth, the theory of which is completely new to the reviewer and probably new to the reader.
The most important factor is whether the attacking king can find hiding places. This often depends on where the defending king is. It has some similarities with queen and pawn vs queen endings:
Vovk – Savchenko Move 90 White to play
With a rook’s pawn, generally if White’s king is away from the action (near the pawn), the game is drawn, but it is not so easy to give a main drawing zone which was possible in the queen and rook’s pawn or knight’s pawn versus queen case, but d7 seems to be a a good square but it does not always draw.
Matters are very complex and the wins are often very long as this game shows:
Vovk – Savchenko Variation 1 Move 94 Black to play
The tablebases give this position as a draw after 94…h2 95.Qh5! Kg2 96.Qg5+ Rg3 97.Qxf4 h1Q 98.Qd2+ Kh3 99.Qh6+ with a perpetual
Vovk – Savchenko Variation 1 Move 98 Black to play
Back to the game: 90…h2 91. Qg2?! (91.Qh7+ is tougher losing in 92 moves) 91…Rf2 92.Qh1?! Kh3 93.Qa8?! Rf8 94.Qb7?!
Vovk – Savchenko Move 94 Black to play
94…R2f7?! (Black missed a quick win 94…Re2+ 95.Kd6 Rd8+ 96.Kc5 Rc2+ 97.Kb4 Rb2+ winning the queen) 95.Qb3+?! Rf3?! 96.Qb1 Re8+ 97.Kd7 Here White loses despite the king being on d7.
Vovk – Savchenko Move 97 Black to play
97…Ree3? A natural move, throwing away the win, 97…Rh8! wins in 46 moves 98.Kd6? This was White’s last chance to draw: Black won on move 114 0-1
Vovk – Savchenko Variation 2 Move 104 Black to play
As the reader can see, this endgame is very complex, even harder than queen + pawn v queen.
Here is example with the king hiding in front of the rook’s pawn in the corner:
Tiviakov – Van der Wiel Leiden 2011 Move 108 Black to move
Black played 108…Rb1+? throwing away the win which was to be had with 108…Kg1 in 125 moves! 109.Ka4 now White is holding and Tiviakov defends perfectly:
If the reader has played through this ending, it was remarkably simple to win.
With a central pawn, there is no fortress on the short side for the defending king:
2R+Central P v Q Instructive example
This is winning after 1.Kd7 Qg7+ 2.e7
In general, the queen can draw when the defending king is well placed and the attacker cannot coordinate and safeguard the king. This can be very complicated and not easy to calculate:
Zwakala – De Abreu Boksburg 2018 Move 71 White to play
White’s king is trapped on the edge but White can just hold: 71.Qb6+ Kf7 72.Kg4 R5f4+ 73.Kg5 Rf6 74.Qb1 Rg3+ 75.Kh4 Rg2 75.Kh4 Rg2
Zwakala – De Abreu Boksburg 2018 Move 76 White to play
76.Qb3+ and lost quickly 76.Qh7+! draws 76…Kf8 77.Qh8+ Rg8 78.Qh5 e5 79.Kh3 Rg7 80.Qh4 Kf7 81.Qc4+ Re6 82.Qc7+ Re7 83.Qc4+ Kf6 84.Qc6+ Re6 85.Qf3+ =
Here is a game from the early Fischer. His opponent played 90..Kd6? and Fischer defended perfectly to draw.
Fischer – Matthai Montreal 1956 Move 90 Black to move
Black could have hunted down the White king as follows: 90…Rc3 91.Kg4 Ra4+ 92.Kh5 Rc5+ 93.Kh6 Rh4+ 94.Kg6 Rg4+ 95.Kh6 Rgg5
Fischer – Matthai Montreal 1956 Variation Move 96 White to move
96.Qa2 Ke8 97.Qa8+ Kf7 98.Qa2+ Rcd5
Fischer – Matthai Montreal 1956 Variation Final
After 99.Qf2+ Rgf5 winning as 100…Rh5+ follows
General case with more pawns
In general the rooks want static control and the queen dynamic. It is extremely important for the rooks to coordinate. Examples of positions where the two rooks are better are shown below.
The reviewer gives some typical positions with a quick assessment: buy the book to go through the analysis.
In this position below the rooks have full board control. White wins easily.
Hole – Thomassen Oslo 2011 Move 35 Black to move
In the position below the rooks are coordinated and white’s weak isolated pawns are easy pickings for the rooks. Black won quickly.
Shirov – Anand Linares 1998 Move 41 Black to move
In the next position, white has just played 43.Re1 threatening Ree7, Black has to weaken his pawns to prevent the immediate loss of the f7-pawn. This is enough for white to win.
Kramnik – Andreikin Tromso 2013 Move 43 Black to move
The queen needs targets to start dynamic play. Good for the queen are weak pawns, an exposed king, uncoordinated rooks and of course dangerous friendly passed pawns.
Queen + two connected passed pawns usually beat two rooks. The defensive setup with the rooks doubled up against the more advanced pawn can be difficult to break down. The position below is winning but takes nearly 50 moves against best defence!
Murdiza – Rozentalis Cappelle-la-Grande 2004 Move 59 Black to move
The position below is winning for the queen as the rooks are uncoordinated and the queen has a dangerous passed c-pawn.
McShane – Mamedov Astana 2019 Move 45 White to move
In this position the passed pawn dominates the rooks but Black is still holding out. The key to winning this game is to open a second front on the queenside to widen the bridgehead for the queen. Hence 48.c4!
Shirov – Short Yerevan 1996 Move 48 White to move
In the next position Black has a small material advantage with two connected passed pawns. The easiest way to win is to open a second front on the queenside and create fresh White pawn weaknesses, hence 35…a5!
Giri – Aronian Leuven 2018 Move 35 Black to move
In the next example, there is rough material equality but the queen is winning here as White’s rooks are uncoordinated, his king is exposed and he has lots of weak pawns.
Amanov – Adams Wheeling 2012 Move 30 White to move
Chapter 7 – Queen versus Rook and Two Minor Pieces
Surprisingly the author does not cover the endgame with no pawns as R+B+N v Q is drawn but is difficult to hold.
The pieces seek static control. In the position below, Black is winning but needs squares for his pieces, hence 34…g5!? After 35.fxg5 Bxg5 Black is winning as White’s pawns are going to drop off in the long run.
Vitiugov – Lysyj Kazan 2014 Move 34 Black to move
In the next example, the position is static with the pieces controlling everything. The queen has no targets and White’s king is safe. White will slowly and surely improve his pieces and pick off Black’s pawns.
Grischuk – Topalov Linares 2010 Move 47 Black to move
In the next example, the queen has passed pawns, but they are all separated and effectively isolated, so Black’s well coordinated pieces can just collect the apple harvest after 34…Rb4!
Caruana – Le St Louis 2017 Move 34 Black to move
The queen loves dynamic play with an exposed enemy king.
A good example is below where queen and 3 pawns fight a rook and two bishops with an exposed king. After 24.Qe6 Black is struggling to coordinate and finish development. Black put up stiff resistance but the defensive task proved too much and White won.
Karpov – Speelman Reykjavik 1991 Move 24 White to move
In the next game, a queen and two connected passed pawns supported by the king face an uncoordinated rook, bishop and knight. The queen wins effortlessly.
Kramnik – Aronian Zurich 2012 Move 30 Black to move
Chapter 8 Queen an Minor Piece vs Queen (and Minor Piece)
This topic is covered well with sections on:
Queen + Knight v Queen
Queen + Knight + Pawns v Queen + Pawns
Queen + Bishop v queen
Queen + Bishop + Pawns v Queen + pawns
Queen + Knight endings
Queen + Bishop (same colour) endings
Queen + Bishop (opposite colour) endings
Queen + Knight v Queen + bishop endings
This is particularly good chapter.
Chapter 9 Queen + Rook v Queen + Rook
This piece combination is a really a mixture of middlegame and endgame themes. King safety is paramount. In this game White’s king is safe whereas Black’s king is looking potentially vulnerable.
Fischer – Benko 1959 Move 33 White to move
Fischer played the incisive 33.a4!! to open up files for his rook. If 33…b4 34.Rh5!
There is another Fischer game below. White had to play 35.Rf3. However after 35.Qf8+? Kh5 Black’s king entered the fray with decisive effect. After 36.g4+ Kh4 37.Qxf6+ Kxh3 it was all over.
Blau – Fischer Varna 1962 Move 35 White to move
Chapter 10 Queen vs. Minor pieces
The interesting endgames of queen v 2 minor pieces with no pawns are covered.
The endgame of queen v two knights with pawns is covered showing typical winning methods:
Overloading the knights which can only defend a limited front
King invasion
Zugzwang
Some successful fortresses are also demonstrated.
The endgame of queen v two bishops with pawns is also covered. Positions with mutual passed pawns are shown demonstrating the power of the queen. Some fortresses are shown of course.
The endgame of queen v knight and bishop with pawns is also covered. Positions with fortresses are covered with methods of breaching them covered.
Queen versus three minor pieces is by far the most interesting endgame covered with this rough material equality.
In this sort of position where the pieces are uncoordinated, the queen wins:
Berkes – Indjic Valjevo 2018 Move 36 Black to move
If the pieces are coordinated and their king is safe, they have good winning chances.
Lautier – Gurevich Munich 1993 Move 53 White to move
White misfired with 53.b5? (53.Qxb7 holds a draw) 53…Nd4! wins as the pieces gain static control. Eventually all the queenside pawns were exchanged and Black won on the kingside.
If the minor pieces have control even with a pawn apiece, the pieces have winning chances:
Gustafsson – Svane Bonn 2011 Move 50 Black to move
Black played 50…Qc1+? and lost the pawn and the game. 50…Qg1 just holds!
The next position is one of dynamic equality:
Nisipeanu – Radjabov Bazna Move 30 Black to move
30…Bc6! 31.Qxa7 Nc5=
Chapter 11 is a pot pourri of fascinating positions that do not belong elsewhere in the book.
Chapter 12 covers some endgame studies. Every endgame book should include some studies to enhance the readers’ imaginations.
The book ends with comprehensive solutions to the exercises set in each chapter.
In summary, this is an excellent book which requires a lot of time to absorb. Some sections are much easier to absorb than others, for example the sections on two rooks v queen in the general case with many pawns is excellent and would be useful for club players and above. The chapter on queen and minor piece v queen and minor piece with many pawns is also superb. The more difficult sections such as queen and pawn v queen are definitely worth studying and are fascinating in themselves.
FM Richard Webb
FM Richard Webb, Basingstoke, Hampshire, 11th August 2021
Tactical Training in the Endgame, Cyrus Lakdawala, everyman Chess, Cyrus Lakdawala, 23rd July 2021, ISBN-13 : 978-1781945865
From the publisher:
“Goethe once wrote, “Everything is both simpler than we can imagine, and more complicated than we can conceive.” He could well have had chess endgames in mind. Endgames have fewer pieces on the board than middlegames but this does not necessarily make them “easier” to play or understand.
Tactical expertise is, understandably, generally associated with middlegame (and sometimes opening) positions. However, tactics are also crucial in endgames – a point that is sometimes overlooked. Even some quite simple looking pawn endgames can feature complex tactical ideas. Tactics in endgames also tend to be very different to middlegame tactics.
As well as the familiar themes of pins, skewers and forks, endgames also feature unique concepts that rarely occur in middlegames such as pawn breakthroughs, manoeuvring for zugzwang and active use of the king as an aggressive unit.
In this book the highly experienced chess author and coach Cyrus Lakdawala guides the reader through the complexities of endgame tactical play. Lakdawala assembles positions that are most effective to improve tactical ability. Work your way through this book and you will undoubtedly see the results in your own games.”
end of blurb…
“Cyrus Lakdawala is an International Master, a former National Open and American Open Champion, and a six-time State Champion. He has been teaching chess for over 30 years, and coaches some of the top junior players in the U.S.”
The reviewer is a fan of this type of book which is a really good endgame puzzle/training tome: this title does not disappoint. The examples are a pleasing mixture of endgames from high level games; composed studies and a final chapter consisting of composed mate in two problems.
In the introduction, the author addresses the common objection to studies and problems “they are artificial and also too difficult”. He recalls a piece of advice from GM Bill Lombardy: “You don’t have to solve them. Just try for a few minutes and then look up the answer.” This is the point, the act of attempting to solve the study/problem followed by a close study of the answer will improve your analytic ability and enlarge your toolbox of recognised patterns. A lot of studies have very memorable moves/themes which once seen are never forgotten.
The reviewer can recall a particular knight and pawn endgame where I jeopardised an easy draw by missing a study like move (lack of imagination in cruise mode) but redeemed myself by scrambling a study like draw (desperation but only found because my imagination had been improved by studying studies).
Cyrus goes on to discuss training techniques to improve students’ calculation skills, tactical awareness and tactical/strategic imagination: he and the vast majority of trainers regard studies as an essential tool to aid the development of endgame mastery.
In the main seven chapters, I like the way the author breaks down the more difficult studies to aid a student/reader to solve them: it’s almost like a brain dump of his assessment/analysis process as he goes about solving the problem.
The over the board endgames include many games from masters of the endgame such as Botvinnik, Capablanca, Karpov, Smyslov, and Tal. Tal may not be immediately recognised by some as a maestro of the endgame, but his calculation skills and imagination were second to none and this made him a superb endgame player.
The studies include giants such as Afek, Grigoriev, Mitrofanov, Pogosyants, Réti, Troitzky.
The book is divided into eight chapters, the first two sections are kind of introductory followed by five chapters with different piece combinations. The final section is a set of mate in two problems.
The reviewer will showcase three or four positions from each chapter to give the reader a taster.
Here are some interesting positions from Chapter One – Deadly Simplicity.
Chigorin – Tarrasch Ostend 1905 Move 50
This position is from the game Chigorin v Tarrasch Ostend 1905. White looks to be in terrible trouble here as black’s king is going to outflank white’s king and win material.
White played the resigned 50.gxf6 and lost shortly. However, white does have a dastardly defence which once seen is always remembered. 50.Kg4!! Ke4 51.g6! Now white creates a stalemate defence or he can create a future passed pawn. 51…hxg6 (51…h6 52.Kh5! and the f-pawn cannot be captured as it is stalemate!)
Next I shall show a lovely study which looks deceptively simple!
J.Dobias 1926 White Win
White to play and win.
The obvious approach to black’s pawn such as 1.Kf4? or 1. Ke5? fails to 1…Kc4 2.Kg5 Kd3 3.Kxg6 Ke4 and black gobbles the f-pawn to draw. 1.Kd5? looks tempting to shoulder barge the black king, however 1…Kb4! draws 2.Ke5 (2.f4 Kc3! draws is a major point) Kc4 3.Kf6 Kd4 4.Kxg6 Ke4 draws.
1.Kd4!! is the only way preventing the side approach, now 1…Kb4 (1…Kc6 2.Ke5 Kd7 3.Kf6 wins) 2.f4! The key point 2..Kb3 3.Ke5 Kc4 4.Kf6 wins
A really instructive problem and very game like.
The next study is white to play and win. I remember being shown this study as a kid and solving it.
S.Kryuchkov 1927 White Wins
1.Re8+ !! (1…Kg7 2.f6+ wins black’s rook) 1…Kxe8 2.g7 Rg8 3.f6 Zugzwang 3…Rf8 4.exf8Q+ Kxf8 5.Kd7 Kg8 6.Ke7 and wins the f-pawn and the game.
Chapter 2 – Recognizing Patterns
C.Lakdawala – Position For Analysis White To Play
What is happening here with white to play? White can draw easily with 1.Rxe7 or 1.gxf7. Can white do better?
1.f6 looks interesting with the idea of 1…Rxe8 2.gxf7
C.Lakdawala-Position For Analysis Move 2
Surely white is winning with 3.fxg7 to follow after black moves his rook. But analyse further! 2…Rd8!! wins as after 3.fxg7 Ke7!+ wins both pawns and the game. Cyrus had set this position as an exercise for some students, most of whom complained bitterly when they fell into the trap. The author responded that he did not specify a “white to play and win” position, he just gave them a position to analyse, just like a game! A great learning experience.
Here is a didactic opposite coloured bishop endgame.
Stein – Tarnowski Bucharest 1961 Move 51 White to move
How does white make progress here? 51.Be7 allows Kc7 blocking the king’s path into black’s position. 51.Bb8! does the trick and black resigned 1-0. If 51…Kxb8 52.Kd6 Kc8 53.Kxe6! Kd8 54.Kf6 Kd7 55.Kg7 Ke7 56.Kxh7 Kf7 57.e6+ decoying the black king, winning after 58.Kg7 and 59.h7
Here is some Troitzky magic: white to play and draw.
Troitzky 1899 White Draws
White looks to be in desperate straits as the black’s outside passed h-pawn looks to be the decisive factor.
1.Kb6! threatening 2.a6 1…Kc8 2.a6 Kb8 3.a7+! Ka8 4.Kc7! h5 5.Kxd6 h4 6.Kxd7 h3 7.e5 h2 8.e6 h1Q 9.e7 Qd5+ This looks lost for white as an e-pawn on the seventh normally loses against a queen 10.Kc7! Qe6 11.Kd8 Qd6+ 12.Kc8! Qxe7 stalemate
Chapter 3 – King And Pawn Endgames
Here is an important idea that does occur in practice. Alexei Shirov lost a game to this idea.
Polerio 1590
This position looks to be drawn after a move like 1.Rg1 a1=Q as white wins both pawns but black’s king gets back in time to secure the draw. However white has an elegant idea to win: 1.Ra1! Kxa1 Forced as 1…Kb3 2.Kc1 Ka3 3.Kc2 wins the a-pawn and the game easily 2.Kc2 Zugzwang 2…g5 3.hxg5 h4 4.g6 h3 5.g7 h2 6.g8Q h1Q 7.Qg7#
Here is a famous finish to a game demonstrating the potential power of a breakthrough and Reti’s theme with king paths.
Em.Lasker – Tarrasch St. Petersburg 1914 Move 41 White To Play
White looks to be lost as after 1.Kf6 c4 2.bxc4 bxc4 3.Ke5 c3! 4.bxc3 a4 the black pawn promotes. 1.Kg6!! threatening h5 forces 1…Kxh42. Kf5 Kg3 3.Ke4 Kf2 4.Kd5 Ke3!
Em.Lasker-Tarrasch St. Petersburg 1914 Move 45
5.Kxc5 Kd3 6.Kxb5 Kc2 7.Kxa5 Kxb3 draw (A really instructive endgame lesson – kings do not have to take the most obvious path.)
Some Vasily Smyslov magic next.
Aronin-Smyslov Moscow 1951 Move 46 Black To Move
White had had a vastly superior (winning) rook ending and decided to enter this king and pawn ending which he assessed as easily winning for white as he has a potential passed outside h-pawn and his king can enter via c4. Smyslov shattered that illusion with 46…g4!! 47.h4 (47.hxg4 does not help as the potential passed pawn has disappeared and black’s king now can enter white’s position via g5 leading to a draw.) 47…c5 48.Ke2 Kh7! 49.Kd3 Kh6 waiting
Aronin-Smyslov Moscow 1951 Move 50
50. c3 (white’s intended 50.Kc4 loses to the breakthrough move 50…f5! 51.exf5 e4! 52.c3 a5! zugzwang and the e-pawn promotes) 50…a5 51.cxb4 axb4 drawn (A brilliant escape for the endgame master)
Chapter 4 – Rook Endgames
A famous study but worth reproducing called Lasker’s manoeuvre/steps/ladder. This has occurred in practice in GM games.
Here is some more Troitzky magic which is very game like.
Troitzky (Extract)1933 White Wins
Black appears to be ok as his h-pawn should be enough to draw.
1.e5! fxe5+ (1…h3 2.exf6 wins as the black king will exposed to a decisive rook check) 2.Ke4! h3 3.Rh8! Rxa7 4.Rh6+ Ke7 5.Rh7+ securing the rook and the game. A very common idea in rook and pawn endgames.
Here is the end of a game Judit Polgar v Nigel Short Monte Carlo 1993.
J.Polgar – Short Monte Carlo 1993 Move 62 White To Play
This is instructive: 61.h6+! Kf7 (61…Kxh6 62.Kf6 wins threatening mate and the rook) 62.g5!! fxg5 63.Rd8! and black cannot stop the h-pawn without giving up the rook, 1-0 in a few moves after a few spite checks.
Chapter 5 – Queen Endgames
Queen endgames are notoriously tricky and complex.
Here is an entertaining study.
J.Behting 1907 White Wins
White looks to be in trouble as 1.Qe3!! is met by 1…f4 forcing promotion, but look further: 2.Qf2! d1=Q 3.Kc3!! zugzwang 3…f3 4.Qe3+ Kb1 5.Qb6+ Kc1 6.Qb2#
Here is an amusing study. How does white win here?
E.Pogosyants (extract) 1974 White Wins
After 1.Qxg8+ Kxg8 white can play 2.h7+ which only leads to stalemate or 2.hxg7 and although white wins the a-pawn, black’s king reaches the a8 corner in time to draw.
Here is an amusing finish from a game Adams-Dimitrov.
Adams-V. Dimitrov Move 68 Black to play
Black played 68…e3?? no doubt looking forward to a win over his illustrious opponent. Adams reply soon disabused him: 69.Qh3+! 69…Qxh3 stalemate (Lesson: the queen is powerful, always be on the look-out for mating and stalemating ideas)
Chapter 6 – Minor Piece Endgames
Here is a study by the great Grigoriev which shows a bad bishop endgame, but how does white breakthrough?
N.Grigoriev 1931 White wins
1.g4 creating a passed h-pawn does not win as white has no entry point for his king. So the only idea to win must be Bxh5 but white must prepare this move without allowing black’s bishop to get out of its cage.
1.Bf3 Bb7 2.Ke3! (2.Ke4? would allow black’s bishop to improve its posting 2…Bc8 and draws) Ba8 3.Ke4! Bb7 4.Kf4 Ba8 5.Bxh5! (Now black’s bishop is on its worst possible square) Kxh5 6.g4+ Kxh4 (6…Kh6 7.g5Kg7 8.h5 Bb7 9.h6+ Kf7 10.gxf6 Kxf6 11.h7! Kg7 12.Ke5 Kxh7 13.Kd6 winning) 7.g5 fxg5+ 8. Ke4! (8.Ke5 also wins but takes much longer) Kh5 (8…g4 9.f6 g3 10.Kf3! Kh3 11.f7 g2 12.f8Q g1Q 13.Qh8#) 9.Ke5! g4 10.f6 g3 11.f7 g2 12.f8Q g1Q 13.Qh8+ Kg4 14.Qg7+ winning the queen
Here is more Smyslov magic:
Smyslov – Yastrabov Moscow 1936
How does white breakthrough? Black looks to have a fortress.
Kotov – Botvinnik Moscow 1955 Move 59 Black To Move
59…g5!! 60.fxg5 d4+! 61.exd4 Kg3 (The position below demonstrates the very important “one diagonal” principle in opposite coloured bishop endings. Black’s bishop fulfils two roles on one diagonal: protecting his own b3-pawn whilst simultaneously preventing the advance of white’s passed pawns.)
Kotov-Botvinnik Moscow 1955 Move 62
62.Ba3 Kxh4 63.Kd3 Kxg5 64.Ke4 h4 65.Kf3 Bd5+ 0-1 Black wins the bishop which has to give itself up for the h-pawn and then simply captures white’s pawns winning easily.
Chapter 7 All Other Piece Combinations
Tal – Trifunovic
Palma de Mallorca (5) 1966
Tal-Trifunovic 1966.Move 45
Tal had to seal in this position and he played the best move beginning a ten move combination.
Here is a jointly composed study with one of the composers being Leopold Mitrofanov of Qg5!! fame. If the reader doesn’t know what I am on about, then look it up for a real treat – arguably one of the greatest studies ever.
D.Gurgenidze & L.Mitrofanov 1979 Draw
1.Be4+ Kg3 2.Bf3! Kxf3 3.f7 Bd6+ 4.Kxd6 d1Q+ 5.Kc7!! Qxc2+ 6.Kd7 drawing (Black’s king is one square too far from the winning zone.)
Here is a superb study by Yochanan Afek.
Y.Afek 2000 White wins
1.b7 Qc6 2.Bd7! Qxd7 3.Rxe4+ (These checks avoid black’s stalemate defences, I will leave the reader to work them out) Ka5 4.Re5+ Kb6! (4…Ka6? 5.b8N+ wins) 5.b8Q+ Ka6
Y.Afek 2000 Move 6
White is threatened with mate and has no checks. 6.Rb5!! Qxb5 7.Qa7#
Chapter 8 Composed Mates In Two
Here is a problem – white to play and mate in two moves.
S.Dowd 2020 Mate In 2
1.Qf1! There are four different mates. I shall leave the reader to figure them out.
In summary, an excellent endgame coaching/training manual to improve your analytic powers with some instructive, beautiful and entertaining games, studies and problems.
FM Richard Webb
FM Richard Webb, Chineham, Hampshire, 27th July 2021
The Chess Endgame Exercise Book Paperback, JDM Nunn, Gambit Publications Ltd., 2020
John Nunn has written around thirty books on chess, many of these being some of the finest published in any language : Secrets of Pawnless Endings (1994, Batsford) for example, is easily a candidate for the all time list. John is a director of Gambit Publications Ltd. together with Murray Chandler and Graham Burgess.
GM John Nunn
From the rear cover :
“Everyone knows they should work on their endgame play. So many hard-earned advantages are squandered in ‘simple’ endings… But it’s tough finding a way to study endings that doesn’t send you to sleep and that helps you actually remember and apply what you have learnt.
“While endgame theory books are helpful, active participation by the reader is a great aid to learning. I hope that this book of endgame exercises will encourage readers to put their brains in high gear, both to test themselves and to learn more about the endgame. I have spent several months selecting the 444 exercises in this book from what was initially a much larger collection.” – John Nunn
All major types of endgame are covered, together with a wide-ranging chapter on endgame tactics. Examples are drawn from recent practice or from little-known studies. The emphasis is on understanding and applying endgame principles and rules of thumb. You will learn by experience, but always backed up by Nunn’s expert guidance to ensure that the lessons you take away from the book are correct and useful.”
To get some idea of the book Gambit (via Amazon) provide a “Look Inside” at their Kindle edition.
As you would expect with Gambit, the notation is English short form algebraic using figurines for pieces. A previous criticism (ibid) has been addressed in that each diagram has a W or B “whose move it is” indicator. The diagrams do not have coordinates but this is not likely to be a problem for most.
Here on YouTube John Nunn gives the reader an introduction to the book :
So, what did we think?
This is another superb endgame book by John Nunn. This excellent tome is titled as an exercise book, so the reader will gain most by attempting to solve the puzzles, but there is no compulsion to do this: the book can also be treated as a practical endgame manual.
Most of the positions are from recent actual play and show typical positions that occur in practice and therefore show practical problems and mistakes even by very strong players. In many positions, John Nunn selects two or three obvious candidate moves and asks the reader to choose one. I like this approach as it reflects a real game and the pressure to choose between candidates.
There are some theoretical positions which are shown in many endgame primers. Some studies are included which always expand the reader’s mind by showing the beautiful rich tapestry of chess and should increase the reader’s imagination in practical play.
Each of the first nine chapters has an introductory piece over two pages which is short and pithy introducing some main principles for the forthcoming chapter: for example in the king and pawn ending section, key ideas are presented including:
Shouldering Away
Distant Opposition
Diagonal Opposition
Reserve Tempi
Assessing transitions into Q+P endings
This is followed by the exercises which vary in difficulty from 1-5. This degree of hardness is indicated by a number of stars. Level 1 is solvable by a club player; level 5 will give a Grandmaster a good workout.
Most of the chapters have a special harder exercises section.
The two biggest chapters are king and pawn endings, and rook and pawn endings which reflect their importance and relative occurrence. Many endings reduce down to bare king and pawn endings which most be understood to play the endgame at a half decent level. Rook and pawn endings are the most common as the rooks tend to be developed last: excellence in these endings is a sure sign of a strong player.
The reviewer will show a flavour of positions from the first nine chapters with varying difficulty levels.
Chapter 1 – King and Pawn Endings
This first position below in the book is a level 1 exercise and an illustration of triangulation.
Triangulation Example 1 White To Move
Black to move here has to move his king losing the d-pawn and the game quickly. But it is white to move and white wins by executing a fundamental manoeuvre as follows:
1.Ke2 Ke6 (1…Kc6 2.Kd2 is no different) 2. Kd2! Kd5 3.Kd3 and now black has the move and is in zugzwang. White has moved his king in a triangle whereas black could only move his king between two squares (because the c5 pawn restricts his manoeuvres).
Shown below is a harder example (level 3) of triangulation.
Triangulation Example 2 White To Move
To the casual observer this position looks to be drawn as both kings are tied up watching the opponent’s connected passed pawns. White’s pawns are further advanced and he can win with a subtle manoeuvre as follows:
Kg4! White must prevent d5 and d4, 1…Kf6 (The toughest defence. 1…d5 loses to 2.Kg5 see below) 2.Kg3! d5 (2…Kg7 3.Kf4 d5 3.Kg5 transposes) 3. Kf4 Zugzwang, black must give way 3…Kg7 4.Kg5 e3 5.h6+ Kg8 6. Kf6 e2 7.h7+ Kh8 8.Kf7 e1=Q 9.g7+ Kxh7 10.g8=Q+ Kh6 11.Qg6#
In the basic king and pawn endgame below, the author informs the reader that black has only one move to draw.
Teiitbaev-Ufimtsev Moscow 2019 Black to move
This position illustrates not only the opposition but also consideration of the opponent’s pawn breaks. White has two winning ideas:
Achieve the position of Ke5 v Ke7 with black to move
Get in the h5 break when black cannot capture and follow up with Kg7 or Kh7 drawing
Black played 1…Kd6? guarding against the first idea but not the second. White won with 2.Kg4 Ke6 3.h5 gxh5+ 4.Kxh5 Kf7 5.Kh6 seizing the critical squares, winning.
To this end only 1…Kf7! draws viz: 2.Ke5 Ke7 seizing the opposition or 2. Kg4 Kf7 meeting 3.h5 with 3…gxh5+ 4.Kxh5 Kg7 drawing
The next example shows an example of the distant opposition at work.
Distant Opposition White To Move
White only has one move to draw: 1.Kh2! (Seizing the distant opposition three squares apart, 1.Kg2? Ke2 2.Kg3 Ke3 3.Kg4 Kf2 4.Kh4 Kf3 5.Kg5 Kg3 wins) 1…Kd3 2.Kh3! Kd4 3.Kh4! Ke4 4.Kg4 Ke3 5.Kg3 Ke2 6.Kg2 Kd2 7.Kh2 holding the draw. White’s king has access to all the squares on the h-file, which why this defence works.
This next struggle (at level 3) shows the importance of reserve tempi and how crucial it is to manage them precisely. This is of course coupled with exact calculation. Neither side wants to move their king as to do so loses the game. Nunn gives the reader an amusing choice between 1…a4, 1…b5 and 1…e4 stating that one loses, one draws and one wins.
McNally-Patterson Coventry 2019 Black to Move
This is highly instructive as black played the worst move, but white let him escape with a draw!
Black wins with 1…b5! gaining space and ensuring that white runs out of pawn moves first. 2.b3 c5 3.c4 (3.f3 a4!) 3…bxc4 4.bxc4 a4 5.a3 e4 winning the h-pawn 6.Kg3 Kxh5 7.Kf4 Kg6 8.Ke5 Kg5 9.Kd5 Kf4 10.Kxc5 Kf3 11.Kd5 Kxf2 12.c5 e3 13.c6 e2 14.c7 e1=Q 15.c8=Q Qd2+ 16Ke5 f4 with a winning Q ending for black
It is very instructive to look at the other two moves that Nunn suggests: it is all down to exact calculation which is why king and pawn endings are so interesting and difficult!
I shall finish the king and pawn examples with a level 5 difficulty example.
Aguilar Samper-Belmes Buenos Aires 2019 White To Move
How does white draw here? White played 1.Kd5? and lost.
1.c5! b5! (1…bxc5? loses as 2.b5 axb5 3.a5 wins as black cannot catch the a-pawn and his own pawns are too slow. 2.axb5 axb5 White has a protected passed pawn but most play some accurate moves to draw. 3. Kd5!! (3.Kf3? loses to the triangulation technique of the second example above viz: 3…h5 4.Kg3 Kf5 5.Kf3 h4 6.Kg2 g4 7.Kf2 g3+ 8.Kf3 Ke5 9.Kg2 Ke6! 10.Kf3 Kf5 11.Kg2 Kg4 12.c6 h3+ 13.Kg1 Kf3 14.c7 h2+ 15.Kh1 Kf2 16.c8=Q g2+ mates) 3…g4 (3…h5 4.Kd6 h4 5.c6 h3 6.c7 h2 7.c8=Q h1=Q 8. Qe6+ Kg7 9.Qd7+ is a perpetual) 4.Ke4!! A brilliant switchback 4…h5 5.Kf4 Ke6 6.Kg3 Ke5 7.Kh4! Now white oscillates between h4 and g3 drawing, black cannot play his king to g5 as the white c-pawn promotes. The Kd5, Ke4 manoeuvre forced black to advance his pawns in a sub optimal manner allowing white a blockade. A very instructive ending.
Chapter 2 covers knight endings. The reviewer will give a couple of examples. The type of position below does occur in practice quite often: the stronger side may have won a knight on the queenside by promoting an outside passed passed pawn. How does white win?
Knight Ending Zugzwang Example White To Play
Black is threatening Kf5 followed by Kg4 drawing.
White must play 1.Nd4! Kg5 (threatening Kg4 followed by h4) 2.Ke6! (The obvious 2.Ke5? throws the win away 2…Kg4 3.Nf5 Kg5 zugzwang 4.Ke6 Kg6 zugzwang) 2…Kg4 (2…h4+ 3.Nf3+ wins) 3.Nf5! Kg5 4.Ke5! Zugzwang 4…Kg4 4.Kf6 Kf3 5.Kg5 winning the pawn and the game. This is a very common theme in knight endgames as a knight cannot lose a tempo.
The second knight and pawn example is harder.
Warakomski-Moranda Katowice 2019 White To Play
White played 1.Kd5 which only draws. It looks logical as it places the king near the kingside ready for a hoped for decisive invasion. However it does not win. Passed pawns must be pushed!
White wins with 1.Kb6! Blocking his own pawn but the king must support the dangerous pawn. 1…Nxg5 2. Kb7 (Keeping the black pieces from their optimal squares. 2.Ka7? Ne6 3.Ne4 Nd4! 4.b6 Nc6+ draws) 2…Ne6 3.Ne4! g5 4.Nf6+ Kd8 5.b6 Nc5+ 6.Ka8! Ke7 7.Ne4! Nd7 8.b7 g4 9.Nc5 wins
Chapter 3 covers bishop endings.
The type of ending below is fairly common and is covered in endgame primer manuals. How does white draw?
Lysenko-Hamitevici 2019 White to move
The key factor here is the presence of the h-pawn which renders this position a draw with accurate defence, because of the edge of the board and stalemating opportunities. A similar position with pawns on the e,f & g files would be won for black.
White lost this game by playing 1.Bb5? but could have drawn as follows:
1.Kg1! (Or 1.Kh1!) Kg3 2. Bd7! (2.Bd5? loses to 2…f2+ 3.Kf1 Kh2) 2…f2+ 3.Kf1 Kf3 4.Bxg4+ Kxg4 5.Kxf2 with a clear draw
The position below is covered in Basic Chess Endings by Fine and other primers on the endgame. How does black to play draw?
Moiseenko-Flom 2019 Black to move
1…Kd5! (Black played 1…Be7? Now white wins with a standard idea. 2.Bd8 Bc3 3.Bh4 Ba5 4.Bg3 and black prevent cannot prevent Bc7 blocking out the bishop and wins) 2. Bd8 Bc3 3.Bh4 Ba5 4.Be1 Bb6 5. Bf2 Ba5 6.Bg3 Kc6 (Just in time to stop Bc7, black draws) =
This chapter also has some excellent examples of opposite coloured bishop endgames which are well worth study. Buy the book to see these.
Chapter 4 covers bishop versus knight endings.
Here is a position that looks desperate for black, so he resigned. But there is a saving resource. His pieces are restricted and near the corner, so….
Baklanova-Y.Kim 2019 Black To Move
1…Kh8! (Any knight move allows the f-pawn to advance decisively) draws 2.Kf7 Ng7! 3.Bd4 (3.f6 Nh5 draws) 3…Kh7! draws as 4. Bxg7 is stalemate
The next fight shows how poorly the knight deals with rook pawns.
Esipenko-Pershin 2019 Black To Move
Black won with 1…Kb5 2.Kf3 Kc4 3.Ke2 Kc3 Keeping the white king away by shouldering – a common theme in all sorts of endings. Even though the pawn has not moved, white cannot draw! 4.Nf4 Kc2 5.Nd5 a5 (Finally the pawn moves) 6.Nc7 a4 7.Nb5 Be5 8.Na3+ (8.Ke3 Kb3 9.Kd3 Kb4 10.Na7 a3 11.Nc6+ Kc5 12.Na5 a2 13.Nb3+ Kb4 14.Kc2 Bf6 is a win by zugzwang – a common occurrence in B+P v N endings) Kb3 9.Nb1 Bc3 10.Kd1 Ba5 11.Kc1 Bb4 0-1 as 12. Kd1 is met by Kb2 winning easily.
Chapter 5 covers Rook Endings.
The position shows a common type of position. Nunn asks the question, which is best 1.Rf8+, 1.Rg8 or 1.Ke5?
Ivanisevic-Madl 2018-9 White To Move
The intermediary check gains a tempo which wins: 1.Rf8+! Ke4 Attempting to shoulder barge the white king 2. Rg8! Kf4 3.Kd5 g4 4. Kd4 1-0 as 4…h3 5.Kd3 Kf3 6.Rf8+ Kg2 7.Ke2 Kg1 8.Kf3 g2 9.Kg3 Kh1 10.Rh8+ Kg1 11.Rh2 wins
Which king move should white make in the position below?
Rahmani-Belouadah 2019 White To Move
White played 1.Ke6? and lost because of 1…Re1+ which is similar to the position above. 1.Kg6 draws as white should keep his king on the same side as Black. 1…Kf3 2.f5 Ke4 3.f6 Rg1+ 4.Kh7 Rf1 5.Kg7 Ke5 6.f7 draws
How does black draw in this common type of position?
Hesitation Check Black To Play
1…Re1! 2.f6 (2.Kf6 Kb4! 3.e7 Kc5 4.Kf7 Kd6 draws after 5.f6 Kd7 or 5.e8=Q Rxe8 6.Kxe8 Ke5 draws) 2…Re5!+ (A superb hesitation check which is easy to miss, 2…Rxe6 loses to 3.f7) 3.Kg6 Rxe6 drawing.
One move wins for black in this position. What is it?
Marcelo-Fernandez Garcia 2018-9 Black to Play
1…Rc3+! is the winner. This idea is analysed in “My Sixty Memorable Games” in a Fischer game with Gligorić (with reversed colours). Fischer comments that he spent all night analysing this rook and pawn endgame learning a lot about rook and pawn endgames.
2. Kd2 b5 (now the black rook shields the king from a frontal assault) 3.Rb1+ Rb3 4. Rh1 Ka3 5.Kc2 Rb2+! 6.Kc1 b4 7.Rh8 Rg2 8.Ra8+ Kb3 9.Rb8 Rg1+ 10.Kd2 Rb1! 11.Rb7 Ka2 and white cannot avoid the Lucena position for long.
In the example below, Dr Nunn asks which is better 1…Ke8 or 1…Kg8? This is a fundamental rook and pawn position that everyone should know.
Mutovin-Kulik 2019
The black king should move to the short side, so the rook can operate on the long side.
Black played 1…Ke8? which loses 2.Ra8+ Kd7 3.Rf8! The key move 3…Rf2 4.Kg7 Rg2+ 5.Kf7 Rf2 6.f6 and the Lucena will soon be reached.
1… Kg8! would have drawn 2. Ra8+ Kh7 3.Ke6 (3.Rf8 Ra1! preparing flank checks on the long side) 3…Kg7! 4. Ra7+ Kf8 5.Kf6 Kg8 repeating =
Should black play 1…Rb6, 1…Ka7, 1…Rh2?
Rook Ending Vancura Example
Only 1…Rb6! draws setting up the Vancura position as soon as possible. 2.Kf4 Rc6 3.Kg5 Rc5+ 4.Kg6 Rc6+ 5.Kg7 Rc7+ with a standard Vancura draw. This Vancura draws only works with rook pawns.
Chapter 6 covers Rook and Minor Piece endgames.
I will show three examples of didactic positions.
This is a standard theoretical position with the king in the wrong corner (same colour as the bishop).
Edouard-Erdos 4NCL 2018-9
White wins by 1.Kf6! (Black is threatening Bb2 followed by Bg7) 1…Be3 2.Kf7 Ba7 3.Ra6 smoking out the bishop 3…Bb8 4.Ra8 Bc7 5.Rc8 Bf4 (5…Bb6 6.Rc3 Kh6 7.Rc6+ wins the bishop) 6.Rc4 Bg5 7.Rc3 1-0 since 7…Kh6 8.Rh3+ wins the bishop
In the next game we have a rook and opposite colour bishop ending where mating ideas are always on the agenda particularly when a king is on the edge of the board.
Nakamura-Adly Internet 2019 White To Play
White won with 1.Kc7! (Threatening the brutal 2.Rb8#) 1…Bb7 2.a6! winning easily as 2…Rxc5+ 3.Rxc5 Bxa6 4. Ra5 wins
The next example shows the notoriously difficult rook and bishop versus rook ending. The reviewer has had this endgame twice in practice and won both times. This type of position is very common in this ending. Black has only one drawing move. What is it?
This second rank defence is good but cannot always be reached. It does not work when the king is in the corner.
Here is a R v B with the defending king near the safe corner, however, this position is still very dangerous for white, who has one drawing move.
Czopor-Dragun 2019 White To Move
White played 1.Bd5? and lost as follows: 1…Rd7 (Black smokes the bishop out again) 2.Bc6 Rc7 3.Bd5 Rd7 4.Bc6 Rd6 5.Bb5 Rb6 6.Be8 Rb8 7.Bg6 Rh8+ winning 1.Kh5 draws since 1…Kf5 2.Kh4 Kf4 3.Kh3 or Kh5 draws
Chapter 7 covers queen endings.
Here I will give a flavour with four endings. Here white has a strong passed pawn but white’s queen is offside. How does black impede its further advance? This type of position occurs quite frequently.
Dimakiling-Schebler Pattaya 2019 Black To Move
Black played 1…Qc5? (1…Qf3? also loses 2. Qb6 wins) 2.Kg1 Qd4 (or 2…Qc1+ 3.Kg2 winning as black cannot check on the long diagonal) 3.c7 1-0
Black can draw with 1…Qd4! (Harassing white’s king and stopping Qb6) 2.Kg1 Qd1+ 3.Kg2 Qd5+ draws as 4.f3 Qd2+ 5.Kh3 Qc1 draws
The next position shows how dangerous a queen can be: don’t forget she is a potent mating force! Black is a pawn up but white’s next few moves show how immaterial that is.
There are many games, even in GM praxis where the stronger side falls into a mating net trying to a avoid a perpetual.
The next game shows the notorious Q + rook’s pawn v Q ending.
Here black has placed his king onto a very poor square. Black should have put his king in the a1 corner area to draw. Even then, the defending side has to be very accurate. How does white win?
Sanal-Szustakowski Graz 2019 White To Play
Black’s king is very vulnerable to a cross check. White should move his king towards the 4th rank to exploit black’s king position. So:
1.Qf5! (1.Kg7? only draws, don’t forget a queen can shepherd home a pawn without its king’s help, so white plays his king towards the rank that black’s king is on) 1…Qg2+ 2.Kf6 Qb2+ 3.Kg5 (Black has no more checks) 3…Qh8 4.Qd7+ (4.h7 is quicker) 4…Ka3 (4…Kb3 lasts longer) 5.Qe7+ Ka4 6.h7 Qb8 7.Qd7+ Kb3 8.Qd3+ Ka4 9.Qd4+ wins 1-0
Notice how black’s king position obstructs the scope of his own queen and allows a cross check.
Here is an unusual position which looks hopeless for black as white’s king looks safe and a7 followed by a8=Q looks inevitable. However, black can draw!
Q v 3 Pawns Black to move
1…Kg2! Getting the king out of way to avoid any potential cross checks. 2.a7 Kf3! ( or 2…Kf2) 3.a8=Q Qg8+ 4.c8=Q Qg3+ 5.Qc7 Qg8+ 6.Ka7 Qa2+ 7.Kb6 Qb3+ 8.Kc5 Qc2+! 9.Kd6 Qg6+ 10.Kd5 Qe4+ with a draw by perpetual despite white being a queen and a pawn up!
Chapter 8 is Endings With Queens And Other Pieces
The position below is a fairly common type of position. It looks as though white can double the rooks on the b-pawn and win it followed by ganging up on the kingside pawns winning. Black can prevent this with accurate defence. How?
Dottling-Merkel Germany 2018-9 Black To Play
Black played 1…Qa3? and lost 2.Rfe1 wins as 3.Re2 and 4.Reb2 followed by 5.Rxb4 cannot be prevented. 1…Qd2? also loses to 2.Rb3, but 1..Qc3! holds; white is surprisingly unable to organise his rooks to win the b-pawn. 2. Rfe1 Qd2! 3.Kf1 Qd3+ 4.Kg1 Qd2 5.Red1 Qc2 6.Rdc1 Qd2 and white is not making any progress.
Here is a rampant rook situation. White’s king is stalemated, so he is continually offering his rook with check for stalemate. Quite often there is a king manoeuvre to get out of the checks. How does black win here?
Mwale-Makoto Sandton Blitz 2019 Black To Play
Black played 1…Kf5? 2.Rg5+! Oops, skewering the queen, drawing instantly.
A win was to be had with 1…Kh5 (or 1…Kh6) 2.Rh4+ (2.Rg5+ Qxg5 lifts the stalemate) 2…Kg6 3.Rh6+ (3.Rg4 Qg5 wins) 3…Kf7 4.Rh7+ (4.Rxf6+ Ke7 5. Re6+ Kd8 ends the checks) 4…Ke6 5.Re7+ Kf5 6.Re5+ Qxe5 wins)
Here is a theoretical Q v R+P ending. Nunn puts the poser: which is better 1…Rc2 or 1…Rc8?
The reviewer feels a bit smug as he knew the answer to this one.
Enders-W. Watson Bundesliga 2018-9
Black played 1…Rc2? which is a blunder because white’s king can now cross the c-file: 2.Qb1+! Kc3 3.Kc5 b3 4.Qe1+! Rd2 (4…Kd3+ 5.Kb4 b2 6.Qb1 Kd2 7.Kb3 and he pawn falls) 5.Qc1+ Rc2 6.Qe3+ Kb2 7.Kb4 winning the pawn and the game.
1…Rc8! Draws 2.Qd1+ Ka3! 3.Qd3+ Kb2 4.Qd4+ Ka3 holding the draw
Chapter 9 Endgame Tactics
White played 1.Kf3 allowing 1…Kh4 and black consolidated his advantage to win. What did white miss?
Presalovic-Vrabel Slovakia 2018-9
White missed a beautiful draw with 1.Qd8+ Kg4 (1…Kh6 does not help) 2.Qd1+!! Rxd1 stalemate in mid board. Very study like.
The tenth and final chapter is the test chapter.
In summary a really good book to improve the reader’s endgame knowledge and analytical skills.
FM Richard Webb, Chineham, Hampshire, 30th May 2021
The Chess Endgame Exercise Book Paperback, JDM Nunn, Gambit Publications Ltd., 2020
Upcoming Events
There are no upcoming events.
We focus on the British Chess Scene Past & Present !
This website uses cookies to improve your experience. We'll assume you're ok with this, but you can opt-out if you wish. Cookie settingsACCEPT
Privacy & Cookies Policy
Privacy Overview
This website uses cookies to improve your experience while you navigate through the website. Out of these cookies, the cookies that are categorized as necessary are stored on your browser as they are as essential for the working of basic functionalities of the website. We also use third-party cookies that help us analyze and understand how you use this website. These cookies will be stored in your browser only with your consent. You also have the option to opt-out of these cookies. But opting out of some of these cookies may have an effect on your browsing experience.
Necessary cookies are absolutely essential for the website to function properly. This category only includes cookies that ensures basic functionalities and security features of the website. These cookies do not store any personal information.


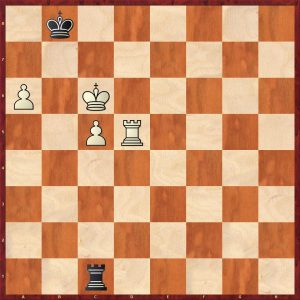
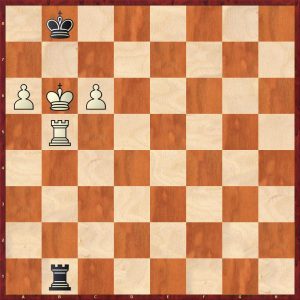
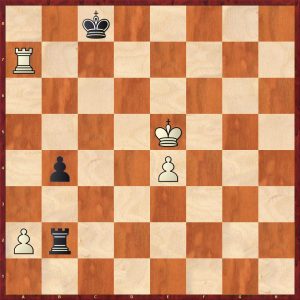
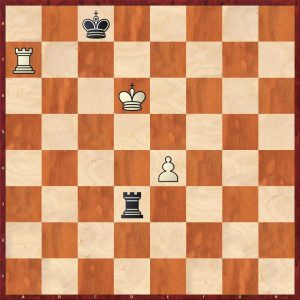
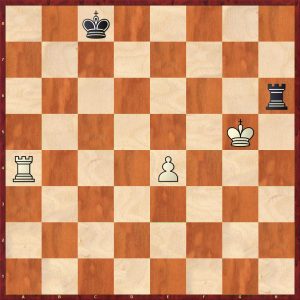
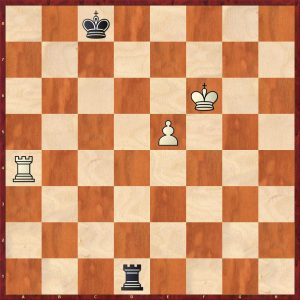

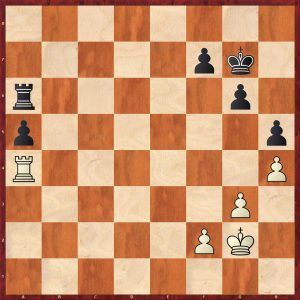
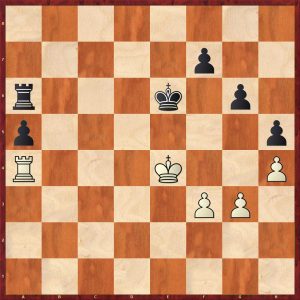
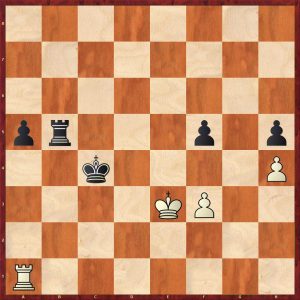
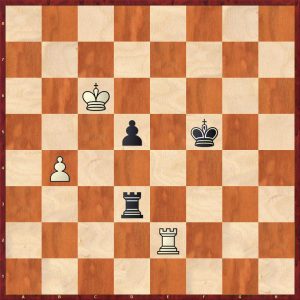
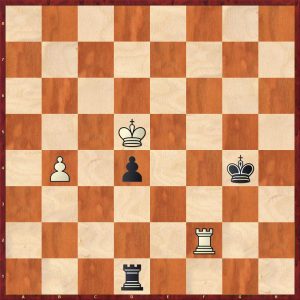
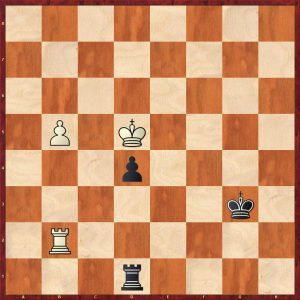

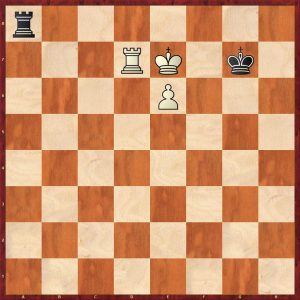
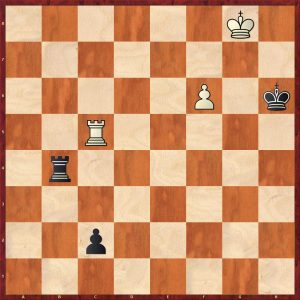
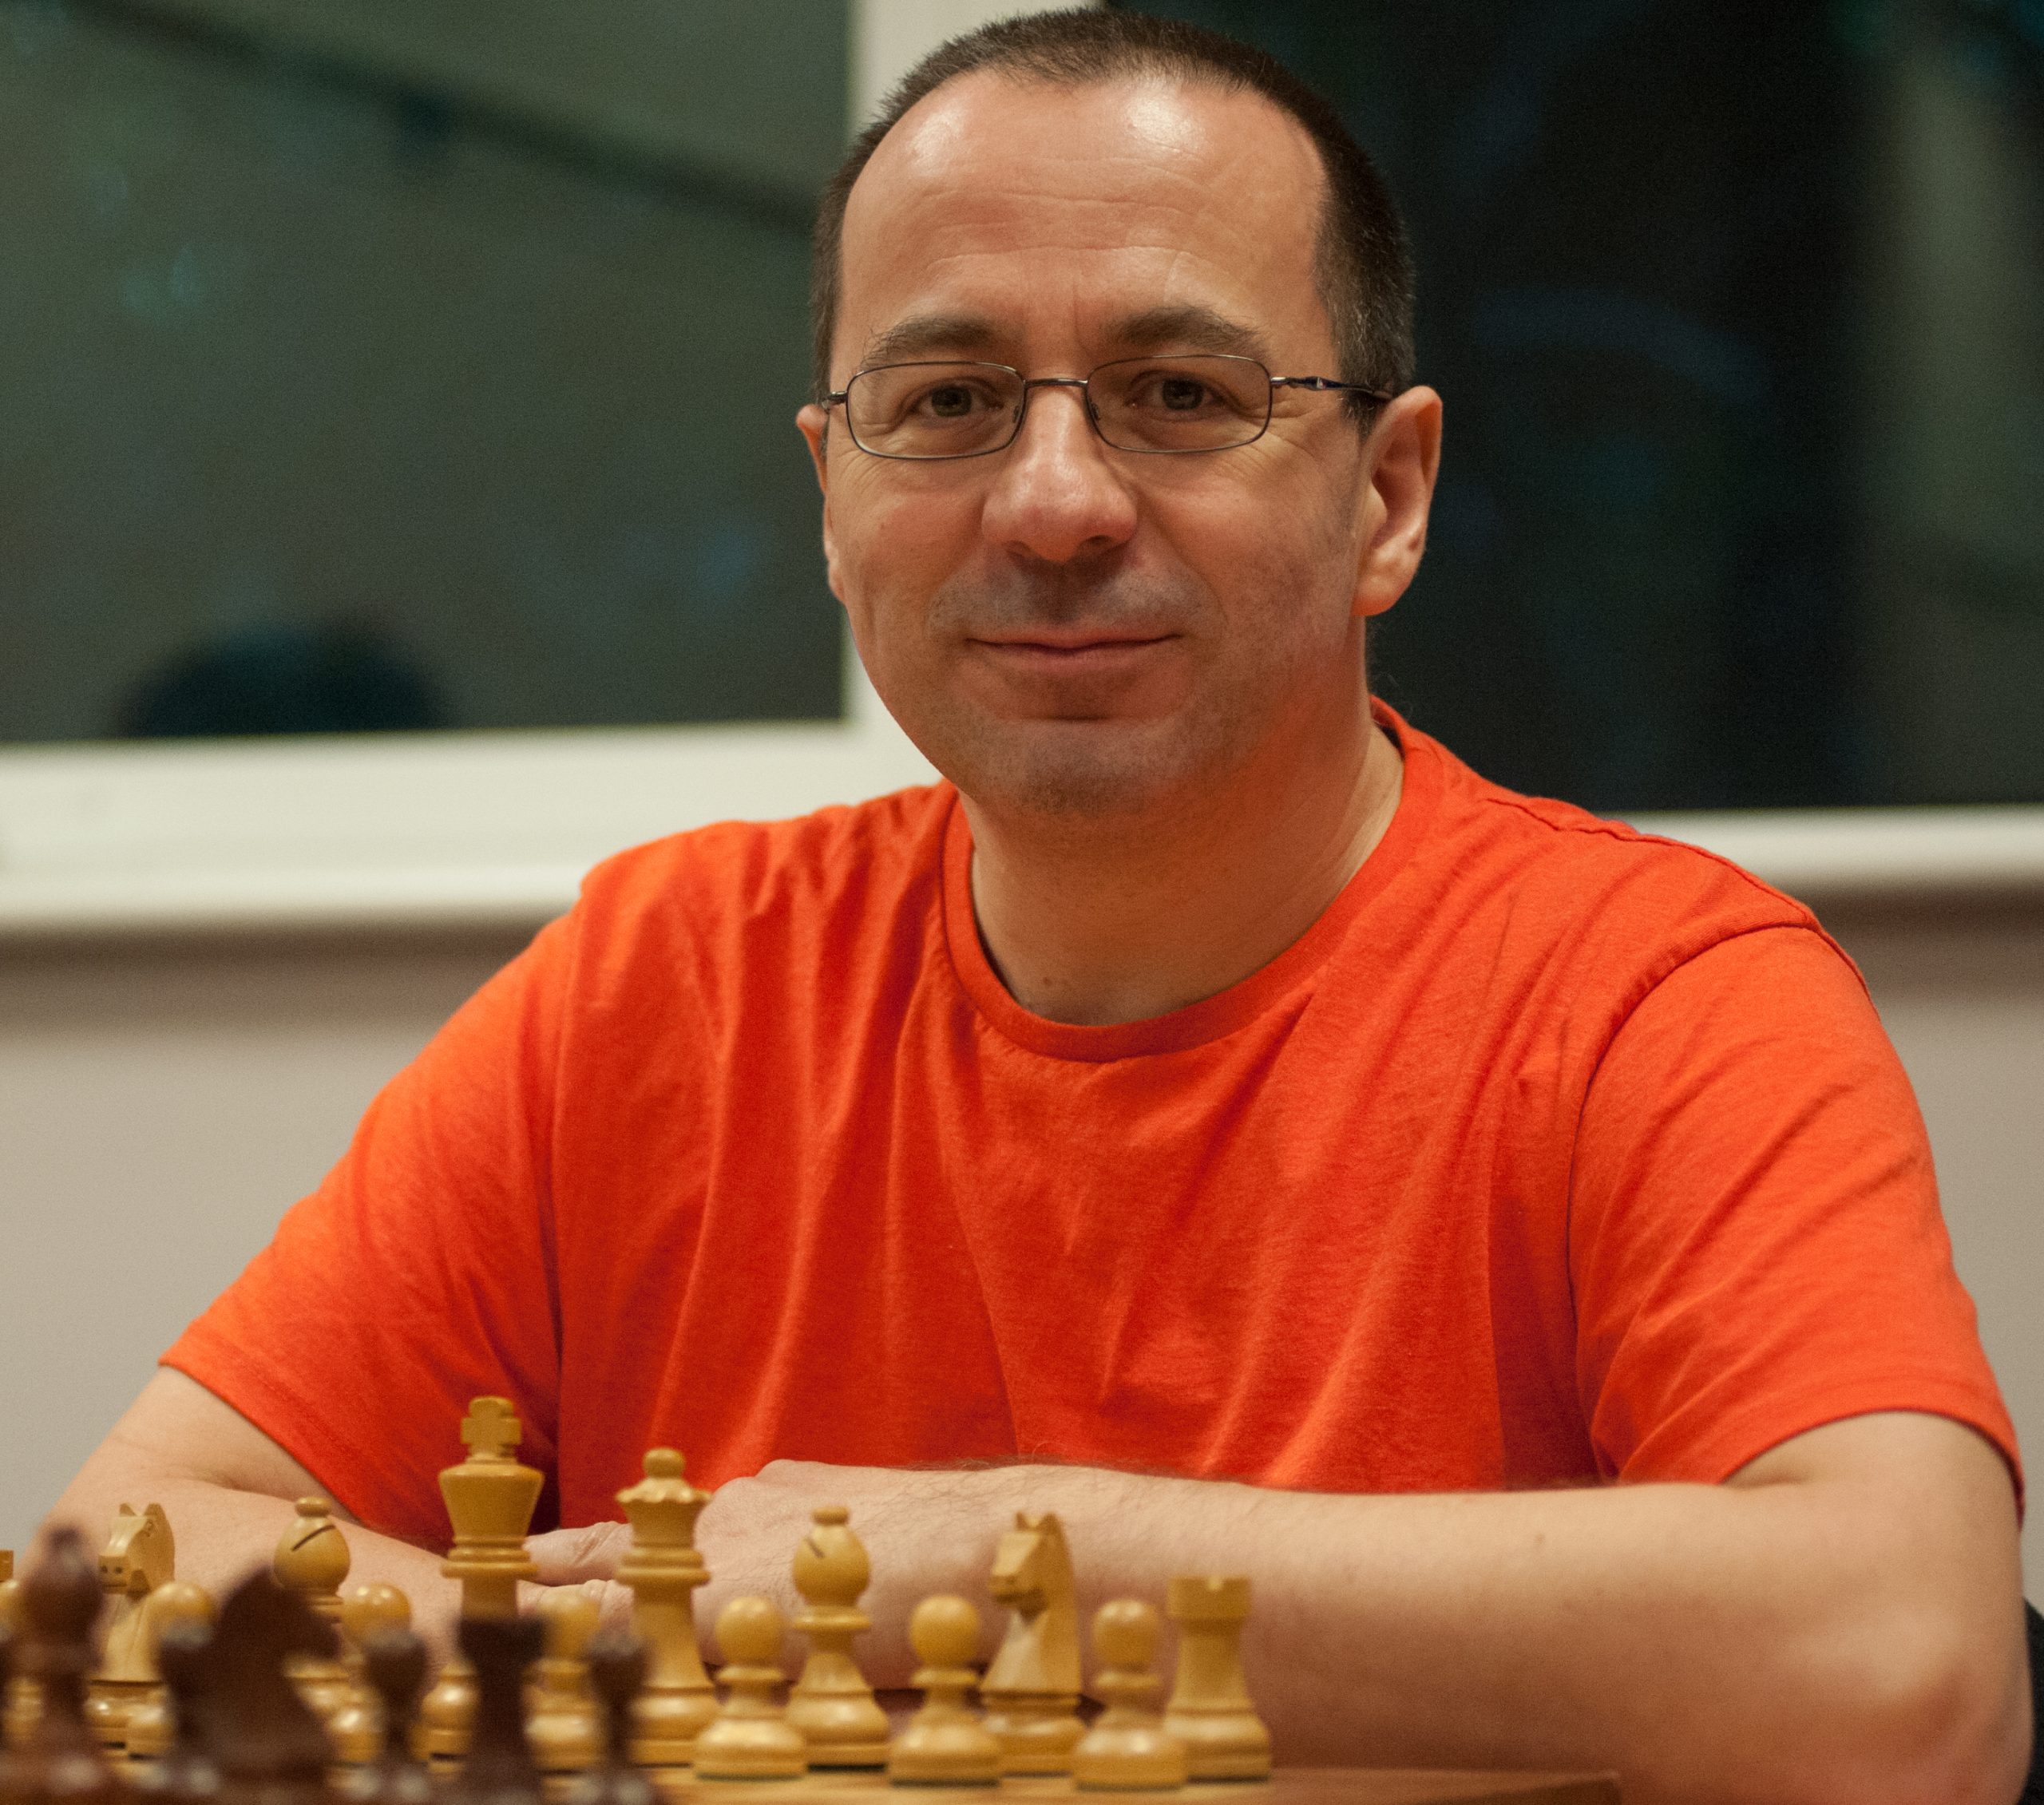
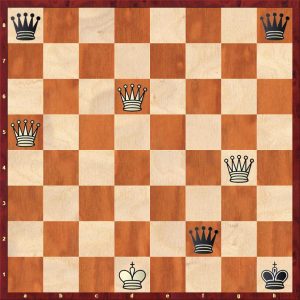
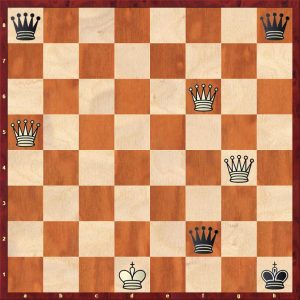
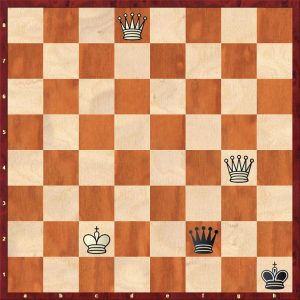
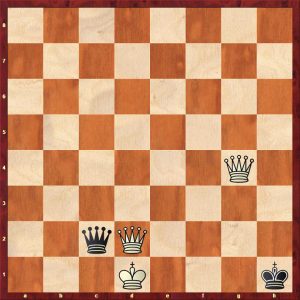
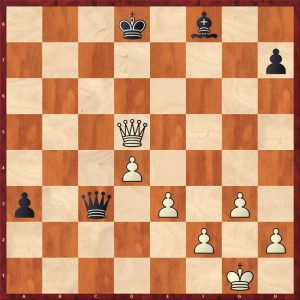
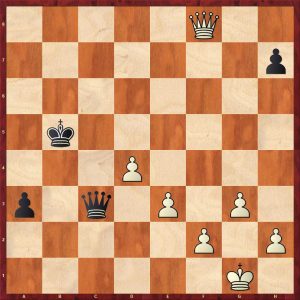
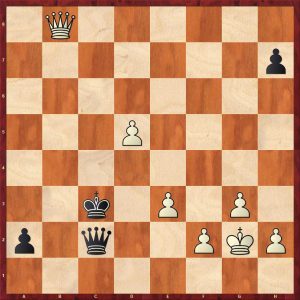
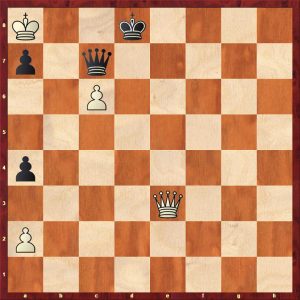
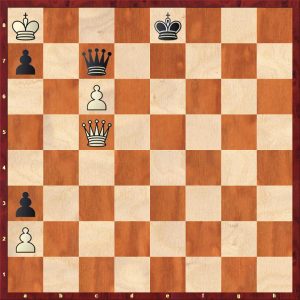
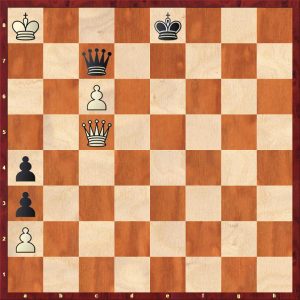
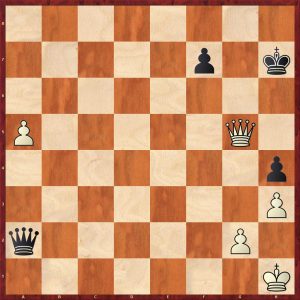
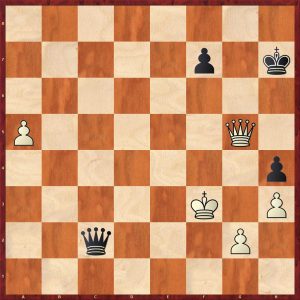
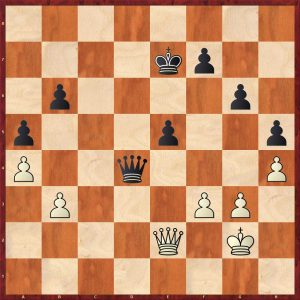
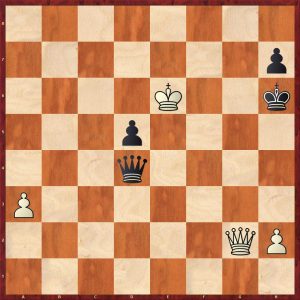
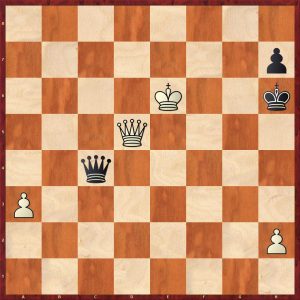
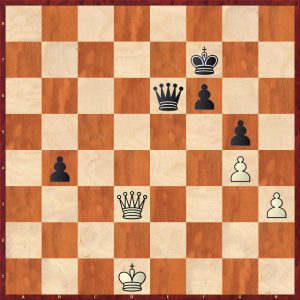
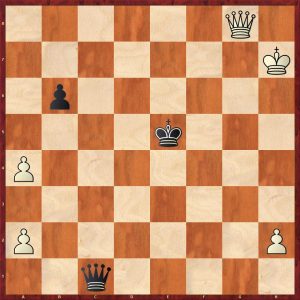
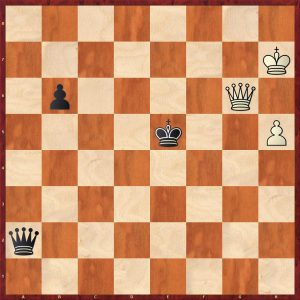
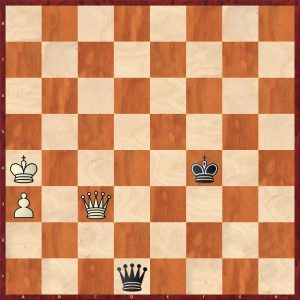
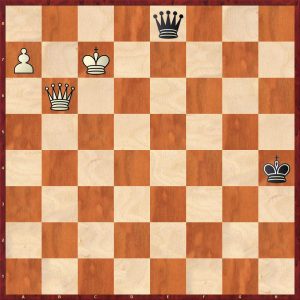
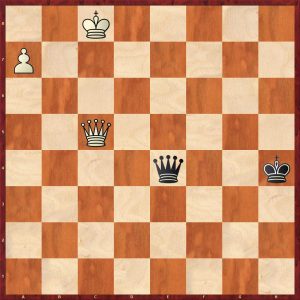
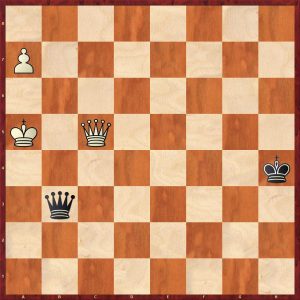
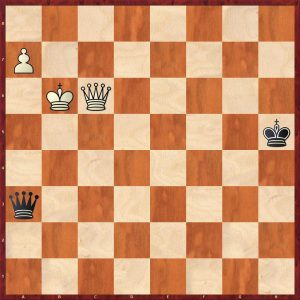
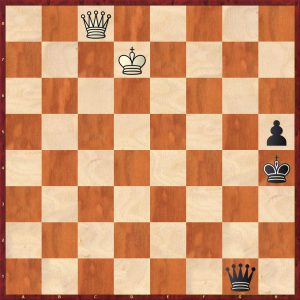
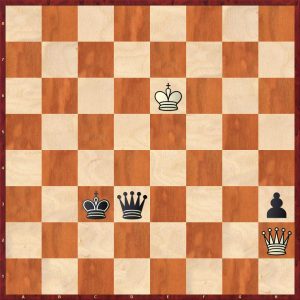
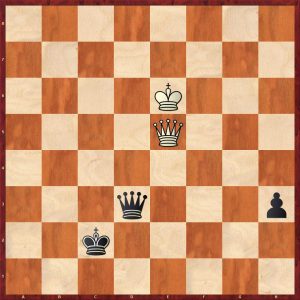
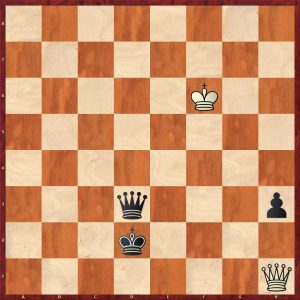

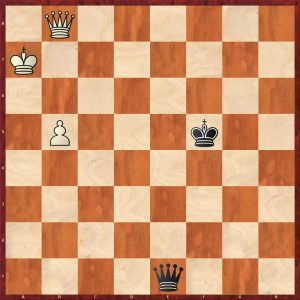
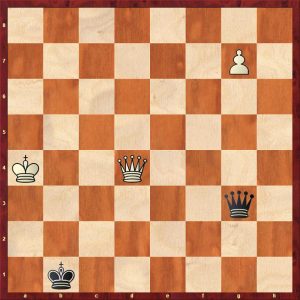
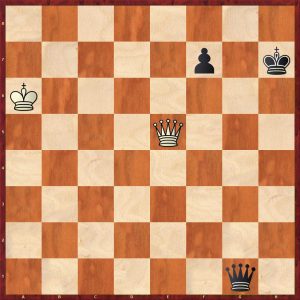
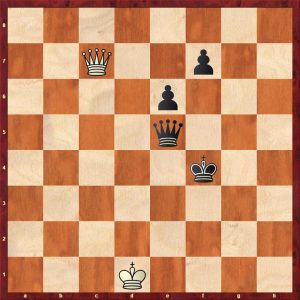
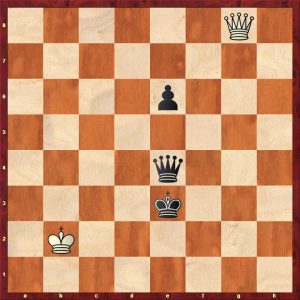
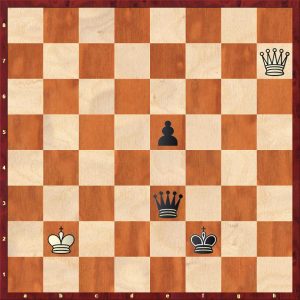
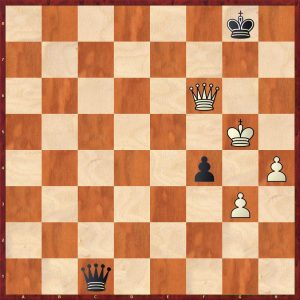
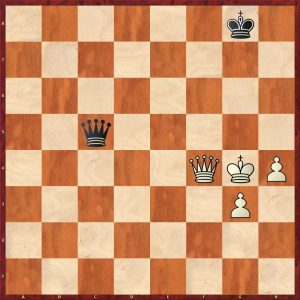

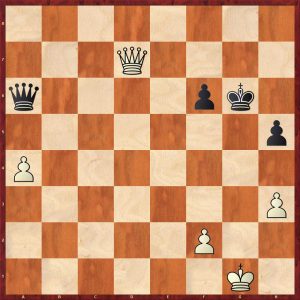
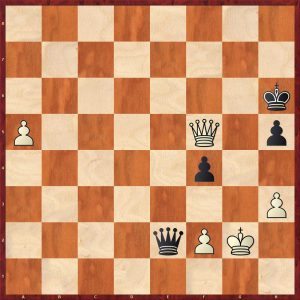
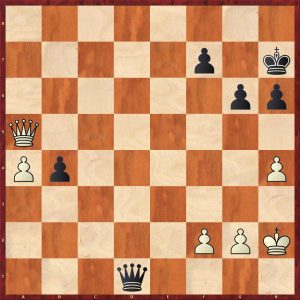
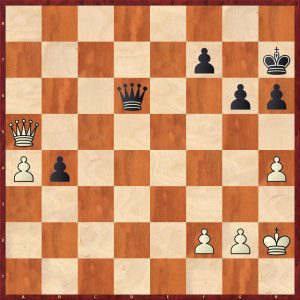
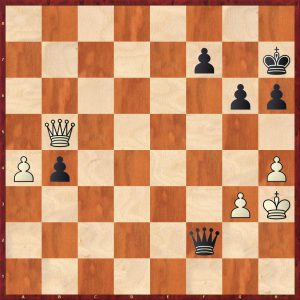
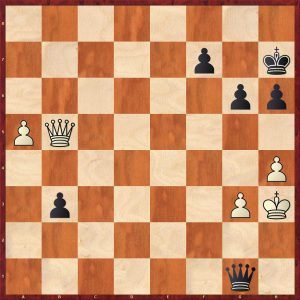
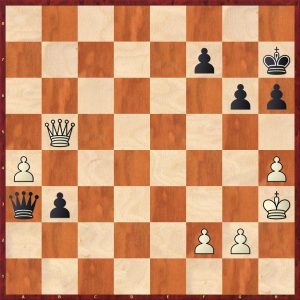
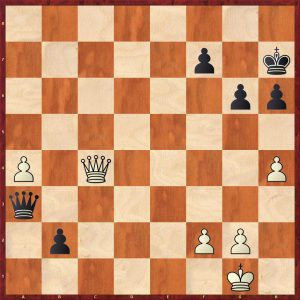
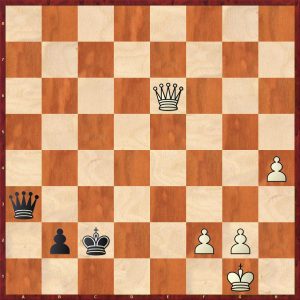
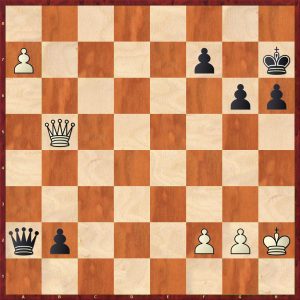
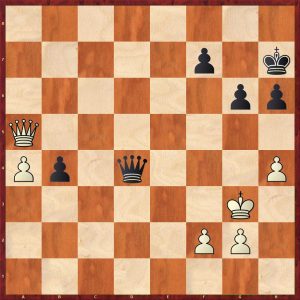
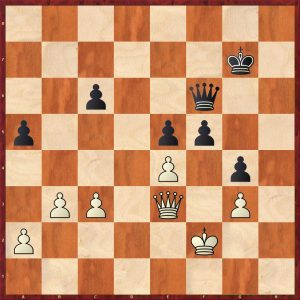
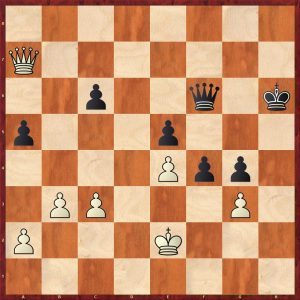
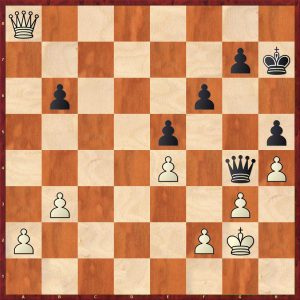
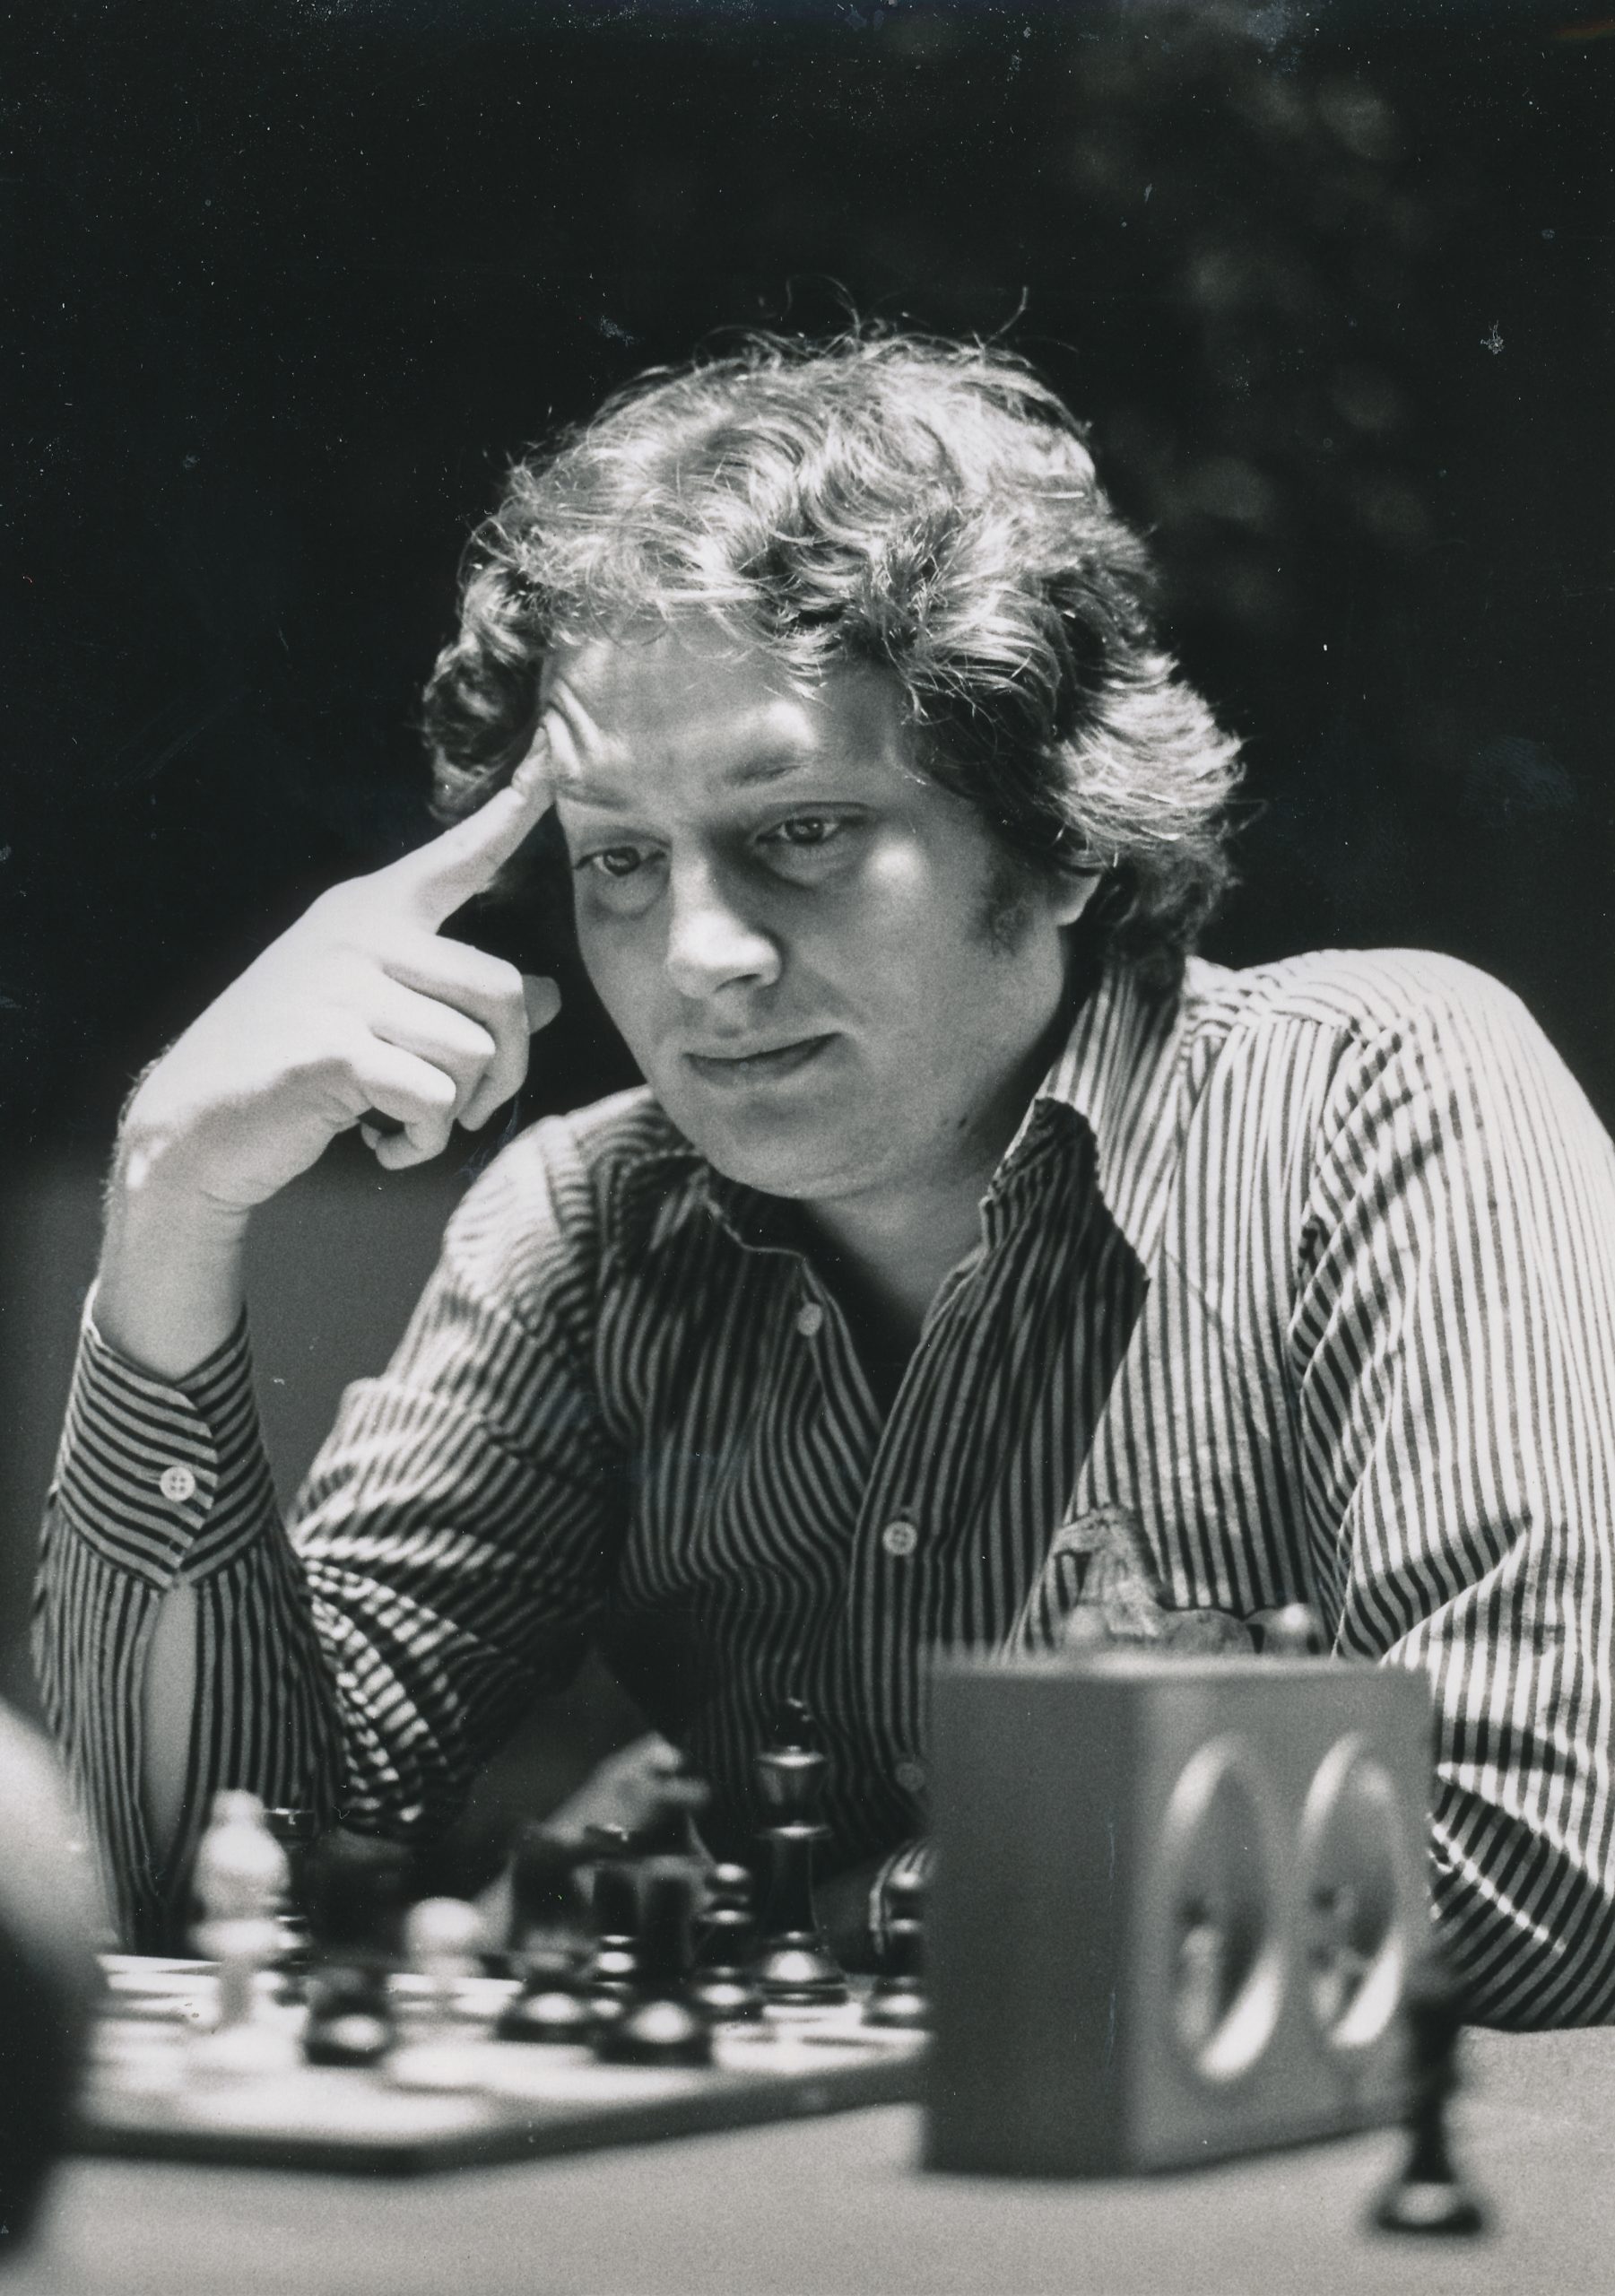

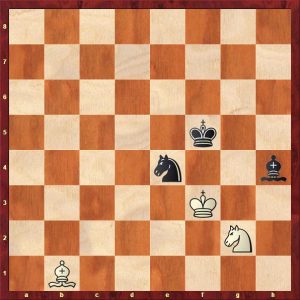
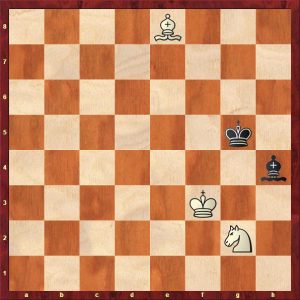
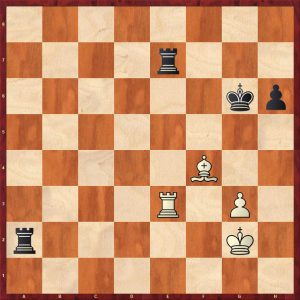
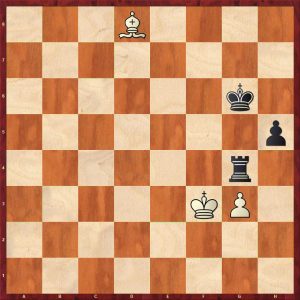
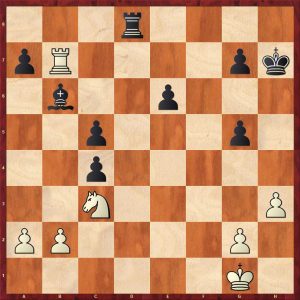
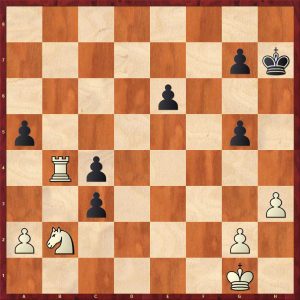
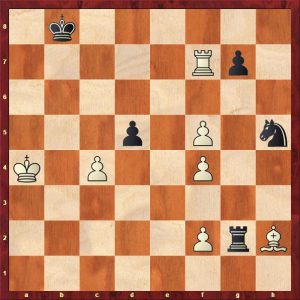
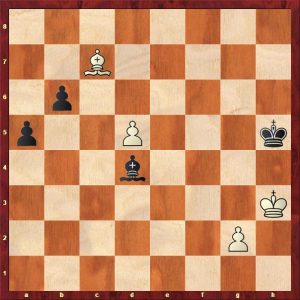
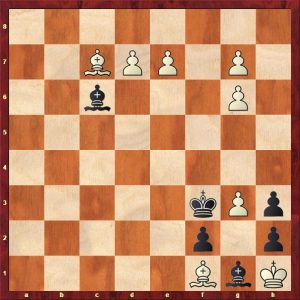
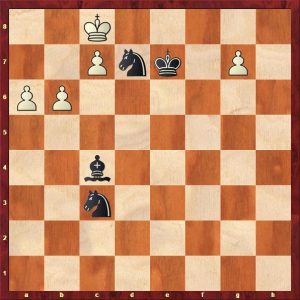
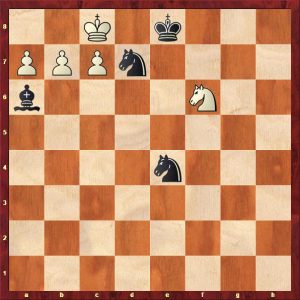
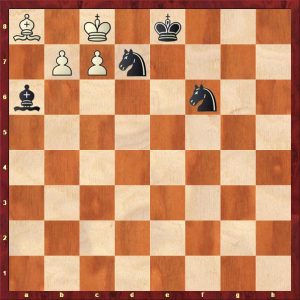
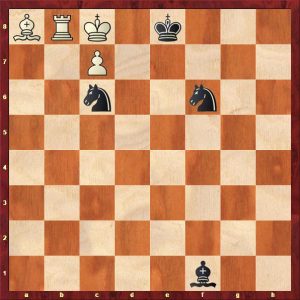
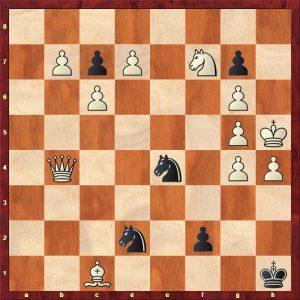
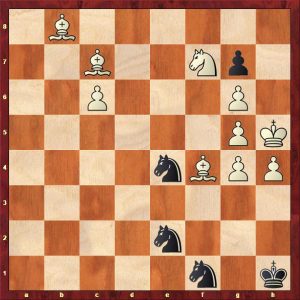
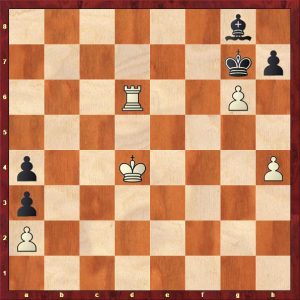
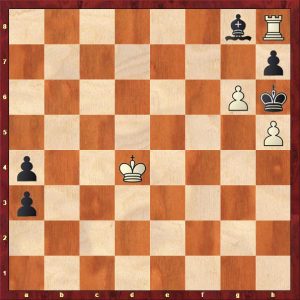
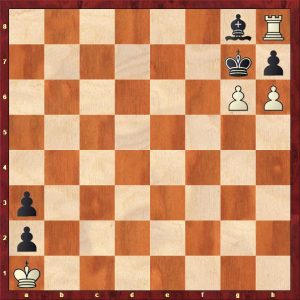

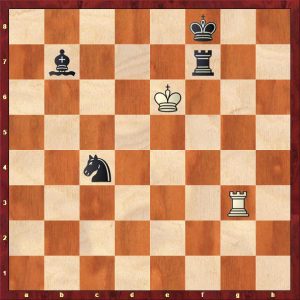
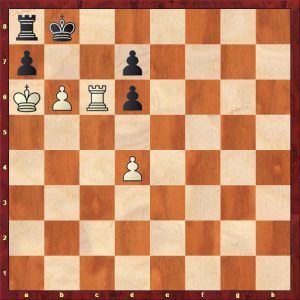
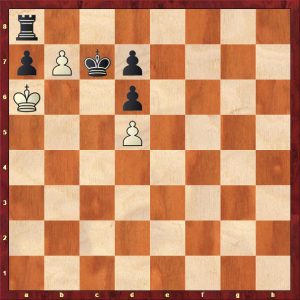
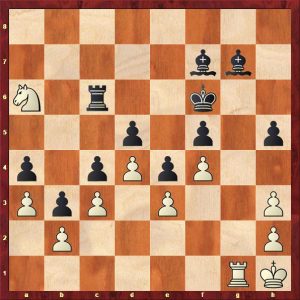
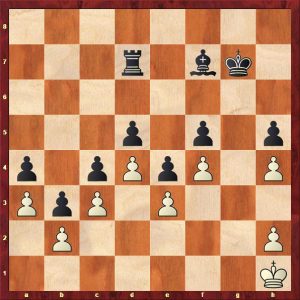
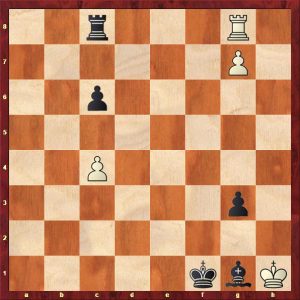
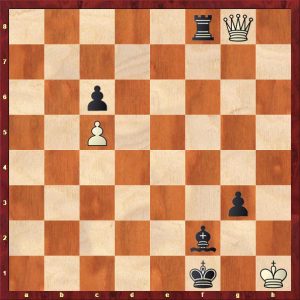
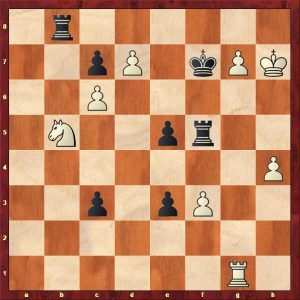
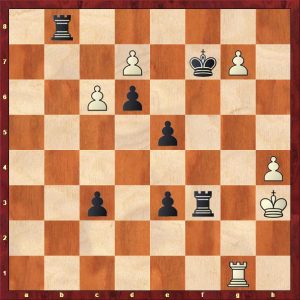
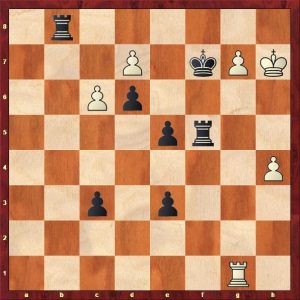
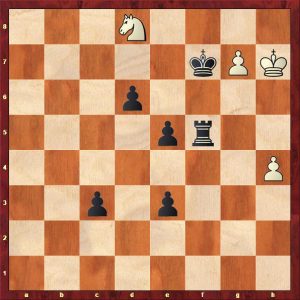
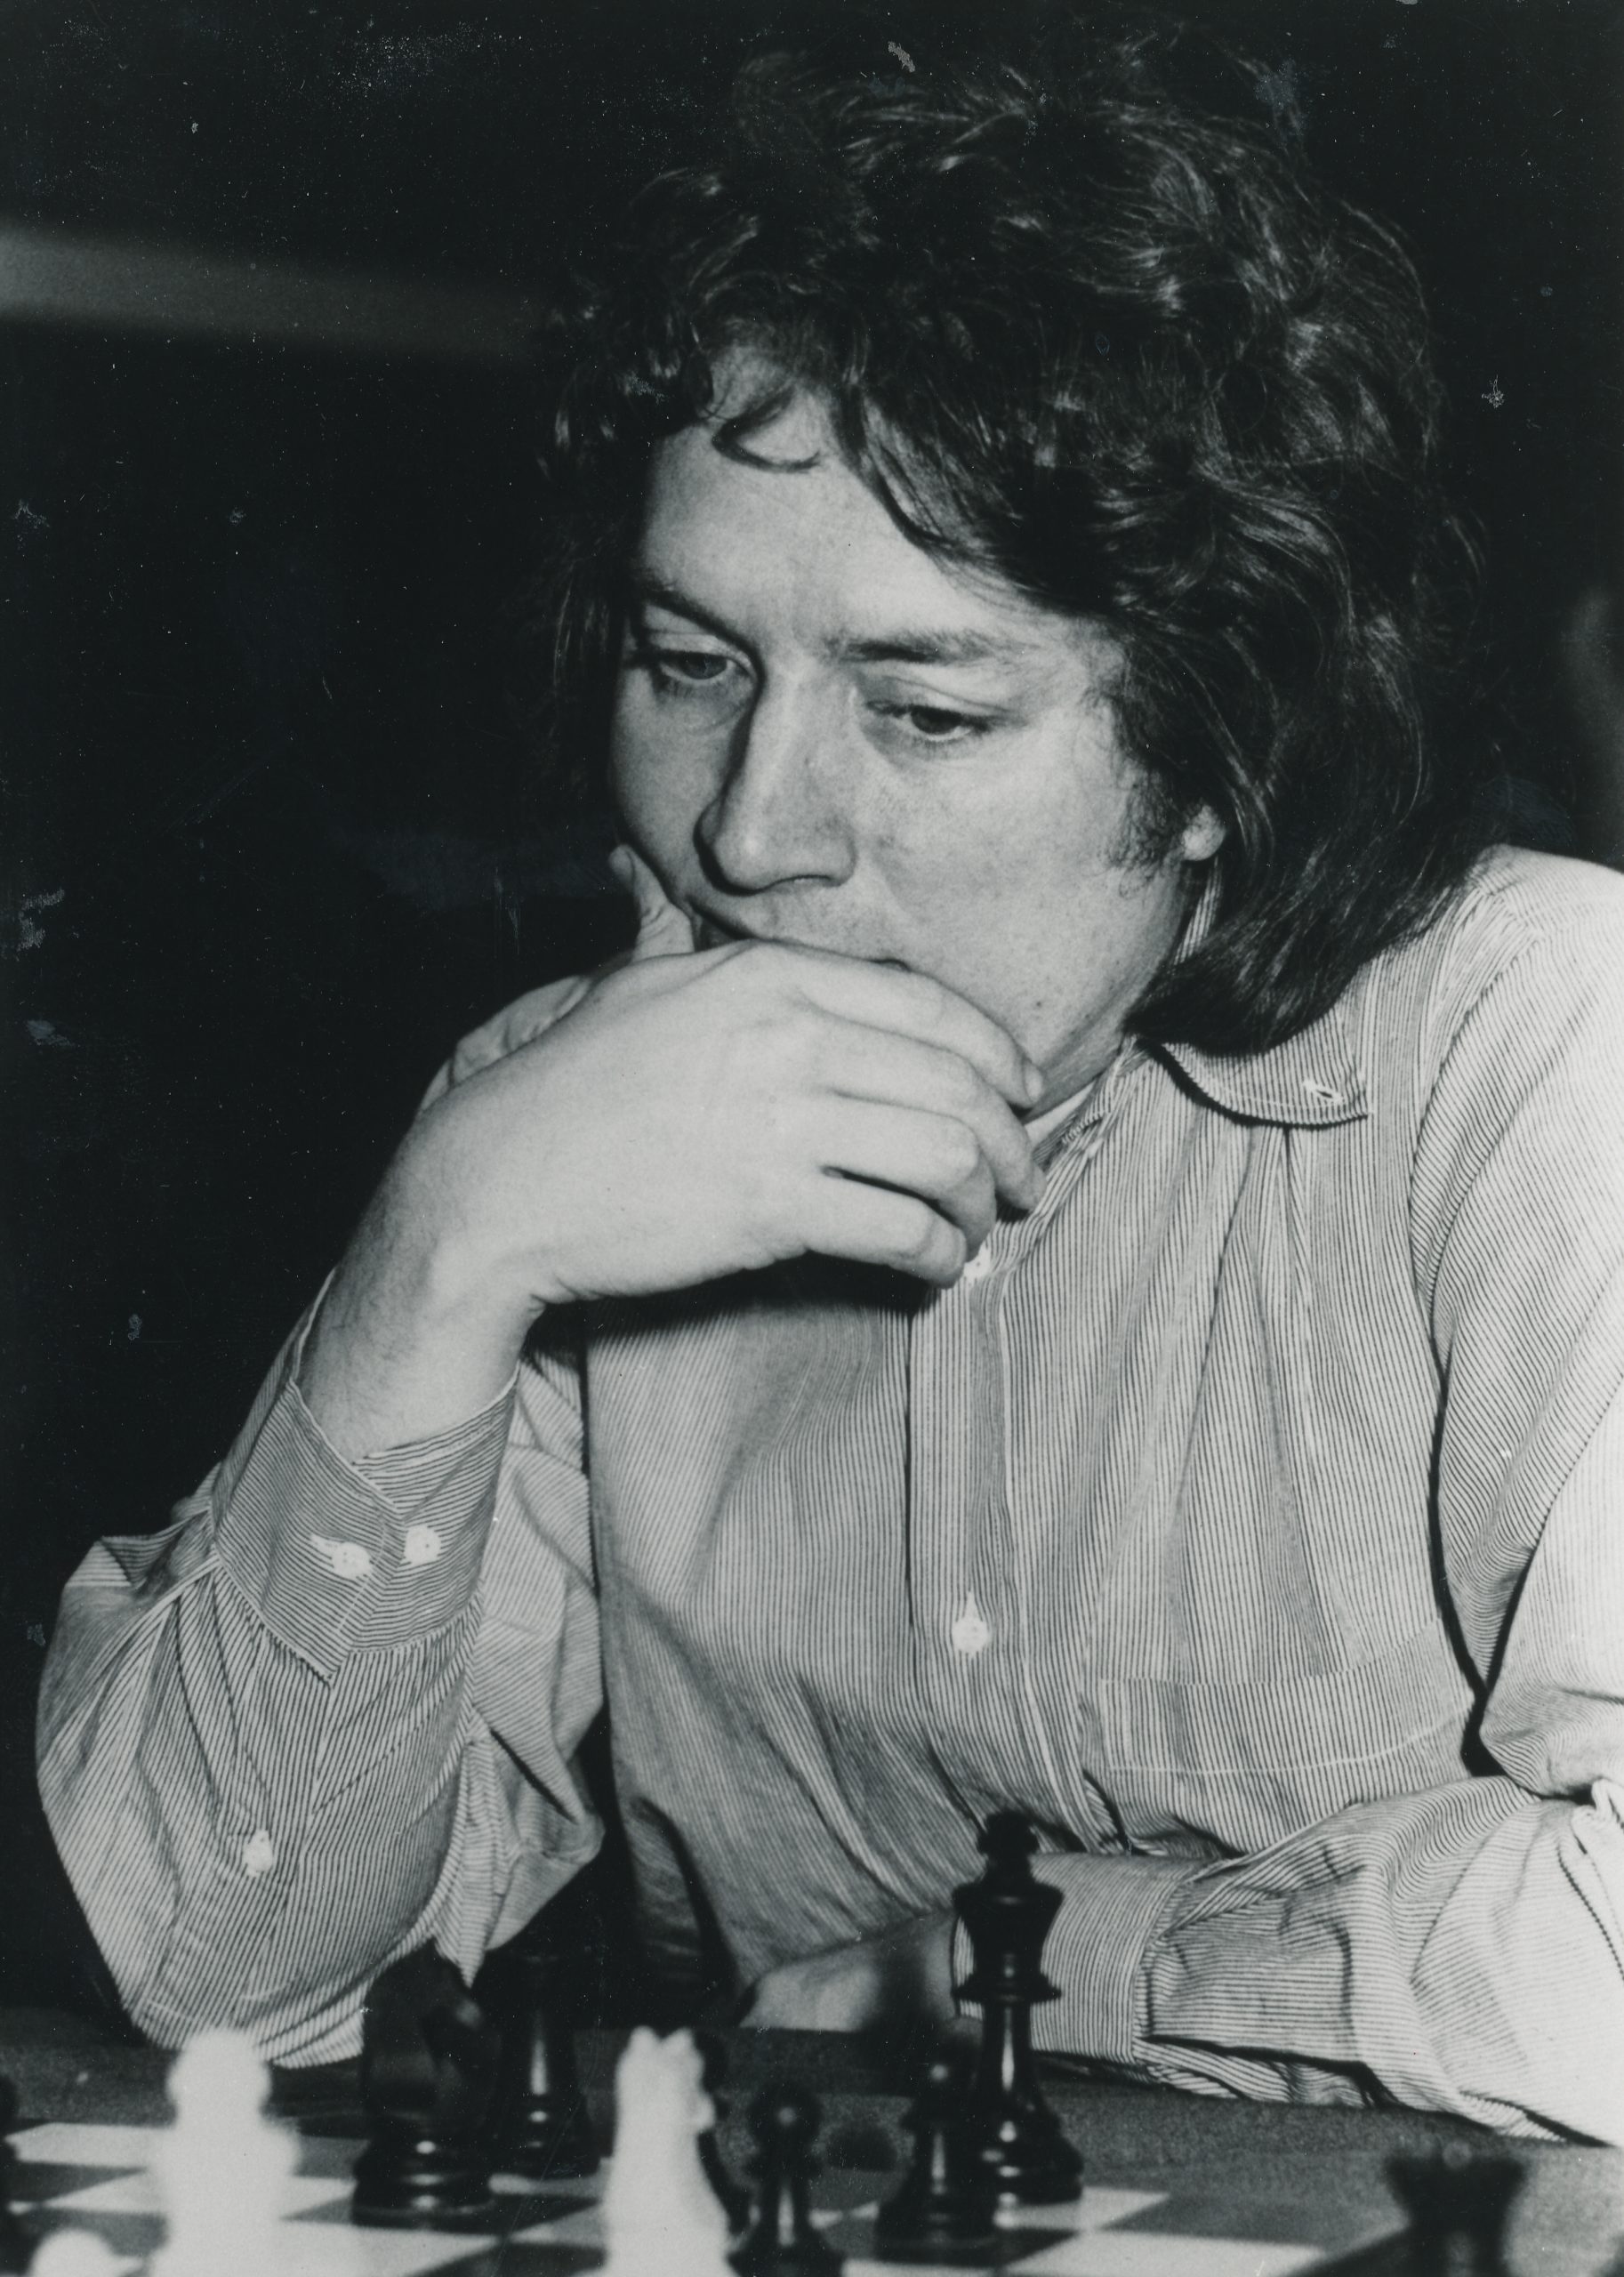
 Understanding Pawn Endgames: Valentin Bogdanov