The Chess Endgame Exercise Book : John Nunn
John Nunn has written around thirty books on chess, many of these being some of the finest published in any language : Secrets of Pawnless Endings (1994, Batsford) for example, is easily a candidate for the all time list. John is a director of Gambit Publications Ltd. together with Murray Chandler and Graham Burgess.
From the rear cover :
“Everyone knows they should work on their endgame play. So many hard-earned advantages are squandered in ‘simple’ endings… But it’s tough finding a way to study endings that doesn’t send you to sleep and that helps you actually remember and apply what you have learnt.
“While endgame theory books are helpful, active participation by the reader is a great aid to learning. I hope that this book of endgame exercises will encourage readers to put their brains in high gear, both to test themselves and to learn more about the endgame. I have spent several months selecting the 444 exercises in this book from what was initially a much larger collection.” – John Nunn
All major types of endgame are covered, together with a wide-ranging chapter on endgame tactics. Examples are drawn from recent practice or from little-known studies. The emphasis is on understanding and applying endgame principles and rules of thumb. You will learn by experience, but always backed up by Nunn’s expert guidance to ensure that the lessons you take away from the book are correct and useful.”
To get some idea of the book Gambit (via Amazon) provide a “Look Inside” at their Kindle edition.
As you would expect with Gambit, the notation is English short form algebraic using figurines for pieces. A previous criticism (ibid) has been addressed in that each diagram has a W or B “whose move it is” indicator. The diagrams do not have coordinates but this is not likely to be a problem for most.
The book is divided into 10 chapters as follows :
- Pawn Endings
- Knight Endings
- Bishop Endings
- Bishop vs Knight Endings
- Rook Endings
- Rook and Minor Piece Endings
- Queen Endings
- Endings with Queens and Other Pieces
- Endgame Tactics
- Test Papers
which is a similar sequence to that in Chess Endgame Workbook for Kids reviewed by us.
Here on YouTube John Nunn gives the reader an introduction to the book :
So, what did we think?
This is another superb endgame book by John Nunn. This excellent tome is titled as an exercise book, so the reader will gain most by attempting to solve the puzzles, but there is no compulsion to do this: the book can also be treated as a practical endgame manual.
Most of the positions are from recent actual play and show typical positions that occur in practice and therefore show practical problems and mistakes even by very strong players. In many positions, John Nunn selects two or three obvious candidate moves and asks the reader to choose one. I like this approach as it reflects a real game and the pressure to choose between candidates.
There are some theoretical positions which are shown in many endgame primers. Some studies are included which always expand the reader’s mind by showing the beautiful rich tapestry of chess and should increase the reader’s imagination in practical play.
Each of the first nine chapters has an introductory piece over two pages which is short and pithy introducing some main principles for the forthcoming chapter: for example in the king and pawn ending section, key ideas are presented including:
Shouldering Away
Distant Opposition
Diagonal Opposition
Reserve Tempi
Assessing transitions into Q+P endings
This is followed by the exercises which vary in difficulty from 1-5. This degree of hardness is indicated by a number of stars. Level 1 is solvable by a club player; level 5 will give a Grandmaster a good workout.
Most of the chapters have a special harder exercises section.
The two biggest chapters are king and pawn endings, and rook and pawn endings which reflect their importance and relative occurrence. Many endings reduce down to bare king and pawn endings which most be understood to play the endgame at a half decent level. Rook and pawn endings are the most common as the rooks tend to be developed last: excellence in these endings is a sure sign of a strong player.
The reviewer will show a flavour of positions from the first nine chapters with varying difficulty levels.
Chapter 1 – King and Pawn Endings
This first position below in the book is a level 1 exercise and an illustration of triangulation.
Black to move here has to move his king losing the d-pawn and the game quickly. But it is white to move and white wins by executing a fundamental manoeuvre as follows:
1.Ke2 Ke6 (1…Kc6 2.Kd2 is no different) 2. Kd2! Kd5 3.Kd3 and now black has the move and is in zugzwang. White has moved his king in a triangle whereas black could only move his king between two squares (because the c5 pawn restricts his manoeuvres).
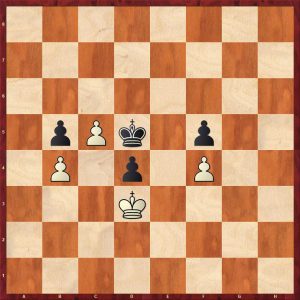
Shown below is a harder example (level 3) of triangulation.
To the casual observer this position looks to be drawn as both kings are tied up watching the opponent’s connected passed pawns. White’s pawns are further advanced and he can win with a subtle manoeuvre as follows:
- Kg4! White must prevent d5 and d4, 1…Kf6 (The toughest defence. 1…d5 loses to 2.Kg5 see below) 2.Kg3! d5 (2…Kg7 3.Kf4 d5 3.Kg5 transposes) 3. Kf4 Zugzwang, black must give way 3…Kg7 4.Kg5 e3 5.h6+ Kg8 6. Kf6 e2 7.h7+ Kh8 8.Kf7 e1=Q 9.g7+ Kxh7 10.g8=Q+ Kh6 11.Qg6#
In the basic king and pawn endgame below, the author informs the reader that black has only one move to draw.
This position illustrates not only the opposition but also consideration of the opponent’s pawn breaks. White has two winning ideas:
- Achieve the position of Ke5 v Ke7 with black to move
- Get in the h5 break when black cannot capture and follow up with Kg7 or Kh7 drawing
Black played 1…Kd6? guarding against the first idea but not the second. White won with 2.Kg4 Ke6 3.h5 gxh5+ 4.Kxh5 Kf7 5.Kh6 seizing the critical squares, winning.
To this end only 1…Kf7! draws viz: 2.Ke5 Ke7 seizing the opposition or 2. Kg4 Kf7 meeting 3.h5 with 3…gxh5+ 4.Kxh5 Kg7 drawing
The next example shows an example of the distant opposition at work.
White only has one move to draw: 1.Kh2! (Seizing the distant opposition three squares apart, 1.Kg2? Ke2 2.Kg3 Ke3 3.Kg4 Kf2 4.Kh4 Kf3 5.Kg5 Kg3 wins) 1…Kd3 2.Kh3! Kd4 3.Kh4! Ke4 4.Kg4 Ke3 5.Kg3 Ke2 6.Kg2 Kd2 7.Kh2 holding the draw. White’s king has access to all the squares on the h-file, which why this defence works.
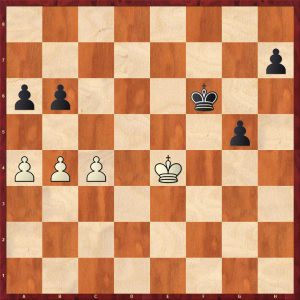
This next struggle (at level 3) shows the importance of reserve tempi and how crucial it is to manage them precisely. This is of course coupled with exact calculation. Neither side wants to move their king as to do so loses the game. Nunn gives the reader an amusing choice between 1…a4, 1…b5 and 1…e4 stating that one loses, one draws and one wins.
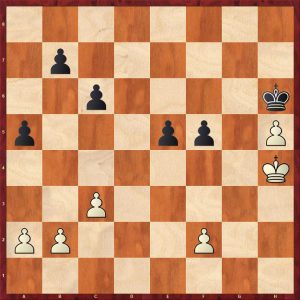
This is highly instructive as black played the worst move, but white let him escape with a draw!
Black wins with 1…b5! gaining space and ensuring that white runs out of pawn moves first. 2.b3 c5 3.c4 (3.f3 a4!) 3…bxc4 4.bxc4 a4 5.a3 e4 winning the h-pawn 6.Kg3 Kxh5 7.Kf4 Kg6 8.Ke5 Kg5 9.Kd5 Kf4 10.Kxc5 Kf3 11.Kd5 Kxf2 12.c5 e3 13.c6 e2 14.c7 e1=Q 15.c8=Q Qd2+ 16Ke5 f4 with a winning Q ending for black
It is very instructive to look at the other two moves that Nunn suggests: it is all down to exact calculation which is why king and pawn endings are so interesting and difficult!
I shall finish the king and pawn examples with a level 5 difficulty example.
How does white draw here? White played 1.Kd5? and lost.
1.c5! b5! (1…bxc5? loses as 2.b5 axb5 3.a5 wins as black cannot catch the a-pawn and his own pawns are too slow. 2.axb5 axb5 White has a protected passed pawn but most play some accurate moves to draw. 3. Kd5!! (3.Kf3? loses to the triangulation technique of the second example above viz: 3…h5 4.Kg3 Kf5 5.Kf3 h4 6.Kg2 g4 7.Kf2 g3+ 8.Kf3 Ke5 9.Kg2 Ke6! 10.Kf3 Kf5 11.Kg2 Kg4 12.c6 h3+ 13.Kg1 Kf3 14.c7 h2+ 15.Kh1 Kf2 16.c8=Q g2+ mates) 3…g4 (3…h5 4.Kd6 h4 5.c6 h3 6.c7 h2 7.c8=Q h1=Q 8. Qe6+ Kg7 9.Qd7+ is a perpetual) 4.Ke4!! A brilliant switchback 4…h5 5.Kf4 Ke6 6.Kg3 Ke5 7.Kh4! Now white oscillates between h4 and g3 drawing, black cannot play his king to g5 as the white c-pawn promotes. The Kd5, Ke4 manoeuvre forced black to advance his pawns in a sub optimal manner allowing white a blockade. A very instructive ending.
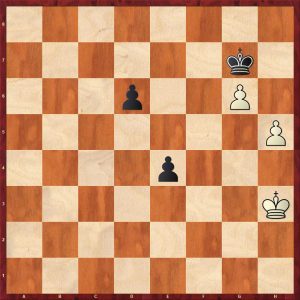
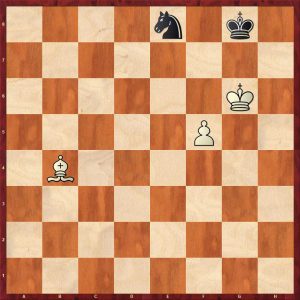
Chapter 2 covers knight endings. The reviewer will give a couple of examples. The type of position below does occur in practice quite often: the stronger side may have won a knight on the queenside by promoting an outside passed passed pawn. How does white win?
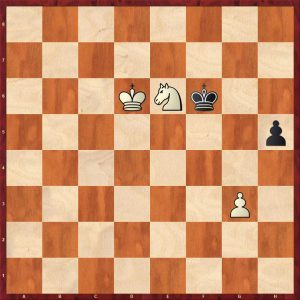
Black is threatening Kf5 followed by Kg4 drawing.
White must play 1.Nd4! Kg5 (threatening Kg4 followed by h4) 2.Ke6! (The obvious 2.Ke5? throws the win away 2…Kg4 3.Nf5 Kg5 zugzwang 4.Ke6 Kg6 zugzwang) 2…Kg4 (2…h4+ 3.Nf3+ wins) 3.Nf5! Kg5 4.Ke5! Zugzwang 4…Kg4 4.Kf6 Kf3 5.Kg5 winning the pawn and the game. This is a very common theme in knight endgames as a knight cannot lose a tempo.
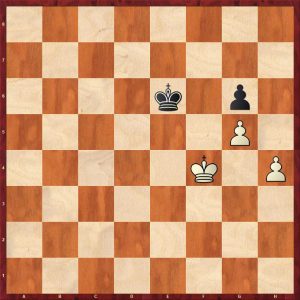
The second knight and pawn example is harder.
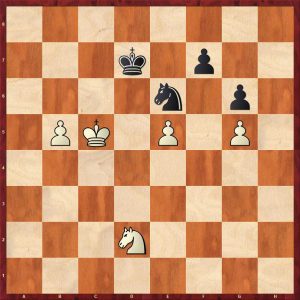
White played 1.Kd5 which only draws. It looks logical as it places the king near the kingside ready for a hoped for decisive invasion. However it does not win. Passed pawns must be pushed!
White wins with 1.Kb6! Blocking his own pawn but the king must support the dangerous pawn. 1…Nxg5 2. Kb7 (Keeping the black pieces from their optimal squares. 2.Ka7? Ne6 3.Ne4 Nd4! 4.b6 Nc6+ draws) 2…Ne6 3.Ne4! g5 4.Nf6+ Kd8 5.b6 Nc5+ 6.Ka8! Ke7 7.Ne4! Nd7 8.b7 g4 9.Nc5 wins
Chapter 3 covers bishop endings.
The type of ending below is fairly common and is covered in endgame primer manuals. How does white draw?

The key factor here is the presence of the h-pawn which renders this position a draw with accurate defence, because of the edge of the board and stalemating opportunities. A similar position with pawns on the e,f & g files would be won for black.
White lost this game by playing 1.Bb5? but could have drawn as follows:
1.Kg1! (Or 1.Kh1!) Kg3 2. Bd7! (2.Bd5? loses to 2…f2+ 3.Kf1 Kh2) 2…f2+ 3.Kf1 Kf3 4.Bxg4+ Kxg4 5.Kxf2 with a clear draw
The position below is covered in Basic Chess Endings by Fine and other primers on the endgame. How does black to play draw?
1…Kd5! (Black played 1…Be7? Now white wins with a standard idea. 2.Bd8 Bc3 3.Bh4 Ba5 4.Bg3 and black prevent cannot prevent Bc7 blocking out the bishop and wins) 2. Bd8 Bc3 3.Bh4 Ba5 4.Be1 Bb6 5. Bf2 Ba5 6.Bg3 Kc6 (Just in time to stop Bc7, black draws) =
This chapter also has some excellent examples of opposite coloured bishop endgames which are well worth study. Buy the book to see these.
Chapter 4 covers bishop versus knight endings.
Here is a position that looks desperate for black, so he resigned. But there is a saving resource. His pieces are restricted and near the corner, so….
1…Kh8! (Any knight move allows the f-pawn to advance decisively) draws 2.Kf7 Ng7! 3.Bd4 (3.f6 Nh5 draws) 3…Kh7! draws as 4. Bxg7 is stalemate
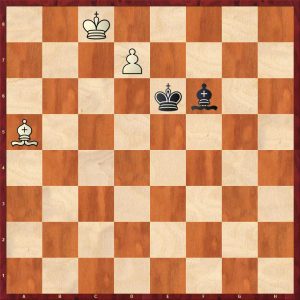
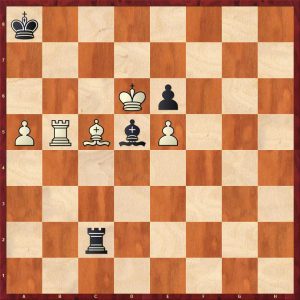
The next fight shows how poorly the knight deals with rook pawns.
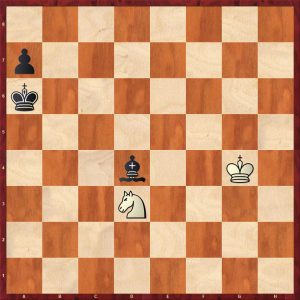
Black won with 1…Kb5 2.Kf3 Kc4 3.Ke2 Kc3 Keeping the white king away by shouldering – a common theme in all sorts of endings. Even though the pawn has not moved, white cannot draw! 4.Nf4 Kc2 5.Nd5 a5 (Finally the pawn moves) 6.Nc7 a4 7.Nb5 Be5 8.Na3+ (8.Ke3 Kb3 9.Kd3 Kb4 10.Na7 a3 11.Nc6+ Kc5 12.Na5 a2 13.Nb3+ Kb4 14.Kc2 Bf6 is a win by zugzwang – a common occurrence in B+P v N endings) Kb3 9.Nb1 Bc3 10.Kd1 Ba5 11.Kc1 Bb4 0-1 as 12. Kd1 is met by Kb2 winning easily.
Chapter 5 covers Rook Endings.
The position shows a common type of position. Nunn asks the question, which is best 1.Rf8+, 1.Rg8 or 1.Ke5?
The intermediary check gains a tempo which wins: 1.Rf8+! Ke4 Attempting to shoulder barge the white king 2. Rg8! Kf4 3.Kd5 g4 4. Kd4 1-0 as 4…h3 5.Kd3 Kf3 6.Rf8+ Kg2 7.Ke2 Kg1 8.Kf3 g2 9.Kg3 Kh1 10.Rh8+ Kg1 11.Rh2 wins
Which king move should white make in the position below?

White played 1.Ke6? and lost because of 1…Re1+ which is similar to the position above. 1.Kg6 draws as white should keep his king on the same side as Black. 1…Kf3 2.f5 Ke4 3.f6 Rg1+ 4.Kh7 Rf1 5.Kg7 Ke5 6.f7 draws
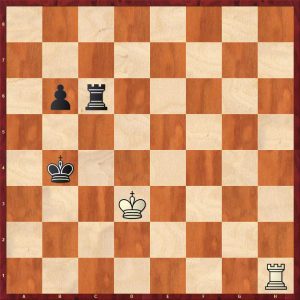
How does black draw in this common type of position?
1…Re1! 2.f6 (2.Kf6 Kb4! 3.e7 Kc5 4.Kf7 Kd6 draws after 5.f6 Kd7 or 5.e8=Q Rxe8 6.Kxe8 Ke5 draws) 2…Re5!+ (A superb hesitation check which is easy to miss, 2…Rxe6 loses to 3.f7) 3.Kg6 Rxe6 drawing.
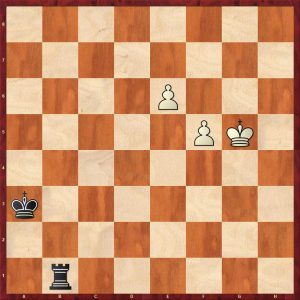
One move wins for black in this position. What is it?
1…Rc3+! is the winner. This idea is analysed in “My Sixty Memorable Games” in a Fischer game with Gligorić (with reversed colours). Fischer comments that he spent all night analysing this rook and pawn endgame learning a lot about rook and pawn endgames.
2. Kd2 b5 (now the black rook shields the king from a frontal assault) 3.Rb1+ Rb3 4. Rh1 Ka3 5.Kc2 Rb2+! 6.Kc1 b4 7.Rh8 Rg2 8.Ra8+ Kb3 9.Rb8 Rg1+ 10.Kd2 Rb1! 11.Rb7 Ka2 and white cannot avoid the Lucena position for long.
In the example below, Dr Nunn asks which is better 1…Ke8 or 1…Kg8? This is a fundamental rook and pawn position that everyone should know.
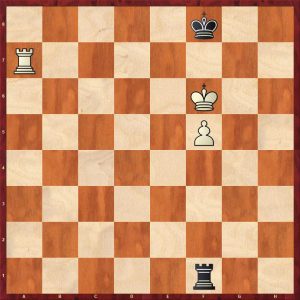
The black king should move to the short side, so the rook can operate on the long side.
Black played 1…Ke8? which loses 2.Ra8+ Kd7 3.Rf8! The key move 3…Rf2 4.Kg7 Rg2+ 5.Kf7 Rf2 6.f6 and the Lucena will soon be reached.
1… Kg8! would have drawn 2. Ra8+ Kh7 3.Ke6 (3.Rf8 Ra1! preparing flank checks on the long side) 3…Kg7! 4. Ra7+ Kf8 5.Kf6 Kg8 repeating =
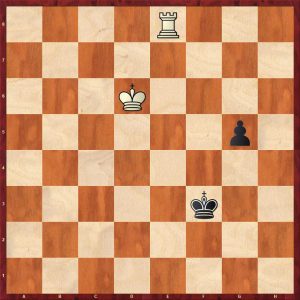
Should black play 1…Rb6, 1…Ka7, 1…Rh2?
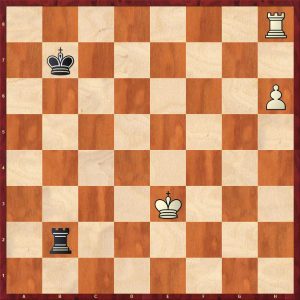
Only 1…Rb6! draws setting up the Vancura position as soon as possible. 2.Kf4 Rc6 3.Kg5 Rc5+ 4.Kg6 Rc6+ 5.Kg7 Rc7+ with a standard Vancura draw. This Vancura draws only works with rook pawns.
Chapter 6 covers Rook and Minor Piece endgames.
I will show three examples of didactic positions.
This is a standard theoretical position with the king in the wrong corner (same colour as the bishop).
White wins by 1.Kf6! (Black is threatening Bb2 followed by Bg7) 1…Be3 2.Kf7 Ba7 3.Ra6 smoking out the bishop 3…Bb8 4.Ra8 Bc7 5.Rc8 Bf4 (5…Bb6 6.Rc3 Kh6 7.Rc6+ wins the bishop) 6.Rc4 Bg5 7.Rc3 1-0 since 7…Kh6 8.Rh3+ wins the bishop
In the next game we have a rook and opposite colour bishop ending where mating ideas are always on the agenda particularly when a king is on the edge of the board.
White won with 1.Kc7! (Threatening the brutal 2.Rb8#) 1…Bb7 2.a6! winning easily as 2…Rxc5+ 3.Rxc5 Bxa6 4. Ra5 wins
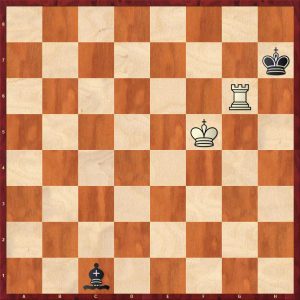
The next example shows the notoriously difficult rook and bishop versus rook ending. The reviewer has had this endgame twice in practice and won both times. This type of position is very common in this ending. Black has only one drawing move. What is it?
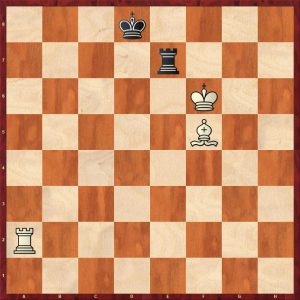
1…Rb7! 2.Rc2 Rb8 3.Be6 Ra8 4.Rc6 Rb8 5.Ke5 Rb7 6.Kf6 Rb8 drawing
This second rank defence is good but cannot always be reached. It does not work when the king is in the corner.
Here is a R v B with the defending king near the safe corner, however, this position is still very dangerous for white, who has one drawing move.
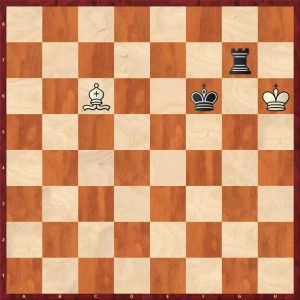
White played 1.Bd5? and lost as follows: 1…Rd7 (Black smokes the bishop out again) 2.Bc6 Rc7 3.Bd5 Rd7 4.Bc6 Rd6 5.Bb5 Rb6 6.Be8 Rb8 7.Bg6 Rh8+ winning 1.Kh5 draws since 1…Kf5 2.Kh4 Kf4 3.Kh3 or Kh5 draws
Chapter 7 covers queen endings.
Here I will give a flavour with four endings. Here white has a strong passed pawn but white’s queen is offside. How does black impede its further advance? This type of position occurs quite frequently.
Black played 1…Qc5? (1…Qf3? also loses 2. Qb6 wins) 2.Kg1 Qd4 (or 2…Qc1+ 3.Kg2 winning as black cannot check on the long diagonal) 3.c7 1-0
Black can draw with 1…Qd4! (Harassing white’s king and stopping Qb6) 2.Kg1 Qd1+ 3.Kg2 Qd5+ draws as 4.f3 Qd2+ 5.Kh3 Qc1 draws
The next position shows how dangerous a queen can be: don’t forget she is a potent mating force! Black is a pawn up but white’s next few moves show how immaterial that is.
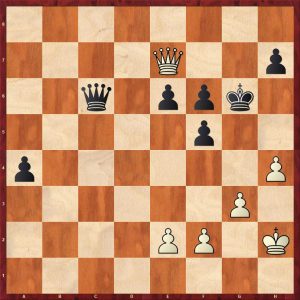
White won with a mating attack as follows:
1. h5+ (1…Kg5 2.Qg7+ Kxh5 3.Qxh7+ Kg5 4.f4+ Kg4 5.Qh3#) 1… Kh6 2.Qxf6+ Kxh5 3.f4 h6 4.Qf7+ 1-0 as 4…Kg4 5.Qg6#
There are many games, even in GM praxis where the stronger side falls into a mating net trying to a avoid a perpetual.
The next game shows the notorious Q + rook’s pawn v Q ending.
Here black has placed his king onto a very poor square. Black should have put his king in the a1 corner area to draw. Even then, the defending side has to be very accurate. How does white win?
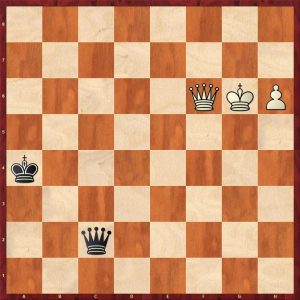
Black’s king is very vulnerable to a cross check. White should move his king towards the 4th rank to exploit black’s king position. So:
1.Qf5! (1.Kg7? only draws, don’t forget a queen can shepherd home a pawn without its king’s help, so white plays his king towards the rank that black’s king is on) 1…Qg2+ 2.Kf6 Qb2+ 3.Kg5 (Black has no more checks) 3…Qh8 4.Qd7+ (4.h7 is quicker) 4…Ka3 (4…Kb3 lasts longer) 5.Qe7+ Ka4 6.h7 Qb8 7.Qd7+ Kb3 8.Qd3+ Ka4 9.Qd4+ wins 1-0
Notice how black’s king position obstructs the scope of his own queen and allows a cross check.
Here is an unusual position which looks hopeless for black as white’s king looks safe and a7 followed by a8=Q looks inevitable. However, black can draw!
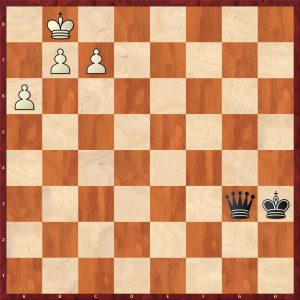
1…Kg2! Getting the king out of way to avoid any potential cross checks. 2.a7 Kf3! ( or 2…Kf2) 3.a8=Q Qg8+ 4.c8=Q Qg3+ 5.Qc7 Qg8+ 6.Ka7 Qa2+ 7.Kb6 Qb3+ 8.Kc5 Qc2+! 9.Kd6 Qg6+ 10.Kd5 Qe4+ with a draw by perpetual despite white being a queen and a pawn up!
Chapter 8 is Endings With Queens And Other Pieces
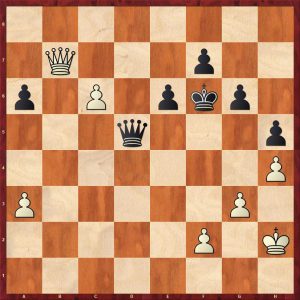
The position below is a fairly common type of position. It looks as though white can double the rooks on the b-pawn and win it followed by ganging up on the kingside pawns winning. Black can prevent this with accurate defence. How?
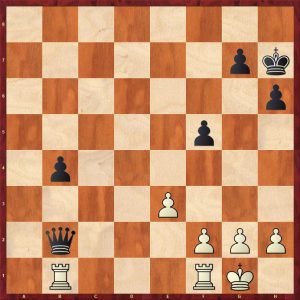
Black played 1…Qa3? and lost 2.Rfe1 wins as 3.Re2 and 4.Reb2 followed by 5.Rxb4 cannot be prevented. 1…Qd2? also loses to 2.Rb3, but 1..Qc3! holds; white is surprisingly unable to organise his rooks to win the b-pawn. 2. Rfe1 Qd2! 3.Kf1 Qd3+ 4.Kg1 Qd2 5.Red1 Qc2 6.Rdc1 Qd2 and white is not making any progress.
Here is a rampant rook situation. White’s king is stalemated, so he is continually offering his rook with check for stalemate. Quite often there is a king manoeuvre to get out of the checks. How does black win here?

Black played 1…Kf5? 2.Rg5+! Oops, skewering the queen, drawing instantly.
A win was to be had with 1…Kh5 (or 1…Kh6) 2.Rh4+ (2.Rg5+ Qxg5 lifts the stalemate) 2…Kg6 3.Rh6+ (3.Rg4 Qg5 wins) 3…Kf7 4.Rh7+ (4.Rxf6+ Ke7 5. Re6+ Kd8 ends the checks) 4…Ke6 5.Re7+ Kf5 6.Re5+ Qxe5 wins)
Here is a theoretical Q v R+P ending. Nunn puts the poser: which is better 1…Rc2 or 1…Rc8?
The reviewer feels a bit smug as he knew the answer to this one.
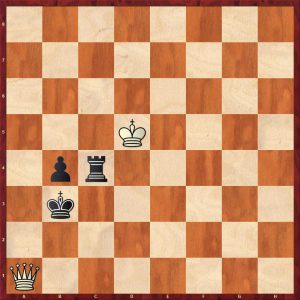
Black played 1…Rc2? which is a blunder because white’s king can now cross the c-file: 2.Qb1+! Kc3 3.Kc5 b3 4.Qe1+! Rd2 (4…Kd3+ 5.Kb4 b2 6.Qb1 Kd2 7.Kb3 and he pawn falls) 5.Qc1+ Rc2 6.Qe3+ Kb2 7.Kb4 winning the pawn and the game.
1…Rc8! Draws 2.Qd1+ Ka3! 3.Qd3+ Kb2 4.Qd4+ Ka3 holding the draw
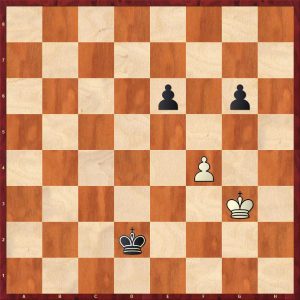
Chapter 9 Endgame Tactics
White played 1.Kf3 allowing 1…Kh4 and black consolidated his advantage to win. What did white miss?
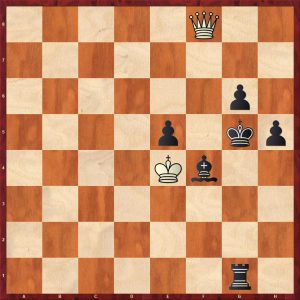
White missed a beautiful draw with 1.Qd8+ Kg4 (1…Kh6 does not help) 2.Qd1+!! Rxd1 stalemate in mid board. Very study like.
The tenth and final chapter is the test chapter.
In summary a really good book to improve the reader’s endgame knowledge and analytical skills.
FM Richard Webb, Chineham, Hampshire, 30th May 2021
Book Details :
- Hardcover : 192 pages
- Publisher: Gambit Publications Ltd (16 Sept. 2020)
- Language: English
- ISBN-10: 1911465597
- ISBN-13: 978-1911465591
- Product Dimensions: 17.15 x 1.52 x 24.77 cm
Official web site of Gambit Publications Ltd.
 Save as PDF