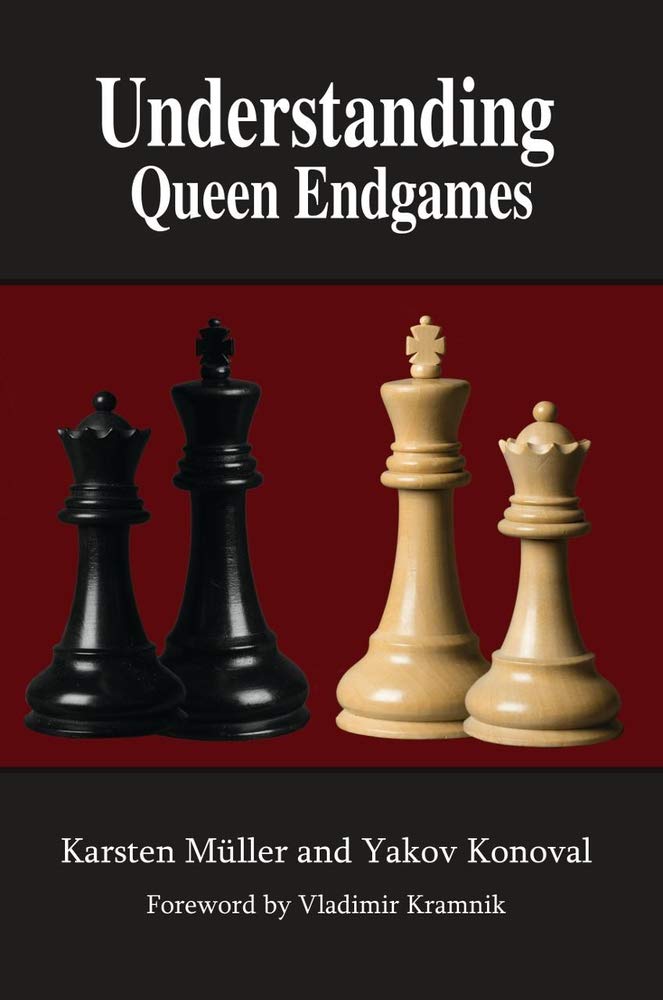
From the publisher:
The Daunting Domain of Queen Endgames Explained! Knowing the abilities and limitations of the powerful queen is very valuable for mastering the secrets of the royal game, and this can be studied best in the endgame.
Queen endgames are very difficult, if only for purely mathematical reasons the queen is the most mobile piece in chess, and the amount of possible options is incomparably higher than in any other type of endgames.
This book follows a dual philosophy as in the three previous works by the same authors: Understanding Rook Endgames, Understanding Minor Piece Endgames and Understanding Rook vs. Minor Piece Endgames. The 7-piece endings are dealt with in great detail. They are often so complex that pre-tablebase analysis almost always contains errors. Many new discoveries are revealed here. But to really understand the fight of a queen against a queen or minor pieces with rooks, these theoretical positions are of course not enough. So subchapters on the principles of each material configuration have been added.
All in all, this fantastic book is already on my (very short) “must study” list for chessplayers of different levels, including the top ten! I want to thank the authors for the courage which is required just to start working on such a complex topic, as well as for the very high quality of their work, which will endure for decades to come and will be very useful for many future generations of chessplayers. The foreword is by Vladimir Kramnik,14th World Chess Champion”
This titanic technical endgame tome is a Magnum Opus with a forward by former World Champion Vladimir Kramnik. The complexity of queen endings is obvious as the queen is the most mobile piece and the number of variations becomes vast after only a few ply. This is probably the reason that this is the first work to cover queen endings in great depth. The complexity of these endgames is shown by a famous game from Vladimir Kramnik’s World Championship match versus Peter Leko in 2004. The first game of that match reached this position:
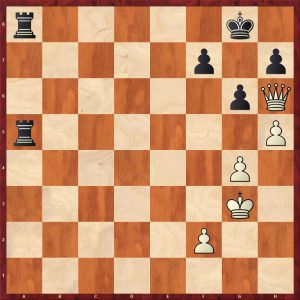
White played 44.Qf4?? which loses as demonstrated by Kramnik in the game and is covered in this book 44…g5! 45.Qf6 h6! winning, the point being that 46.Qxh6 loses the queen to 46…R8a6! After 45…h6 White cannot prevent Black from manoeuvring his rooks to win the kingside pawns. The natural move is 44.hxg6 exchanging pawns to reduce material which was thought, at the time, to draw. In fact Black stills retains winning chances. As the position has eight men the result is still not known definitively – this shows the richness of such endgames.
This publication also covers endgames that have had little coverage in the past such as Two Rooks + Pawn v Queen.
Most first quick skim of the book did concern me slightly as I noticed some diagrams followed by 100+ moves with no annotations. On a deeper perusal, I realised that these examples are included as “longest wins” for certain material combinations. This emulates John Nunn’s longest wins in “Secrets of Pawnless Endings”. There is plenty of well annotated material within practical games to bring out key ideas, for example the techniques to break down fortresses are examined in detail.
The book has ten main chapters traditionally based on piece configuration:
- Chapter 1 Queen vs. Pawn
- Chapter 2 Queen vs. Queen
- Chapter 3 Queen vs. Rook
- Chapter 4 Queen vs. Rook and Knight
- Chapter 5 Queen vs. Rook and Bishop
- Chapter 6 Queen vs. Two Rooks
- Chapter 7 Queen vs. Rook and Two Minor Pieces
- Chapter 8 Queen and Minor Piece vs. Queen (and Minor Piece)
- Chapter 9 Queen and Rook vs. Queen and Rook
- Chapter 10 Queen vs. Minor Pieces
Each chapter ends with some fruitful exercises to check if you were paying attention. The solutions are given near the end of the book.
Chapter 1 Queen vs. Pawn
This chapter obviously concentrates on the cases where the pawn is on the seventh rank. Here is the end of a Troitzky study:
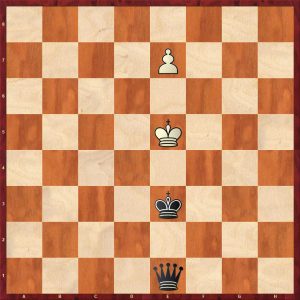
1.Ke6!! and whichever way Black’s king goes, White moves into his shadow drawing: 1…Kf4+ 2.Kf7! draws or 1…Kd4+ 2.Kd7 draws
This next position looks arcane but the reviewer has has this position twice in blitz, once as the attacking side and once as the defending side: in both cases the defence was accurate to hold the draw.
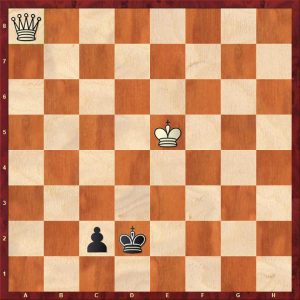
White cannot win despite the proximity of his king. White can try 1.Qd5+ 1…Ke1!! is the only move to draw, 1…Ke2 loses to 2.Qa2! Kd1 3.Kd4! c1Q 4.Kd3 mating. White can also try 1.Qa2 Kc3!! is the only move to draw, 1…Kd1 2.Kd4! c1=Q 3.Kd3 mating.
This chapter goes on to cover many types of position with far advanced pawns against a queen.
Chapter 2 Queen versus Queen
Naturally the authors start with the notoriously difficult ending Queen and Pawn vs. Queen: their comment is “This can be very deep and tricky if the defending king can’t get in front of the pawn.” Certainly an understatement as many strong GMs have gone down in drawn endings. A whole volume could be dedicated to this fascinating endgame.
The authors systematically cover the rook’s pawn, knight’s pawn, bishop’s pawn and centre pawns. Some useful general rules are given for each pawn:
“Rook Pawn – In this case, the drawing zone for the defending king is usually quite large when the pawn is not far advanced, as the rook pawn does not provide good shelter. But the zone gets smaller as the pawn advances, and the main drawing zone is in the corner farthest from the queening square.”
A didactic example from Carlsen-Gashimov Monaco 2011 is given:
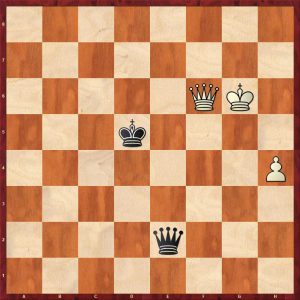
Black’s king is badly placed restricting his own queen, so he should run to the a1-corner as fast as he can. 59…Kc5!? 60.h5 Qe8+ 61.Kh6 Kd5?! 61…Kb4 going closer to the drawing zone is more logical 62.Kg5 Qg8+ 63.Kf4 Qb8+ 64.Kg4
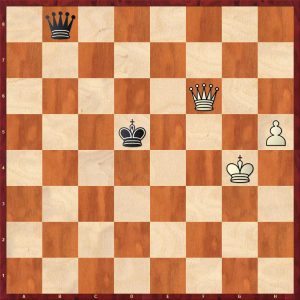
64…Qb4+! An excellent move preserving the draw., 64…Qa7? loses to 65.Qf4!! cutting the Black king off from the a1-drawing zone and winning in the long run. It looks as though Black’s king might get near the pawn, but that is an illusion: he just restricts his own queen’s movements. 65.Kg5 Qd2+ 66.Kg6 Kc4 67.h6 Qg2+ 68.Kf7 Qb7+ 69.Kg8 Qb8+ 70.Qf8 Qg3+ 71.Kh8 Qe5+ 72.Qg7 Qe4 73.h7
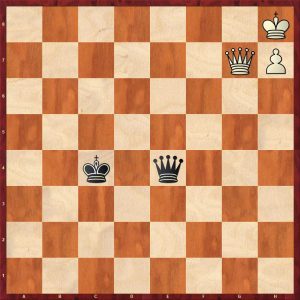
This a typical position from this ending, white has pushed the pawn to the seventh rank with his king hiding in the corner in front of the pawn. This is a tablebase draw but this has been known for many decades before the advent of tablebases.
73…Kd3?? loses, a bad mistake from a 2700 GM. 73…Kb3! draws but accuracy is still required. 74.Qf7+ (74.Kg8 Qe8+ 75. Qf8 Qg6+ 76.Kh8 Kc2=) 74…Kb2
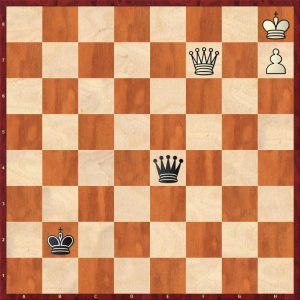
This is the type of position that Black is aiming for. The authors explain why it is drawn with a pithy comment: “and White can’t win as the king must move too far from the pawn to move into a countercheck position.” For example: 75.Kg7 Qg4+ 76.Qg6 Qd7+ 77.Kh6 Qd2+ 78.Qg5 Qd6+ 79.Kh5
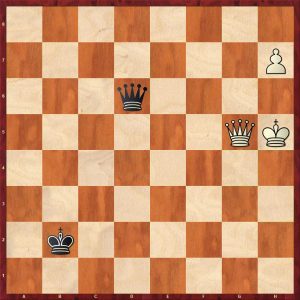
Another excellent explanation from the authors: “White’s king wants to go to h1 or h2 to make counterchecks possible, but the pieces are then too far apart” (and un-coordinated) e.g. 79…Qd1+ 80.Qg4 Qh1+ 81.Kg6 Qc6+ 82.Kg5 Qd5+ 83.Qf5 Qg2+ 84.Kh4
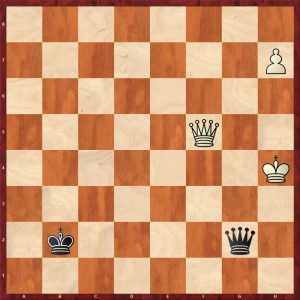
84…Qh2+ 85.Qh3 Qf4+ 86.Kh5 Qe5+ 87.Kg6 Qd6+ 88.Kf7 Qf4+ drawn
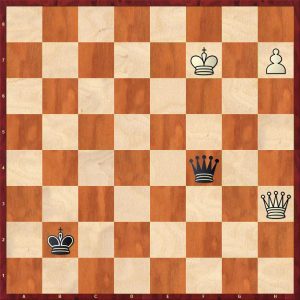
Black to the game after 73…Kd3??
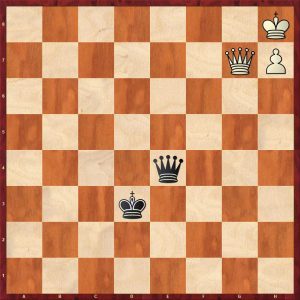
74.Qd7+ Ke2?! (74…Kc2 lasts longer but does not save the game anymore: buy the book to find out how White wins) 75.Kg8 White is going to shuffle his king along to the adjacent file to Black’s king to setup a crosscheck: 75…Qg6+ 76.Kf8 Qh6+ 77.Qg7 Qf4+ 78.Qf7
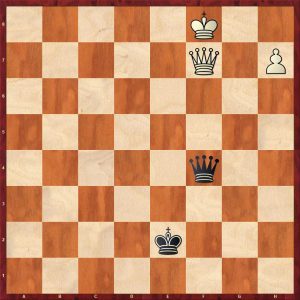
78…Qh6+ Notice how Black’s choice of checks are severely restricted because of his king’s placement 79.Ke7 Qh4+ 80.Ke8 Qa4+ 81.Kf8! Now we can see again why Black’s king is badly placed: Black has no good checks.
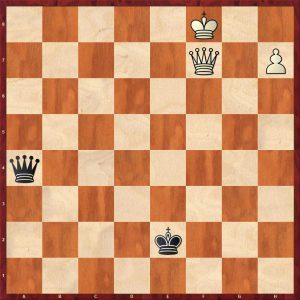
81…Qd4 82.Qh5+ Kf2 83.h8Q Qd6+ 84.Kf7 Qd7+ 85.Kg6 1-0
A very important ending to study and learn from a World Champion.
Muller & Konoval give an example of good defence with the king in the drawing zone where the defending side does not let the draw slip at any point:
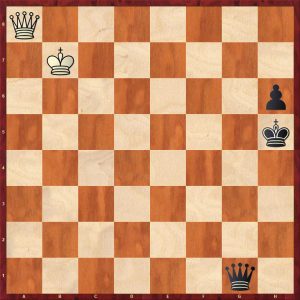
Piket played 57.Qe8+ and drew: buy the book to see the excellent defensive effort.
Here is an old game where modern tablebases really show how difficult these endgames are:
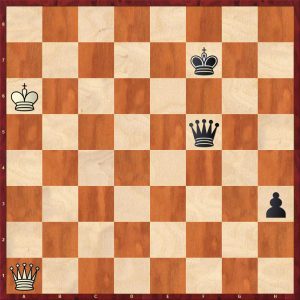
White played 80.Qc1? The amazing 80.Qh1!! is the only move to draw, for example 80…Qd7 81.Qf3+ Ke8 82.Qa8+ Ke7 83.Qh8! Qd6+ 84.Ka7!
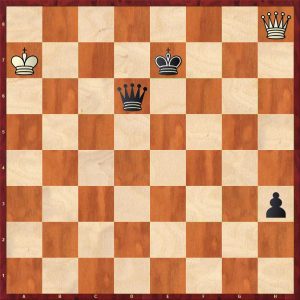
Drawing, a beautiful geometric display of the queen’s power with the white queen moving around all the corners in a few moves. 80…Qe5! 81. Qb1
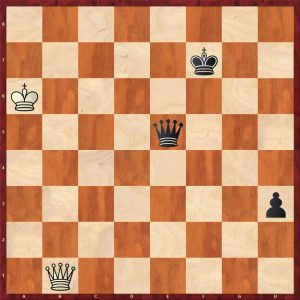
81…Qf6+? (A mistake improving White’s king for free particularly as White’s checks are restricted because of potential cross checks, the natural 81…h2! wins, e.g.: 82.Qb7+ Kf6 83.Qf3+ Ke7 84.Qb7+ Kd8 85.Qa8+ Kd7 86.Qb7+? Qc7 and white has no good check, so he loses) 82.Ka7! and white drew with excellent defence 82…Kg7 83.Qg1+ Kh7 84.Qe3 Qa1+ 85.Kb8 Qb2+ 86.Ka7 Qg2 87.Qd3+ 87…Kh8 Although White’s king is in the drawing zone, Black’s king is on a neighbouring rank making counterchecks possible, so white played 88.Ka6! (88.Qe3 also draws)
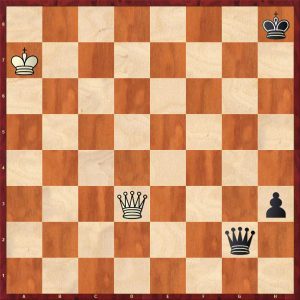
88…h2 89.Qd8+ Kh7 90.Qc7+! Staying on the h2-pawn so Black cannot interpose the queen, and White drew 14 moves later by repetition.
If the defending king can get in front or very near the pawn, it should do so:
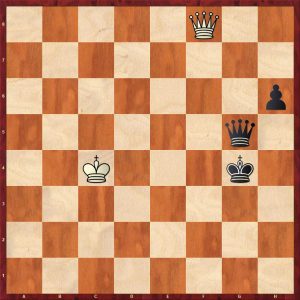
63.Kd3! h5 64.Ke2! now the draw is easy as white does not fear a queen exchange.
Sometimes the defending king has to keep both options open: here is a brilliant example:
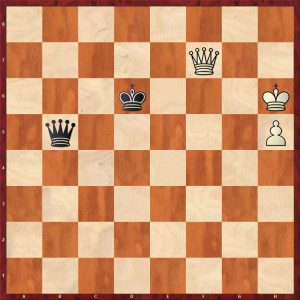
Black looks to be in trouble as his king is a long way from the drawing zone and will interfere with his queen. However Nakamura found 60…Ke5!! 61.Kg7 Qc6! Keeping Black’s options open 62.h6
After 62.Qg6 Qb7+ 63.Kh8 Qa8+ 64.Qg8 Qc6 65.Qg5+ Black changes plans and runs to the drawing zone as White’s king is badly placed in front of the pawn, he just has time to do this 65…Kd4!! 66.Qg7+ Kc4 67.h6 Kb3 68.h7 Ka2=
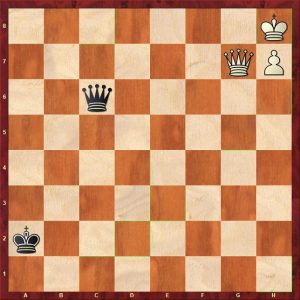
62… Qg2+ 63.Qg6 Qb7+ 64.Qf7 Qg2+ 65.Kh8 Qa8+ 66.Qg8 Qf3
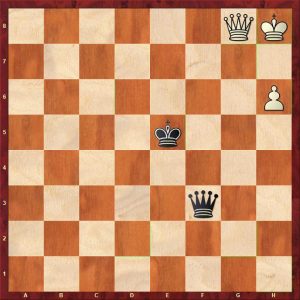
67.Qg6 (67.h7 Qh5 68.Qg7+ Ke6! draws as Black’s king cramps White’s pieces.) 67…Qf8+ 68.Kh7 Qf3 69.Qg7+ Ke6 70.Kg8 Qh5 71.h7 Qe8+ 72.Qf8 Qg6+ 73.Kh8 Qf7 drawn
Knight Pawn – “With a knight pawn, play is similar to a rook pawn, but the winning chances are better as the pawn provides better shelter. There is still a drawing zone in the far corner.”
The play is complex and there are many subtleties with slight differences being crucial as we shall see below.
Here is a superb example of drawing technique from Negi-Postny Helsingor 2009:
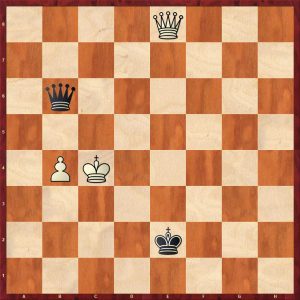
Where does Black put his king? 63…Kf1! (63…Kd2? loses in 91 moves as the king is cut off from the drawing zone!) 64.b5 Qc7+ 65.Kd5 Qb7+ 66.Qc6 Qf7+ 67.Kd6 Qf4+ 68.Kd7 Qf7+ 69.Kc8 Qf8+ 70.Kb7 Qe7+ 71.Qc7 Qe4+ 72.Ka6 Qa4+ 73.Qa5 Qc4 74.Qa1+ Kg2
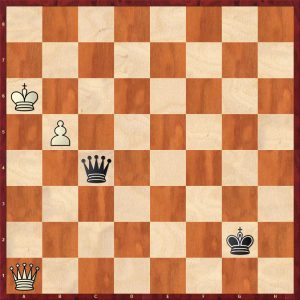
Black’s king has reached the drawing zone. It is still very easy to go wrong.
75.Qb2+ Kh1 76.Qh8+ Kg1 77.Qg7+ Kh1 78.Qb7+ Kh2 79.Qc6 Qa2+ 80.Kb7 Kg1 81.Qc1+ Kf2 82.Qc5+ Kf1 83.b6 Postny comments :The pawn has reached the 6th rank already, although it is still a draw theoretically. For the defensive side it’s very easy to go astray, but, somehow I managed to give the right checks. 83…Qg2+ 84.Ka6 Qa8+ 85.Kb5 A crucial position, Black’s king is temporarily out of the drawing zone and cannot go back immediately.
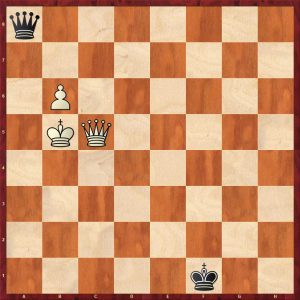
85…Qe8+! The only move to draw 86.Ka5 Qe1+ 87.Ka6 Qa1+ 88.Qa5
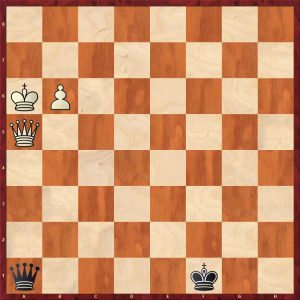
88…Qf6! 89.Qb5+ Kg1 90.Qc5+ Kh1 91.Ka7 Qa1+ 92.Kb7 Qg7+ 93.Qc7 Qf8 94.Qd7 Qf2 95.Qd5+ Kg1 96.Qg5+ Kh1 97.Kc6 Qc2+ 98.Kd6 Qh2+ 99.Qe5 Qh6+ 100.Kc5 Qc1+ 101.Kd5 Qd2+ 102.Qd4 Qg5+ 103.Kc4 Qc1+ 104.Qc3 Qf1+ 105.Kb4 Qb1+ 106.Qb3 Qe1+ 107.Kb5 Qe5+ 108.Ka6 Qa1+ 109.Kb7 Qg7+ 110.Kc6 Qf6+ 111.Kc5 Qe7+ 112.Kd4 Qf6+ 113.Kd3 Qf5+ 114.Kc3 Qe5+ 115.Kb4 Qe1+ 116.Qc3 Qb1+ 117.Ka5 Qa2+ 118.Kb5 Qd5+ 119.Qc5 Qd3+ 120.Kc6 Qg6+ 121.Kb7 Qf7+ 122.Ka6 Qa2+ 123.Qa5 Qe2+ 124.Ka7 Qf2 125.Qd5+ Kg1 126.Kb7 Qf8 127.Qd4+ Kh1 128.Qe4+ Kg1 129.Qe3+
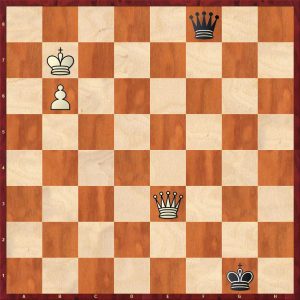
Postny comments again: For a moment I thought that I was losing. The queen covered the a3 square, and Kb7-a7 followed by the pawn advance just one move before the fifty move rule seems inevitable. But… 129…Kh1! 130.Ka7 Qf2!! This stalemate trick saves the game. 131.Qe4+ Kg1 132.Kb7 Qf7+ 133.Kc6 Draw due to the fifty move rule. ½-½
The next example shows how difficult this ending really is:
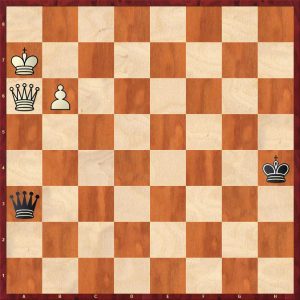
Black’s king is not yet in the drawing zone. Black played the obvious check 77…Qe7+? which loses 77…Qe3! (77..Qc5? loses to 78.Qd3!) does draw, e.g. 78.Ka8 Kh3 79.b7 Qe4 80.Ka7 Qd4+ 81.Qb6 Qa1+ 82.Qa6 Qd4+ 83.Ka8 Qe4
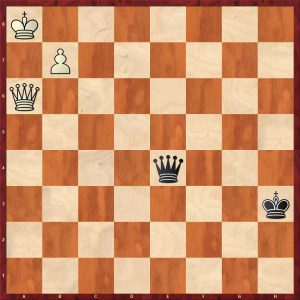
This is drawn despite Black’s king not being in the drawing zone but it is close enough! 84.Qa2!? cutting the Black king off from the drawing zone (by analogy with the line below) does not win here.
Back to the game 78.b7 Qe3+ 79.Ka8 Qe4
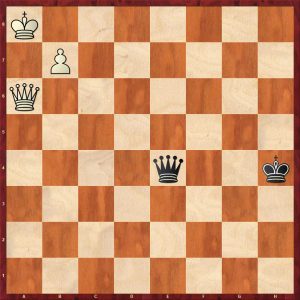
80.Qb5? 80.Qa3!! cutting the king off from the drawing zone wins, followed by moving White’s king down to the same rank as Black’s king which is similar to the line below 80…Qf3? (80…Kg3! draws) 81.Qb4+ Kh3 82.Qc5?! Qe4
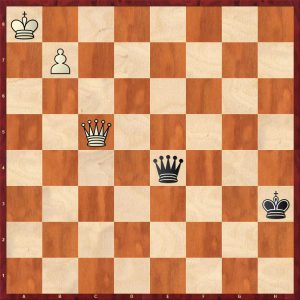
83.Qc3+? Sloppy, improving Black’s king for free and the queen is much better placed on c5; it was time to move the White king down to the rank that Black’s king is on: 83.Ka7! wins, e.g. 83…Qa4+ 84.Kb6 Qb3+ 85.Ka6 Qa4+ 86.Qa5 Qc4+ 87.Qb5 Qe6+ 88.Ka5 Qa2+ 89.Kb6 Qf2+ 90.Qc5 Qb2+ 91.Ka6 Qe2+ 92.Ka5 Qa2+ 93.Kb5 Qe2+ 94.Qc4 Qb2+ 95.Qb4 Qe5+ 96.Ka4 Qe8+ 97.Ka3
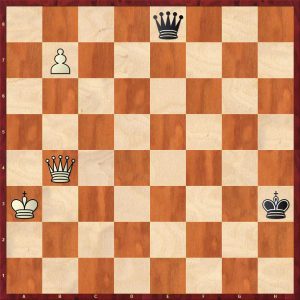
97…Qb8 98.Kb3 Kh2 99.Kb2 Qe5+ 100.Kb1 Qf5+ 101.Ka1 wins
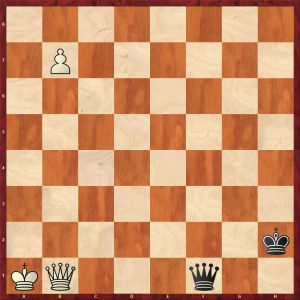
Very instructive. This is a typical winning manoeuvre in queen and pawn vs queen.
Back to the game after 83.Qc3+? Kg2
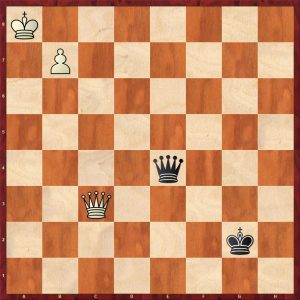
84.Ka7 Qe7 85.Kb6 Qd8+ 86.Qc7 Qd4+ 87.Qc5 Qb2+ 88.Kc7 Qg7+ 89.Kc6
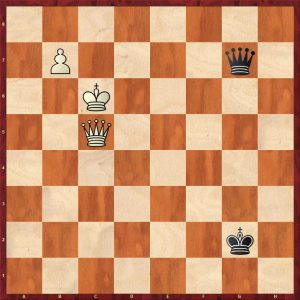
A key position and a common problem for the defending side, which check should I make? Black choose the wrong check and lost. 89…Qg6+? The authors offer some general advice here: “As Black’s king is on a light square, it was better to operate on dark squares”: 89…Qf6+! Drawing 90.Qd6 Qc3+ 91.Kd7 Qg7+ 92.Qe7 Qd4+ 93.Ke8 White is trying to bring his king across to the same file as Black’s king. Qh8+ 94.Qf8 Qe5+
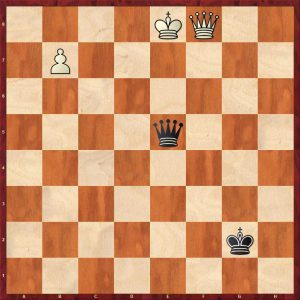
95.Kf7 loses the pawn to a fork 95…Qd5+ drawing instantly
Back to the game, after 89…Qg6+? 90.Qd6 Qe8+?!
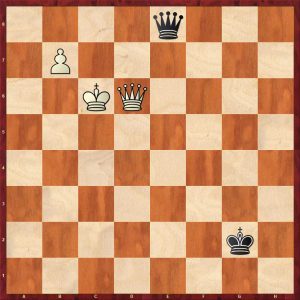
91.Qd7?! (91. Kb6! Qe3+ 92. Kc7 Qa7 Kc8 wins quickly, now we see why Black’s queen should operate on the dark squares) 91…Qg6+
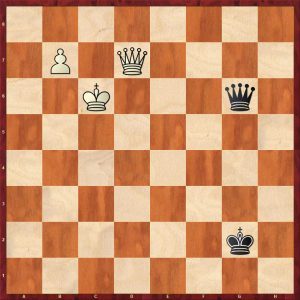
92. Kd5? White could have centralised the queen and effected a memorable manoeuvre to win 92.Qd6! Qc2+ 93.Kd7 Qh7+ 94.Qe7 Qd3+ 95.Ke8 Qg6+ 96. Kf8 Qf5+ 97.Kg8 Qd5+ 98.Kh8 Qh5+ 99.Qh7 winning
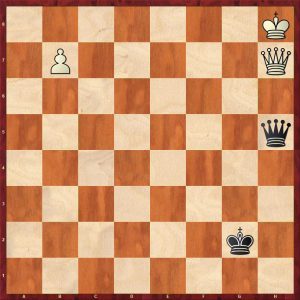
Notice that this winning motif is effectively the same idea as the king manoeuvre down the a-file and b-files rotated ninety degrees!
In the game: 92…Qd3+ 93.Ke6 Qg6+ 94.Ke5 Qg5+ 95.Ke4 Qg6+! 96.Ke5 Qg5+ 97.Kd6
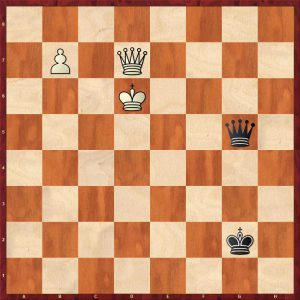
97…Qf6+? The final mistake allowing White to improve his queen. 97…Qf4+ 98.Kc6 Qa4+ 99.Kc7 Qa5+ 100.Kc8 Qc5+ draws 98.Qe6! 98…Qd8+?! 99.Kc6 Qh8 100.Qa2+ Kf1 101.Qb1+ and queens the pawn, White won 4 moves later.
Here is a pretty study showing a neat idea:
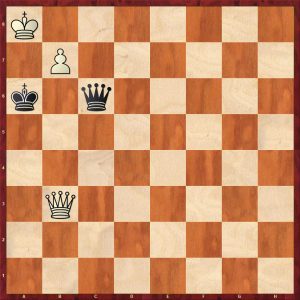
How does White break the pin to get his pawn home?
1.Qb4! mutual zugzwang 1…Qh1 (1…Qd5 2.Qa4+ Kb6 3.Qb3+ Qxb3 4.b8Q+ wins; 1…Qf3 2.Qa4+ Kb6 3.Qb3+ wins; 1…Qg2 2.Qa3+Kb5 3.Qb2+ wins) 2.Qa3+ Kb6 3.Qb2+ Ka6 4.Qa2+ Kb5 5.Qb1+ Qxb1 6.b8Q+ skewering the queen
Amazingly this idea occurred in a game and White missed the neat win, but won anyway.
Bishop Pawn
This is completely different. If the defending king can’t get in front of the pawn or at least very near the pawn, the attacker usually wins as there is no drawing zone in the far corner. This is best pawn for the superior side.
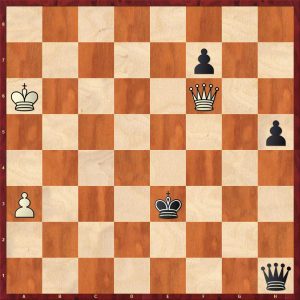
White played 65.Qe5+? (A bad mistake from a 2500 player, 65.Qc3+ draws as Black’s queen is poorly placed.) 65…Qe4! Black gives up his h-pawn to centralise his queen and get his f-pawn going 66.Qxh5 f5 White has restored material equality but is now lost as the centralised Black queen is dominant and the f-pawn is much more dangerous than White’s a-pawn. 67.Qh3+ Kd2 68.Qh2+ Kc3 69.Kb5 f4 70.Qh8+ Kb3 71.Qf8 f3 72.Qf7+ Kxa3 Black has eliminated the a-pawn which wasn’t strictly necessary. The win is simple from here as Black’s queen is so well placed.
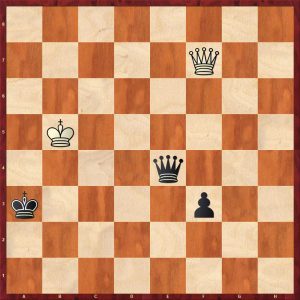
73.Qf8+ Kb2 74.Qf6+ Kc2 75.Ka6?! Accelerating the loss. When the kings are close to each other on files or ranks, the stronger side should always be on the look out for a sequence to exchange queens.
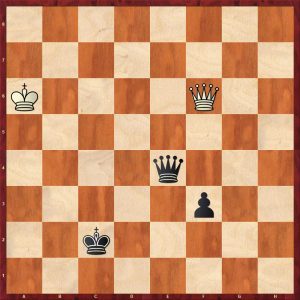
75…Qd5?! (Black could have exchanged queens with 75…Qd3+! 76.Kb7 Qb3+ 77.Ka8 Qa3+ 78.Kb7 Qb2+) 76,Qf4 Kd3 77.Qg3 Qc4+ 78.Ka7 Qc5+ 79.Ka8 Qd5+ 80.Ka7 Ke2 81.Qg4 Kd3 82.Qg3
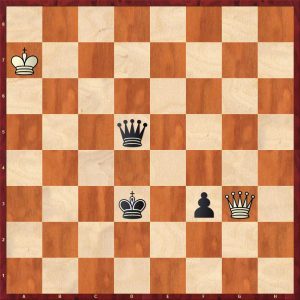
82…Qd4+! 83.Ka6 Ke2 84.Qh3 f2 85.Qh5+ Ke1 86.Qa5+ Kd1 87.Qh5+ Kc2 88.Qe2+ Kc3
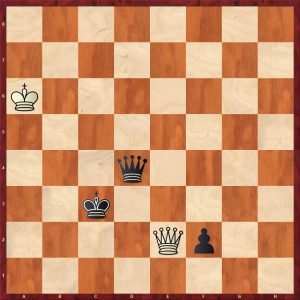
89.Kb7 Qg7+ 0-1 in view of 90.Kb8 Qf8+ 91.Kb7 Qf7+ 92.Kb6 f1Q
A central pawn
This is similar to the bishop’s pawn, but the winning chances are slightly less. There is no drawing zone for the defending king in the far corner:
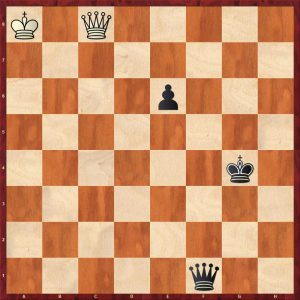
There is no chance for a draw here with the central pawn as Black cannot be prevented from advancing the pawn to the queening square: it just requires patience, care and a lot of moves.
Black played 68…Qa1+ (the natural 68…Qf5 unpinning the pawn is better.)
Black played well, not letting the win slip at any point until this position at move 110:
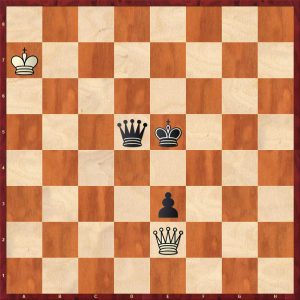
Black played 110…Kf4?? which throws the win away as white has a brilliant draw utilising the fact that the pawn is unprotected by the queen and the star cross perpetual check. Better was 110…Qb3 protecting the pawn and preparing cover for the king on the queenside viz.: 111.Qh2+ Ke4 112.Qg2+ Kd3 113.Qg6+ Kd2 114.Qg5 Qc4 115.Ka8 Qd4 116.Kb7 Kc3 117.Qg3 Qd3 winning
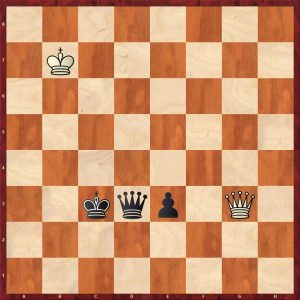
The reviewer makes this observation:
Notice how Black’s king has migrated over to the file adjacent to White’s king ready to setup cross checks in a few moves. This cannot be prevented wherever White’s king is on the board with two exceptions:
- The weaker side can draw if the defending king gets in front of the pawn
- or reaches a small drawing zone on the short side of the pawn.
The only other drawing mechanism is to setup the star cross perpetual check or a variant of it which is shown below.
111.Qh2+! Reaching a very important position as White can draw
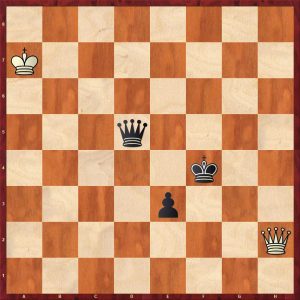
111…Kg4 112.Qg1+Kf4 113.Qh2+ Ke4
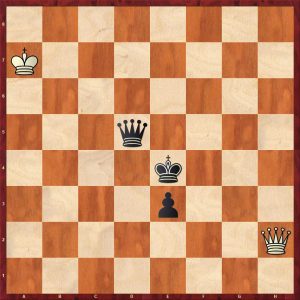
114.Qg2+?? [114.Qh1+!! Kd4 115.Qa1+ Kd3 116.Qd1+ Ke4 117.Qh1+ Ke5 118.Qh5+ Kf5 (118…Kd6 or Ke6 loses the pawn to 119.Qh6+) 119.Qh5+ drawing] 114…Kd4 115.Qb2+ Kd3 Black breaks the perpetual sequence and wins as White’s queen has lost her checking distance
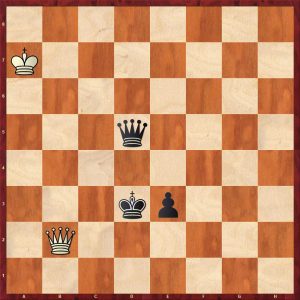
116.Qb1+ Ke2 117.Qc2+ Kf3 118.Qc3 Kf2 (quicker is 118…Qd6) 119.Qf6+ Qf3 120.Qd4 Qf5 121.Qh4+ Kf3 122.Qh1+ Ke2 123.Qh2+ Qf2 124.Qh5+ Qf3
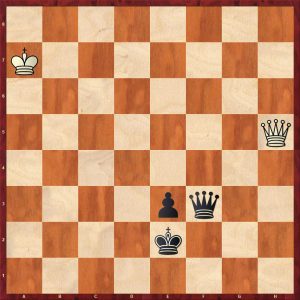
125.Qh2+? (Centralising with 125.Qe5 was a tougher defence) 125…Kf1 126.Qc2 e2 127.Qc4 Kg2 128.Qg8+ Qg3 129.Qd5+Kg1
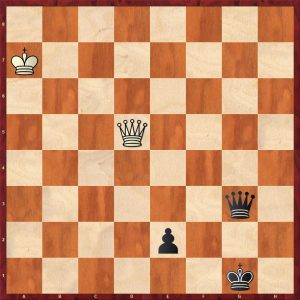
Exploiting White king position 0-1
The central pawn does have a small drawing zone for the defending side which is on the short side of the pawn:
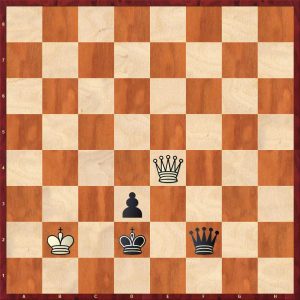
This is a theoretical draw as White’s king restricts Black’s king manoeuvres, but White must defend perfectly:
91.Kb3? losing as White’s king can be kicked out of the drawing zone. 91,Qc4 holds for example 91…Qb6+ 92.Ka2 Qa5+ 93.Kb2 Qe5+ 94.Kb1 Qa1+ 95.Kb2 Qe3 96.Qc1+ Ke2 97.Qc4=
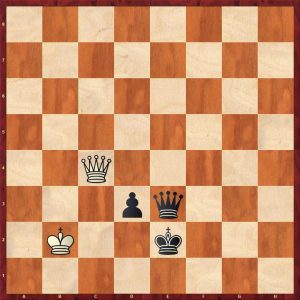
White’s king covers the queenside and the White queen can hassle Black on the kingside. If Black’s king strays too far on the kingside, Black cannot block a queen check as White will simply exchange queens drawing owing to the proximity of his king to the pawn.
The game continued 91…Qb6+ 92.Kc4 Qa6+ (92…Qc7+ is better 93.Kb3 Qc3+ 94.Ka2 Qa5+ 95.Kb2 Qb5+ 96.Ka3 Kc3 wins) 93.Kb3?! Qb5+ 94.Ka2 Kc3 95.Qe1+ Kc2 0-1 (96.Qf2 d2)
The book covers numerous positions with more pawns.
Here is a celebrated game Kasparov v The World Internet 1999.
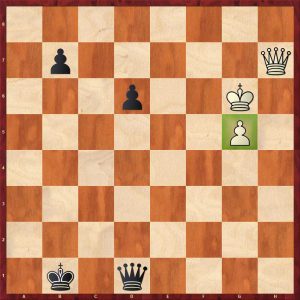
Although Black is a pawn up, White is playing for the win as his g-pawn is the most advanced pawn. The seven piece tablebase confirms this position is a draw but Black is on the edge of losing and most defend perfectly. The game continued 51…b5?! (51,,,Ka1! holds) 52.Kf6+ Kb2? (The final mistake 52…Ka1 was necessary) 53.Qh2+ Ka1 54.Qf4! b4 55.Qxb4 Black is lost as the d-pawn is a hindrance as it obstructs Black’s queen and offers cover to White’s king. Without the d-pawn the position is drawn as show earlier in this review.
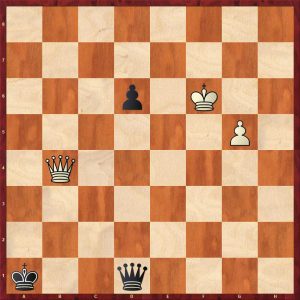
The ROW did not last much longer and resigned on move 62.
Chapter 3 Queen v Rook
The basic Queen v Rook endgame is covered sufficiently. The authors show how to break the third rank defence:
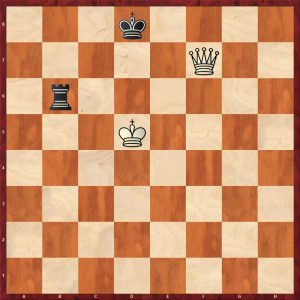
The authors observe: “The third rank defence is very difficult to break down if you do not know how, because it requires at least one counter-intuitive move to achieve that. John Nunn suggests the following method:”
1.Qf4! (1.Qg7 does not make progress because of 1…Ke8 2.Qc7 Rh6 3.Ke5 Rg6 and the starting position has been mirrored) 1…Kd7 2.Qa4+! Kc7 3.Qa7+ Forcing Black into the third rank defence 3…Rb7 4.Qc5+ Kb8 5.Kd6 Rg7 6.Qb4+ Rb7 7.Qe4 Rb6+ 8.Kc5 Ka7 9.Qd4 Rb7 10.Kc6+ Ka8 11.Qd5 Kb8 12.Qa5 and Philidor’s position is reached.
The book covers a multitude of Queen vs Rook + Pawn(s) positions where there are many fortresses worth knowing and even in the situations where the queen wins, many wins are quite long and complicated. Here is an example of a simple draw.
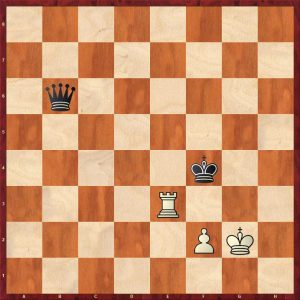
Here White can simply move his rook back and forth between two safe squares e3 & g3.
An additional pawn for Black on g4 makes no difference viz:
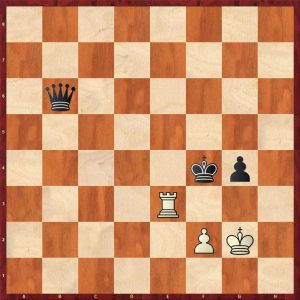
This is clearly drawn as well. However, make a subtle change to the position and place Black’s king on e7, then the queen wins:
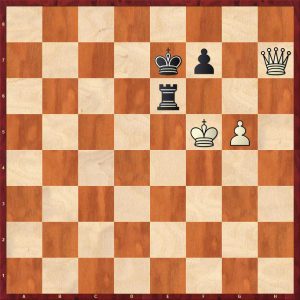
White played the incomprehensible 89.g6? allowing the simple 89…Rxg6 drawing 89.Qh1! wins as follows: 89…Rg6 90.Qa8 Re6 91.Qa3+ Ke8 92.Kg4 Rg6 93.Kh5 Re6 94.Qb4 zugzwang
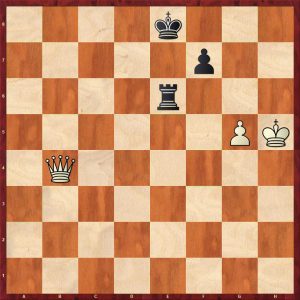
Black has no good move. One key point is 94…Rg6 95.Qe4+ Kf8 (95…Re6 96.Qxe6 fxe6 97.Kh6 winning) 96.Qxg6 winning
With a further advanced bishop’s pawn, it is no longer a fortress as the attacking king can encircle the weaker side’s position:
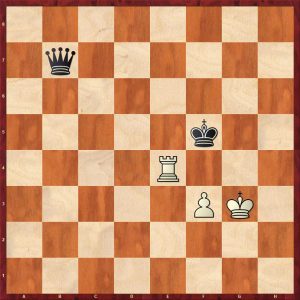
The winning process falls into three phases and zugzwang is the main weapon to achieve these steps:
- First the king has to cross the e-file
1.Kf2 Qc7 2.Kg2 Qc2+ 3.Kg1 (3.Kg3 Qd2 4.Rg4 Ke5 5.Re4+ Kd5 and the first phase is complete) 3…Qd2 4.Kf1 Qh2 5.Re2Qg3 6.Rg2 Qh3 7.Kf2 Ke5 8.Rg4 Kd5
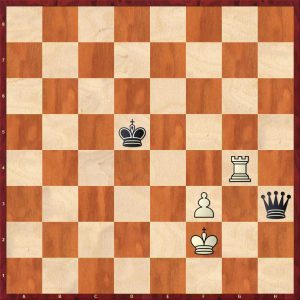
2. Next the Black king crosses the fourth rank:
9.Ke2 Qh6 10.Kf2 Qd2+ 11.Kf1 Qe3 12.Kg2 Qe2+ 13.Kg3 Qf1! 14.Re4 Qg1+ 15.Kf4 Qf2! 16.Kg4 Qg2+ 17.Kf4 Qg1!
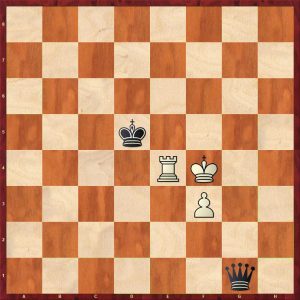
White is in zugzwang again and most give way. There are two main defences 18.Re5+ and 18.Ra4.
After 18.Re5+ Kd4 19.Re4+ Kd3 The king’s next target is f2 to gobble the pawn 20.Re8 Qd4+ 21.Re4 Qg7!
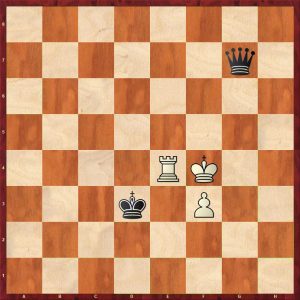
22.Re3+ Kd3 23.Re4 Qg6!
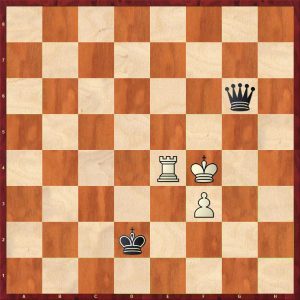
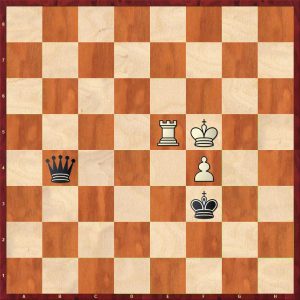
Next the final phase: Black’s king crosses the e-file to win the pawn.
24.Re5 Qf6+ 25.Rf5 Qd4+ 26.Kg5 Qg7+ 27.Kf4 Ke2 28.Ke4 Kf2 29.f4 Qe7+ 30.Re5 Qb4+ 31.Kf5 Kf3 and the pawn falls
After 18.Ra4, they are two winning methods, Magnus Carlsen shows one of them here in a position with reversed colours:
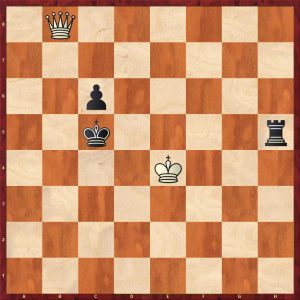
White can win with 64.Kd3 which is quickest according to the tablebase but Carlsen’s method is just as good:
64.Kf4! Rd5 65.Kg4 zugzwang 65…Kc4 (65…Rd4+ 66.Kf5) 66.Qb6! Rd4+ (66…c5?! 67.Qe6 Kd4 Kf4 wins) 67.Kf5 c5 68.Qa5 Rd5+ 69.Ke6
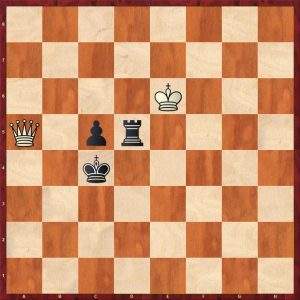
69…Rd4 70.Qa4+ Kc3 71.Qa3+ Kc4 72.Qa5 Rd3 73.Qa4+ Kc3 74.Qa3+ Kc4 75.Qc1+ Kb4 76.Qb2+ Kc4 77.Qc2+
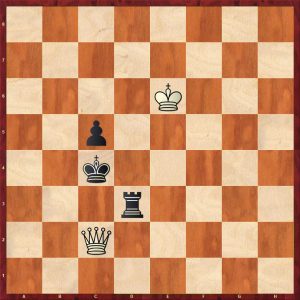
77…Kd4 [77…Rc3 78.Qe4+ Kb3 79.Qb1+! (79.Kd6?? Kb2=) Kc4 80.Kd6 wins] 78.Kd6 c4 79.Qf2+ Re3 80.Qd2+ 1-0
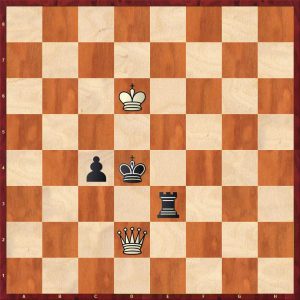
because 80…Rd3 (80…Ke4 81.Qd5+ wins) 81.Qf4+ Kc3+ 82.Kc5 wins
Chapter 4 Queen versus Rook and Knight
Fortresses are an important topic here.
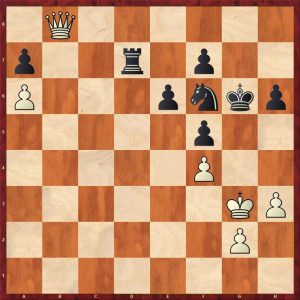
Here Black has a fortress. White’s obvious pawn lever is g4, so Black stops it with 37…h5! Can White exploit the g5 square? 38.Kh4 Kh6 39.Qb2 Kg6 40.Qc3 Ne4
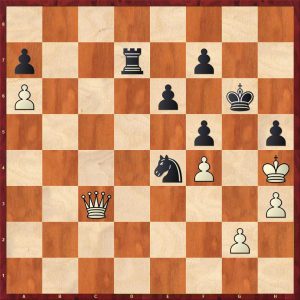
41.Qc8 (41.Qf3 Nf6 42.Qg3+ Kh7 43.Qg5?? Ne4 44.Qxh5+ Kg7 45.g4 Rd8 46.gxf5 Rh8 wins for Black!) 41…Nf6 42.Qb8 R37 43.g4 hxg4 44.hxg4 fxg4 45.Qe5
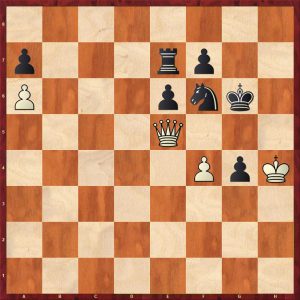
45…Ng8! 46.Qg5+ Kh7 47.Qxg4 f6 48.Qg2 Kh8 49.Qe4 Kg7 drawn
Techniques to destroy fortresses are examined:
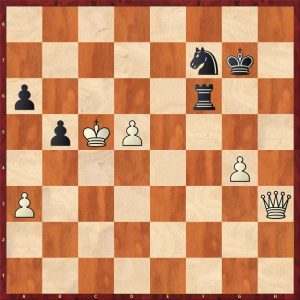
Here the rook and knight have a temporary blockade of two passed pawns. A pawn sacrifice disrupts the coordination of Black’s pieces: 69.g5!? Nxg5?! (69…Rg6 is tougher) 70.Qg4? (A rare mistake from the former World Champion 70.Qg3! breaks the blockade 70…Rg6 71.Qe5+ Kf7 72.d6 wins; 70…Kh6 71.Qh4+ Kg6 72.d6 wins) 70…Rg6 71.Kb4 Nf7 72,Qd4+ drawn
Here a blockade could have been broken by clever manoeuvring:
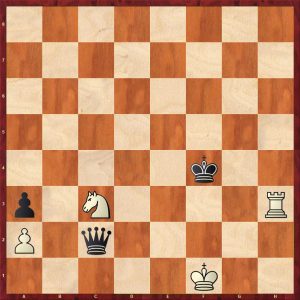
This looks desperate for white who looks to be close to zugzwang. Black continued 52…Kg4? allowing White to escape
52…Qf5! 53,Kg2 Qg4+ 54.Kh2 Qg5 55.Rd3 Qg6 56.Ne2+ Ke4 57.Rh3 Qf6+ 58.Nc3+ Kd4 59.Ne2+ Kc4 60.Kg3 Qb2 61.Rh4+ Kc5 wins
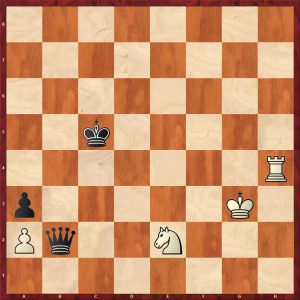
53.Re3! Qd2 54.Rg3+! Kh4 55.Rf3 mutual zugzwang and white held on for a draw
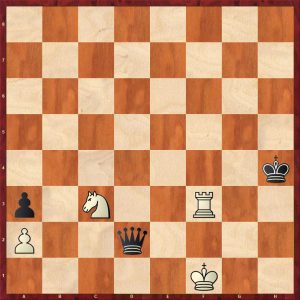
Queen vs Rook + Knight + Pawn
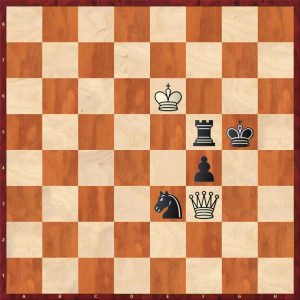
It is hard to believe that White can lose to here. White played 110.Qe2? which does lose and he lost quickly missing a draw when Black erred. (110.Qb7 holds along with 4 other moves) 110…Rf6+ does win for Black. Buy the book to find out how.
Chapter 5 Queen versus Rook and Bishop
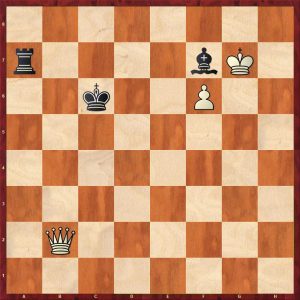
It is hard to believe that White can win this position as the f7 square is covered by both rook and bishop and all Black’s pieces are safe and coordinated. White failed to win this game in practice; he tried for 16 moves and gave up. However, White can force the pawn through or win a piece in 43 moves. This is a good example where computer generation of tablebases has really enhanced the understanding of the endgame and found sophisticated winning manoeuvres in positions like these. The key piece in this type of position is the attacker’s king.
Chapter 6 Queen vs Two Rooks
The authors summarise this material imbalance thus “The rooks are slightly superior materially speaking, but this does not make them favourites automatically. It is very important, if they can get static control and their king can hide. The queen on the other hand often wants to start dynamics to overload the rooks and destroy their coordination and harmony.”
The ending of two Rooks + P v Q is covered in some depth, the theory of which is completely new to the reviewer and probably new to the reader.
The most important factor is whether the attacking king can find hiding places. This often depends on where the defending king is. It has some similarities with queen and pawn vs queen endings:
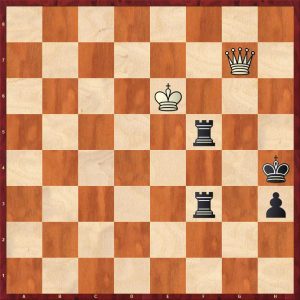
With a rook’s pawn, generally if White’s king is away from the action (near the pawn), the game is drawn, but it is not so easy to give a main drawing zone which was possible in the queen and rook’s pawn or knight’s pawn versus queen case, but d7 seems to be a a good square but it does not always draw.
Matters are very complex and the wins are often very long as this game shows:
90.Qg8? losing
90.Qd4+ holds 90…R5f4 91.Qd8+ Kg3 92.Qg5+ (92.Qg8+ loses in 117 moves) 92…Kf2 93.Qc5+ Re3+ 94.Kd7
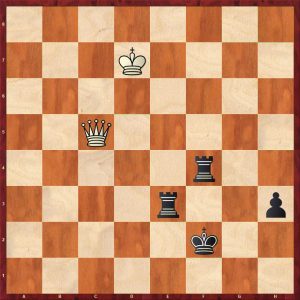
The tablebases give this position as a draw after 94…h2 95.Qh5! Kg2 96.Qg5+ Rg3 97.Qxf4 h1Q 98.Qd2+ Kh3 99.Qh6+ with a perpetual
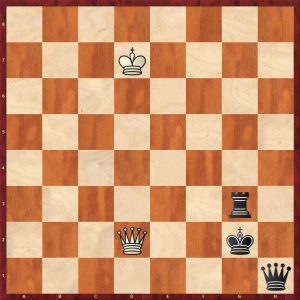
Back to the game: 90…h2 91. Qg2?! (91.Qh7+ is tougher losing in 92 moves) 91…Rf2 92.Qh1?! Kh3 93.Qa8?! Rf8 94.Qb7?!
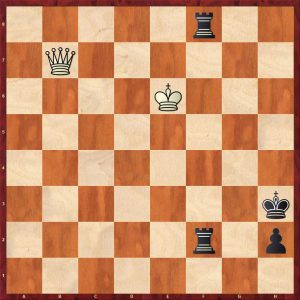
94…R2f7?! (Black missed a quick win 94…Re2+ 95.Kd6 Rd8+ 96.Kc5 Rc2+ 97.Kb4 Rb2+ winning the queen) 95.Qb3+?! Rf3?! 96.Qb1 Re8+ 97.Kd7 Here White loses despite the king being on d7.
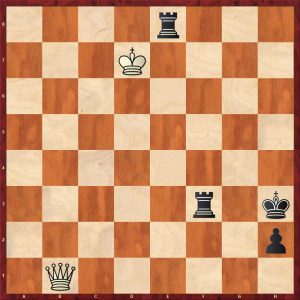
97…Ree3? A natural move, throwing away the win, 97…Rh8! wins in 46 moves 98.Kd6? This was White’s last chance to draw: Black won on move 114 0-1
98.Qh7+ seizes the draw 98…Kg2 99.Qc2+ Rf2 100.Qc6+ Ref3 101.Qg6+ Rg3 102.Qc6+ Kg1 102.Qc1+ Rf1 103.Qc5+ drawing
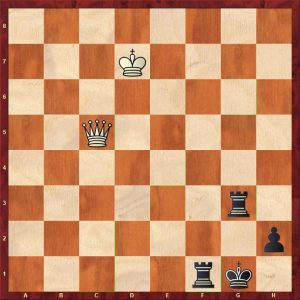
As the reader can see, this endgame is very complex, even harder than queen + pawn v queen.
Here is example with the king hiding in front of the rook’s pawn in the corner:
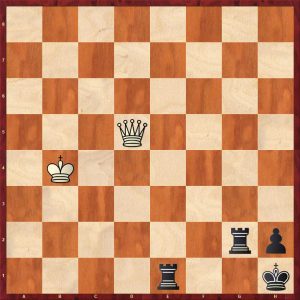
Black played 108…Rb1+? throwing away the win which was to be had with 108…Kg1 in 125 moves! 109.Ka4 now White is holding and Tiviakov defends perfectly:
109… Rf1 110.Qe4 Kg1 111.Qe3+ Rgf2 112.Qg5+ Kh1 113.Qd5+ Rf3 114.Qc6 Kg2 115.Qc2+ R1f2 116.Qg6+
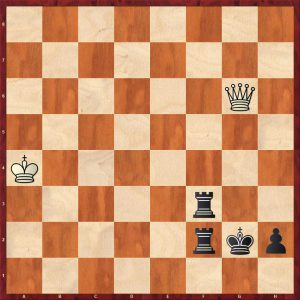
116…Rg3 117.Qe4+ Rff3 118.Qc2+ Kg1 119.Qd1+ Rf1 120.Qd4+ Kg2 121.Qe4+ Rff3 122.Qc2+ Kg1 123.Qd1+ Rf1 124.Qd4+ Rf2 125.Qd1+ Kg2 126.Qd5+
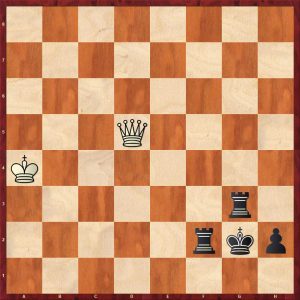
126…Rgf3 127.Qg5+ (127.Qg8+ loses after 127…Kf1) Kf1 128.Qc1+ Ke2 129.Qc2+ Ke3 130.Qc3+ Ke4 131.Qc4+ Kf5 132.Qf7+ Ke5 133.Qc7+ Kd4 134.Qd6+ Kc3 135.Qa3+ Kc2 ½-½
The knight’s pawn is the best pawn for the attacker. The attacker wins, if reasonably well placed and coordinated and the king safe:
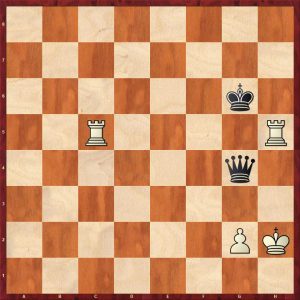
White won quickly in about 20 moves after 74…Qf4+ 75.Kg1 Qe3+ 76.Kh1
There is no safe place for the defender’s king with a knight’s pawn.
The bishop’s pawn is surprisingly different. Here a few draws exist. One occurs with the defending king on the long side in a good position:
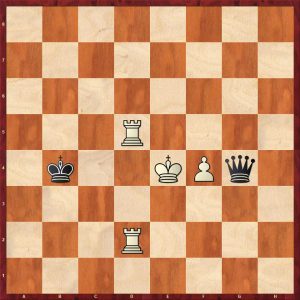
This is a theoretical draw. White can try 69.R5d4+
Or 69.Ke5 Qg7+ 70.Ke6 Qh6+ 71.Kd7 Qg7+ 72.Kc6 Qf6+ 73.Rd6 Qf5 74.R2d5 Qc8+=
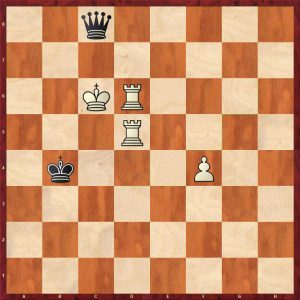
69…Ka5! (69…Kb3? loses in 107 moves) 70.Rd6 Kb4 71.Rb2+ Kc5 72.Rbb6 Qe2+ 73.Kf5 Qh5+ =
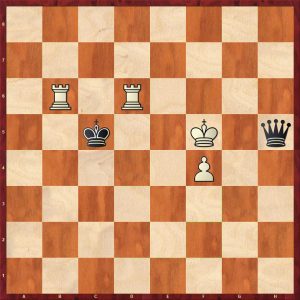
White a knight’s pawn this setup does not draw because Black’s queen is too restricted on the short side:
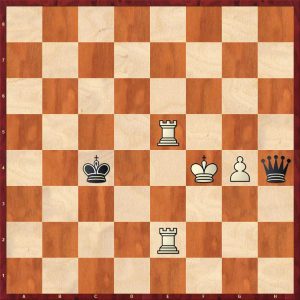
1,R5e4+ Kb5 2.Re7 Qf6+ 3.Kg3 Qc3+ 4.R2e3 Qf6 5.R3e5+ Kb4 6.g5
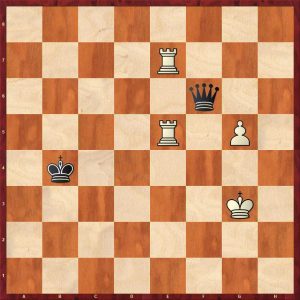
6…Qf1 7.Kg4 Qd1+ 8.Re2 Kc3 9.Kh5 Qh1+ 10.Kg6 Qd5 11.R2e6 Qd3+ 12.Kg7 Qd4+ 13.Re5
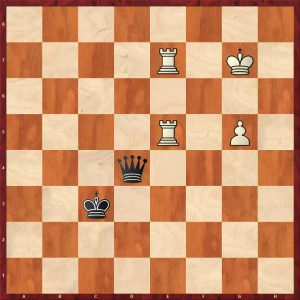
13…Kc2 14.g6 Kd2 15.Kg8 Qd6 16.g7 Qb8+ 17.Kf7 Qb3+ 18.R5e6 Qf3+ 19.Rf6 Qd5+ 20.Ree6
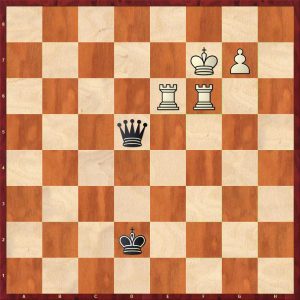
20…Qb7+ 21.Kg8 Qh1 22.Rh6 Qa8+ 23.Kh7 Qa7 24.Kh8 Qa1 25.Ref6 winning
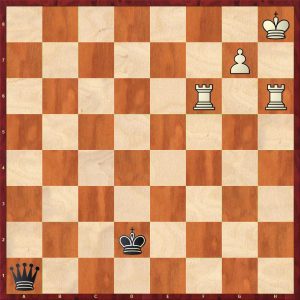
If the reader has played through this ending, it was remarkably simple to win.
With a central pawn, there is no fortress on the short side for the defending king:
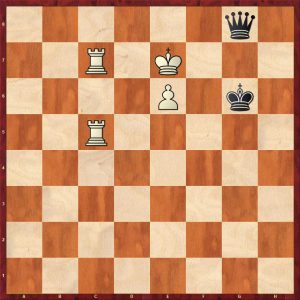
This is winning after 1.Kd7 Qg7+ 2.e7
In general, the queen can draw when the defending king is well placed and the attacker cannot coordinate and safeguard the king. This can be very complicated and not easy to calculate:
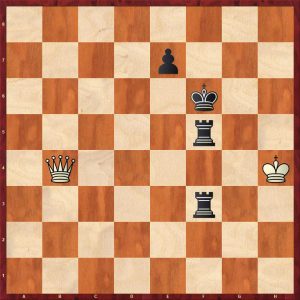
White’s king is trapped on the edge but White can just hold: 71.Qb6+ Kf7 72.Kg4 R5f4+ 73.Kg5 Rf6 74.Qb1 Rg3+ 75.Kh4 Rg2 75.Kh4 Rg2
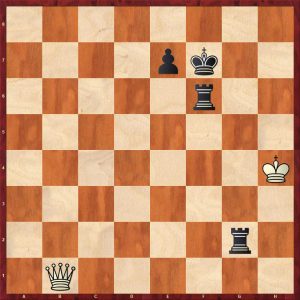
76.Qb3+ and lost quickly 76.Qh7+! draws 76…Kf8 77.Qh8+ Rg8 78.Qh5 e5 79.Kh3 Rg7 80.Qh4 Kf7 81.Qc4+ Re6 82.Qc7+ Re7 83.Qc4+ Kf6 84.Qc6+ Re6 85.Qf3+ =
Here is a game from the early Fischer. His opponent played 90..Kd6? and Fischer defended perfectly to draw.
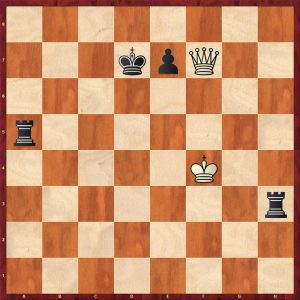
Black could have hunted down the White king as follows: 90…Rc3 91.Kg4 Ra4+ 92.Kh5 Rc5+ 93.Kh6 Rh4+ 94.Kg6 Rg4+ 95.Kh6 Rgg5
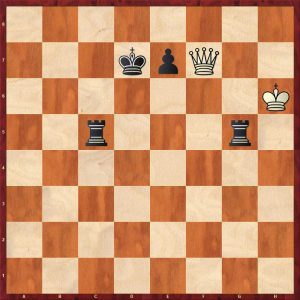
96.Qa2 Ke8 97.Qa8+ Kf7 98.Qa2+ Rcd5
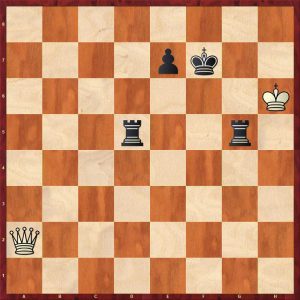
After 99.Qf2+ Rgf5 winning as 100…Rh5+ follows
General case with more pawns
In general the rooks want static control and the queen dynamic. It is extremely important for the rooks to coordinate. Examples of positions where the two rooks are better are shown below.
The reviewer gives some typical positions with a quick assessment: buy the book to go through the analysis.
In this position below the rooks have full board control. White wins easily.
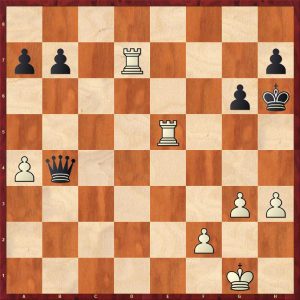
In the position below the rooks are coordinated and white’s weak isolated pawns are easy pickings for the rooks. Black won quickly.
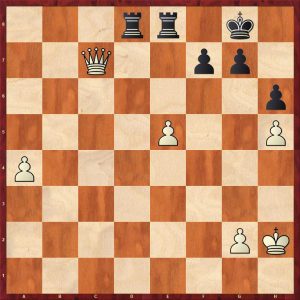
In the next position, white has just played 43.Re1 threatening Ree7, Black has to weaken his pawns to prevent the immediate loss of the f7-pawn. This is enough for white to win.
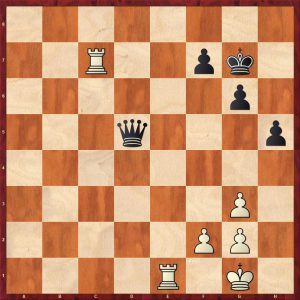
The queen needs targets to start dynamic play. Good for the queen are weak pawns, an exposed king, uncoordinated rooks and of course dangerous friendly passed pawns.
Queen + two connected passed pawns usually beat two rooks. The defensive setup with the rooks doubled up against the more advanced pawn can be difficult to break down. The position below is winning but takes nearly 50 moves against best defence!
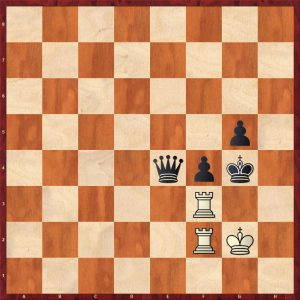
The position below is winning for the queen as the rooks are uncoordinated and the queen has a dangerous passed c-pawn.
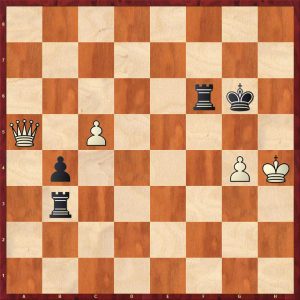
In this position the passed pawn dominates the rooks but Black is still holding out. The key to winning this game is to open a second front on the queenside to widen the bridgehead for the queen. Hence 48.c4!
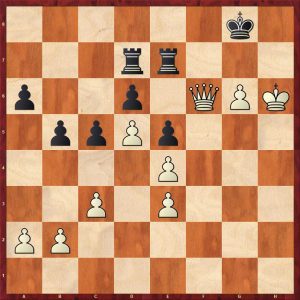
In the next position Black has a small material advantage with two connected passed pawns. The easiest way to win is to open a second front on the queenside and create fresh White pawn weaknesses, hence 35…a5!
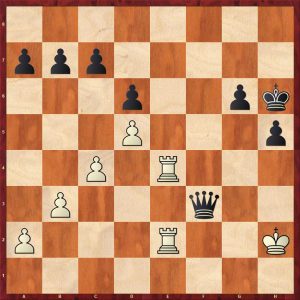
In the next example, there is rough material equality but the queen is winning here as White’s rooks are uncoordinated, his king is exposed and he has lots of weak pawns.
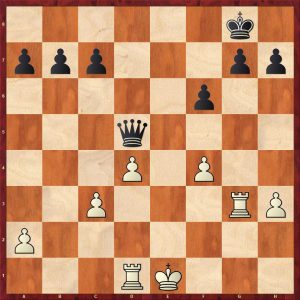
Chapter 7 – Queen versus Rook and Two Minor Pieces
Surprisingly the author does not cover the endgame with no pawns as R+B+N v Q is drawn but is difficult to hold.
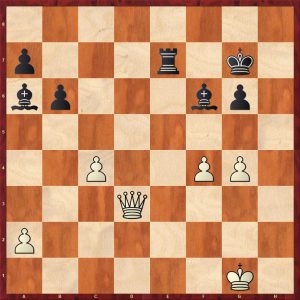
The pieces seek static control. In the position below, Black is winning but needs squares for his pieces, hence 34…g5!? After 35.fxg5 Bxg5 Black is winning as White’s pawns are going to drop off in the long run.
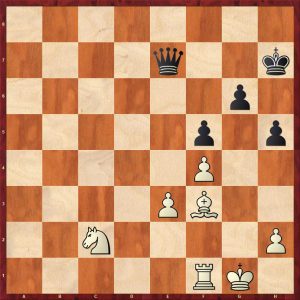
In the next example, the position is static with the pieces controlling everything. The queen has no targets and White’s king is safe. White will slowly and surely improve his pieces and pick off Black’s pawns.
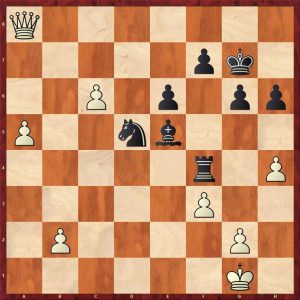
In the next example, the queen has passed pawns, but they are all separated and effectively isolated, so Black’s well coordinated pieces can just collect the apple harvest after 34…Rb4!
The queen loves dynamic play with an exposed enemy king.
A good example is below where queen and 3 pawns fight a rook and two bishops with an exposed king. After 24.Qe6 Black is struggling to coordinate and finish development. Black put up stiff resistance but the defensive task proved too much and White won.
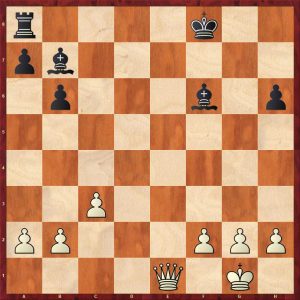
In the next game, a queen and two connected passed pawns supported by the king face an uncoordinated rook, bishop and knight. The queen wins effortlessly.
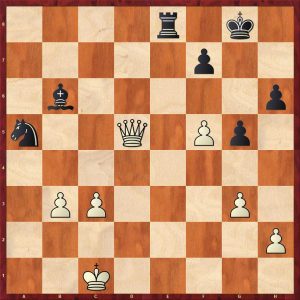
Chapter 8 Queen an Minor Piece vs Queen (and Minor Piece)
This topic is covered well with sections on:
- Queen + Knight v Queen
- Queen + Knight + Pawns v Queen + Pawns
- Queen + Bishop v queen
- Queen + Bishop + Pawns v Queen + pawns
- Queen + Knight endings
- Queen + Bishop (same colour) endings
- Queen + Bishop (opposite colour) endings
- Queen + Knight v Queen + bishop endings
This is particularly good chapter.
Chapter 9 Queen + Rook v Queen + Rook
This piece combination is a really a mixture of middlegame and endgame themes. King safety is paramount. In this game White’s king is safe whereas Black’s king is looking potentially vulnerable.
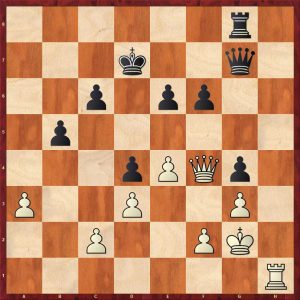
Fischer played the incisive 33.a4!! to open up files for his rook. If 33…b4 34.Rh5!
There is another Fischer game below. White had to play 35.Rf3. However after 35.Qf8+? Kh5 Black’s king entered the fray with decisive effect. After 36.g4+ Kh4 37.Qxf6+ Kxh3 it was all over.
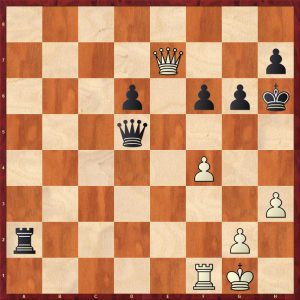
Chapter 10 Queen vs. Minor pieces
The interesting endgames of queen v 2 minor pieces with no pawns are covered.
The endgame of queen v two knights with pawns is covered showing typical winning methods:
- Overloading the knights which can only defend a limited front
- King invasion
- Zugzwang
Some successful fortresses are also demonstrated.
The endgame of queen v two bishops with pawns is also covered. Positions with mutual passed pawns are shown demonstrating the power of the queen. Some fortresses are shown of course.
The endgame of queen v knight and bishop with pawns is also covered. Positions with fortresses are covered with methods of breaching them covered.
Queen versus three minor pieces is by far the most interesting endgame covered with this rough material equality.
In this sort of position where the pieces are uncoordinated, the queen wins:
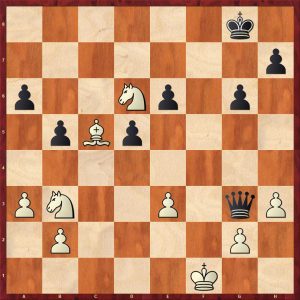
If the pieces are coordinated and their king is safe, they have good winning chances.
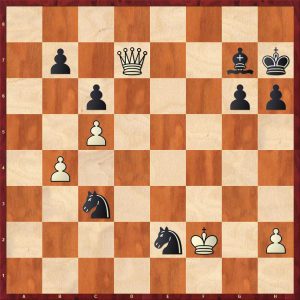
White misfired with 53.b5? (53.Qxb7 holds a draw) 53…Nd4! wins as the pieces gain static control. Eventually all the queenside pawns were exchanged and Black won on the kingside.
If the minor pieces have control even with a pawn apiece, the pieces have winning chances:
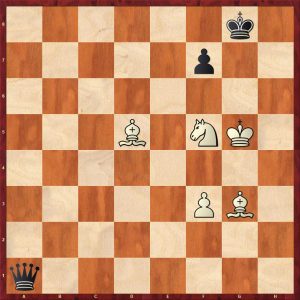
Black played 50…Qc1+? and lost the pawn and the game. 50…Qg1 just holds!
The next position is one of dynamic equality:
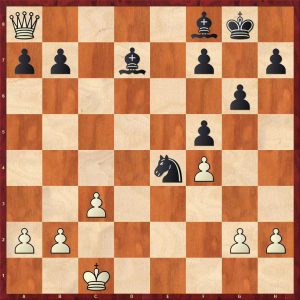
30…Bc6! 31.Qxa7 Nc5=
Chapter 11 is a pot pourri of fascinating positions that do not belong elsewhere in the book.
Chapter 12 covers some endgame studies. Every endgame book should include some studies to enhance the readers’ imaginations.
The book ends with comprehensive solutions to the exercises set in each chapter.
In summary, this is an excellent book which requires a lot of time to absorb. Some sections are much easier to absorb than others, for example the sections on two rooks v queen in the general case with many pawns is excellent and would be useful for club players and above. The chapter on queen and minor piece v queen and minor piece with many pawns is also superb. The more difficult sections such as queen and pawn v queen are definitely worth studying and are fascinating in themselves.

FM Richard Webb, Basingstoke, Hampshire, 11th August 2021
Book Details :
- Hardcover : 272 pages
- Publisher:Russell Enterprises (24 Mar. 2021)
- Language: English
- ISBN-10:1949859312
- ISBN-13:978-1949859317
- Product Dimensions: 15.24 x 1.27 x 22.86 cm
Official web site of Russell Enterprises
