Blurb from the publisher:
“If you want to improve your middlegame play, you will have to develop a FEEL for positions.
That’s what Boris Zlotnik has been stressing during his long and rich trainers career. Clicking through concrete variations (a popular pastime in the computer era) is not enough. To guide your thinking during a game you should be able to fall back on a reservoir of typical ideas and methods.
That is exactly what this book offers you: Zlotnik’s legendary study material about the middlegame, modernized, greatly extended and published in the English language for the first time. As you familiarize yourself with the most important strategic ideas and manoeuvres in important basic opening structures, you will need less time to discover the clues in middlegame positions.
You will find it so much easier to steer your game in the right direction after the opening has ended. Zlotnik’s Middlegame Manual is accessible to a wide range of post-beginners and club players. It is your passport to a body of instructive material of unparalleled quality, collected during a lifetime of training and coaching chess.
A large collection of exercises, carefully chosen and didactically tuned, will help you drill what you have learned. With a foreword by Fabiano Caruana.”

“Boris Zlotnik is an International Master from Russia and a prominent chess trainer. For many years he was the director of the legendary Chess Department of the INEF College in Moscow. In 1993 he emigrated to Spain. One of his most successful pupils is Fabiano Caruana, who in 2004, as a 12-year-old, moved to Madrid with his entire family to live near his trainer.”
End of blurb.
Courtesy of Amazon we have an option to Look Inside the Kindle version of this book
From my first quick perusal through this middlegame manual, I was really impressed with the illuminative, explanatory paragraphs enumerating the possible plans of both sides particularly in Part 1 Typical structures in the middlegame. These typical schemes are demonstrated with instructive games from top players of many periods interspersed with many pithy paragraphs which effectively communicate key ideas. The reviewer will give examples as we navigate this excellent training manual for typical middlegame structures and manoeuvres.
The tome also effectively uses the analysis and evaluations of chess engines in conjunction with the excellent, explanatory passages to scrutinise games and emphasize key motifs. It is surprising how often the play and evaluations of the old masters is vindicated by the computer. (Of course there are tactical oversights, but that is to be expected.)
The book is divided into three sections. Part 1 is concerned with Typical structures in the middlegame and has three chapters:
- The Isolated Queen’s Pawn
- The Carlsbad Structure
- Symmetrical Pawn Structures
Part 2 is titled Typical methods of play:
- Restricted mobility in the King’s Indian Defence
- Should we exchange the fianchettoed bishop (EFB) ?
- The d5-square in the Sicilian
Part 3 has two chapters with exercises followed by solutions.
The reviewer will present a detailed report of chapters 1 and 2 to give the reader a good feel for the book. Chapter 3 will get modest coverage whilst Chapters 4-6 will get a very brief overview.
Chapter 1 The Isolated Queen’s Pawn
The author begins with an introduction with Tarrasch’s famous quote followed by showing the typical IQP pawn structures viz.:
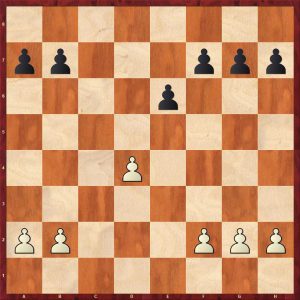
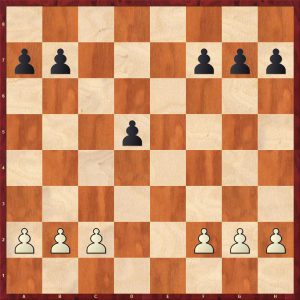
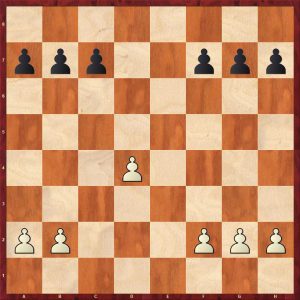
As the author points out, these pawn structures can occur from a wide variety of openings which only makes their study more valuable for any aspiring player to improve.
As a young junior, the reviewer won a host of games against the IQP by exchanging pieces and exploiting the weak d-pawn in the endings. As a result of these comfortable victories, against mainly weaker opposition, I jumped to the false conclusion that the IQP was a “bad thing”. My poor education was soon exposed when I got crushed in games against stronger players who knew exactly how to handle the advantages of the IQP.
Zolotnik gives a quick historical survey of the IQP with a couple of games from the Victorian era including a game by the first official world champion William Steinitz.
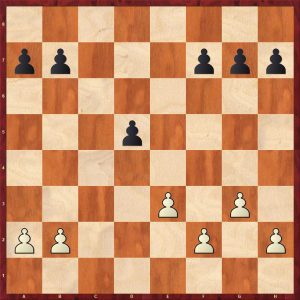
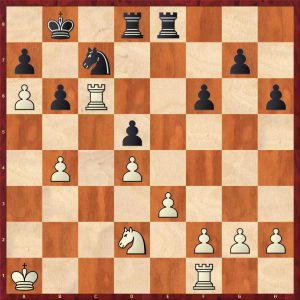
The author explains the weakness of the IQP in the endgame with two didactic games by Sergei Tiviakov.
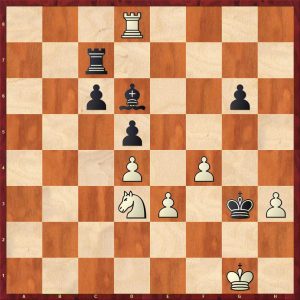
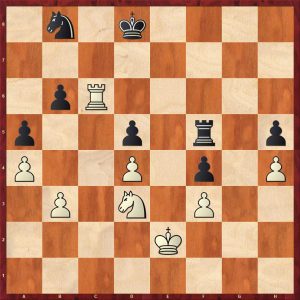
The first endgame starts here:
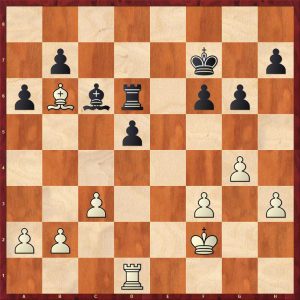
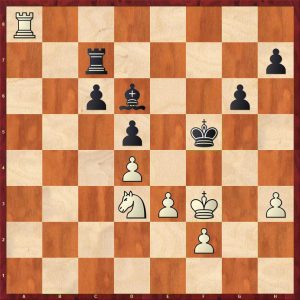
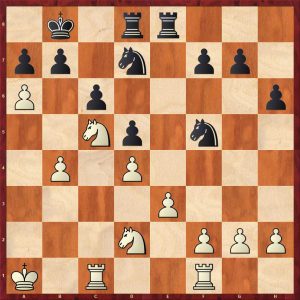
The second endgame commences here:
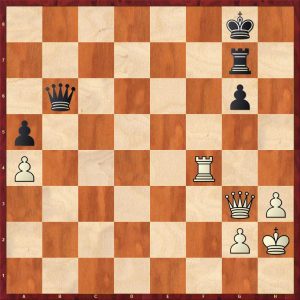
After the exchange of one pair of rooks, this position is reached:
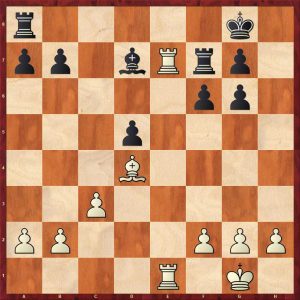
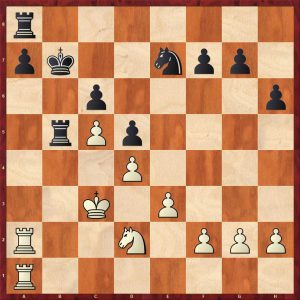
The reader may well be thinking: black is slightly worse, but with opposite coloured bishops how did black lose those endgames, particularly as the white rook has no obvious entry point? Tiviakov’s second opponent was a decent GM close to 2600 and he got ground down thus displaying how difficult these type of equals minus mode endings are to defend with an inferior pawn structure and a semi-bad bishop. Stockfish helpfully indicates that the ending is drawn for many moves, but pity the mere mortals in practice with an increment finish! Buy the book to enjoy these ending masterclasses.
The author proffers some sagacious observations:
“As can be seen from these two endings, the main drawbacks of the IQP are that it cannot be defended by another pawn, and in addition the square in front of this pawn, as well as various squares to the side of the pawn, can be exploited by the opponent as strongpoints for his pieces. These disadvantages are most apparent following simplification, whereas the side with the IQP possesses several advantages which are present in the middlegame. First and foremost, the IQP confers a space advantage, which makes it easy to regroup the pieces and consequently to create threats in different areas of the board, especially on the kingside. Secondly, the IQP serves as support for the central deployment of one or two minor pieces, particularly a knight, which creates the conditions for an attack on the enemy castled king. Thirdly, the side with the isolated pawn can exert pressure along the c- and e- files.”
The author then lists the typical plans for both sides in the IQP battle of ideas:
“The side with the IQP has the following four plans available:
A) kingside attack;
B) opening the game by advancing the isolated pawn;
C) advancing the isolated in order to fix an enemy pawn on an adjacent file;
D) developing activity on the queenside
The side playing against the IQP employs basically two methods:
A) simplification of the position, aiming for an endgame;
B) transformation from an IQP structure to a structure with hanging pawns.”
The subsequent six sub-sections of the chapter analyses each of these plans in turn.
Sub-section A Kingside attack
This begins with an exemplary attacking game by Vladimir Tukmakov against Viktor Kortchnoi from the Soviet championship Riga 1960: the great defensive player Kortchnoi is smashed up. Well worth a visit: get the book to enjoy this slugfest with good notes.
The author adds this observation: “In the structure with a pawn on e6 versus a pawn on d4, the ‘hot spots’ where White often sacrifices his pieces are e6 and f7, while in the structure with pc7/c6 versus pd4, there is a typical sacrifice, as seen in the following game.”
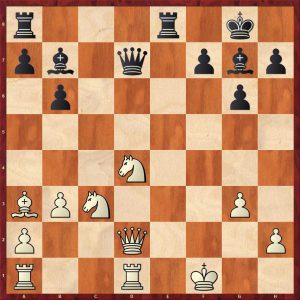
Here is a modern game in the Petroff that shows these demolition of these ‘hotspots’.
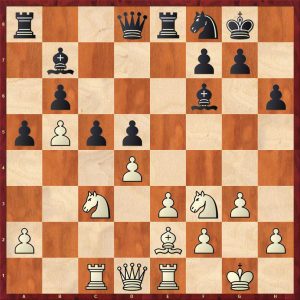
Nils Grandelius (2653) – Anna Zatonskih (2424)
IoM Masters 2017
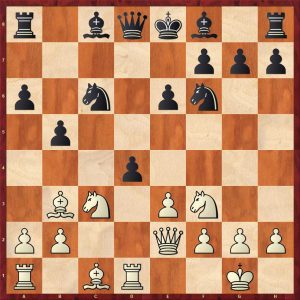
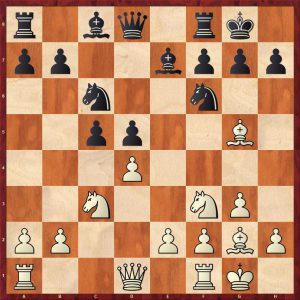
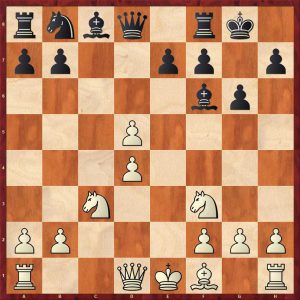
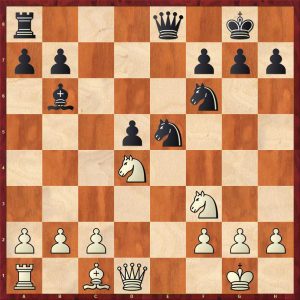
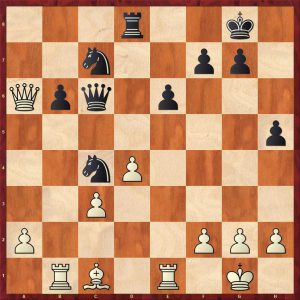
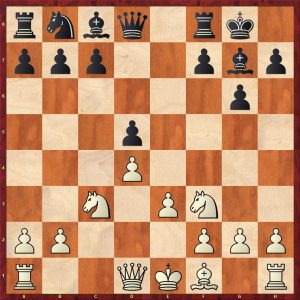
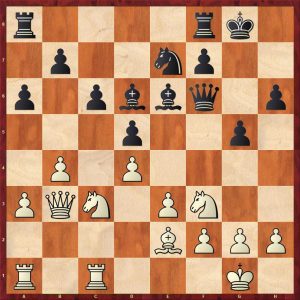
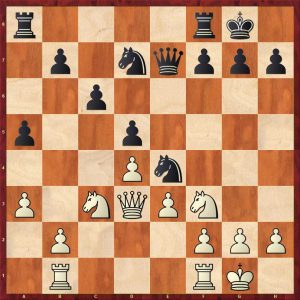
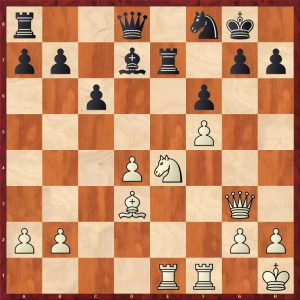
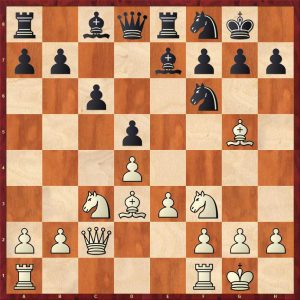
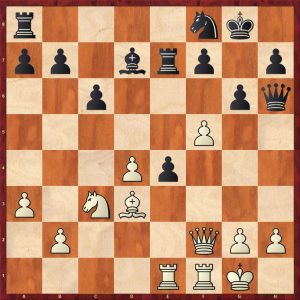
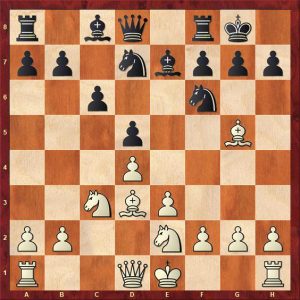
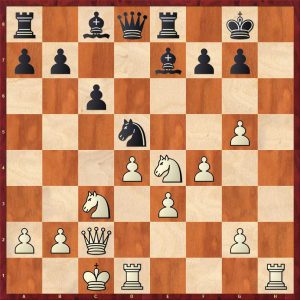
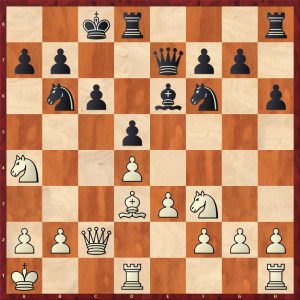
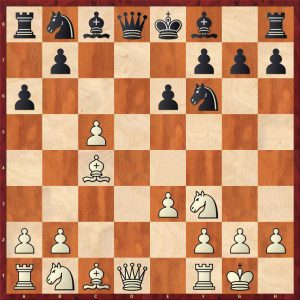
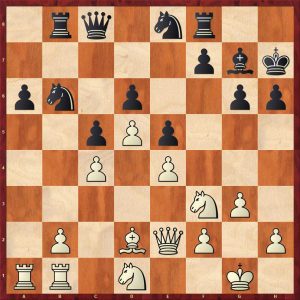
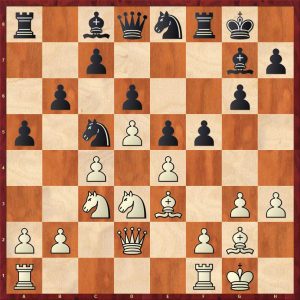
1.e4 e5 2.Nf3 Nf6 3.Nxe5 d6 4.Nf3 Nxe4 5.d4 d5 6.Bd3 Nc6 7.0-0
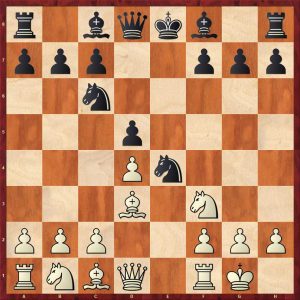
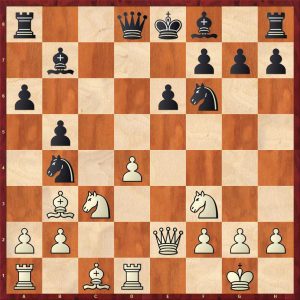
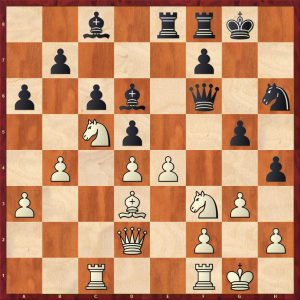
7…Bg4 (7…Be7 is more common and scores better, but Stockfish likes both moves) 8.c4 Nf6 9.Nc3 Be7 10.cxd5 Nxd5 11.h3 Be6 12.Re1 0-0 A typical IQP position
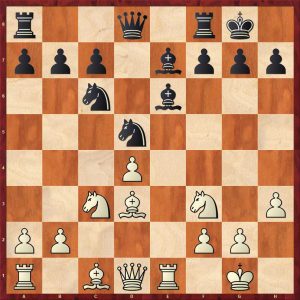
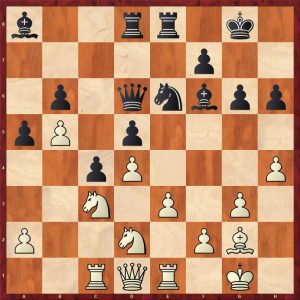
13.a3 (White employs a standard plan, preparing the well known queen on d3 and bishop on c2 battery eyeing up h7) 13…Re8 14.Bc2 (It is interesting to note that after 14.Qc2 h6 15.Rxe6!? white has sufficient compensation for the exchange)
A common sort of IQP position which contains hidden venom.
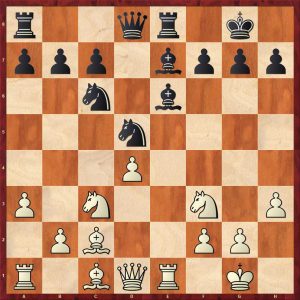
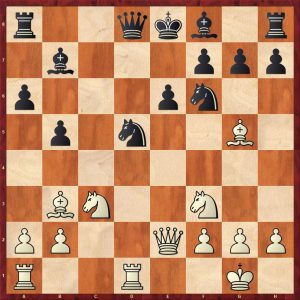
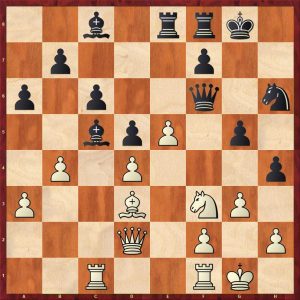
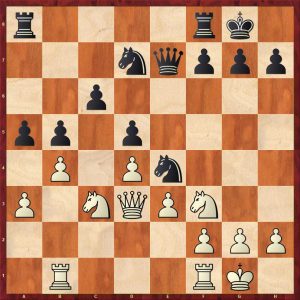
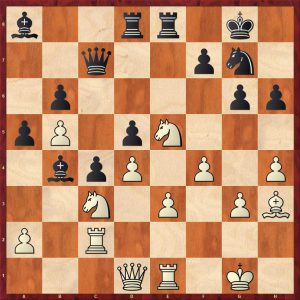
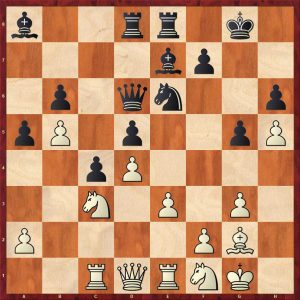
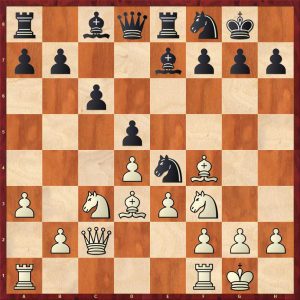
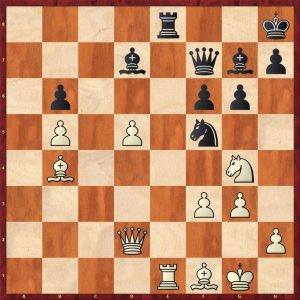
14…h6?? (This looks wrong in this type of position and is totally refuted. Black should wait for Qd3 and play g6 solidifying the b1-h7 diagonal, better is 14…Bf6, 15.Qd3 g6 16.Bh6 (or 16.Ba4!? with a tiny edge according to the iron monster) Nxc3 17.bxc3 Bf5 with equality) 15.Qd3 Nf6
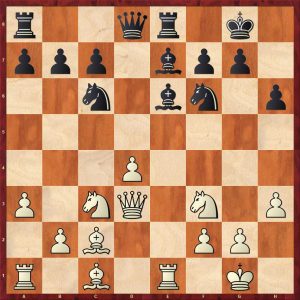
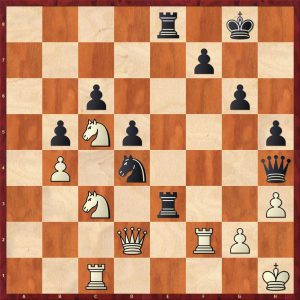
The erroneous h-pawn advance is severely punished with a thematic breakthrough:
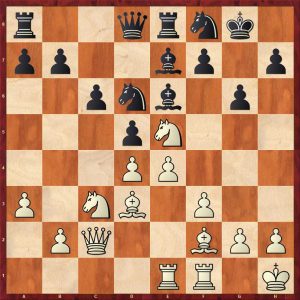
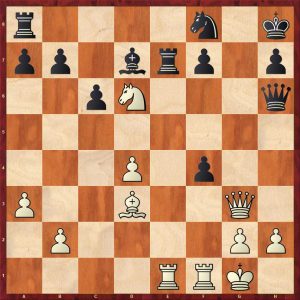
16.Bxh6! Winning by force 16…gxh6 (16…Qd7 is hopeless: 17.Bg5 g6 18.d5! Nxd5 19.Rxe6! Qxe6 20.Nxd5 crashes through) 17.Rxe6! Killing, as all the white squares collapse.
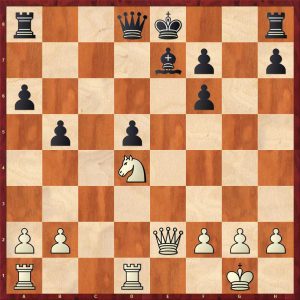
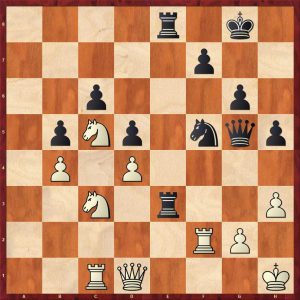
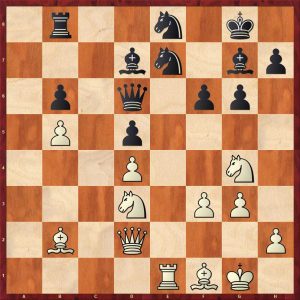
17…Qd7 (17…fxe6 leads to a typical finish: 18.Qg6+ Kh8 19.Qxh6+ Kg8 20.Ng5! bringing in the third piece for the attack and mate follows quickly, for example 20…Rf8 21.Bh7+ Kh8 22.Bf5+ Kg8 23.Bxe6+ Rf7 24.Bxf7#) 18.Rae1 fxe6 19.Qg6+ Kf8 20.Qxh6+ Kg8
21.Ne5 (White can also win in a similar manner to the line given above: 21.Qg6+ Kh8 22.Ng5 Rf8 23. Qh6+ Kg8 24.Bh7+ Kh8 25.Bf5+) Nxe5 22.dxe5 Bf8 23.Qxf6 Bg7 24.Qg6 Qd2 25.Re3 Re7 26.Ne4 Qc1+ 27.Kh2 Qxb2 28.Nf6+ Kf8 29.Nd7+ Rxd7 30.Rf3+ 1-0
A lesson in care about moving pawns in front of the king. A surprising mistake, 14…h6?? from an IM standard player.
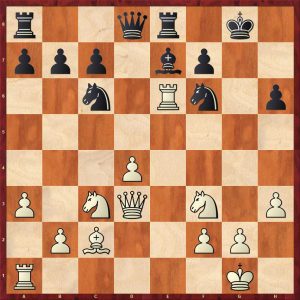
Plan B: opening the game by advancing the IQP
Here is a superb game from the young Boris Spassky showing his brilliant tactical and positional skills:
Boris Spassky – Avtonomov
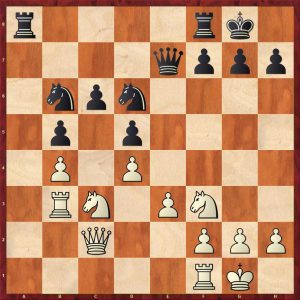
Leningrad 1949
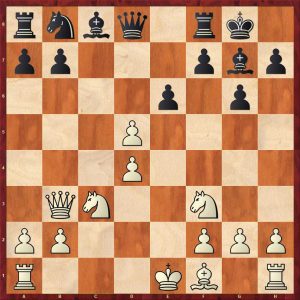
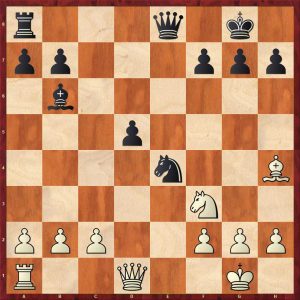
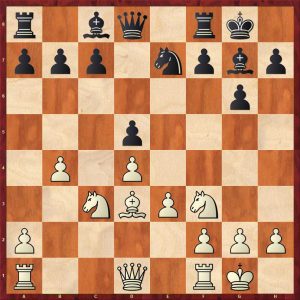
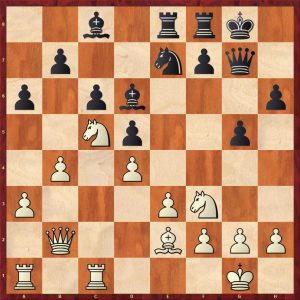
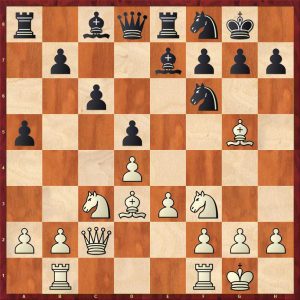
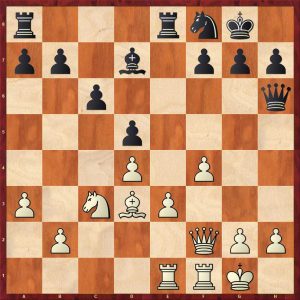
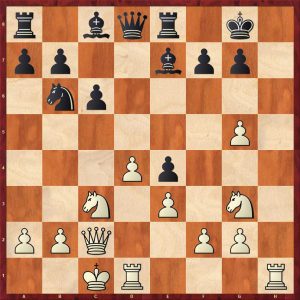
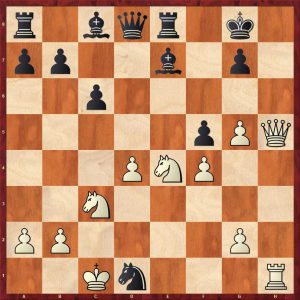
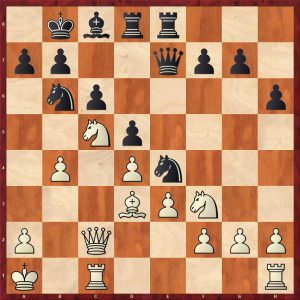
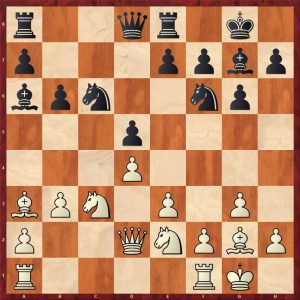
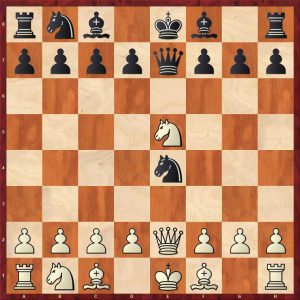
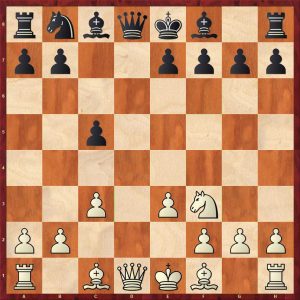
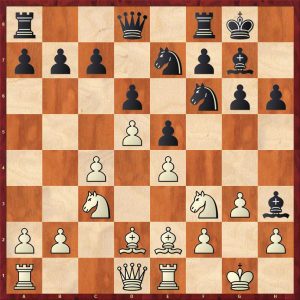
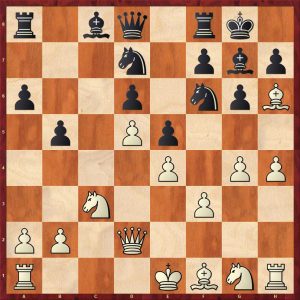
1.d4 d5 2.c4 dxc4 3.Nf3 Nf6 4.e3 e6 5.Bxc4 c5 6.0-0 a6 7.Qe2 b5 8.Bb3 (The main line, but 8.Bd3 is also a played) 8…Nc6 (Modern theory prefers 8…Bb7! or Stockfish prefers 8…Be7) 9.Nc3
A common position from the queen’s gambit accepted. Black now plays an obvious move that is a serious mistake.
9…cxd4? (Once again 9…Bb7! is the modern main line, Stockfish, again prefers kingside development with 9…Be7) 10.Rd1!
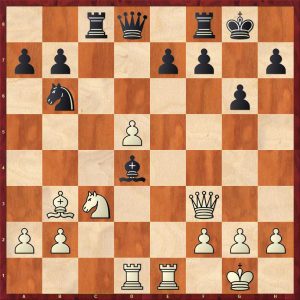
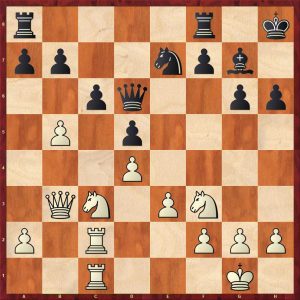
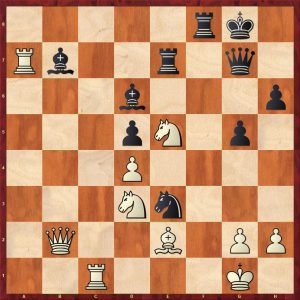
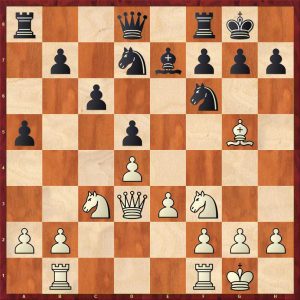
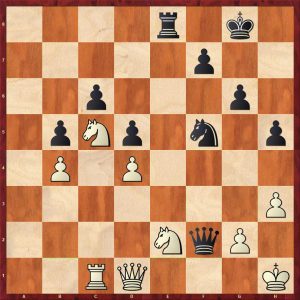
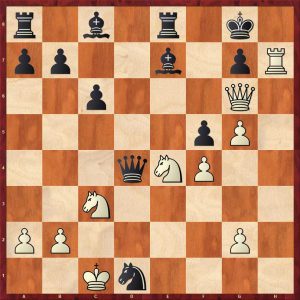
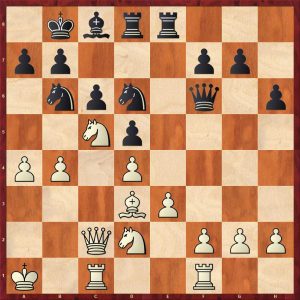
The point, a standard resource in the QGA after a previous Qe2 10…Bb7? (10…Na5 was essential surrendering a pawn for the bishop pair: 11.Nxd4 Bd6 12.e4 Qc7 13.Nf3 Nxb3 14.axb3 Be7 15.Nxb5 Qb8 16.Nc3 0-0) 11.exd4 Nb4? (The losing move! It is hard to believe that Black will not survive ten moves from here, 11…Na5 is better, but 12.d5! anyway which is similar to the game leads to a clear advantage to white)
The d5 square is covered five times, but….
12.d5!! (Completely crushing. Now we see why Stockfish liked Be7 on moves 8 and 9) 12…Nbxd5 (12…Nfxd5 loses a piece to 13.a3!) 13.Bg5! (Developing the last minor piece with a killing pin and more pressure on d5, simply 14.Nxd5 is threatened winning a piece)
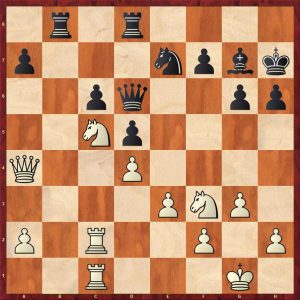
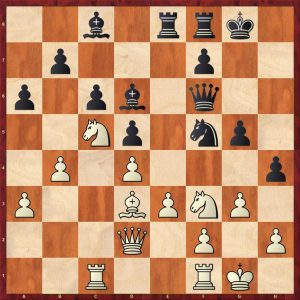
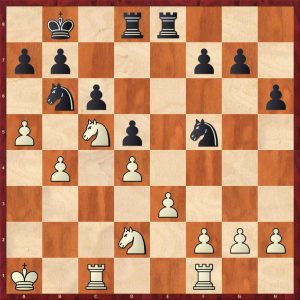
13…Be7 Forced 14.Bxf6 (Crunch!, smashing up black’s kingside, so his king will never find shelter) 14…gxf6 15.Nxd5 Bxd5 (15…exd5 is better but black is still lost) 16.Bxd5 exd5 17.Nd4
Black’s position is a sorry sight. His king has no haven: the end is swift. Notice how the white steed is the key cavalryman in the execution.
17…Kf8 (17…0-0 18.Nf5! wins a piece owing to the threat of 19.Qg4+ mating) 18.Nf5 h5 19.Rxd5! Qxd5 20.Qxe7+ Kg8 21.Qxf6 A crisp finish in a fine attacking game 1-0
An exemplary display from the future World Champion.
Subsection C: advancing the isolated pawn to fix an enemy pawn
This plan occurs most frequently in structures with a black IQP arising from the Tarrasch Defence to the Queen’s Gambit. There are cases with a white IQP in the Gruenfeld Defence for example.
The reviewer will show some key positions from a game Nikolay Novotelnov – Igor Bondarevsky Moscow 1951.
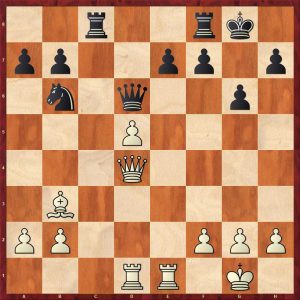
This is the standard tabiya from the Tarrasch Defence to the Queen’s Gambit.
In the position below, Bondarevsky played a memorable idea which is not obvious 12…d4!
Boris Spassky was a pupil of Bondarevsky and in the position above played 12…h6 13.Bxf6 Qxf6 14.Nxb6 axb6 15.Qb3 Qd8 16.a3 d4!
Spassky’s expertise in this variation played a large part in his victory over Petrosian in the World Championship match in 1969.
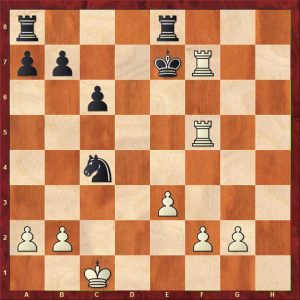
The Bondarevsky game reached this position after move 21:
It’s all gone horribly wrong for white who has to endure horrendous pressure down the e-file. Black duly won after several mistakes by both sides.
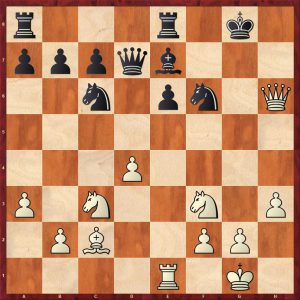
Here is an instructive game from another former World Champion, Vasily Smyslov.
Vasily Smyslov – Vladimir Liberzon
Moscow 1969
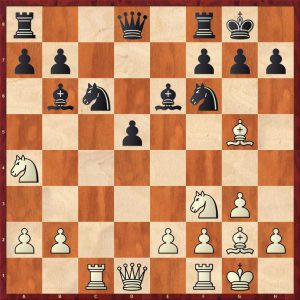
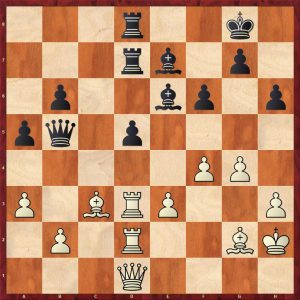
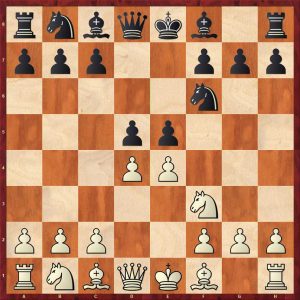
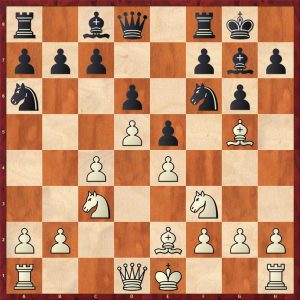
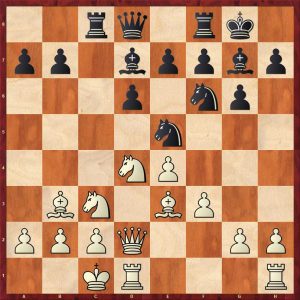
1.c4 g6 2.Nc3 Bg7 3.d4 Nf6 4.Bg5 c5 5.e3 cxd4 6.exd4 d5 7.Bxf6 Bxf6 8.cxd5 0-0 9.Nf3
According to modern theory, this position should hold no terrors for black.
9…Nd7 9…Bg4 is a decent move: 10. Bc4 Bxf3 11.Qxf3 Bxd4 12. Rd1 Bxc3+ 13.Qxc3 Qd6 14.0-0 Nd7 15.Rfe1 Rac8 16.Qd4 Nb6 17.Bb3 with equality. This looks slightly easier to play for white who has more space and pressure on the e-pawn, Kasparov outplayed his opponent and went on to win.
Stockfish likes 9…Bg7 10.Qb3 e6!?
There are a lot of gambits in the Bg5 systems against the Gruenfeld after white has surrendered his dark squared bishop. This gambit is totally sound: after 11.dxe6 Bxe612.Qxb7 Qe8! 13.Be2 Nc6 14.0-0 Rb8 15.Qa6 Nxd4 16.Nxd4 Bxd4 17.Rad1 Bg7 With equality, black’s bishop pair and activity compensate for the pawn.
The Smyslov-Liberzon game continued:
10.Bc4 Nb6 11.Bb3 Bg4 12.0-0 Rc8 (12…Nc8 to blockade the d-pawn is also fine) 13.Re1 Bxf3 14.Qxf3 Bxd4 15.Rad1
This position is equal and black can continue as he did in the game or retain his bishop with equality in both cases. The reviewer agrees with the author and prefers the latter course. Equal does not mean drawn and white’s space advantage makes his position somewhat easier to play.
15…Bxc3 16.bxc3 Qd6 17.h4
17…h5?! (17…a5! undermining the bishop is better: 18.a4 h5 19.g4 hxg4 20.Qxg4 Rxc3 21.Re6 fxe6 22.Qxg6+ is only a draw)18.Rd4?! (Strike while the iron is hot: 18.g4! hxg4 19.Qxg4 Rxc3 20.h5 with a strong initiative and a clear advantage, e.g. 20…g5 21.Qxg5+ Kh8 21.Qxe7 Nc8 22.Qe4)
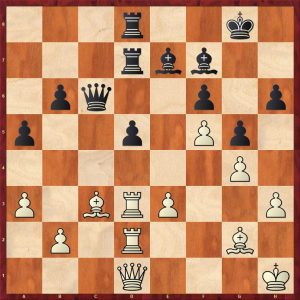
18…Kg7 19.Rf4 Rc7? (Disconnecting the rooks with fatal consequences, once again 19…a5! is the right idea with equality)
20.Re6! Qd8 21.Re3 I’ll be back 21…Qd6

22.Rfe4?! (22.g4! sets up a winning attack: notice how the d5-pawn confers on white a space advantage which allows easy manoeuvring of his major pieces whilst black’s rook and knight are still offside) 22…a5! 23.a4 Qf6 (23…Nd7 is better) 24.Rf4 Qd6
25.Re6! (Hello again! This time the rook brings the grim reaper with a specially sharpened scythe.) 25…Qc5 26.Rxg6+! Ouch fxg6 27.Rxf8 Qxc3 28.Qf7+ Kh6 29.Qf4+ Kg7 30.Rf7+ Kg8 31.d6 Qxb3 32.Rf8+ 1-0
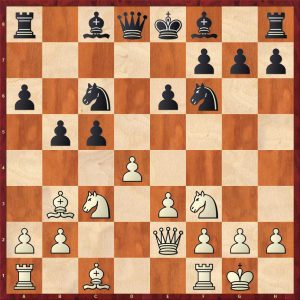
Plan D – developing activity on the queenside
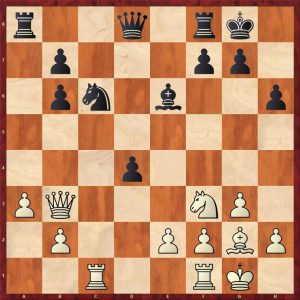
Here is one of the author’s games:
Alexander Bitman – Boris Zlotnik Moscow 1979
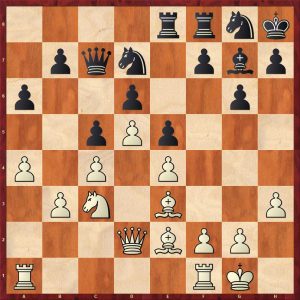
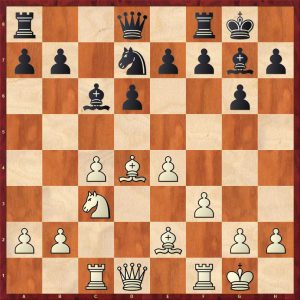
1.e4 e6 2.d4 d5 3.Nd2 c5 4.Ngf3 Nf6 5.exd5 exd5 6.Bb5+ Bd7 7.Bxd7+ (7.Qe2+ is the main alternative) Nbxd7 8.dxc5 (8.0-0 is more accurate) Bxc5 9.0-0 0-0 10.Nb3 Bb6
In this position, white plays a seemingly natural move that is a mistake because it allows black to gain time for activating his pieces. The reviewer has made the same mistake in a very similar position in an on-line blitz game.
11.Re1?! (11.c3! or 11.Nbd4 is better) Re8! (Preventing 12.Be3) 12.Rxe8+ Qxe8 13.Nbd4 Ne5 (13…Qe4 is interesting: Stockfish likes the game move as well)
14.Bg5?! (A definite mistake, it’s as if white thought that black’s queen was still on d8! Better is 14.Nxe5 Qxe5 15.Be3 Re8 16.c3 h5 17.h3 with equality) Ne4 15.Bh4!? (The bishop is out of play here, 15.Bf4 is better; 15.Be3 Nc4!) 15…Nxf3+ 16.Nxf3 (Strangely 16.gxf3 is better ejecting the powerful knight at the cost of a weakened kingside)
16…Qb5! (Attacking the weak queenside which is made more effective because of white’s misplaced bishop) 17.Rb1 Re8 18.a3? ( A fatal weakening: better was 18.Qd3 or 18.c3 with the idea of 19.Nd4) 18…h6 19.Qd3 Qxd3 (Good enough to win a pawn and the game, but 19…Qc5!? is even better 20.b4 Qc6 with a big advantage) 20.cxd3 Nc5 Winning a pawn and the full point 21.Re1 (21.d4 Nb3 wins the d4-pawn because of white’s weak back rank) 21…Rxe1+ 22.Nxe1 Nb3 23.Nc2 Nc1 24.Nb4 (24.d4 Nb3 wins a pawn) 24…Bd4! 25.b3 Bc5! 26.Nxd5 Bxa3 27.b4 a6 28.Be7 f6 29.d4 Ne2+ 30.Kf1 Nxd4 and black won the pawn up technical endgame 0-1
The last two subsections of this chapter cover the two main plans for the defending side.
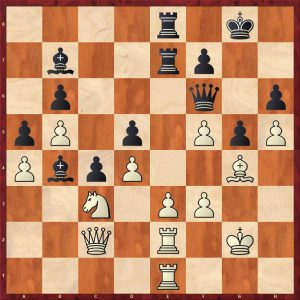
1.6 Plan A: simplification of the position
Here is a smooth win from the former World Champion, Anatoly Karpov at the height of his powers, over another ex-champion Boris Spassky.
Anatoly Karpov (2705) – Boris Spassky (2640)
Montreal Montreal 1979
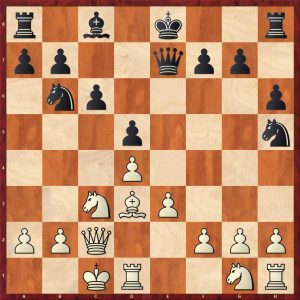
1.d4 Nf6 2.c4 e6 3.Nf3 d5 4.Nc3 Be7 5.Bf4 0-0 6.e3 c5 7.dxc5 Nc6 8.Qc2 Qa5 9.a3 Bxc5 10.Rd1
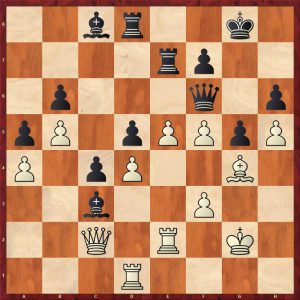
10…Be7 (This move is still one of the main lines today, however 10…Rd8!? is the latest theory leading to a small edge for white, one complicated line is: 11.Nd2! d4!? 12.Nb3 Qb6 13.Na4 Bb4+, 14.axb4 Qxb4+ 15.Nd2 e5 16.Bg5 Qa5 17.Qb3 Nb4 18.Bxf6 gxf6 19.Be2 Bd7 20.Ra1 dxe3 21.fxe5 b5 22.0-0 bxa4 23.Qc3 with a small edge. The only reason the reviewer gives this line is to demonstrate the extent of computer home preparation today: in Karjakin-Anand, Shamkir 2019, white won after playing the first 36 moves of home preparation) 11.Nd2 Bd7? (11…e5! is better and is the main line leading to rough equality) 12.Be2 Rfc8?! (Again 12…e5! is better limiting white’s edge) 13.0-0 Qd8 14.cxd5 exd5 (14…Nxd5 15.Nxd5 exd5 16.Qb3 with a definite edge) 15.Nf3 h6
Karpov makes a pertinent note: “The exchange of at least one pair of knights favours White, as it makes it easier to control the d4-square. Furthermore the f3-square is available for the e2 bishop, exerting direct pressure on the d5-pawn.”
16.Ne5 Be6 17.Nxc6 (17…Bxc6? 18.Ba6! nets an exchange, showing the power of white’s active bishops) Rxc6 18.Bf3 Qb6 19.Be5! Threatening to win the d5-pawn forcing black’s reply
19…Ne4 20.Qe2 Nxc3 21.Bxc3
21…Rd8 (Stockfish recommends 21…Bxa3!? 22.Bxg7! Kxg7 23.bxa3 Qb3! 24.e4 Rc2 25.Qe1 d4 26.e5 d3 27.Qe4 d2 28.Qf4 Qc4 29.Be4 Rb2= Few human players would choose a line leading to a smashed up kingside with no material compensation.) 22.Rd3! Rcd6 23.Rfd1 23…R6d7
The position has clarified with a clear white advantage. Black has no compensation for the weak d-pawn. The author makes an interesting historical comment here stating that in the 1960s, many Soviet players erroneously believed that an IQP cannot be exploited without knights. This game should disabuse anyone of that myth. Karpov wins a model game with a patient build-up and some prophylactic moves: sit back and appreciate the game.
24.R1d2 Qb5 25.Qd1 b6 26.g3 Bf8 27.Bg2 Be7 28.Qh5! a6 29.h3 Qc6 30.Kh2 a5
White now begins the assault to force a second weakness with a fine demonstration of a kingside initiative. The author points out that white has another good plan 31.Bd4 followed by doubling rooks on the c-file. The fact that white has two excellent plans shows how bad black’s cheerless position is.
31.f4! f6
Forced as 31…f5 allows 32.Qg6 Bf8 33.Be5 with the winning idea of …g3-g4
32.Qd1 Qb5 33.g4
33…g5? (The fatal error after defending for so long: black was probably is time trouble and lashed out wanting to do something, 33..Bf7! 34.h4 Qc6 35.Bd4 Bc5 36.Rc3 keeps white’s edge but black is still resisting) 34.Kh1 Qc6 35.f5 Bf7
36.e4! The decisive breakthrough against the IQP Kg7 37.exd5 Qc7 38.Re2 b5 39.Rxe7 Rxe7 40.d6 Qc4 41.b3 1-0
A didactic display from Karpov giving black not one iota of counterplay.
The final subsection covers:
Transformation from an IQP structure to a structure with hanging pawns
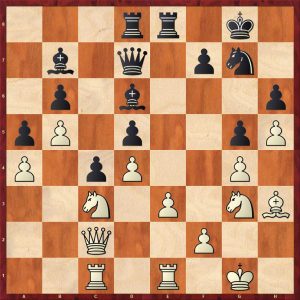
Here is an impressive blockade with an exquisite control of tactics from the former World Boss of chess, Garry Kasparov.
Vladimirov (2612) – Kasparov (2838) Batumi 2001
1.d4 Nf6 2.c4 e6 3.Nc3 Bb4 4.e3 0-0 5.Bd3 d5 6.Nf3 c5 7.0-0 cxd4 8.exd4 dxc4 9.Bxc4 b6 10.Qe2 Bb7 11.Rd1 Bxc3 12.bxc3 Qc7

13.Bb2?! (A weak move as the bishop never sees the light of day. The main line is 13.Bd3, 13.Ne5 is ok as well with equality) 13… Bxf3 14.Qxf3? (The ugly 14.gxf3 had to be played, play could continue 14…Nc6 15.Bb3 Nh5 16.c4 Nf4 17.Qe3 with a definite black advantage) 14…Qxc4! A far sighted exchange sacrifice based on the weakness of the white squares and the imminent danger to white’s queen 15.Qxa8 The tempting cake is ingested but is laced with poison 15… Nc6 16.Qb7 Nd5
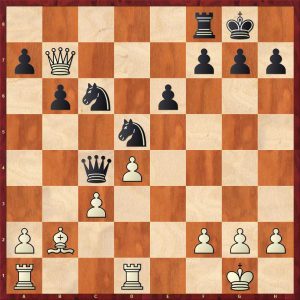
Black has a big advantage with a vice like grip on the white squares. The difference in activity of the respective sides’ pieces is quite striking: the only active white piece, the queen, is all alone and in dire danger of death.
17.Re1 Rb8 18.Qd7 Rd8 19.Qb7 h5?! (A rare Kasparov inaccuracy, 19…Na5! 20.Qxa7 Qc6 21.c4 Nxc4 22.Rac1 Nf4 23.f3 Nd3 24.Rxc4 Qxc4 25.Qxb6 Rc8 26.Rf1 h6 is easily winning for black. Notice how the knights stomp all over white combining threats against the queen, the kingside and white’s passively placed bishop and rooks) 20.Bc1? (The final mistake: Stockfish points out that with 20.Rac1! White can still put up a fight) 20…Na5 21.Qxa7 Qc6 22.Qa6 Nc4 23.Rb1 Nc7
After 24.Qa7 Ra8, the greedy queen meets her end on the executioner’s block 0-1
Chapter 2 – The Carlsbad structure
This is the famous Carlsbad structure, named from the great Carlsbad tournament in 1923 (in the modern day Czech Republic close to the German border), is one of the most important pawn structures in the game of chess both historically and in the modern game:
A deep understanding of how to play the positions with the Carlsbad structure is the hallmark of a very strong player and I suspect, every GM. The British GM, Keith Arkell was once asked how did you become a GM? He quipped: Carlsbad structures, and rook endings. Of course, Keith has a profound knowledge of more than just those two topics, but his pithy reply contains much more than a grain of truth. The titanic struggle between Capablanca and Alekhine for the World Championship in 1927 featured many games in the queen’s gambit including the Carlsbad structure. The reviewer’s scant knowledge of these games is a gap in his chess education. Many GMs have observed that one of their key skills over lower rated players is their superior knowledge and praxis of rook endings.
Back to the topic at hand: the author shares his knowledge of these positions with a lucid listing of both sides respective plans:
“Plan A: minority attack with b4-b5xc6;
Plan B: attack in the centre with e3-e4;
Plan C: kingside attack with both sides castled on the kingside;
Plan D: kingside attack with the kings castled on opposite sides;
Plan E: play in positions with both sides castled on the queenside.
Black in turn has the following methods of defence available:
i) Kingside counterattack with pawns;
ii) Kingside counterattack with pieces;
iii) Positional methods of defence, e.g. erecting a barrier with b7-b5 or controlling the squares c4 and b5 with the pieces;
iv) The central break c6-c5;
v) Counterattack against White’s queenside castled position.
Black’s choice of defensive method depends on which plan White adopts. For instance, method v) can only occur in the plan of Plan D or E.”
Plan A: the minority attack
This is a frequently adopted plan and is covered in great detail in this book. “The minority attack is a typical strategic method, which has the aim of creating a weak pawn in the opponent’s ranks, precisely where he has a pawn majority. The same procedure is applicable to a large number and variety of middlegame positions.”
There are many variations/lines of the Sicilian where Black launches a minority attack against white’s queenside.
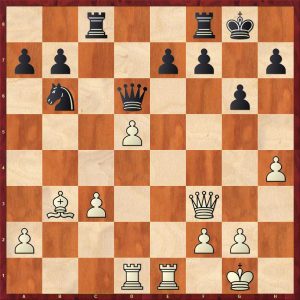
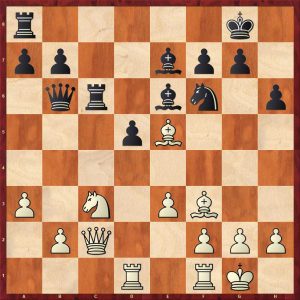
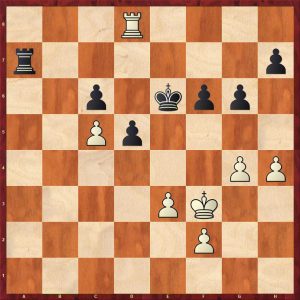
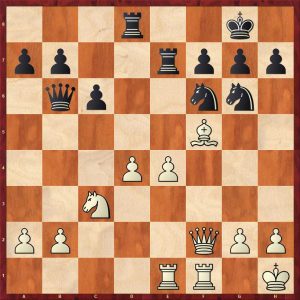
This next position shows a celebrated endgame resulting from a classic minority attack: Kotov-Pachman from Venice 1950.
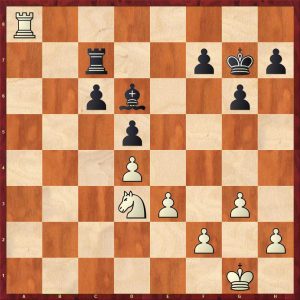
Stockfish helpfully suggests 42..h5! with a microscopic edge to White. I am not disagreeing with the silicon brain, but white has a more pleasant position to play. Black only has one weakness, so he can hold with patient, careful defence looking to go active at the right time. However, a decent GM went down here.
I will not reproduce a detailed analysis of this ending here: I will give the key positions in this ending including a fascinating line showing black’s defensive resources.
42… Kf6?! (42…h5! is better preventing white’s next cramping move) 43.g4! White fixes the h7-pawn as a potential weakness
43…Ke6?!
Much better is 43…Kg5! 44.h3 f5! 45.gxf5
Not 45.f4+? Kh4 46.gxf5
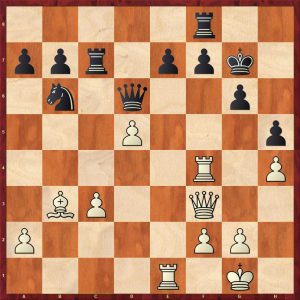
46…Kg3!! 47.fxg6 (47.f6 Rf7) 47…hxg6 48.Rd8
48…Ra7! 49.Kf1 Bc7 50.Rd7 Ra1+ 51.Ke2 Ra2+ 52.Kd1 Ba5 53.Ne5 Bd2=
45…Kxf5 46.Kf1 Kg5 47.Kg2 Kf6 48.Kf3 Kf5 with a slight edge to white, but black’s king is active.
Back to the game:
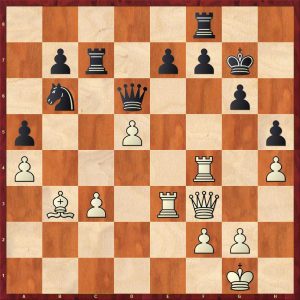
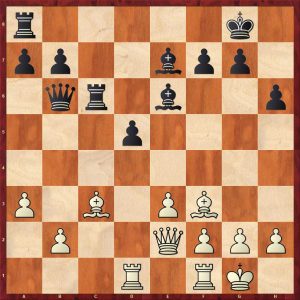
44.Kg2 Rb7 45.Re8+ Re7 46.Rh8 f6 47.h4 Rb7 48.Kf3 Rf7 49.Re8+ Re7 50.Rd8 Ra7

White has made significant progress but black can still hold.
51.Nc5+ Ke7?! (51…Bxc5 giving up a pawn offers good drawing chances) 52.Rc8 Bxc5 53.dxc5 Kd7 54.Rh8 Ke6 55.Rd8
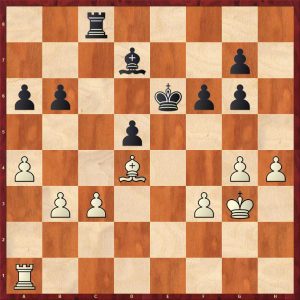
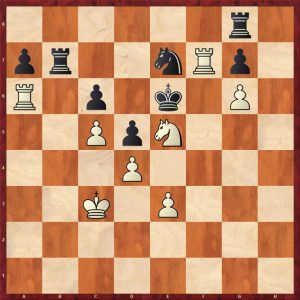
55…Ke7? (The decisive mistake: counterplay with 55…Ra4! holds. This shows that the decision on whether to stay passive or go active is not obvious even for a strong GM: White now wraps up efficiently) 56.Rd6 Ra6 57.g5 fxg5 58.hxg5 Kf7 59.Kg3 Ke7 60.f3 Ra3 61.Kf4 Ra4+ 62.Ke5 Ra3 63.Rxc6 Rxe3+ 64.Kxd5 Rd3+ 65.Ke4 Rc3 66.f4 Rc1 67.Rc7+ Kd8 68.Rxh7 Rxc5 69.Rf7 1-0
Buy the book to see this endgame analysed in more detail.
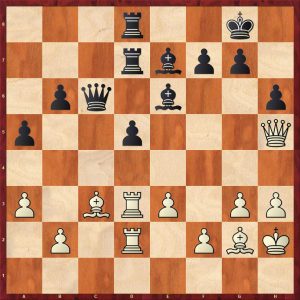
A typical double rook endgame arising from a minority attack. Black only has one weakness but he is totally passive awaiting white’s attempts to breach his fortress. Stockfish defends this ending without breaking a sweat, however for flesh and blood, down on the clock in an increment finish against a good, grinding GM, there is zero chance of a draw. Buy the book to see how Mark Hebden won this ending.
Here is a model game from another former World Champion.
Tigran Petrosian – Nikolai Krogius
Tbilisi 1959
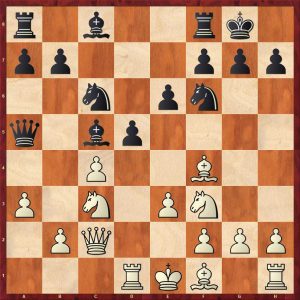
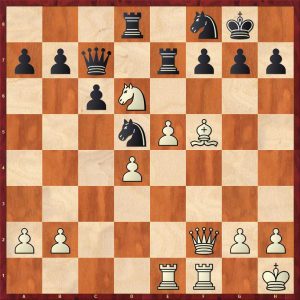
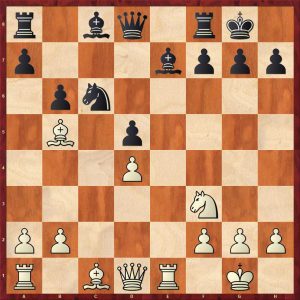
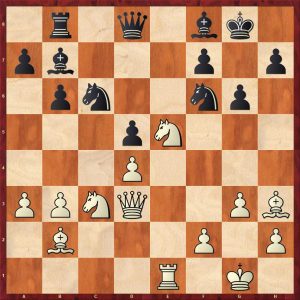
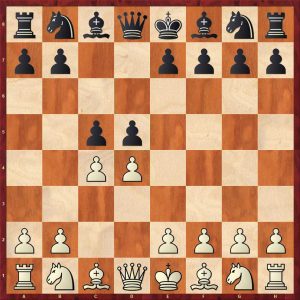
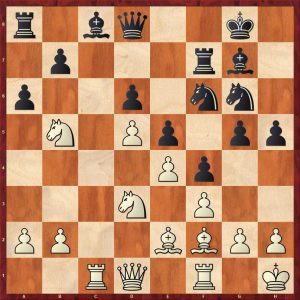
1.d4 Nf6 2.Nf3 g6 3.c4 Bg7 4.Nc3 d5 5.Bg5 Ne4 6.cxd5 Nxg5 7.Nxg5 e6 8.Nf3 exd5 9.e3 0-0
A Carlsbad structure from the 5.Bg5 line against the Gruenfeld.
10.Bd3 (White can also play 10.Be2, Qb3 or even b4 straightaway, none of these moves secure an edge against accurate play) Nc6 (The more common move order is 10…c6 11.0-0 Qd6 12.Rc1 a5) 11.0-0 Ne7 (Stockfish agrees with the reviewer’s preference: 11…a5) 12.b4
Bf5? [This exchange of bishops is a poor positional error as the game is now closer to the Kotov-Pachman ending. Better is 12…c6 13.Rc1 (13.b5 c5!) 13…a6 14.a4 Qd6 15.Rb1 Be6 16.h3 Nc8 with equal chances ] 13.Bxf5 Nxf5 14.b5 (14.Qb3 c6 15.b5 was more incisive)

14…Qd6?!
Occupying the obvious square for the knight, Stockfish prefers 14…a6 15.bxa6 (15.a4 axb5 16.axb5 c5 17.bxc6 bxc6 18.Na4 Nd6 19.Qc2 Nc4 20.Nd2 Nxd2 21.Qxd2 and an endgame similar to Kotov-Pachman is near which we know is tenable but unpleasant) 15.bxa6 Rxa6 16.Qb3 Ra5 17.Rac1 c5 18.dxc5 Rxc5 19.Nb5 with a small advantage to white.
15.Qb3 Ne7 16.Rfc1 Kh8? (What on earth is this move for? 16…Rfc8 looks more relevant, but white is better in any case) 17.Rc2 h6 18.Rac1 c6
19.Na4! (19.bxc6 bxc6 20.Na4 20…Rfb8 gives black some play down the b-file) 19…Rab8 20.g3 (Typical prophylaxis securing the back rank and creating a stronger barrier against f5-f4, the direct 20.Nc5 is even stronger) 20…Kh7 21.Nc5 Rfd8?! Loses the c-pawn quickly, but Stockfish already assesses black’s game as dead, 21…b6 puts up more resistance 22.bxc6 bxc6 23.Qa4!
Eyeing both weak pawns on a7 and c6; this is why black should have played a6 or a5 earlier to exchange off the a-pawn 23…Qf6 24.Kg2 (The ever cautious Petrosian improves his king before winning the c-pawn as he saw that it cannot run away. This follows the Russian rule about about improving your king before the final assault. 24.Ne5 wins the pawn more quickly: 24…Ra8 25.Nb7 Rdc8 26.Nxc6) 24…Ra8 25.Nb7 Re8 26.Na5 g5 27.h3 Qf5 28.Nxc6 With the fall of this pawn, the game is over. Petrosian gives his opponent no chance. Qe4 29.Rc5 f5 30.Qc2 Nxc6 31.Rxc6 f4 32.exf4 gxf4 33.g4 Bxd4 34.Qd2 Bg7 35.Re1 Qa4 36.Qxd5 Rxe1 37.Nxe1 Rf8 38.Nf3 Kh8 39.Rc7 a6 40.Qb7 Rg8 41.Nh4 1-0
I like the didactic commentary of the author on the strategic features following this cruising crush by Petrosian:
“1. It is essential for white to carry out the b4-b5 advance in circumstances that do not allow Black to reply with c6-c5, which means that white needs to control the c-file and in particular the c5 square.
2. It is useful for white to exchange his own dark-squared bishop for the enemy knight, since this gains several tempi (the black bishop is badly placed on f6) and he can attack the c6-pawn with his knight after the usual minority attack.
3. The move g2-g3 is also good for White, forming a ‘saw’ against the possible advance of the enemy f-pawn.
4. It is appropriate for Black to play a7-a6 (or sometimes a5), since after White advances with a2-a4 and b4-b5, Black is able to exchange his a6-pawn, leaving him with just one weakness on c6 instead of two.
5. in anticipation of White’s b4-b5 advance, Black should prepare either Kingside counterplay or the advance c5.”
The author goes on to discuss the methods of defence against the minority attack beginning with:
i) Kingside counterattack with pawns
The following modern day clash shows this theme well even though Black lost:
Lev Aronian (2777) – Vishy Anand (2797)
Baden-Baden 2015
1.c4 e6 2.Nc3 Nf6 3.Nf3 d5 4.d4 Bb4 5.cxd5 exd5 6.Qa4+ Nc6 7.Bg5 h6 8.Bxf6 Qxf6 9.e3 0-0 10.Be2 a6 11.0-0 Be6 12.Rfc1 Bd6 13.a3 Ne7 14.b4 c6 This time we reach the Carlsbad structure from the Ragozin 15.Qb3 g5! This looks good as black has the bishop pair pointing at the kingside. After this game, the white players of this variation went back to the drawing board as black is clearly better here with an initiative.
16.Qb2 Qg7 (Stopping e4 and preparing a possible f-pawn battering ram) 17.Na4 Rae8 18.Nc5 Bc8
19.g3?!
Too slow and stereotyped forming the Nimzowitsch saw. White had to get on with it on the queenside with 19.a4! f5 20.b5 (20.Nd3?! f4 21.exf4 Ng6 22.Re1 Nxf4 23.Nfe5 now both 23…gxf4 and 23…Nxf4 lead to a black initiative with a superior position) 20…axb5 21.axb5 21…f4 22.Nd3 fxe3 23.fxe3 Nf5 24.bxc6 Nxe3 25.cxb7 Bxb7 26.Ra7 Re7 27.Nfe5 with approximate equality!
The game continued:
19…Nf5!? (This move is good, but Stockfish, the author and the reviewer prefer the obvious 19…f5! which is clearly much better for black, e.g. 20.Kh1 Ng6 21.Nd3 Qe7 22.Re1 Qe4 23.Kg1 f4 with a dangerous attack) 20.Bd3 Qf6 21.Rf1 h5! 22.Rac1 h4! 23.Qd2
23…Nh6? (A tactical blunder retreating the knight to the wrong square, letting White off the hook, 23…Ng7 is good, after say 24.Be2 the obvious 24…hxg3! leads to a big advantage for black; 24…Re7 is even better according to Stockfish, White’s position is unappealing in both cases; 23…hxg3 is also excellent for black ) 24.e4! Clearly missed by Anand
24…Bxc5?! (24…Be7! 25.Ne5 dxe4 26.Bxe4 Rd8 is equal, Anand probably missed that 24…Qxf3 loses to 25.Qxg5+ Kh7 26.e5+ Bf5 27.Bxf5+ Nxf5 28.Rc3!! Nxd4 29.Qxh4+) 25.e5! A powerful Zwischenzug
25…Qg7? (The final mistake, 25…Bxb4 26.axb4 Qg7 27.Nxg5 Bf5 28.Nf3 hxg3 29.fxg3 Bh3 leads to a slight edge for white) 26.bxc5 Now black is dead 26…f6 27.exf6 Rxf6 28.Nxg5 Bf5 29.Rce1 Rff8 30.Rxe8 Rxe8 31.Nf3 Bxd3 32.Qxd3 Re4 33.Re1 hxg3 34.hxg3 1-0
A pity that Vishy spoiled a well played game but his approach renders this line unplayable for White.
ii) Kingside attack with pieces
Here is a game played by the brilliant attacking player Rashid Nezhmetdinov (who famously once beat Mikhail Tal in the style of Tal).
Mark Taimanov – Rashid Nezhmetdinov
Kiev 1954
1.d4 d5 2.c4 c6 3.Nf3 e6 4.cxd5 exd5 5.Nc3 Nf6 6.Bg5 Be7 7.Qc2 Nbd7 8.e3 0-0 9.Bd3 Re8 10.0-0 Nf8 11.Rab1 a5 (A small refinement as the open a-file after a3 and b4 by White could be useful. However its drawback could have been exploited by White on move 14.)
12.a3 Ne4 (The standard move, but the silicon brain prefers 12…Ng6) 13.Bxe7 Qxe7 14.b4 (White should probably change plans here and remove black’s best minor piece and exploit the b6 square with 14.Bxe4! dxe4 15.Ne5 Bf5 16.Rfc1 Ne6 17.Nc4 Nc7 with an edge for white) axb4 15.axb4 Ng6 (The engine also likes 15…Bf5) 16.b5 Bg4

17.Nd2? (This is a definite mistake which loses, more prudent is 17.Bxe4! removing black’s most dangerous minor piece: 17…dxe4 18.Nd2 with a definite advantage to white) 17…Nxd2 18.Qxd2 Nh4! (Suddenly black has whipped up a very dangerous attack with threats of 19…Nf3+ and 19…Nh3)

19.f3!? (19.Be2 Bh3! 20.g3 wins an exchange, so Taimanov gives up a pawn) Qxe3+ 20.Qxe3 Rxe3 21.fxg4 Rxd3 22.bxc6 bxc6 23.Ne2 Rd2 24.Rf2 h6 25.Rbf1 Ng6 26.h3 f6 (This is clearly winning for black) 27.Ng3 Rxd4 winning a second pawn, but Black failed to convert and only drew!
iii) Positional methods of defence
The following game shows an important method of defence.
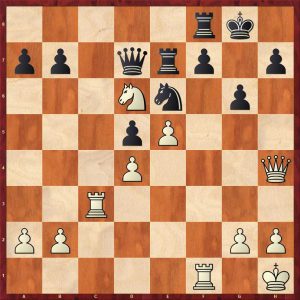
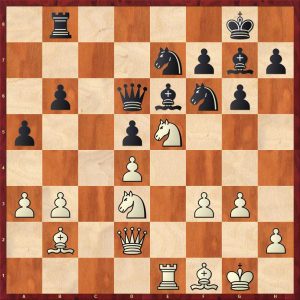
Pedrag Nikolic (2635) – Vladimir Kramnik (2790)
Monte Carlo Blindfold 1998
1.d4 Nf6 2.c4 e6 3.Nf3 d5 4.Nc3 c6 5.cxd5 exd5 6.Bg5 Be7 7.e3 Bf5 8.Bd3 Bxd3 9.Qxd3 (9.Bxf6 is more accurate: 9…Bxf6 10.Qxd3, so black has to waste time getting his b8 knight to a good square like f6) 9…Nbd7 10.0-0 0-0 11.Rab1 a5
Zolotnik makes the pertinent observation that the minority attack is nothing like as effective with the white squared bishops off the board. One of the main reasons for this is that the black knights can gain a strong square on c4. White should manoeuvre patiently.
12.a3 Ne4 13.Bxe7 Qxe7
14.b4? (Too stereotyped blindly following a standard plan without considering the subtle differences with a standard minority attack when the white squared bishops are on the board. b4 had to be prepared properly, e.g. 14.Qc2 f5 15.b4 axb4 16.axb4 Ra3 17.Rb3 with equality) 14…b5! (The point, a Black knight will land on c4 blocking the c-file pressure)
15.Qc2 axb4 16.axb4 Nd6 17.Rb3 Nb6!
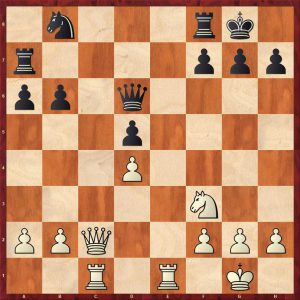
Let us absorb Vladimir Kramnik’s assessment of this position:
“The position has clarified. The knight goes to c4 blocking all White’s play on the queenside, after which the main events transfer to the kingside, where Black has more resources. Although in general the play seems nothing spectacular, in reality it is a classic game for the Carlsbad structure.
18.Ne5 Rfc8 19.Nd3 Nbc4! The other knight can move over to the kingside at its leisure. 20.Nc5 Re8 21.h3 g6 22.Rc1

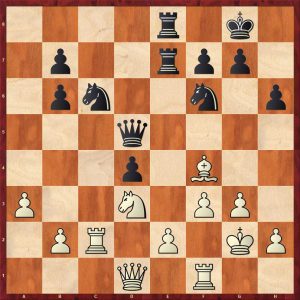
22…Ra7 (22…Nf5 is probably even better) 23.Qd1 h5 24.Kh1 Qg5 25.Rbb1 Rae7 26.Ra1

Black has skilfully moved his forces over to the new theatre of battle on the kingside: the end is close for White.
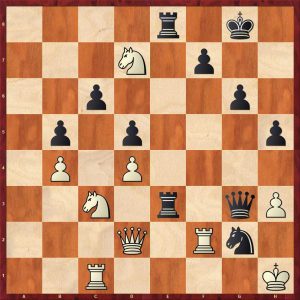
26…Nf5 Black could have sacrificed the knight on e3 now: 26…Nxe3! 27.fxe3 Rxe3 28. Ra2 Nf5 29.Rf2 Qg3 30.Re2 Rxe2 31.Nxe2 Qf2 winning
27.Ra2 Ncxe3! 28.fxe3 Rxe3 29.Rf2
29…Qh4?
29…Qg3! wins 30.Qd2Nh4! 31.Nd7 Nxg2! White’s king will die of exposure
32.Nf6+ Kf8 33.Nxe8 Qxh3+ 34.Kg1 Nf4! 35.Rxf4 Rg3+ 36.Kf2 Qh2+ winning
Back to the game 30.Qd2 Amazingly 30.Kg1 holds according to our silicon friend 30… Nxd4
31.Rcf1?( Again 31.Kg1 holds) Nf5! with crushing threats 32.Rxf5 gxf5 33.Nd1 Re1 34.Kg1 R8e2 35.Qc3 Rxd1 0-1
Although Black muffed the final attack in the game allowing white a couple of chances to hold on, the really educational part of the game was from moves 14 to 26.
Another defensive method is the advance c6-c5-c4. Here is another lesson from Vlad:
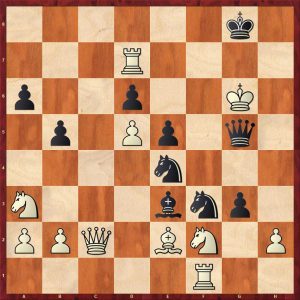
Topalov (2740) – Kramnik (2790)
Linares 15th 1998
1.d4 Nf6 2.c4 e6 3.Nf3 d5 4.Nc3 Be7 5.Bg5 h6 6.Bh4 0-0 7.e3 b6 8.Be2 Bb7 9.Bxf6 Bxf6 10.cxd5 exd5 11.b4 The bishop on b7 is misplaced compared with the Anand game above where it sits on e6 11…c6 12.0-0 a5
13.b5 (This is the most common move which scores better than the alternatives which are 13.a3 and 13.bxa5. It is interesting that Stockfish evaluates them all roughly the same) 13…c5! 14.Re1 (The modern main line is 14.Ne5 cxd4 15.exd4 Bxe5 16.dxe5 d4 17.Na4 Qg5 18.Bg4 Qxe5 19.Nxb6 Ra7 with an edge to white) 14…Re8 15.Rc1 Nd7 16.g3 (16.dxc5 Nxc5 17.Nd4 Qd6=) 16…Nf8 17.Na4?!
This move is controversial, probably better is 17.dxc5 bxc5 18.Na4 c4 19.Nc5 19…Qb6 (19…Bc8 is interesting) 20.Nxb7 Rxb7 21.a4 Ne6= 17…c4! Fixing the structure, so the weak spots b6,c6 will be less accessible. The bishops will enable black to position his pieces in such a way, as to enable activity on the kingside. The e4 break is hard for White to achieve. 18.Bf1 Qd6 (18…Qc7 is also good) 19.Bg2 Rad8 20.h4 Ne6 (The black squared bishop should be improved to the a3-f8 diagonal where it can influence the game more viz. 20…Qc7 21.Nc3 Be7, black is a bit better) 21.Nc3 g6 22.Nd2 Ba8 (Black has a total clamp on the position stopping e4, Stockfish assesses this position as pretty equal)
23.h5?! [This looks slightly suspect, after 23.f4!? with the idea of transferring the knight to e5, 23…Ng7 24.Bh3 (24.Nf3 Nf5!) 24…Qc7 25.Nf3 Be7 26.Ne5 Ba3 27.Rc2 Bb4 black is to be preferred]
Back to the game: 23…g5 24.Nf1 Be7 The first part of a regrouping of the black forces that improves his position considerably
25.g4?!Weakening the h2-b8 diagonal which is dangerous as Black has a dark squared bishop; white’s own bishop is becoming bad with the self induced structural changes on the kingside. 25.Nh2 is superior, e.g. 25…f5 26.g4 f4 27.e4! dxe4 28.Bxe4 Nxd4 29.Bxa8 Rxa8 30.Ne4 Qd5 31.Nf3 Nxf3+ 22.Qxf3 and the strong knight on e4 compensates for the pawn minus.
25…Qd7 26.Ng3 Ng7 27.a4 Bb4 28.Bh3 Bb7 29.Qc2 Bd6!
Black has a clear regrouping plan of Bc7, Qd6,Bc8,Rf8 and f5 crashing through
30.Nf5 Stopping f5 for good but at a great cost. The dark squares around White’s king look sickly and White’s light squared bishop is a bad bishop now. 30…Nxf5 31.gxf5 Bb4 32.Kg2 Qd6 33.f3 White is positionally busted and must await Black’s final assault 33…Re7 34.Re2 Rde8 35.Rce1 Qf6 36.Bg4
The once proud bishop on g2 is now choked by its own foot soldiers.
36…Bd6 37.Qd1 Bb4 38.Qc2 Rd8 39.Rd1 Bc8 40.e4? The f5-pawn is a source of great trouble for white, so he panics and defends it: but this last move before the time control is a decisive mistake. White had to sit tight and make Black find the winning breakthrough: 40.Na2 lasts longer. 40…Bxc3 41.e5 [41.Qxc3 dxe4 42.fxe4 (42.Rxe4 42…Rxe4 43.fxe4 Bb7 44.Qe3 c3 45.d5 c2 46.Rc1 Rc8 with a huge advantage) 42…Bb7 43.Bf3 g4! 44.Bxg4 Rxe4 45.Rxe4 Bxe4+ 46.Kf2 Bd3-+]
41…Rxe5!! 42.dxe5 (42.Rxe5 Bxd4! 43.Re2 Bc3 winning with the simple idea of d5-d4) 42…Bxe5 The triumph of strategical concept, despite an exchange sacrifice black controls the whole board and pawns c4-d5 will start rolling. 43.Rde1 Bc7 44.Re8+ Kg7 45.Rxd8 Bxd8 46.Rd1 Bb7 47.f4 d4+ 48.Bf3 d3 0-1 (49.Qxc4 Qb2+ 50.Kg3 Bxf3 51.Kxf3 Qe2+ wins)
Plan B: attack in the centre with e3-e4
This plan can occur in two forms depending on where White’s Ng1 is developed to e2 or f3. The first one is based on creating a pawn centre by means of f3 and e4. The second way of playing e4 is with the king’s knight on f3 leading to an IQP position.
The game below shows the first Soviet World Champion Mikhail Botvinnik at work against possibly the strongest player never to become the top dog: Paul Keres.
Botvinnik – Keres
Moscow, 1952
1.d4 Nf6 2.c4 e6 3.Nc3 d5 4.cxd5 exd5 5.Bg5 Be7 6.e3 0-0 7.Bd3 Nbd7 8.Qc2 Re8 9.Nge2 Nf8 10.0-0 c6
11.Rab1 (The author points out that Stockfish likes Botvinnik’s choice here, but modern players usually play 11.f3 immediately) 11…Bd6?! (This move is based on a tactical oversight,11…a5 is better here) 12.Kh1 Ng6?! Continuing the faulty plan
13.f3! Be7 (A loss of time, Black realised that his intended 13…h6? fails to 14.Bxf6! Qxf6 15.e4!Qh4 16.e5!) 14.Rbe1 (14.e4 dxe4 15.fxe4 Ng4 16.Bd2 c5 17.Nd5 cxd4! is unclear which was not Botvinnik’s style)
14…Nd7?! (It’s odd to waste more time simply exchanging off the dark squared bishops, 14…Be6 is better or 14…h6 15.Bxf6 Bxf6 16.Ng3 Nf8 17.Qf2 Bh4 18.e4 with a small edge to white) 15.Bxe7 Rxe7 16.Ng3 Nf6

17.Qf2! White is clearly better now as he prepares e4 and has a lead in development 17…Be6? (A kind of pseudo development of the bishop subjecting black’s minor pieces to a potential pawn roller, better is 17…b6 but Black is struggling anyway.) 18.Nf5
Better is 18.f4! which Stockfish assesses as winning already viz: 18…Bd7 19.f5 Nf8 20.e4! dxe4 21.Ngxe4 Nxe4 22.Nxe4 f6 23.Qg3 with a very strong attack for White: look at Black’s pieces cowering waiting for the inevitable end.
18…Bxf5 19.Bxf5 Qb6 20.e4! dxe4 21.fxe4 Rd8
22.e5! (Pushing the defensive knight away and preparing Ne4-Nd6) 22…Nd5 23.Ne4 Nf8 24.Nd6 Qc7
25.Be4! Stockfish likes Botvinnik’s move 25…Ne6 26.Qh4 g6 27.Bxd5! Removing one of Black’s best pieces, it’s now close to the end for Black 27… cxd5 28.Rc1 Qd7 29.Rc3 Rf8
30.Nf5! Crunch 30…Rfe8 (30…gxf5 21.Rg3+ Ng7 22.Qf6 and mate next ) 31.Nh6+ Kf8 32.Qf6 Ng7 33.Rcf3 Rc8 34.Nxf7 Re6 35.Qg5 Nf5 36.Nh6 Qg7 37.g4 1-0
A crushing strategic win for Botvinnik. One of the main reasons that Keres never got to the pinnacle was Botvinnik’s continual strategic mastery over him. Keres was a brilliant theoretician and attacking player but Botvinnik had clearly worked out how to play against Keres.
Plan C: kingside attack with both sides castled on the kingside
This plan can take two forms: The first is based on the advance f4 and is sometimes accompanied with the e4 break. The second is characterised by the advances g4 and h4.
The first plan here is demonstrated by Tigran Petrosian:
Petrosian 2605 – Beliavsky (2570)
Moscow 1983
1.d4 d5 2.c4 e6 3.Nc3 Nf6 4.cxd5 exd5 5.Bg5 Be7 6.e3 0-0 7.Bd3 Nbd7 8.Nf3 Re8 9.0-0 c6 10.Qc2 Nf8
11.a3!? Not the commonest move but not without bite 11…Ne4 (A common response, but 11…Bg4 is ok as well) 12.Bf4
12…Ng5 (An interesting move; 12…f5 is the main line bolstering the knight but conceding e5; the author suggests a move not in Megabase which is surprising 12…Bf5!? although it involves a pawn sacrifice) 13.Nxg5
13.Ne5 is interesting keeping all the pieces on followed by f3 and e4 securing a space advantage with a full board of pieces, e.g. 13…g6 14.Rae1 Nge6 15.Bg3 Ng7 16.f3 Nf5 17.Bf2 Be6 18.Kh1 Nd6 19.e4 with an edge
13…Bxg5 14.Bxg5 Qxg5 15.Rae1 Bd7 16.f4 Qh6 17.Qf2
17…Re7? (17…f5! had to played despite weakening the e5 square and leaving Black with a bad bishop, White would improve his worst piece with 18.Nb1! b6! 19.Nd2 c5 20. Nf3 c4 Black has got counterplay on the queenside, but White is definitely better with a tough fight ahead.) 18.f5! g6 19.e4! dxe4
20.Nxe4 (20.Qg3! is very strong as well: 20…Bxf5 21.Rxf5 Qg7 22.Rf2 Qxd4 23.Rxe4 Rxe4 24.Nxe4 winning; 20…e3 21.Ne4 is very good, e.g. 21…Kh8 22.Qd6 Rae8 23.Qf6+ Kg8 24.Nd6 wins) 20…gxf5 21.Qg3+ Kh8 22.Nd6 f4 Trying to complicate matters
23.Rxe7! Qxd6 (27…fxg3+ 28.Nxf7+ wins) 24.Rxd7 Qxd7 25.Qxf4 Rd8
Black’s king is horribly exposed and cannot survive long.
26.Qf6+ Kg8 27.Kh1 Qxd4 28.Qxf7+ Kh8 29.Qe7! Ng6 30.Bxg6 hxg6 31.h3 b5 32.Rf6!
32…Rg8 33.Rxc6
A quicker way 33.Rd6! Qg7 34.Qh4+ Qh7 35.Qg5 c5 36.Re6 b4 37.Re7 Rg7 38.Re4

33..Rg7 34.Qg5 Kh7 35.Kh2 b4 36.Rf6 bxa3 37.bxa3 Qc4 38.Rf4 Qc7 39.Qh4+ Kg8 40.Qg3 a5 41.a4 Qb6 1-0
Plan D: kingside attack with opposite side castling
This game is a total annihilation of Black in an exciting good old fashioned kingside hack. Black had his chances but finding the accurate moves when subjected to such a brutal direct attack is not easy.
Boris Gulko – Paul Van der Sterren
Amsterdam 1988
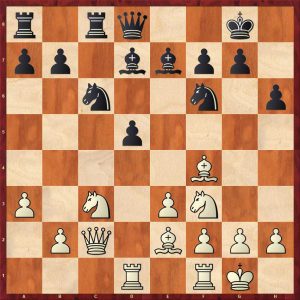
1.d4 Nf6 2.c4 e6 3.Nc3 d5 4.cxd5 exd5 5.Bg5 Be7 6.e3 0-0 7.Bd3 c6 8.Nge2 Nbd7
9.Ng3!? (This move was played in the 32nd game of the Capablanca-Alekhine World Championship match)9…h6 (Capablanca responded rather ineptly 9…Ne8 10.h4!? Ndf6 11.Qc3 Be6 12.Nf5 Bxf5 13.Bxf5 Nd6 14,Bd3 h6 15.Bf4 Rc8 16.g4!? Nfe4? 17,g5 h5 18.Bxe4 Nxe4 19.Nxe4 dx34 20.Qxe4 and white won with his extra pawn.) 10.h4 Nb6! (10…hxg5? is asking for a kicking 11. hxg5 g6 12.gxf6 Nxf6 13.Qd2 Re8 14.0-0-0 and white has a pleasant initiative) 11.Qc2 (11.Nh5!? leads to a perpetual: 11…Nbd7 12. Qf3 Re8! 13. Nxg7! Kxg7 14.Bxh6+ Kxh6 15.Qf4+ Kg7 16.Qg5 drawn) 11…Re8 12.0-0-0 12…hxg5 (Very brave: Stockfish likes this as well as 12…Nc4) 13.hxg5 Ne4 14.Bxe4 dxe4
15.f4 Deliberately complicating the game by not playing one of the two obvious recaptures on e4, 15.Ncxe4 leads to an unbalanced ending: 15…Bxg5 16. Rh5 Bh6 17.Rdh1 f5 18.Nxf5 Bxf5 19.Qxf5 Qxd4 20.Nf6+ gxf6 21.Rxh6 Qc4 22.Qxc4 Nxc4 23.Rg6+ Kf7 24.Rgxf6+ Ke7 25.Rf7+ when white has three pawns for a knight: this looks better for Black as his pieces are very active.
15.Qxe4 Bxg5 16.Qh7+ Kf8 17.Nce4 Be6 18.Nh5 Bh6 19.Nhf6 Ke7 20.Nxe8 Qxe8 is unclear but probably better for Black
15…Nd5 16.Ngxe4 (16.Rh2 is interesting when 16…f5! is the best reply which may well refute the attack)
16…Nxe3 (Greedy but sufficient to draw at least! The engine likes 16…f5! or 16…Bb4 which seem to be good for Black) 17.Qf2 Nxd1? (17…f5 definitely holds, I will leave the reader to spend some time with the silicon brain) 18.Qh4 f5! 19.Qh5
Kf8?? The losing mistake, taking yet more material leads to a probable draw viz.: 19…fxe4 20.g6 Bh4 21.Rxh4 Qxh4 22.Qxh4 Nxc3 23.bxc3 e3 White is left with a queen and pawns against a host of pieces but can probably draw as Black’s king is horribly exposed. 24.Qh7+ Kf8 25.Kd1! Using the king to stop the dangerous e-pawn25… Bf5 26.Ke1 e2 27.g4 Bxg4 28.Qh8+ Ke7 29.Qh4+ Kd6 30.Qxg4 Re7 31.f5 Rf8 with a black edge 20.Qg6 Kg8 21.Rh7 Qxd4
22.Qh5! Probably the move Black overlooked Qe3+ 23.Kc2 1-0
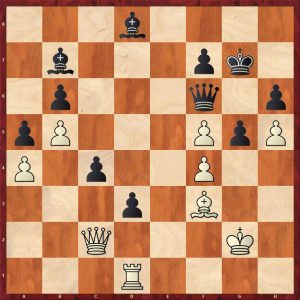
Plan E: play in positions with both sides castled on the queenside
Here is an impressive game from the World Championship candidate.
Nepomniachtchi (2757) – Nisipeanu (2672)
Dortmund 2018
1.c4 e6 2.Nc3 d5 3.d4 Nf6 4.cxd5 exd5 5.Bg5 c6 6.Qc2 Be7 7.e3 Nbd7 8.Bd3 h6 9.Bh4 Nh5 10.Bxe7 Qxe7 11.0-0-0 Nb6
12.Nf3!? (White decides to save a tempo by omitting the customary h3 )12…Nf6 (12…Be6 13.Kb1 Nf6 14.Ne5 Ng4 15.Nxg4 Bxg4 16.Rde1 0-0-0 with equality; 12…Bg4 13.Kb1 Nf6 14.Rc1 Bxf3 15.gxf3 0-0-0 16.Qb3 Kb8 17.a4 with a slight edge to White) 13.Kb1 Be6 14.Ka1 (Preparing the minority attack, 14.Rc1 is another idea) 14…0-0-0 15.Na4
Kb8?! (14…Nxa4 removing the potentially annoying knight is better) 16.Rc1 Rhe8 (16…Nxa4 17.Qxa4 Ne4 18.Rc2 Rhe8 19.Rhc1 f6 20.Ne1 Bf5 with a slight edge for White) 17.Nc5 Bc8 18.b4 (Hasty, 18.Nd2 stops Black’s next move) 18…Ne4
19.a4 (The minority attack continues even though the kings are on the queenside, 19.b5! cxb5 20.Bxb5 Rg8 21.Qb2 Be6 leads to a slight edge for White) 19…Nd6! (Fighting for c4) 20.Nd2 (20…h5 21.Rhd1 g6 22.a5 Nd7 23.Nf3 a6 is roughly equal) 20…Qf6 21.Rhf1
21…Bf5?! (This is a typical move in the Carlsbad structure, but the bishop is a good defensive piece here holding black’s structure together) 22.Bxf5 Qxf5 23.Qxf5 Nxf5 24.a5
24…Nd7?
Possibly the decisive mistake, the retreat into the corner is better 24…Na8! 25.a6 b6 26.Nd3 Ne7 27.Ne5 f6 28.Nxc6+ Nxc6 29.Rxc6 Nc7 white has a slight edge
25.a6! Undermining the c6-pawn with a definite White edge
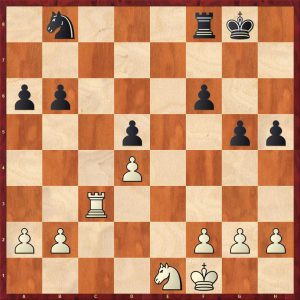
25…Nxc5 26.bxc5! Kc7 27.axb7 Rb8 28.Kb2 Rxb7+ 29.Kc3 Rb5 30.Ra1 Kb7 31.Ra2 Ne7 32.Rfa1 Ra8
White has a huge plus, now a knight manoeuvre improves his position further
33.Nb1! (Or Nf3, Ne5,Nd3,Nb4) Kb8 34.Ra6 Kb7 35.R6a4 Kb8 36.Na3 Rb7 37.Ra6 Kc7 38.Nc2 Kd7 39.Nb4
Black’s two weaknesses on a7 and c6 are covered. To win the game, White must open the position to increase the bridgehead for his more active rooks. This can be achieved by arranging the opening of the centre/kingside.
39…f6 40.f3 f5 Hindering e4 but White can break with g4 instead 41.Nd3 Ke6 42.Ne5 Rc7 43.g4 fxg4 44.fxg4 h5 45.h3 hxg4 46.hxg4 Kf6 47.Rf1+ Ke6 48.Rf7 Rg8 49.g5 Rb7
50.g6 Zugzwang 1-0
Chapter 3 – Symmetrical pawn structures
The introduction to this section contains some insightful observations about symmetrical positions. This paragraph stood out: “In modern chess, a tiny advantage, evaluated by the engine at 0.20, is already sufficient reason for the player with white to analyse the corresponding continuation in depth.” The reviewer wonders whether this approach is linked to the impressive technique of Magnus Carlsen in grinding out wins from positions with small edges: an impressive example is Carlsen’s win over Nakamura in the Airthings Masters rapid in December 2020 in the anti-Berlin line: 1.e4 e5 2.Nf3 Nc6 3.Bb5 Nf6 4.0-0 Nxe4 5.Re1 Nd6 6.Nxe5 Nxe5 7.Rxe5 0-0 8.Bf1. This game is not covered in this book but is instructive nevertheless.
In section 3.2, Zlotnik enumerates the possible advantages for the side to move in a symmetrical pawn structure situation:
- Control of an open file;
- Establishment of an outpost;
- Active deployment of the pieces.
Control of an open file is such a fundamental concept of chess that this factor alone can win a game. The celebrated game Botvinnik-Alekhine from AVRO 1938 is a superb example of this. Alekhine gets a lousy opening but resists well forcing Botvinnik to show exemplary technique in the endgame. The reviewer will give this game with key positions and a few notes to remind the reviewer of this historic tussle.
Mikhail Botvinnik-Alexander Alekhine AVRO 1938
1.Nf3 d5 2.d4 Nf6 3.c4 e6 4.Nc3 c5 5.cxd5 Nxd5 6.e3 Nc6 7.Bc4 cxd4 8.exd4 Be7 9.0-0 0-0 10.Re1 b6?! Possibly the losing move 11.Nxd5! exd5 12.Bb5 Despite the symmetrical pawn structure Black is now doomed to a passive defence. Weaknesses on the c-file and a slight discoordination of the black pieces give White an easy game in which he can develop his initiative.
12…Bd7? Now after the inevitable exchange of the light-squared bishops the black position becomes even more vulnerable. 13.Qa4 Nb8 Forced 14.Bf4 Bxb5 15.Qxb5 a6 16.Qa4 Keeping the horse on b8 in its stable. 16…Bd6 In order to relieve pressure. 17.Bxd6 Qxd6 18.Rac1 Ra7 19.Qc2! c-file domination
19…Re7 20.Rxe7 Qxe7 21.Qc7 Qxc7 22.Rxc7 After these exchanges the white rook invades the seventh rank. This rook cannot win the game alone, as White must bring in the cavalry.
22…f6! 23.Kf1 23…Rf7 24.Rc8+ Rf8 25.Rc3! g5 A good idea: by pushing his pawns on the kingside, Black reduces the importance of the seventh rank. 26.Ne1 h5
27.h4!! Forcing new weaknesses on the kingside. 27…Nd7 28.Rc7
28…Rf7 29.Nf3! g4 30.Ne1 Aiming for f4 via d3 30…f5 31.Nd3 f4 The key square is temporarily under control, but the pawn on f4 is another weakness.

32.f3 (32.Nb4 wins a pawn, but Botvinnik doesn’t want to allow any counterplay) 32…gxf3 33.gxf3 a5 34.a4 Kf8 35.Rc6 Ke7 36.Kf2 Rf5 37.b3 37…Kd8 38.Ke2 Nb8
39.Rg6! (39.Rxb6? Kc7 and 40…Nc6 gives Black counter-chances.)
39…Kc7 40.Ne5 Keeping the steed tied up 40…Na6 41.Rg7+ Kc8 42.Nc6 Rf6 43.Ne7+ Kb8 44.Nxd5 Caching in 44…Rd6 45.Rg5 Nb4 46.Nxb4 axb4 47.Rxh5 Rc6 48.Rb5 Kc7 49.Rxb4 Rh6 50.Rb5 Rxh4 51.Kd3 1-0
Alekhine said after the tournament: “Of the 14 games I played in this tournament only once did I feel that my opponent outplayed me – it was the game with Botvinnik in round seven”. Praise indeed.
3.2.2 Establishment of an outpost
“Sometimes it happens that control of an open file is not in itself enough to ensure immediate superiority, in that case the best measure is to establish an output on that file.”
Here is a game from Botvinnik who loved playing positions with isolated pawns.
Botvinnik – Petrosian
Moscow 1964
1.c4 c5 2.Nf3 Nf6 3.Nc3 e6 4.g3 b6 5.Bg2 Bb7 6.0-0 Be7 7.b3 d5 8.e3 0-0 9.Bb2 Nc6 10.cxd5 exd5 11.d4 Re8 12.Rc1 Rc8
13.Bh3! Rb8 14.Re1 cxd4 15.exd4 Bb4 16.Rxe8+ Qxe8 17.a3 Bf8 (Better was 17…Bxc3 or 17…Bc8) 18.Qd3 g6 19.Re1 Qd8 20.Ne5 White has a slight pull
21…Bg7 21.f3 Na5 22.Qd1 a6 23.Na2 Nc6 24.Bc3 Qc7 25.Qd2 a5 26.Bb2 Qd6 27.Nc1 Bc8 28.Bf1!? Avoiding exchanging as White has more space 28…Be6 29.Ncd3 Ne7 (A definite error, 29…Nd7 is better)
30.b4! (Squeezing Black) axb4 31.axb4 Ne8 (31…Nd7 is better) 32.b5 f6 33.Ng4 Bd7? The fatal mistake, 33…Nf5 was ok
34.Bc3! (winning the d5-pawn) 34…Nf5 35.Nf4 Qf8?! (35…Qa3 is tougher) 36.Nxd5 Kh8 37.Bb4 Qf7 38.Ne7! Ned6 39.Nxf5 Nxf5 40.d5 Re8
And white won on move 62.
3.2.3 Active deployment of the pieces
Gulko – Radjabov
Malmo 2001
1.g3 g6 2.Bg2 Bg7 3.d4 d6 4.e4 e5?! A poor move allowing White a definite advantage. Stockfish does not rate this move at all. 5.dxe5
5…dxe5 (Stockfish prefers 5…Bxe5 6.Nf3 but white has a pleasant advantage in both cases] 6.Qxd8+ Kxd8
But the book to see how White exploited his lead in development and more active pieces.
3.3 Breaking the symmetry as a method of defence
Robert Byrne – Bobby Fischer New York 1963 began with a symmetrical structure.
This game looks pretty even. Bobby played the enterprising 12…e5!? to break the symmetry. Eleven moves later the game was over.
This celebrated game had to be included. Black has just played 21…Qd7!
The story goes that the grandmasters watching the game failed to understand what was happening.
Section 3.4 A clash of pawns covers some interesting symmetrical opening sequences such as:
The book contains the antidotes to these lines.
The last subsection is 3.5 Symmetrical structures from various openings.
Here are a couple of positions that are covered in depth:
Carlsen won an impressive game versus Nisipeanu at Medias in 2011.
White has just played 6.dxc3 which looks harmless, however in Radjabov-Svidler Geneva 2017, Black responded with some inaccurate moves and was lost at move 19! Book the book to find out how.
Part 2 of this publication covers Typical methods of play in three chapters.
Chapter 4 Restricted Mobility in the KID covers typical methods of play, particularly for White, but also for Black whrn the centre is blocked.
Two cautionary tales for White are given early on in the chapter showing White being blown away on the kingside. Here is one of them:
This position is pretty standard fare in the KID. White has just played 18.Nb5 and Black boots the knight with 18…a6. This manoeuvre by White looks odd to lose time, but b6 has been weakened and this is significant. White should play 19.Nc3! g4 20.Na4 g3 21.Nb6 Rb8 22.Bg1 gxh2 23.Bf2 Bd7 24.Nxd7! removing the dangerous bishop and White is slightly better.
So tried 19.Na3? and got stuffed.
The author discusses the main White methods to counter Black’s expansion with f7-f5:
- The manoeuvre Nf3-h4
- Pinning the Nf6 with Bc1-g5
- Playing an early g2-g4
- Exchanging pawns with exf5 gxf5, followed by f2-f4/f3
The reviewer will show a couple of typical positions involving each idea and leave the reader to get the book to study further.
19.Nh4!
13.Nh4!?
White has just played 8.Bg5 which is named after Petrosian.
White played 17.g4!
Black has just played 14…f5. White played 15.exf5 gxf5 16,f4
Chapter 5 Should we exchange the fianchettoed bishop (EFB)?
This considers the matter of exchanging Black’s fianchettoed bishop in the KID, Sicilian Dragon and the Sicilian Accelerated Dragon. As the author points out, sometimes White seeks the exchange for attacking reasons but Black will also seek to exchange his bishop for positional reasons in say the Maroczy Bind.
The position below shows a common idea in the KID:
12… Bxh6! 13.Qxh6 Kg8! 14.h5 Ng8! 15.Qe3 g5! and the kingside remains closed.
Here is a mainline Dragon position from a game Geller-Kortchnoi Moscow 1971.
In this Dragon tabiya, Geller played 12.Bh6? which looks logical to exchange the bishop. Timing is everything and in this position Black has a well known riposte 12…Bxh6 13.Qxh6 Rxc3! 14.bxc3 a5!? (14…Qa5 and 14…Qc7 are also both good enough for equality)
Black achieved an excellent position but muffed the attack allowing Geller off the hook. The players agreed a draw when Geller was much better.
Here is a standard Maroczy Bind position in the Accelerated Dragon.
Black has just played 12…Nd7 offering an exchange of dark squared prelates. White has two plans here:
Gain space on the queenside with 13.b4 allowing the bishop exchange or retain the dark squared bishop 13.Be3 keeping it to guard the dark squares and avoiding exchanges as White has more spaces.
White played the inaccurate 13.Kh1?! after 13…Bxd4 14.Qxd4 Qb6 and black is equal.
The author gives a good introduction to the Maroczy style positions.
Chapter 6 – the d5-square in the Sicilian.
The chapter covers what is says in the title. The typical strategic manoeuvres for both White and Black are covered in the Boleslavsky’s Variation of the Najdorf, the Sveshnikov and related systems.
Topics covered are:
Boleslavsky’s idea
The power of Nd5
Bishops of opposite colours
Chapter 7 is an excellent set of exercises followed by Chapter 8 Solutions.
This publication is one of the best middlegames I have read and the reviewer definitely recommends this book for all club players and above.

FM Richard Webb, Basingstoke, Hampshire, 1st August 2021
Book Details :
- Hardcover : 400 pages
- Publisher:New In chess (7 Dec. 2020)
- Language: English
- ISBN-10:9056919261
- ISBN-13:978-9056919269
- Product Dimensions: 17.22 x 2.67 x 23.67 cm
Official web site of New in Chess
 Save as PDF